Eboy Steel BRAVEN Braai Oven User manual

User Guide
Braven Braai Oven

Braai Oven
Web: www.braaioven.co.za | Email: [email protected]
Pizzas
Roasts & Ribs
Oven Bakes
Fish & Chicken
Breads
Portable and Collapsible
Ideal for camping or home use
Limited Offer Included FREE!
Pizza Peel
Temperature Gauge
Manufactured by: Stainless Steel
5 Year Warranty
TM

PARTS LIST
Bottom plate
Carry handles
Tray
Left side plate
Right side plate
Back plate
Front plate (door)
Top plate
Key
Optional extras:
Pizza peel
Thermometer
Carry bag

Assembly
Place the bottom plate on a flat surface with the number 1 in the
left side corner.
Match number 1 on the bottom plate with number 1 on the left side
plate. Fit left side plate hooks into the bottom plate slots and move the
plate back until it cannot move any further.
Match number 2 on the bottom plate with number 2 on the back
plate. Fit back plate hooks into the bottom plate slots and move the
back plate left until it cannot move further making sure the top and
bottom tag align and fit into the left plate slots.
Match number 3 on the bottom plate with number 3 on the right
side plate. Fit right side plate hooks into the bottom plate slots and
move the plate back until it cannot move further making sure the top
and bottom tag align and fit into the back plate slots.
Fit the temperature gauge through the hole near the top left of the
top plate and secure it with the nut. Now align and lower the top plate
above the already fitted plates. The hooks from the left and right plate
must protrude through the top plates left and right side slots. Now
move the top plate back until the tags slide under the back plates
slots and until it cannot move any further.
Place the tray inside the assembled oven and then fit the front
door onto the left and right side hooks. The key MUST now be fitted
into the back plates centre slot to ensure safety and to maintain the
box shape.

How To Use
Fully assemble the Braven and prepare a fire using wood or
charcoal. Gas may also be used to heat the oven.
Place the Braven on a grill or raise it above the flames (bricks work
well). Ensure that the Braven is not placed directly on burning
charcoal or wood, as damage to the steel may occur. Spread the
coals evenly underneath the oven to ensure even heat distribution -
especially when cooking pizzas.
Insert a handle into the left plate side slots and one into the right
plate side slots should you wish to carry the oven when hot. Ensure
the handles are Inserted correctly - they must slide all the way up into
the receiving slots or the oven may fall.
Disassembly: when cooking is complete, allow time for the
Braven to cool down first before attempting to dismantle it. When hot,
the Braven metal expands and it may be more difficult to release the
parts from the slots. The procedure to dismantle is the reverse of the
assembly…
1 - remove key, 2 - remove front door, 3 - remove top plate
4 - remove right plate, 5 - remove back plate, 6 - remove left plate
The parts may now be cleaned if desired and are dishwasher safe.
Clean with household dish detergent and rinse thoroughly. METAL
SCOURERS or scrapers (like steel wool) must never be used.
The carry bag is also hand washable in cold water.

Cooking with the Braven
Once your desired temperature is reached, open the Braven front
door using a glove or tongs and then place your food into the oven.
Refit the door and monitor the temperature to ensure desired cooking
results.
TIP: Place cooked food in a dish on top of the Braven to keep it warm, until you are
ready to eat. Alternatively, take the Braven off its direct heat source and place it
nearby the heat and then place your food inside the oven.
Pizza: Sprinkle some flour or semolina on the tray to prevent
sticking and place the pizza on it using a pizza peel or similar item.
Roasts (meats & vegetables): Use the Braven the same as you
would use a kitchen oven to cook your favourite roast meals. Roast
chicken, potato bake, roast vegetables etcetera. Make sure you use
oven safe dishes.
Fried eggs, bacon, sausage or similar: Remove the front door,
key and top plate. Cook directly on the tray or invert it to help prevent
food from falling off the sides.
DO NOT use the handles to carry the Braven when the top plate is removed.
Breads, quiches, potatoes etc.: Foods wrapped in tin foil can be
placed inside the Braven to cook quickly or placed on top to cook
slowly (e.g. garlic bread).

5 Year Warranty
Braven Stainless Steel Braai Ovens are an investment that will last many years.
We design our ovens to the highest quality standards for top performance and
cooking results. We are proud of our Bravens and stand behind all our products by
offering this long term warranty.
Warranty Highlights
● Braven pays for shipping warranted replacement parts and also pays for
shipping warranted defective parts back to the factory.
● Limited to the repair or replacement of steel parts only which prove to be
defective under normal domestic use. The Braven should therefore not be
left outdoors exposed to the elements for long periods of time, and best
stored indoors in its protective carry bag.
● There is NO LABOUR warranty as all the parts are easily assembled by the
user.
● This warranty is extended only to the original purchaser as indicated on the
proof of purchase receipt. It applies only to products sold through retail or
online stores and only when used exclusively by the purchaser in the
country purchased.
● Braven support is normally open 5 days a week to assist with any questions,
installation, service and setup queries.
Warranty Term
Braven stainless steel ovens are under warranty for a period of FIVE YEARS from the
date of purchase. Proof of purchase is required to submit a warranty claim.
Warranty Exclusions
Any failures or operating difficulties due to accident, abuse, misuse, alteration,
misapplication, vandalism, improper installation or improper maintenance or service,
or failure to perform normal and routine maintenance. Deterioration or damage due to
severe weather conditions, scratching, discoloration (except from normal use which is
expected), exposure to chemicals or chemical residues. Contamination from other
materials especially other metals (like steel wool), warping (unless assembly is
difficult or impossible), and normal wear and tear based on the properties of the steel.
Manufactured by:
Important Notices
1) Parts may be tight fitting initially but will ease with use.
2) Parts may show some scratch marks resulting from
movement during transport or from the manufacturing
process itself, and this will in no way affect the
performance of the oven.
3) A nice golden brown shade and some warping of the
steel parts is normal after use, and characteristic of the
stainless steel.
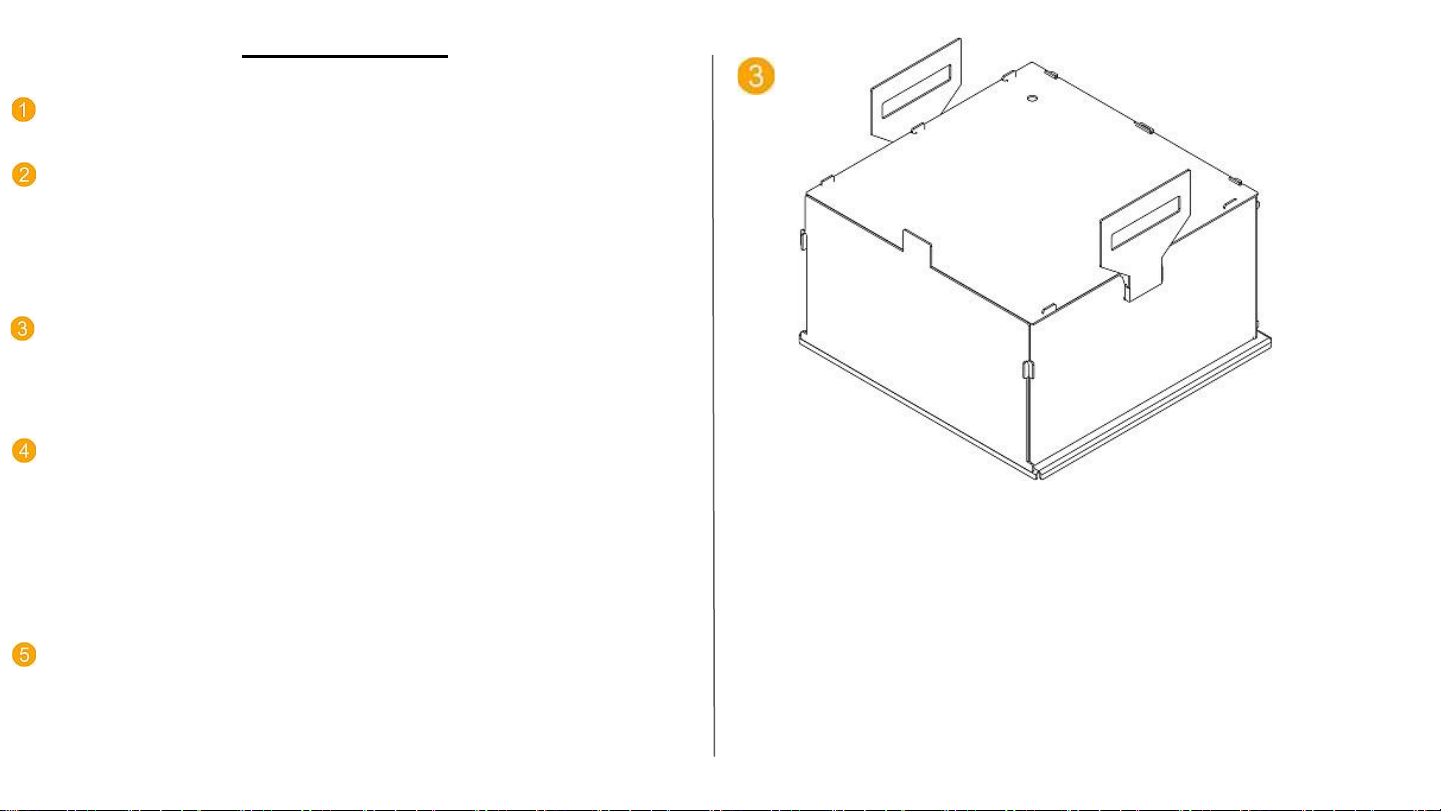
4) Dismantle and pack in the carry bag only once the
oven is cool.
5) The Braven must not be placed directly on burning
charcoal or wood as damage to the steel may occur.
6) Do not use the handles to carry the Braven when the
top plate is removed.
Specifications:
Mass: 9.8kg
Dimensions: 350mm (L) x 340mm (W) x 202mm (H)
Dimensions - pizza tray: 320mm (L) x 320mm (W) x 12mm (H)
Material: 3CR12 Stainless Steel | Thickness: 2mm
Proudly manufactured in South Africa
Table of contents