Ecellence DR-SEOC-1TWJ User manual

Full HD Dash Cam
Instruction Manual
Please read this instruction manual before using this product and keep
for future reference.

©2019 Ecellence or its subsidiaries
All rights reserved. Under the copyright laws, this manual may not be copied or modi-
fied in whole or in part without the written consent of Ecellence.
Ecellence reserves the right to change or update the content of this manual without
prior notice.

CONTENT
The Ecellence dash cam is a high-end video processor with 1080p video recording. This
system features G-sensor technology that allows the camera to automatically save the video
footage in the event leading up to a collision, the dash cam provides solid evidence for acci-
dents and helps with car insurance claims. In order to reduce blind spots, it uses a 170° ultra
wide-angle all glass lens which can monitor 4 lanes comfortably.
1. Install the product correctly, do not block the driver’s vision or obstruct the airbag.
Incorrect installation of the product may cause product failure and injury.
2. Keep this product away from strong magnetic fields to avoid damage.
3. Do not expose this product to rain, moisture or water under any circumstances, doing so
may result in the risk of electric shock or fire.
4. Do not insert or pull out the micro SD card when the product is working to avoid
damaging the micro SD card.
5. Do not clean this product with chemical solvents or cleansers.
6. When driving, do not adjust the controls of your device as this is a distraction to driving.
7. Use this product within the scope of the law.
INTRODUCTION
IMPORTANT SAFETY INSTRUCTIONS
3
1. Introduction
2. Important Safety Instructions
3. Product Specification
4. Package Contents
5. Product Features
6. Camera - Parts & Controls
7. Installation Instruction
8. Special Function Description
9. Battery Charging Instructions
10. Troubleshooting
3
3
4
5
5
6-8
9-10
11
11
11
1
2

PRODUCT SPECIFICATION
High-definition camera, high-definition
video.
Built-in (the dash cam will automatically
save the current video of accidents as
an undeletable file)
120 A + grade high-resolution
ultra-wide-angle lens
Russia, Japan, France, Italy, Germany,
Western, English, Chinese (simplified),
Chinese (Traditional), Korean Etc.
AVI
Features
Product Name Car Recorder
G-sensor
LCD screen size
Camera
Language
File Format
Video resolution
Video formats
Color effects
Continuous loop video
Truck switch machine
Motion Detection Function
Date of hours
Carrier media
The camera mode
Photo format
Memory card
Microphone
Built-in stereo
Infrared night vision
Current frequency
USB function
Power Interface
Battery
480P,720P,Maximum 1080P
PAL / NTSC
Standard
Seamless looping video, do not drain
seconds
Support auto ignition boot, turn off
shutdown
Support
Support
Built-in Memory (total: 64MB)
5 million
JPEG
TF (up to 32GB)
Support
Support
Support
50HZ / 60HZ
50HZ / 60HZ
50HZ / 60HZ
1: USB-Disk
2: the PC-Camera
3.0LTPS
4
3

PACKAGE CONTENTS
Dash Cam
PRODUCT FEATURES
FULL HD
Provides clarity and ability to recognize details easily
170º WIDE ANGLE
easily cover up to 4 lanes
DVR NIGHT VISION
Night time and country drivers we’ve got you covered!
MOTION AND IMPART DETETION (G-SENSOR)
Saves and locks curren video file when accident happens
LOOP RECORDING
Seamlessly record your every moment
PARKING MODE
Protect your car while you are away
EASY SETUP
Support up to languages and easy to setup
3 in LCD
Integrated screen makes it easy to review footage
DURABLE AND SLICK DESIGN
Harder, stronger with better heat resistance
BUILT-IN MIC AND SPEAKER
Records evidence if you have an altercation with another driver
Car Power Cable USB Cable Windshield Mount
Instruction Manual
5
4
5
Instruction Manual

CAMERA - PARTS & CONTROLS
1
2
3
4
1. OK BUTTON
Short press the “OK" button to start and stop the recording, to take photos in camera mode
and to confirm any selection.
2. MODE SELECTION
Press the “MODE” button to switch between the camera mode, video camera mode and
playback mode.
Camera mode: Press the “Mode selection” button until you get to the camera mode, where
the camera icon displays on the top right corner of the screen, then press the “OK” button to
take a photo, the screen flashes once to indicate that the photo has been taken successfully.
Video camera mode: Short press the “Mode selection” button to switch to video mode,
video icon will display at the upper left corner of the screen; Short press the “OK” button to
start recording video, the video icon will appear flashing red dot to indicate the video is
recording.
Playback mode: Short press “Mode selection” button to switch to playback mode, playback
icon will display at the upper-left corner of the screen, Short press “Up” button or “Down”
button to browse through the files and select a file, then short press the “OK” button to play
the selected video files. Press the Menu button to make a selection on a specific
image/video.
3. LOCK BUTTON
Short press the “LOCK" button to lock and protect the current file while the camera is record-
ing. This feature will come in handy when you have just experienced an accident or an event
that you wish to save. To switch back to unprotect mode, press OK.
4. POWER BUTTON
Long press the “POWER” button once to turn the dashcam on, the blue LED indicator light will
light up and it will begin recording automatically. To turn it off, long press the “POWER” and
the LED indicator light will turn off. The Power button is also used to switch between daylight
(sun icon) and night (star and crescent moon icon) vision, short press the “POWER BUTTON” to
switch.
6
6

7. TF/ MEMORY CARD SLOT
This unit must have a TF/Memory card in this slot for the camera to work properly. Only insert or
eject micro TF/memory card while device is powered off. It supports up to 32GB memory card
8. UP/+ BUTTON
Press the “Up” button to zoom out while recording. Press once to turn the microphone on/off.
Also in menu setting mode, short press this key to move up in the menu options.
9. MENU BUTTON
Press the OK button to change to standby mode and stop the recording. Then press the
“Menu" button to bring up the Video menu. Use the up/down button to navigate through the
features (Resolution, Loop recording, Record audio, Exposure, Motion detection, Date stamp
and Gsensor) and make a selection. Press Ok to confirm your selection.
Press the “Menu” button a second time for the Setup menu, use the up/down button to navi-
gate through the settings (Park mode, Date/time, Auto power off, Screensaver, Sound,
Language, Frequency, Format and Default setting.
Press the Menu button to return back to the main menu.
10. DOWN/- BUTTON
Press the “Down" button to set the screen to standby mode while the camera is still continuous-
ly recording, press again to bring the screen back on. Press to zoom out while recording. Also,
press this key to move down in the menu options.
5. MICROPHONE
Integral microphone for audio recording.
6. RESET BUTTON
In the unlikely event the Dash Cam becomes unresponsive, press the RESET button to restart.
5
6
7
8
9
10
7
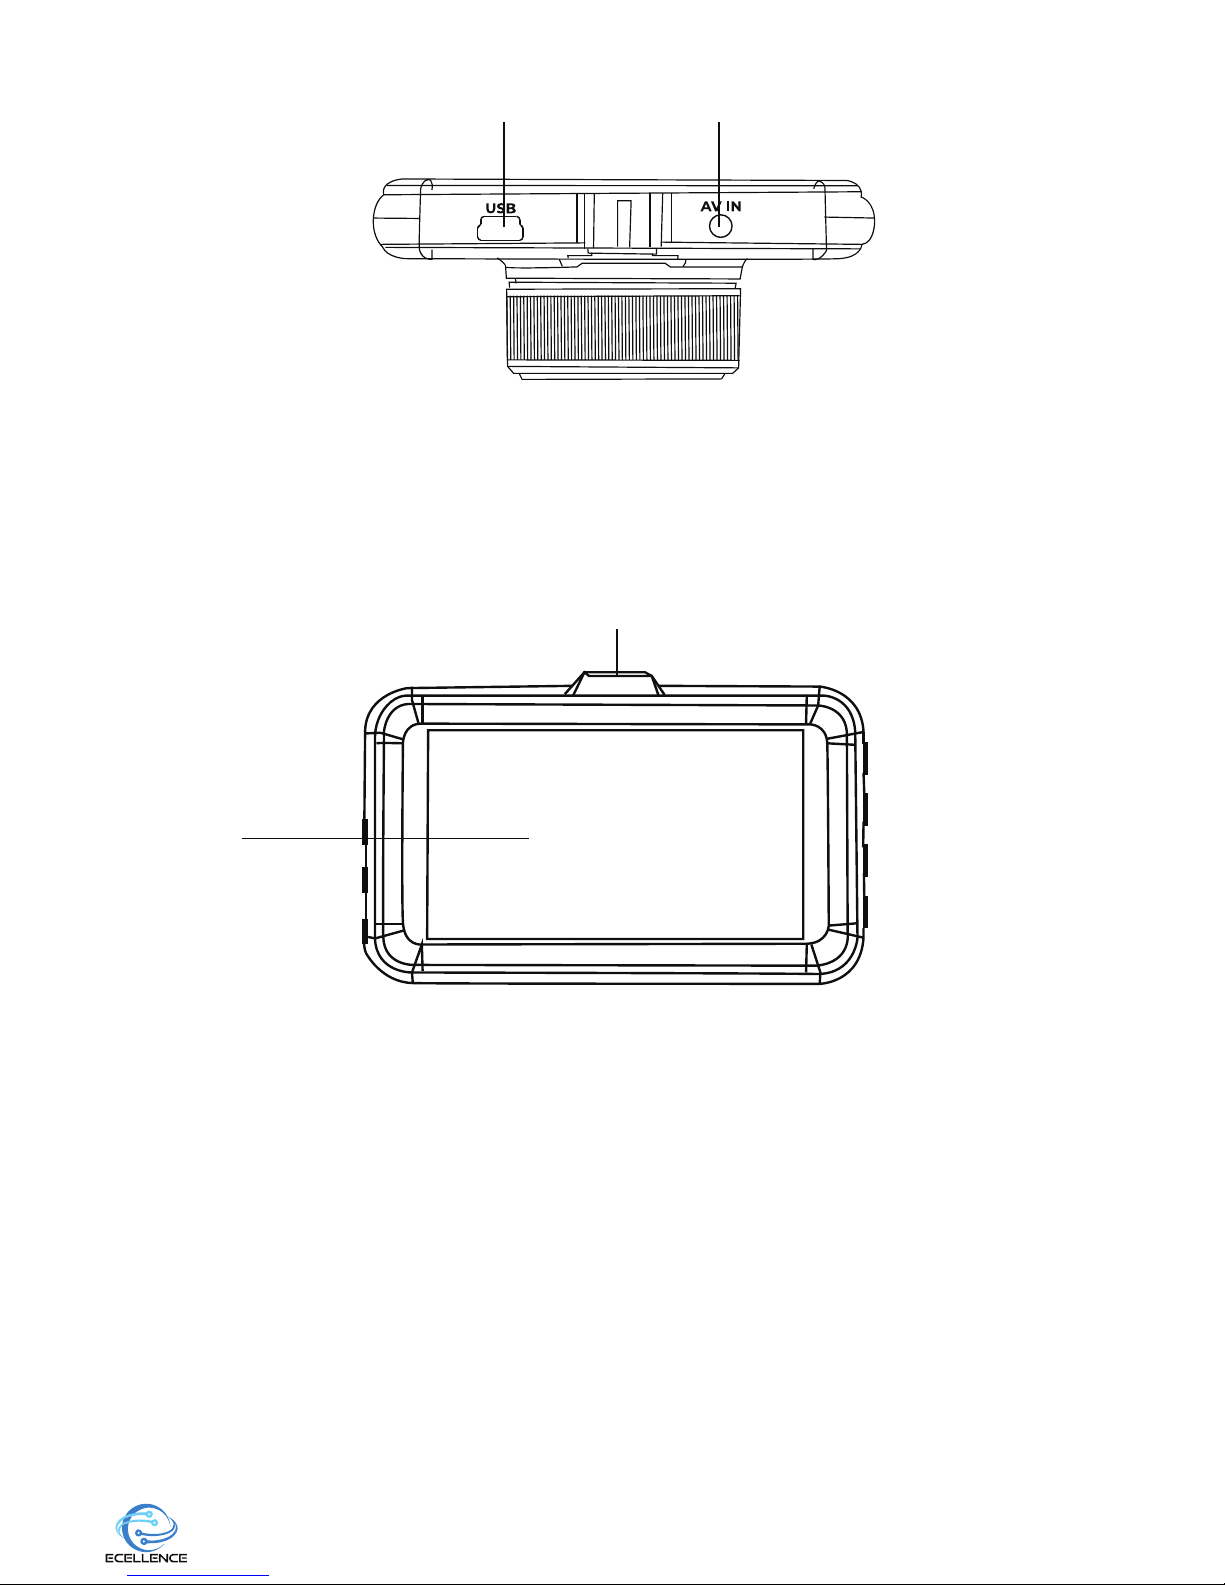
11. DC-IN & USB socket
Connect the supplied car power cable or USB data cable here.
12. AV In socket
Used to connect your Dash Cam to a television using an AV Cable (sold separately).
13. AV Out socket
Used to connect your Dash Cam to a television using an AV Cable (sold separately).
14. Mounting point
11
13
14
12
8
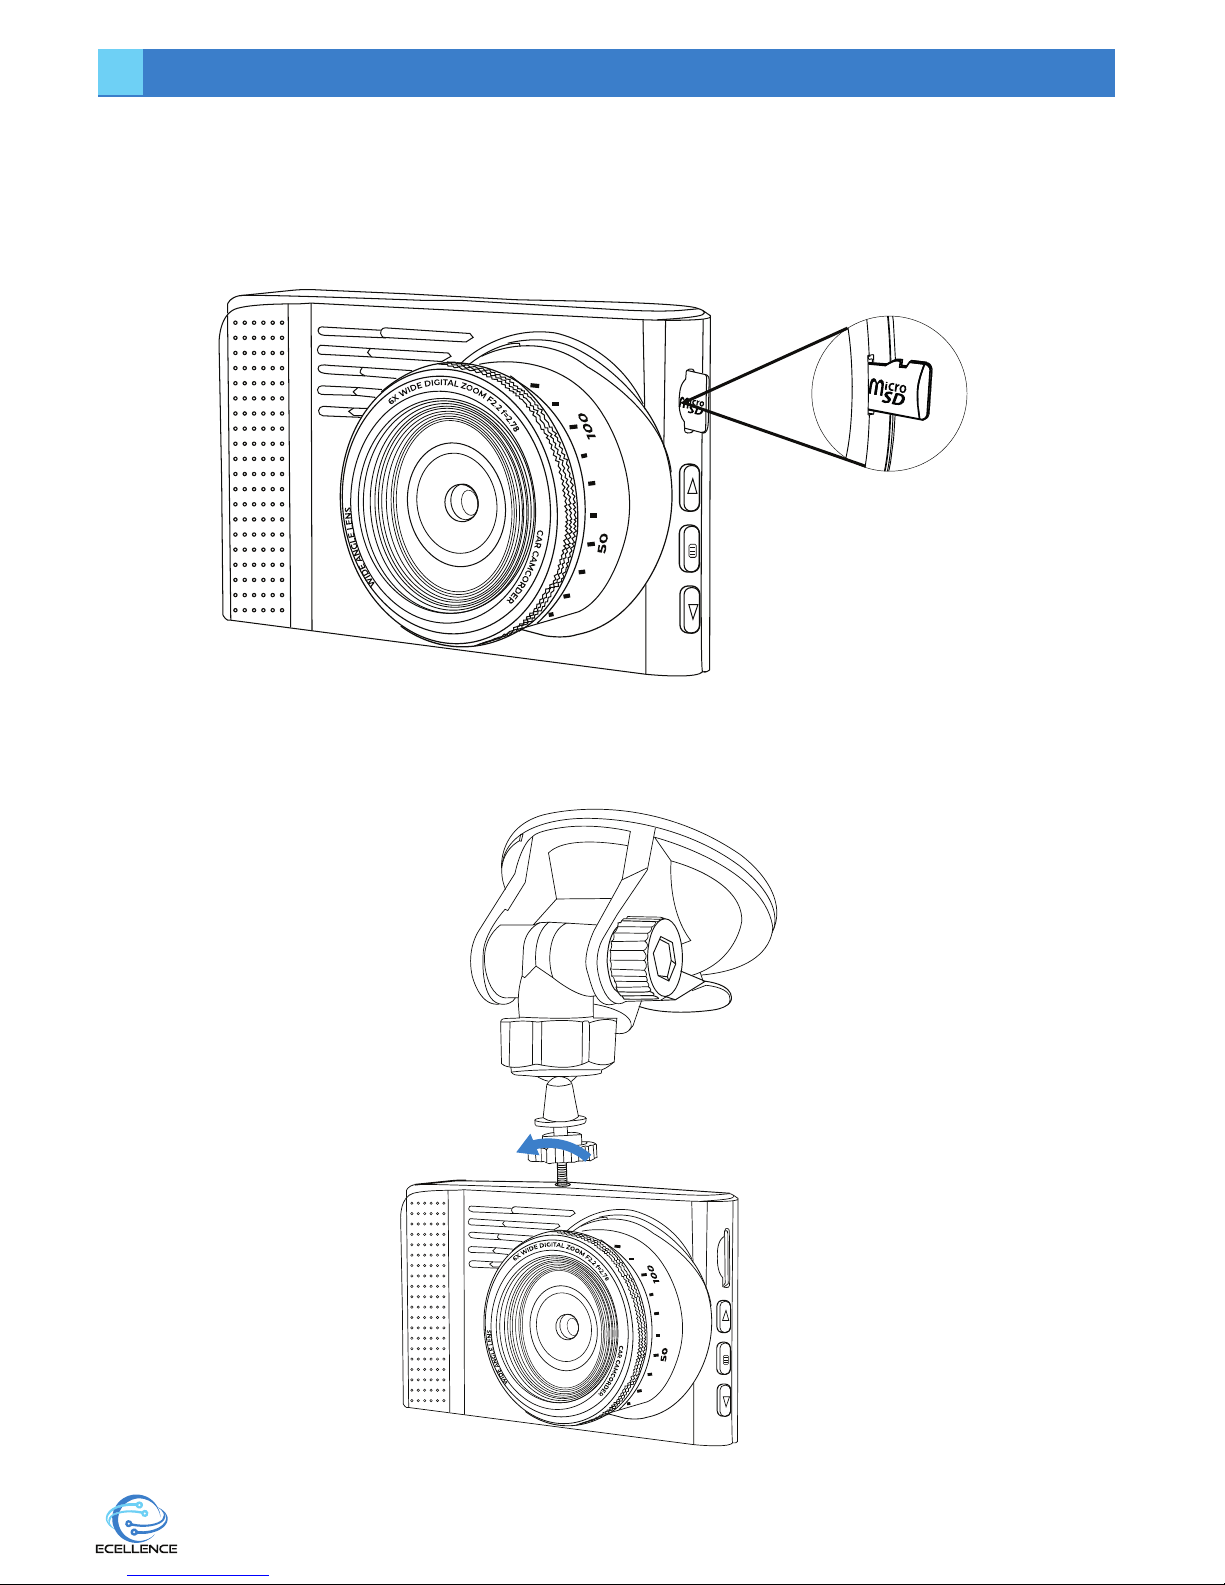
INSTALLATION INSTRUCTION
1. Insert the SD memory card (up to 32GB- not included) into the SD card slot, until it clicks
into place. If required, use the edge of a small coin or a similar object to push the memory
card in place. A second push will release the memory card from the SD card slot allowing
you to remove it.
2. Connect the camera to the mounting bracket and turn the camera anti-clockwise
until it is tightly connected to the mount.
9
7
12-24V DC
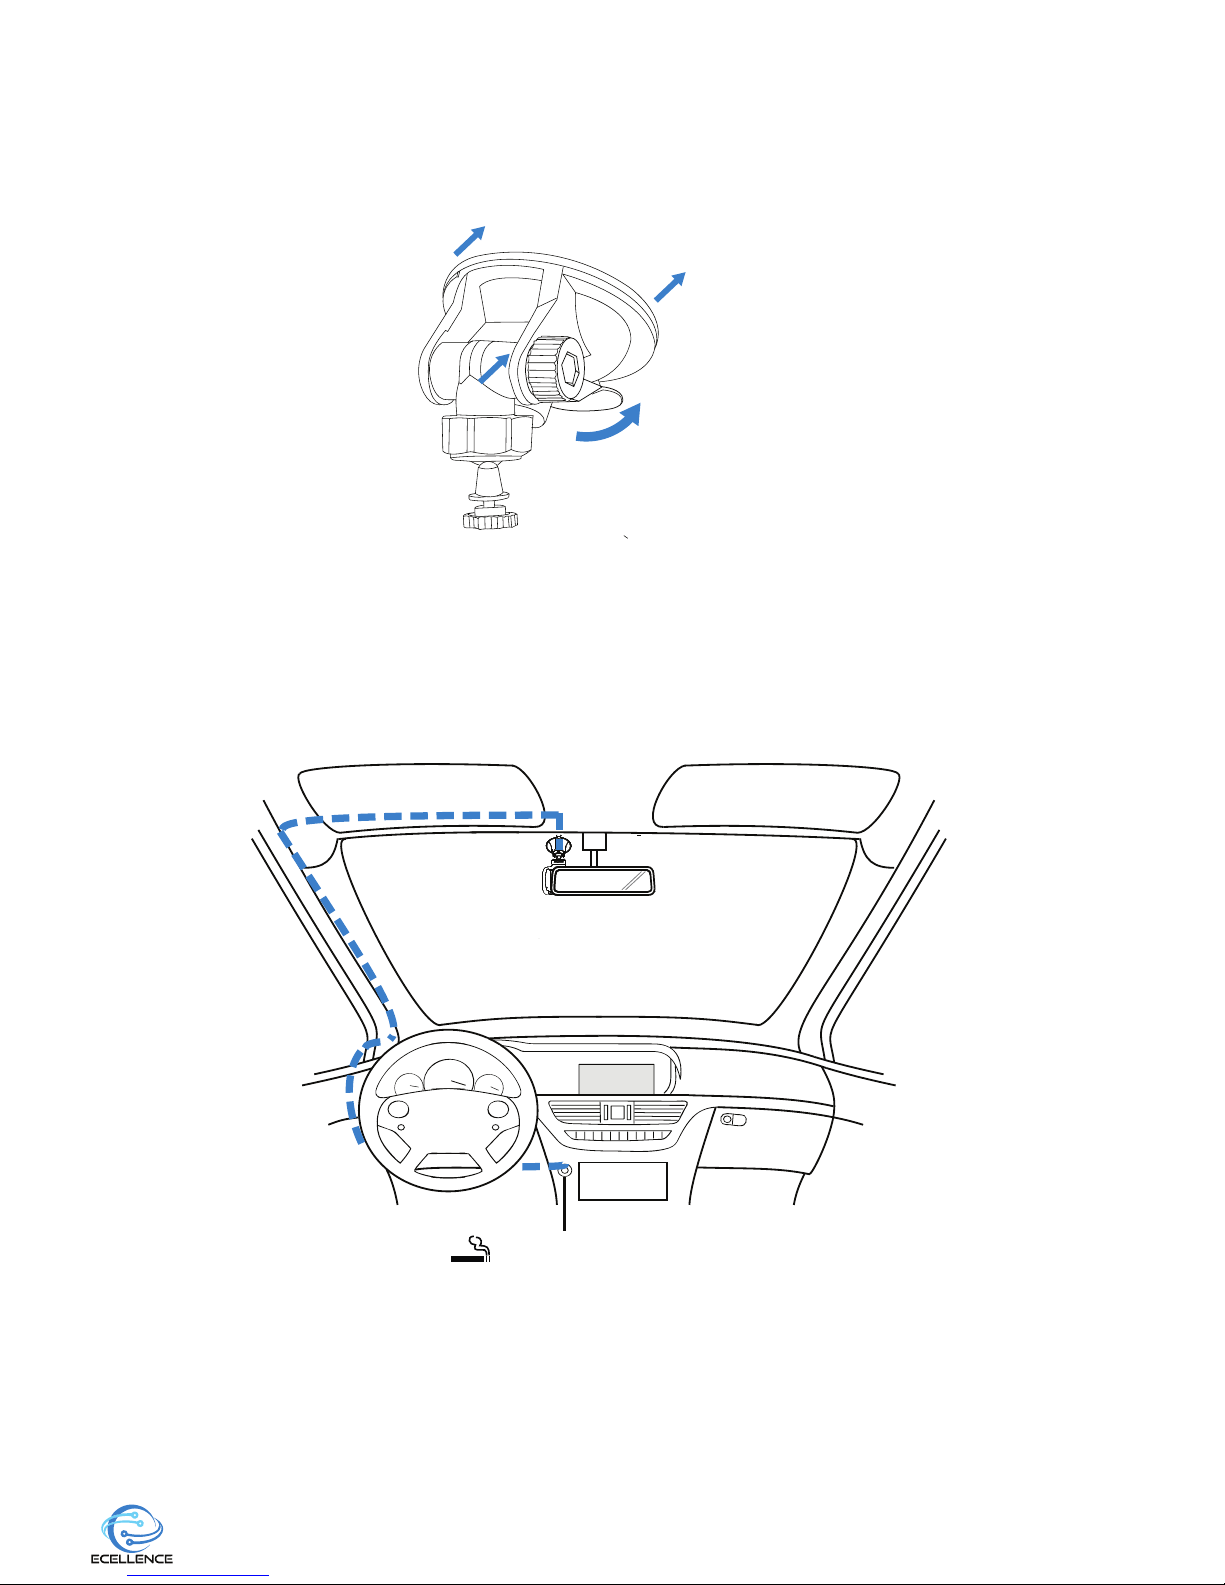
3. Remove the protective film from the suction cup of the mount. Select a suitable position
for the mount and clean the windscreen with a dry clean cloth to achieve a good con
tact between the windscreen and the suction cup. Attach the mount to the windscreen
and release the locking lever of the mount to secure it in place.
Note: Choose a glass area without painted effect.
4. Adjust the camera view, then tighten the lock.
5. Connect the charger to the dash cam. The Ecellence dash cam will automatically power
on and start recording once power is available. In some vehicles this will be when
connections are made, for others it will power on once the ignition has been turned on.
6. (Optional) Hide the dashcam's charging cable
10

SPECIAL FUNCTION DESCRIPTION
1. THE G-SENSOR FUNCTION
When the gravity acceleration is up to 6g (1g = 9.80 m/sec 2), the camera will automatically
protect the current video file where the acceleration was detected. The continuous loop
recording will not delete this video file where the g-sensor was activated and protect that file.
2. HOLD-SOS function
Press this button during the recording process & the current video file is protected just
as the g-sensor protects video file.
USB Mode: The USB cable connects to the computer, a screen will automatically pop up with
the USB menu. There are two modes to choose from:
• Mass Storage: In this mode, you can access all video files or photo files
• PC-Camera: In this mode “USB video device” will appear, then you can see real-time
pictures or videos.
BATTERY CHARGING INSTRUCTIONS
Please be advised that the dashcam batteries are only designed to last a short period of time
to safely save the file when power cuts off, hence it requires constant battery charge. It’s inter-
nal battery should provide approximately 20minutes recording time on a full charge.
There are three ways of charging the battery:
1) Use the power adapter to charge.
2) Use the PC-USB charging.
3) Use the vehicle power charger.
The red LED indicator light will come on when the dash cam is charging and it will go off,
when the the battery is fully charged. The charging time is about 180 minutes.
Note: When using this product, due to improper operation caused by the phenomenon of
the crash, you can disconnect the battery or press the reset button before turning on the
power to start using the camera.
TROUBLESHOOTING
1) Why is my Ecellence Car Dashcam not recording?
Confirm that the memory card is inserted properly and that there is enough space on the
memory card. Also, confirm that the dashcam has enough power or connected to a
power source.
2) Why are my recordings or photos blurry?
Use a clean soft lens cleansing cloth to gently clean the lens.
3) My device is frozen/ has stopped functioning.
Remove the battery to reset.
11
8
9
10
Table of contents


