VSYSTO M2F User manual

USER MAUAL
1 INTRODUCTION.........................................................................................................2
2 PACKAGE CONTENTS ...............................................................................................2
3 CAMERA OVERVIEW..................................................................................................2
3.1 Structure ...........................................................................................................2
3.2 Status Icons ......................................................................................................4
3.3 Optional Accessories..........................................................................................4
4 SPECIFICATIONS.......................................................................................................5
5 Getting Started ............................................................................................................6
5.1 Installation.........................................................................................................6
5.2 Inserting a Memory Card....................................................................................6
5.3 Powering On and Off..........................................................................................6
5.4 Switch Display Mode..........................................................................................6
6 OPERATION ...............................................................................................................7
6.1 Video Recording ................................................................................................7
6.2 System Setup....................................................................................................7
6.3 Playback...........................................................................................................8
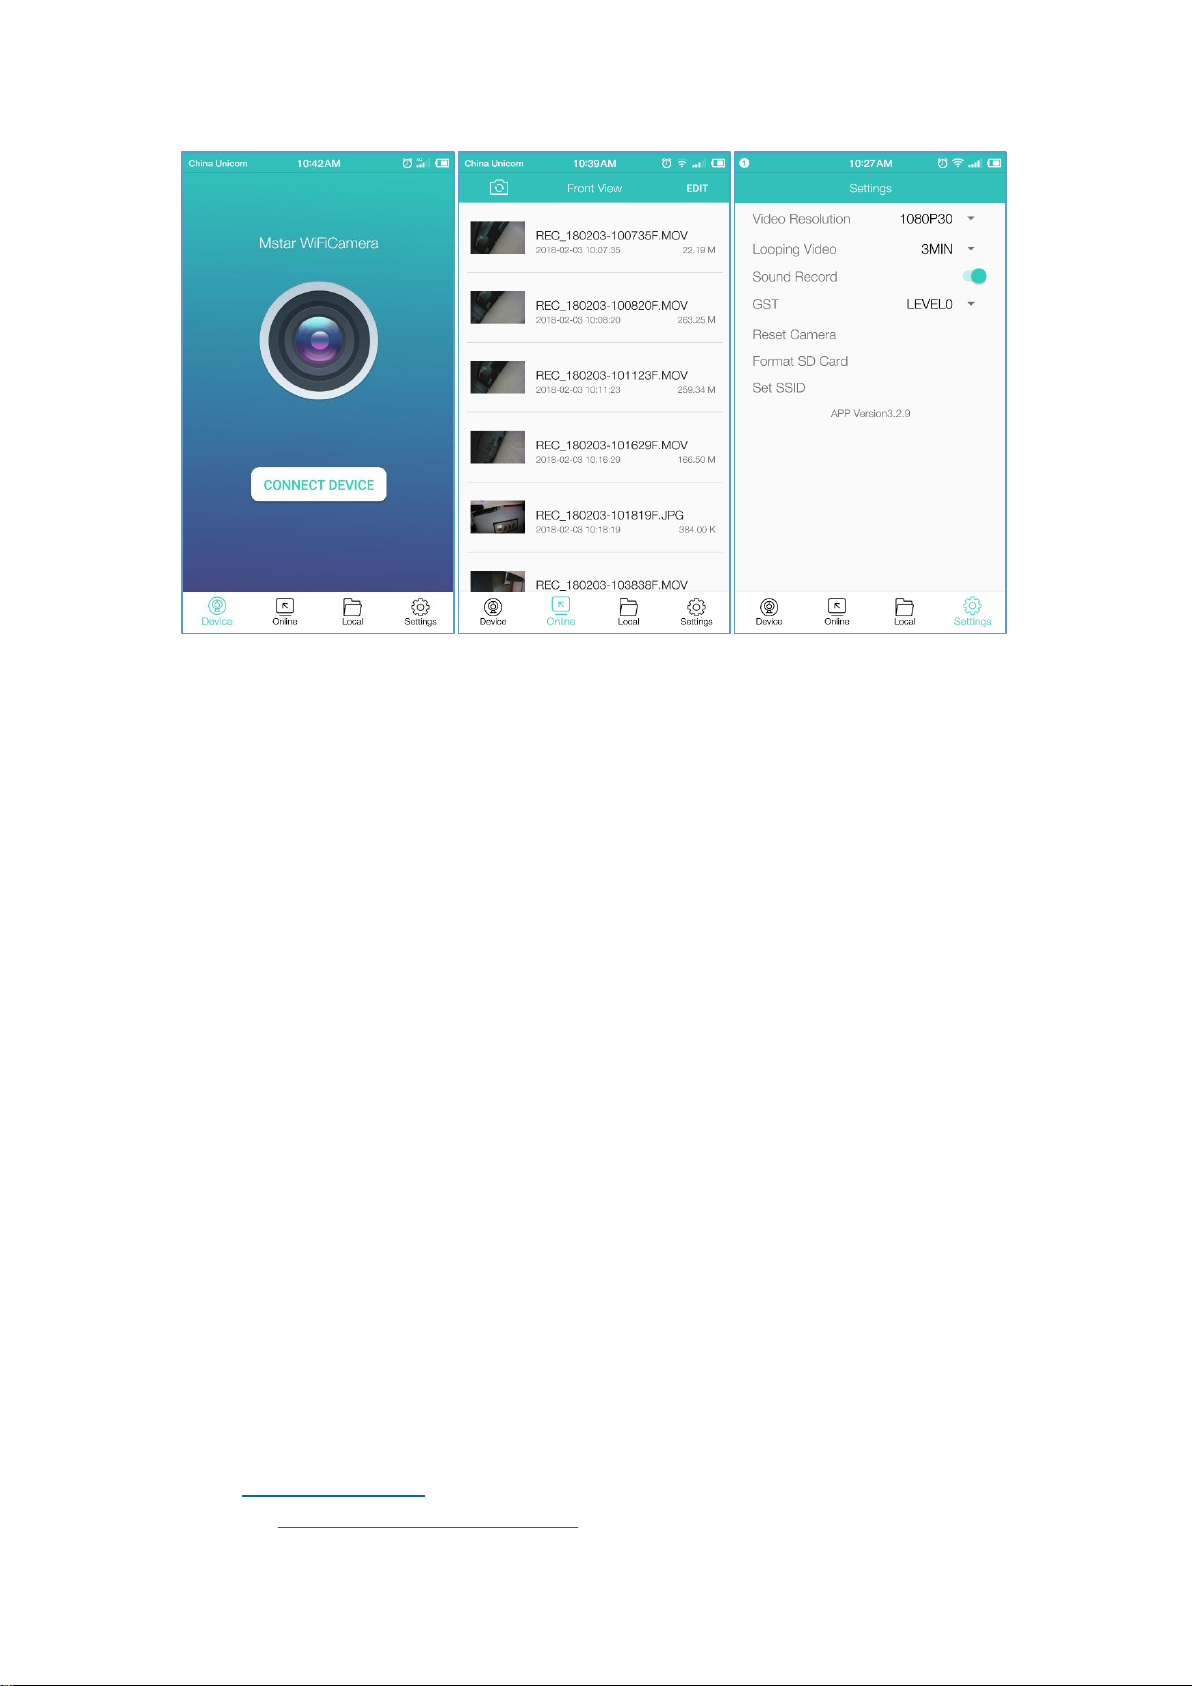
6.4 Wi-Fi Connection & Operation ............................................................................9
7 WARRANTY & SUPPORT .........................................................................................10
7.1 Warranty ......................................................................................................... 10
7.2 FAQ................................................................................................................ 10
7.3 Support........................................................................................................... 10
7.4 Your Opinion Matters ........................................................................................11

1 INTRODUCTION
Thank you for choosing VSYSTO 2CH motorcycle dash cam system. This device is especially
designed for motorcycles, aimed to simplify the use of cameras, for security, and pleasure.
With the VSYSTO dual dash cam system, you can easily record high resolution videos of your
ride from 2 viewpoints. Install and forget it, just enjoy your ride!
Product Features
● Separate dual cameras
● Full HD high resolution
● Built-in Wi-Fi with mobile APP
● Support loop recording
● Support emergency mode
● Support maximum 128G micro SD card
● Super capacitor design instead of Li-ion battery
●Continuous uninterrupted power supply
● Automatic power on and off
● Waterproof design
●Support GPS track (optional)
2 PACKAGECONTENTS
Main unit (1)
Waterproof case (1) –Optional
Handlebar mount (1) –Optional
3M adhesive mount (1)
Waterproof cameras (2)
2.0 meters camera extension cable (2)
Power cable (1)
USB test cable (1)
3 CAMERAOVERVIEW
3.1 Structure

Icon
Meaning
Icon
Meaning
Rear camera
Wired remote
Rear camera extension cable
Emergency button (optional)
GPS tracker (optional)
LED indicator2
Split cable
Front camera
Power adapter
Front camera extension cable

LED Indicator1
When turn on the motorcycle, the dash cam automatically power on and enter video mode,
both red and blue LED Indicator1will be on at the same time.
Definition
Red Light
Blue Light
Solid light
The device is ON
Standby mode
Slow blinking light
/
Video mode
Fast blinking light
/
Emergency mode
No light
The device is OFF
The device is OFF
3.2 Status Icons
Icon
Meaning
Icon
Meaning
Frame rate (30fps)
Wi-Fi connected
Video resolution (FHD/HD)
Wi-Fi disconnected
Video mode
Memory Status (Inserted)
Playback mode
Recording
Wi-Fi status (on)
Standby mode
3.3Optional Accessories
Wired Remote
1) Short press any button of wired remote to activate manual emergency mode and save a
video file named ‘’Key 001 002 003….’’which won’t be overwritten.
2) Long press any button of wired remote to turn off Wi-Fi; long press the button again to turn
on the Wi-Fi.
3) Indicate the camera status (LED Indicator2):
LED Light Frequency
Dash Cam Status
0.5 s
Recording properly
0.1 s
Emergency mode
0 s (light on)
Standby mode
Off (light off)
Power off
GPS Tracker
Optional GPS Tracker will show your movement (in Google map) and speed when playback
the video in our GV Player.

Tips
※It costs a few minutes to receive the GPS signal at first connection.
※The weather and environment like indoor, high buildings will affect the GPS signal.
※Please fix the GPS module exterior and don’t put it in a metal case or interior.
※The GPS player is supported on Windows platform only.
※You can download the GPS player from official website or contact seller to get it.
4 SPECIFICATIONS
Model
M2F
Processor
MSC8328
Screen
3.0 TFT , 960 x 240
Resolution
Front: 1920*1080; SONY IMX323 sensor
Rear: 1920*1080; SONY IMX323 sensor
Video frame rates
30fps
Lens
6-layer full glass
Lens waterproof level
IP67
Collision G-Sensor
Three-axis stereo collision detection
Loop recording
Support (Off/1min/2min/3min/5min)
Wi-Fi
Support
Microphone
Built-in
Speaker
Built-in
Video format
MOV (H.264)
Memory card
TF card up to 128GB
Language
English/French/Deutsch/Italian/Spanish/Portuguese/
Russian/Turkish/Korean/Japanese
Operating humidity
15%~60% RH

Operating temperature
0~60 °C
Battery capacity
Super Capacitor + RTC
Power supply
INPUT: DC 12-24V; OUTPUT: DC 5V 2A
Note: Specifications are subject to change without notice.
5 Getting Started
5.1 Installation
Please refer to the 'Quick Installation Guide', and also installation video guide can be found
on our YouTube channel.
NOTE: Please test the dash cam before installing it on your motorcycle. You can read the
user manual or contact the seller if there is any question.
5.2 Inserting a Memory Card
Insert the memory card into the card slot until it clicks. To remove the memory card, push to
eject the memory card out of the slot.
NOTE:
1. Make sure inserting the memory card with right direction: The golden finger side of memory
card facing the screen of the DVR.
2. Do not remove or insert the memory card when the device is being powered on. This may
damage the memory card.
3. Please use high speed micro SD card with CLASS⑩
4. Please format cards before use and anytime a significant amount of data has been collected
to ensure that device and SD cards are working properly together.
5.3 Powering On and Off
The dash cam will automatically power on once the ignition switch is on, and start recording
when there is a TF card inserted. It will automatically power off and stop recording once the
bike is not being used (still keep recording about 3 minutes for smart power cable).
NOTE:
1. When you get the ACC power cable, please must connect the yellow wire to 12V ACC port
of your motorcycle (KEY ignition)
2. The smart power cable is connected to the motorcycle battery directly. It works by detecting
the voltage change and continuous vibration.
5.4 Switch Display Mode
Press in standby mode/video mode to switch different display (front,rear,1:1,PIP).

6 OPERATION
6.1 Video Recording
1) Normal Video Mode
It starts video recording automatically when power on, the LED indicator will flash slowly. Stop
recording automatically when power off (still keep recording around 3 minutes for smart power
cable), to stop recording manually by pressing the ‘Menu/OK’ button.
Loop on (by default): Loop recording mode continuously records videos to create footages of
assigned length of time (default setting: 3 minutes). If the memory reaches maximum, then
the oldest footage will be deleted to store the most recent footage. Set the video clip time in
the dash cam configuration or Wi-Fi app.
Loop off: It records as 30 minutes per clip for both front and rear camera without overwriting
until the memory reaches maximum and then stop.
NOTE: You cannot record videos without a micro SD card.
2) Emergency Video Mode
G-Sensor Event Recording: It will automatically activate emergency recording mode when
detecting a collision. The LED indicator will flash quickly.
It will save a video file named ‘’GSR 001 002 003….’’
Manual Event Recording: Press the emergency button of wired remote during the recording
to manually activate emergency recording mode. The LED indicator will flash quickly.
It will save a video file named ‘’KEY 001 002 003….’’
NOTE: Video files recorded in emergency mode are protected from being overwritten.
6.2 System Setup
Press the ‘Menu/OK’ button to stop recording (enter standby mode) before setup the system,
and press the ‘Menu/OK’ button again to enter menu system.
1) Press to select different options.
2) Press to confirm the options or settings.
3) Press to enter menu or quit menu settings.

MenuSettingTree
Refer to the table below for details on menu setting items and available menu setting options.
Item
Select
Description
Video resolution
1080P 30fps/720P 30fps/720P 60fps
Set resolution
Video clip time
Off/1/2/3/5min
Set loop recording time
Sound record
On/Off
Set the sound mode
Beep
On/Off
Set key sound
Clock settings
Date & time
Setting date & time
Date format
None/ YYYY MM DD /MM DDYYYY/ DD
MM YYYY
Set date format
Flicker
50Hz/60Hz
Set light frequency
LCD power save
Off/1/3min
Set screen saver time
Protect level
Off/0/1/2/3/4 level
Set the G-sensor sensitivity
GPS status
Display GPS status
Display GPS status
Time zone select
Select the corresponding time zone
Use GPS to set the time zone
Reset setup
Yes/No
Reset all settings
WiFi mode
On/Off
Set Wi-Fi status
Format SD-card
Yes/No
Delete all data in the card
SD card info
Display remaining recording time
FW Version
Check the firmware version
NOTE: Settings may change without prior notice.
6.3 Playback
1) Playback on mobile device
Wi-Fi: Connect to your DVR with Wi-Fi APP (Android & iOS), you can easily play back videos
through your mobile device.
OTG: Plug the micro SD card into your mobile device with an OTG card reader (need your
mobile device support OTG). You will find FRONT and REAR video file folder when you
access the memory card and then select the video you want to play.
2) Playback on dash cam
In playback mode, press ‘Up/Down’ to select the video file, and then press ‘Menu/OK’ button
to play/stop the video you choose.
3) Playback on PC
Plug the micro SD card into an available USB port on your PC with a USB card reader. You
will find FRONT and REAR video file folder when you access the memory card and then
select the video you want to play.
You can get some information from the video file name:
“REC” means normal video file

“KEY” means file recorded by pressing controller
“GSR” means file recorded by triggering G-sensor
“170809” means date 9th August, 2017
“163256” means time 16 o’ clock 32 minutes 56 seconds
“F” means front camera video file
“MOV” means video file format
“KEY” and “GSR” file won’t be overwritten in normal loop recording.
6.4 Wi-Fi Connection & Operation
When successfully connected with your smartphone via built-in Wi-Fi, you can save and
playback the driving recording videos on your smartphone. You can also change settings of
dash cam via Wi-Fi app.
1) Scan the QR code below to download the App from Google Play and App Store.
2) Select ‘MotoDV_M2' from available Wi-Fi network to connect. Default password
is ’1234567890’.
3) Wi-Fi app operation
The dash cam will stop recording when you open Wi-Fi App (connected successfully) during
the recording, and if there is no operation within 30 seconds, or 30 seconds after you quit the
app, it will start recording automatically. Also you can also start/stop recording manually on the
Wi-Fi App.
Click to stop recording manually. Click to start recording manually.
Click to take photo.
Click to switch front and rear camera. Click to enter/exit full screen view.
Click to go back to previous menu.

NOTE:
● GST OFF means the G-sensor is turned off; GST LEVEL4 is the most sensitive level.
●When you connect the DVR failed, please make sure your mobile device is in the Wi-Fi
range (<5 meters) and connected the correct Wi-Fi successfully, and then you can turn off the
cellular network to try again.
● It won’t provide the ability to remotely view the camera.
● Contact seller if it encounters an error when setting the SSID.
7WARRANTY & SUPPORT
7.1 Warranty
Weprovide customers with a warranty of 12 MONTHS from the date of purchase. Please visit
our official website for details.
7.2 FAQ
There may be some information not fully covered on our user manual, take a look at our FAQ
page which may have the answers to your questions.
7.3 Support
If you have any questions regarding your product, please do not hesitate to contact us, please
contact us by below ways.
Please include your order number and product model number.
Email: support@vsysto.com
Facebook: https://www.facebook.com/szvsys/

Twitter: https://twitter.com/vsysto
YouTube: https://www.youtube.com/c/szvsys
7.4 Your Opinion Matters
Our products are designed to do amazing things.
We constantly optimize and strive for excellence to make driving safer, and more fun. Share
your product experience and story with us to inspire someone else.
If you have any thoughts on how we can do even better, we welcome your constructive
feedback and suggestions.
Table of contents
Other VSYSTO Dashcam manuals