Echo Chang PA 2040 User manual

USER'S MANUAL
3-Channel, 4 x 200W Professional Powered Mixer
4 ZONE
NEUTRIK
NEUTRIK NEUTRIK
NEUTRIK
4 ZONE
1. Read these instructions before operating this
apparatus.
2. Keep these instructions for future reference.
3. Heed all warnings to ensure safe operation.
4. Follow all instructions provided in this document.
5. Do not use this apparatus near water or in locations
where condensation may occur.
6. Clean only with dry cloth. Do not use aerosol or liquid
cleaners. Unplug this apparatus before cleaning.
7. Do not block any of the ventilation openings. Install
in accordance with the manufacturer
’
s instructions.
8. Do not install near any heat sources such as radiators,
heat registers, stoves, or other apparatus (including
.
9. Do not defeat the safety purpose of the polarized or
grounding-type plug. A polarized plug has two blades
with one wider than the other. A grounding type plug
has two blades and a third grounding prong. The wide
blade or the third prong is provided for your safety. If
the provided plug does not into your outlet, consult
an electrician for replacement of the obsolete outlet.
10. Protect the power cord from being walked on or
pinched particularly at plug, convenience receptacles,
and the point where they exit from the apparatus.
11. Only use attachments/accessories by the
manufacturer.
12. Use only with a cart, stand, tripod, bracket, or
table by the manufacturer, or sold with
the apparatus. When a cart is used, use caution
when moving the cart/apparatus
combination to avoid injury from tip-
over.
13. Unplug this apparatus during lighting
storms or when unused for long
periods of time.
14. Refer all servicing to service personnel.
Servicing is required when the apparatus has been
damaged in any way, such as power-supply cord or
plug is damaged, liquid has been spilled or objects
have fallen into the apparatus, the apparatus has
been exposed to rain or moisture, does not operate
normally, or has been dropped.
IMPORTANT SAFETY INSTRUCTIONS
CAUTION: TO REDUCE THE RISK OF ELECTRIC SHOCK,
DO NOT REMOVE COVER (OR BACK)
NO USER SERVICEABLE PARTS INSIDE
REFER SERVICING TO QUALIFIED PERSONNEL
The lightning flash with arrowhead symbol, within an
equilateral triangle, is intended to alert the user to the
presence of uninsulated
“
dangerous voltage
”
within the
product
’
magnitude to constitute a risk of electric shock to persons.
The exclamation point within an equilateral triangle is in-
tended to alert the user to the presence of important operat-
ing and maintenance (servicing) instructions in the literature
accompanying the appliance.
WARNING: To reduce the risk of or electric shock, do
not expose this apparatus to rain or moisture.
CAUTION: Use of controls or adjustments or performance
of procedures other than those may result in
hazardous radiation exposure.
The apparatus shall not be exposed to dripping or splashing and that no objects with liquids, such as vases,
shall be placed on the apparatus. The MAINS plug is used as the disconnect device, the disconnect device shall
remain readily operable.
Warning: the user shall not place this apparatus in the area during the operation so that the mains switch
can be easily accessible.
CAUTION
RISK OF ELECTRIC SHOCK
DO NOT OPEN
1
2
3
4
220 5
50
6
7
8
9
10
WARNING: To reduce the risk of fire or electric shock,
do not expose this apparatus to rain or moisture.
CAUTION: Use of controls or adjustments or
performance of procedures other than those specified
may result in hazardous radiation exposure.
The lightning flash with arrowhead symbol,
within an equilateral triangle, is intended to
alert the user to the presence of uninsulated
"dangerous voltage" within the product's
enclosure that may be of sufficient magnitude
to constitute a risk of electric shock to persons.
The exclamation point within an equilateral
triangle is intended to alert the user to
the presence of important operating and
maintenance (servicing) instructions in the
literature accompanying the appliance.
1. Read these instructions before operating this
apparatus.
2. Keep these instructions for future reference.
3. Heed all warnings to ensure safe operation.
4. Follow all instructions provided in this document.
5. Do not use this apparatus near water or in locations
where condensation may occur.
6. Clean only with dry cloth. Do not use aerosol or liquid
cleaners. Unplug this apparatus before cleaning.
7. Do not block any of the ventilation openings. Install
in accordance with the manufacturer
’
s instructions.
8. Do not install near any heat sources such as radiators,
heat registers, stoves, or other apparatus (including
.
9. Do not defeat the safety purpose of the polarized or
grounding-type plug. A polarized plug has two blades
with one wider than the other. A grounding type plug
has two blades and a third grounding prong. The wide
blade or the third prong is provided for your safety. If
the provided plug does not into your outlet, consult
an electrician for replacement of the obsolete outlet.
10. Protect the power cord from being walked on or
pinched particularly at plug, convenience receptacles,
and the point where they exit from the apparatus.
11. Only use attachments/accessories by the
manufacturer.
12. Use only with a cart, stand, tripod, bracket, or
table by the manufacturer, or sold with
the apparatus. When a cart is used, use caution
when moving the cart/apparatus
combination to avoid injury from tip-
over.
13. Unplug this apparatus during lighting
storms or when unused for long
periods of time.
14. Refer all servicing to service personnel.
Servicing is required when the apparatus has been
damaged in any way, such as power-supply cord or
plug is damaged, liquid has been spilled or objects
have fallen into the apparatus, the apparatus has
been exposed to rain or moisture, does not operate
normally, or has been dropped.
IMPORTANT SAFETY INSTRUCTIONS

INTRODUCTION...............................................................................4
FEATURES........................................................................................5
GETTING STARTED.........................................................................5
FRONT PANEL..................................................................................6
BACK PANEL................................................................................. 15
APPLICATION................................................................................ 18
SPECIFICATIONS............................................................................19
TABLE OF CONTENTS
PA2040
POWERED MIXER

Page 4
PA2040 User's Manual
Introduction
Congratulations on your purchase of another ne
Echo-Chang product. PA2040 is built into a rugged
casing for heavy-duty use and contains numerous
built in features to make your mixing experience a
memorable one. Five speaker outputs channels are
available for versatile setup, each oering 200 Watts
of Peak power. A stereo USB recording and playback
module has been included for recording of your
main mix or playback of audio les directly into your
mix. In order to get the best performance from the
mixer, we advise you to read all safety and operation
instructions before use, and keep this manual handy
for future reference.
1338
SENPRINI 200 1341
ECHO CHANG 1358

Page 5
PA2040
Features
• Four zone speaker outputs oering 200 Watts
• Two Combo input jacks for microphones
• A single ¼” phone jack for line inputs
• Bluetooth audio streaming from Bluetooth devices
• FM radio built-in
• Onboard stereo USB recording function with MP3
and WAV playback
• Echo Eect with adjustable Speed and Repeat
• Bass and treble EQ available on main mix
• Six segment front panel VU meter
• Two ¼” phone jacks for low-impedance output and
four barrier strips for 100V zone output
• Independent Zone buttons
• Stereo RCA tape in and record output, record out
with ¼” phone jack output
Getting Started
1. Before turning the power on, the master volume
control should be set to -∞.
2. Always turn the power o before connecting or
disconnecting cables.
3. Check the AC outlet to ensure it is of a suitable
voltage before connecting the AC plug of this
device.
4. Do not obstruct the back panel due to the heatsink
and air vents needing ventilation.
5. Please ensure the distance between the back of
the PA2040 and the wall is over 1.5 feet to ensure
the device gets the ventilation which it needs.
RMS200W
3
)COMBO(
¼" XLR
MP3/WAV USB
4
1004
ZONE1+ZONE2+ZONE3+ZONE4
RCA
MAIN OUT ¼"
D
Bluetooth
FM
1
MASTER
2
3
220
4
5
30

Page 6
PA2040 User's Manual
12
34
NEUTRIK
NEUTRIK NEUTRIK
NEUTRIK
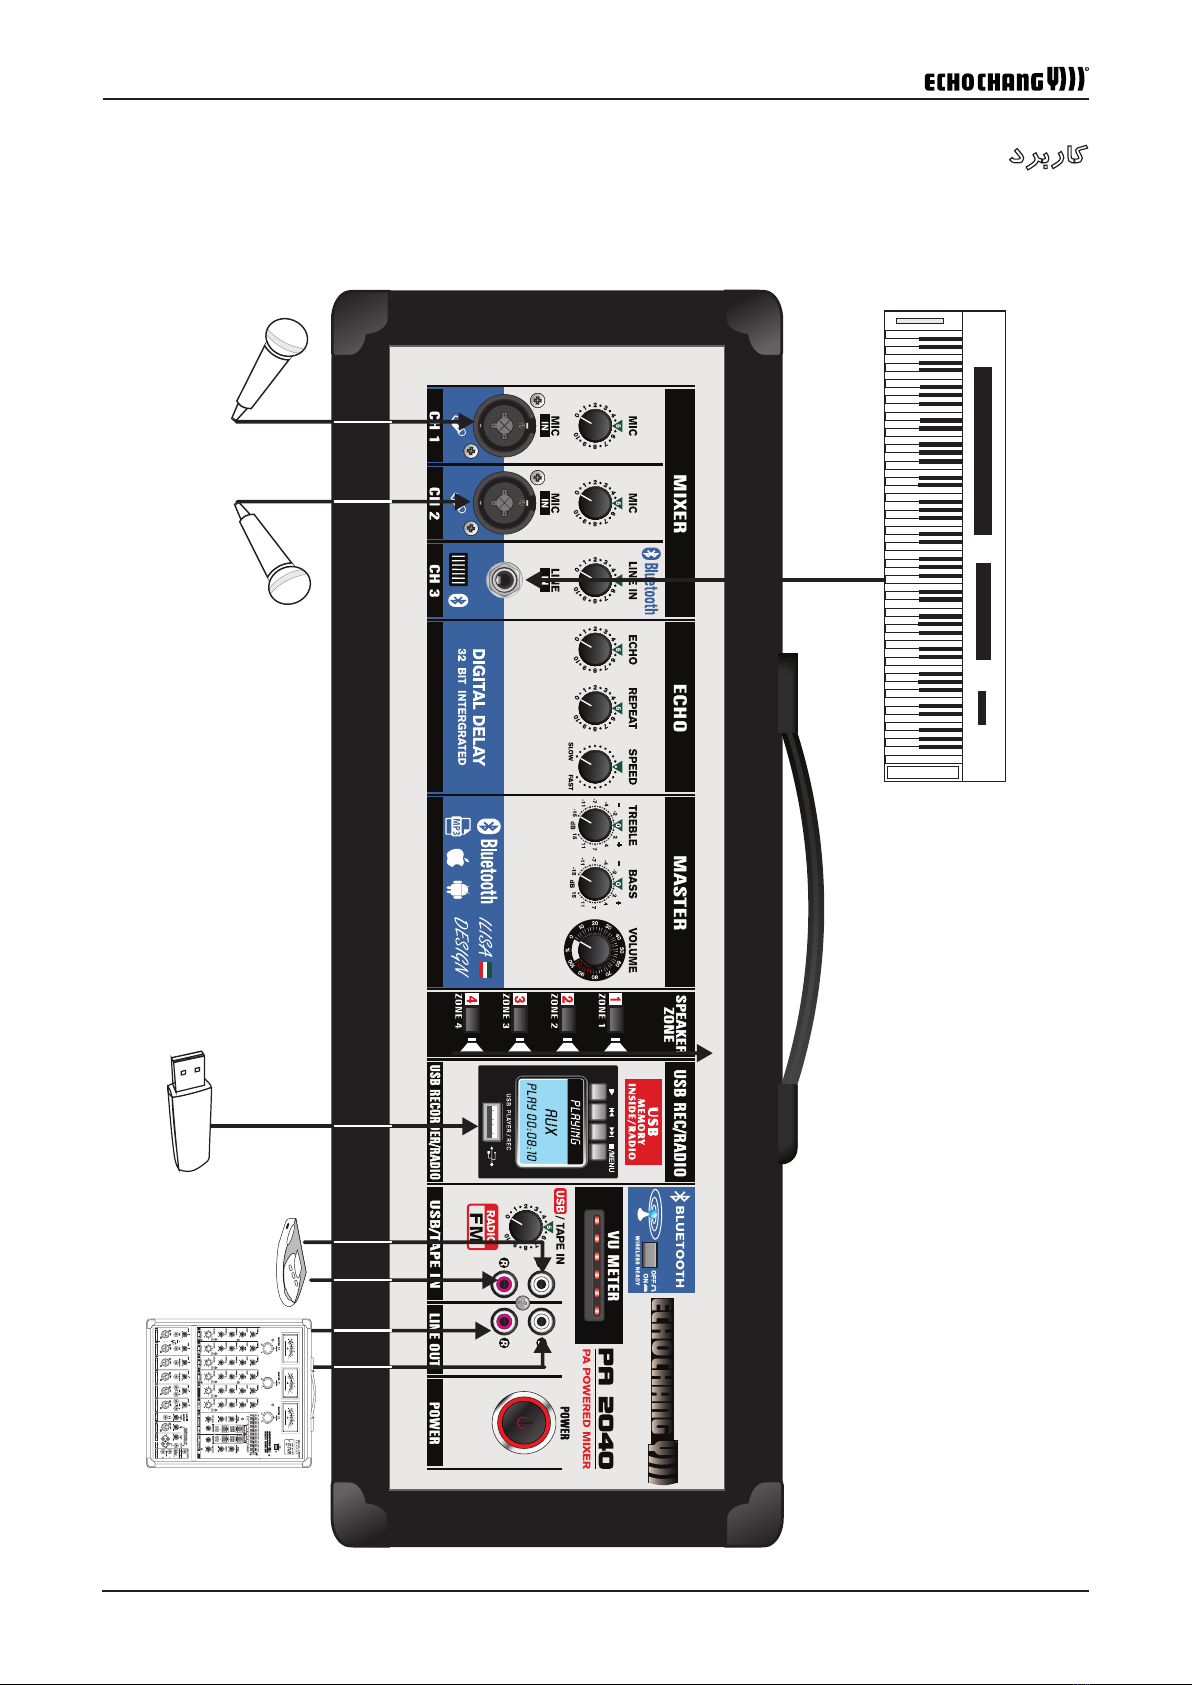
Front Panel
1. Combo Inputs
Channels 1 and 2 feature combo input connectors that accept mi-
crophone input signals through either XLR and ¼" TRS connec-
tors. The signal from these inputs is controlled by their respective
level controls.
2. ¼" Line Input
This ¼" line input connector is for connection of external line-level
devices such as CD players, MP3 players and instruments such
as keyboards.
3. Mic In Volume Controls
These rotary controls allow users to adjust the incoming micro-
phone signals from their respective input jacks.
4. Line In / Bluetooth Level Control
This rotary control is for the third input channel and adjusts the
incoming signal from the line-level input jack as well as the wire-
less Bluetooth signal. Both the input and the bluetooth function can
be used at the same time, however this level control adjusts the
signal simultaneously. That being the case, we advise using the
bluetooth source's volume control to better balance the audio level
of the input and the Bluetooth.
1
3
2
4
Mic In Volume Control
Line In/Bluetooth Control
Bluetooth
LINE IN
LINE IN
Bluetooth
Combo Mic Inputs
COMBO(
)COMBO(
¼" XLR
Line Inputs
MP3 Player

Page 7
PA2040
5 6 7 8 9 10
5. Echo Control
The control on the left will adjust the nal output level of the digital
echo eect.
7. Speed Control
To increase the speed control of the echo eect, turn this knob to
the right. You will hear the signal echo at a faster rate.
8. Treble Control
Turn to the right to boost high frequencies, adding crispness to
percussion from drum machines, cymbals, and synthesizers. Turn
to the left to cut these frequencies, reducing the possibility of sibi-
lance or hissing. The control has a shelving response giving 15dB
of boost or cut at 12 kHz.
8
9
10 7
5
6
Echo Control
CH2 CH1
Repeat Control
Speed Control
Treble Control
Bass Control
Volume Control
6. Repeat Control
The Repeat control allows users to add one or more repeats to the
selected eect (up to 10 repeats total).
9. Bass Control
Turn to the right to add warmth to vocals or extra punch to guitars,
drums and synthesizers. Turn to the left to reduce stage rumble,
hum or to improve any mushy sounds. The control has shelving
response giving 15dB of boost or cut at 80Hz.
10. Volume Control
This rotary control allows users to adjust the nal output level of
the PA2040 power amplier. This will control the output level of all
4 zones and the low-impedance output at the same time.
Page 8
PA2040 User's Manual
11 12
13 15
14
16
19
20
1817
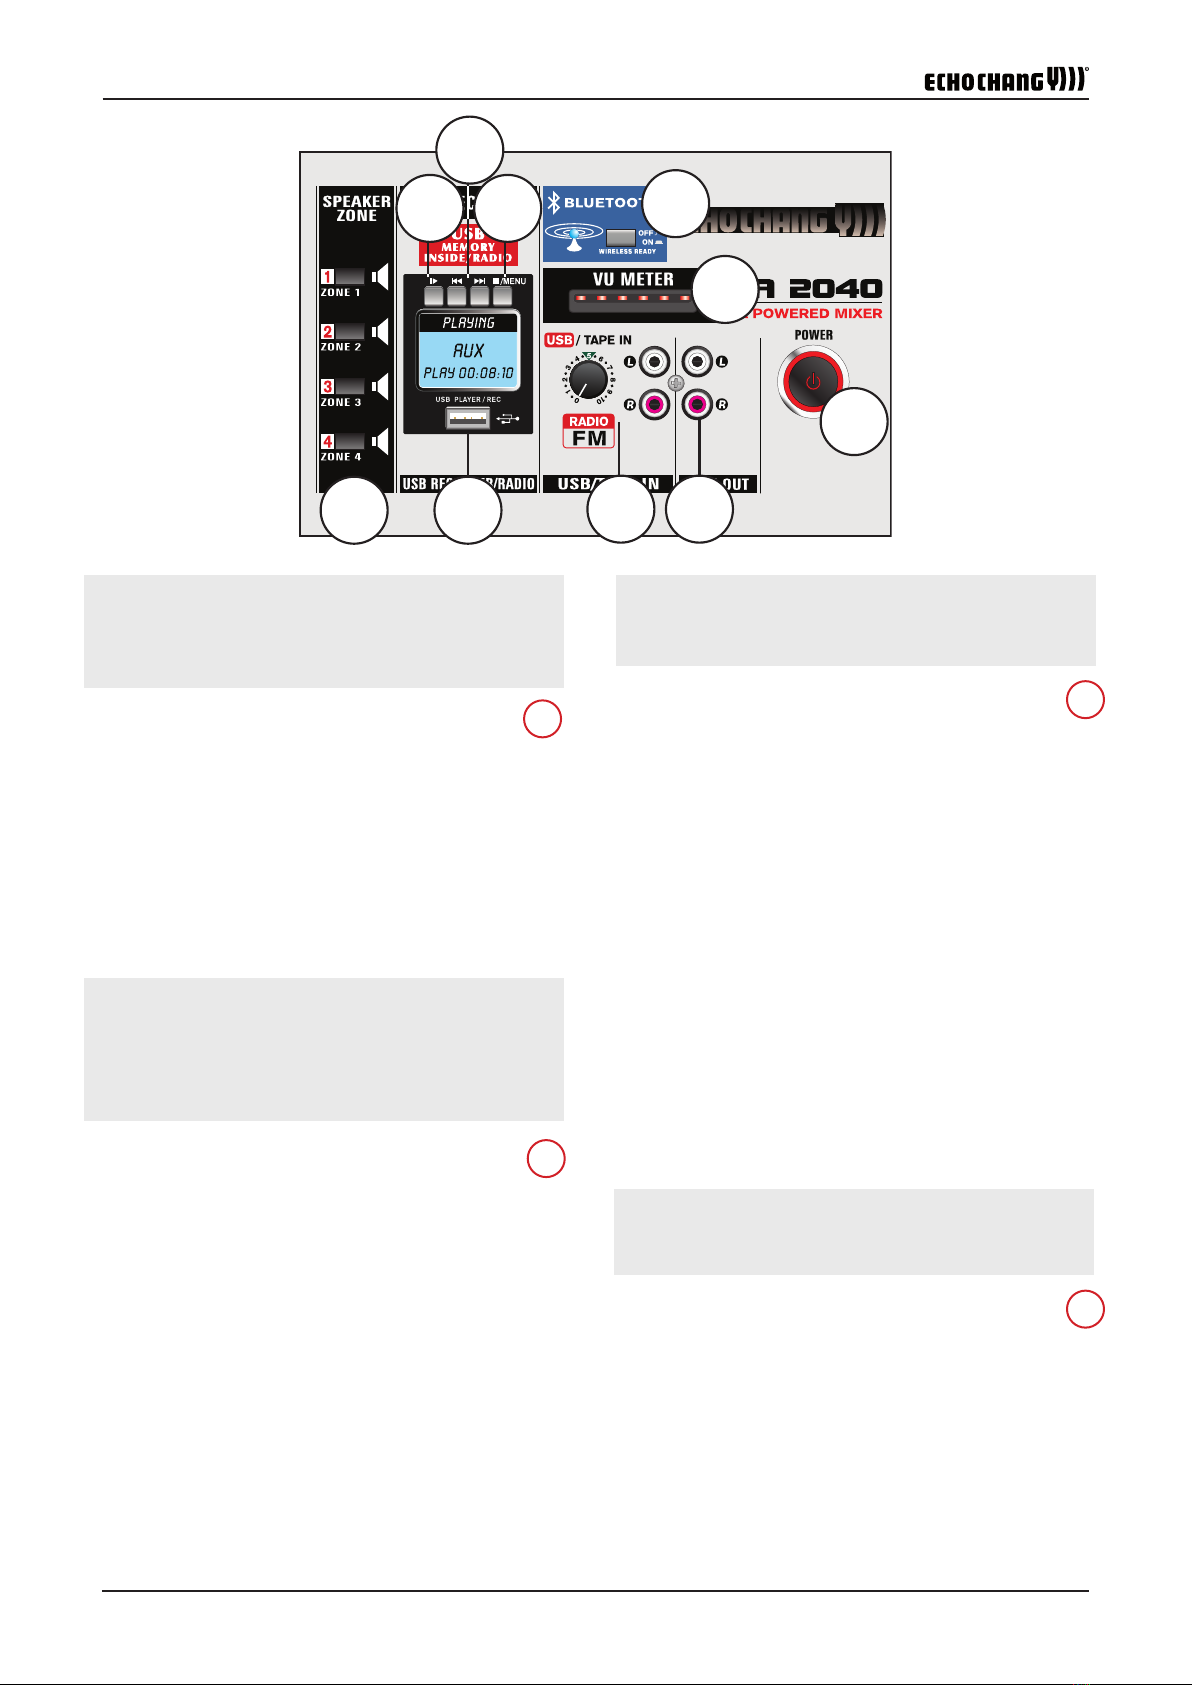
11. Speaker Zone Buttons
These buttons will allow users to assign the main signal to their re-
spective zones. These correspond to the zone outputs on the rear.
12. USB Port
Connect your USB ash drive to this port for either playback or
recording of digital audio les.
13. Play/Pause Button
This button will allow you to play and pause audio playing through
the USB recording. In addition to this, it will allow you to select
menu options when navigating the menu.
14. Back/Forward Buttons
These buttons allow users to skip forward and backwards between
digital audio tracks available. They also allow users to navigate
left/right and up/down within the internal software. When in the
recording menu, the 'back" button is also used to initiate recording
and the 'forward' button is used to save the recording.
14
13
12
11
ZONE 1, ZONE 2, ZONE 3, ZONE 4
)ZONE 3( 3)ZONE 2( 2 )ZONE 1( 1
)ZONE 4( 4
" ZONE 4 , ZONE 3, ZONE 2, ZONE 1
:
0004321
USB PORT)USB(
USB
FAT-32
II
II
II
Page 9
PA2040
BLUETOOTH NAME: SENPRINI_PA2040
PASSWORD: 2040
SENPRINI_PA2040 :
2040 :
15. Stop/Menu Button
In general, pushing this button will return you to the previous
menu. This includes when navigating menus and sub-menus with-
in the USB recording module.
16. Bluetooth Button
Push this button to activate the Bluetooth streamining function of
the PA2040. The PA2040 will then be available as SENIPRINI_
PA2040 in your BT-enabled devices. Activate with the password:
2040. The audio will be sent through your channel 3 input.
17. USB/Tape/Radio Input and Control
These RCA inputs allow the cassette recorder or CD players to be
added to the Master outputs. The included knob adjusts the signal
level from the Tape In and USB module input to the Master and
Zone mixes.
18. Line Out
These RCA and ¼” sockets provide signal output (pre-master fad-
er) for cassette decks, MP3 recorders and consumer-grade audio
equipment.
19. VU Meter
This 6-segment meter shows the output level of the main mix. The
meter gives users a constant visual warning of excessive peaks
in signals that might cause overloading. Adjusting the output level
control to allow the indicator arm to occasionally sit around (or
before) the center to 70% position will ensure you get little to no
distortion while maintaining a high quality of audio.
CH3
SENPRINI_PA2040
2040
WIRELESS READY
CH3
19
20
18
16
17
15
RCA FM
RCA
USB/TAPE IN
RCA
RCA
CD RECORDER
VU Level Meter
LED
DISTORTION
Power Switch & Indicator
MASTER
/ MENU
20. Power Button
This button is used to turn the PA2040 on and o. Be sure to turn
the system's Master Volume down before powering on the mixer.
Page 10
PA2040 User's Manual
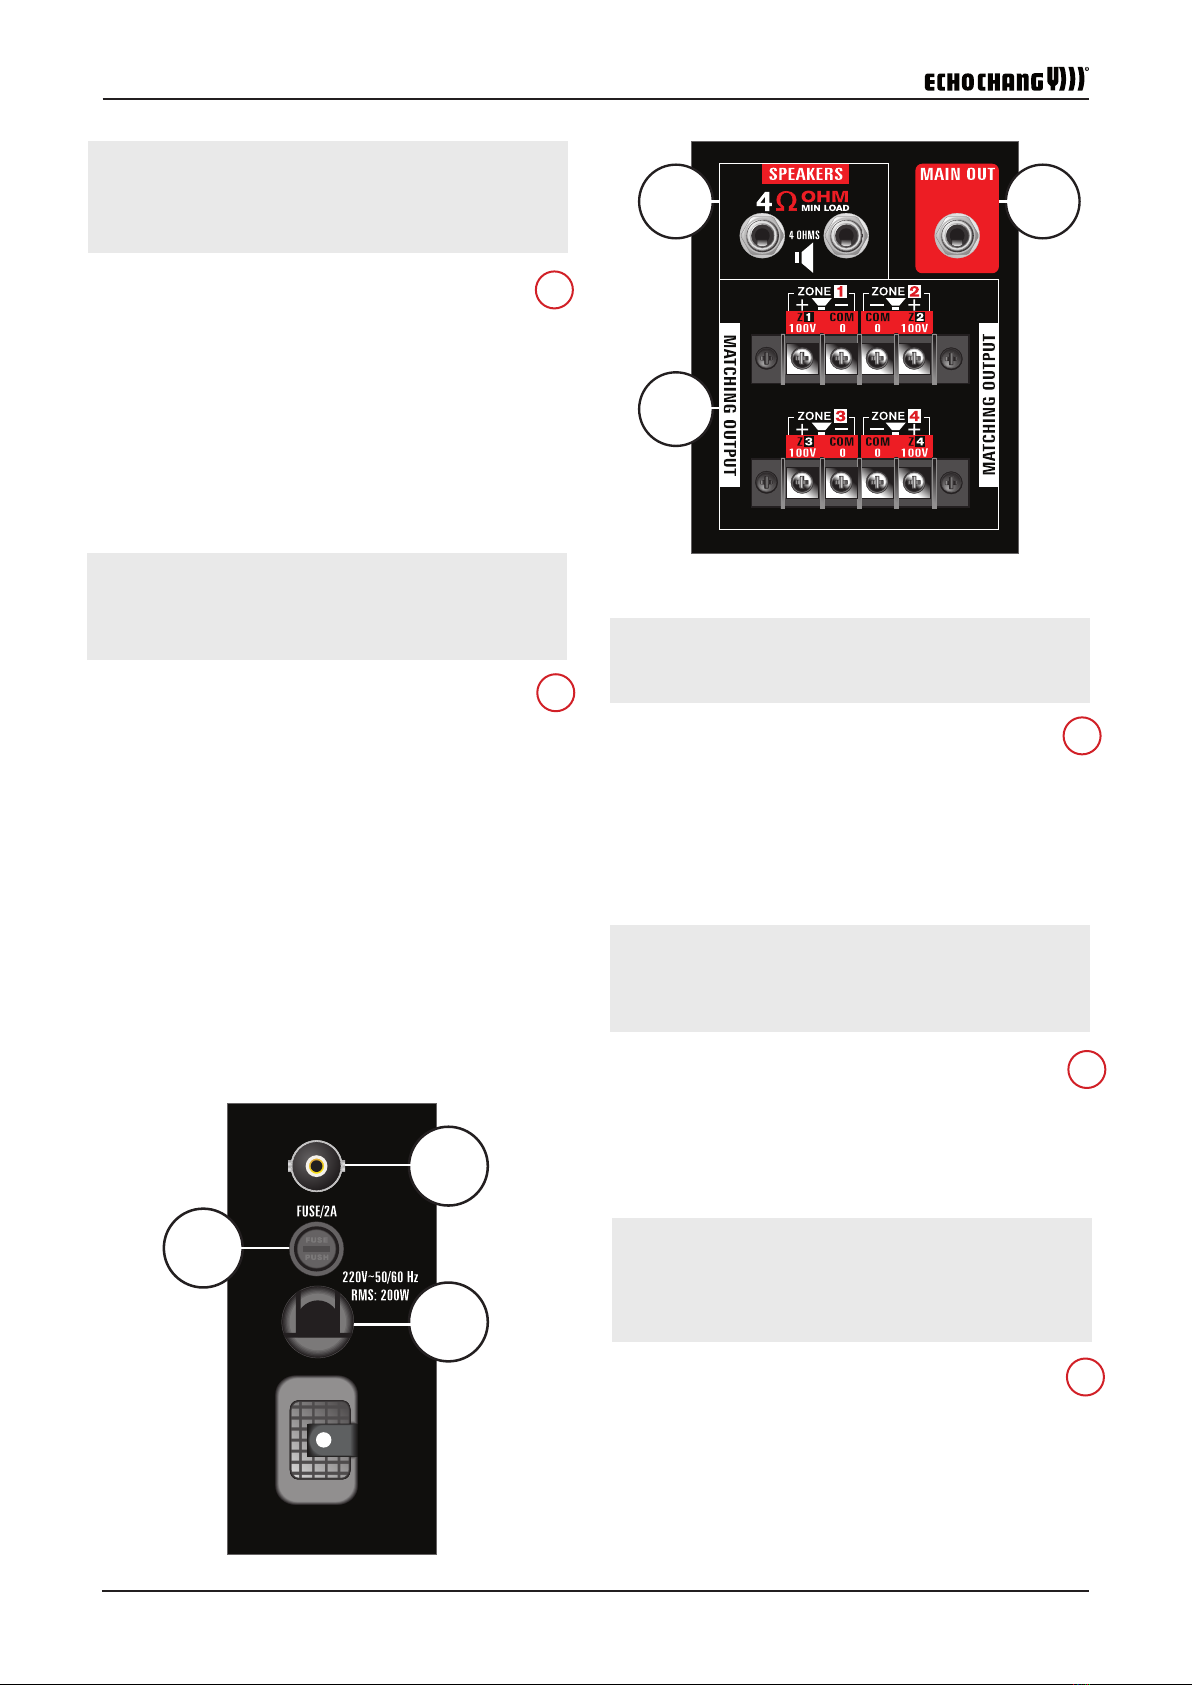
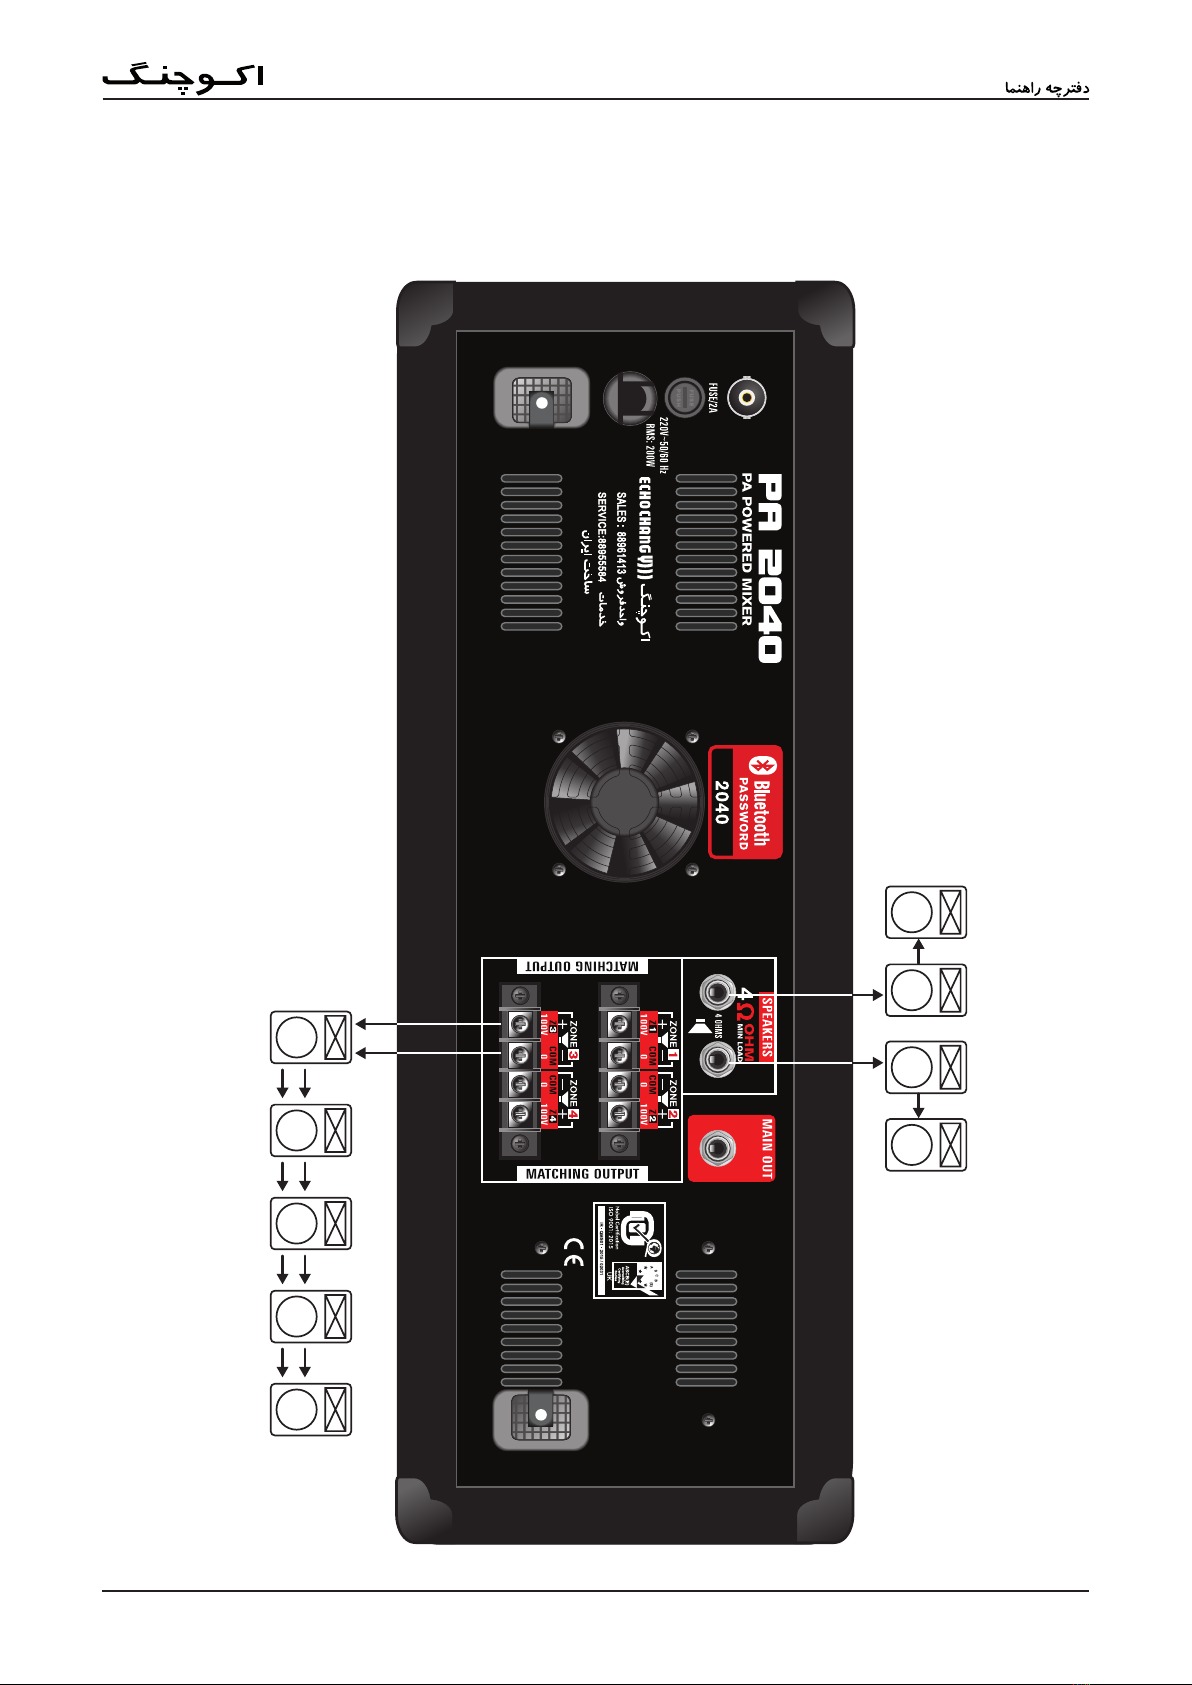
24. Antenna
This BNC port is for the inclusion of the PA2040's antenna. This
allows the built-in USB module's radio to receive radio signals. The
radio function can be found within the USB module's main menu.
22.
Speakers can be connected to these jacks. The PA2040 includes
two 4Ω outputs. Each of these allow for a single 4Ω speaker or two
8Ω speakers to be daisy-chained.
23. Zone Outputs
Each of the four available zones features a 100V output which
allows for distributed line setups. This can be used with speakers
with built-in 100V transformers. A distributed line setup allows for
more speakers to be included in each zone.
25. Fuse
The PA2040's fuse can be found here. If the system doesn't turn
on for any reason, be sure to check the fuse to see if it needs re-
placing. The PA2040 requires a 2A fuse. 21. Main Output
This sends line level signals from the mixer to external devices,
such as power ampliers or powered monitors.
23
22
21
25
24
)BACKGROUND MONITOR(
Zone Output
ZONE 1 , ZONE 2, ZONE 3, ZONE 4
" ZONE 1 , ZONE 2, ZONE 3, ZONE 4
Fuse Holder
FM Antenna
FM
)FM ANTTENA(
4
16 4
2122
23
24
26
25

Page 11
PA2040
26. AC Power Cable
The PA2040 includes a pre-installed AC power cable. This can be
connected to a suitable AC power outlet to provide power to the
mixer. Be sure to check local voltage levels before attempting to
use this device.
26
Power Cable
220
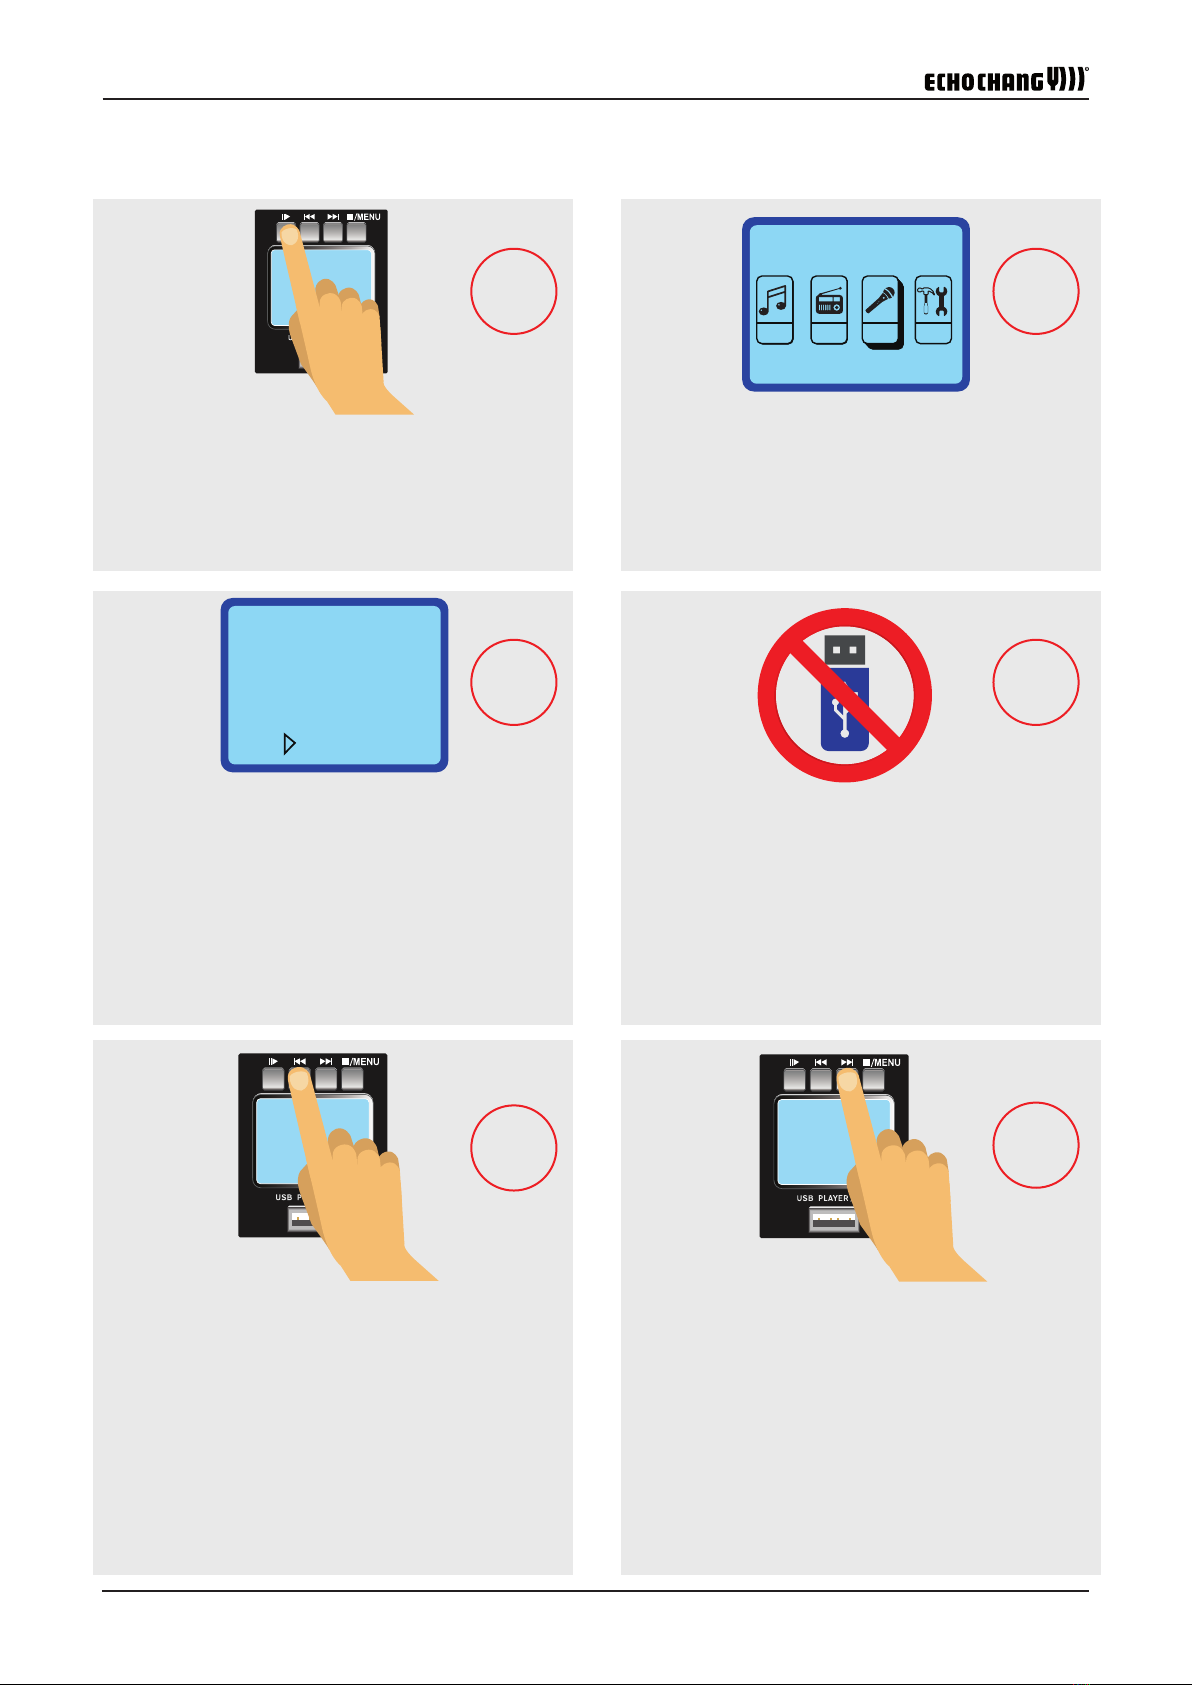
More on the USB Recorder
Playback of Files
After connecting a USB ash drive the USB recorder will take a few
seconds to read les on the disc. Use the Reverse/Cue buttons
to navigate up and down this menu and the; button to enter.
Press; to play a track. When a track is playing, press the Reverse
or Cue buttons to cue the previous or next track, hold the Reverse
or Cue buttons to skip backwards or forwards through tracks, push
the; button to pause playback or the Stop/Menu button to return
to the previous menu. When in the 'Music' playback menu, push
and hold the Stop/Menu button to alter the equalizer mode. You can
push and hold the; button for more playback options.
:USB
II
Playback Display
During playback the screen may show the following properties:
Time (Minutes and Seconds), Repeat Mode, EQ Mode, File Name,
File Directory and Track Number.
WMAMP3
Music 00:10
USB 0001/0013
JL_REC
FILE0001.WAV
F
NOR
A

Page 12
PA2040 User's Manual
Deleting a File
When in the Music (MSC) menu, select the le you wish to delete.
Push and hold the; button to enter options. Use and : to
scroll through the options to nd "Delete File". Push the; button
to immediately delete the le.
II MSC
2
IIDELETE FILE
USB 2
PA2040 USB
UPLOAD
FM
FMPA2040
SYS :
SYSII
:
II
Copy MP3 Files to Internal Storage
Using a USB-A to USB-A cable between the USB module and a
Windows or Mac computer will allow you access to the PA2040's
USB module's storage. Once connected, simply copy any les you
wish to play (MP3 or WAV) to the PA2040.
Due to the limited onboard storage, EchoChang recommends
using MP3 les over WAV to conserve space.
FM Radio
The PA2040 has a built-in FM radio function that can be accessed
by selecting the FM Radio icon in the main menu. The menu of this
function can be used to scan for available stations. See the next
page for details.
Language Select
Selecting between English and Persian languages is simple. This
option can be found within the "SYS" menu. Like other functions,
simply use the and : buttons to navigate and the II► button
to conrm selection.
Repeat Mode
To activate repeat, push and hold the Play/Pause button when
in the Music (MSC) menu. Select “Repeat” from the menu using
the ; button. Use the Reverse/Cue buttons to scroll through the
various repeat options. Repeat options include Repeat All, Single
Device, Random and Repeat Folder. The Repeat mode can be set
during playback without aecting the audio.
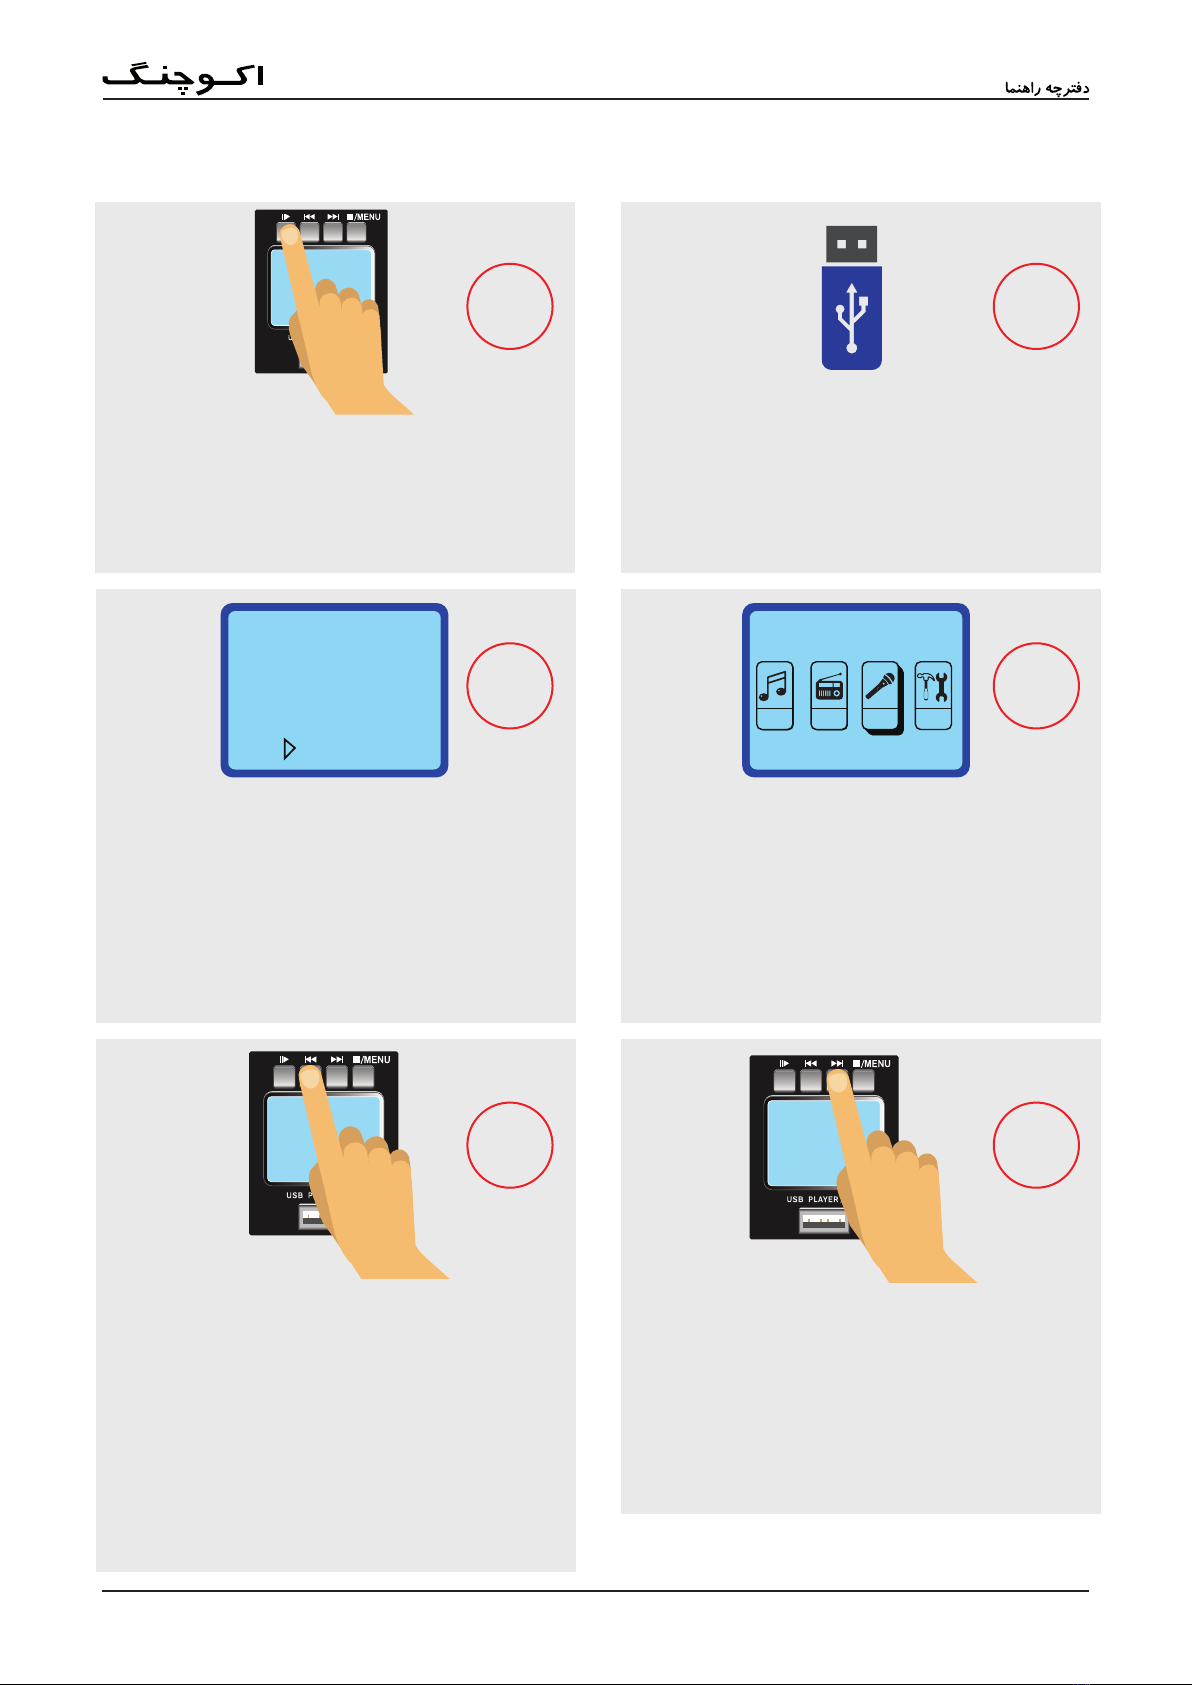
Recording a WAV
Navigate the main menu to nd the Recording option on screen.
1. Push the : button to begin recording.
2. You can push the play/pause button to pause mid-recording.
3. Push the button to nalize the recording.
Do not remove your USB media when the screen displays “LOAD-
ING” as the USB recorder is writing your le to the USB drive. Files
will be named FILE0001.WAV where the le number is increased
by 1 for each new recording.
MSC :
MSCII
:
SINGLE REPEAT ALL
REPEAT FOLDER
WAV
REC :
II
:
II
II
FILE0001.WAV
0002-0003-0004……

Page 13
PA2040
Use the and : buttons to navigate to the FM
icon and push }; to select. Ensure your antenna is
attached before beginning (see point #24).
Push and hold the }; button to access the menu for
this function.
Select 'Auto Search' and press the }
; button to begin
nding stations in your area.
This is only required the rst time you use the FM
Radio function as they will be stored for later use.
When complete, the radio will automatically start. You
can push the and :buttons to navigate between
your saved stations.
Using the FM Radio
STEP 1
1
STEP 2
2
STEP 3
STEP 4
4
Recording CtlII
start rec
)FM ANTENNA(
FM :
II
:
2II
AUTO SEARCH
II
2II
Pause RecRecord Ctl
Save Rec
Also within this menu, users can select to record the
currently active station. Push and hold };button,
select the “Record Ctl” option and select “Start Rec”.
Push and hold }; button and select “Record Ctl” again
to nd the "Pause Rec" and "Save Rec" options.
STEP 6
STEP 5
5
6 3
Radio
MSCFM REC SYS
Radio
C06
Rec
91.7MHz
recording Ctl
Exit
start rec
recording Ctl
Exit
save rec
pause rec
Radio
Record Ctl
Auto Search
Echo Ctl
Radio
C06
Rec
91.7MHz
FM
Page 14
PA2040 User's Manual
Use the and :buttons to locate the "REC" menu
and push
;
to select.
REC :
II
USBUSB
:
II
II
II
WAVMP3
WAV
FILE0001.WAV
0002-0003-0004……
Use
;
to pause recording at any time. Push
;
again to resume recording.
USB
Ensure you do not insert a USB ash drive. This will
allow you to record directly to the onboard storage
by default.
Push the : button to begin recording.
The current recording destination and record time will
appear on screen. Push and hold the
; button to
enter into the Recording function's menu at any time.
Push the button within the recording menu to
immediately save the recording.
Files will be named like so: FILE0001.WAV. The le
number is increased by 1 for each new recording.
STEP 4
STEP 6
STEP 5
STEP 1
STEP 2
STEP 3
Recording an MP3 to Internal Memory
4 1
2
3
5
6
Record
FMMSC RE SYSC
Record
SD1
Rec
00:00:10
Radio
C06
Rec
91.7MHz
Page 15
PA2040
II
II
II
WAVMP3
WAV
FILE0001.WAV
0002-0003-0004……
REC :
II
:
USB
Recording an MP3 to USB Drive
STEP 4
STEP 6
STEP 5
STEP 1
STEP 2
STEP 3
4 1
2
3
5
6
Use the and :buttons to locate the "REC" menu
and push
;
to select.
Use
;
to pause recording at any time. Push
;
again to resume recording.
Push the : button to begin recording.
The current recording destination and record time will
appear on screen. Push and hold the
; button to
enter into the Recording function's menu at any time.
Push the button within the recording menu to im-
mediately save the recording.
Files will be named like so: FILE0001.WAV. The le
number is increased by 1 for each new recording.
As the PA2040 records in WAV format, we strongly suggest
using larger USB ash drives for recording purposes.
Record
FMMSC RE SYSC
Record
USB
Rec
00:00:10
Radio
C06
Rec
91.7MHz
USBUSB
Insert a FAT-32 formatted USB ash drive. This will
automatically allow you to record directly to the USB
ash drive.
Page 16
PA2040 User's Manual
NEUTRIK
NEUTRIK NEUTRIK
NEUTRIK
HEADPHONES
KEYBOARD
USB FLASH DISC
MICROPHONES
CD OR MP3
PLAYER
ADDITIONAL MIXER
16 ohms 16 ohms 16 ohms16 ohms
LOW-IMPEDANCE SPEAKERS
DISTRIBUTED LINE INSTALLATIONS
SURFACE MOUNT OR CEILING SPEAKERS
APPLICATION
Page 17
PA2040
NEUTRIK
NEUTRIK NEUTRIK
NEUTRIK
HEADPHONES
KEYBOARD
USB FLASH DISC
MICROPHONES
CD OR MP3
PLAYER
ADDITIONAL MIXER
16 ohms 16 ohms 16 ohms16 ohms
LOW-IMPEDANCE SPEAKERS
DISTRIBUTED LINE INSTALLATIONS
SURFACE MOUNT OR CEILING SPEAKERS

Page 18
PA2040 User's Manual
SPECIFICATIONS
POWER AMP, Output Power in Watts (@THD<0.5%, 1KHz) Zone Outputs: 200W (100V)
Low Impedance Output: 200W @ 4 ohms
Variable Digital Echo with Speed and Repeat
Combo Mic Inputs 2
Line Input Channel 1
Master Graphic EQ Bass and Treble Control
Noise (20Hz to 20KHz bandwidth, IHF-A weighted, line inputs to main output)
Master Output, all channel level at min. <-78dBu
Power Amp Output, all channel level at min. <-63dBu
THD+N
Power Output, 1KHz, 20Hz to 20KHz. <0.5% @ 200 watts, 4 ohms each CH
Any Output, 1KHz @ +14dBu, 20Hz to 20KHz, Channel Inputs. <0.3%
CMRR (1 KHz @ -60dBu, Gain at maximum) 80dB
Crosstalk (1KHz @ 0dBu, 20Hz to 20KHz bandwidth, channel in to main output)
Channel level @ min., other channels at unity <-66dB
Frequency Response (Mic input to output)
20Hz ~ 20KHz, line level o/p @ +4dBu into 600 ohms +1/-2dB
20Hz ~ 20KHz, power amp o/p 1 watt into 8 ohms +1/-2dB
Maximum Level
Mic Preamp Input +10dBu
All Other Inputs +22dBu
Unbalanced Outputs +22dBu
Speaker Impedance 4Ω-16Ω / low impedance output
USB Recorder Large LCD w/4-button control
Files Playback .MP3, .WAV
Recording Format .WAV
Bluetooth 2.4 GHz Audio Stream
Microphone Preamp E.I.N.
150 ohms terminated, max. gain <-122dBm
Power Consumption )average maximum( 200 Watts
Power Requirement )depends on region( 220VAC 50Hz
Dimensions )WxHxD( 471 x 205 x 275 mm
Net Weight 8.6 Kg

Page 19
PA2040
MEMO

WWW.ECHOCHANG.COM
WWW.ECHOCHANG.IR
No. 224, Echo Chang Building Keshavarz Blvd, 14177 Tehran, Iran
Tel: +98 21 88959010, 88961413 Fax: +98 21 88959252
Table of contents
Other Echo Chang Music Mixer manuals


