Echo Chang iMX 6060 User manual

USER'S MANUAL
6-Channel, 3 x 500W Professional Powered Mixer

1. Read these instructions before operating this
apparatus.
2. Keep these instructions for future reference.
3. Heed all warnings to ensure safe operation.
4. Follow all instructions provided in this document.
5. Do not use this apparatus near water or in locations
where condensation may occur.
6. Clean only with dry cloth. Do not use aerosol or liquid
cleaners. Unplug this apparatus before cleaning.
7. Do not block any of the ventilation openings. Install
in accordance with the manufacturer
’
s instructions.
8. Do not install near any heat sources such as radiators,
heat registers, stoves, or other apparatus (including
.
9. Do not defeat the safety purpose of the polarized or
grounding-type plug. A polarized plug has two blades
with one wider than the other. A grounding type plug
has two blades and a third grounding prong. The wide
blade or the third prong is provided for your safety. If
the provided plug does not into your outlet, consult
an electrician for replacement of the obsolete outlet.
10. Protect the power cord from being walked on or
pinched particularly at plug, convenience receptacles,
and the point where they exit from the apparatus.
11. Only use attachments/accessories by the
manufacturer.
12. Use only with a cart, stand, tripod, bracket, or
table by the manufacturer, or sold with
the apparatus. When a cart is used, use caution
when moving the cart/apparatus
combination to avoid injury from tip-
over.
13. Unplug this apparatus during lighting
storms or when unused for long
periods of time.
14. Refer all servicing to service personnel.
Servicing is required when the apparatus has been
damaged in any way, such as power-supply cord or
plug is damaged, liquid has been spilled or objects
have fallen into the apparatus, the apparatus has
been exposed to rain or moisture, does not operate
normally, or has been dropped.
IMPORTANT SAFETY INSTRUCTIONS
CAUTION: TO REDUCE THE RISK OF ELECTRIC SHOCK,
DO NOT REMOVE COVER (OR BACK)
NO USER SERVICEABLE PARTS INSIDE
REFER SERVICING TO QUALIFIED PERSONNEL
The lightning flash with arrowhead symbol, within an
equilateral triangle, is intended to alert the user to the
presence of uninsulated
“
dangerous voltage
”
within the
product
’
magnitude to constitute a risk of electric shock to persons.
The exclamation point within an equilateral triangle is in-
tended to alert the user to the presence of important operat-
ing and maintenance (servicing) instructions in the literature
accompanying the appliance.
WARNING: To reduce the risk of or electric shock, do
not expose this apparatus to rain or moisture.
CAUTION: Use of controls or adjustments or performance
of procedures other than those may result in
hazardous radiation exposure.
The apparatus shall not be exposed to dripping or splashing and that no objects with liquids, such as vases,
shall be placed on the apparatus. The MAINS plug is used as the disconnect device, the disconnect device shall
remain readily operable.
Warning: the user shall not place this apparatus in the area during the operation so that the mains switch
can be easily accessible.
CAUTION
RISK OF ELECTRIC SHOCK
DO NOT OPEN
1
2
3
4
220 5
50
6
40
7
8
9
10
WARNING: To reduce the risk of fire or electric shock,
do not expose this apparatus to rain or moisture.
CAUTION: Use of controls or adjustments or
performance of procedures other than those specified
may result in hazardous radiation exposure.
The lightning flash with arrowhead symbol,
within an equilateral triangle, is intended to
alert the user to the presence of uninsulated
"dangerous voltage" within the product's
enclosure that may be of sufficient magnitude
to constitute a risk of electric shock to persons.
The exclamation point within an equilateral
triangle is intended to alert the user to
the presence of important operating and
maintenance (servicing) instructions in the
literature accompanying the appliance.
1. Read these instructions before operating this
apparatus.
2. Keep these instructions for future reference.
3. Heed all warnings to ensure safe operation.
4. Follow all instructions provided in this document.
5. Do not use this apparatus near water or in locations
where condensation may occur.
6. Clean only with dry cloth. Do not use aerosol or liquid
cleaners. Unplug this apparatus before cleaning.
7. Do not block any of the ventilation openings. Install
in accordance with the manufacturer
’
s instructions.
8. Do not install near any heat sources such as radiators,
heat registers, stoves, or other apparatus (including
.
9. Do not defeat the safety purpose of the polarized or
grounding-type plug. A polarized plug has two blades
with one wider than the other. A grounding type plug
has two blades and a third grounding prong. The wide
blade or the third prong is provided for your safety. If
the provided plug does not into your outlet, consult
an electrician for replacement of the obsolete outlet.
10. Protect the power cord from being walked on or
pinched particularly at plug, convenience receptacles,
and the point where they exit from the apparatus.
11. Only use attachments/accessories by the
manufacturer.
12. Use only with a cart, stand, tripod, bracket, or
table by the manufacturer, or sold with
the apparatus. When a cart is used, use caution
when moving the cart/apparatus
combination to avoid injury from tip-
over.
13. Unplug this apparatus during lighting
storms or when unused for long
periods of time.
14. Refer all servicing to service personnel.
Servicing is required when the apparatus has been
damaged in any way, such as power-supply cord or
plug is damaged, liquid has been spilled or objects
have fallen into the apparatus, the apparatus has
been exposed to rain or moisture, does not operate
normally, or has been dropped.
IMPORTANT SAFETY INSTRUCTIONS

TABLE OF CONTENTS
POWERED MIXER
INTRODUCTION 4
FEATURES 5
GETTING STARTED 5
FRONT PANEL 6
BACK PANEL 14
USB PLAYER 15
SPECIFICATIONS 17
APPLICATION 18
iMX

Page 4
iMX6060 User's Manual
Introduction
Congratulations on your purchase of the EchoChang
iMX6060 Powered Mixer. The iMX6060 is built into a
rugged construction casing for heavy-duty use and
contains numerous built in features to make your
mixing experience a memorable one. In order to
get the best performance from the mixer, we advise
you to read all safety and operation instructions
before use, and keep this manual handy for future
reference.
1338
SENPRINI200 1341
ECHO CHANG 1358
!
!

Page 5
iMX6060
Features
4Three 500 Watt power ampliers
45 input channel mixer
4Additional microphone input sent to line-level
'Record' outputs and USB recorder
4Built-in USB recorder / player
4Tube circuit available on channels 1 and 2
48-preset DSP eects with 24-bit processing and
two main parameter controls (speed and repeat)
4Wireless bluetooth connectivity through channel 5
47-band Main EQ control for the Master mixes
4Treble/bass EQ controls on each input channel
4+48V phantom power for condenser mics (Mic 6)
4Super Hi-Z inputs and stereo line inputs
4Headphone output with volume control
4Rugged steel case
Getting Started
1. Before turning the power on, the Master output
control should be set to -∞.
2. Always turn the power o before connecting or
disconnecting cables.
3. Check the AC outlet to ensure it is of a suitable
voltage before connecting the AC plug of this
device.
4. Do not obstruct the back panel due to the heatsink
and air vents needing ventilation.
5. Please ensure the distance between the back of
the iMX6060 and the wall is over 1.5 feet to ensure
the device gets the ventilation which it needs.
6. Do not touch the heat-sink when the mixer is in
use as it can get extremely hot.
STEREO 500W •
•
USB •
ECC83S •
•
A,B,C 7 •
DSP 8 •
24 STEREO
6 •
HI-Z •
5 BLUETOOTH •
•
•
-1
MASTER A, B, C
-2
-3
220
-4
-5
40
"
-6
"

Page 6
iMX6060 User's Manual
FRONT PANEL
1. Treble Control
Turn to the right to boost high frequencies, adding
crispness to percussion from drum machines,
cymbals, and synthesizers. Turn to the left to cut
these frequencies, reducing the possibility of
sibilance or hissing. The control has a shelving
response giving 15dB of boost or cut at 12 kHz.
5. Volume Control
The volume control determines the proportion of
the channel signal to the mix, and provides a clear
visual indication of channel level.
TREBLE
PEAK/SIG
PEAK
SIG
BASS
ECHO
2. Bass Control
Turn to the right to add warmth to vocals or extra
punch to guitars, drums and synthesizers. Turn to
the left to reduce stage rumble, hum or to improve
any mushy sounds. The control has shelving
response giving 15dB of boost or cut at 80Hz.
3. Echo Control
This knob feeds the channel signal to the built-
in digital eects after the volume control, and will
therefore fade up and down not only by the setting
of the echo control, but also by use of the channel’s
volume control.
4. Peak & Signal Indicators
These colored LED indicators will illuminate red or
green depending on the state of the channel. When
the green LED lights up, this means a signal is being
fed into the channel. When the signal reaches high
peaks – 4 dB before being dynamically clipped – the
red LED will illuminate.
1
4
2
5
3
1
2
3
5
4

Page 7
iMX6060
6. Gain Control
This control adjusts the sensitivity of the microphone
input jack. On Channels 1 & 2, this normally is set
to the center spot (it clicks into place). If the input
PEAK LED keeps lighting up, simply turn a little to
left to minimize the possible distortion!
7. XLR Jacks
These inputs accept typical XLR-type connectors
for low impedance microphones.
XLR Jacks
XLR
ECHOCHANGiMX6060
6060
WIRELESS READY
5
GAIN
21
PEAKGAIN
GAIN
VOLUME
GAIN
GAIN
8. Bluetooth (BT) ON/OFF and Indicator
Push this button to activate the Bluetooth streamining
function of the iMX6060. The iMX6060 will then be
available as ECHOCHANGiMX6060 in your BT-
enabled devices. Activate with the password: 6060.
The audio will be sent through channel 5. The
"Wireless Ready" indicator will light up when the
Bluetooth function is activated.
BLUETOOTH NAME: ECHOCHANGiMX6060
PASSWORD: 6060
ECHOCHANGiMX6060:
6060:
7
8
6
iMX6060
iMX6060
iMX6060
6
7
8

Page 8
iMX6060 User's Manual
11. Master A Control
The Master A control determines the nal level of
the Master A bus, the output of which is sent through
the Master A speaker outputs.
10. Stereo Line Inputs
Channel 5 features stereo line-level devices (such
as keyboards, synthesizers, or rhythm boxes) can
be connected to the Line inputs. The Line inputs
are unbalanced, and are compatible with line-level
devices with 600Ω output impedances.
5
RL¼
CD
5
A, B, C7
60-360Hz
7-16KHz2.5-7KHz
A, B, C
MASTER A
A
A
MASTER B
B
B
10
14
11
12
14. Graphic Equalizer
These 7 band graphic equalizers allow the user to
independently adjust the frequency response of the
Master A, B and C signals. The graphic equalizer
sprovide a maximum of 12 dB of cut or boost on each
frequency (60, 120, 360, 1K, 2.5K, 7K & 16K Hz).
12. Master B Control
The Master B control determines the nal level of
the Master B bus, the output of which is sent through
the Master B speaker outputs.
10
MASTER C
C
C
13
13. Master C Control
The Master C control determines the nal level of
the Master C bus, the output of which is sent through
the Master C speaker outputs.
34
SUPER Hi-Z
9. Super Hi-Z 1/4” Inputs
The Super Hi-Z (470K ohms) input is best suited for
direct input of acoustic electric guitar, electric guitar
or bass guitar. The 1/4” phone jacks of the Super
Hi-Z are unbalanced, while the Low-Z is balanced.
9
9

Page 9
iMX6060
18. Power Indicator
This small LED indicates whether the iMX6060 has
a power source connected to the device, and is
currently activated.
16. Lamp On
The LAMP switch, to the right of the mixer face, will
turn the backlight of the VU meters on and o.
17. Peak LED
The Peak LED illuminates to show the built-in limiter
circuit in the power amplier is activated. The limiter
is used to prevent excessive input levels to the
amplier. When the Peak LED is on continuously it
is advised that users lower the master level control
level.
LED
LAMP ON SWITCH
LED PEAK
VU LEVEL METERS
DISTORTION
18
16
17
15
15. VU Level Meters
The iMX6060 features contemporary-styled VU
level meters to show the output levels of Masters
A, B and C. The meters give users a constant visual
warning of excessive peaks in signals that might
cause overloading. Adjusting the output level control
to allow the indicator arm to occasionally sit around
(or before) the 0 position will ensure you get little
to no distortion while maintaining a high quality of
audio.
11 12
14
17
13
15
16
18

Page 10
iMX6060 User's Manual
ECHO 1
ECHO 2
ECHO
QURAN
REVERB
DUET
PING PONG
PING PONG+DELAY 2
19. Echo Return
Echo return control adjusts the level of the processed
eect sounds returned from the built-in digital eect
processor to the Master A, B and C mixes. Eects
are in stereo so left signals will be sent to Master A
while right signals will be sent to Master B and C.
22. Repeat Control
The Repeat control allows users to add a single (or
up to 10) repeat to the Echo and Duet eects.
21. Speed Control
Speed Parameter control allows users to adjust the
eect speed or decay time to their liking (from the
left position, which is the slowest, to the right, which
speeds the eect up).
ECHO RTN
PROGRAM
ECHO1, ECHO2, ECHO, QURAN, REVERB, DUET,
PING PONG+DELAY, PING PONG
SPEED
REPEAT
ECHO ON "
""
19
20
21
22
23
20. Program Control
Using the program knob allows users to jump
between the dierent eects that can be applied
to the mix. Their selection is accompanied by an
illuminated LED.
The ECHO/EFFECT ON button located on the front
panel must be pushed in to use any of the eects.
The accompanying LED will light up when the
eects are turned on.
DIGITAL EFFECTS PROCESSOR
20
21
22
19
23

Page 11
iMX6060

Page 12
iMX6060 User's Manual
26. Record Button
Push and hold this button for 2 seconds to initiate
recording. Recording will begin in pause mode,
and users can push the play/pause button to begin
recording. Files will be recorded in MP3 format at
128 or 192 kHz sampling rates by default.
The iMX6060 features a fantastic USB recording and
playback feature that allows users to record MP3
les directly from the main signal of the mixer. Users
can also playback MP3 and WMA les from properly
formatted USB ash drives. All signals from the USB
player are controlled by the USB LEVEL control.
24. Display
This screen will show the USB recorder’s current
status and le properties.
25. USB Port
Connect your USB ash drives here. Flash drives can
be used to record to or for playback of MP3 or WMA
les.
USB
WMAMP3
REC
REC
001
4
4
/ MENU
:
0004321
USB
USB
USB
USB
FAT-32
XP
USB
24
26
25
27
27. Back/Next Buttons
Pushing these buttons will allow users to skip back
and forwards between tracks in sequence. Please
note that these buttons cannot be held down to fast-
forward/rewind through tracks.
USB PLAYER & RECORDER
USB
24
25
26 28
27 29
30

Page 13
iMX6060
29. Stop/Menu Button
This button will stop the currently playing or
recording track. Keep pushing this button will bring
up the main menu where users can set repeats
or delete les. This button also works as a ‘back’
button when navigating menus.
30. USB Level Control
This rotary control adjusts the nal output level from
the USB playback module. It determines the signal
level sent to the Master A and B outputs.
31. Phones Output and Control
This sends the main signal to headphones for
monitoring purposes. Also included is a level control,
allowing users to adjust the volume to their liking.
4
4
4
/ MENU
4
REC
USB–
USB
/ MENU
DELETE , REPEAT
DELETE
4
USB–
USB
/ MENU
DELETE , REPEAT
REPEAT
REPEAT ONE
REPEAT ALL
USB LEVEL
USB
28
29
30
31
28 31
27 29
30
28. Play/Pause Button
Push this button to start and stop playback and
recording of the currently displayed track. Starting
a track after it is paused will resume the track from
the point at which it was paused (in both record and
playback mode). When in recording mode, push
and hold this button to nalize recordings. When
in playback mode, pushing and holding this button
will revert back to the rst track on the USB memory
card.
Page 14
iMX6060 User's Manual
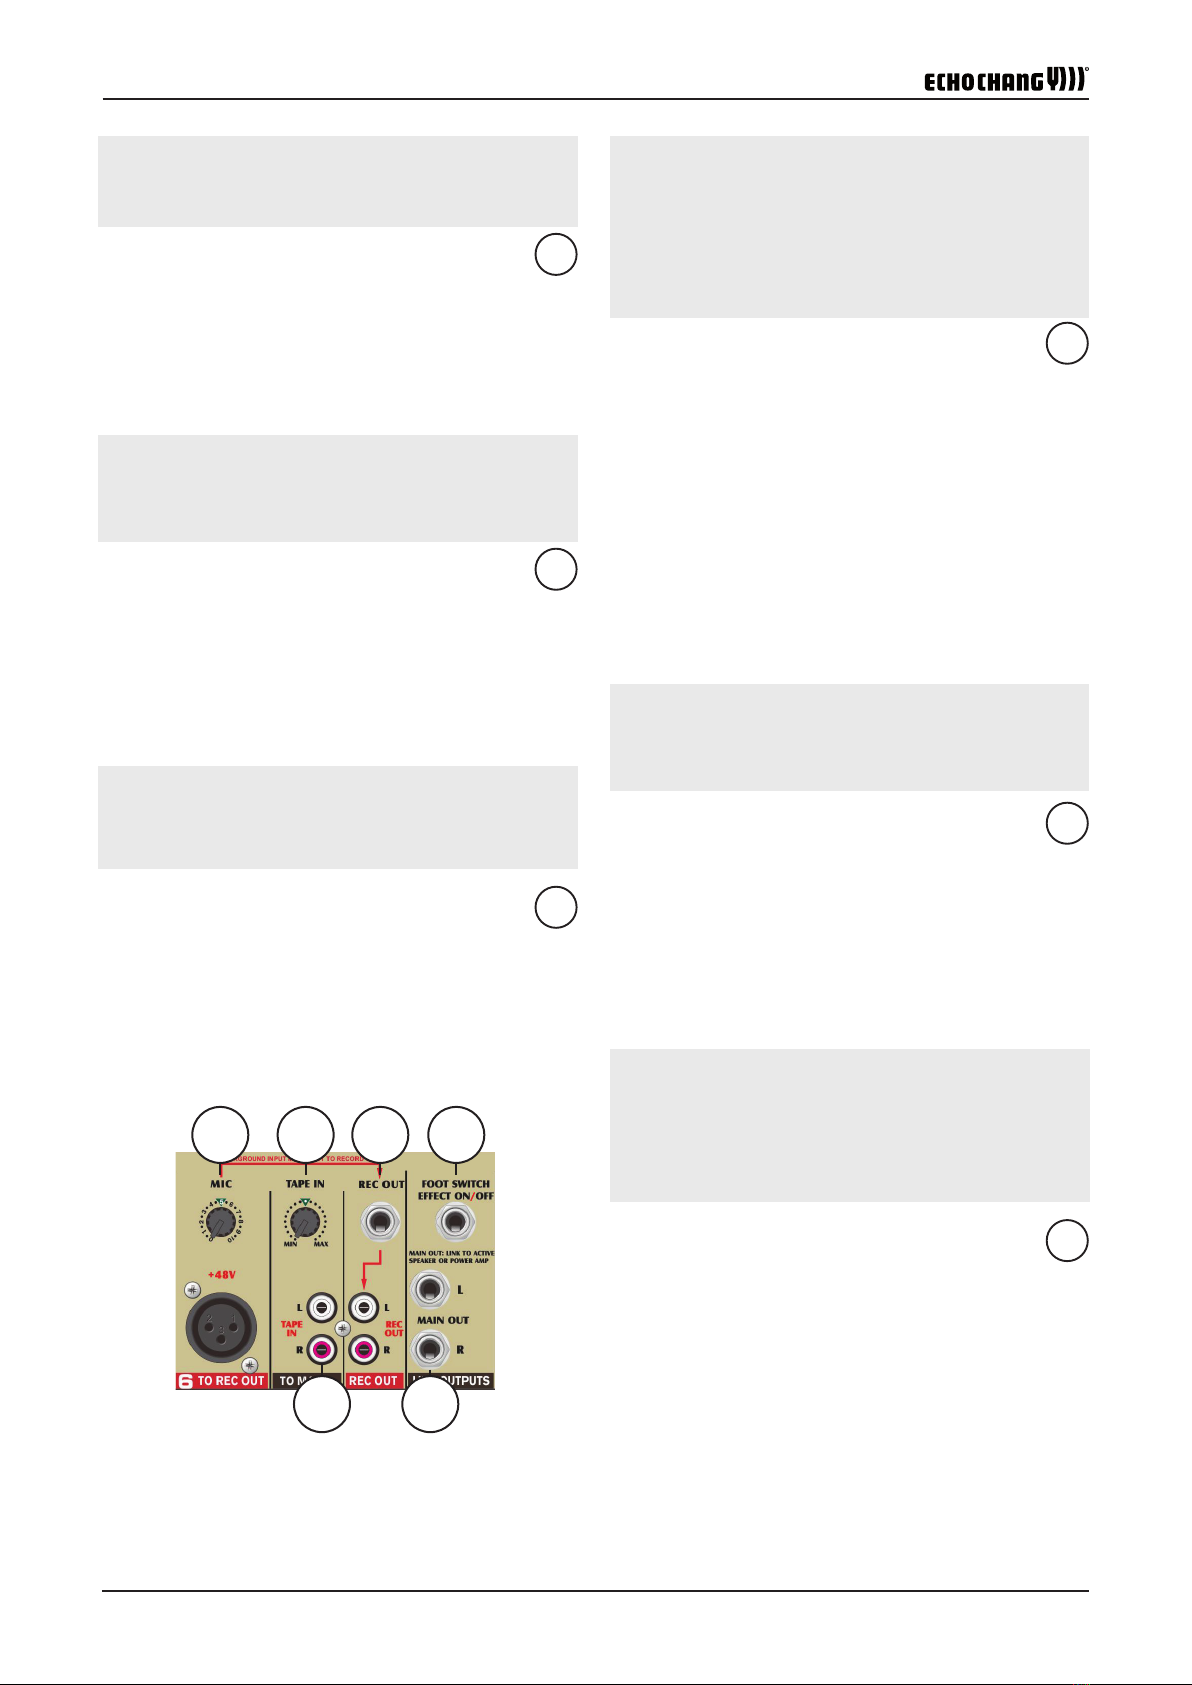
34. Rec Output and Trim
Record Output using RCA and ¼” sockets which
provide signal output (pre-master fader) for cassette
decks and home audio equipment. The small trim
control allows the output level to be adjusted to
match recording levels.
35. Tape In
These RCA inputs allow the cassette recorder or CD
players to be added to the Master A and B outputs.
36. Main Output
This sends line level signals (before the Master A and
B controls) from the mixer to external devices, such
as power ampliers or powered monitors.
37. Footswitch
This 1/4" phone jack is for a standard non-latching
type footswitch. Using a footswitch with this jack will
allow users to turn the EFX on and o.
(CD)
( )
TAPECD
IN
MAIN OUTPUT
(BACKGROUND MONITOR)
32. Mic Input and Control
This XLR input will allow an additional condensor
microphone to be connected to the iMX6060. This
signal will then be sent to the line-level "Record"
outputs, but will not be sent through to the speakers.
The included knob adjusts the signal level from the
mic input.
33. Tape In Control
This rotary control adjusts the nal output level from
the RCA Tape Inputs (point 34). It determines the
signal level sent to the Master A and B outputs.
REC OUT
CD RECORDER
5
PCM88
REC OUT
Tape Input Control
TAPE IN
CD
34
32
33
35
36
37
32 33 34 37
35 36

Page 15
iMX6060
One Speaker Connection
A single speaker with impedance between 4Ω and
8Ω can be connected to any jack of each of the
Master A, B and C speaker outputs (peak output is
1000W+1000W+1000W at 4Ω).
BACK PANEL
38. Speaker Output Jacks (Power Amps A, B and C)
Speakers can be connected to these jacks. The
iMX6060 includes a three-channel power amp, and
there are two ways in which the speakers can be
connected to the iMX6060.
16 16 16 16
+
----
-
++++
4 ohms
PARALLEL CONNECTION
16 (Impedance) ÷ 4 (Speakers Quantity) = 4 ohms (Total Impedance)
Two Speaker Connection
Two 8Ω to 16Ω speakers can be connected to Power
Amp A, two more to Power Amp B and two more for
Power Amp C for a grand total of six speakers.
8 (Impedance) ÷ 2 (Speakers Quantity) = 4 ohms (Total Impedance)
A, B, C
3 iMX6060
1688 4
8 41
842A B C
3
2 16 82
84A B C
38
38

Page 16
iMX6060 User's Manual
More on the USB Recorder
Playback of Files
If no USB medium is connected to the USB recorder, the screen
will display “NO DEVICE”. After connecting a USB ash drive the
USB recorder will take a few seconds to read les on the disc.
Users can then navigate either les recorded by the USB record-
er (“Recorded”) or their own MP3 or WMA les (“Files”). Use the
Reverse/Cue buttons to navigate up and down this menu and the
Play/Pause button to enter. Within the Files menu, directories are
indicated by an “F” icon while les are indicated by a musical note.
When scrolling through les, users can hold the Reverse/Cue but-
tons to scroll faster after 4 seconds. Press Play/Pause to play a
track. When a track is playing, press the Reverse or Cue buttons
to cue the previous or next track, hold the Reverse or Cue buttons
to skip backwards or forwards through tracks, push the Play/Pause
button to pause playback or the Stop/Menu button to stop playback.
Playback Display
During playback the screen will show the following properties:
File Type (MP3 or WMA)
Sample Rate
Status (Play or Pause)
Time (Minutes and Seconds)
Track Details (Name, Artist and Album)
40. AC Power Inlet
Insert one end of the included AC power cable
into this slot, and the other end into an appropriate
AC power outlet. Be sure to check local voltage
levels before attempting to use this device.
39. Power Switch
This switch turns the power of the iMX6060 on
and o.
NOTE: Before turning the EMX606 on or o, turn down the
MASTER controls of Master A, B and C, and ensure the AC
outlet is of a suitable voltage.
POWER SWITCH
MASTER A, B, C
AC POWER INLET
220
) NO DEVICE
(
READING () USB
()
()
4
4
WMAMP3
39
40
USB
39 40

Page 17
iMX6060
Repeat Mode
To activate repeat, push and hold the Stop/Menu button. Select
“Repeat” from the menu using the Play/Pause button. Use the
Reverse/Cue buttons to scroll through the various repeat options.
Repeat options include No Repeat, Repeat One, Repeat All and
Repeat Directory. Repeat can be set during playback without af-
fecting the audio.
Recording an MP3
Push and hold the Record button for 2 seconds to start recording.
Recording will begin in pause mode. Push the Play/Pause but-
ton to begin recording. You can push this button again to pause
mid-recording. Push the Stop/Menu button to nalize the record-
ing. Do not remove your USB media when the screen displays
“LOADING” as the USB recorder is writing your le to the USB
drive. Files will be named REC__001.MP3 where the le number
is increased by 1 for each new recording.
Changing the Recording Sample Rate
Push and hold the Record button for 4 to 5 seconds to change the
recording sample rate. When you do so, the two available sample
rates will appear on screen: 128 kHz and 192 kHz. Push the record
button again to swap the sampling rate. Wait a couple of seconds
and the menu will automatically exit.
Deleting a File
Whenever a le is highlighted users can push and hold the Stop/
Menu button for at least 1 second to access the menu. Use the cue
button to scroll down to “DELETE” and push the Play/Pause button
to accept. Press the Play/Pause button again to conrm deletion or
the Stop/Menu button to decline.
USB
USB
/ MENU
DELETE , REPEAT
DELETE
4
REC
128192
:
192
192KHz
REC
001
4
4
/ MENU
USB
USB
MENU
DELETE , REPEAT
REPEAT :
REPEAT ONE
REPEAT ALL

Page 18
iMX6060 User's Manual
iMX6060
Average Output Power (@THD<0.5%, 1KHz) 3 x 500W @ 4 ohms
Peak Output Power 3 x 1000W @ 4 ohms
Built-in Digital Eect Processor 8 programs with speed and repeat controls
Range ±15dB
Noise (20Hz to 20KHz bandwidth, IHF-A weighted, line inputs to main output)
Master output, all channel level at min. <-78dBu
Power amp output, all channel level at min. <-63dBu
THD+N
Power output, 1KHz, 20Hz to 20KHz. <0.5% @ 250 Watts, 4 ohms
Any output, 1KHz @ +14dBu, 20Hz to 20KHz, channel inputs. <0.3%
CMRR (1 KHz @ -60dBu, Gain at maximum) 80dB
Crosstalk (1KHz @ 0dBu, 20Hz – 20KHz bandwidth, channel in to main output)
Channel level @ min., other channels at unity <-63dB
Frequency Response (Mic input to output)
20Hz to 20KHz, line level o/p @ +4dBu into 600 ohms +0/-2dB
20Hz to 20KHz, power amp o/p 1 watt into 8 ohms +0/-2dB
Maximum Level
Mic preamp input +10dBu
All other inputs +22dBu
Unbalanced outputs +22dBu
Impedance
Mic input 2.2K ohms
Hi-Z input 5K ohms
Super Hi-Z input 470 ohms
All other inputs >10K ohms
RCA 2T outputs 1.2K ohms
All other outputs 560 ohms
Microphone Preamp E.I.N.
150 ohms terminated, max. gain <-122dBm
Power Consumption (average maximum) 330 watts
Power Requirement 220VAC 50Hz
Dimensions (WxHxD) 420 x 405 x 166 mm (16.5” x 15.9” x 6.5”)
Net Weight 15 kg ( 33 lbs)
SPECIFICATIONS

Page 19
iMX6060
APPLICATION
Main Speakers
Additional PA System
RECORDER
(CASSETTE, DAT, MD)
CD PLAYER
KEYBOARD
MICROPHONE
BACKGROUND
MICROPHONE
HEADPHONES
FOOTSWITCH
USB FLASH DRIVE
ELECTRIC GUITAR
POWER AMPLIFIER
8Ω–16Ω 8Ω–16Ω8Ω–16Ω 8Ω–16Ω8Ω–16Ω 8Ω–16Ω

Head O
ff
ice: No.224, Echo Chang Building .Keshavarz Blvd, 14177 Tehran , IranTel: +98 21 88959010,88961413 Fax: + 98 21 88959252
WWW.ECHOCHANG.COM
www.echochang.ir
Table of contents
Other Echo Chang Music Mixer manuals


