Eckman Elite EKETC01E User manual

1
ELECTRIC TELESCOPIC HEDGE TRIMMER AND BRANCH LOPPER
SET MODEL EKETC01E
INSTRUCTION MANUAL
回
PLEASE READ AND SAVE THESE INSTRUCTIONS FOR FURTHER REFERENCE!
ANY QUESTIONS OR PROBLEMS? Please call the ECKMAN Helpline on: 0844 441 3011 or go to www.ECKMAN.co.uk

2
Contents
I. Technical Data...................................................................................... 3
II. Intended Use....................................................................................... 4
III. Explanation of Symbols on Your Product........................................... 4
IV. Safety Instructions............................................................................. 5-9
V. Part Identification.............................................................................. 10
VI. Assembly........................................................................................... 11-15
VII. Application Range............................................................................ 16
VIII. Connection…................................................................................... 16
IX. Operation.......................................................................................... 16-18
X. Maintenance and Servicing................................................................ 19
XI. Guarantee......................................................................................... 19
XII. EC Declaration of Conformity............................................................20
XIII. Exploded View & Parts List...............................................................21-24

3
I. Technical Data
Factory Model/Eckman Model
M1E-8ET-410 M1L-4ET-250/EKETC01E
Voltage/Frequency
230V-240V~/50Hz
Input Power
450W/600W
No load speed (Hedge trimmer
/Branch Lopper) RPM
1600/min ./6500/min
Noise emission value LWA
(Hedge trimmer /Branch Lopper)
measured 95dB(A) /102 dB(A)
Hand / arm vibration a vhw
(Hedge trimmer /Branch Lopper)
< 2.52 m /s2 /< 2.27 m /s2
Overall Length (Hedge trimmer
/Branch Lopper)
2.85m /3.25m
Length of cutter blade (Hedge
trimmer /Branch Lopper)
460mm/250mm
Set Net Weight(without power
cord)
6.45Kgs
Branch Lopper Chain and Bar
10 inch Oregon Chain(gauge:0.05”,pitch:3/8”, 40
links)and Oregon Bar with SDS bar cover
Maximum Diameter Cut of The
reciprocating Hedge Trimmer
blade
15mm/1/2”
Weight of hedge trimmer with
handle / weight of branch lopper
with handle
3.95KGS/3.75KGS
Minimum reach of hedge
trimmer / minimum reach of
lopper
2.35m/2.75m
Blade Adjustment Degrees
(Hedge trimmer /Branch Lopper)
+60° to -80°/0° to 30°
Length of Power Cable
10m cord with BS plug

4
II. Intended Use
This 2-in-1 Trimmer and Lopper is intended for the cutting of hedges, shrubs, branches and grass
coverings in private domestic gardens and allotments. If used for purposes other than those
intended, this will invalidate your guarantee.
III. Explanation of Symbols on your product
WARNING !
Read the user instructions carefully to make sure you understand all the
controls and what they do.
Remove plug from the mains immediately if the cable is damaged or cut.
Do not expose to rain.
Do not leave the product outdoors while it is raining.
The use of eye protection is recommended.

5
IV. Safety Instructions
•If this product is not used properly it can be dangerous. The warnings and
safety instructions must be followed to ensure reasonable safety and
efficiency in using this product. The operator is responsible for following
the warnings and instructions in this manual and on the product. Never
use the product unless the guards provided by the manufacturer are in the
correct position.
•For safety reasons, children under the age of 16 and people not familiar
with these operating instructions must not use this 2-in-1 Trimmer and
Lopper. Persons with reduced physical or mental abilities may use the
telescopic hedge trimmer only if they are supervised or instructed by a
responsible person.
General Power Tool Safety Warnings
WARNING! Read all safety warnings and all instructions. Failure to follow the warnings
and instructions may result in electric shock, fire and /or serious injury.
•Save all warnings and instructions for future reference.
The term “power tool” in the warnings refers to your mains operated (corded) power tool or battery
operated (cordless) power tool.
Work area safety
a) Keep work area clean and well lit- Cluttered or dark areas invite accidents.
b) Do not operate power tools in explosive atmospheres, such as in the presence of flammable
liquids, gases or dust- Power tools create sparks which may ignite the dust or fumes.
c) Keep children and bystanders away while operating a power tool- Distractions may cause an
accident.
Electrical safety
a) Power tool plugs must match the outlet. Never modify the plug in any way. Do not use any
adaptor plugs with earthed (grounded) power tools- Unmodified plugs and matching outlets will
reduce risk of electric shock.
b) Avoid body contact with earthed or grounded surfaces, such as pipes, radiators, ranges and
refrigerators- There is an increased risk of electric shock if your body is earthed or grounded.

6
c) Do not expose power tools to rain or wet conditions- Water entering a power tool will increase
the risk electric shock.
d) Do not abuse the cord. Never use the cord for carrying, pulling or unplugging the power tool.
Keep cord away from heat, oil, sharp edges or moving parts- Damaged or entangled cords increase
the risk of electric shock.
e) When operating a power tool outdoors, use an extension cord suitable for outdoor use- Use of a
cord suitable for outdoor use reduces the risk of electric shock.
f) If operating a power tool in a damp location is unavoidable, use a residual current device (RCD)
protected supply- Use of an RCD reduces the risk of electric shock.
Personal safety
a) Stay alert, watch what you are doing and use common sense when operating a power tool. Do
not use a power tool while you are tired or under the influence of drugs, alcohol or medication- A
moment of inattention while operating power tools may result in serious personal injury.
b) Use personal protective equipment. Always wear eye protection- Protective equipment such as
dust mask, non-skid safety shoes, hard hat, or hearing protection used for appropriate conditions
will reduce personal injuries.
c) Prevent unintentional starting. Ensure the switch is in the off-position before connecting to
power source and/or battery pack, picking up or carrying the tool- Carrying power tools with your
finger on the switch or energising power tools that have the switch on can cause an accident.
d) Remove any adjusting key or wrench before turning the power tool on- A spanner or an allen
key left attached to a rotating part of the power tools may result in personal injury.
e) Do not overreach. Keep proper footing and balance at all times- This enables better control of
the power tool in unexpected situations.
f) Dress properly. Do not wear loose clothing or jewellery. Keep your hair, clothing and gloves
away from moving parts- Loose clothes, jewellery or long hair can be caught in moving parts.
g) If devices are provided for the connection of dust extraction and collection facilities, ensure
these are connected and properly used- Use of dust collection can reduce dust-related hazards.
Power tool use and care
a) Do not force the power tool. Use the correct power tool for your application- The correct power
tool will do the job better and safer at the rate for which it was designed.
b) Do not use the power tool if the switch does not turn it on and off- Any power tool that cannot
be controlled with the switch is dangerous and must be repaired.
c) Disconnect the plug from the power source and/or the battery pack from the power tool before
making any adjustments, changing accessories, or storing power tools- Such preventive safety
measures reduce the risk of starting the power tool accidentally.

7
d) Store idle power tools out of the reach of children and do not allow persons unfamiliar with the
power tool or these instructions to operate the power tool- Power tools are dangerous in the
hands of untrained users.
e) Maintain power tools. Check for misalignment or binding of moving parts, breakage of parts
and any other condition that may affect the power tool’s operation. If damaged, have the power
tool repaired before use- Many accidents are caused by poorly maintained power tools.
f) Keep cutting tools sharp and clean- Properly maintained cutting tools with sharp cutting edges are
less likely to bind and are easier to control.
g) Use the power tool, accessories and tool bits etc. in accordance with these instructions, taking
into account the working conditions and the work to be performed- Use of the power tool for
operations different from those intended could result in a hazardous situation.
Service
•Have your power tool serviced by a qualified repair person using only identical replacement
parts- This will ensure that the safety of the power tool is maintained.
2-in-1 Trimmer and Lopper safety warnings
• Keep all parts of the body away from the cutter blade. Do not remove cut material or hold
material to be cut when blades are moving. Make sure the machine is unplugged from the power
supply when clearing jammed material- A moment of inattention while operating either trimmer
may result in serious personal injury.
• Carry the 2-in-1 Trimmer and Lopper by the handle with the cutter blade stopped. When
transporting or storing the 2-in-1 Trimmer and Lopper always fit the cutting device cover- Proper
handling of the pole hedge trimmer and branch lopper will reduce possible personal injury from the
cutter blades.
• Hold the power tool by insulated gripping surfaces only, because the cutter blade may contact
hidden wiring or its own cord- Cutter blades contacting a “live” wire may make exposed metal parts
of the power tool “live” and could give the operator an electric shock.
• Keep cable away from the cutting area- During operation the cable may be hidden in shrubs and
can be accidentally cut by the blade.
Additional Safety Recommendations
Work area safety
•Only use the product in the manner and for the functions described in these instructions. The
operator or user is responsible for accidents or hazards occurring to other people or their property.
Electrical safety

8
•The British Standards Institute recommends the use of a Residual Current Device (R.C.D.) with a
tripping current of not more than 30mA. Check your R.C.D. every time you use it. Before use,
examine the mains power cable for damage –if it is damaged do not use it.
•Do not use the product if the electric cables are damaged or worn.
•Immediately disconnect from the mains electricity supply if the cable is cut, or the insulation is
damaged. Do not touch the electric cable until the electrical supply has been disconnected.
•Your electric cable must be untangled. Tangled cables can overheat and reduce the efficiency of
your product.
•Always switch off at the mains before disconnecting any plug, cable connector or extension cable.
•Switch off, remove plug from mains and examine electric supply cable for damage or ageing before
winding cable for storage. Do not repair a damaged cable. Replace it with a new one.
•Always wind cable carefully, avoiding kinking.
•Use only on AC mains supply voltage shown on the product rating label.
•Under no circumstances should an earth be connected to any part of the product. This product is
double insulated and does not require an earth.
Cables
•Use only permitted extension cables as per HD 516. →Ask your electrical specialist.
Personal safety
•Always wear suitable clothing, gloves, and shoes.
•Thoroughly inspect the area where the product is to be used and remove all wires and other
foreign objects.
•All adjustments (turning the blade unit, inclining the blade head) should be made with protective
sheath in place, and the Hedge Trimmer must not rest on the blade in the process.
•Before using the product and after any impact, check for signs of wear or damage and repair as
necessary.
•Before using the 2-in-1 Trimmer and Lopper, always make sure that the hand guard provided is
fitted.
•Never attempt to use an incomplete product or one with an unauthorised modification.
Incomplete or modified products are potentially dangerous and will invalidate your guarantee.
Power tool use and care
•Know how to stop the product quickly in an emergency.
•Never hold the product by the guard.

9
•Do not use the product if the protection equipment (hand protection, 2-hand safety switch,
protection cover, quick blade-stop) are damaged.
•Do not use ladders whilst operating the product.
Remove the plug from the mains:
•Before leaving the product unattended for any period.
•Before clearing a blockage.
•Before checking, cleaning or working on the appliance.
•If you hit an object. Do not use your product until you are sure that the entire product is in a safe
operating condition.
•If the product starts to vibrate abnormally, check immediately. Excessive vibration can cause
injury.
•Before passing to another person.
Maintenance and storage
RISK OF INJURY!
•Do not touch blades.
•When finishing or interrupting work fit protective cover.
•Keep all nuts, bolts and screws secure to be sure the 2-in-1 Trimmer and Lopper is in a safe working
condition.
•Store disconnected, in a safe dry environment out of the reach of children.
10
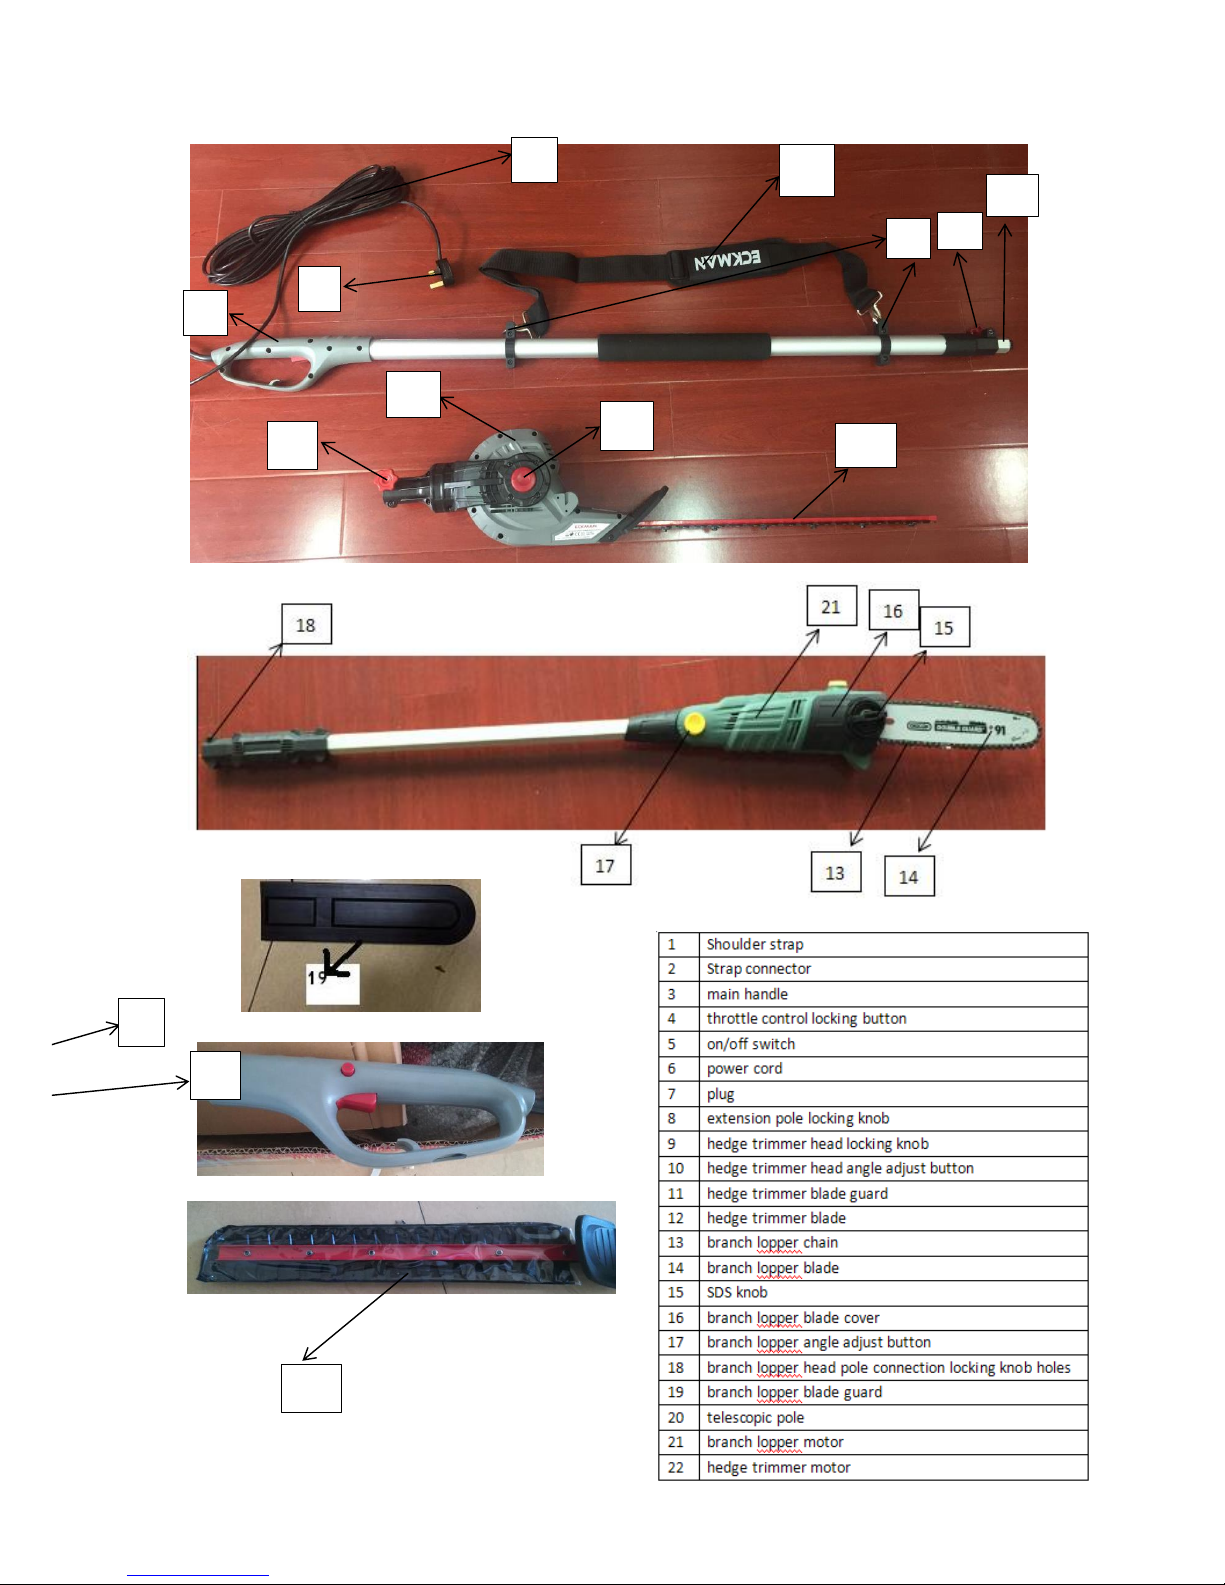
V. Part Identification
6
1
7
3
2
8
20
9
22
10
12
4
5
11

11
VI. Assembly
Unpacking
•This product requires assembly.
•Carefully remove the product from the box.
•Inspect the product carefully to make sure no breakage or damage has occurred during shipping.
•Do not discard the packing material until you have carefully inspected and satisfactorily operated
the product.
BEFORE ASSEMBLY Firstly unpack and check all parts have been supplied. If you think any parts
are missing, first check the packaging again before calling the Eckman helpline on 0844 441 3011.
WARNING:
•If any parts are damaged or missing, do not operate this product until the parts are
replaced. Failure to follow this warning could result in serious personal injury.
WARNING:
•Do not attempt to modify this product or create accessories not recommended for use
with this product. Any such alteration or modification is misuse and could result in a
hazardous condition leading to possible serious personal injury.
WARNING:
•Do not connect to power supply until assembly is complete. Failure to comply could
result in accidental starting and possible serious personal injury.
Shoulder Strap Assembly
•Connect the end of strap with the spring clip to the handle as per Figure 1 below:
.
Fig 1
Adjust the length of the shoulder strap to ensure the 2-in-1 Trimmer and Lopper is well balanced and
as comfortable as possible.

12
Use the strap to take the weight of the 2-in-1 Trimmer and Lopper, especially when the telescopic
poles are fully extended.
Using the strap to its potential will make trimming much easier, faster and less tiring.
Hedge Trimmer Assembly
2. The tube is hexagonal shaped and will only fit one way. Insert the telescopic pole (part No.20)
into the Hedge Trimmer head in direction A (see Figure 3 below), until the locking holes click into
place. Make sure the slot 1 on the telescopic pole and two screwed holes (number 2 in Figure 3
below) are in line.
3. Insert the locking knob into the screwed holes (see Figure 4 below), then tighten the locking knob
by turning screw firmly. Make sure that connection is tight.
1. Loosen and remove the locking knob from the linking handle (see Figure 2 below):
Figure 3
A
Figure 2
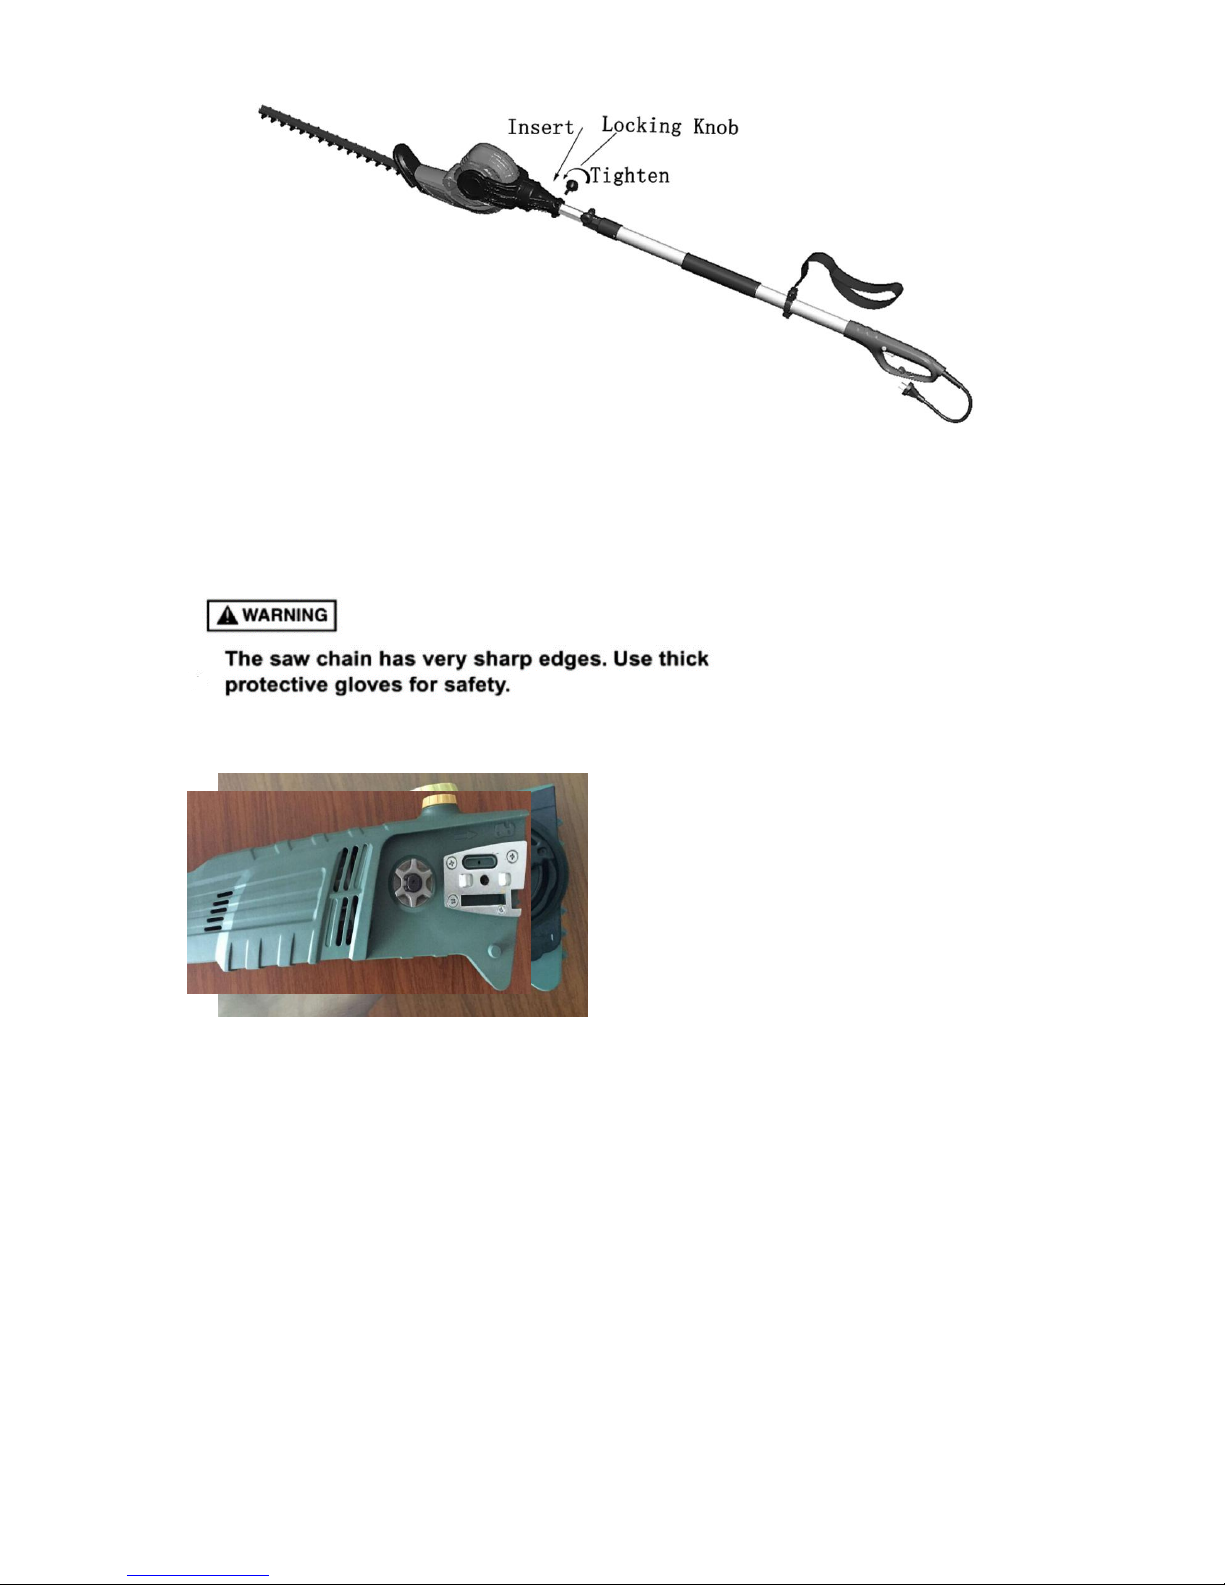
13
Telescopic Branch Lopper Assembly
Installing the guide bar and saw chain to the chainsaw/lopper attachment:
1. Loosen the SDS bar cover knob and remove the bar cover (See Figure 5 & 5a below).
Figure 5 Figure 5a
2.Position the chain around the sprocket and then around the guide bar. (Note: If the chain is not
properly fitted over on the sprocket, the chain saw lopper will not work and could cause serious
injury). Mount the guide bar to the power head by the bar cover with SDS knob .(Note: the lopper
head incorporates an SDS chain tightening system. The inner knob is used to tighten/untighten the
cover. The outer knob is used to tighten/untighten the chain .) See Figure 6 & 7 below
Figure 4

14
Figure 7
Figure 6
3.Adjust the chain tension by turning the chain tension SDS outer knob until the tie straps just touch
the bottom of the bar rail. Turning clockwise tightens the chain. Then check the chain for smooth
rotation and proper tension while moving it by hand (wear gloves). If necessary, re-adjust the outer
chain tension knob (but loosen the bar cover first) .The correct tension is reached when the chain in
the middle of the bar can only be raised by approximately 3-4mm
(see Figure 8 below).
Figure 8
4. Filling With Chain Lubrication Oil.
NEVER use the chainsaw without chain oil as this will cause almost immediate damage and will not
be covered by the warranty. A small bottle of 100ml of chain oil is supplied for first time use. Only
fill the oil reservoir ¾ full. Do not over-fill more than 3/4. Chain oil is available from all good
retailers of garden machinery and DIY stores (see Figure 9 as below).

15
Figure 9
VII. Application Range
•The 2-in-1 Trimmer and Lopper is designed for cutting and trimming hedges, branches, bushes and
shrubs around your house or allotment. Any other usage will invalidate your guarantee.
•The 2-in-1 Trimmer and Lopper is designed for use by adults. Adolescents over 16 years may use it
only under supervision. DO NOT USE this machine in the rain or damp conditions.
•The operator or user is responsible for accidents or damage to other people or their property. The
manufacturer is not liable for any damage caused due to incorrect operation.
VIII. Connection
•This machine may only be connected to single-phase 230V AC 50Hz UK Mains outlet. Ensure that
the mains voltage is the same as the operating voltage indicated on the rating plate.
IX. Operation
WARNING:
•Do not allow familiarity with this product to make you careless. Remember that a careless
fraction of a second is sufficient to inflict serious injury.

16
WARNING:
•Always wear CE approved safety goggles or safety glasses with side shields when operating
power tools. Failure to do so could result in objects being thrown into your eyes, resulting in
possible serious injury. Wear head protection when using the lopper.
WARNING:
•Do not use any attachments or accessories not recommended by the manufacturer of this
product. The use of attachments or accessories not recommended can result in serious
personal injury.
Starting and Stopping
•Connect the 2-in-1 Trimmer and Lopper plug to the power supply.
To start the blade movement, push the Throttle Control Locking Button and then pull the trigger
switch. To stop blade movement, release the trigger switch.
Adjusting the Pivoting Head
•Disconnect the plug from the power supply.
•Place the hedge trimmer or branch lopper on a flat surface.
•Depress both pivot buttons and adjust trimmer or lopper angle adjustment head until it snaps
securely into place at one of their available positions indicated (see figure 10 &below).
Figure 10

17
CAUTION:
•Do not place hand between pivoting head and threaded base. Failure to heed this caution
could result in a pinch point injury.
Cutting Tips
WARNING:
•Always keep both hands on the hedge trimmer/branch lopper handles. Never hold shrubs or
branches with one hand and operate hedge trimmer /branch lopper with the other. Failure
to follow this warning can result in serious injury or even death.
WARNING:
•Clear the area to be cut before each use. Remove all objects such as cords, lights, wire, or
loose string which can become entangled in the cutting blade and create a risk of serious
personal injury.
•When operating the hedge trimmer/branch lopper, keep the mains lead behind the
trimmer/lopper. Never drape it over the hedge /branches being cut.
•Do not force the hedge trimmer/branch lopper through heavy shrubbery. This can cause the
blades to bind and slow down. If the blades slow down, reduce the pace or diameter of the
branches.
•If blades become jammed, stop the motor, allow the blades to stop, and disconnect the plug
from the power source before attempting to remove the obstruction.
•If desired, you can use a string to help cut your hedge level. Decide how high you want the
hedge. Stretch a piece of string along the hedge at the desired height. Trim the hedge just
above the guide line of string. Trim the side of a hedge so that it will be slightly narrower at
the top. More of the hedge will be exposed when shaped this way, and it will be more
uniform. Take extra care not to cut or entangle the string in the cutting blades of the
trimmer.
•Wear gloves when trimming/cutting branches, thorny or prickly growth hedges. When
trimming new growth, use a wide sweeping action, so that the stems are fed directly into
the cutting blade. Older growth will have thicker stems and will be trimmed easiest by using
a sawing movement.

18
X. Maintenance and Servicing
•Before carrying out any checks or maintenance operations, disconnect the plug from the electric
power supply.
•Check your 2-in-1 Trimmer and Lopper regularly before starting the work.
•Damaged cutting blades have to be repaired or exchanged by a qualified service man before
working with the 2-in-1 Trimmer and Lopper.
•After each cutting operation, clean the cutting blade with a soft brush and cloth with lubricating
fluid oil and spray a thin layer of fluid protective oil
•Always keep the ventilation slots in motor housing clean
•Never clean or spray the 2-in-1 Trimmer and Lopper with water. Clean the motor housing only
with a moist cloth and never use detergents or solvents. These could ruin the plastic parts of the 2-
in-1 Trimmer and Lopper. Finally, dry the motor housing carefully.
•Store the 2-in-1 Trimmer and Lopper with the supplied protection blade covers.
XI .Guarantee:
This product is guaranteed against faulty workmanship for a period of 24 months from date of
purchase.
Your guarantee will be invalidated if the machine is modified in any way, used for purposes
outside the parameters of this instruction manual or wilfully damaged or abused.
Your statutory rights remain unaffected.

19
EC DECLARATION OF CONFORMITY
The undersigned, as authorised by:Ningbo East Tools Co.,Ltd.
Declares that the following equipment manufactured by Ningbo East Tools Co.,Ltd.
has been tested and conforms to the Directive: -
2000/14/EC
2006/41/EC
2004/108/EC
of the European Parliament and of the council on the approximation of the laws of the Member States
relating to the noise emission in the environment by equipment for use outdoors.
Equipment Category - (As defined in the Directive)
Product Name: ELECTRIC TELESCOPIC HEDGE TRIMMER AND BRANCH LOPPER SET
Model: M1E-8ET-410 M1L-4ET-250(ECKMAN MODEL NO.:EKETC01E)
Description: 2 in 1,230-240V, 50HZ
The technical documentation is kept by:Ningbo East Tools Co.,Ltd.
Add: No.307,East Buzheng Rd,Wangchun Industrial Zone,Yinzhou section, Ningbo, China
The conformity assessment procedure followed was in according with annex(2000/14/EC 2006/41/EC
2004/108/EC ) of the Directive.
A copy of this certificate has been submitted to the European Commission and to EU Member State:
the United Kingdom
Place of Declaration: NINGBO, 315000, P.R. China
Date: May, 30, 2017
Signed by:
Position in Company: GENERAL MANAGER
Name and address of manufacturer or Authorised representative: Ningbo East Tools Co.,Ltd.
Add: No.307,East Buzheng Rd,Wangchun Industrial Zone,Yinzhou section, Ningbo, China
IMPORTED BY ECKMAN CO.,LTD
ADD: 29 WELBECK STREET,LONDON W1G 8DA, ENGLAND

20
Exploded View & Parts List
NO.
NAME
NO.
NAME
1
Cable and plug
20
Lock set A
2
Bushing
21
Tamper screws M5*14
3
Isobar board
22
Hexagon nuts M5
4
Screw ST4*16
23
Big extension rod
5
Screw ST3*10
24
Knob
6
Terminal
25
Neck
7
Stopper
26
Hang buckle
8
Right power joint
27
Foam soft set
9
Left power joint
28
Block set
10
Left handle
29
Blocking block spring
gear sets
11
Spring
30
Block set of plugging
block
12
Push button
31
Plugging block gland
13
Single switch
32
Spring wire
14
Spring
33
Small extension rod
15
Button
34
Main joint lower cover
16
Right handle
35
Plug
17
Hex bolt M5*25
36
Main plug cover
18
Washer ø6
37
Screw ST3*10
19
Locknut M6
38
Main joint cover
This manual suits for next models
2
Table of contents
Other Eckman Elite Trimmer manuals


