Eckman ekht36 User manual

36 V LI-ION MULTI-ANGLE
HEDGE TRIMMER
MODELEKHT36
INSTRUCTION MANUAL
PLEASE READ AND SAVE THE INSTRUCTION MANUAL FOR FUTURE REFERENCE
Any questions please call the Eckman helpline on:0844 441 3011 or go to www.eckman.co.uk

2
CONTENTS
TECHNICAL DATA.................................................................3
INTENDED USE.......................................................................3
SAFETY INSTRUCTIONS...................................................4-8
PARTS IDENTIFICATION..................................................8-9
ASSEMBLY...............................................................................9
CHARGING THE BATTERY..........................................10-11
OPERATION...........................................................................12
HANDLE ADJUSTMENT.................................................12-13
MAINTENANCE.....................................................................13
GUARANTEE..........................................................................14

3
TECHNICAL DATA
Model No./Factory No.
EKHT36/ET1305
Voltage
36V DC
Blade
Double -action and two sided
Blade strokes(no load)
1400 /min
Blade length
510mm
Blade gap
11mm
Blade brake time
<1S
Blade material
65 Mn
Distance of teeth
14mm
Battery type
Lithium-Ion
Battery capacity
1.3Ah
Battery charging time
About 3-5 hours
Operating time
40mins
Handle adjustment
The handle can be turned in 3 positions(from -90° to
+90°)at horizontal direction and turned in 6
positions(from -45° to +67.5°) at vertical direction
Net weight
3.5kgs
Gross weight
3.75kgs
Noise level
95dB
Vibration level
3,0m/s2
INTENDED USE
Your hedge trimmer has been designed for trimming hedges, shrubs and brambles, not
to be used for any other purpose. This tool is intended for consumer use only.
Your charger has been designed for charging batteries of the type supplied with this
tool, NOTALLOWED TO CHARGE OTHER BATTERIES.

4
SAFETY INSTRUCTIONS
Know your power tool
· Warning! Carefully observe the instructions in this manual to reduce the risk of
personal injury or material damage.
· Read all of this manual carefully before operation.
· Before operating, make sure that you know how to switch the machine off in an
emergency .
· Retain this manual for future reference .
General Safety Rules
WARNING! Read all instructions. Failure to follow all instructions listed below may
result in electric shock, fire and/or serious injury. The term “power tool” in all of the
warnings listed below refers to your battery operated (cordless) Hedge Trimmer.
SAVE THESE INSTRUCTIONS
1) Work area
a) Keep work area clean and well lit. Cluttered and dark areas invite injuries.
b) Do not operate power tools in explosive atmospheres, such as in the presence
of flammable liquids, gases or dust. Power tools create sparks which may ignite the
dust or fumes.
c) Keep children and bystanders away while operating a power tool. Distractions
can cause you to lose control.
2) Electrical safety
a) Avoid body contact with earthed or grounded surfaces such as pipes,
radiators, ranges and refrigerators. There is an increased risk of electric shock if
your body is earthed or grounded.
b) Do not expose power tools to rain or wet conditions. Water entering a power
tool will increase the risk of electric shock.
3) Personal safety
a) Stay alert, watch what you are doing and use common sense when operating a
power tool. Do not use a power tool while you are tired or under the influence of
drugs, alcohol or medication. A moment of inattention while operating power tools
may result in serious personal injury.
b) Use safety equipment. Always wear eye protection. Safety equipment such as
dust mask, non-skid safety shoes, hard hat, or hearing protection used for appropriate
conditions will reduce personal injuries.
c) Avoid accidental starting. Ensure the switch is in the off position before
plugging in. carrying power tools with your finger on the switch or plugging in
power tools that have the switch on invites accidents.
d) Remove any adjusting key or wrench before turning the power tool on. A
wrench or a key left attached to a rotating part of the power tool may result in
personal injury.

5
e) Do not overreach. Keep proper footing and balance at all times. This enables
better control of the power tool in unexpected situations.
f) Dress properly. Do not wear loose clothing or jewellery. Keep your hair,
clothing and gloves away from moving parts. Loose clothes, jewellery or long hair
can be caught in moving parts.
g) If devices are provided for the connection of dust extraction and collection
facilities, ensure these are connected and properly used. Use of these devices can
reduce dust related hazards.
4) Power tools use and care
a) Do not force the power tool. Use the correct power tool for your application.
The correct power tool will do the job better and safer at the rate for which it was
designed.
b) Do not use the power tool if the switch does not turn it on and off. Any power
tool that cannot be controlled with the switch is dangerous and must be repaired.
c) Disconnect the plug from the power source before making any adjustments,
changing accessories, or storing power tools. Such preventive safety measures
reduce the risk of starting the power tool accidentally.
d) Store idle power tools out of the reach of children and do not allow persons
unfamiliar with the power tool or these instructions to operate the power tool.
Power tools are dangerous in the hands of untrained users.
e) Maintain power tools. Check for misalignment or binding of moving parts,
breakage of parts and any other condition that may affect the power tools
operation. If damaged, have the power tool repaired before use. Many accidents
are caused by poorly maintained power tools.
f) Keep cutting tools sharp and clean. Properly maintained cutting tools with sharp
cutting edges are less likely to bind and are easier to control.
g) Use the power tool, accessories and tool bits etc., in accordance with these
instructions and in the manner intended for the particular type of power tool,
taking into account the working conditions and the work to be performed. Use of
the power tool for operations different form intended could result in a hazardous
situation.
5) Battery tool use and care
a) Ensure the switch is in the off position before inserting battery pack. Inserting
the
battery pack into power tools that have the switch on invites accidents.
b) Recharge only with the charger specified by the manufacturer. A charger that is
suitable for one type of battery pack may create a risk of fire when used with another
battery pack.
c) Use power tools only with specifically designated battery packs. Use of any other
battery packs may create a risk of injury and fire.
d) When battery pack is not in use, keep it away from other metal objects like
paper
clips, coins, keys, nails, screws, or other small metal objects that can make a
connection from one terminal to another. Shorting the battery terminals together

6
may cause burns or a fire.
e) Under abusive conditions, liquid may be ejected from the battery; avoid
contact.
If contact accidentally occurs, flush with water. If liquid contacts eyes,
additionally seek medical help. Liquid ejected from the battery may cause irritation
or
burns.
6) Service
a) Have your power tool serviced by a qualified repair person using only identical
replacement parts. This will ensure that the safety of the power tool is maintained.
Additional safety instructions for batteries and chargers
Batteries
· Never attempt to open for any reason
· Do not expose to water
· Do not incinerate the battery pack even if it is severely damaged or is completely
worn out. The battery pack can explode in a fire.
· Do not store in locations where the temperature may exceed 40℃
·Do not leave the battery pack in the charger when the charging is finished,
otherwise battery leakage may occur.
·Charge only at room temperature.
·Charge only at using the charger provided with the tool (see technical data)
· Before charging , make sure that the battery is dry and clean.
· Use only the correct type of battery for the tool(see technical data).
·When dispose of batteries follow the instructions given in the section "protecting
the environment".
·Under extreme conditions ,battery leakage may occur .When you notice liquid on
the battery , proceed as follows:
· Carefully wipe the liquid off using a cloth.Avoid skin contact.
· In case of skin or eye contact, follow the instructions below.
The battery fluid, a 25-30% solution of potassium hydroxide, can be harmful. In
case of skin contact, immediately rinse with water. Neutralize with a mild acid such as
lemon juice or vinegar. In case of eye contact, rinse abundantly with clean water for at
least 10 minutes. Consult a physician.
Chargers
·Charger’s plug must match the outlet. Never modify the plug in any way.
Unmodified plugs and matching outlets will reduce risk of electric shock..
·Use your charger only to charge batteries of the type supplied with your tool.
Other batteries could burst, causing personal injury and damage.
·Only 2 battery packs is allowed to be charged continuously in order to prevent
overheating of charger, necessary rest time is required to let the charger cool down
before further charging.
·When charging is finished, unplug the charger from mains socket outlet and take
away the battery pack from the charger, do not leave the battery pack in the charger.
·Never carry the charger by its cord or pull it to disconnect from the socket. Keep

7
the cord away from heat , oil and sharp edges .
·Never attempt to charge non-rechargeable batteries.
·The cord of charger is not changeable, do not continue to use if the cord is
damaged.
·Do not expose to water or rain, do not use in wet condition.
· Do not open the charger.
· Do not probe the charger.
· Intended for indoor use only
Additional safety instructions for hedge trimmers
Wear EU approved safety goggles when operating this tool.
Wear gloves when operating this tool.
Do not expose the tool to rain or high humidity.
· THIS TOOL CAN CAUSE SERIOUS INJURIES. Read instructions carefully for
the correct handling, preparation, maintenance, starting and stopping of the tool. Be
familiar with all controls and proper use of the tool;
· Only use the tool in daylight or good artificial light.
· Never allow children to use the tool;
· Beware of overhead power lines;
· Avoid operating while people, especially children are nearby;
· Dress properly! Do not wear loose clothing or jewellery which can be caught in
moving parts. Use of sturdy gloves, non-skid footwear, and safety glasses is
recommended;
· If the tool stalls, immediately switch it off. Remove the battery before attempting to
remove any obstructions;
· Remove the battery before checking, maintenance or working on the tool;
· While operating the tool be always sure of a safe and secure operating position
especially when using steps or a ladder;
· Do not attempt to repair the tool;
· Do not operate the tool with a damaged or excessively worn cutting device;
· Always wear ear protection, goggle and helmet during operating;
· Always ensure that all guards are fitted when using the tool. Never attempt to use an
incomplete tool or a tool with unauthorized modifications;
· Always use two hands to operate the tool;
· When transporting or storing the tool always fit the blade sheath.
· Always be aware of your surroundings and stay alert for possible hazards that you
may not hear due to the noise of the tool;
· Do not carry the tool with your hands on the switch unless the battery has been
removed .
· If you have not used a hedge trimmer before, preferably seek practical instruction by
an experienced user in addition to studying this manual.
· Never touch the blades while the tool is running .
· Never attempt to force the blades to come to a standstill.
· Do not put the tool down until the blade have come to a complete standstill .
· Regularly check the blades for damage and wear . Do not use the machine when the
blades are damaged.

8
· Take care to avoid hard objects (e.g. metal wire, railings)when trimming. Should you
accidentally hit any such object immediately switch the tool off and check for any
damage.
· Should the tool start to vibrate abnormally, immediately switch it off and check for
any damage.
· Always be aware of falling debris when cutting the higher sides of a hedge.
· Be aware of the cutting blade, always wear gloves to protect your hands from cut.
ELECTRICAL SAFETY
Your charger has been designed for a specific mains voltage. Always check to make
sure the mains voltage corresponds to the voltage on the rating plate.
PARTS IDENTIFICATION(Fig.A)
1.Front handle 2.Lock-off button 3.Ventilation slots
10

9
4.Guard 5.Battery pack 6.Charger 7.Charge station
8.Blade sheath 9.Charging indicator 10. Adjustment knob
ASSEMBLY
Warning! Before assembly, remove the battery pack from the tool.
Fig.B
Fitting and removing the battery (Fig.B)
Your hedge trimmer is equipped with a battery pack, which powers the unit.
To fit battery pack
1. Place battery pack in your hedge trimmer. Align raised rib on battery pack with
groove inside hedge trimmer. See Figure B.
2. Make sure the latches on each side of your battery pack snap in place and battery
pack secured in hedge trimmer before beginning operation.
To remove battery pack
1.Locate latches on end of battery pack and depress to release battery pack from your
hedge trimmer.
2. Remove battery pack from your hedge trimmer. See Figure B.
·CHARGINGTHE BATTERY (Fig.C)
The battery needs to be charged before first use and whenever it fails to produce

10
sufficient power on jobs that were easily done before. When charging the battery for
the first time, or after prolonged storage, it will only accept an 80% charge. After
several charge and discharge cycles, the battery will attain full capacity. The battery
may become warm while charging, this is normal and does not indicate a problem .
Remove it from the tool and insert it into the charge station (8). The battery pack
will only fit into the charge in one way. Do not force .Be sure that battery is fully
seated in the charger.
Your battery can be charged in 3-5 hours charger supplied. Be sure to read all
safety instructions before using your charger. This product is not user serviceable.
There are no user serviceable parts inside the charger. Servicing at an authorized
service center is required to avoid damage to static sensitive internal components.
Read all of the instructions in the battery charger section of this manual before
attempting to charge the battery pack for your tool. Always use correct battery pack
(pack supplied with tool or replacement pack exactly like it). Never install any other
battery pack, it will ruin your tool and may create a hazard.
1 .Charging procedure
These chargers require no adjustment and are designed to be as easy as possible to
operate. Simply place your battery pack into the receptacle of a plugged in charger
and it will automatically charge the pack.
Fig. C
(1). Connect the adaptor 6 to the charger station 7.
(2). Plug the charger into an appropriate AC power outlet. The green LED (POWER)
9 lights to tell you that the charger is ready for use.
(3) Insert the battery pack 6 into the charger, as shown in Fig C, making sure the pack
is fully seated in the charger. The red LED (CHARGE) 9 lights to tell you that the
battery pack is on charge.
(4). The battery pack will be fully charged in about 4 hours.
2 . Important charging notes.
Longest life and best performance can be obtained if the battery pack is charged
when the air temperature is between 18-24℃. Do not charge the battery pack in a very
low or very high air temperature. This is important and will prevent serious damage to
the battery pack.
(1). The charger and battery pack may become warm to touch while charging. This is

11
a normal condition, and does not indicate a problem.
(2). Use the charger in normal room temperatures whenever possible. To prevent
overheating, do not cover the charger and do not charge battery packs in direct
sunlight or near heat sources.
(3). If the battery pack does not charge properly –(a).check current at receptacle by
plugging in a lamp or other appliance. (b). move charger and battery pack to a
location where the surrounding air temperature is approximately 18-24℃. (c).if
charging problems persist, take or send the tool , battery pack and charger to your
local service center.
(4). The battery pack should be recharged when it fails to produce sufficient power on
jobs which were easily done previously. DO NOT CONTINUE to use under these
conditions. Follow the charging procedure. You may also charge a partially used pack
whenever you desire with no adverse affect on the battery pack.
(5). Under certain conditions, with the charger plugged in to the power supply, the
exposed charging contacts inside the charger can be shorted by foreign material.
Foreign materials of a conductive nature such as, but no limited to, steel wool,
aluminum foil, or any buildup of metallic particles should be kept away from charger
cavities. Always unplug the charger from the power supply when there is no battery
pack in the cavity. Unplug charger before attempting to clean.
(6). Do not immerse charger in water or any other liquid.
(7). WARING!!!: don’t allow any liquid to get inside charger. Electric shock may
result. To facilitate the cooling of the battery pack after use, avoid placing the charger
or battery pack in a warm environment such as in a metal shed, or an uninsulated
trailer.
(8). CAUTION!!!: never attempt to open the battery pack for any reason. If the plastic
housing of the battery pack breaks or cracks, return to a service center for recycling,
do not put it into further use.
OPERATION (Fig.D)

12
Fig.D
For your safety, this tool is equipped with a double switch system. This system
prevents starting the tool inadvertently and will only allow operation while holding
the tool with both hands.
Switching on
· Squeeze the front handle switch (1).
· Squeeze the front trigger switch (2).
Switching off
· Release the front handle switch (1) or the trigger switch(2).
Never attempt to lock a switch in the on position.
HANDLE ADJUSTMENT(Fig. E-F)
Hold the handle 2 tightly, slide the lock button 1 up and then turn the cutter head 3 to the
desired position. Release the lock button 1 again and check whether the cutter head is locked
in place.
Note: The trimmer head can be adjusted in three positions(-90°、0°、90°)at horizontal
direction.
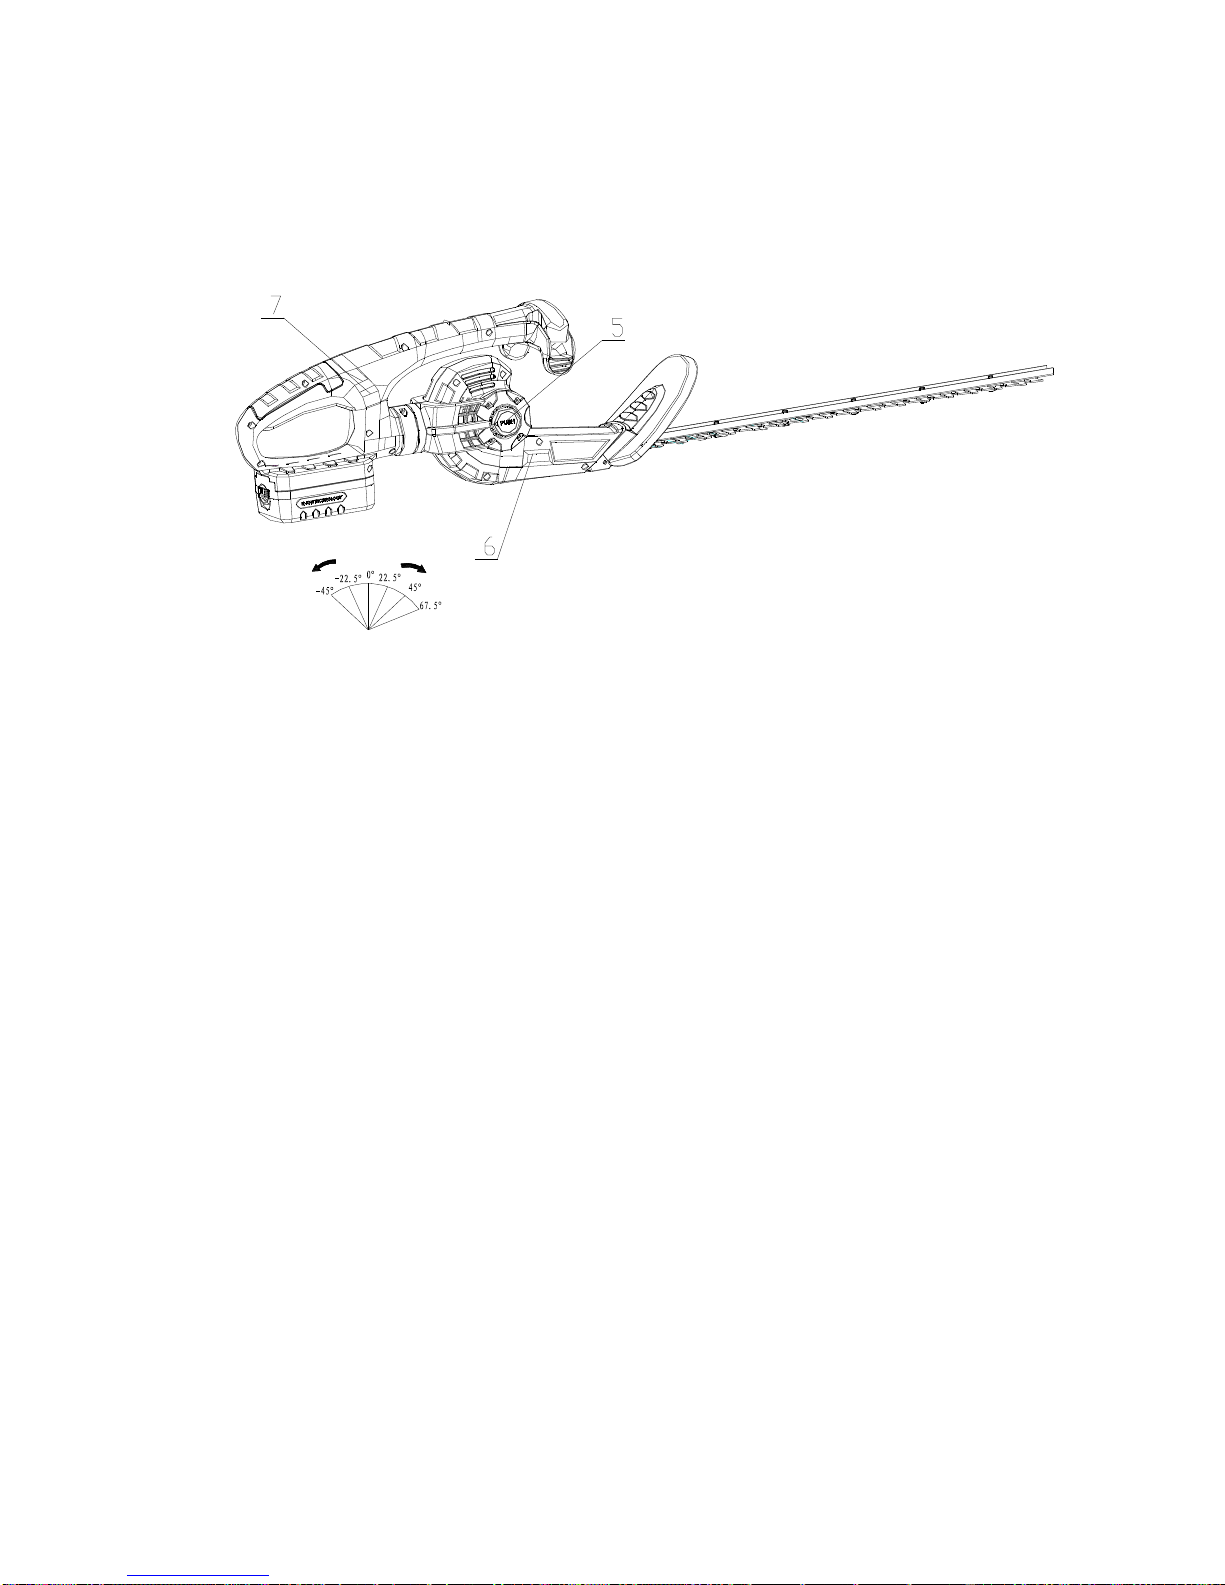
13
Hold the handle 7 tightly, slide the lock button 1 up and then turn the cutter head 6 to
the desired position. Release the lock button 5 again and check whether the cutter
head is locked in place.
Note: The trimmer head can be adjusted in six positions (-45°、-22.5°、0°、22.5°、
45°、67.5°)
Fig. F
MAINTENANCE
Your tool has been designed to operate over a long period of time with a minimum of
maintenance. Continuous satisfactory operation depends upon proper tool care and
regular cleaning. Your charger does require any maintenance apart from regular
cleaning.
1.Before performing any maintenance on the tool, remove the battery from the tool.
Unplug the charger before cleaning it.
2.After use , carefully clean the blades.
3.After cleaning, apply a film of light machine oil to prevent the blades from rusting.
4.Regularly clean the ventilation slots in your tool and charger using a soft brush or
dry cloth.
5.Regularly clean the motor housing using a damp cloth .Do not use any abrasive or
solvent-based cleaner.

14
GUARANTEE
This product is guaranteed against faulty workmanship for a period of 24 months from
date of purchase. Your guarantee will be invalidated if the machine is modified in any
way, used for purposes outside the parameters of this instruction manual or willfully
damaged or abused. Your statutory rights remain unaffected.
Table of contents
Other Eckman Trimmer manuals


