Eckman HT001 User manual

3.6V LITHIUM-ION BATTBERY-OPERATED
GRASS SHEAR AND HEDGE TRIMMER
MODEL:HT001
USER MANUAL
IMPORTANT: Read and understand this manual before assembling or
operating this appliance. Improper use of this appliance can cause
severe injury or death. Keep this manual in a safe place for future
reference.
Any questions or problems-please call the Eckman Helpline on 0845 555
4440 or visit www.eckman.co.uk

1
IMPORTANT TIPS:
1,Unit is fully assembled. Remove clear plastic blade guard before use and save it to use as
blade-cover when unit is not in use.
2,Battery must be charged before use. Please refer to battery charging instructions.
3,If the blade becomes jammed on a branch while cutting, IMMEDIATELY release trigger and clear
jam. If you continue to hold trigger with blade jammed you will damage the motor.
4,IMPORTANT: This is a powerful tool that is remarkably easy and comfortable to use. As such,
please pay attention to the placement of the blades while using to avoid cutting yourself.
TECNICHAL SPECIFICATIONS
Type ET2903
Battery voltage DC 3.6V
Battery type Lithium-Ion
No load speed 1000rpm
Cutting length of hedge
trimmer
110mm
Cutting width of grass shear 80mm
Telescopic handle Adjusts from 580mm to 900mm
Battery capacity 1.3Ah
Charging time 4Hours
Net weight 1Kg(with swivel handle)
●SAFETY INSTRUCTIONS
Please read these instructions before operating this product and save these instructions.
For safe operation:
1. Keep children and animals away from working area.
2. Switch on motor only when the hands and feet are away from the cutting blades.
3. Use only the manufacturer recommended replacement parts and accessories.
4. When not in use, tools and batteries should be stored separately in a dry, high or locked up place,
out of reach of children. Ensure that battery terminals cannot be short-circuited by other metal parts
such as screws, nails, etc.
5. Do not use excessive pressure during operation. It will do the job better and safer at the rate for
which it was intended.
6. Dress properly
Do not wear loose clothing or jewelry; they can be caught in moving parts.
Wear stout shoes while using the grass shear. Wear protecting hair covering to contain long hair.
7. Maintain tools with care

2
Keep cutting tools sharp and clean for better and safer performance. Follow instructions for
lubrication and changing accessories.
8. Disconnect tools
Disconnect the tool from its battery pack when not in use, before servicing and when changing
accessories such as blades.
9. Avoid unintentional starting
Do not carry the tool with a finger on the switch.
10. Stay alert
Watch what you are doing. Use common sense. Do not operate the tool when you are tired.
11. Warning
The use of any accessory or attachment, other than recommended in this instruction manual, may
present a risk of personal injury.
Ensure you only use the battery supplied with this trimmer.
Ensure that the outside surface of battery pack or tool is clean and dry before plugging into charger.
Ensure that batteries are charged using the correct charger recommended by the manufacturer and
supplied with this trimmer. Incorrect use may result in a risk of electric shock, overheating or
leakage of corrosive liquid from the battery.
12. Have your tool repaired by a qualified person
This tool is constructed in accordance with the relevant safety requirements. Qualified persons using
original spare parts should only carry out repairs; otherwise this may result in considerable danger to
the user.
13. Disposal of battery
Ensure battery is disposed of safety following local disposal guidelines in your area.
● IMPORTANT SAFETY INSTRUCTIONS FOR BATTERY CHARGER
1. Before using charger, read all instructions and cautionary markings on charger, battery pack, and
product using battery pack.
2. DANGER: 230 volts present at charging terminals. Do not probe with conductive objects. Danger
of electric shock or electrocution.
3. The charger and battery are specifically designed to work together. DO NOT attempt to charge the
battery with any chargers other than the ones supplied with this product.
4. Do not expose charger to rain or snow.
5. This charger is not intended for any uses other than charging rechargeable batteries.Any other uses
may result in risk of fire, electric shock or electrocution.
6. To reduce risk of damage to electric plug and cord, disconnect from mains socket by pulling the
plug rather than the cord.
7. Make sure cord is located so that it will not be stepped on, tripped over, or otherwise subjected to
damage or stress.
8. The charger is ventilated through slots in the top and the bottom of the housing. Do not place any
object on top of charger or on a surface that might block the ventilation slots and result in excessive
internal heat. Place the charger in position away from any heat source.
9. Do not operate charger if it has received a sharp blow, been dropped, or otherwise damaged in any
way.
10. Do not disassemble charger. Take it to authorized service center when service or repair is required.
Incorrect reassemble may result in a risk of electric shock, electrocution or fire.

3
11. To reduce risk of electric shock, unplug charger from outlet before attempting any cleaning.
Removing the battery pack will not reduce this risk.
12. Never attempt to connect 2 chargers together.
13. DO NOT store or use the tool in locations where the temperature may reach or exceed 105°F (such
as outside sheds or metal buildings in summer).
14. The charger is designed to operate on standard household electrical power (230volts). Do not
attempt to use it on any other voltage!
●IMPORTANT SAFETY INSTRUCTIONS FOR BATTERY
The battery is not fully charged when you first receive it. First read the safety instructions below
the follow charging notes and procedures.
READ ALL INSTRUCTIONS CAREFULLYAND KEEP IN A SAFE PLACE FOR FUTURE
REFERENCE.
1. Do not incinerate the battery even if it is severely damaged or is completely worn out. The battery
can explode in a fire.
2. A small leakage of liquid from the battery cells may occur under extreme usage or temperature
conditions. This does not indicate a failure. However, if the outer seal is broken and this leakage
gets on your skin:
a. Wash quickly with soap and water.
b. Neutralize with a mild acid such as lemon juice or vinegar.
c. If battery liquid gets in your eyes, flush them with clean water for a minimum of minutes and
seek immediate medical attention.(medical notes: the liquid is 25-35% solution of potassium
hydroxide.)
3. Do not connect the positive pole and the negative pole of the battery with any metal objects. Battery
could be short circuited causing damage to the battery and possibly causing severe burns or fire.
4. Charge the battery only in the chargers supplied with the product.
5. NOTE: the battery in your tool is the lithium-ion type, with no self-discharge or memory
effect.
● ASSEMBLY
1,Fitting/removing the wheels assembly(see Fig. 1)
Fitting the wheels assembly (1):
Insert wheel frame (1) into handle shell, and tighten frame knob (2).
Removing the wheels assembly (1):
Loosen frame knob (2), and take out wheel frame (1).
WARNING: Do not turn on the switch when you fit or remove the wheels assembly. This can cause a
serious injury.

4
Fig. 1
2,Fitting/removing the telescopic swivel handle(see Fig. 2)
Guide the swivel handle (2) at the desired angle into the handle holder of the grass shear until the lock
engages.
The starting lockout and ON button on the tools no longer function when the swivel handle is
mounted.
Removing the telescopic swivel handle:
Press the release button (1)and pull out the swivel handle.
Fig. 2
● OPERATINGYOUR TOOLS(see Fig. 3)
Warning: Never remove or bridge the switching devices.
The starting lockout prevents your tools from being switched on unintentionally.
Cutting without swivel handle:
1. Push lock-off button (1) forward and press switch (2).
2. Release the lock-off button (1) again.
NOTE: If the LED (3) lights in red when use this tool, it means the battery is empty. Stop
working at once and charge the battery with the charger we provided.
5
Fig. 3
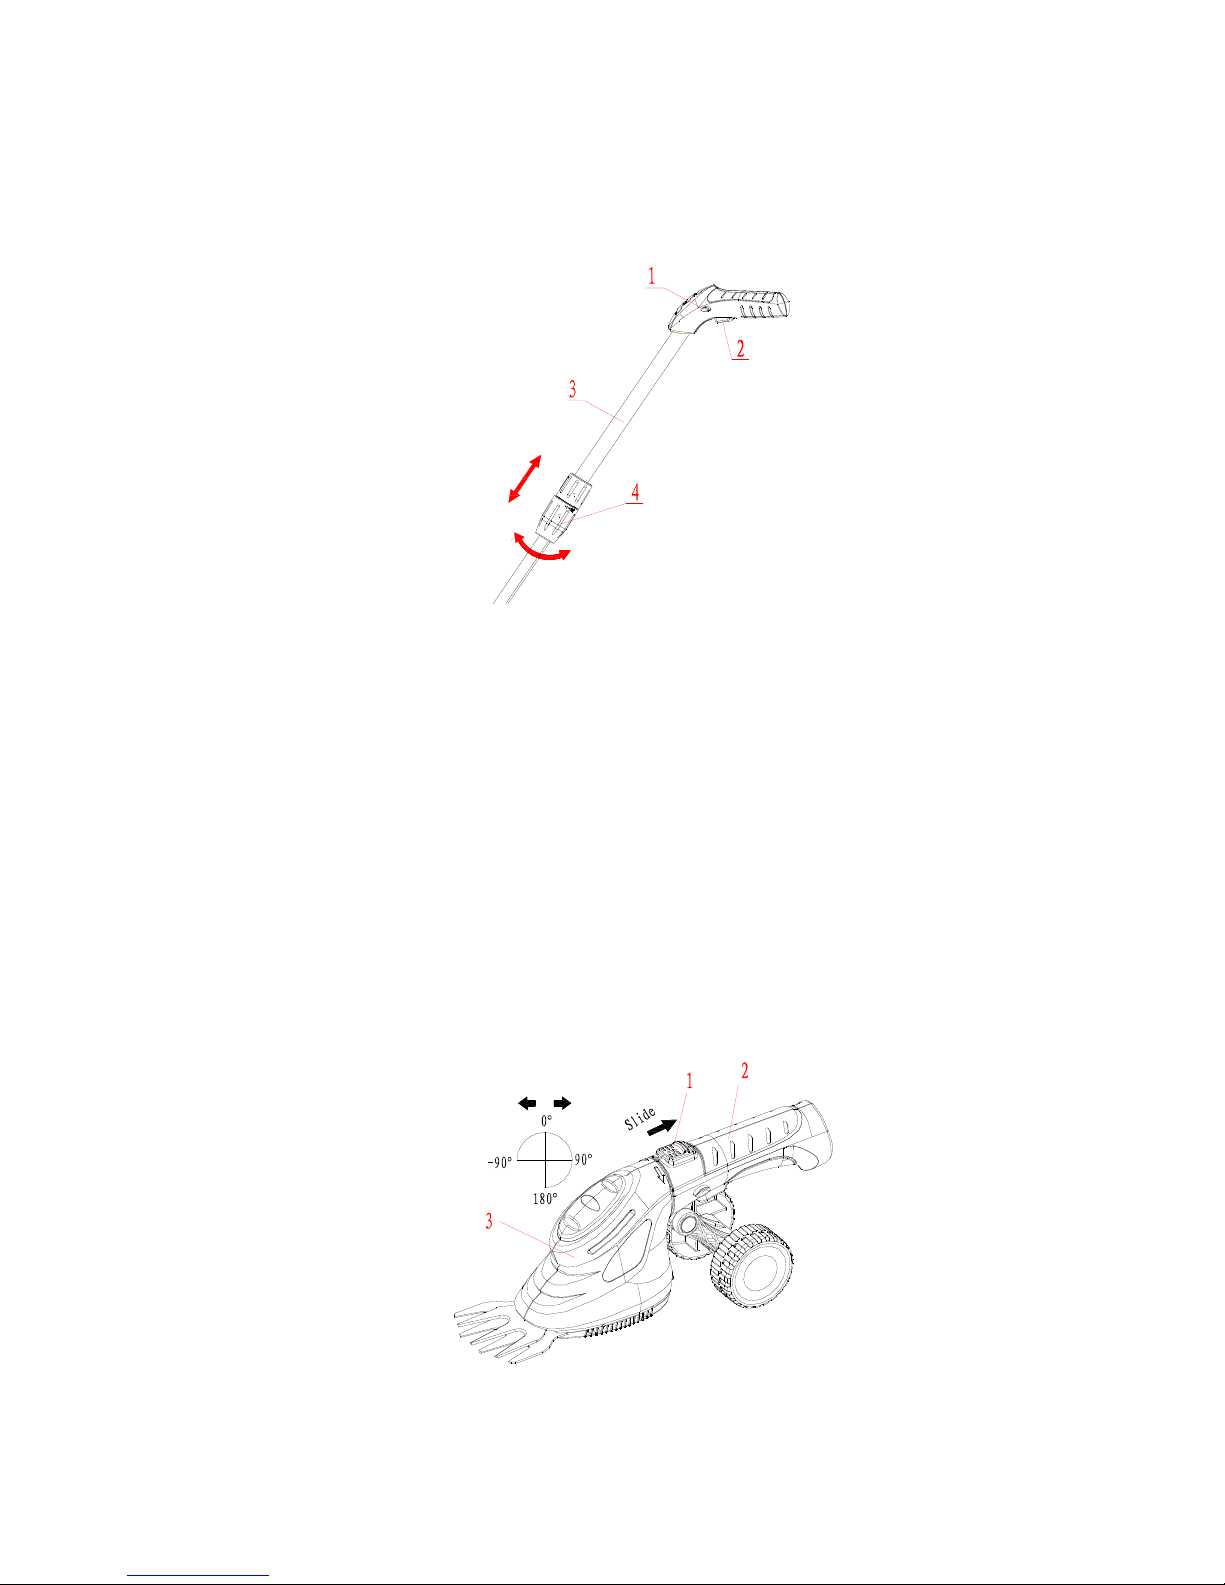
Cutting with telescopic handle:
The telescopic handle is fully height adjustable and can be adapted to suit your height..
Fig. 4
Warning: Do not turn on the switch when you adjust the telescopic handle. This can cause a
serious injury. (see Fig. 4)
1. Attach the telescopic handle.
2. Hold the tube (3) with one hand, and then loosen the adjusting bolt (4).
3. Set the handle to the correct length and tighten the adjusting bolt (4).
4. Push lock-off button (1) forward and press switch (2).
5. Release the lock-off button (1) again.
Function of swivel head(see Fig. 5)
Hold the handle 2 tightly。Slide the lock button(1)up and then turn the cutter head 3 to the desired
position.Release the lock button (1)again and check whether the cutter head is locked in place.
Note:The cutter head can be locked in five positions(-90°、0°、90°、180°)。

6
Fig. 5
Fig. 6
Swivel 900for trimming grass. (see Fig. 6)
Use the swivel head function with wheels to trimmer along lawn edges.
Fig. 7
Swivel 1800for trimming the tops of hedges. (see Fig. 7)
Adust height for cutting and trimming grass. The suitable height for cutting grass is 40mm and
25mm. (see Fig. 8)

7
Fig. 8
Fig. 9
The suitable height for trimming grass is 80mm、65mm and 40mm. (see Fig. 9)
●CHARGE
The battery can be charged in about 4 hours. Be sure to read all safety instructions before using
your charger. This product is not user serviceable. There are no user serviceable parts inside the
charger. Servicing at an authorized service center is required to avoid damage to static sensitive
internal components.
Read all of the instructions in the battery charger section to this manual before attempting to
charge the battery in your tool.
8
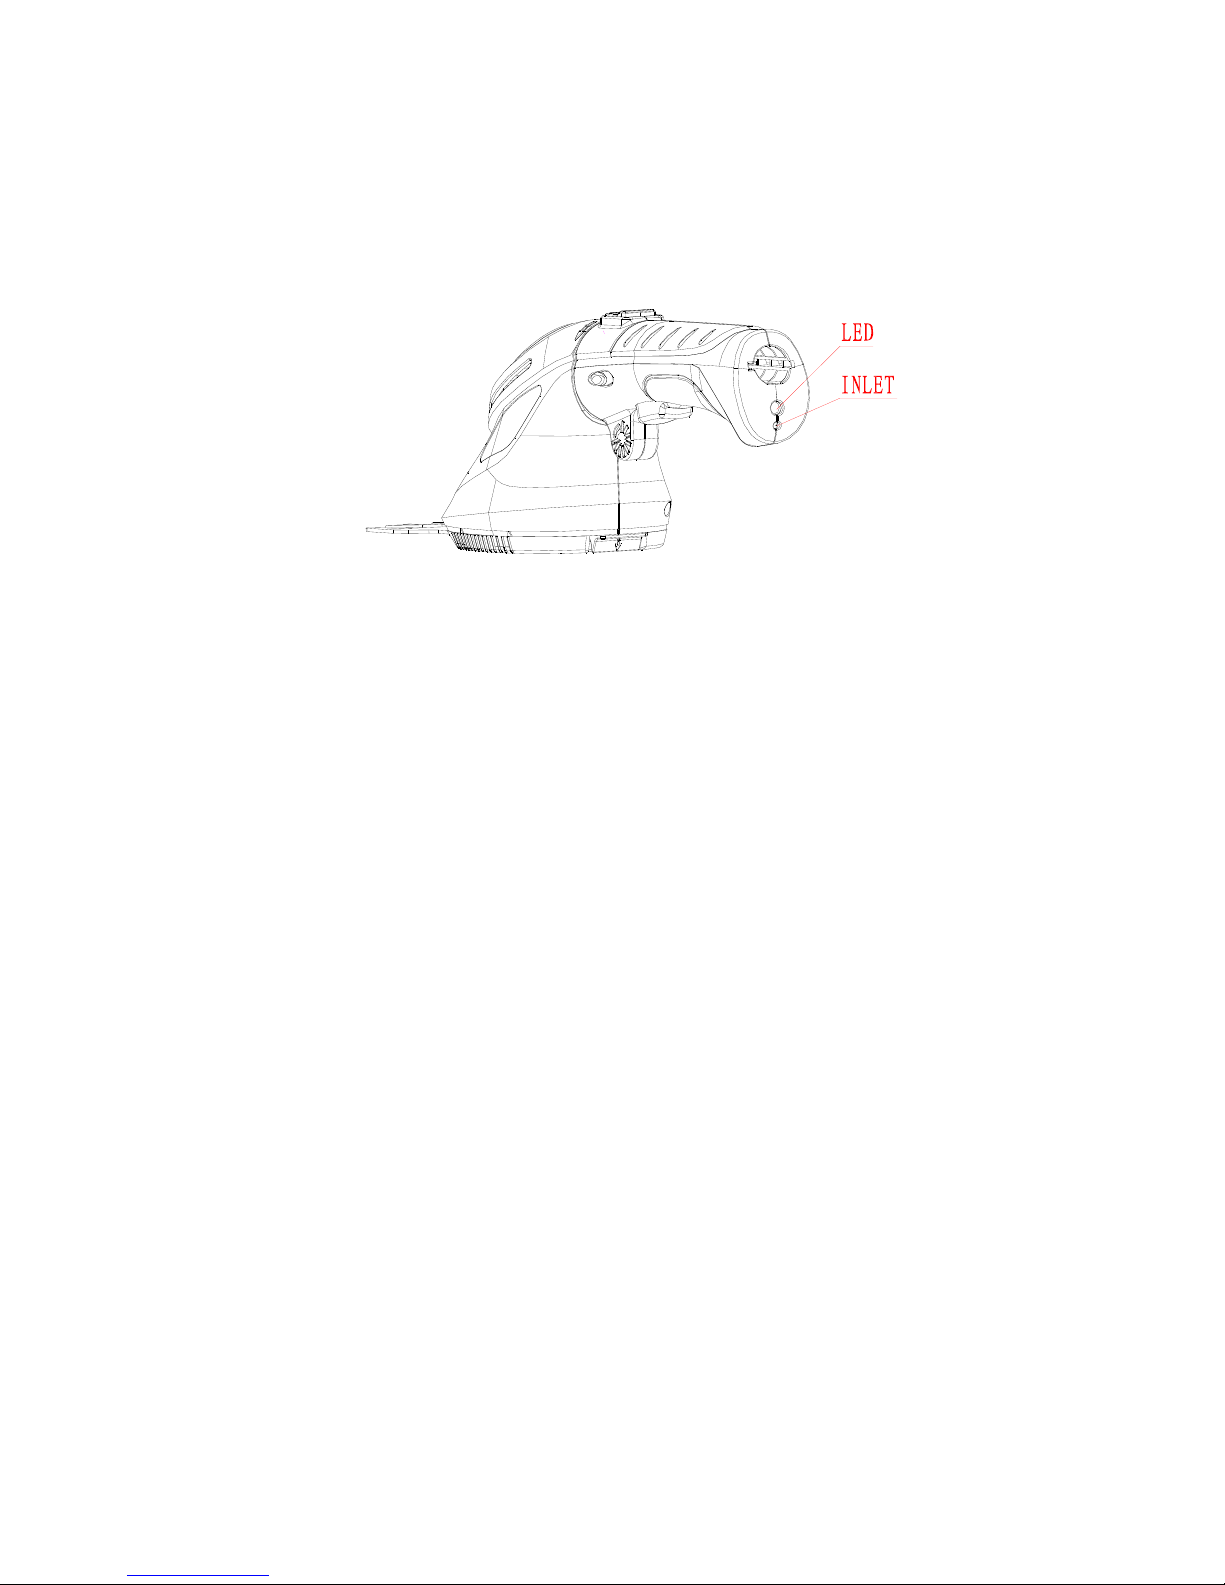
1. Charging procedure (see Fig. 10)
These chargers require no adjustment and are designed to be as easy as possible to operate.
Fig. 10
(1). Connect the charger and the tool. (Insert into the INLET of the machine)
(2). Plug the charger into an appropriate 230VAC power outlet. When the LED on the machine is
red, it means the battery is on charge.
(3).About 4 hours later, the LED turns from red to green. This means the battery is fully charged.
Note: The starting lockout and ON button on the tools no longer function when charging.
2. Important charging notes.
Longest life and best performance can be obtained if the battery pack is charged when the air
temperature is between 65°F-75°F (18-24℃). Do not charge the battery in an air temperature below
+40°F(+4.5℃), or above +105°F(+40.5℃). This is important and will prevent serious damage to
the battery.
(1).The charger and battery may become warm to touch while charging. This is a normal condition,
and does not indicate a problem.
(2). Use the charger in normal room temperatures whenever possible. To prevent overheating, do not
cover the charger and do not charge battery in direct sunlight or near heat sources.
(3). If the battery does not charge properly —— ①check current at receptacle by plugging in a lamp
or other appliance. ②check to see if receptacle is connected to a light switch which turns power off
when you turn out the light. ③move charger and battery pack to a location where the surrounding
air temperature is approximately 65°F-75°F(18-24℃). ④if charging problems persist, take or send
the tool and the charger to your local service center.
(4).The battery should be recharged when it fails to produce sufficient power on jobs which were
easily done previously. DO NOT CONTINUE to use under these conditions. Follow the charging
procedure.
(5).Under certain conditions, with the charger plugged in to the power supply, the exposed charging
contacts inside the charger can be shorted by foreign material. Foreign materials of a conductive
nature such as, but no limited to, steel wool, aluminum foil, or any buildup of metallic particles should
be kept away from charger cavities.Always unplug the charger from the power supply when there is
no battery pack in the cavity. Unplug charger before attempting to clean.

9
(6). Do not immerse charger in water or any other liquid.
(7). WARING: don’t allow any liquid to get inside charger. Electric shock may result. To facilitate the
cooling of the battery pack after use, avoid placing the charger or tool in a warm environment such as
in a metal shed, or an uninsulated trailer.
●CHANGINGTHE BLADES
Warning!
DO NOT operate the switch whilst dismantling or fitting the blades. Risk of injury!
Fig. 11
The blade can be changed rapidly and easily without any tools. (see Fig. 11)
1,To change the blade, you must first remove the Blade cover (A) at first. Follow the steps as shown
in the upper figure.
① Hold the machine in one hand as shown.. Lever the retainer (B) upwards with your thumb and
forefinger of another hand.
② Hold the blade cover firmly and pull it backwards.
③ Remove the blade cover upwards.
2,Take off the blade and install another blade. (see Fig. 12)

10
Fig. 12
Warning!
DO NOT operate the trimmers before the blade cover is installed. Risk of injury!
3,Install the blade cover following the steps as shown. (see Fig. 13)
① Insert the blade cover align the two lines marked in the upper figure.
② Push the blade cover forwards until the retainer fit tightly and securely.
Fig. 13

11
●MAINTENANCE AND REPAIR
Do not rinse the machine with water.
The trimmer should be stored in a dry place when it is not in use.
Before every use of this trimmer, check whether the blade is in good order and undamaged. Replace
blade if damaged.
The blade should be cleaned and lubricated after every use. If the trimmer is used for a long time the
blades should be lubricated during operations.
GUARANTEE:
This product is guaranteed for a period of 12 months from date of purchase. Any
modification or misuse of this machine will invalidate your guarantee. Your statutory
rights remain unaffected.
Imported by T2 Direct Ltd - London
Table of contents
Other Eckman Trimmer manuals


Popular Trimmer manuals by other brands


Toro
Toro 51354 Addendum to the Operator Manual

Energizer
Energizer EZ20VTHPC-UK user guide

UNITED OFFICE
UNITED OFFICE KH 4436 PAPER TRIMMER operating instructions
 Handling instructions")
Hitachi
Hitachi CG24EKB (SL) Handling instructions

GreenWorks
GreenWorks ST60L02 Operator's manual

LIVERYMAN
LIVERYMAN FLARE 150493 Instructions for use


