eControl 100 User manual

eControl Model 100 & Model 150
User Guide
CAUTION: THIS UNIT IS HEAVY EQUIPMENT AND ADEQUATE MANPOWER MUST BE USED IN MOVING THE RANGE TO
AVOID DAMAGE TO THE UNIT OR THE FLOOR.
REMEMBER, when replacing a part on this appliance, use only spare parts that you can be assured conform to the
safety and performance specification that we require.
PLEASE READ THESE INSTRUCTIONS BEFORE USING THIS APPLIANCE AND KEEP IN A SAFE PLACE FOR FUTURE
REFERENCE.
UKCA (UNITED KINGDOM CONFORMITY ASSESSED)
The eControl System is manufactured by:
UK Innovations Group Ltd, i-Worx Unit 9, Innovation Way, Wootton, Bedfordshire, MK43 9SP, United Kingdom
eCONTROL SYSTEM FOR HEAT STORAGE RANGE COOKERS
UK PATENT PENDING APPLICATION No. 21 13047.1
For use in GB

P a g e 1 | 24
Contents
1. Health and Safety
2. Introduction
3. Overview
4. Operating the eControl Cooker
5. Consumption & Running Costs
6. eControl Model 100 & 150
The Roasting Oven
-Roasting Oven Baffle
The Baking Oven
The Simmering Oven
The Hotcupboard (Model 150)
The Plates
General Advice
7. Cleaning & Caring
8. Installation instructions
- Installation requirements
- Delivery requirements
- Appliance dimensions: eControl 100
- Appliance dimensions: eControl 150
- Clearances
- Power supply
- Room Vented Model
9. Wiring diagram
10. Maintenance

P a g e 2 | 24
1. Health and Safety
Consumer Protection
As a responsible manufacturer, we take care to make sure that our products are designed and constructed to meet
the required safety standards when properly installed and used.
•Children less than 8 years of age shall be kept away unless continuously supervised. Cleaning and user
maintenance MUST not be made by children without supervision.
•CHILDREN SHOULD BE KEPT AWAY FROM THE APPLIANCE AS SOME SURFACES CAN BECOME HOT TO THE
TOUCH.
•WARNING: ACCESSIBLE PARTS MAY BECOME HOT
•DURING USE. TO AVOID BURNS AND SCALDS CHILDREN SHOULD BE KEPT AWAY.
•WARNING: During use the appliance becomes hot.
•Care should be taken to avoid touching heating elements inside the ovens.
•WARNING : Any spillages should be removed from the hotplate lids before they are opened.
•WARNING : This appliance is not intended to be operated by means of an external timer not approved by the
manufacturer or a separate remote-control system.
•CAUTION: The cooking process has to be supervised.
•A short term cooking process has to be supervised continuously.
•WARNING: Danger of fire: Do not store items on the cooking surfaces.
•WARMING: Top plate and lids can be become extremely hot if hobs left on full continuously.
•WARNING: Unattended cooking on a hob with fat or oil can be dangerous and may result in fire. NEVER try
to extinguish a fire with water, but switch off the appliance and then cover flame e.g. with a lid or fire
blanket.
•Never place anything aluminium between the saucepan base and the ceramic surface of the induction hob
(i.e. cooking mats, aluminium foil, etc).
•IMPORTANT: Oil is a fire risk, NEVER leave pans containing oil or fat unattended during the heating or
cooking period.
•Never fill the pan more than one-third fill of fat or oil.
•WARNING: If the induction or ceramic hob surface is cracked, switch off the appliance to avoid the possibility
of electric shock.
•Installation and maintenance must be performed by a suitably qualified installer or service agency.
•WARNING! This appliance must be installed with an appropriate device that will allow permanent
disconnection of the Live and Neutral conductors. During Installation or disconnection prior to any electrical
work, the appliance must be permanently disconnected from the Supply (Live) and Neutral Conductors.
•If a supply cord is damaged it must be replaced by the manufacturer, its service agent or similarly qualified
persons in order to avoid a hazard.
•DO NOT use a steam cleaner on your cooker.
•To avoid overheating, DO NOT install the cooker behind a decorative door.
•DO NOT use abrasive pads, caustic cleaners, oven cleaners or metal scrapers to clean the surfaces of the
enamel.
•IMPORTANT: Only use recommend Vitreous Enamel Association approved cleaners for cleaning the vitreous
enamelled surfaces of this product.
•DO NOT put oven doors or resting plates in a dishwasher.
•Children should be supervised to ensure that they do not play with the appliance.
•Induction hobs; - Metallic objects such as knives, forks, spoons and lids should not be placed on the hob
surface since they can get hot.

P a g e 3 | 24
Cooker Base or Hearth
It is essential that the base or hearth on which the cooker and should be level and capable of supporting the total
weight of one or both units.
The appliance may contain some of the materials that are indicated below. It is the Users/Installers responsibility to
ensure that the necessary personal protective clothing is worn when handling where applicable, the pertinent parts
that contain any of the listed materials that could be interpreted as being injurious to health and safety, see below
for information.
Glues and Sealants
Exercise caution - if they are still in liquid form use face mask and disposable gloves.
Glass Yarn, Mineral Wool, Insulation Pads, Ceramic Fibre
May be harmful if inhaled. May be irritating to skin, eyes, nose and throat. When handling avoid contact with skin or
eyes. Use disposable gloves, face-masks and eye protection. After handling wash hands and other exposed parts.
When disposing of the product, reduce dust with water spray, ensure that parts are securely wrapped.
General
•In the event of a fire, cover the pan with a lid and switch OFF the electricity.
•Smother the flames on the hob rather than attempting to remove the pan to the outside.
•Burns and injuries are caused almost invariably by picking up the burning pan to carry outside.
Deep Fat Frying
•Use a deep pan, large enough to completely cover the appropriate heating area.
DO NOT hang dish towels on the handrail. Doing so will block the air vent. Blocking the air vent can cause excessive
temperature increase to the control panel and prevent easy access.
When the oven (s) are on;
DO NOT leave any oven door open for long periods, this will affect the temperature of the oven and may allow
controls to become hot.

P a g e 4 | 24
2. Introduction
As responsible manufacturers we take care to make sure that our products are designed and constructed to meet
the required safety standards when properly installed and used.
Your eControl Cooker gives you everything you love about a heat storage cooker, but with the added convenience
that the two hotplates can be turned on or off, as required.
Refer to the diagram in the Overview chapter to familiarise yourself with the product and refer to the relevant
sections for the ovens, plates, controls etc.
In the interests of safety and effective use, please read the following before using your new appliance.
Ensure that the kitchen is well ventilated: keep natural ventilation holes open or install a mechanical ventilation
device (mechanical extractor hood).
Prolonged intensive use of the appliance may call for additional ventilation, for example, opening of a window, or
more effective ventilation, for example increasing the level of mechanical ventilation where present.
Installation must be to local and national wiring regulations and carried out by a qualified engineer.
A little smoke and some odour may be emitted when first switched on. This is normal and harmless (from oven
lagging and starch binder on the element insulation) and will cease after a short period of use.
P a g e 5 | 24
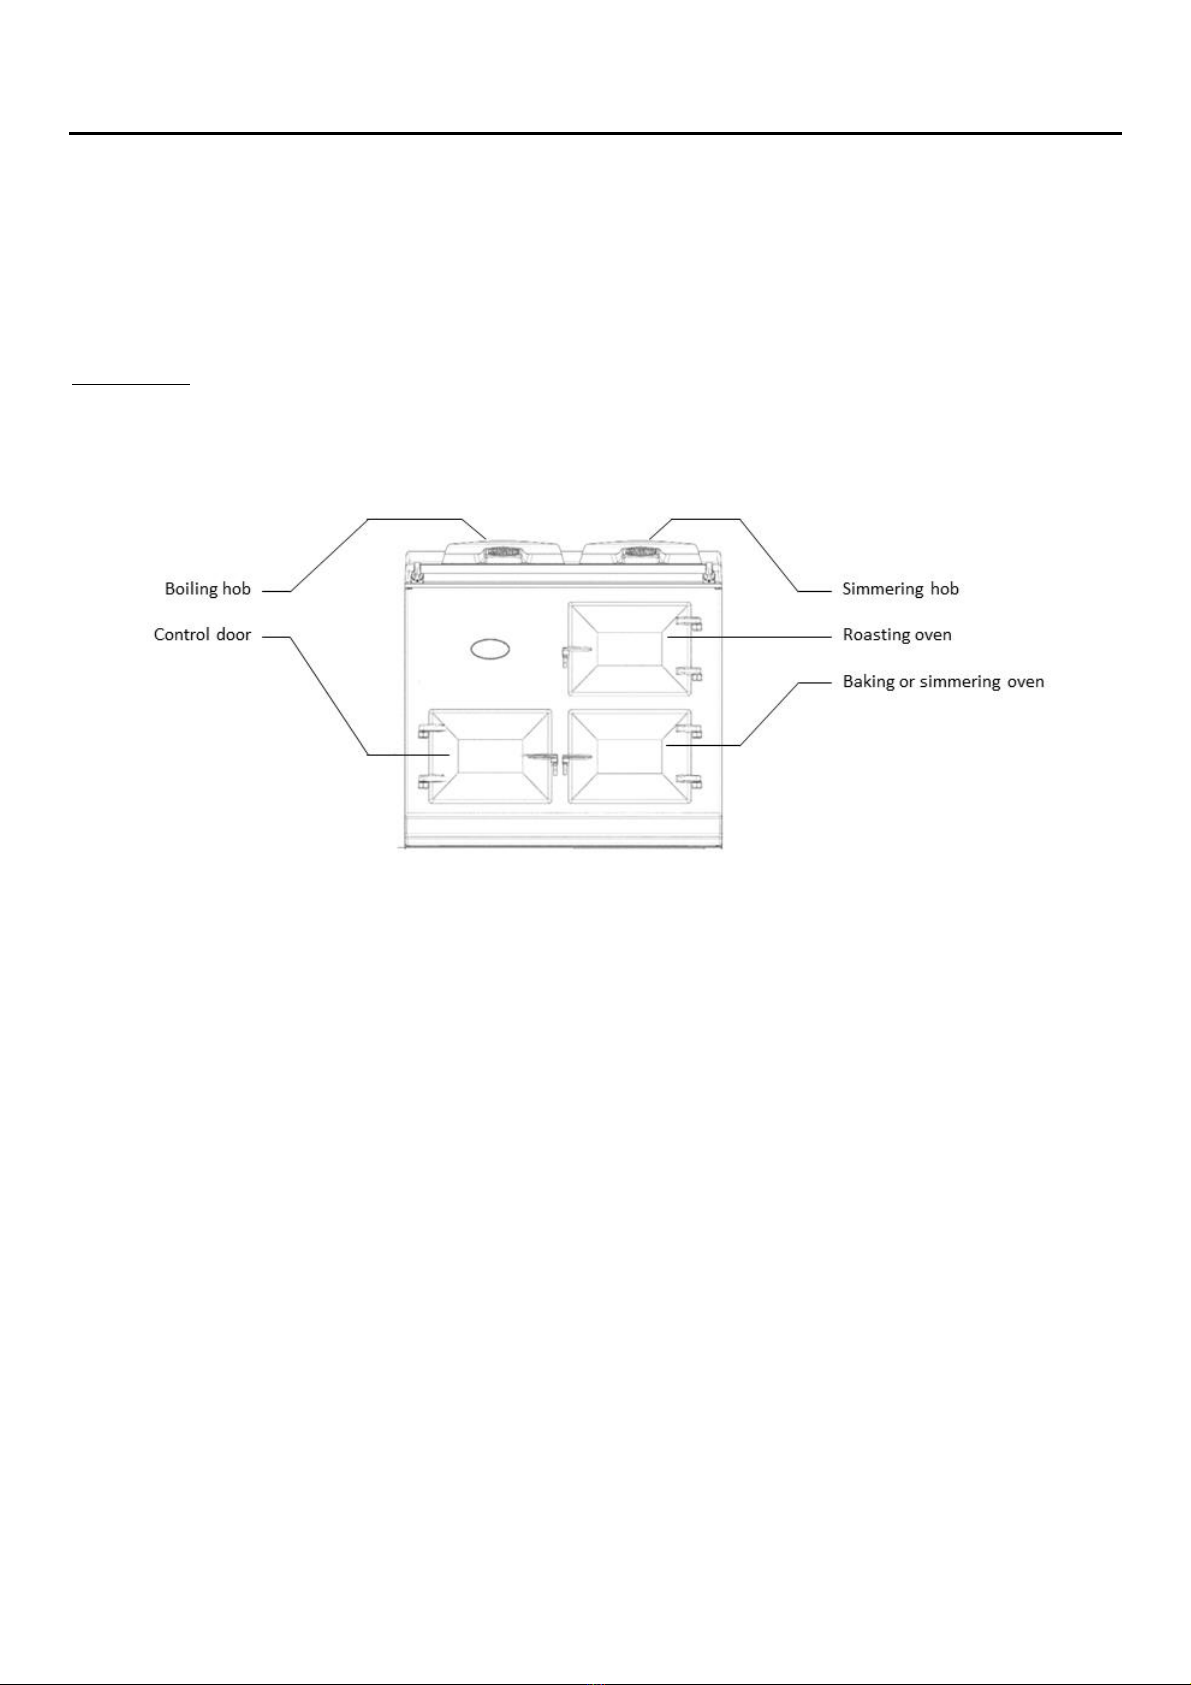
3. Overview
WARNING: ACCESSIBLE PARTS MAY BECOME HOT DURING USE. TO AVOID BURNS AND SCALDS CHILDREN SHOULD
BE KEPT AWAY.
eControl 100
The eControl Cooker has the traditional cast iron ovens with independently controlled hotplates.
Hotplates
The two hotplates are at different heats; the boiling plate being the hottest of the two and the simmering plate is a
lower heat. Each plate is individually controlled.
Boiling Plate
The boiling plate is used for making toast, boiling a kettle, stir-frying and cooking at a higher heat.
Simmering Plate
The simmering plate is for slower cooking, such as sauces, simmering pans and can also be used to cook on directly
for toasted sandwiches, drop scones, no-fat fried eggs and quesadillas.

P a g e 6 | 24
Roasting Oven
The hottest oven for high temperature cooking; pastries breads, roasting of meat, vegetables and poultry, grilling at
the top of the oven and frying on the base of the oven.
Baking Oven
A moderate oven for cooking cakes and biscuits, baking fish, lasagne or shepherds pie, plus roasting meat and
poultry at a medium heat. Cooking sweet and savoury dishes together is no problem as the flavours do not mix.
Simmering Oven
Long, slow cooking in the simmering oven develops flavours and makes the toughest meat tender. It’s large capacity
means several pans can be stacked here; soup, casserole, steamed rice, steamed carrots and poached fruits all
cooking simultaneously, without any danger of burning.
WARNING: ACCESSIBLE PARTS MAY BECOME HOT DURING USE. TO AVOID BURNS AND SCALDS CHILDREN SHOULD
BE KEPT AWAY.
eControl 150
Warming Plate (Hot cupboard)
The warming plate is the ideal resting place for cooked food.
Slow Cooking Oven (Hot cupboard)
Ideal for a broad range of long slow cooking applications, such as leg of lamb, pulled pork, belly pork and celebration
cake.

P a g e 7 | 24
Warming Oven (Hot cupboard)
Used for warming plates and serving dishes. Can also be used for resting joints before carving.
Roasting Oven
The hottest oven for high temperature cooking; pastries, breads, roasting of meat, vegetables and poultry, grilling at
the top of the oven and frying on the base of the oven.
Baking Oven
A moderate oven for cooking cakes and biscuits, baking fish, lasagne or shepherds pie, plus roasting meat and
poultry at a medium heat. Cooking sweet and savoury dishes together is no problem as the flavours do not mix.
Simmering Oven
Long, slow cooking in the simmering oven develops flavours and makes the toughest meat tender. It’s large capacity
means several pans can be stacked here; soup, casserole, steamed rice, steamed carrots and poached fruits all
cooking simultaneously, without any danger of burning.

P a g e 8 | 24
4. Operating the eControl Cooker
The different zones of the eControl Cooker are described in the following pages.
The traditional heat storage cooker is famous for the gentle warmth it emits; with the eControl Cooker you will get
warmth only when the cooker is on or warmth, to a lesser degree, when only parts of it are on.
The eControl system controls are outlined in the following panel diagram.
Oven Control
Your eControl 100 has two ovens which three optional temperatures creating three distinct cooking zones.
The Roasting Oven for high temperature cooking
The Baking Oven for moderate temperature cooking
The Simmering Oven for long, slow cooking
DO NOT OPERATE THE APPLIANCE WITH THE DOORS OPEN.

P a g e 9 | 24
eCONTROL 100 –CONTROLS EXPLAINED
HOB CONTROL (UPPER KNOB)
POSITION 1 - OFF
POSITION 2 - RIGHT HAND PLATE ON ONLY
POSITION 3 - BOTH HOB PLATES ON
POSITION 4 - LEFT HAND PLATE ON ONLY
POSITION 5 - ECO MODE: BOTH HOBS AT HALF TEMPERATURE
OVEN CONTROL (LOWER KNOB)
POSITION 1 - OFF
POSITION 2 - ROASTING OVEN TOP & SIMMERING OVEN BOTTOM
POSITION 3 - ROASTING OVEN TOP & BAKING OVEN BOTTOM
(AMBIENT HEAT MODE - FOR MAXIMIZED AMBIENT HEAT)
POSITION 4 - ECO MODE: BAKING OVEN TOP & WARMING OVEN BOTTOM
(THIS MODE IDEAL FOR REDUCING COSTS BETWEEN MEALS AND FOR SUMMER COOKING)
eCONTROL 150 –CONTROLS EXPLAINED
HOB CONTROL (UPPER KNOB)
POSITION 1 - OFF
POSITION 2 - RIGHT HAND PLATE ON ONLY
POSITION 3 - BOTH HOB PLATES ON
POSITION 4 - LEFT HAND PLATE ON ONLY
POSITION 5 - ECO MODE: BOTH HOBS AT REDUCED TEMPERATURE
OVEN CONTROL (LOWER KNOB)
POSITION 1 - OFF
POSITION 2 - ROASTING OVEN TOP & SIMMERING OVEN BOTTOM
POSITION 3 - ROASTING, BAKING, SIMMERING & WARMING OVEN
(AMBIENT HEAT MODE - FOR MAXIMIZED AMBIENT HEAT)
POSITION 4 - ECO MODE: BAKING OVEN TOP & WARMING OVEN BOTTOM
(THIS MODE IDEAL FOR REDUCING COSTS BETWEEN MEALS AND FOR SUMMER COOKING
Key Parameters
- Top right hand oven up to roasting temperature in approx. 25 minutes from eco mode
- Top right hand oven up to baking temperature in approx. 50 minutes from stone cold
- Top right hand oven up to roasting temperature in approx. 70 minutes from stone cold
- Hobs up to cooking temperature in approx. 8-10 minutes from stone cold
- Hobs up to boiling temperature in approx 14 minutes
- Hobs up to full temperature from eco mode in approx. 5 minutes
*Please allow at least an additional 30 minutes for oven temperature stabilization when pre heating the ovens from
stone cold.

P a g e 10 | 24
5. Consumption & Running Costs
Consumption Data (Model 100 - Ovens)
•Eco mode (Continuous operation - Baking and Simmering temperatures)
(Consumption - 0.32 kw/hr, Estimated Cost - £7.53 p/w)
•Normal mode (Continuous operation - Roasting and Simmering temperatures)
(Consumption - 0.41 kw/hr, Estimated Cost - £9.64 p/w)
•Full ambient heat mode (Continuous operation - Roasting & Baking temperatures)
(Consumption - 0.48 kw/hr, Estimated Cost - £11.29 p/w)
Consumption Data (Model 150 - Ovens)
•Eco mode (Continuous operation - Baking and Simmering temperatures)
(Consumption - 0.32 kw/hr, Estimated Cost - £7.53 p/w)
•Normal mode (Continuous operation - Roasting and Simmering temperatures)
(Consumption - 0.41 kw/hr, Estimated Cost - £9.64 p/w)
•Full ambient heat mode (Continuous operation - Roasting, Baking, Simmering and Warming temperatures)
(Consumption - 0.68 kw/hr, Estimated Cost - £15.99 p/w)
*All consumption figures on ovens can be significantly reduced when paired with a 32amp Wi-fi timer switch
Consumption Data (Model 100 & 150 –Boiling Hob)
•At full temperature –Turned on as required
(Consumption - 0.48 kw/hr, Estimated - £0.07 p/h)
Consumption Data (Model 100 & 150 –Simmering Hob)
•At full temperature –Turned on as required
(Consumption - 0.39 kw/hr, Estimated - £0.05 p/h)
Consumption Data (Model 100 & 150 –Both hobs on ECO mode at the same time)
•Eco mode temperature (5 minutes pre heat to full temperature)
(Consumption - 0.48 kw/hr, Estimated - £0.07 p/h)
*Fast hob heat up times means that they can be normally switched OFF and turned on when required
*For additional ambient heat ECO mode can be selected for continuous use
*All consumption data tested and recorded pro-rate over 7 day test period

P a g e 11 | 24
6. eControl Model 100 & 150
The Roasting Oven
When cooking on the floor of the roasting oven for long periods of time (more than 30 minutes), place a grid shelf on
the floor of the oven before putting the food into the oven, this lifts the food away from the base element to ensure
best cooking results are achieved. The floor of the ovens are hotter than on traditional models due to the location of
the heating elements.
The beauty of the roasting oven is that any fat splashes are burnt off when the oven is at full heat, just brush out
occasionally to get rid of carbon deposits.
The roasting oven is excellent for bread and pastries. Quiches in ceramic or pies in Pyrex dishes need not be baked
blind as when they are placed on the base of the oven, the pastry cooks from underneath and the filling will set and
brown from the all-round heat. As you are aware metal flan tins conduct heat quicker than ceramic so may need less
cooking time.
The specially designed roasting tins and bakeware slide directly onto the runners, so almost every available square
centimetre of space can be used. Food can be protected by the use of the cold plain shelf or shielded by means of
the large roasting tin, which means that you can cook food that requires different temperatures at the same time. If
food is browning too quickly and you do not want to move it to another oven just slide the cold plain shelf over the
food to reduce the top heat.
Roasting Oven Baffle
•All eControl Cookers and kits come with a perforated oven baffle that will be fitted by the installer to the
lowest oven rack tier of the top oven.
•Although the oven baffle can be removed when required it is advised to leave this in position for most day to
day cooking. This creates a more balanced temperature in the oven above the baffle suitable for most types
of cooking.
•The zone underneath the baffle can be hotter than above between thermostatic cycles, take this into
consideration with cooking methods when using the baffle or use to your advantage to crisp food for short
periods. It is best to additionally use an oven grid shelf on the floor of the oven to separate food the
strongest effects of the oven heat source.
•It is not advised to leave the baffle on the floor of the oven for long periods of time as this will create an
imbalance in the thermostatic cycle.
•PLEASE NOTE: DO NOT store anything in the ovens and avoid using large cookware such as the cold plain
shelf until the oven has reached it’s operating temperature.
•Please allow an additional 30 minutes for oven temperature stabilization when cooking in the roasting oven
following a pre-heat from cold.

P a g e 12 | 24
Fig 1 –Perforated oven baffle
The Baking Oven
This oven is set at a moderate heat, so is ideal for cakes, biscuits and also anything that requires medium heat
cooking such as fish pie, lasagne, soufflés, crumble and roulades. Meat and poultry can be cooked here in fact most
things that can be cooked in the roasting oven can be cooked in the baking oven but for a longer time.
When cooking on the floor of the baking oven for long periods of time (more than 30 minutes), place a grid shelf on
the floor of the oven before putting the food into the oven, this lifts the food away from the base element to ensure
best cooking results are achieved. The floor of the ovens are hotter than on traditional models due to the location of
the heating elements.
Cook cakes together on one shelf, if two shelves are used interchange the food to achieve even colouration, as you
would with any oven which is zoned in heat.
As with the roasting oven the specially designed roasting tins and bakeware slide directly onto the runners, so
almost every available square centimetre of space can be used. Food can be protected by the use of the cold plain
shelf or shielded by means of the large roasting tin, which means that you can cook food that requires different
temperatures at the same time.
If food is browning too quickly and you do not want to move it to another oven just slide the cold plain shelf over the
food to reduce the top heat.
NOTE: Always remove the cold plain shelf and roasting tins on completion of cooking. If left in the oven it will affect
the oven temperature.
When using the roasting oven for a long period of time i.e. a full meal, the baking oven temperature may rise, it will
therefore be necessary to adjust the cooking procedure, the following suggestions may prove useful.
1. When placing the food in the baking oven, ensure the cold plain shelf is set directly above the dish, for the
whole of the cooking time.

P a g e 13 | 24
2. In addition it may be necessary to lower the shelf position.
3. When baking food, such as very rich fruit cakes, which require a long period of cooking time, place the cake
on the fourth grid shelf position of the oven with the cold plain shelf set directly above for 3/4 hour approximately.
Move the plain shelf to the middle of the simmering oven. Transfer the cake to this shelf and bake until cooked
through.
NOTE: A loose metal perforated plate can positioned in the top of the baking oven in order to optimise cooking
performance.
The Simmering Oven
The simmering oven can be described as a continuation oven, it continues to cook food that has been brought up to
heat elsewhere on the cooker with the exception of meringues which are dried out rather than ‘cooked’.
•To get the very best performance, we recommend using cookware with thick bases and stacking lids.
•Joints of meat and poultry should be brought up to heat ideally in the roasting oven for 30 - 45 minutes, then
transfer to the simmering oven.This method is unsuitable for stuffed meat and poultry.
•Make sure that pork and poultry reach an internal temperature of at least 75°C.
•Always bring soups, casseroles and liquids to the boil before putting in the oven.
•Always thaw frozen food completely before cooking.
•Root vegetables will cook better if cut into small pieces.
•Adjust seasonings and thickenings at the end of the cooking time.
•Many dried pulses and beans for example, dried red kidney beans must be boiled for a minimum of 10
minutes, after soaking, and before inclusion in any dish.
The Plates
The top plate is the enamelled surface surrounding the plate position. It will become hot when the hotplates are in
use. Although it is not a cooking surface you can use the warmth for a number of useful activities, which more often
than not save time and washing-up! These include warming honey or syrup in the jar, or melting butter or chocolate
in a basin - so saving on melting over a saucepan - but please put the basin on a cork mat or folded piece of kitchen
towel to avoid scratching the enamel. Although it is durable and hard-wearing surface vitreous enamel is glass and
will show scratch marks!
The top plate when warm can also be used to rest a cup of coffee or tea or dry off awkwardly shaped tins, peelers or
food mixer and processor parts.

P a g e 14 | 24
Hotplates
The hotplates operate separate from the ovens and are independent of each other.
The boiling plate is on the left hand side and the simmering plate is on the right hand side. The boiling plate is the
hottest with the simmering plate being the cooler of the two. They both have electric elements directly beneath the
cooking plates and can heat up rapidly. The hotplates can be used completely independently from the ovens.
The whole hotplate area can be used for cooking and several pans can be accommodated on a single plate at any
one time. The hotplates are set very slightly above the top plate to avoid accidental scratching if the pans are pulled
to one side. DO NOT drag the utensils from one plate to another as the enamel will suffer!
The stainless steel insulated covers are brought down over the hotplates when they are not in use. When the
hotplates are ‘on’ the insulated covers will be hot. We strongly advise not to put anything such as kettles, saucepans
or baking tins directly onto the insulated covers because they will show any scratches - invest in a pair of chef’s pads
to protect the surface if the covers are to be used as resting places!
WARNING: IF HOBS ARE LEFT ON FULL CONTINOUSLY THE TOP PLATE AND LIDS CAN BECOME VERY HOT. USING ECO
MODE BETWEEN COOKING CYCLES REDUCES THE HEAT AND TO SAVES ON RUNNING COSTS.
Boiling Plate
The hottest hotplate, the boiling plate is used for boiling, griddling, stir-frying, making toast - indeed anything that
requires a high heat. Green vegetables keep their colour when boiled quickly here or use a steamer over the
saucepan to cook more than one vegetable at once.
Please be advised the boiling plate is too hot to cook food on directly.
Simmering Plate
The simmering plate is the cooler of the two hotplates and so is used for recipes that require a lower heat such as
making sauces, scrambling eggs, heating milk, slow frying, simmering soups and root vegetables. In addition, it can
be used to cook on directly as a form of griddle - invaluable for toasted sandwiches, quesadillas, soups, drop scones,
searing scallops and even a non-fat fried egg. Slow cooked toast can be made on the simmering plate, no need here
to use the toaster.
The same size as the boiling plate, the simmering plate is also machined flat to give the best all-over contact with the
AGA saucepans, grill pan, frying pan and kettle.
General Advice
When first switched on, the appliance will emit an odour for a short while. This is simply due to protective oil burning
off the hotplates. Wipe the inside of the lids whilst the appliance is heating up to avoid a film of this oil being
deposited on the inside.
The following points are intended to help in adapting to the heat storage range cooker style of cooking during the
change -over from a previous non-heat storage cooker.
For the most effective operation of the cooker, the following points should be carefully observed:

P a g e 15 | 24
1. Close the insulating covers whenever the hotplates are not in use.
2. When boiling or simmering use pane with lids fitted or part fitted to achieve the performance required
3. Clean the hotplates regularly with a wire brush.
4. Utensils with flat bases must be used to make perfect contact with the hotplate.
5. Take care when closing the oven doors, to lift them onto the catch.
6. Cook as much as possible in the ovens so that heat is conserved and cooking smells and condensation are
reduced.
7. The oven doors should not be left open for long periods of time during cooking and heating up.
•For optimum cooking performance, use cast iron cookware. They have flat bases which give the best contact
with the hotplates.
•Pans can be stacked in the simmering oven. This is especially useful for steaming vegetables and keeping
sauces warm.
•Store plain shelves out of the appliance. Use it cold in the roasting oven to deflect the heat from the top of
the oven, creating a more moderate oven temperature underneath. It can also be used as a baking sheet.
7. Cleaning & Caring
•REMEMBER: be careful of the hot appliance.
•For most cleaning it is best when the appliance is turned off.
•DO NOT use a steam cleaner to clean this cooker.
•DO NOT use abrasive pads, caustic cleaners, oven cleaners or metal scrapers to clean the surfaces of the
enamel.
•IMPORTANT: AGA recommend Vitreous Enamel Association approved cleaners for cleaning the vitreous
enamelled surfaces of this product.
•When cleaning use as little water as possible.
•DO NOT immerse the doors in water as they are packed with insulating material, which will be damaged by
excessive moisture.
•DO NOT put oven doors or resting plates in a dishwasher.
All that is usually needed to keep the vitreous enamelled surfaces of your cooker bright and clean is a daily rub over
with a damp, soapy cloth followed immediately with a clean, dry cloth to avoid streaks.
Ovens and Hotplates - are made from cast iron and keep themselves clean. They are very durable, but will rust if
surface moisture is left on them. Remember to always switch the ovens on, to dry them out after cleaning.
Heating up the ovens periodically will help burn off any cooking deposits to aid cleaning within the ovens.
To season the ovens, a light vegetable spray oil (corn oil is best) is recommended. Any stubborn stains can be
removed with the wire brush supplied.

P a g e 16 | 24
Enamelled cast iron. The easiest way to clean the top plate and front plate is to mop up spills as they happen. VEA
approved AGA Enamel Cleaner can be purchased from www. agacookshop.co.uk.
Baked on food is more difficult to clean but can usually be removed with proprietary vitreous enamel cleaners or
mild cream cleaners using a cloth, or if necessary, a nylon scouring pad.
If milk or fruit juice, or anything containing acid is spilt on the enamel, wipe off immediately.
Clean off any condensation streaks on the front plate around the oven doors or vitreous enamel maybe permanently
discoloured.
Remember the top plate and the polished covers will scratch if pans or utensils are dragged across them.
The top of the insulated cover (lid) This is chrome or stainless steel and can be kept clean by wiping over with a
damp cloth and polished up.
If the lining is marked it is best cleaned when the hotplate is cold. It can be cleaned with hot soapy water and/or a
cream cleanser. If badly marked then a soap impregnated pad can be used - this should be used in a circular motion.
The first few times a soap impregnated pad is used you will see the circular marks, these will become reduced and
the surface of the lining becomes shinier each time when used. Do not use excessive water and make sure the lining
is dry before closing the cover.
Oven door linings The linings can be cleaned with hot soapy water, a cream cleanser or soap impregnated pad. To
deep clean the lining place a towel on the work surface and carefully lift off the oven door (doors are heavy) and
place it enamel side down on the towel padding. Clean with a soap impregnated pad to remove stubborn marks. Dry
off before replacing on their hinges.
Enamelled roasting tins Those supplied with the appliance should be cleaned in hot soapy water, soaking if
necessary. A nylon scouring pad can also be used. They may also be cleaned in the dishwasher, but with constant
use, the enamelled finish will become dull in appearance.
DO NOT USE HOB BRITE ON ENAMELLED SURFACES.

P a g e 17 | 24
8. Installation instructions
WARNING!
Please read the Warning, Cautionary notes at the start of this section. If the information contained within these
instructions is not followed, property damage or personal injury may occur.
DO NOT store or use gasoline or other flammable vapors and liquids in the vicinity of this or any other appliance.
Installation and service must be performed by a qualified installer or service agency.
WARNING! This appliance must be installed with an appropriate device that will allow permanent disconnection of
the Live and Neutral conductors. During Installation or disconnection prior to any electrical work, the appliance
must be permanently disconnected from the Supply (Live) and Neutral Conductors.
CAUTION: THIS UNIT IS HEAVY, PROPER EQUIPMENT AND ADEQUATE MANPOWER MUST BE USED IN MOVING THE
RANGE TO AVOID DAMAGE TO THE UNIT OR THE FLOOR.
•REMEMBER, when replacing a part on this appliance, use only spare parts that you can be assured conform
to the safety and performance specification that we require.
•DO NOT use reconditioned or copy parts that have not been clearly authorised by eControl Cookers.
PLEASE READ THESE INSTRUCTIONS BEFORE USING THIS APPLIANCE AND KEEP IN A SAFE PLACE FOR FUTURE
REFERENCE.

P a g e 18 | 24
17. Installation requirements
Consumer protection
As a responsible manufacturer, we take care to make sure that our products are designed and constructed to meet
the required safety standards when properly installed and used.
•WARNING - ELECTRIC SHOCK HAZARD
•It is the customers responsibility to contact a qualified electrical installer to make sure the electrical
installation is adequate and in conformance with the regulations.
•Take special care when cutting holes in walls or floor. Electrical wires may be behind the wall or floor
covering and could cause an electrical shock if you touch them.
•Locate any electrical circuits that could be affected by the installation of this product and disconnect power
circuit.
•WARNING: THIS APPLIANCE MUST BE EARTHED.
•DO NOT use an extension lead with this appliance.
•The appliance is designed for the voltage stated on the data plate.
•Recommended but not mandatory to fit an individual
•Residual Current Device (RCD) to the cooker supply circuit.
Hand this Manual to the User for retention and instruct in the safe operation of the appliance.
Delivery requirements
•The eControl 100 arrives on 1 pallet
•The eControl 150 arrives on 2 pallets.
The eControl cooker can be assembled at your property where limited access is available.
For pre-assembled installations there must be access to the kitchen to manipulate a foot print of 1005mm x 740mm.
A wooden template (skate with castor wheels) of dimensions 1005mm x 740mm could be used to check if the AGA
fully built appliance is able to fit through the property grounds and doors into its installation position in the kitchen.
It must also be considered that the height of the appliance is 960mm off pallet and 1100mm on the pallet, so high
level obstacles/restrictions must not be overlooked.
If this skate/template can be manipulated through the property grounds and doors into position, then the AGA can
be installed as intended with no re-work.
P a g e 19 | 24
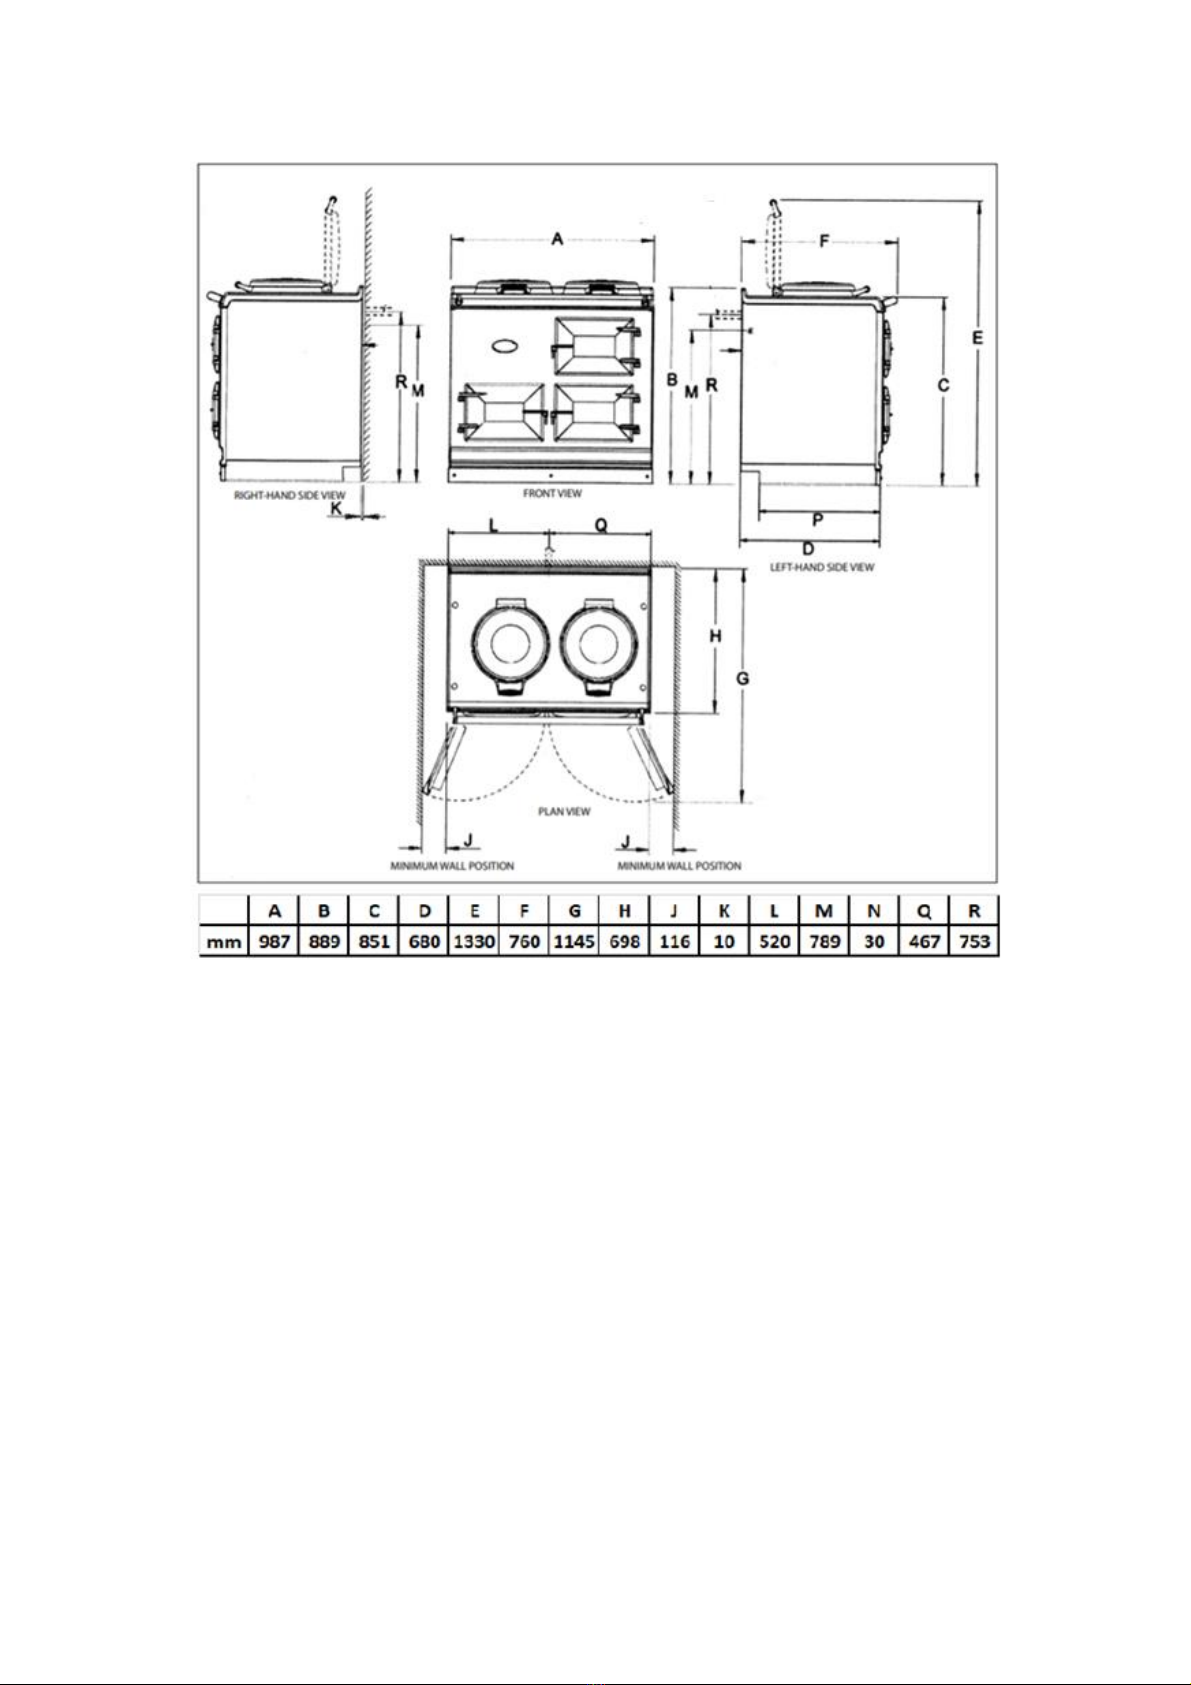
Appliance dimensions –eControl 100
*Add plinth height to appropriate dimensions
Cooker Dimensions
When surveying for a cooker installation the actual clearance required for the ‘body’ of the appliance should be
increased by 10mm beyond the figures quoted above. This allows safe margin to take into account the natural
dimensional variations found in major castings. In particular the width across the appliance recess could be critical.
This manual suits for next models
1
Table of contents
Other eControl Cooker manuals


