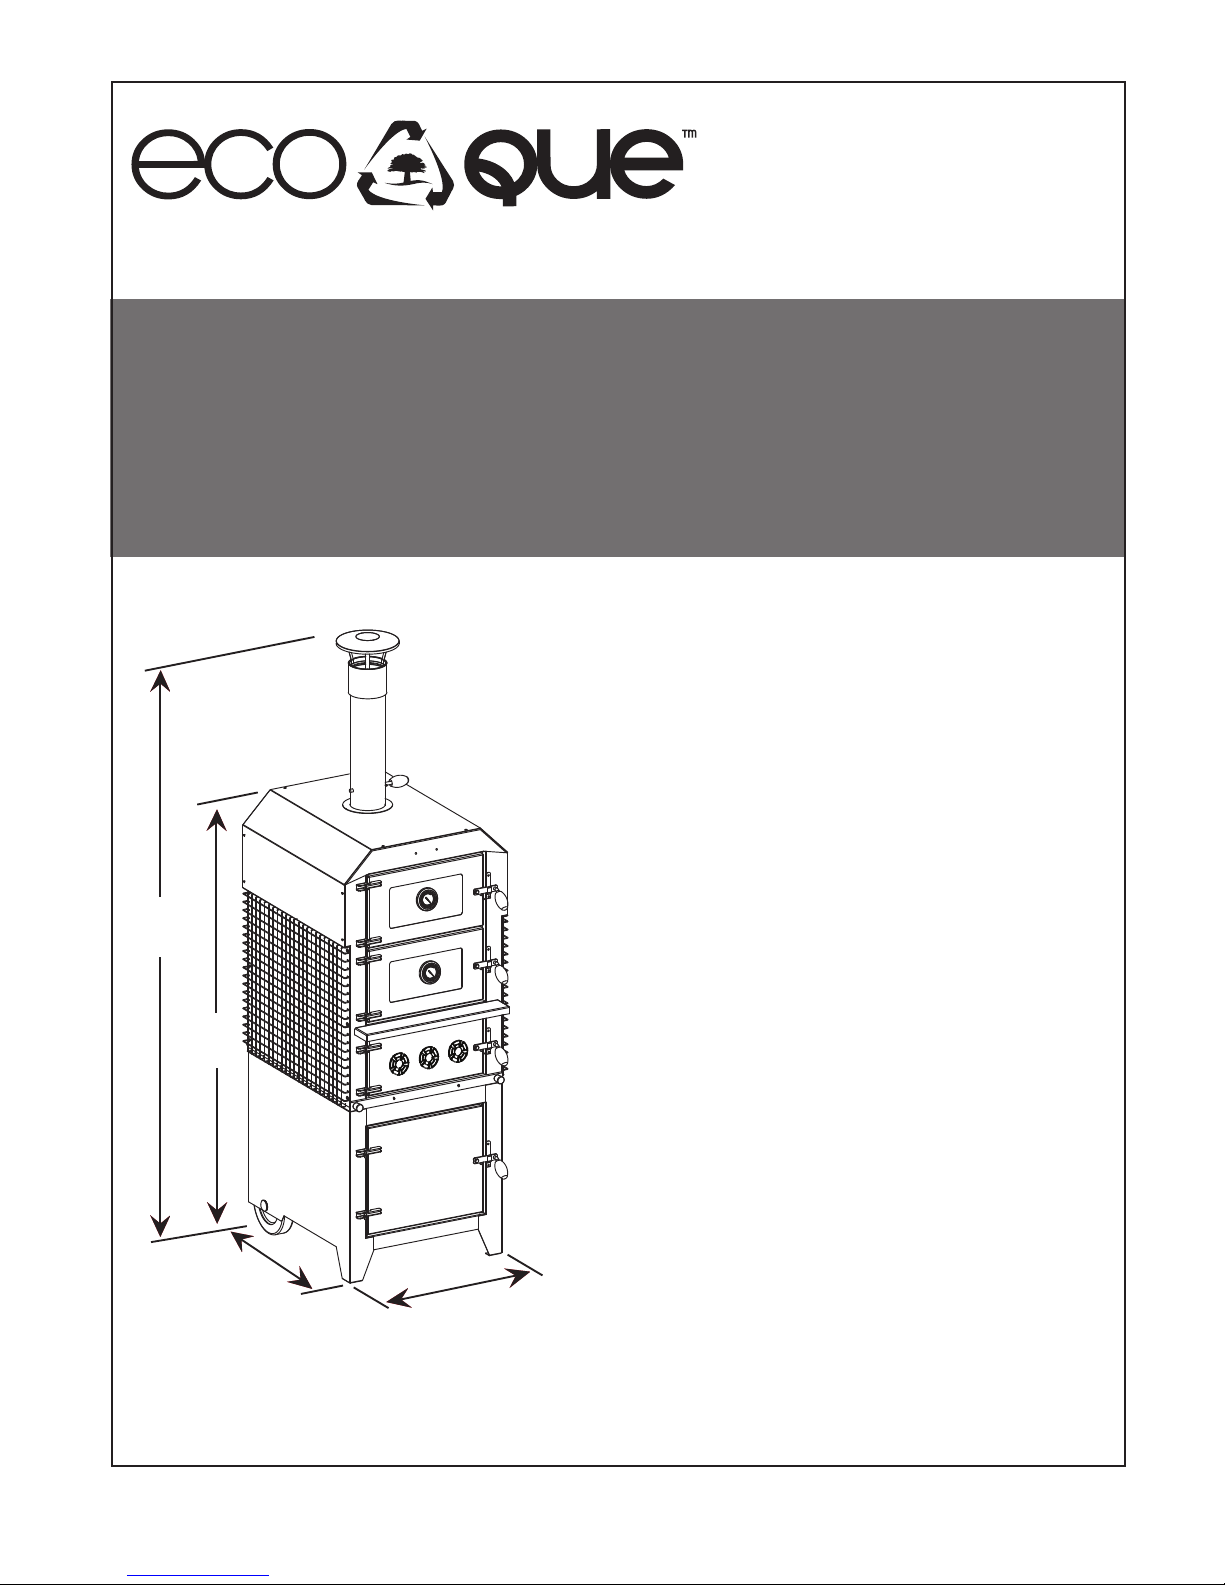
ecoque 71008 Supplement

71008
Wood-Fired Pizza Oven
& Smoker
Warning!
Read all saftey and
operating insturctions
thoroughly before use
BAKE|SMOKE|ROAST
81.3 in
207 cm
58.7 in
149 cm
27 in
68.5 cm
25 in
63 cm
Assembly &
Operation Manual
71008-MAN01

r
T
71008 page|1
Important Safety
Information
! !
You must comply with all safety information when using this product.
Please read all Dangers, Warnings, and Cautions outlined in this section.
Failure to comply could result in fire, injury, damage to property, and/or
death!
Dangers describe the most serious consequences resulting from misuse of
this product.
Warnings describe serious consequences resulting from misuse of this
product.
Cautions represent precautions to take when using this product.

71008 page|2
• Failure to comply with the Dangers, Warnings and Cautions presented by this
manual may result in severe injury, death and/or damage to property.
• Incorrect assembly or improper use may result in hazardous conditions. Only
assemble according to instructions in this manual.
• Adding fuel or volatiles such as lighter fluid to combusting charcoal or flames can
result in explosion. Do not add volatiles after igniting this appliance.
• Do not use liquid or gas fire starters. Always refer to ecoque.com for a list of fire
starters recommended for this appliance.
• Do not leave this appliance unattended around minors or pets.
• Use extreme caution when appliance is hot. Improper handling can result in burns
and/or fire. Wait until appliance is cool before moving.
• Do not use accessories in a manner other than specifically stated by an official
instruction manual. Misuse of accessories could result in destruction of
property, personal injury or death.
• Do not use this appliance in adverse weather, including high winds, rain, or other
extreme conditions.
• Do not use indoors. This product is for use in a well-ventilated outdoor area only.
Failure to comply could result in complications from toxic fumes and gasses or
death.
• Do not dispose of ashes immediately after grilling. Ashes can remain hot for several
hours after use. Stir ashes with water thoroughly in a separate container to ensure
they are completely cool before disposing.
• Do not operate this appliance near (within 25 feet of) any combustible objects.
• Do not operate this appliance while under the influence of drugs or alcohol.
• Do not douse this appliance with water or other fluids when hot. Such
rapid cooling could cause grease explosions, personal injury, and or
damage to the appliance.
• Do not touch or operate this product without the proper personal protective
equipment.
Danger

r
T
71008 page|3
• This appliance is for outdoor use only.
• Follow directions for lighting and maintaining fuel.
• Use appropriate personal protective equipment such as oven mitts and aprons
when operating this appliance.
• Only use wood, charcoal, or plant based fuels specifically designed for outdoor
cooking.
• Use care when transporting this appliance.
• Only use accessories how they are intended to be used. Always follow directions
when using accessories with this appliance.
• Only use this appliance on flat, stable surfaces.
• By-product from the combustion of charcoal and other fuels are known by the State
of California to cause cancer, birth defects or other reproductive harm.
• Edges are sharp and can cause cuts or lacerations. Handle appliance components
with care and never swipe any part of your body across an edge, corner, or side of
this appliance.
• Assembly of this appliance required two people. Do not attempt assembly with one
person or with anyone unable to lift 100lbs (50kg).
Warning
Caution
• Clean appliance often with warm water and non-abrasive scrubber.
• Clean up after barbecuing and dispose of all garbage in an appropriate location.

Smoker Oven
Pizza Oven
Combustion
Chamber w/
Vent Knobs
Fuel Storage
Chimney
Chimney
Adjustment
Temperature
Guages
Protection Wire
Data Plate:
2x temperature gauges
1x front shelf
3x slide out racks
3x small bricks
1x pizza stone
1x surface thermometer
1x food-prep pan/baking tray
2x non-stick pans
1x support wire rack for baking tray
1x chimney
1x chimney top
Component List:
A Word on Fuels:
Optimal Fuel Size (chunk wood):
Width 2.5in (6cm)
Depth 2.5in (6cm)
Height 2in (5cm)
Hints and Tips:
The Smoker Oven is great for smoking large cuts of meat.
With vent control, the smoker oven can maintain
temperatures as low as 200oF (93oC) for “low and slow”
cooking.
The cooking chamber of the pizza oven is completely
sealed off from smoke. If you want to add a great smoke
flavor to your pizza, try placing an EcoQue Chip StripTM
alongside your pizza. Available at ecoque.com
Wear heat-resistant gloves, such as leather gloves or
oven mitts, when using this product.
When cooking with this Wood-Fired Pizza Oven & Smoker,
remember to maintain temperatures with small amounts
of fuel. One or two blocks of chunk wood should do the
trick.
IMPORTANT! Self-Cleaning Burn
Before First Use
71008 page|4
The dataplate is situated on the rear of the oven; always
refer to the details on this plate if you need to contact the
manufacturer for information or to order spare parts.
This Wood-Fired Pizza Oven & Smoker is fuel efficient and
easy to use. Each oven is designed, manufactured and
tested with care to ensure that you have the best wood-
burning pizza oven available.
Only use fuels that do not produce noxious fumes. We
recommend lump charcoal or chunk wood. For best results,
do not use charcoal when cooking food in the smoker oven.
DO NOT USE TIMBER THAT HAS A HIGH RESIN CONTENT
SUCH AS PINE, SPRUCE, OR ANY TREATED/PAINTED
WOOD.
It is important that you conduct a self-cleaning burn in your new
Wood-Fired Pizza Oven & Smoker before you start cooking. This
self-cleaning burn will remove all residue that may have accu-
mulated during shipping and manufacturing.
Please follow instructions under “First Time Lighting”
on page 8 of this manual.
This manual contains information on the safe and proper opera-
tion of the EcoQue Wood-Fired Pizza Oven & Smoker. Read
Thoroughly before use.
Extending
Handles
Note: The door thermometers are calibrated to show the
temperature inside the cooking chamber and do not show the
appropriate temperature when the appliance is cool. Do not be
alarmed if the door thermometers read significantly above ambi-
ent temperature.
Chimney Top

71008 page|5
Remove 4 bolts from top of oven (the
bolts are stored in the threaded holes
on top of the oven for transport).
2
Slide the chimney top on top of the chimney and then attach the chimney to
the top of the pizza oven as shown in the illustration to the right. Use the 4 bolts
removed in the previous step to attach the chimney.
Note: The chimney can be placed so that the chimney adjustment points to the
front of the appliance or to either side.
1
2
4
Don’t forget the two
bolts on the back
Assembly
23 Assemble chimney adjustment in base of chimney. Attach damper rod to damper plate
with 2 bolts as shown.
Unbox the Oven Compartment and the Wood Storage
Box. Use the pull-out rods on the front and back of the
Oven Compartment to lift the Oven Compartment onto
the Wood Storage Box. This step requires two people.
Then use 4 bolts (the bolts are screwed in the thread
holes located in the wood storage box for transport) to
attach the oven compartment to the wood storage box,
as shown in the diagram to the right.
5Transport this unit by pulling out the two handles located on the
front of this unit and lifting slightly. The unit will pivot on the wheels
and can easily be wheeled across a smooth surface to the desired
location. Take all necessary precautions when transporting this unit
to avoid excessive tipping.

Place Parts in the oven and smoker compartment:
(as shown in the diagram)
1x slide out rack in the pizza oven.
2x slide out racks in the smoker oven.
1x ash tray & firebox in the combustion chamber
Place the bricks, pizza stone, and baking tray support
wire rack in the pizza oven as shown. Use baking tray
support wire rack when placing baking tray on top of
pizza stone. Remove baking tray support if not
necessary when cooking directly on the pizza stone.
Food Prep Pan
Important Note:
Do not leave empty pans in the oven during use as
this will damage the pan.
71008 page|6
X 2
Baking Pan/Water Pan
Note: All the parts below are packed in the pizza oven
chamber for transportation. Assemble the ovens
according to the instructions below:
Note: Ensure all cardboard and packaging used to
protect the brick and pizza stone is removed before
using.

71008 page|7
The Firebox is fastened to a wire rack that allows it to easily
slide in and out of the combustion chamber. Follow the
instructions below to insert or remove the firebox
Inserting the Firebox
Tilt wire rack so that hooks pass
diagonally between tabs on side rails
of combustion chamber.
Flatten wire rack so that hooks catch
behind tabs on side rails
Push firebox into combustion cham-
ber.
Hints & Tips
•The door thermometers are calibrated to show the temperature inside the cooking chamber and do not show
the appropriate temperature when the appliance is cool. Do not be alarmed if the door thermometers read
significantly above ambient temperature.
•Please note that the chamber temperature may drop slightly when either oven door is opened. This is normal,
do not immediately add more wood. Instead, close the oven door and wait a few minutes to see if temperature
rises back to the desired temperature. After that, add one piece of wood at a time and check every few
minutes to see if the oven has reached the desired temperature.
•Hold the oven at your desired cooking temperature for about 10 minutes before adding your food. This allows
the temperature inside the appliance to stabilize. After that, maintain the cooking temperature by adding one
small piece of wood at a time.
•Never exceed the maximum temperature of 650oF (350oC)

Open
Close
This Wood-Fired Pizza Oven & Smoker is designed to burn
cleanly and efficiently. Its unique firebox design allows for
easy setup and operation. Follow the simple steps below to
start your fire.
Starting the Fire
Step 1: Place Fire Starters
Remove the fuel grate and place fire starters on fire-starter
grate. Note: Avoid using fire starters that will produce exces-
sive amounts of soot or debris such as paper.
Fire Starters
Step 2: Insert Fuel Grate & Light
Place the fuel grate above the fire-starter grate. After that,
use long matches or a long lighter to ignite the fire starters.
Step 3: Add the Fuel
Now it’s time to add fuel. You can use anything that burns
without producing excessive soot or debris. We recom-
mend using flavored cooking wood or grilling charcoal.
Note: If you are going to be using the smoker oven, use
wood fuel. Charcoal smoke can produce an undesirable
flavor in your food so make sure to only use wood fuel after
you place food in the smoker oven.
Cooking Fuel
Step 4: Control the Temperature
Once you’ve added fuel, slide the fire box back into the
appliance and close the door. The knobs on the front of the
door allow you to directly control the temperature inside
the pizza oven and the smoker oven. To increase the
temperature, open the knob vents. To decrease the
temperature, close the knob vents.
At start-up, If the appliance is cool, make sure to open the
knob vents and allow the oven to heat as quickly as
possible.
Note: Only a small amount of fuel is required to maintain
temperature in the pizza oven and smoker. Be careful not
to add too much wood. Always use the knob vents to
control the cooking temperature.
Note: Cooking times and temperatures will vary depending
on fuel and other factors. It will be important to get a feel
for controlling the temperature with a variety of fuels.
71008 page|8

71008 page|9
Follow the instructions below before cooking in
the pizza oven or smoker oven. It is important to
remove any oil residue or moisture that enters
the appliance during manufacturing and trans-
portation with a self-cleaning burn. Also, be
sure to follow the instructions for proper first time
care of the masonry which includes the pizza
stone and three bricks.
First Time Lighting
•Open the doors and remove any packaging.
•Remove all masonry from the pizza oven.
•Carefully clean the pizza stone with a light
rinse of warm water and a clean rag. Also, use
a damp rag to wipe the three bricks. Do not use
soap or detergent as this will damage the ma-
sonry.
•Carefully dry the pizza stone and three bricks
with a clean towel and then allow to air dry.
• Clean the walls inside of the smoker box and
pizza oven with warm water, mild detergent,
and a non-abrasive scrubber. Dry with towel.
•Place masonry back in the pizza oven when
dry. Never place damp masonry in the pizza
oven as it may crack.
•Follow instructions on page 7 to light the fire.
•Heat the oven to approximately 450oF
(177oC) for at least 2 hours. Be careful not to
exceed 650oF (350C) in the pizza oven.
•Now your oven is ready to use!
Cooking in the Pizza Oven
Follow instructions on page 7 to light the fire
and maintain your desired cooking tempera-
ture. The pizza stone takes about 25 minutes
to heat up and will stay hot for hours. For best
results use the included surface thermometer
to measure the exact temperature of the
pizza stone. Pizza cooking time & tempera-
tures will vary depending on your recipe.
Not Just Pizza!
Note: Cooking times will vary depending on
the type of food and the weight of the food.
For best results always measure the internal
temperature of your food with a long probe
thermometer.
The pizza oven is great for a variety of other
cooking methods.
Planking
Try planking a beautiful piece of salmon or
some veggies and scallops on a cedar plank.
The pizza stone provides a great surface for
planking all kinds of food.
Roasting
If you are looking to roast without smoke, try
using the pizza oven for a controlled, even
heat. Again, use a pan to make sure that
nothing drips on the pizza stone.
Baking
Bake bread, muffins, cornbread, cakes and
everything else you love. Use a thick non-stick
pan or be sure to dust the pizza stone with
cornmeal first because dough will stick to the
stone.
Cooking Pizza
Always use cornmeal when baking on the
stone surface to prevent dough from sticking.
Use a wood peel dusted with cornmeal to
place pizza and bread on the stone. Then use
a steel peel to remove your food.
We are constantly finding new ways to use this
amazing Wood-Fired Pizza Oven & Smoker.
For videos, recipes, and more information
please visit us at ecoque.com
New Recipes and Ideas
It’s easy to cook just about anything in this fully
insulated and extremely efficient pizza oven!
Use the pizza oven instead of the smoker when-
ever you want to plank, roast, or bake without
smoke.
Avoid cooking foods that will drip fat or grease
on the pizza stone. This can damage the stone.
Instead make sure to put foods like lasagna,
meat, and anything else that might drip in one
of the non-stick pans.

Mild Flavor Medium Flavor Heavy Flavor
Peach
Apple
Pecan
White Oak
Cherry
Hickory
Mesquite
Red Oak
Blackjack Oak
OPEN
SHUT SHUT
OPEN
SHUT SHUT
pointer
71008 page|10
Smoking
All of the smoke created by the fire pours into
the smoker oven, delivering an amazing
smoke flavor directly to your food! You can
control the smoke flavor of your food by
following these tips:
• Decide what wood to use
Use table below to choose the right wood.
• Build the fire and heat the smoker oven
Avoid charcoal fuel with food in the smoker
oven.
• Control the smoke with the Chimney
Illustration to the right
• Place a water pan in the smoker oven
Always keep a water pan on the rack below
your food. This adds humidity and helps
regulate the temperature.
• Maintain smoking temperature
Make sure not to add too much fuel.
• Monitor your food’s temperature
Keep tabs on your food with a long probe
thermometer and remove it when directed by t
your recipe.
Hint: Soak wood chips for about an hour and
then add them to your fire for an even more
Experiment with different woods to find your personal
favorite. Always use well-seasoned wood. Green or fresh
wood can turn food black and impart a bitter taste.
Always keep the smoker oven door closed to prevent loss
of heat and smoke. Add wood as necessary to maintain
the proper cooking temperature.
Chimney Adjustment
If the pointer is in the horizontal
position (as shown in the
diagram) the chimney is shut.
If the pointer is in the vertical
position (as shown in the
diagram) the chimney is open.
When the Chimney is shut, smoke is held in the
smoker oven. When the Chimney is open,
smoke is allowed to pass through the smoker
oven. Adjust the chimney to deliver the right
amount of smoke for what you are cooking.
We are constantly finding new ways to use this
amazing Wood-Fired Pizza Oven & Smoker. For
videos, recipes, and more information please
visit us at ecoque.com
New Recipes and Ideas

71008 page|11
Maintenance
Cleaning the Cooking Chambers
The cooking chambers should be cleaned periodically
with warm soapy water and a non-abrasive scrubber.
Remove masonry to ensure that soap does not contact
the masonry. Allow unit to dry thoroughly after cleaning.
Cleaning External Surfaces
Keep your Wood-Fired Pizza Oven & Smoker looking
clean by regularly washing it with warm soapy water.
Again, avoid using an abrasive scrubber as this may
damage the surface finish.
Cleaning the Combustion Chamber
When it comes time to empty the ash tray, follow
these simple steps...
Step 1: Pull out the Fire Box
Step 2: Remove the Pin
Do not remove fire box until fire is com-
pletely extinguished
Step 3: Empty Ash Tray
Warning! Make sure ashes are completely
doused with water after emptying ash tray.
•Scrape off food particles with a plastic scraper or
spatula. A soft wire brush can also be used to lightly
release particles from the stone surface.
•Remove loose particles with a vacuum or with a hand
broom and dust pan.
•Use a clean, damp rag to wipe the stone.
•Allow stone to dry completely before heating the pizza
oven.
Care and Maintenance of the Masonry
Light Cleaning
•Carefully remove the pizza stone. Be sure to allow your
pizza stone to completely cool before removing it for
cleaning.
•Carefully clean the pizza stone with a light rinse of
warm water and a rag. Use a damp rag to wipe the
three bricks if necessary. Do not use soap or detergent as
this will damage the masonry.
•Scrape off food particles with a plastic scraper or
spatula. A soft wire brush can also be used to lightly
release particles from the stone surface.
•Carefully dry the pizza stone and three bricks with a
clean towel and then allow to air dry.
•Place masonry back in the pizza oven when dry. Never
place damp masonry in the pizza oven as it may crack.
Note: The Pizza Stone will darken and discolor with use.
This is a normal part of the seasoning process.
Thorough Cleaning
Note: Allow this appliance to completely
cool before performing maintenance.

Warranty Information
.
Item # 72181
This product is covered by a one year limited warranty. To obtain more information or
register for the warranty please visit ecoque.com/warranty
Limited Warranty Terms
Please Read Thoroughly
Conditions of Warranty
EcoQueTM warranty obligations are limited to the terms set forth below:
• EcoQue hereby warrants this product against defects in materials and workmanship for a period of One (1)
Year from the date of original retail purchase. This warranty is good only to the original purchaser.
• No liability will be accepted for loss or damage during transit.
• The appliance must be operated and maintained in accordance with the supplied instructions.
• No alterations or repairs are to be carried out unless by obtaining prior consent by EcoQue.
• Any repair or replacement does not extend the warranty period.
• Any parts other than original EcoQue parts will void this warranty.
• The warranty period is calculated from the date of purchase only.
• Proof of purchase must be retained in a safe place. Please register online for the warranty at
www.ecoque.com/warranty
Not Covered
• Lack of maintenance, abuse, neglect, misuse, accidental or improper installation of this appliance.
• Scratches, dents, corrosion or discoloration caused by heat, abrasive chemical cleaners or
chipping of painted/coated parts.
• Corrosion or damage caused by exposure to the elements (e.g. insects, weather, hail).
• Grease and fat fires.
• Cleaning and wear and tear.
• Rusting of metal frame or components.
• Commercial use of the product.
• Unauthorized repairs or modifications during the warranty period.
• Cracks and weathering caused by exposure to the elements or damage by heat, insects, chemicals,
or food acids or juices.
• Removal or re-installation costs. This warranty does not cover costs for transit.
If you discover a defect, EcoQue will, at its option, repair or replace the defective part(s) of the
product - or -refund the purchase price of this product at no charge to you provided that EcoQue
is notified of your claim and all relevant details during the warranty period. The first step to notify
EcoQue of your claim is to e-mail: [email protected] - or - call 888.204.4737 so that we
can determine the best course of action for the problem. Based upon this assessment, we will issue
you an R/A Number and instructions on how the problem will be resolved. EcoQue’s warranties do
not apply if the product has been damaged by accident, abuse, misuse, or misapplication; or if the
product has been modified without the written permission of EcoQue.

For videos, recipes, and more information please visit us at ecoque.com
Table of contents