Ecosy+ PANORAMIC 9 MULTI-FUEL User manual
Panoramic 9 Mul-Fuel ecosystoves.co.uk + 4 4 1 2 5 6 8 3 00 99
1
Brought to you by
Ecosy+ Stoves, Hampshire
ADDRESS
CONTACT
Telephone: + 44 1256 830099
PANORAMIC 9 MULTI-FUEL MANUAL

Panoramic 9 Mul-Fuel ecosystoves.co.uk + 4 4 1 2 5 6 8 3 00 99
2
SAFETY
•Please take care when handling the stove. It will
usually require 2 people to li it.
•The stove is only designed to burn wood and
smokeless fuel. No other fuels are permied.
•Ensure that a working Carbon Monoxide alarm ed
in the room of the appliance.
•Ensure the stove is correctly installed and signed o.
CHIMNEY FIRE PROSEDURE.
1.Call the re brigade
2.Ensure all air vents and ue dampers are shut to reduce the
chimney re's oxygen supply
3.Move ammable materials, furniture, ornaments away from the
replace
4.Feel the chimney breast throughout the house - if it is geng hot
then move furniture away from it
5.Do not pour water on the re if you have a stove
Causes of chimney res
The biggest cause of chimney res is a build-up of deposits such as
wood tar or coal soot. As these build up over me, the risk of
chimney re becomes greater. The deposits will release
combusble volales as they heat up from the re below.
Eventually, these may ignite if the temperature reaches ignion
point.
The easiest and most eecve way to stop this happening is regular
cleaning of the ue/chimney. This should be done in rao to the re
usage. We recommend ue sweeping at least once a year.
TECHNICAL INFORMATION COVERING THE PANORAMIC
9 MULTI-FUEL
PANORAMIC 9 MULTI-FUEL
Outlet Size
5”
Defra Approved
Yes
Heat Output
Wood: Nominal 7kw - Low Output 4.8kw - High
Output 9.5kw
Smokeless Coal: 6.3kw
Eciency
Wood: 76.1% Smokeless Coal: 78.8%
DIN Plus Dust (at 13% O2)
Wood: 13 Smokeless Coal: 31
Mean NOX (at 13% O2)
Wood: 68 Smokeless Coal: 155
Mean CnHm (at 13% O2)
Wood: 67 Smokeless Coal: 32
Panoramic 9 Mul-Fuel ecosystoves.co.uk + 4 4 1 2 5 6 8 3 00 99
3
Mean CO emissions
Wood: 0.10 Smokeless Coal: 0.12
Hearth Temperature
66.7c
Flue gas mass ow g/s
Wood: 7.0 Smokeless Coal: 5.0
Mean Flue Gas Temp
Wood: 286 Smokeless Coal: 295
Distance to Combusbles at the Rear
425mm
Distance to Combusbles at the Side
250mm
Hetas Clean Air Approved
Yes ( Wood )
Adjustable Feet
Yes
Weight 140KG
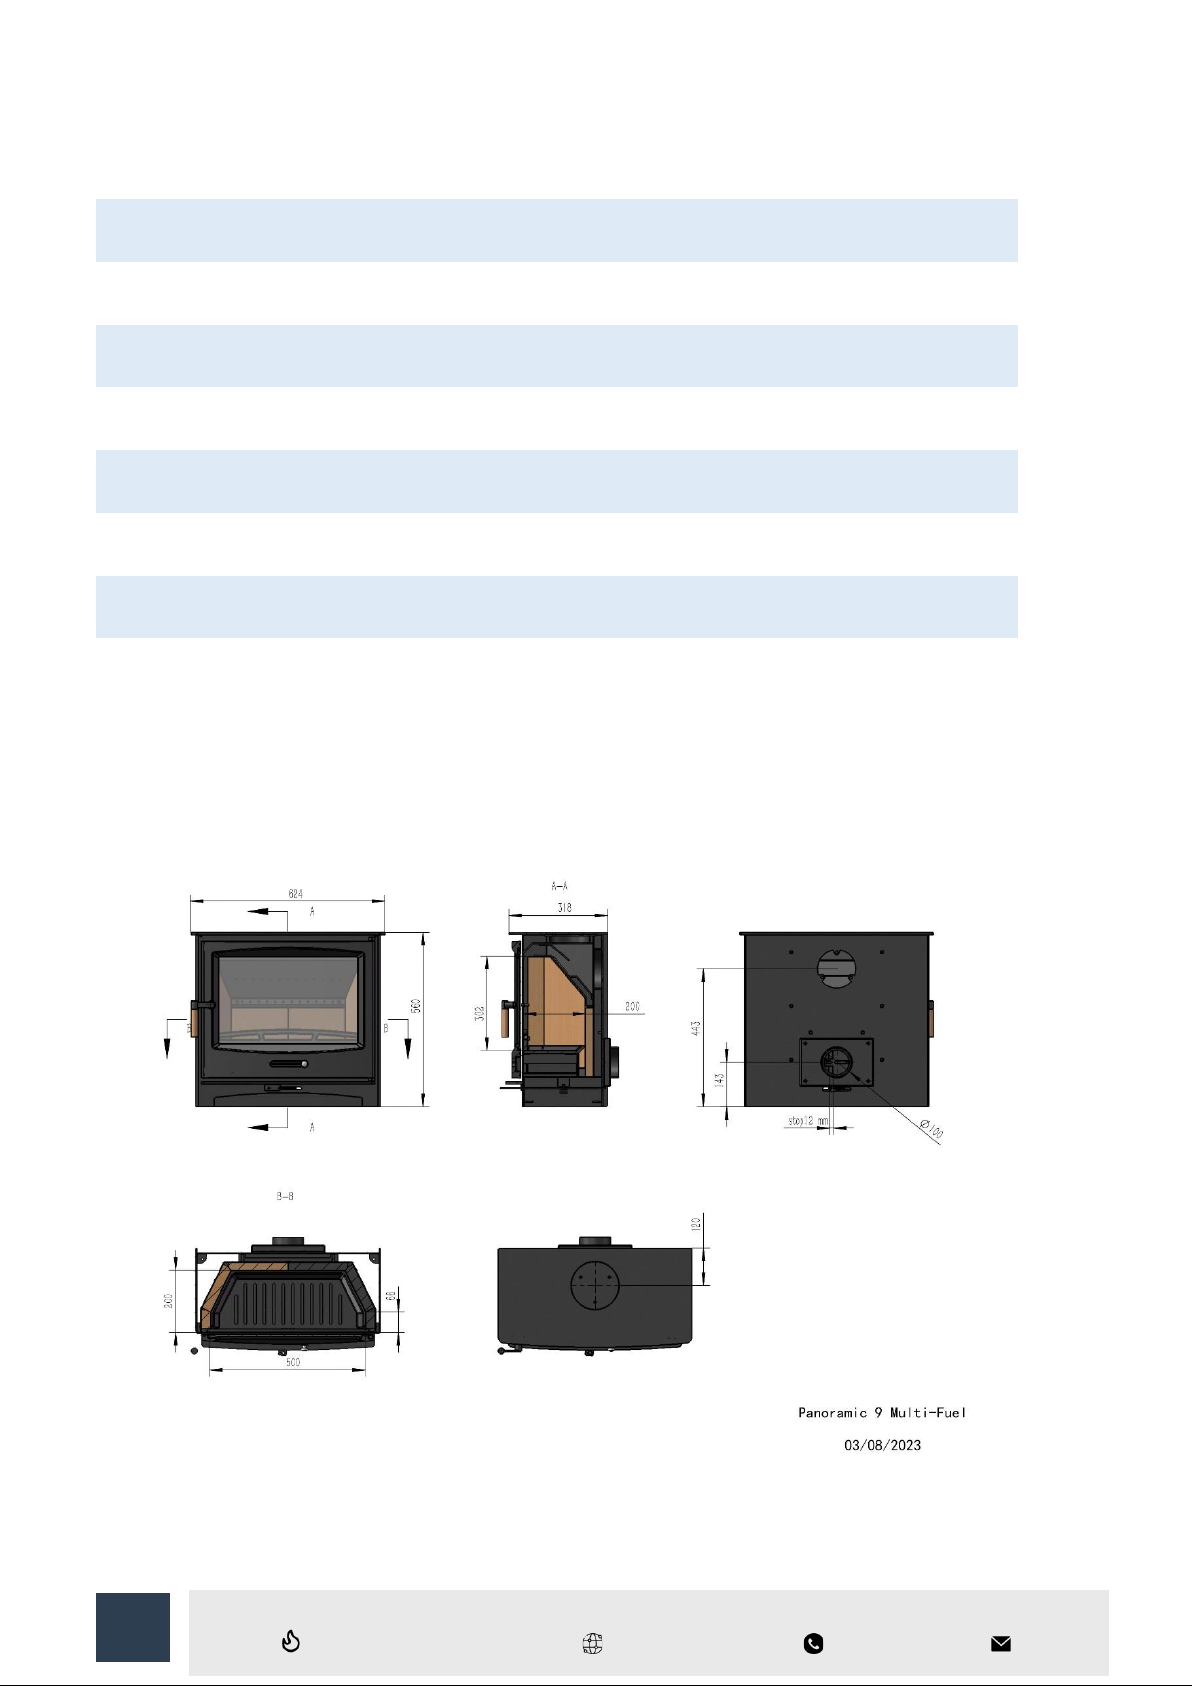
Diagrams
Panoramic 9 Mul-Fuel.
Panoramic 9 Mul-Fuel ecosystoves.co.uk + 4 4 1 2 5 6 8 3 00 99
4
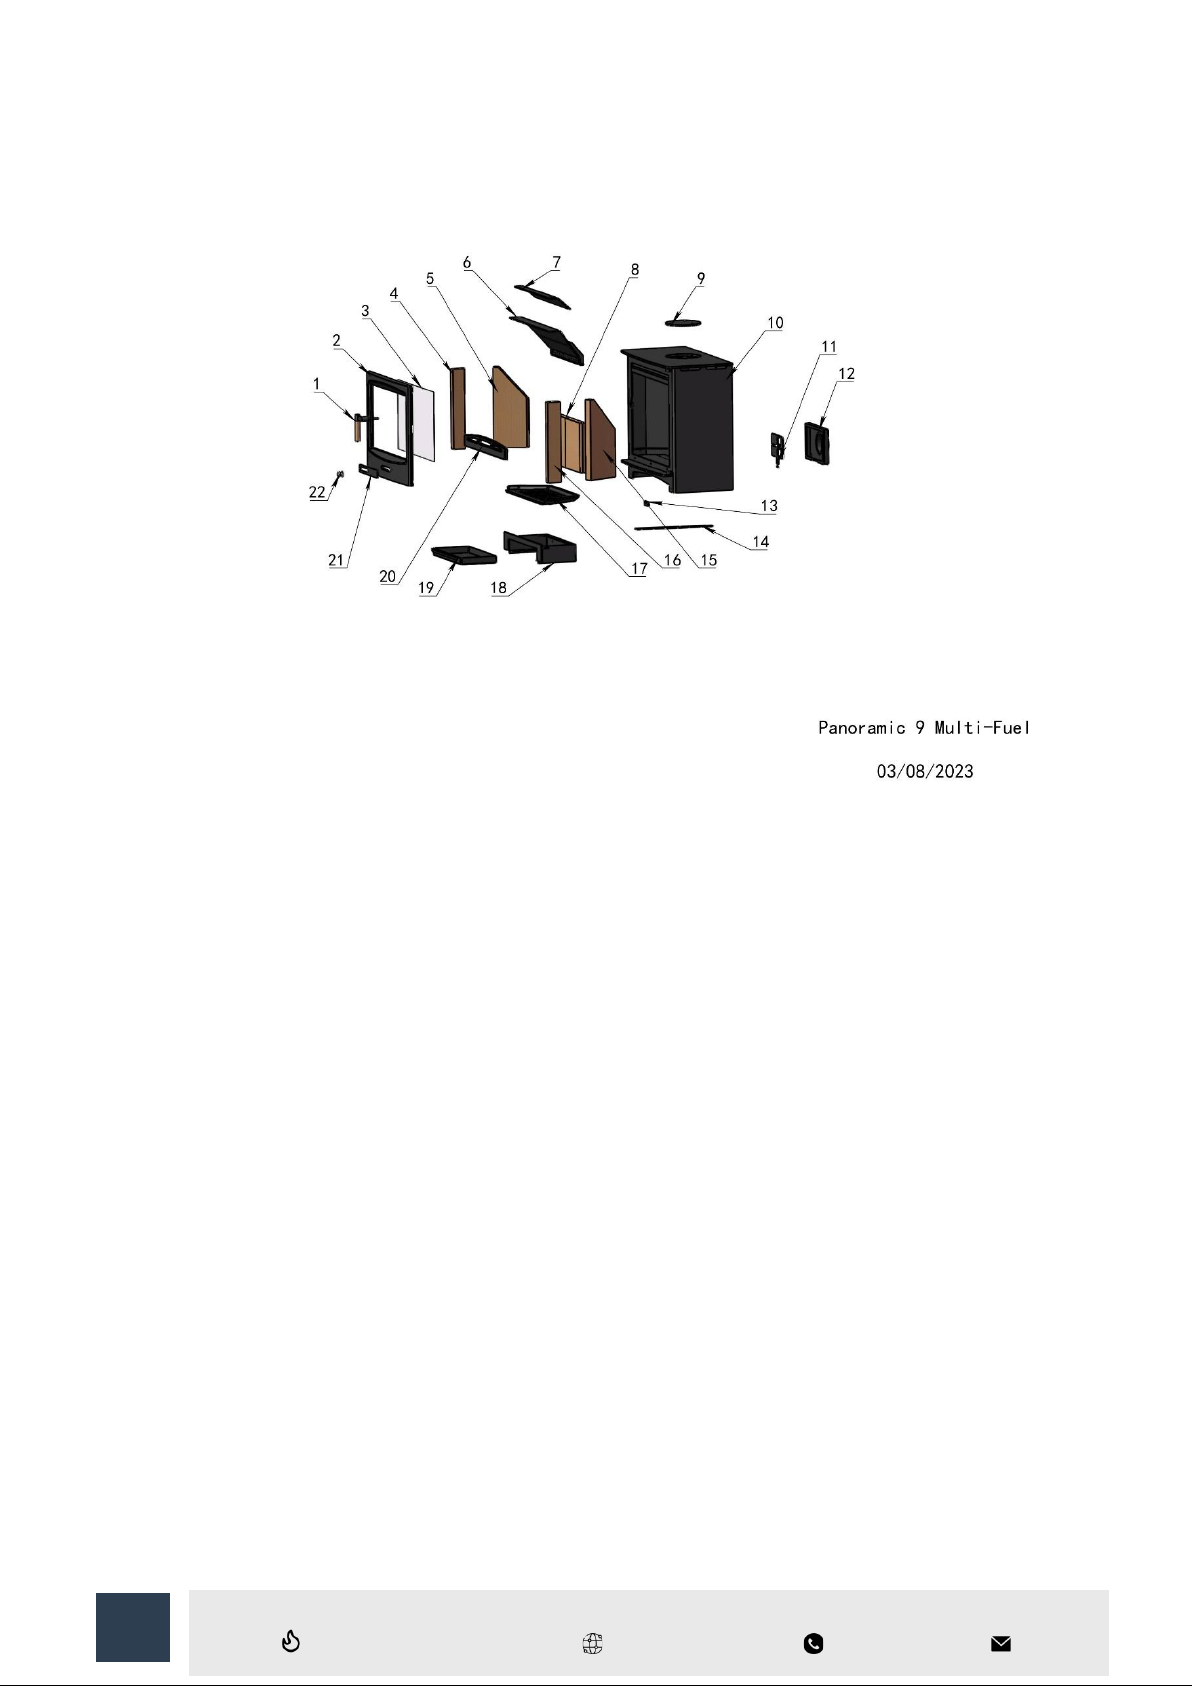
1 – Wooden Handle 2 – Door 3 – Glass 4 – Front right side re brick –5 – Back right side re brick 6 – Primary bae plate 7 – Secondary
bae plate 8 – Back re brick 9 – Top blanking plate 10 – Steel body 11 – Secondary slider 12 – Direct air box 13 – air ow piece 14 – Air
ow bar 15 – back le re brick 16 - Front le re brick 17 – Grate 18 – Grate cradle 19 – Ash pan 20 – Log guard 21 – Primary air slide 22
– Primary air knob
ASSEMBLY
Your stove is fully built and almost ready to go. All you need to do is aach the ue collar that is boxed inside the re, marked “Chimney”.
FLUE PIPE ON TOP
If you are aaching the ue to the top of the stove, you will need to remove the blanking plate that is currently on top. To do this you will
need a Philips screwdriver and 10mm spanner. You can access the nuts holding the blanking plate on through the stove’s rear ue outlet
that will currently be open. Place the spanner on each 10mm nut as you unscrew from above. When the nuts have been removed the
blanking plate will come o. You can then aach the ue collar on top with the bolts going down into the stove.
Reaching through the rear ue, place a washer and then nut on each thread and screw from above, whilst holding the nut with the
10mm spanner. When the collar is on you can then x the blanking plate that came o the top onto the rear. Place the bolts through the rear
blanking plate and line each one up with the pre-drilled hole on the stove. Reaching through the top outlet this me, place each washer and
nut on. When they are all in place, begin to ghten each one with the screwdriver, whilst holding the nut in place with the 10mm spanner.
Panoramic 9 Mul-Fuel ecosystoves.co.uk + 4 4 1 2 5 6 8 3 00 99
5
FLUE PIPE AT REAR
If you are aaching a ue pipe to the rear, the blanking plate will remain on top, and the ue collar will simply bolt onto the rear with
provided ngs and via the same method as above. The bae does not need removing to t the ue outlet in place. If you are aaching
the oponal custom rear ue box, this will bolt on the rear of the stove and the ue collar will then x onto this. The custom rear ue box
helps customs who need to come out of the stove rear, but want to avoid having the stove scking out too far.
Your stove is now assembled and ready for ng!
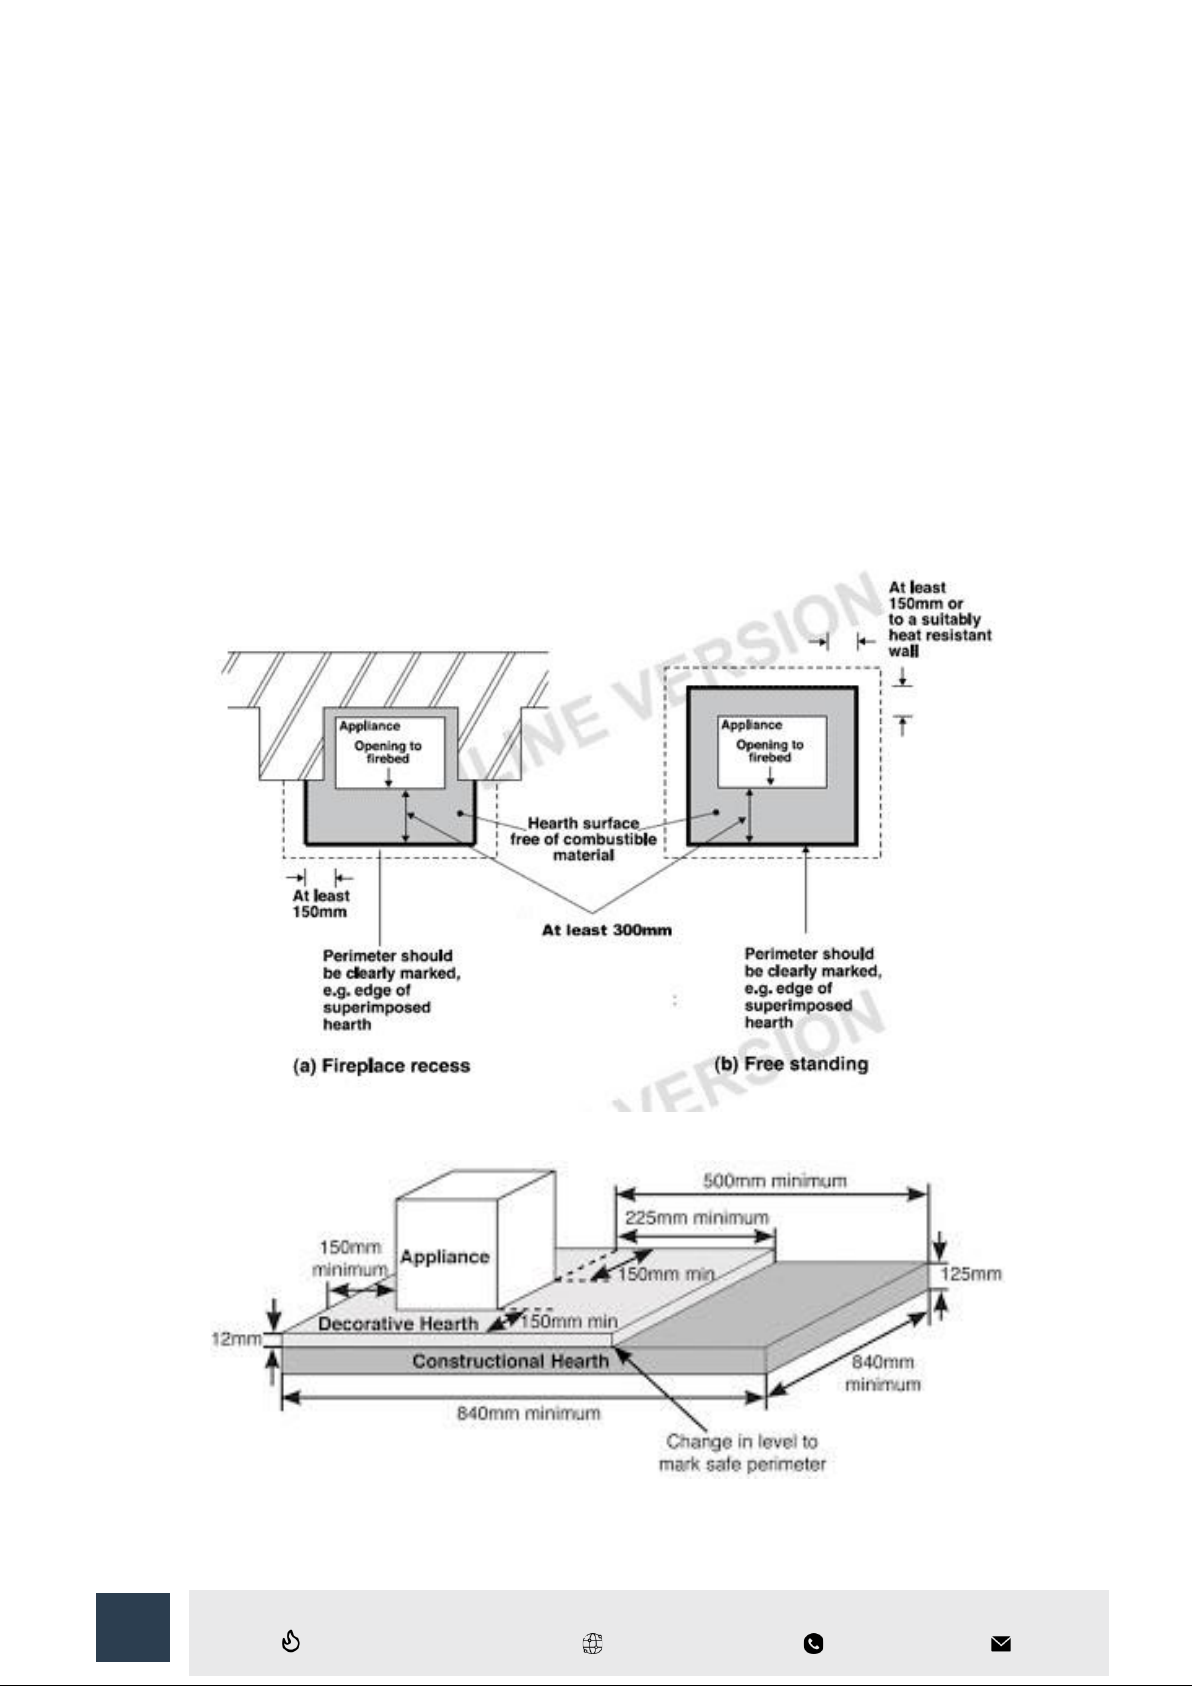
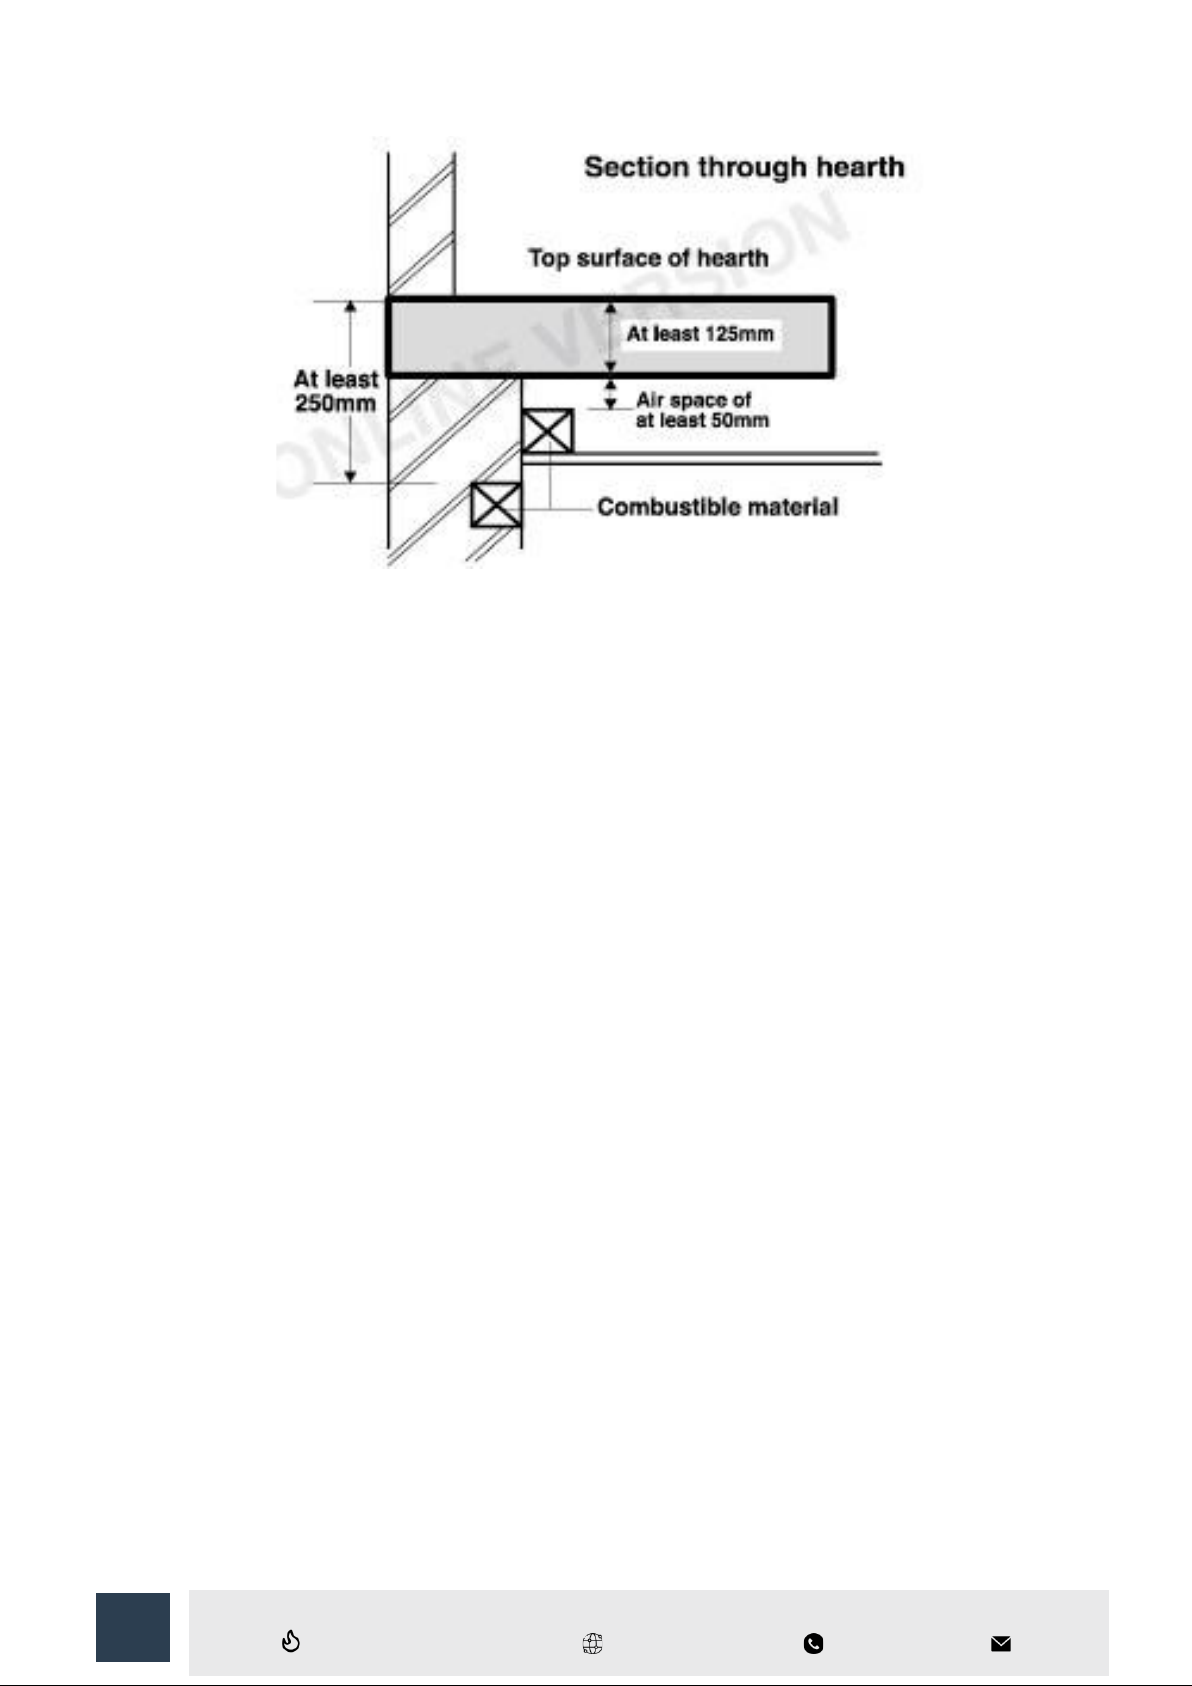
HEARTH
The Panoramic 9 is suitable for a 12mm free standing, non-construconal hearths - see diagram below, marked (b). This is allowed because
each model’s base does not exceed 100°C. The hearth must be made from a non-combusble material strong enough to stand the weight
of the re. Further diagrams relang to construconal hearths are aached belo w. For example, you could use a 12mm thick glass hearth
and have that sat directly onto a wooden oor. Please note that the minimum hearth size for a free-standing stove is 840mm x 840mm
Panoramic 9 Mul-Fuel ecosystoves.co.uk + 4 4 1 2 5 6 8 3 00 99
6
AIR SUPPLY / VENTILATION / CHIMNEY DRAW / SMOKE
SPILLAGE
Your stove will require a constant air supply and should not be used at the same me and in the same room/space as extractor fans or any
device which may draw air supply away from the stove unless the re is connected to its direct air feed socket. This unit is over 5kw and will
require venlaon. This can either be achieved via an air brick in the room, allowing the stove to draw in ambient air. Or, you can connect
up the direct air feed and have it pass through the wall. The stove will then draw air directly from the outside. Having a direct air feed ed
is not always required but can help if you have a poor drawing chimney. Something which is more common on a twin walled insulated
system.
If the stove is drawing in air directly from the room, ensure the direct air spigot at the rear has at least 50mm gap from the back wall to
ensure oxygen can freely ow into the re. If you nd the stove draws well with the door ajar but oen dies when the door is closed, it
could be caused by a lack of oxygen able to ow through that spigot, or a lack of free oxygen in the room in general.
The tesng for this model has been carried out on a chimney with a rang of 12 Pascals and this is industry standard. Anything less than
this approved rang could cause smoke to spill from the stove into the room. The chimney is oen overlooked by the end user but has a
huge bearing on how the re will perform. The chimney creates sucon that pulls the smoke up the chimney and out, opposed to forcing it
out of the re and into the room. The most common cause for a chimney not performing well is the fact it is cold. Cold air sinks the smoke
down, whereas a warmer chimney draws the smoke up and out. This issue is most common on twin-walled chimney systems and exposed
brick chimneys on the gable end of a house. Geng heat up the chimney as quickly as possible will help to ensure this negave pressure is
reversed as quickly as possible. The minimum chimney height required for this unit is 4.5 meters. The complete system must have fewer
than 4 bends and each bend should be 45 degrees or under. You can exit from the rear of the re and aach our custom rear ue box or a
90-degree T piece. Ensure single skin ue pipe is kept away from combusble materials as this will get very hot.
If you are installing into a brick chimney, we would suggest lining the chimney with an approved exible liner. (316 or 904 grade) Doing so
will increase the stove eciency. Do not connect or share the ue or chimney.
CHIMNEY LINING
When purchasing exible ue liner, or twin walled ue, 6” diameter is required if the Defra stop is not ed. If the Defra stop is in place a
5” liner or twin-walled ue can be installed. It is against the law to install a 5” liner on a woodburning stove unless it has the required Defra
ng in place. The ue pipe must be ed INSIDE the ue spigot and sealed with a generous amount of Fire Cement. Access should be

Panoramic 9 Mul-Fuel ecosystoves.co.uk + 4 4 1 2 5 6 8 3 00 99
7
provided for cleaning the ue to ensure that the passageways for exhaust gases remain free from obstrucon. This stove cannot be installed
into a shared ue.
AIR CONTROL
The Panoramic has a bar under the stove and when this is pushed le, the vent is closed and right, the vent is open… it’s that simple. The
stoves have an inner and outer shell and all the air being fed into the re is funnelled between these two layers. When the vent is opened,
air is drawn up the rear and rstly fed through the series of holes posioned in the bae plate (the large piece of metal bolted in at the
rear). Air owing through here helps to feed air into the chamber and re-burn the inial smoke produced by the re. This is a unique design
and one of the key reasons why this stove range is extremely clean burning. Air that is not fed through these holes connues to travel
between the two layers and is then dispersed at speed over the glass. This heated and speeding eect is key to keeping the class clean.
The stove also has a primary air ow vent on the door. This is to add addional air under the re when burning smokeless coal. Wood does
not need a great deal of primary air, however smokeless coal does.
When you light the re, you will want the vents fully open and in most cases the door ajar slightly. When tesng the stove, this was le ajar
for 3 minutes when rst lighng the stove and on re-fuelling. However, this will depend on how well the chimney is drawing. When the re
is established to some degree the door can be closed and the vents gradually closed. If you close the vent down too early before the re is
established, it could go out and/or increase smoke output. When the stove is burning hot and is well established you can turn the re right
down. If done at the right me and with the right fuel, it will die right back and gently burn away for a long me. If you are burning wood,
the primary vent should be closed o rst and then the burn rate of the re controlled with the base lever. If you are burning smokeless
coal, this primary vent will remain open for longer, as the coals need more air underneath them opposed to air owing over them. The base
lever in most cases can be closed by around three quarters and the burn rate of the coals dictated by the primary air.
When you come to refuel, if there is insucient burning material in the re bed to light a new fuel charge, excessive smoke emission can
occur. Refuelling must be carried out onto a sucient quanty of glowing embers and ash that the new fuel charge will ignite in a
reasonable period. If there are too few embers in the re bed, add suitable kindling to prevent excessive smoke.
We do not suggest mixing wood and smokeless coal, as this can create an acid which can rot the internal parts of the stove and chimney
liner.
FUEL OVERLOADING
Overloading can cause excess smoke.
Dampers le open.
Operaon with the air control or appliance dampers open can cause excess smoke. The appliance must not be operated with air controls,
appliance dampers or door le open except as directed in the instrucons.
Operaon with door le open.
Operaon with the door open can cause excess smoke. The appliance must not be operated with the appliance door le open except as
directed in the instrucons.

Panoramic 9 Mul-Fuel ecosystoves.co.uk + 4 4 1 2 5 6 8 3 00 99
8
SMOKE FREE ZONES
REGULATIONS
All Naonal and local regulaons, including those referring to naonal and European standards, need to be complied with when installing
the stove.
THE CLEAN AIR ACT 1993 AND SMOKE CONTROL AREAS
Under the Clean Air Act local authories may declare the whole or part of the district of the authority to be a smoke control area. It is an
oence to emit smoke from a chimney of a building, from a furnace or from any xed boiler if located in a designated smoke control area. It
is also an oence to acquire an “unauthorised fuel” for use within a smoke control area unless it is used in an “exempt” appliance
(“exempted” from the controls which generally apply in the smoke control area).
In England appliances are exempted by publicaon on a list by the Secretary of State in accordance with changes made to secons 20 and 21
of the Clean Air Act 1993 by secon 15 of the Deregulaon Act 2015. Similarly, in Scotland appliances are exempted b y publicaon on a list
by Scosh Ministers under secon 50 of the Regulatory Reform (Scotland) Act 2014. In Northern Ireland appliances
are exempted by publicaon on a list by the Department of Agriculture, Environment and Rural Aairs under Secon 16 of the
Environmental Beer regulaon Act (Northern Ireland) 2016. In Wales appliances are exempted by regulaons made by Welsh Ministers.
Further informaon on the requirements of the Clean Air Act can be found here:
hps://www.gov.uk/smoke-control-area-rules
The Panoramic 9 has both been recommended as suitable for use in smoke control areas when burning seasoned wood logs. Each
appliance has been factory ed with a screw that prevents the full closure of the vent. If you are not in a smoke free zone, this can be
removed.
Your local authority is responsible for implemenng the Clean Air Act 1993 including designaon and supervision of smoke control areas
and you can contact them for details of Clean Air Act requirements.
The Panoramic 9 has a small metal plate xed to the le of the air control lever underneath the stove. This can only be removed if you are
not in a smoke free zone and have installed a 6” chimney system or greater.
Please note the following advice on minimising smoke emissions:
FUEL
Wood- All types of wood are suitable provided they are well seasoned, UNTREATED, and have a
moisture level between 12% and 20%. For so woods, typically they will need to have been le in
suitable storage for 9+ months for the moisture to evaporate. For hardwoods, this will usually be
18 months+. It is recommended that logs should be no more than 5” (125mm) in diameter and 8”
(200mm) in length. If you are unsure of the moisture content of your fuel, then you can buy a
moisture meter which will indicate the moisture levels in your fuel. Liquid fuels must NEVER be
used.
WARNING: Wet mber should not be used as this will create excess tar deposits in the chimney
and stove and could increase the risk of chimney re. Timber which is not of a suitable moisture
content will also create more smoke and harmful emissions and will damage the stove and ue
system. If you are buying wood, always look out for the “Ready To Burn” logo. Suppliers who sign
up to this have regular checks to ensure that the wood they are selling is below a certain moisture
content and is consistent with what they are adversing.

Panoramic 9 Mul-Fuel ecosystoves.co.uk + 4 4 1 2 5 6 8 3 00 99
9
Solid Fuel – Solid mineral fuel should be placed in the stove so that there is no more than a 30° incline of the fuel bed from front to back. It
should not be stacked above the level of the rear rebrick as this may result in damage to the stove. Always de-ash before refueling and do
not let the ash build up to the underside of the grate. Solid mineral fuel produces ash, which if allowed to build up will se the airow
through the Primary air inlet. This will eventually cause the re to go out. With some solid mineral fuels, a residue of burnt fuel or clinker
will accumulate on the grate. Allow the re to go out periodically to remove this. Important! - We cannot stress rmly enough how
important it is to empty the ashpan regularly. Air passing through the re bed cools the grate down. Distoron or burning out the grate bars
is nearly always caused by ash being allowed to build up to the underside of the grate. Anthracite is an approved natural smokeless fuel
(not processed) and therefore can vary greatly in quality and performance. It generally requires excellent air supply and above average re-
bed temperatures to maintain maximum performance and with experience we would suggest that it is used in conjuncon with other
approved manufactured smokeless fuels as per the HETAS approved list hp://www.hetas.co.uk/nd-fuels/ . Smokeless fuels
LIGHTING MY STOVE
Prior to lighng the re for the rst me, ensure that
•Installaon and building work is complete.
•The chimney is suitable and sound and has been swept and free from obstrucon.
•Adequate venlaon and provision for combuson air has been made.
•The stove installaon has been carried out in accordance with Building Regulaons and any applicable local regulaons as well as
these installaon instrucons.
•Chimney draw has been checked and within specicaon. (The stove has been tested at nominal output with a ue draught of 12
Pa) INITIAL CURING AND TEMPERING FIRES.
ESSENTIAL INSTRUCTIONS BEFORE USE
It is essenal to follow these ‘tempering-in’ instrucons in order to avoid serious damage to your stove. The casngs of your stove require
very gentle ‘normalising’ to release stresses in the metal formed during the casng process. The paint nish also requires an inial curing
process to be followed and will release a smell when burning o: For the rst few burns we suggest opening a window to get rid of the
smell.
You will need to have at least two controlled small wood res, each re lasng around 40 minutes – the second re can be started when the
stove is almost cooled down. Aer these res you can increase the fuel load but sll control the re for another few burns as the paint may
sll be curing and in a fragile state. Starng a large re too soon is likely to damage the stove in which case it will not be covered by the
warranty. Note: the paint on any new stove is relavely so. As such do not clean, wash, or wipe the surface unl the paint has fully cured.
Never wipe the stove whilst warm. If the above advice is ignored, then there is a high risk of the paint being “shocked” by excessive heat
and could peel. Furthermore, if the stove is over red it will invalidate your guarantee.
ENSURE THAT YOU HAVE READ AND UNDERSTOOD THESE INSTRUCTIONS BEFORE LIGHTING THE FIRE, AND THAT YOU ARE CONFIDENT THE
STOVE HAS BEEN INSTALLED CORRECTLY.
ALWAYS WEAR A PROTECTIVE GLOVE WHEN REFUELLING YOUR STOVE.
TIPS

Panoramic 9 Mul-Fuel ecosystoves.co.uk + 4 4 1 2 5 6 8 3 00 99
10
IGNITION
(FOLLOW INITITAL TEMPERING INSTRUCTIONS ABOVE FIRST TO AVOID DAMAGE)
•Construct a pile of kindling in the middle of the bed using approx 500g of kindling wood. Stacking the wood like Jenga blocks can
help, as this allows lots of air to ow through.
•Ensure the vents are fully open to allow lots of free air into the stove
•Light with a single relighter.
•Leave the door ajar slightly as that begins to catch. ( Around 3 minutes )
•Aer a few minutes’ add your rst log or two and then connue to leave the door ajar.
•When the burn becomes established, you can close the door; from there, as the re gains in momentum and the rebox
increases in heat, you can begin closing the vents down. ( For further informaon on sengs please see secon marked “ Air
Controls “
•Once the load burns down to embers you can re-load the re. If the stove is nice and warm with plenty of embers, you may not
have to have the door ajar.
FIRST USE TROUBLESHOOTING
When the stove is new the paint is very tacky where the stove is curing. The door locks very ghtly and when opened can pull away the re
rope from its chamber. If the instrucons are followed above this should not happen. However, if it does, the rope will need to be stuck
back in place with “heat resistant re rope glue” Aer a few burns the paint will be cured and this should no longer happen.
In some cases, you glass can go black in the rst few burns. This happens because the stove is not running hot. When the stove gets up to
temperature this should begin to burn o. If it does not, the glass may need cleaning with a stove glass cleaner or a damp cloth that has
been dipped in the ash.
Under certain abnormal weather condions, for example down draughts, it may be dicult to get sucient draw through the appliance to
achieve good combuson. When this happens, the stove should not be used.
CLEANING AND MAINTENANCE
When cold, the inside of the stove should be given a regular sweep out.
The ue and ue pipe will require cleaning with a suitable chimney brush, to minimise build-up of soot and tar. Your chimney will also
require periodic sweeping. We would suggest using a registered and qualied chimney sweep. If the glass becomes stained from the inside,
the air-wash vent may need opening more during use. The high temperature paint which your stove is nished in should last many years
with normal use, but when it does eventually require re-nishing, black heat resistant paint in spray cans can be purchased from most
hardware stores. We would suggest using “Calre at black paint”. Do not use regular paint which is not high temperature resistant. Aer
prolonged periods of not using the re, the stove and ue system should be checked for blockages prior to relighng. We recommend
regular servicing and safety checks are carried out by a qualied engineer. There must be no unauthorised modicaon of the appliance.
Use only replacement parts recommended by the manufacturer.
Panoramic 9 Mul-Fuel ecosystoves.co.uk + 4 4 1 2 5 6 8 3 00 99
11
Bae Plate Removal
If you have not installed an access hatch into the rst length of ue pipe and need to remove the bae plate to gain access for cleaning,
you can do this by following the below steps.
1. Remove the log retainer and base re brick.
2. Remove the side and back re bricks.
3. Unbolt the bae plate. The bae plate is held in with 2 x 10mm nuts that x into a thread, which is wound into the body of the
stove. You only need to remove the nut to slide the bae plate away but somemes these are s and will bring the thread with
it but should easily wind back in place. Ensure the at heat resistant re rope seal is in good condion before reaaching the
bae. If the seal is not connecng with the stove body, excess air will spill into the stove, making the air wash and secondary
burn less eecve. We would also suggest adding a lile bit of copper grease these bolts and the handle bolts when a service is
carried out. Keeping this copper greased will ensure they remain easy to remove in years to come. The rope for the bae is a
generic 10mm wide self-adhesive re rope that can be readily found online.
Replacing the Fire Rope
If your re rope has become frayed and is no longer making a good contact, it will need replacing. To change the rope, we suggest removing
the door and laying it at. To remove the door, you need to lever up the boom door pin, that will have a small head on it. When this is
removed, the door will drop down and pull away. When removed you can pull away the old rope and clean out the groove, ensuring it is
free of debris. Make a note of how the rope was laid as this will make laying the new rope easier. When the groove is clean, line it with a
connuous bead of heat resistant rope glue. You can then lay the rope in the groove pressing it as you go and cung o any excess. Allow
at least 30 minutes for this to dry before re-aaching the door.
Changing glass
To change the glass, you will rst need to remove the door. To do this you need to lever up the boom door pin and this will have a small
head on it. When this is removed, the door will drop down and pull away. Note: On newer models there is a small Alen key thread pinching
this pin in place. This will need removing before the pin can be removed. When removed, lay down the door with the handle facing down.
Begin removing the small glass clips. When removed you can take the old glass out and pop the new one in. When in place, ensure it is
making good contact with the re rope. If that has been checked, you can re-aach the clips and gently pinch them up. Overghtening
these clips can cause the glass to break.
GUARANTEE
The main body of your stove is guaranteed for 5 years on the Panoramic 9
Incorrect use or installaon not carried out by a registered HETAS installer will void the guarantee. The only excepons will be if the install
has been signed o by your local authority or suitably qualied Oec installer. In addion to this the stove must be serviced annually by a
suitably accredited chimney sweep or stove installer. For example, HETAS / METAC / NACS. In this service any perishable parts that are
damaged will need replacing. Please keep hold of these receipts, as they will most likely be required in an unlikely event that a claim was to
be made. We will only ever be liable for the stove itself and will not cover the cost of installaon or de-installaon of
a product. We urge customers to check the stove over prior to it being installed to double check there is no courier damage or obvious
defects with the stove. Any potenal Issues are easier to resolve before the stove is installed.

Panoramic 9 Mul-Fuel ecosystoves.co.uk + 4 4 1 2 5 6 8 3 00 99
12
Notes:
If a re brick is only split but is sll fully protecng the shell, then it does not always need replacing in the service. They only need replacing
when they have crumbled away, exposing the stove’s shell.
If the seal is leaking air into the re this does need changing right away. Any excess air could cause the burner to over re. In some cases,
the rope is ne, and the handle simply needs adjusng to make the door lock a lile ghter.
If the glass is not split and is only crazed, then it does not need replacing to keep in line with the guarantee terms.
Please keep a record of all services as this will be required if a claim is ever put forward.
As a company we will only ever be responsible for the product itself and would not cover installaon / de-installaon of any product that
did have to replaced.
The guarantee period will begin when the stove has been invoiced. Please keep hold of your invoice as this will be requested if a claim is
started. If this is not provided upon request, we will not be able to escalate your claim. The guarantee will begin from the sale date on the
invoice, and we do not cover any cost incurred when removing faulty appliances or installing new ones, even if it has been proven that the
stove is faulty. For full guarantee details please visit www.ecosystoves.co.uk. With every claim we will require a signed copy of the sign-o
sheet.
Panoramic 9 Mul-Fuel ecosystoves.co.uk + 4 4 1 2 5 6 8 3 00 99
13
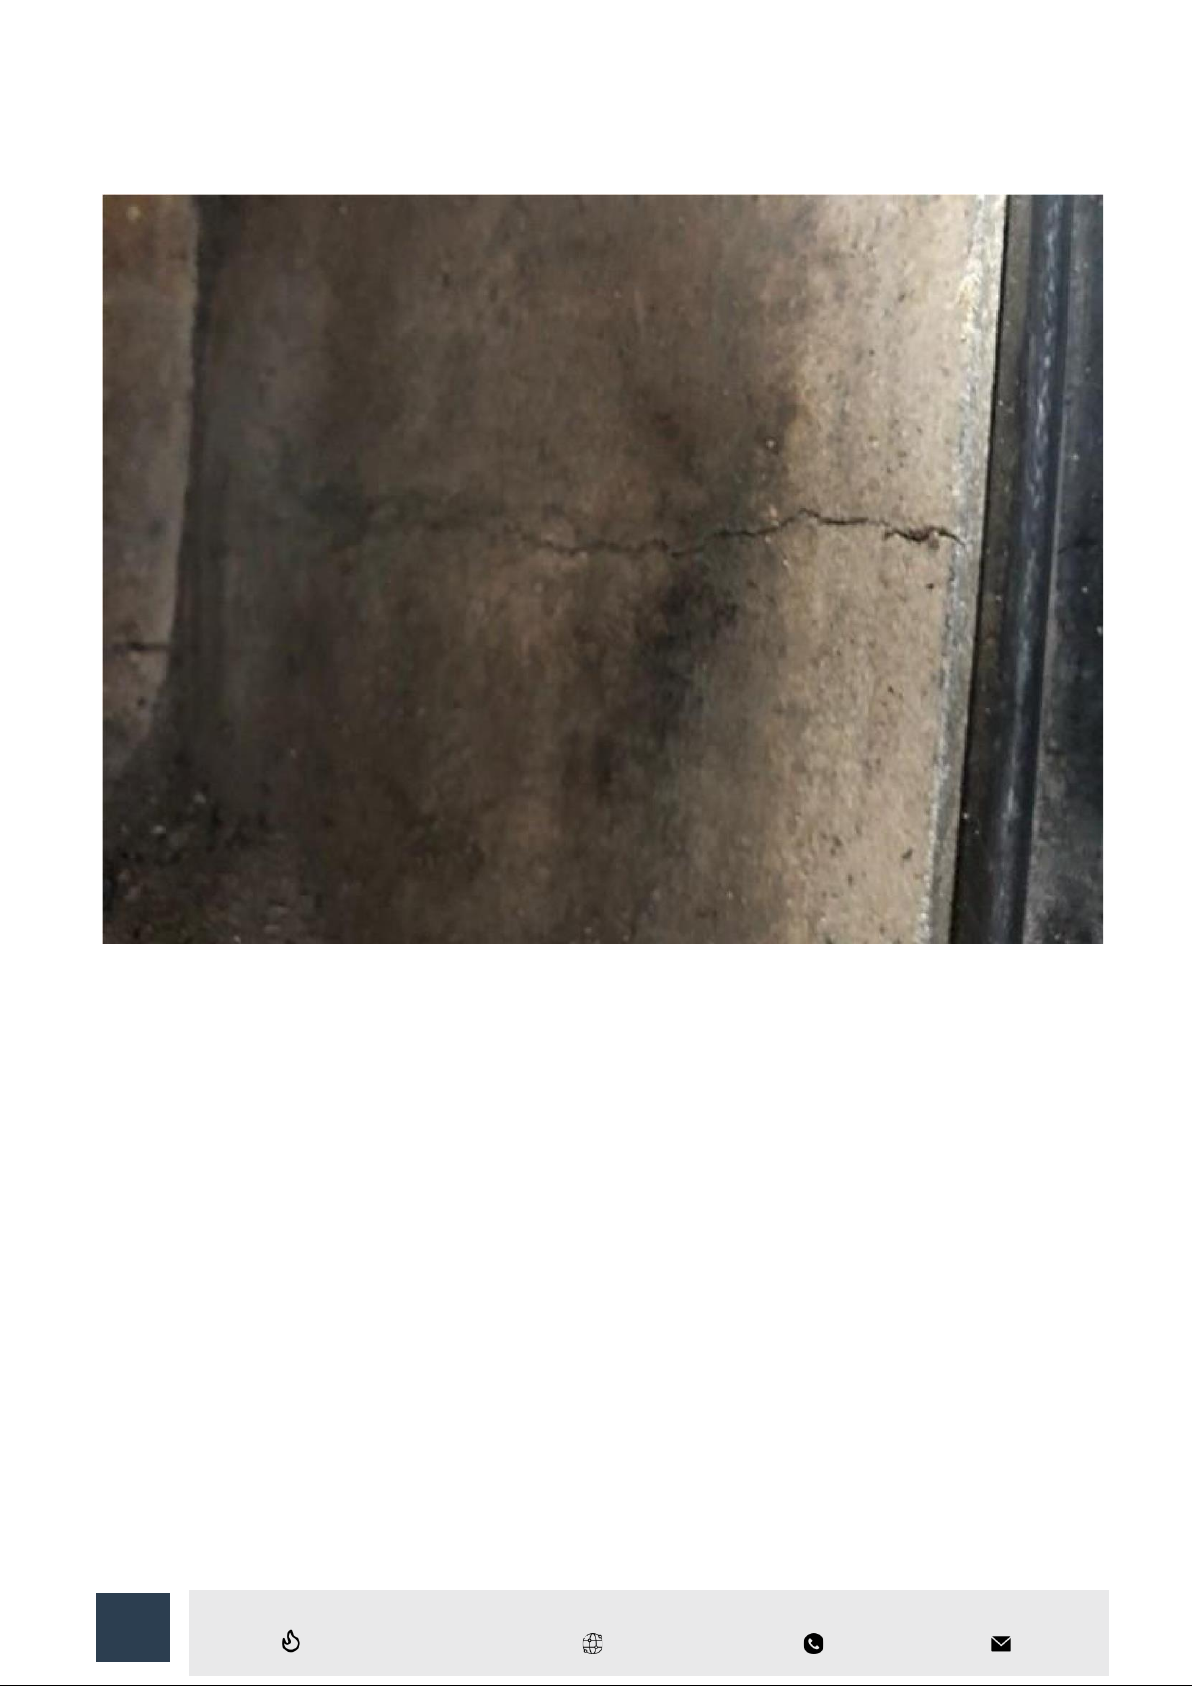
BROKEN FIRE BRICKS
It is common for vermiculite bricks to break. They are fully heat resistant but can be quite fragile.
The most common bricks to break are the base and back bricks as these take the brunt of abuse. ( wood only models have a base brick ) To
ensure the longevity of you r re bricks, please ensure that you gently place fuel in the re and do not over stack fuel. We would also
suggest leaving a small bed of ash in the re at all mes. This helps the wood burn more eciently and also acts a cushion between the log
and the brick itself. If a brick is split it will not need replacing and this could potenally happen at any point. We only suggest changing
bricks when they have crumbled away, exposing the stove’s body.
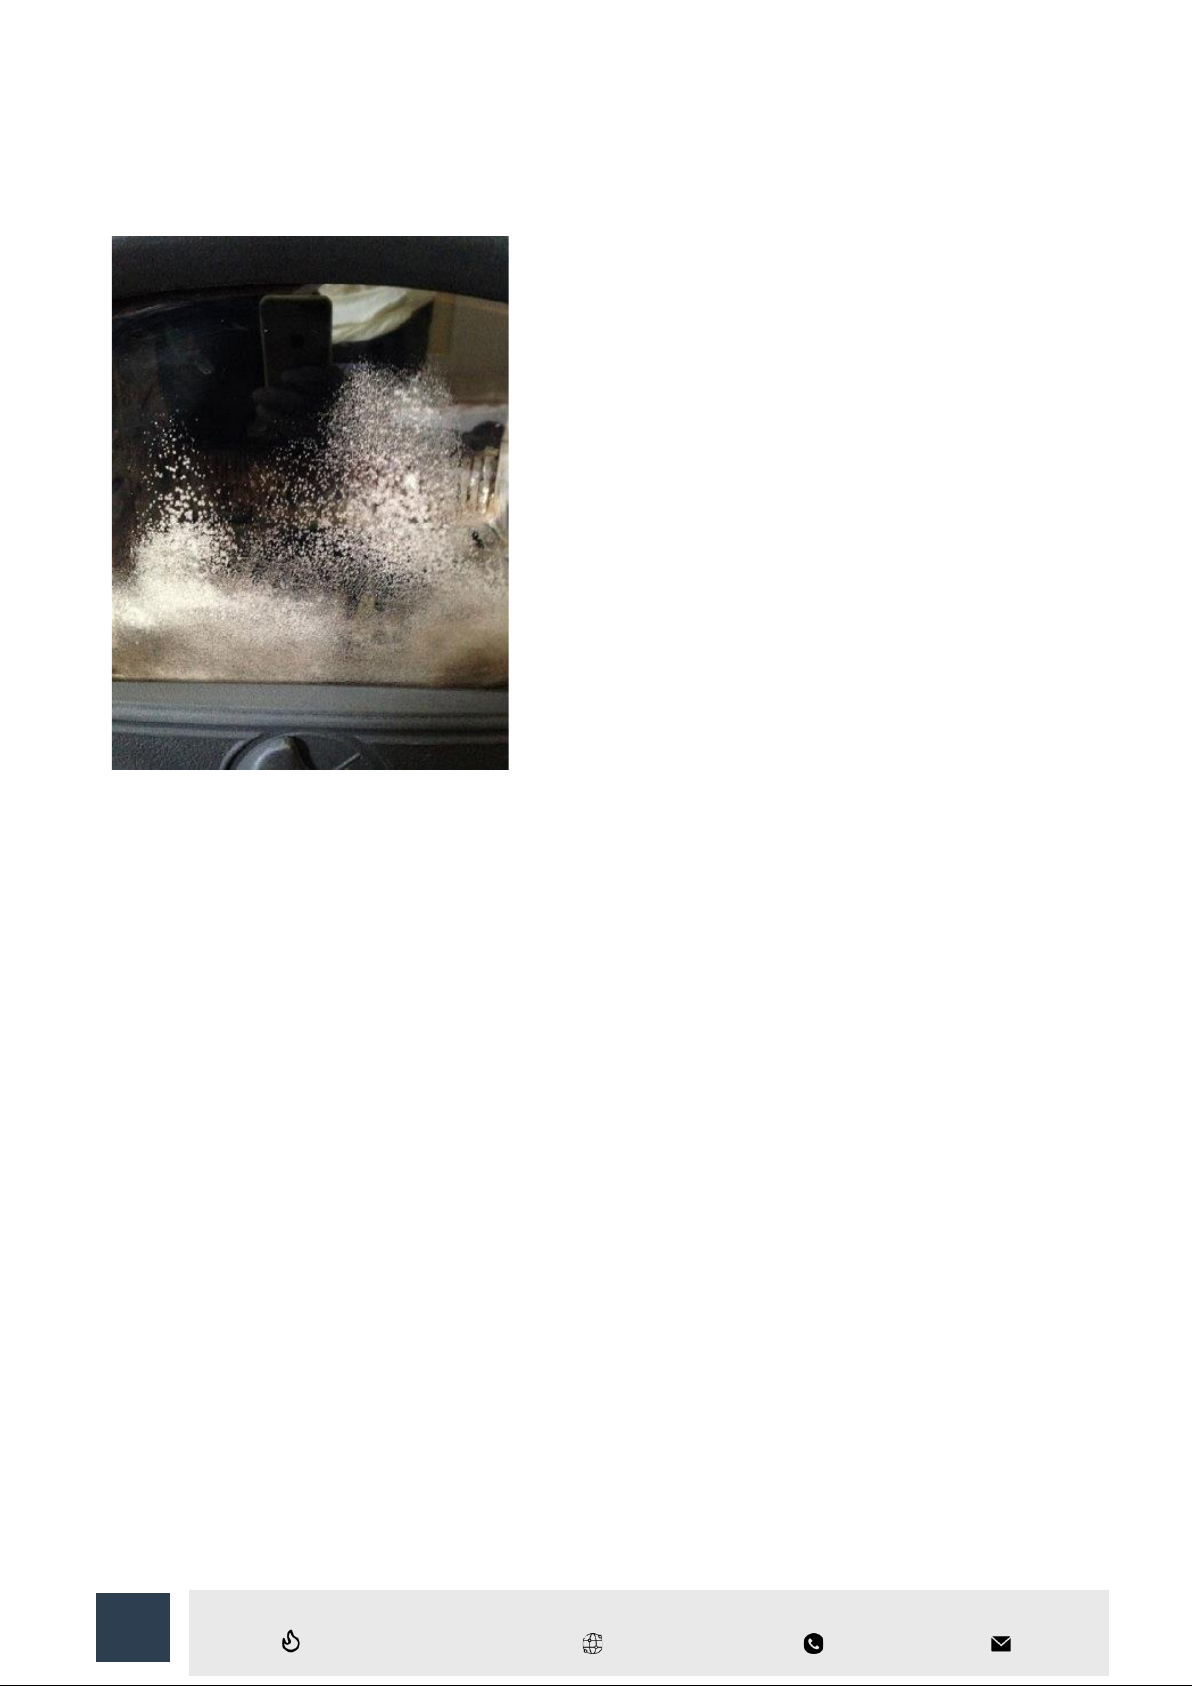
BROKEN / CRAZED GLASS
The glass used in all res is fully approved heat resistant ceramic glass. This glass will not break through heat but can easily break if struck
with a log or similarly hard object. This is why the glass is not covered by any manufacturer of stoves. Common causes for glass breakages
are customers closing the door when a log is sll scking out. Glass will not always break straight away and can be chipped or weakened. It
will then oen break at a dierent me with seemingly no contact. When replacing glass, ensure you only pinch up the glass clips. If they are
over-ghtened it could cause the glass to break.
Cloudy, 'milky' or crazed glass is caused by unburned acidic condensates etching the ceramic glass and unfortunately this cannot be easily
removed. It is denitely not faulty glass but instead does have more to do with the quality of the fuel that you burn and the way that you
Panoramic 9 Mul-Fuel ecosystoves.co.uk + 4 4 1 2 5 6 8 3 00 99
14
operate your stove (long slumbering). This is less common on wood-only models as it is oen caused by the high sulphur content in some
coals. If your glass is crazed, it does not need changing and is safe to use.
An example of crazed stove glass.
Rusty Stove
All stoves on the market are either made from mild steel or cast iron. The mild steel models like this are shot blasted and then painted with
high temperature black paint. This will protect the stove but if the stove remains damp or wet for a long me the oxidizaon process (
surface rusng ) will begin.
Over me, if your stove begins to develop rust it will either be caused by:
•The stove being kept in a damp environment – For example if the stove was le in a damp place for a long me prior to ng.
Or, the stove is in a damp room and not lit too oen.
•The chimney is leaking water onto the stove.
•The stove is being cleaned with a wet cloth and not dried quickly.
Luckily, the resoluon for this is not too hard. In most cases the stove will just need a wipe down with a dry cloth and touching up with
some Calre Fla black paint. This will bring the paint back to a nice nish and will not reappear, assuming the cause of the stove geng
damp / wet has been reced. Please see the below aached picture as an example for a stove that is beginning to rust.

Panoramic 9 Mul-Fuel ecosystoves.co.uk + 4 4 1 2 5 6 8 3 00 99
15
Table of contents
Other Ecosy+ Wood Stove manuals


Popular Wood Stove manuals by other brands

Nibe
Nibe Contura 886G Style manual

Jydepejsen
Jydepejsen SENZA Installation and operation manual

Termofor
Termofor Tunguska Series manual

wiking
wiking Miro 1 Installation and user manual

Vogelzang International
Vogelzang International VG650ELG owner's manual

Drolet
Drolet Blackcomb Installation and operation manual


Burley
Burley Fireball Springdale 9103 Installation instructions & user manual

Drolet
Drolet DB03101 Installation and operation manual

Nibe
Nibe Contura C520 installation instructions

pleasant hearth
pleasant hearth PH35PS-B owner's manual

Lacunza
Lacunza Vulcano 7T E3 E/E Instruction book

RIKA
RIKA Esprit manual