Ecoxotic Cannon PRO LED Pendant Operator's manual

Product Manual & Safety Instructions
www.ecoxotic.com
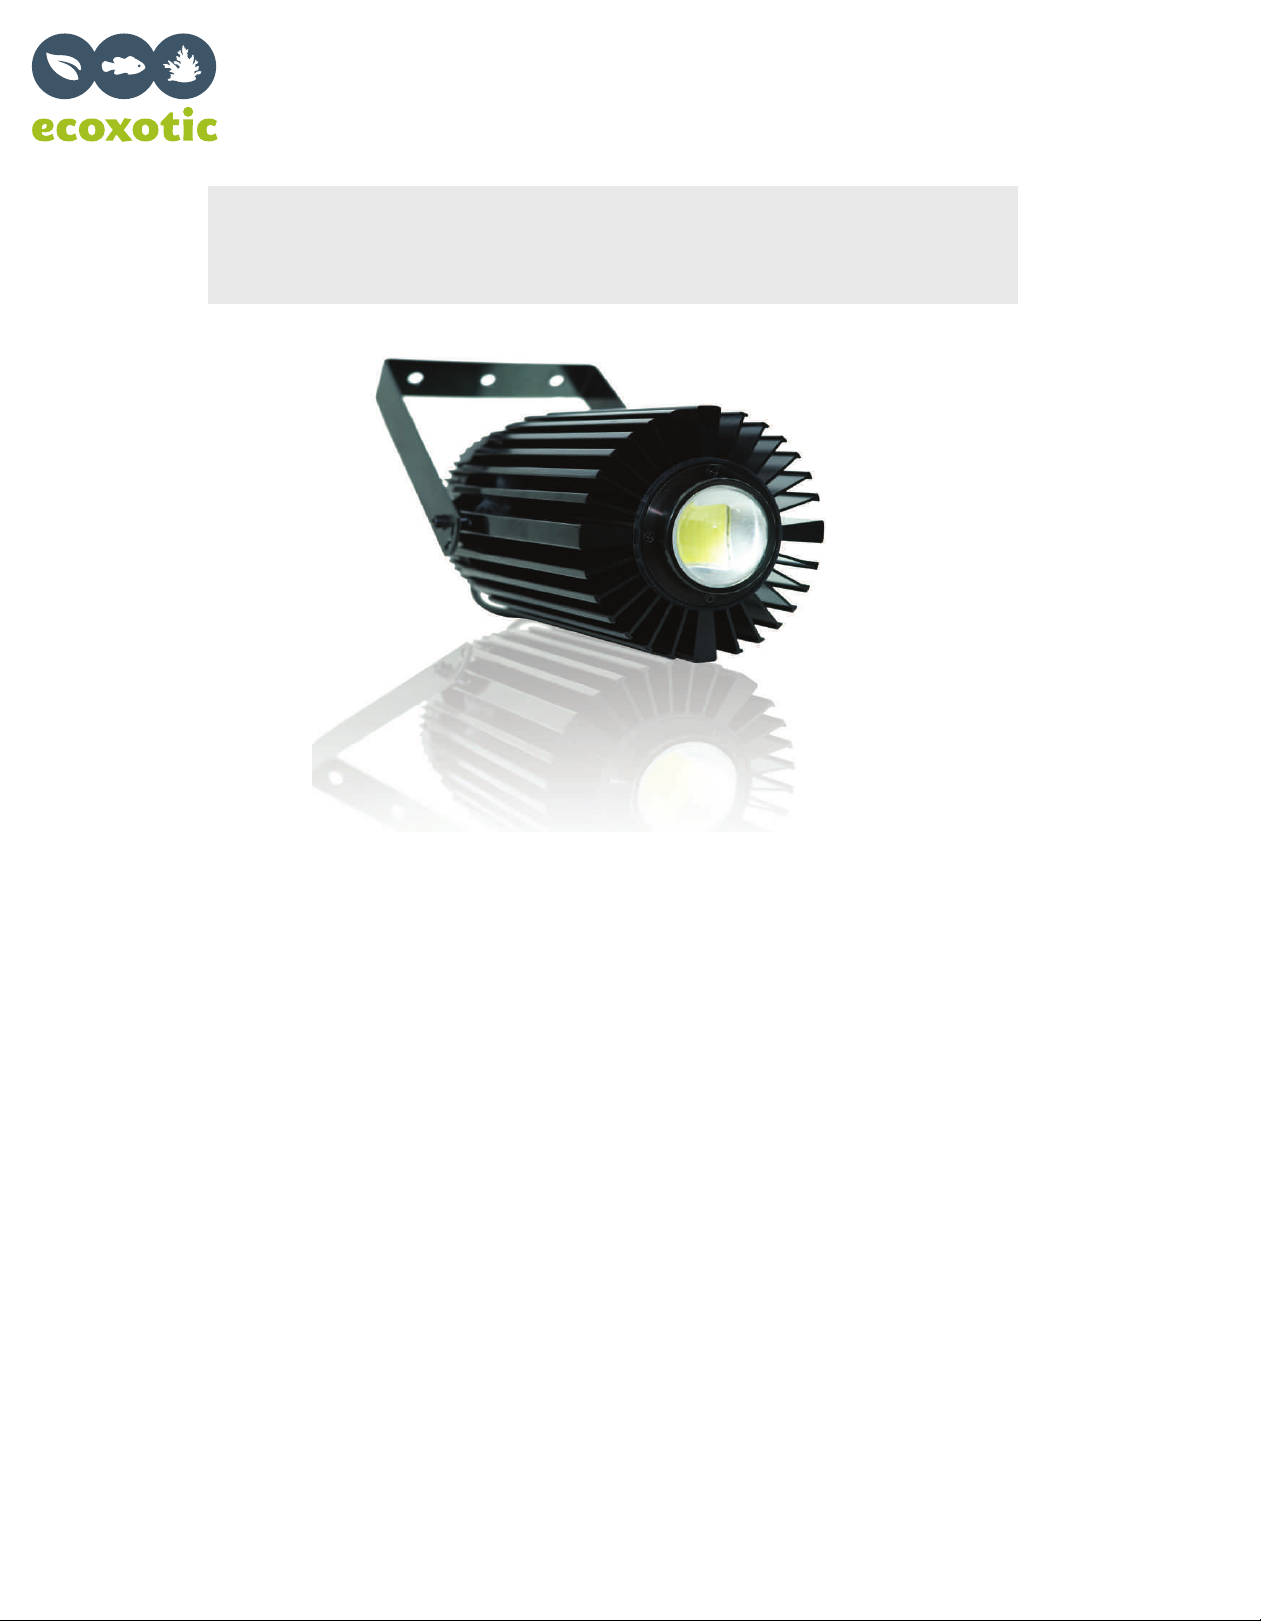
Cannon PRO LED Pendant
Step 1 - What’s Included*:
1 - Cannon LED pendant w/multichip LED & driver (A)
1 - Swivel bracket (pre-installed) with mounting hardware (B)
3 - Optical lenses 90º (pre-installed), 60º, 120º included (C)
1 - Light snoot with mounting hardware (D)
2 - Allen wrenches (E)
1 - Safety cable wire harness (F)
*Dimmable versions also include:
1 - Female DC dimming plug (pre-installed)
1 - Male DC dimming plug (G)
2 - Heat shrink tubing (H)
A
B
C
D
E
F
H
G
60º
90º
120º
Optional Accessories:
45º Optical Lens Pipe / strut clamp 120” Hanging Kit 0-10V LED Controller
Instruction Contents:
Step 1 - What’s Included
Step 2 - Warnings & Precautions
Step 3 - Electrical Wiring
Step 4 - Mounting Methods & Instructions
Step 5 - Snoot Attachment
Step 6 - Optical Lens Adjustment
Step 7 - Connecting to LED Controller
Step 8 - Using IR Remote (6870, 6878)
Step 9 - Warranty

Cannon PRO LED Pendant
Product Manual & Safety Instructions
To Avoid injury and possible electric shock it is imperative you:
READ AND FOLLOW ALL SAFETY INSTRUCTIONS AND WARNINGS
Important Warnings
This is NOT a page of legalese. It contains important safety information that you should read and save for future
reference. Remember you can always quickly reference instructions for all Ecoxotic products on our website.
ver attempt repairs yourself; return the appliance to an authorized service facility for service,
or discard the appliance.
an authorized service facility.
rvision is necessary when an appliance is used by or near children.
Never yank the cord to pull plug from the GFCI. Grasp the plug and pull to disconnect.
0 degrees Celsius or 32 degrees Fahrenheit.
Do not operate at temperatures above 50 degrees Celsius or 122 Degrees Fahrenheit.
If an extension cord is necessary, a cord with a rating at least 15 Amperes should be used. A cord rated for
it will not be tripped over or pulled.
DO NOT
SAVE THESE INSTRUCTIONS
www.ecoxotic.com
This luminaire is for wet locations.
Product Manual & Safety Instructions
To Avoid injury and possible electric shock it is imperative you:
READ AND FOLLOW ALL SAFETY INSTRUCTIONS AND WARNINGS
www.ecoxotic.com
th.
Cannon PRO LED Pendant
Warning: This product must be installed by a licensed electrician
Before beginning any work on the electrical installation, be sure that the main breaker panel is“OFF”to avoid
any danger of electric shock. All mounting of the unit must be completed before proceeding with electrical
hook-up. Where required by local, state or National Electric Codes the circuit should be equipped with a ground
fault interrupter. As with any electric appliance, failure to electrically ground unit may result in serious injury or dea
Grounding Instructions
This appliance must be connected to a GFCI plug then to a grounded wall outlet to minimize the possibility of
electric shock. This plug must be plugged into an outlet that is installed and grounded in accordance with all
appropriate codes and ordinances.
This appliance must be installed on a grounded circuit 120VAC.
If you do not have an available grounded outlet, you must have one installed by a qualified electrician.

Product Manual & Safety Instructions
www.ecoxotic.com
Warning: This product must be installed by a licensed electrician
Cannon PRO LED Pendant
Non-Dimmable Driver, Model #6870,6878 Dimmable Driver, Model
#6871,6872, 6873, 6874, 6875, 6876, 6877
Electrical Requirements
vVA
k
Grounding Instructions
v
Wiring Instructions
Connect Plug & Tighten
The LED driver must be supplied with 120VAC/60Hz per product label.
Note: If product is being shipped outside the USA, an appropriate may or may not be supplied with
the unit.
If product is shipped without a powercord, please use the wiring diagram below.
DIM-(White)
FG (Green/Yellow)
AC/L(Brown)
AC/N(Blue)
+V(Red)
-V(Black)
FG (Green/Yellow)
AC/L(Brown)
AC/N(Blue)
+V(Red)
-V(Black)

Product Manual & Safety Instructions
www.ecoxotic.com
Cannon PRO LED Pendant
Step 4 - Mounting Methods and Instructions
The Cannon PRO LED pendant includes an adjustable swivel bracket which is pre-installed for easy
installation. Two optional mounting methods are also available for mounting the LED to a pipe (using
optional pipe clamp) or hanging vertically (via optional 120” wiring hanging kit).
Swivel Bracket Mount
(Included)
Pipe / Strut Clamp
(Optional)
Swivel Mounting Bracket
A. Locate mounting location on wall, ceiling or beam. Ensure mounting location is capable of holding a
weight of 4kg.. BRACKET MUST BE MOUNTED TO A STRUCTURAL MOUNTING POINT.
B. Place bracket at location and mark location of 2 screw holes.
C. Drill small hole at each screw location.
D. Place bracket at location and attach to beam, ceiling or wall
using the included wood attachment screws.
D. Screw safety cable end loop to suspension point or loop over
point (beam) and run hook gripper end through loop. SAFETY
CABLE MUST BE USED AT ALL TIMES!
E. Attach safety cable hook gripper to pendant eyehook. Tighten
cable and remove any slack by pushing cable into gripper.
To Adjust:
- Remove small locking bolt using small allen wrench
- Loosen adjustment bolt using large allen wrench
- Swivel pendant to desired angle
- Tighten adjustment bolt and locking bolt
Adjustment Bolt
Locking Bolt
Product Manual & Safety Instructions
www.ecoxotic.com
Cannon PRO LED Pendant
Step 4 - Mounting Methods and Instructions
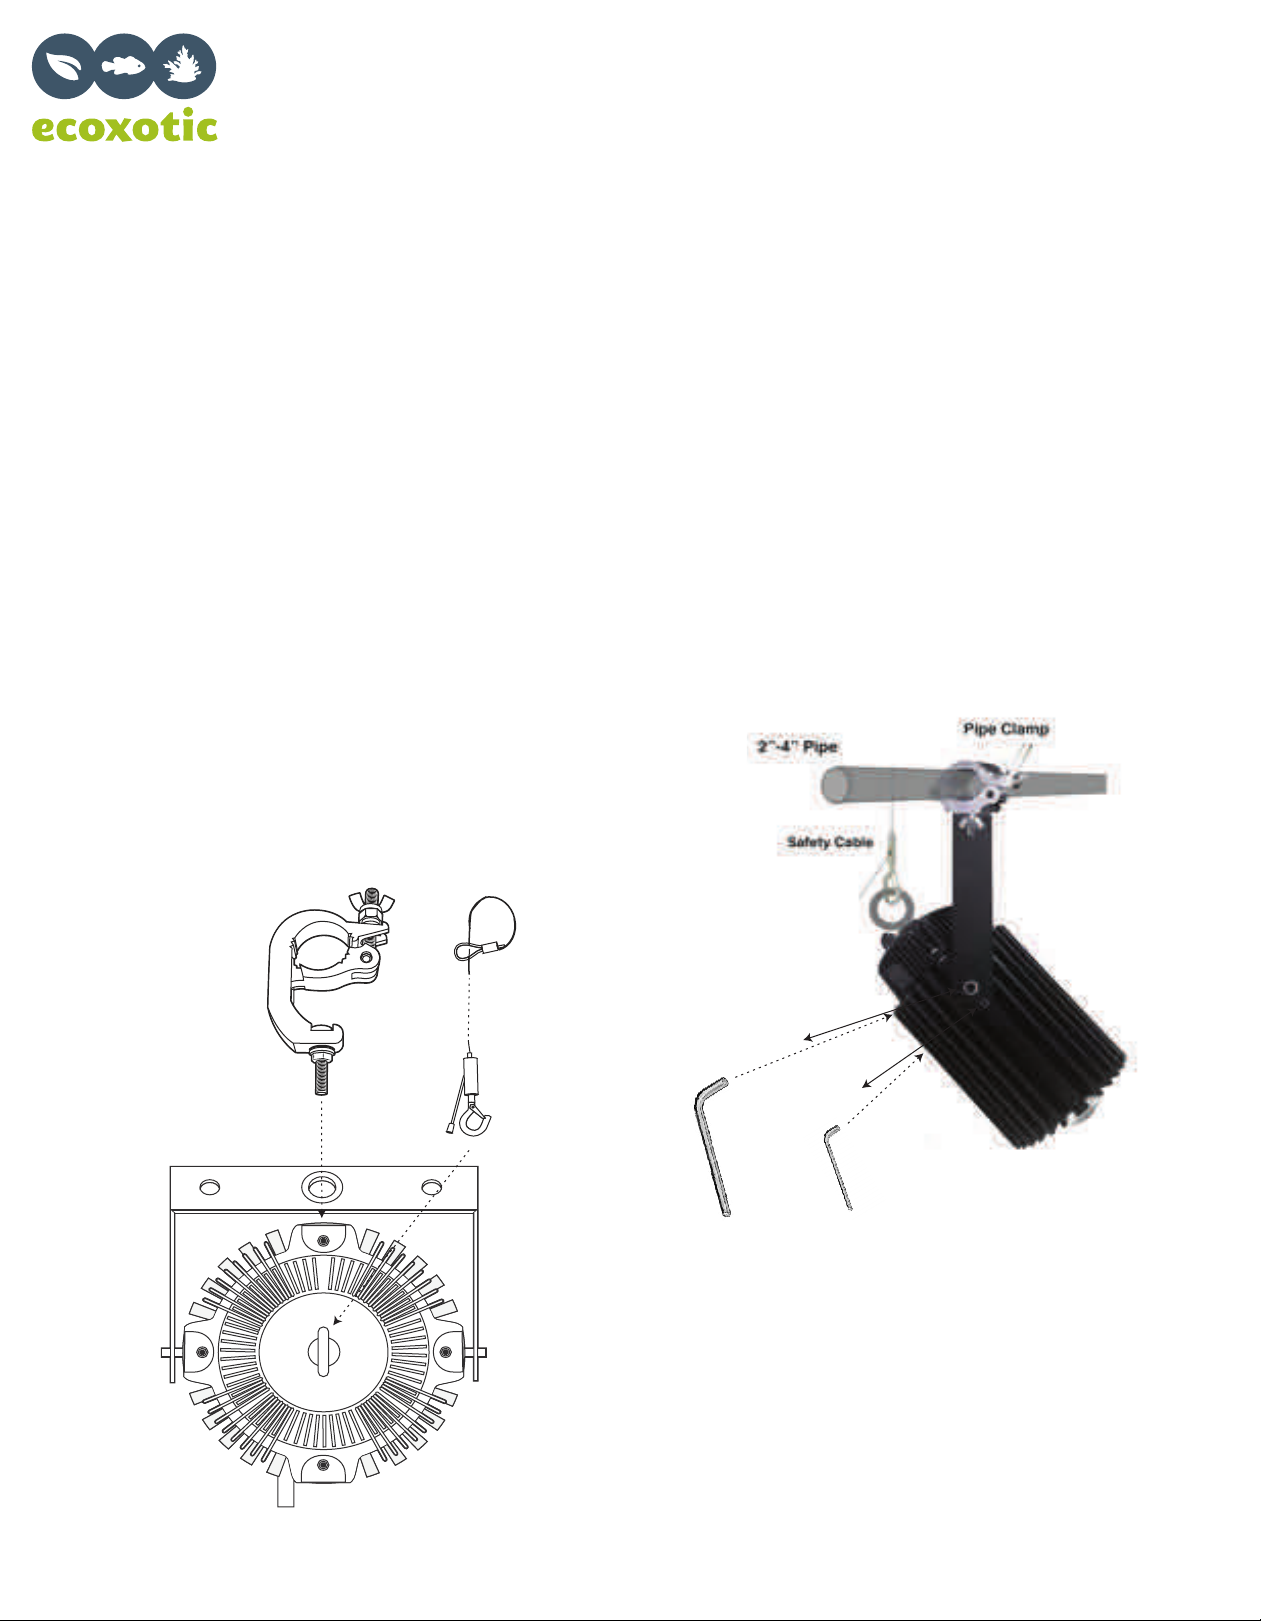
Pipe Clamp Mounting Bracket
A. Locate mounting location on metal pipe. Ensure mounting location is capable of holding a weight of
4kg.. BRACKET MUST BE MOUNTED TO A STRUCTURAL MOUNTING POINT.
B. Attach pipe clamp to pendent swivel bracket by using included hardware and attaching to center
hole of swivel bracket. A washer should be located on each side of bracket. Tighten clamp bolt to
bracket using wrench.
C. Open pipe clamp by loosening thumbscrew and nut.
D. Place bracket at location and attach clamp by closing around pipe and tighten nut and thumbscrew.
D. Loop safety cable around pipe over point and run hook gripper end through loop. SAFETY
CABLE MUST BE USED AT ALL TIMES!
E. Attach safety cable hook gripper to pendant eyehook. Tightencable and remove any slack by
pushing cable into gripper.
To Adjust:
- Remove small locking bolt using small allen wrench
- Loosen adjustment bolt using large allen wrench
- Swivel pendant to desired angle
- Tighten adjustment bolt and locking bolt
Adjustment Bolt
Locking Bolt
Safety Cable
Gripper
Pipe Clamp

Product Manual & Safety Instructions
www.ecoxotic.com
Cannon PRO LED Pendant
Step 4 - Mounting Methods and Instructions
Hanging Kit
A. Locate suspension point on beam or pipe. Ensure
mounting location is capable of holding a weight of 4kg.
BRACKET MUST BE MOUNTED TO A STRUCTURAL
MOUNTING POINT.
B. Place loop over structural mounting point and run hook
gripper end through loop.
C. Attach hook gripper to pendant eyehook. Tighten cable
and remove any slack by pushing cable into gripper. Gripper
Loop
Eye Hook

Product Manual & Safety Instructions
www.ecoxotic.com
Cannon PRO LED Pendant
Step 5 - Snoot Attachment
An optional light snoot is included with each Cannon Pro LED to hide the brightness of the LED
lens from the viewiing area. We highly recommend using the snoot with the 60º and 45º lenses.
A. Slide black snoot over the LED lens ring with the three mounting holes positioned over ring.
B. Attach snoot by slightly tighening three screws (included) into groove on lens ring.
Remove lens ring
Attach snoot with grooved
lens ring and three screws
Step 6 - Optical Lens Adjustment
Three lenses are included with each Cannon Pro - 90º (pre-installed), 60º and 120º. To switch and
adjust light angles:
A. Carefully unscrew lens ring by turning counter clockwise. When removed, the existing lens,
gasket and reflector will slide off of LED chip. IMPORTANT: DO NOT TOUCH LED CHIP!
B. Choose optical lens.
C. Replace reflector, gasket and lens and attach to pendant using the lens ring. Hand tighten only.
See spec sheet for viewing angles.
Step 7 - Connecting to LED Controller
Cannon Pro LED pendants which feature a dimmable LED driver accept the following type of
control signals; 1-10V dc, 10V PWM signal and Resistance. Please refer to the Meanwell HBG160
specification sheet for more information on 10V PWM and resistance signals.
IMPORTANT: If not connecting to a dimmer or controller, we recommend using the larger piece of
heat shrink and covering the dimming cable plug to prevent moisture/corrosion damage.
Note: This light cannot be dimmed to 0 (completely off) and can only be dimmed to a lowest light
level of 10%. This ensures safety when working with/around the light fixture.
Follow instructions on next page to connect to controller.

Product Manual & Safety Instructions
www.ecoxotic.com
Cannon PRO LED Pendant
Step 7 - Connecting to LED Controller To connect to standard 0-10V and PWM controllers:
A. Identify DIM+ and DIM- signal wire from your
LED controller.
B. Slide small heat shrink tape over your dimming
cable/wire.
C. Attach DIM+ wire to + screw terminal on male
DC plug (included).
D. Attach DIM- wire to - screw terminal on male
DC plug.
E. Slide large heat shrink tape over female DC plug
connected to Cannon.
F. Important - TEST Dimming signal by turning
Cannon Pro on and adjusting your controller.
G. Use heat shrink tape to seal your dimming
wire to plug and with male and female plugs
connected, seal both plugs using larger heat
shrink tape.
Dim+
Dim-
Heat Shrink
To connect to Ecoxotic 0-10V LED controller:
A. Follow instructions included with 0-10V controller.
B. Slide large heat shrink tape over female DC plug
connected to Cannon.
C. Plug controller into DC dimming cable using
controller plug or splitter plug.
F. Important - TEST Dimming signal by turning
Cannon Pro on and adjusting the controller.
G. Use heat shrink tape to seal your dimming
wire to plug and with male and female plugs
connected, seal both plugs using larger heat
shrink tape.
0-10V LED Controller
To DC power (transformer included with controller)
Dimming cable to
controller
Product Manual & Safety Instructions
www.ecoxotic.com
Cannon PRO LED Pendant
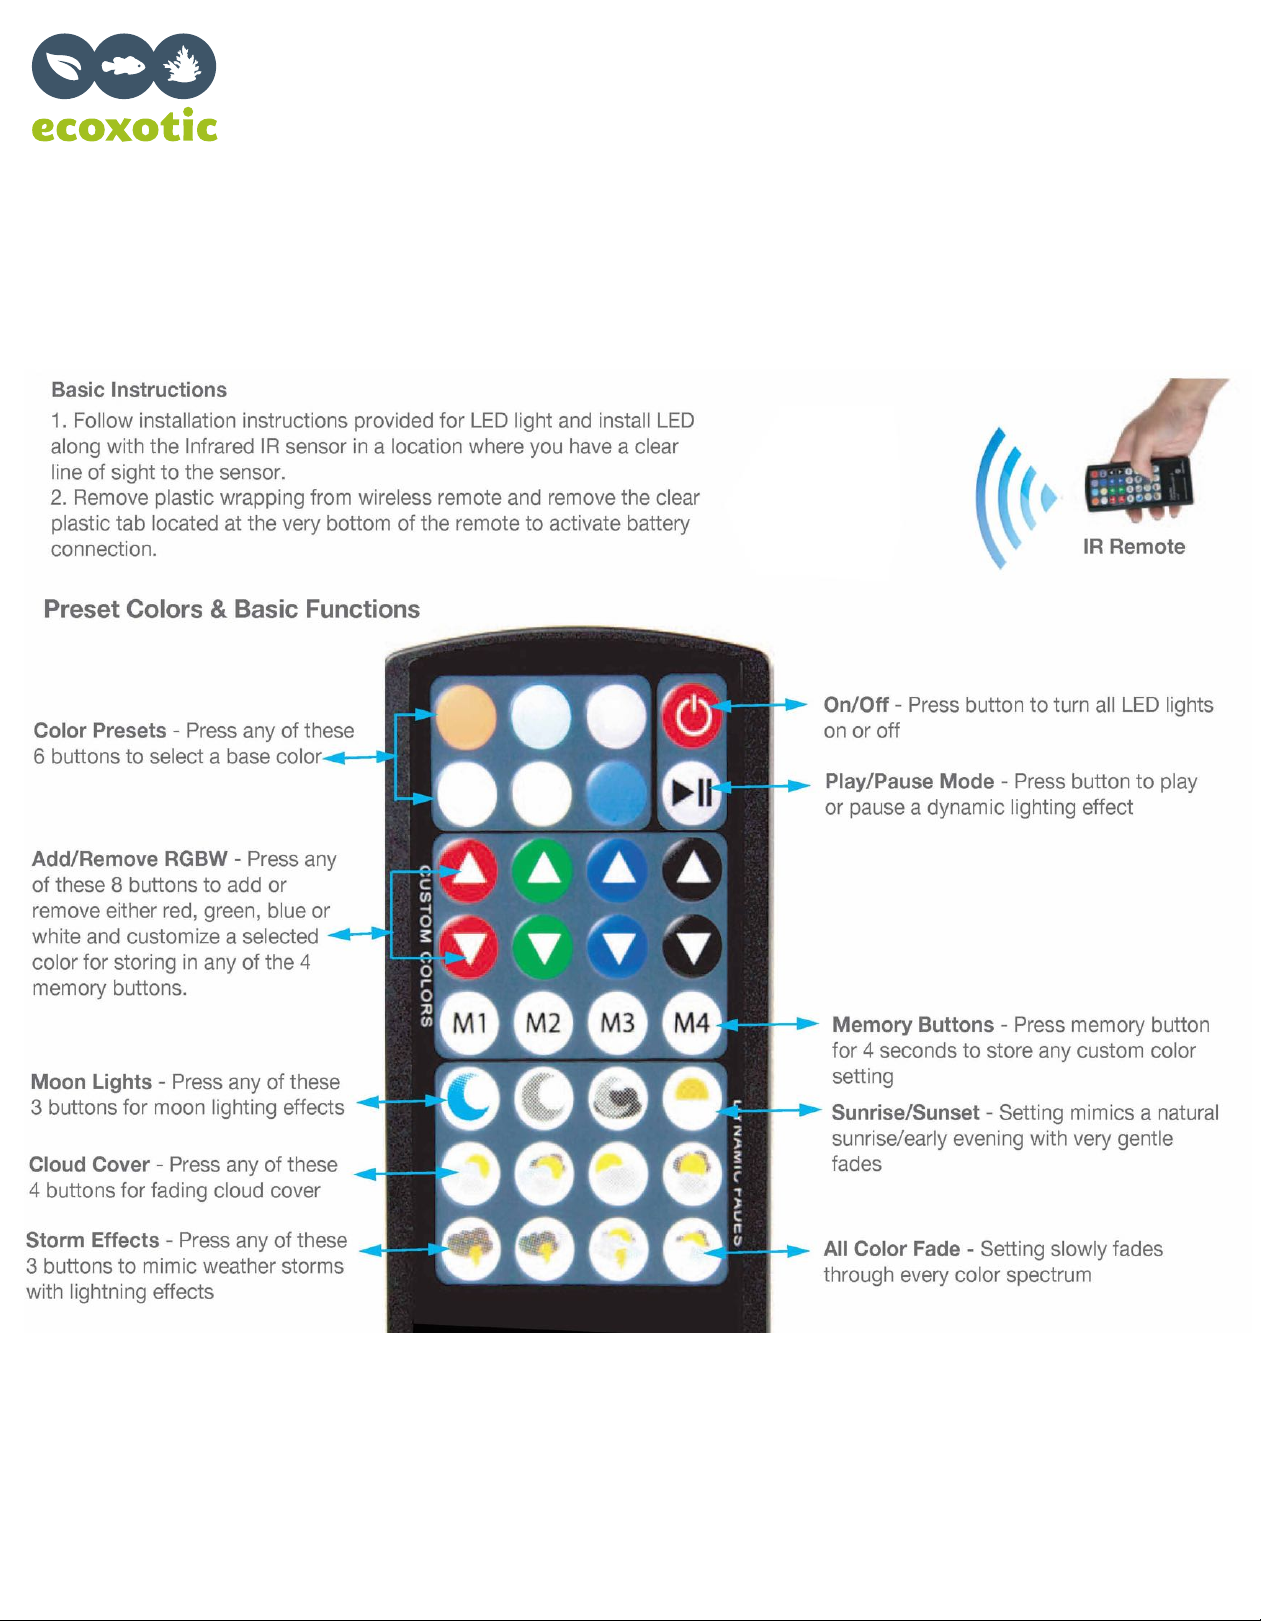
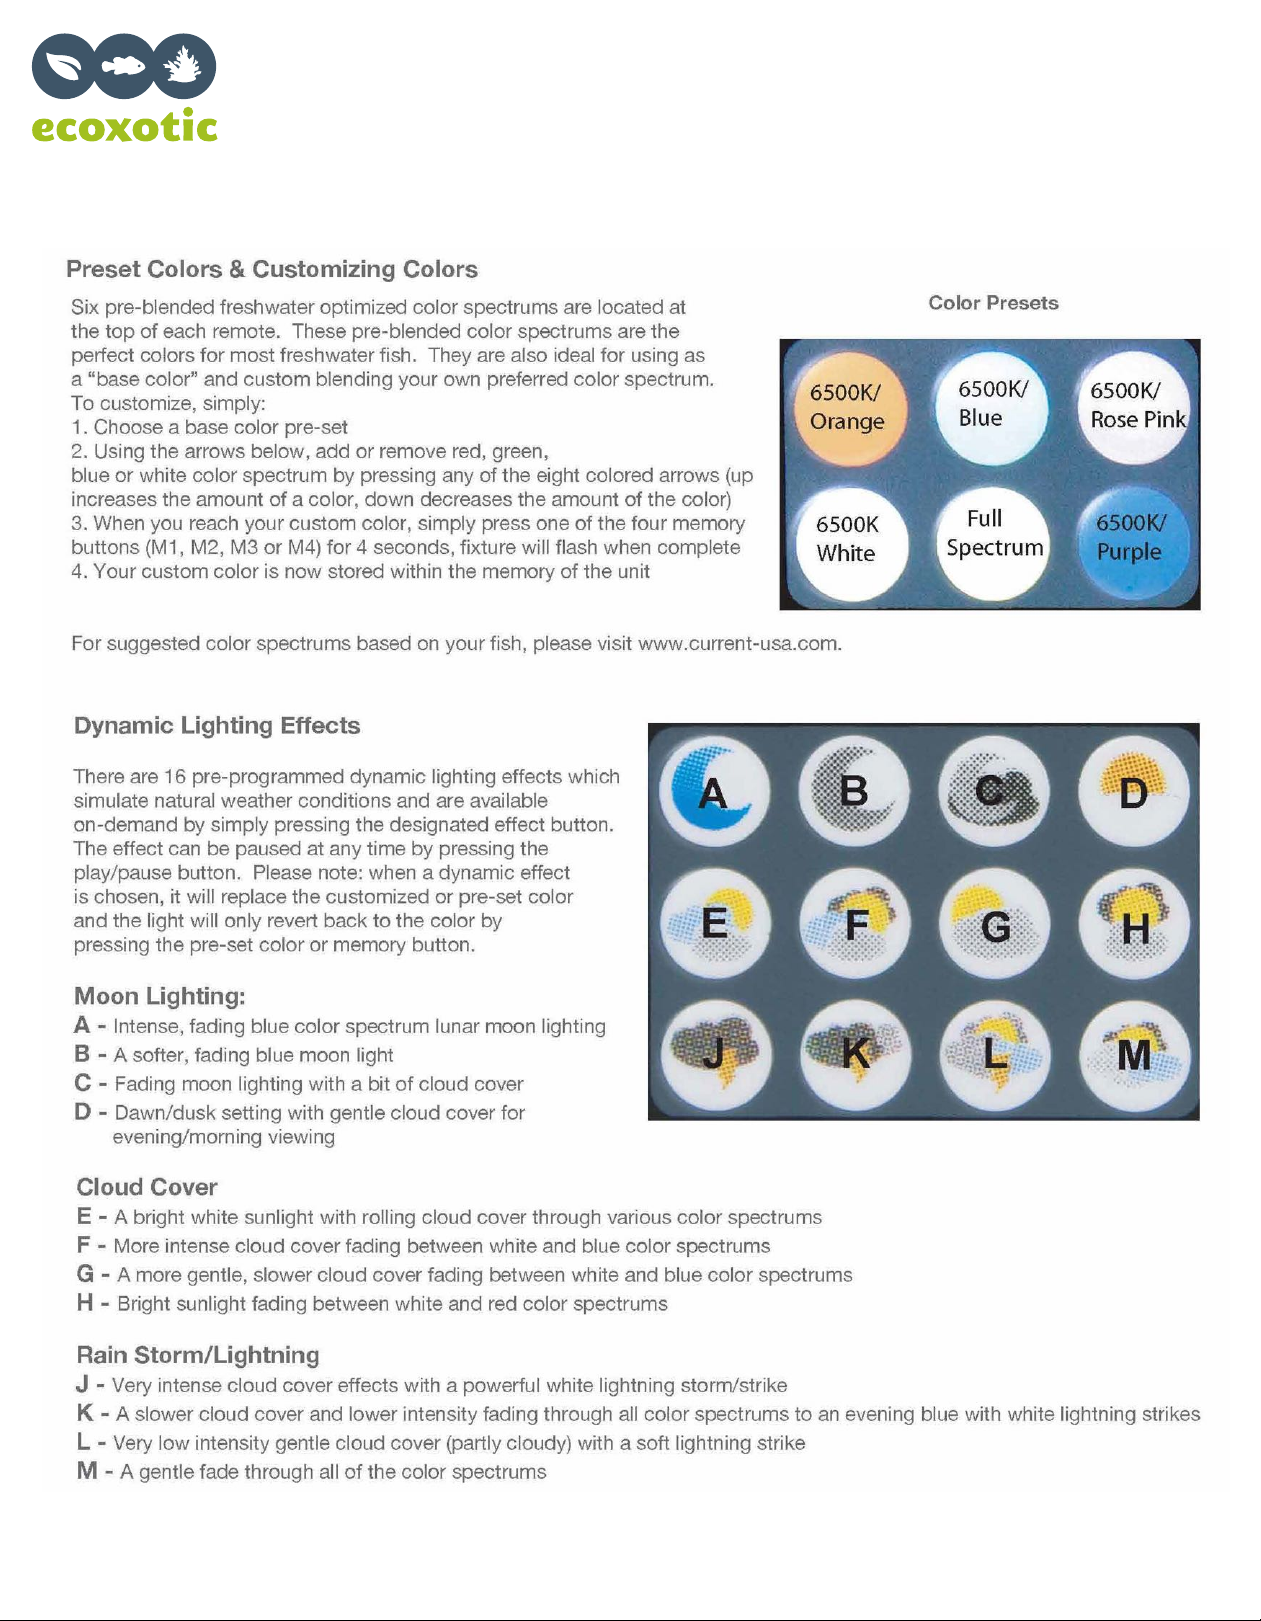
Step 8 - Using IR Remote
Cannon PRO Model# 6870 and #6878 both feature an integrated color spectrum controller which
allows you to wirelessly control the overall color spectrum and intensity using the included remote.
Product Manual & Safety Instructions
www.ecoxotic.com
Cannon PRO LED Pendant
Step 8 - Using IR Remote

Product Manual & Safety Instructions
www.ecoxotic.com
Cannon PRO LED Pendant
Warranty
This limited warranty applies only to products that are manufactured by or for Ecoxotic and can be
identified by trade name or logo affixed to it, and sold by an authorized Ecoxotic retailer in the United
States to you, the original purchaser of such products (“Products“). Ecoxotic hereby warrants that
Products will be free from defects in materials and workmanship for a period of one (1) year from the
date of original retail purchase (the “Warranty Period“). This warranty does not apply to any product
that is not an Ecoxotic Product.
This warranty does not apply to Products (i) that have been damaged by accident, abuse, misuse or
misapplication, improper installation, saltwater corrosion, electrical surges, (ii) that have been modi-
fied without the written permission of Ecoxotic or, (iii) for which any Ecoxotic logos have been
removed or defaced.
US and Canadian residents can contact Ecoxotic directly if you discover a defect in any Product. In
the event that such Product is defective, as determined by Ecoxotic in its sole discretion, Ecoxotic’s
sole obligation, and your exclusive remedy, shall be for Ecoxotic, at its option, to repair or replace
such Product at no charge to you, provided that you (i) return such Product to Ecoxotic during the
Warranty Period, and (ii) provide proof of purchase and registration of such Product. If the returned
Product is not defective or is returned after the Warranty Period, Ecoxotic shall have no obligation to
repair or replace the Product. Residents outside the US and Canada should contact the place of
purchase for warranty issues.
EXCEPT AS EXPRESSLY PROVIDED ABOVE OR AS REQUIRED BY LAW, ECOXOTIC PRODUCTS
ARE PROVIDED “AS IS,” WITHOUT WARRANTY OF ANY KIND. THE WARRANTY AND REMEDIES
SET FORTH ABOVE ARE EXCLUSIVE AND IN LIEU OF ALL OTHERS, WHETHER ORAL OR WRIT-
TEN. ALL WARRANTIES IMPLIED BY STATE LAW, INCLUDING IMPLIED WARRANTIES OF MER-
CHANTABILITY AND FITNESS FOR A PARTICULAR PURPOSE, ARE EXPRESSLY LIMITED TO THE
LESSER OF THE DURATION UNDER STATE LAW OR THE DURATION OF THE LIMITED WARRANTY
SET FORTH ABOVE. IN NO EVENT SHALL ECOXOTIC BE RESPONSIBLE FOR SPECIAL, INCIDEN-
TAL, OR CONSEQUENTIAL DAMAGES, INCLUDING, BUT NOT LIMITED TO LOST PROFITS,
DOWNTIME, GOODWILL, DAMAGE TO OR REPLACEMENT OF OTHER EQUIPMENT OR PROP-
ERTY, COSTS OF RECOVERING OR REPLACING ANY ANIMALS, FISH, PLANTS, TANKS OR
OTHER AQUARIUM RELATED ITEMS AND/OR EQUIPMENT, OR PERSONAL INJURY. Some states
do not allow the exclusion or limitation of incidental or consequential damages or limitations on the
duration of implied warranties, so the above limitations or exclusions may not apply to you. This
warranty gives you specific legal rights, and you may also have other rights that vary form state to
state.
This warranty is not transferable. No person is authorized to change, modify or extend the terms of
this warranty in any manner. This warranty is governed by the laws of the State of California, exclud-
ing conflicts of laws principles. Ecoxotic reserves the right to make changes, additions and improve-
ments to its products from time to time, and has no obligation to replace the exact same model of
Product.
Table of contents
Other Ecoxotic Lighting Equipment manuals


