Eden Acoustique Tomei User manual
!sur !1 22
TÔMEI
User Manual
Version 4.3 - April 2017
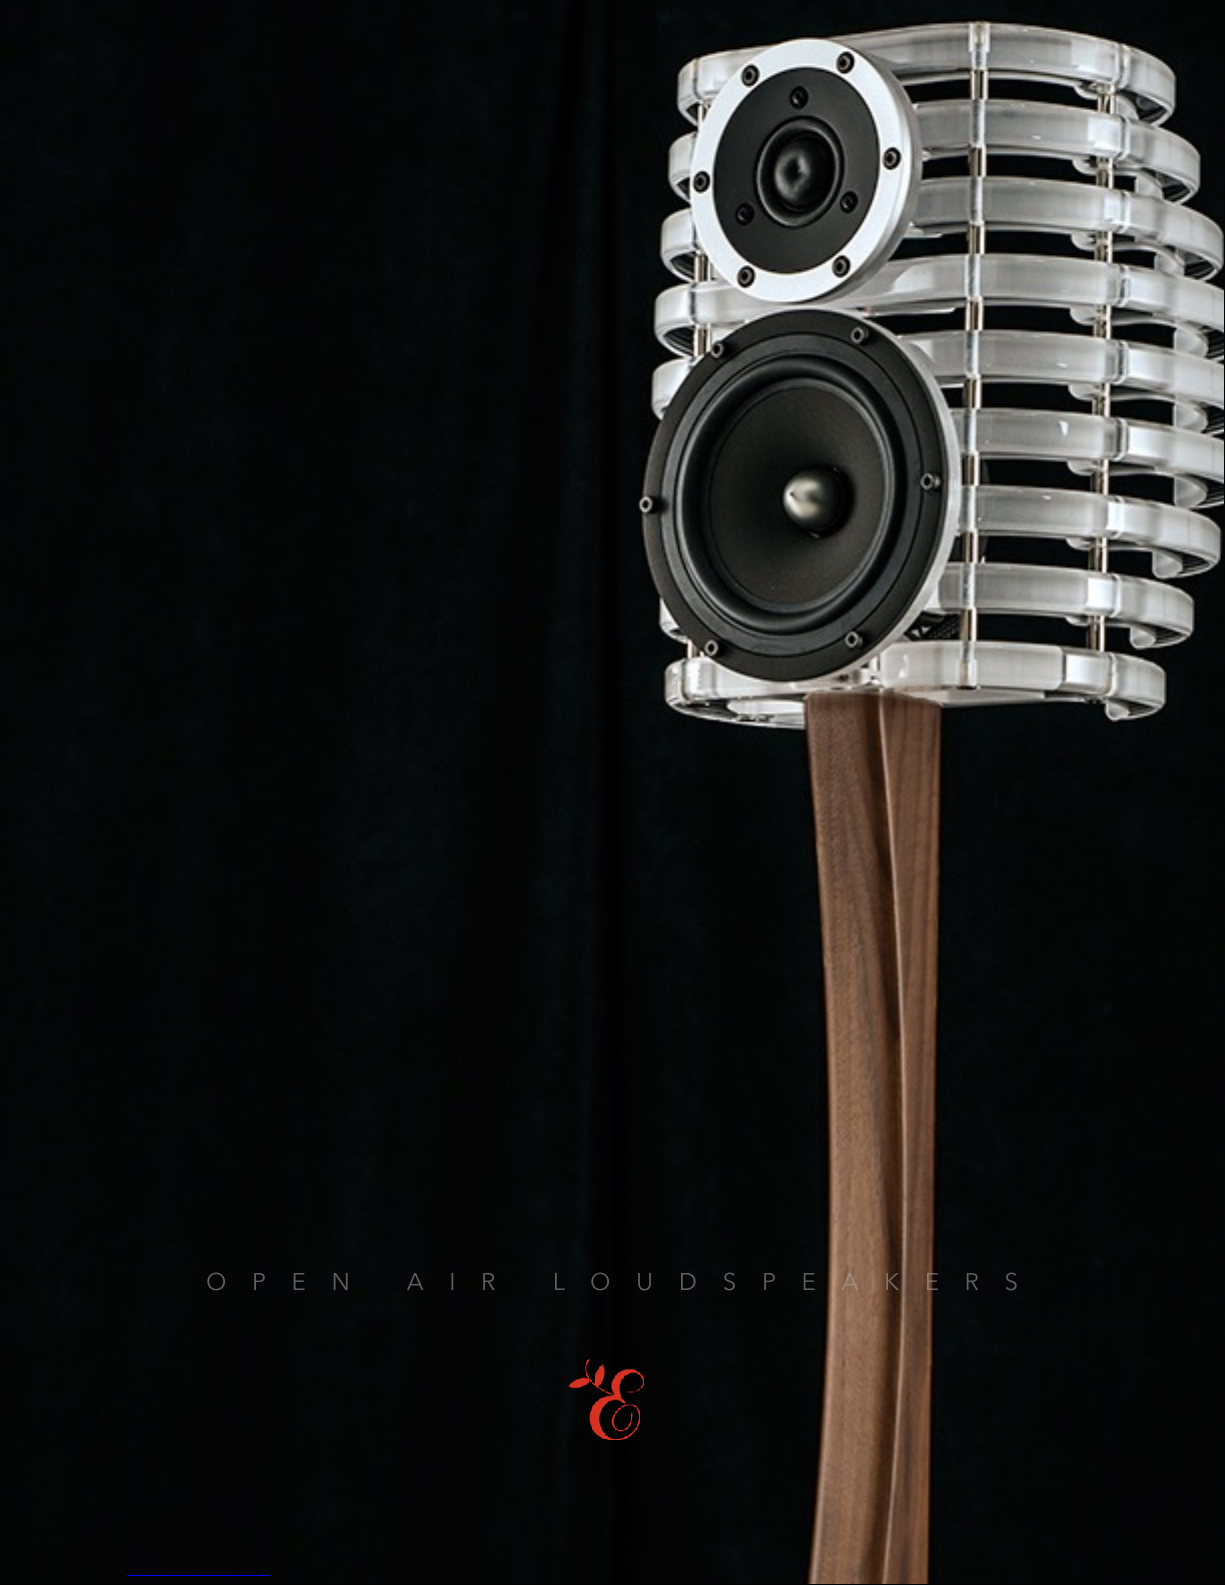
OPEN AIR LOUDSPEAKERS
EDEN ACOUSTIQUE

!sur !2 22
CONTENTS
INTRODUCTION 3
UNPACKING 4
1.1 Precautions 5
1.2 Larger crate 6
1.3 Smaller crate 6
INSTALLATION 9
2.1 Installing the spikes 10
2.2 Connecting TOMEI loudspeakers 10
2.3 Standard loudspeaker set-up 11
2.4 Control Unit 11
USING TOMEI LOUDSPEAKERS 12
3.1 Brief description 13
3.2 Before powering ON 13
3.3 Connecting a source component 13
3.4 Analog input 14
3.5 Digital input 14
3.6 Control Unit Display / Menu 14
3.7 Control Unit Modes 14
3.7.1 Splash Screen 15................
3.7.1 Volume Mode 15................
3.7.2 Source selection 15................
3.7.3 Settings 15................
3.7.5 Settings Description 16................
3.8 Testing the installation 17
3.9 Positioning the TOMEI loudspeakers 17
3.10 Run-in period 17
TROUBLESHOOTING 18
SERVICE AND GUARANTEE 20
5.1 Service 21
5.2 Guarantee 21

!of !3 22
INTRODUCTION
Congratulations on your purchase of the Eden Acoustique TOMEI playback system, a
new vision of the high-end loudspeaker.
TOMEI means “transparent, invisible” in Japanese and it exactly defines the sound of
your new loudspeakers. With TOMEI you do not hear a loudspeaker, you attend a
live musical event.
Dipole loudspeakers propagate the sound in front of a baffle as well as towards the
back. With TOMEI we went further by suspending the drivers in air without any
boundaries. We call it Open Air Design. More than with any other loudspeaker this
brings you closer to the real performance, making it live again.
The lack of a “box” around the speakers provides an accurate, highly resolving and
transparent sound, easily recognized once heard. After a while you begin to hear the
“box” in all conventional speakers… A digital signal processor (DSP) takes care of
crossovers, phase accuracy and time delays with a precision and lack of distortion
not possible in the analog domain. Each loudspeaker is driven by individual
amplifiers, directly connected to the voice coil of each driver.
Skillfully handcrafted by hand, each TOMEI loudspeaker system is an exclusive,
cutting-edge audio art item, as well as a stunning performer that will endow you with
years of musical bliss.
This manual is intended to help you get the best musical experience from these
exceptional performers..
The Eden Acoustique Team
!of !4 22
UNPACKING

!of !5 22
1.1 PRECAUTIONS
The crates are quite big so you may need
help to move them. Please allow sufficient
space for the boxes to be opened and the
contents to be removed.
As part of the Eden Acoustique quality
control process, we check every product
carefully before packing to ensure that it
reaches you in flawless condition.
Once the TOMEI system is unpacked, please
check the units for any physical damage and
retain the shipping crates and all relevant
packing materials for use, should one of the
units need returning.
In the event that damage has occurred,
please notify your Eden Acoustique dealer
immediately, so that a written claim to cover
the damages can be initiated. Check out the
Service and Guarantee section for more
information.
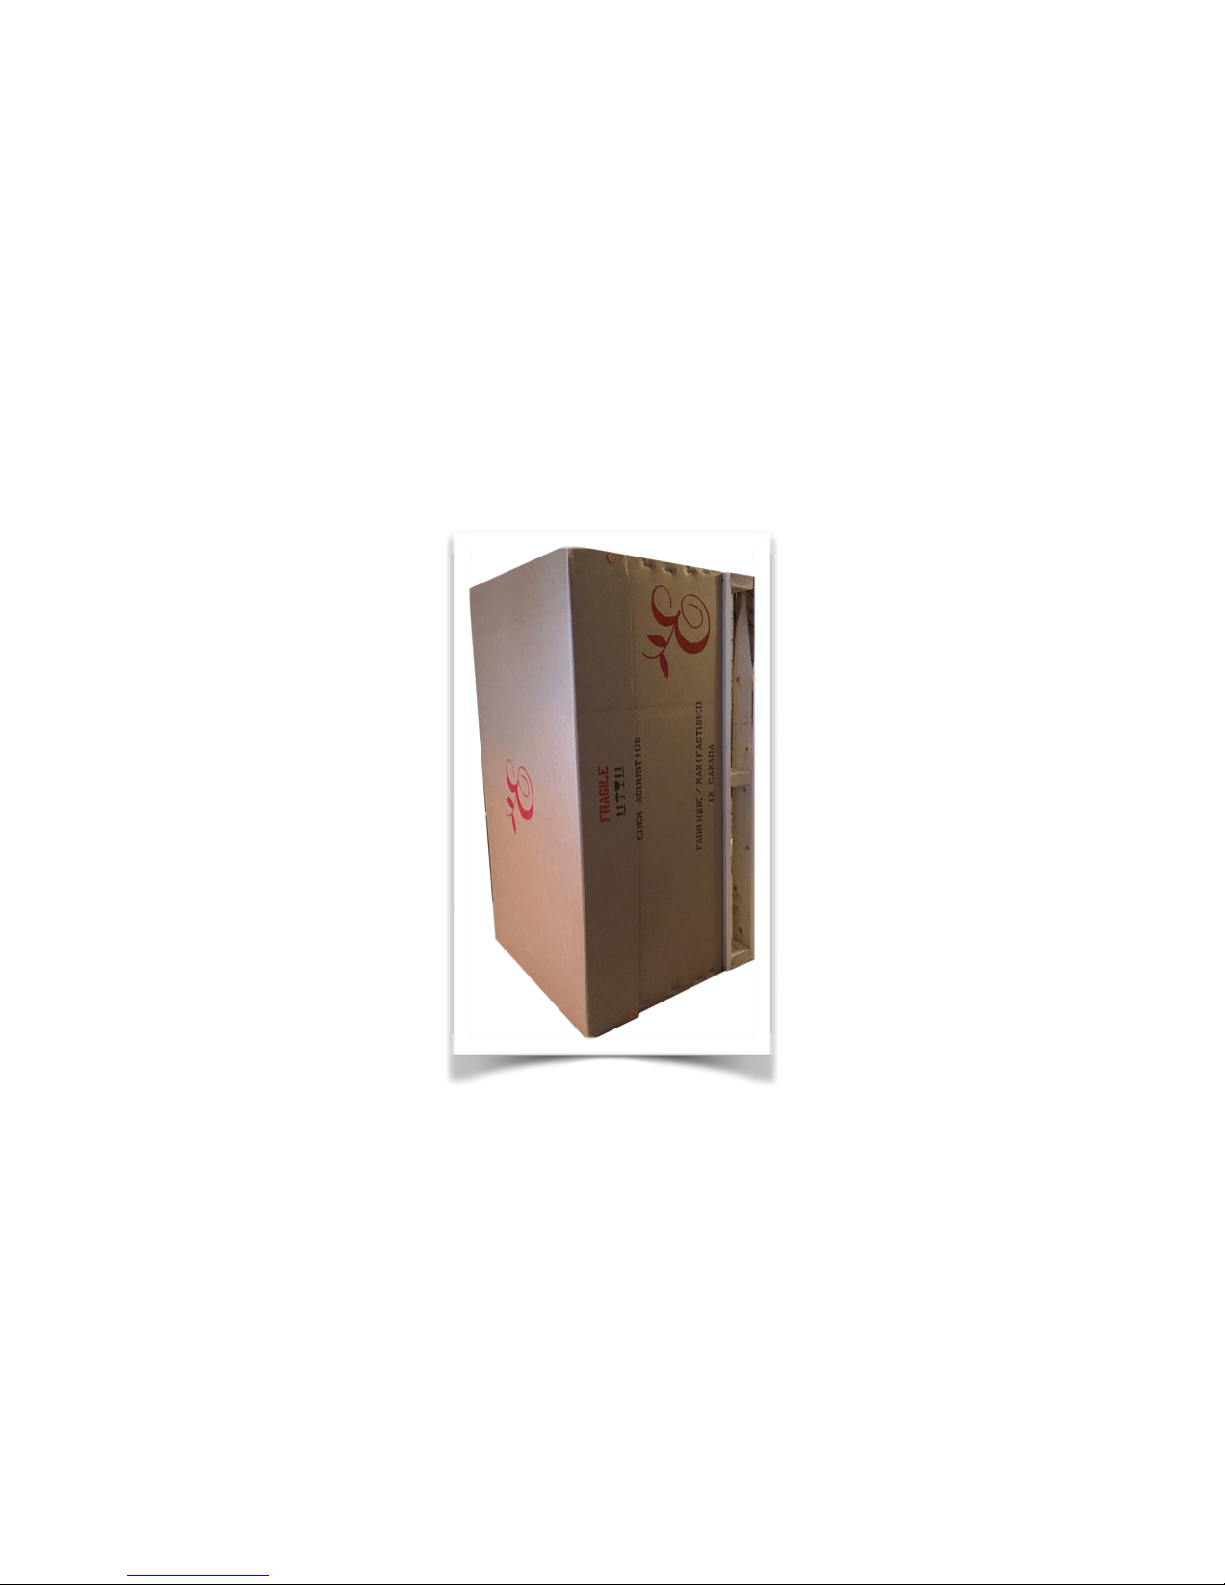
TOMEI loudspeakers come in two crates.
The largest crate contains the two TOMEI
towers on their wood stands.
The smallest crate contains the Control Unit
(amplifiers and DSP) and the bass module. All
cables and accessories are also included in a
burlap pouch found in the front
compartment.
Take great care when
unpacking or re-packing the
TOMEI loudspeakers that you
do not put undue pressure on
the face containing the drive
units, as they may be
damaged if pressed.

!of !6 22
1.2 LARGER CRATE
Remove the four screws, then open the crate.
The screws are identified by a yellow
surround.
1.3 SMALLER CRATE
Remove the four screws, then open the crate.
Remove the padding material that protects
the TOMEI monitors and the solid wood
stands.
Once the crate is open you will see the acrylic
base of the bass module. It is seen from the
bottom.
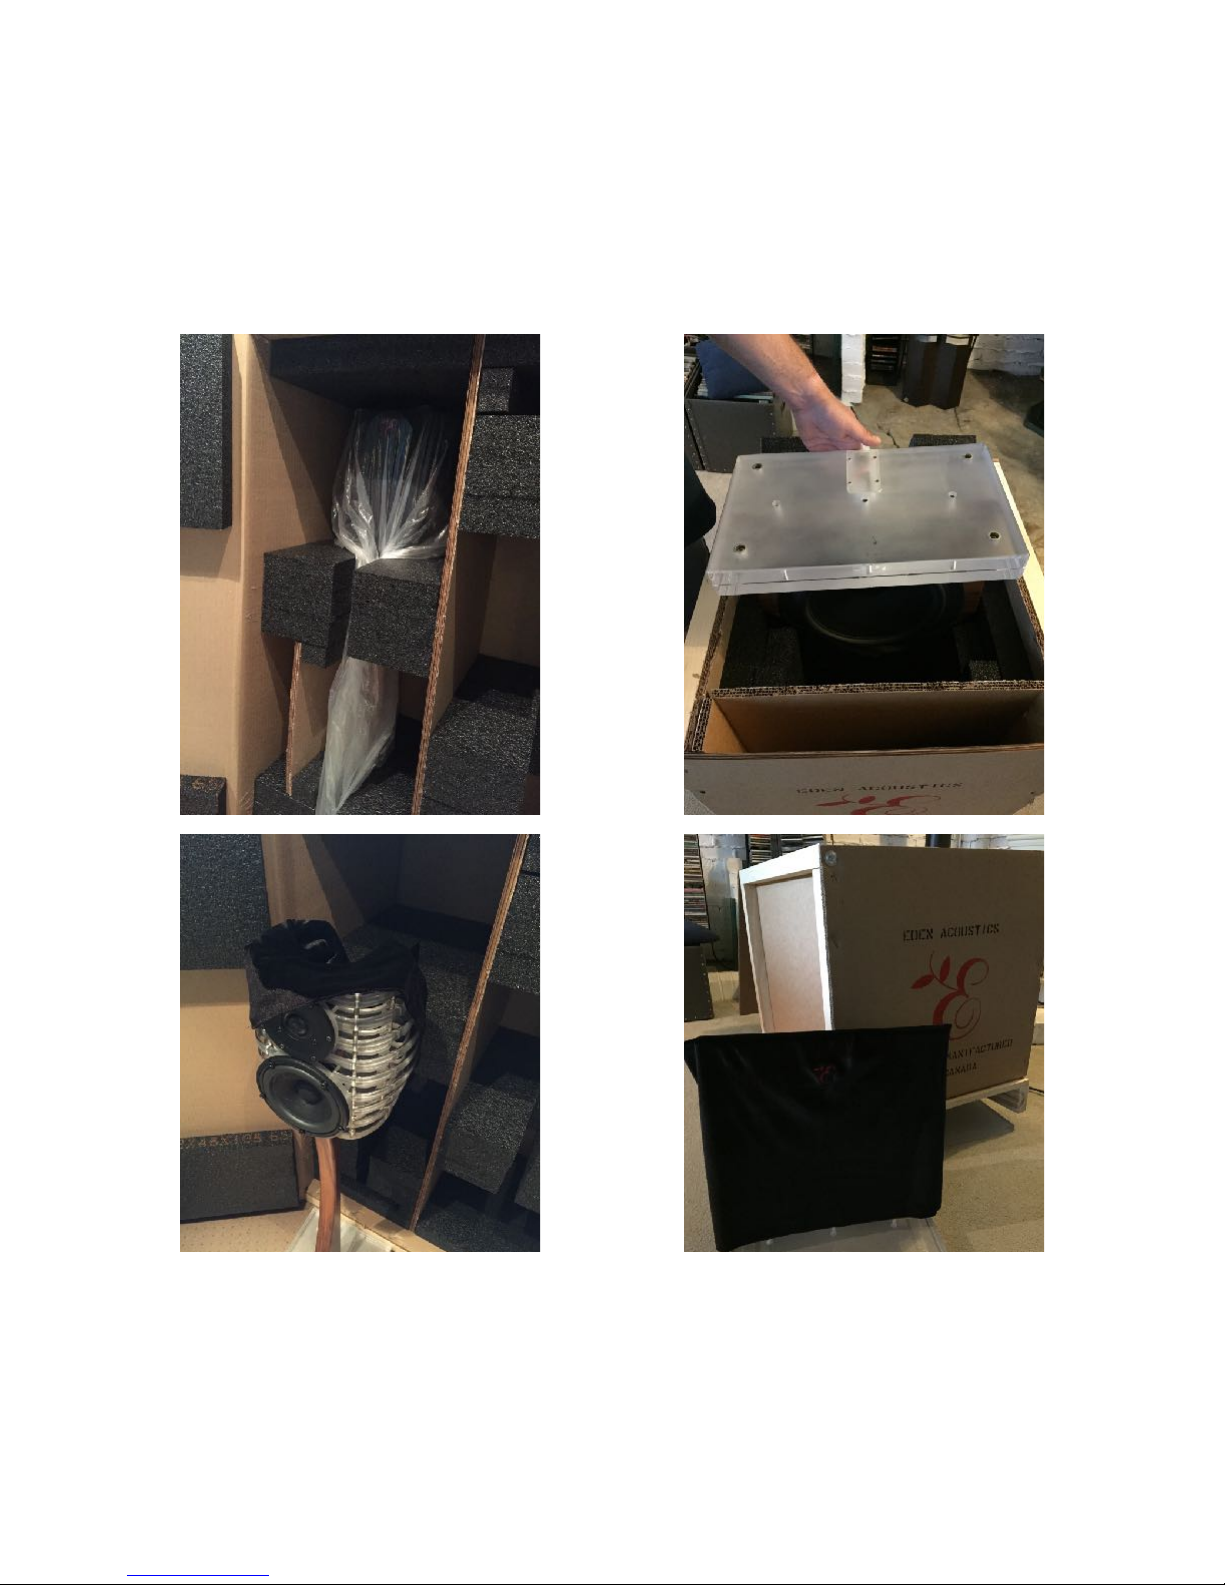
!of !7 22
Extract the TOMEI towers from the foam
protection by pulling carefully on the wood
support.
Remove the black velvet protective hood.
Remove the bass module by pulling carefully
on its acrylic base. The bass module is heavy
and might require a second person to pull it
out.
Remove the black velvet protective hood.

!of !8 22
From the small crate: Remove the burlap
pouch that contains the cables and
accessories.
Remove and unpack the spikes from the
pouch. You will install them later. The spikes
and accessories come in three bags of four.
The spike screws come in a single bag of
twelve in two paper wrapped packages.
Remove the Control Unit carefully. It is
located just besides the bass module in the
crate in a black pouch.
Remove the loudspeaker and AC cables from
the pouch. You will install them later.

!of !9 22
INSTALLATION

!of !10 22
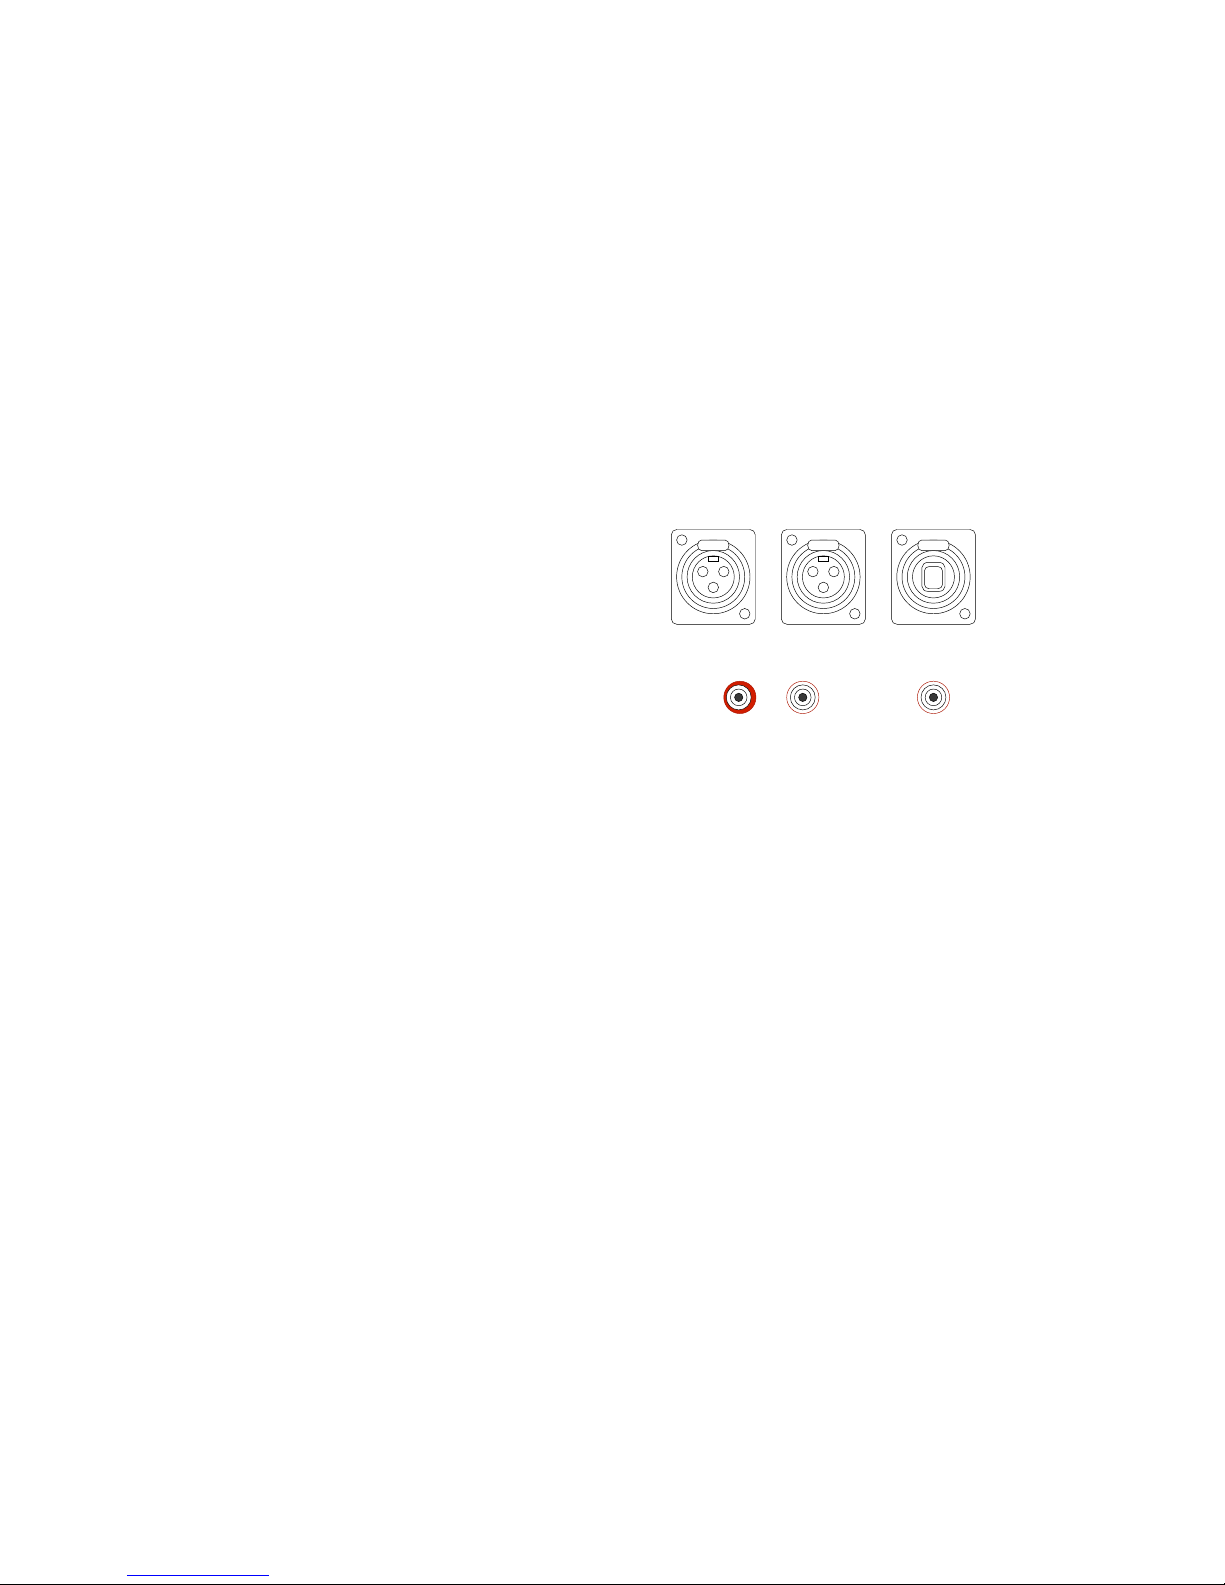
2.2 CONNECTING TOMEI LOUDSPEAKERS
TOMEI loudspeakers come with high-end bi-
wire cables. The following images show each
speaker connector.
We use Neutrik Speakon™ connectors and
plugs, which offer superior connections and
will make your life easier.
Right speaker:
The way to connect the cables to the Control
Unit and loudspeakers is as follows:
1. Place the cable plug on the
corresponding Control Unit connector
and slightly twist left so the cable plug
inserts into it. Push the plug farther inside
the connector while twisting to the right.
The plug should latch in.
2. Connect one end of the speaker cables
to the Control Unit and connect the other
end to the corresponding loudspeaker.
Right
S/PDIF
USB IN
INPUTS
R L
LeftBass
Right
S/PDIF
USB IN
INPUTS
R L
LeftBass
2.1 INSTALLING THE SPIKES
The speakers sit on damped aluminum
spikes. To use, first install the spike screw,
then screw on the height adjustment nut.
Finally insert and screw in the spike into the
opening under the speakers base. There are
four spikes per speaker for a total of 12.
Left speaker:
Spike screw
Floor Protect Ring
Spike
Height Adjust Nut
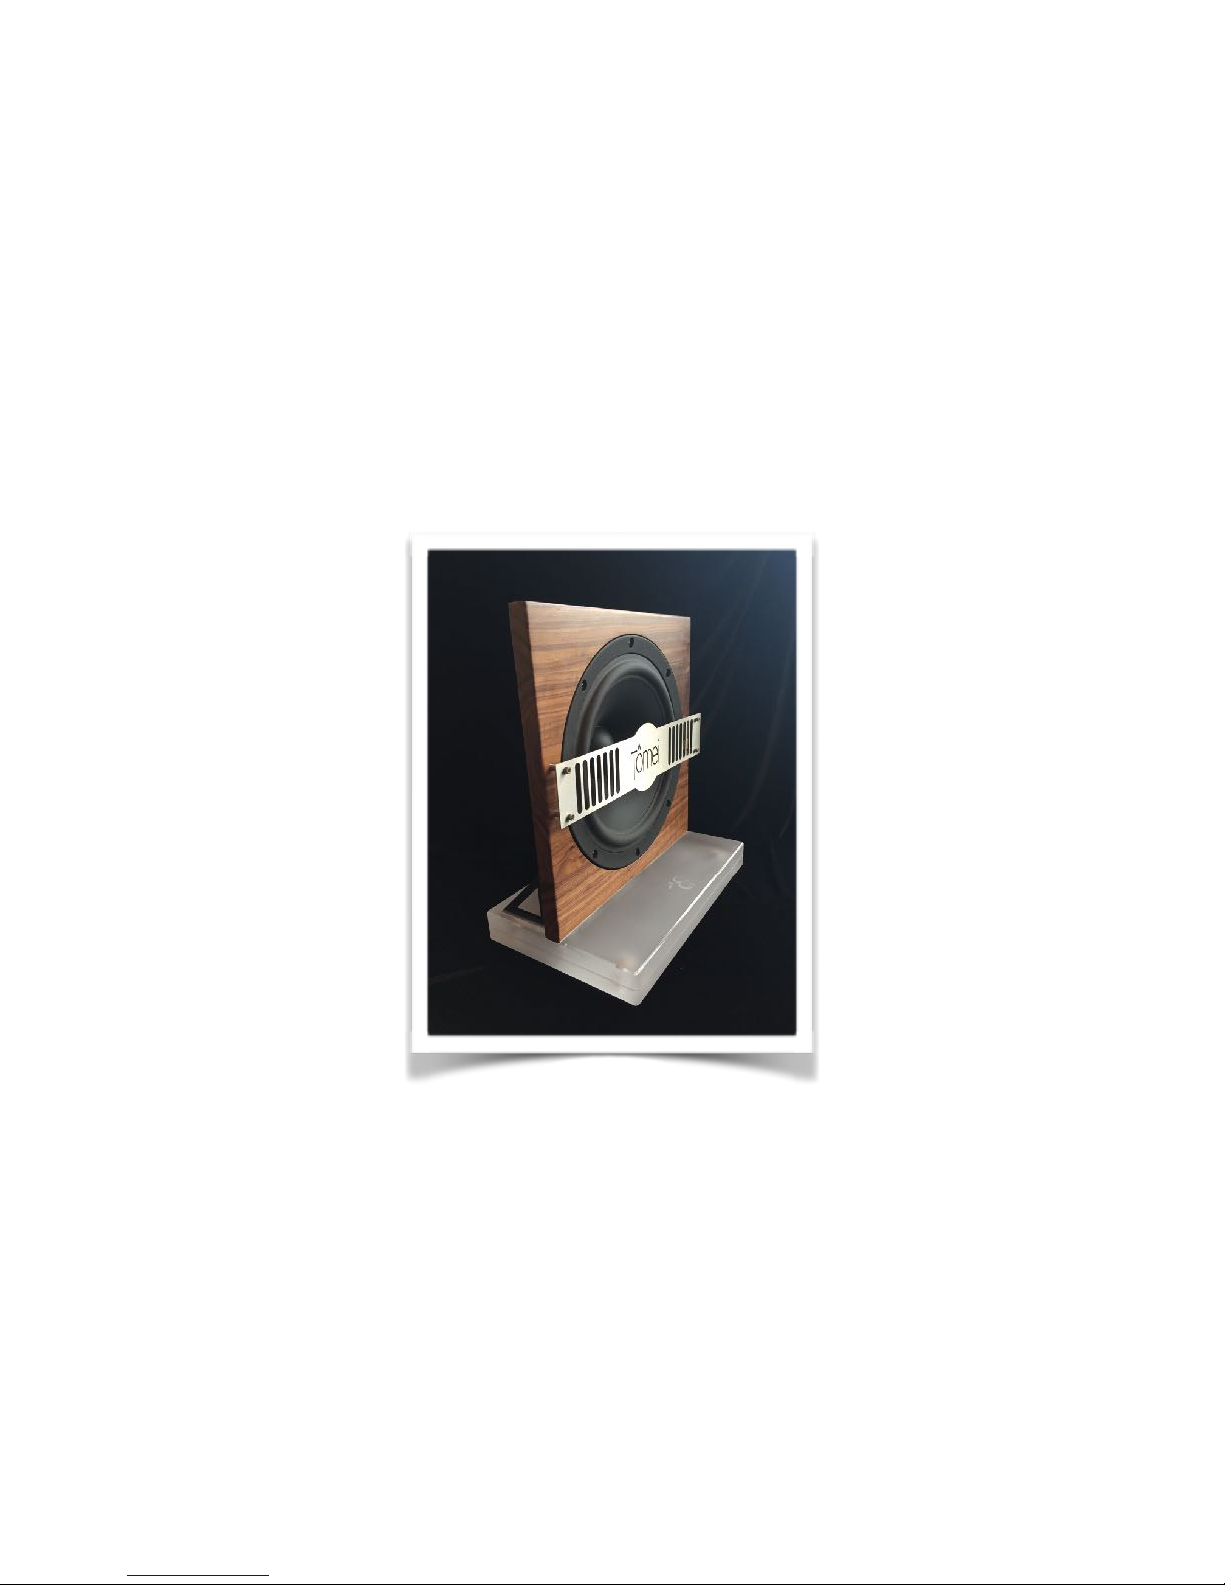
Bass speaker:
Right
S/PDIF
USB IN
INPUTS
R L
LeftBass
NOTE
The bass cable is identified
by a white label titled BASS.

!of !11 22
2.3 STANDARD LOUDSPEAKER SET-UP
Your TOMEI loudspeaker system comes with
two monitor speakers on their solid wood
supports, one central bass module, and all
the electronics in a stainless steel and acrylic
(wood optional) enclosure called the Control
Unit.
All three speakers connect to the Control Unit
using the included cables.
For more details see Section 3 - Using Tomei
Loudspeakers.
2.4 Control Unit
The Control Unit can be located on a shelf or
equipment rack that is well ventilated like any
other electronic gear.
All connections to the Control Unit are made
on the back panel. It would be convenient to
leave at least 8 inches (20 cm) behind the
Control Unit so you can easily access/connect
the cables.
!of !12 22
USING TOMEI LOUDSPEAKERS
!of !13 22
3.1 BRIEF DESCRIPTION
The TOMEI loudspeakers are the fruits of
more than 3 years of continuous
development to eliminate the loudspeaker
enclosure from the sound reproduction
equation. The finest electronics and state-of-
the-art design combine to create what we
believe is a new breed of loudspeakers we
call invisible. Only the music must be heard,
nothing else!
Being an active loudspeaker system, TOMEI
provides an optimized coupling between the
amplifier and the loudspeaker driver. Instead
of inserting lossy passive crossover
components to filter frequency ranges and
flatten driver response by altering the signal
after the amplifier, an active system performs
the same task prior to amplification. The
result is a more efficient system, unhindered
by resistors, capacitors, or inductors.
3.3 CONNECTING A SOURCE COMPONENT
The Control Unit offers balanced (XLR) and
unbalanced (RCA) input connectors for
analog signals. A high performance USB
Audio Class 2 input is available, along with
one S/PDIF input for other digital audio
components.
To use an input you must select it using the
SOURCE SELECTION menu on the display.
(see section 3.7.2)
3.2 BEFORE POWERING ON
Make sure all connections are secure and the
volume control is turned ALL THE WAY
DOWN on your source component or on the
Control Unit.
USB INPUTBALANCED XLR INPUT
RCA INPUTS DIGITAL S/PDIF INPUT (RCA)
!of !14 22
3.4 ANALOG INPUTS
We recommend using the balanced XLR
inputs, but RCA cables can also be used with
excellent results. Since the signal wiring
inside the Control Unit is pure silver, using
high quality interconnect cables will give the
best results.
3.5 DIGITAL INPUTS
Your TOMEI loudspeakers use one S/PDIF
digital input (up to 24 bits/192 kHz sampling
rates) and a high quality USB Audio Class 2
input that accepts all types of HD music, up to
DSD 64 and 128 formats (DSD over PCM).
To use that USB input, please use a high
quality USB cable to connect your computer
to the USB input on the back of the Control
Unit. Once the connection is established
between the computer and the Control Unit,
you can launch your favorite HD music player
or on demand streaming service application.
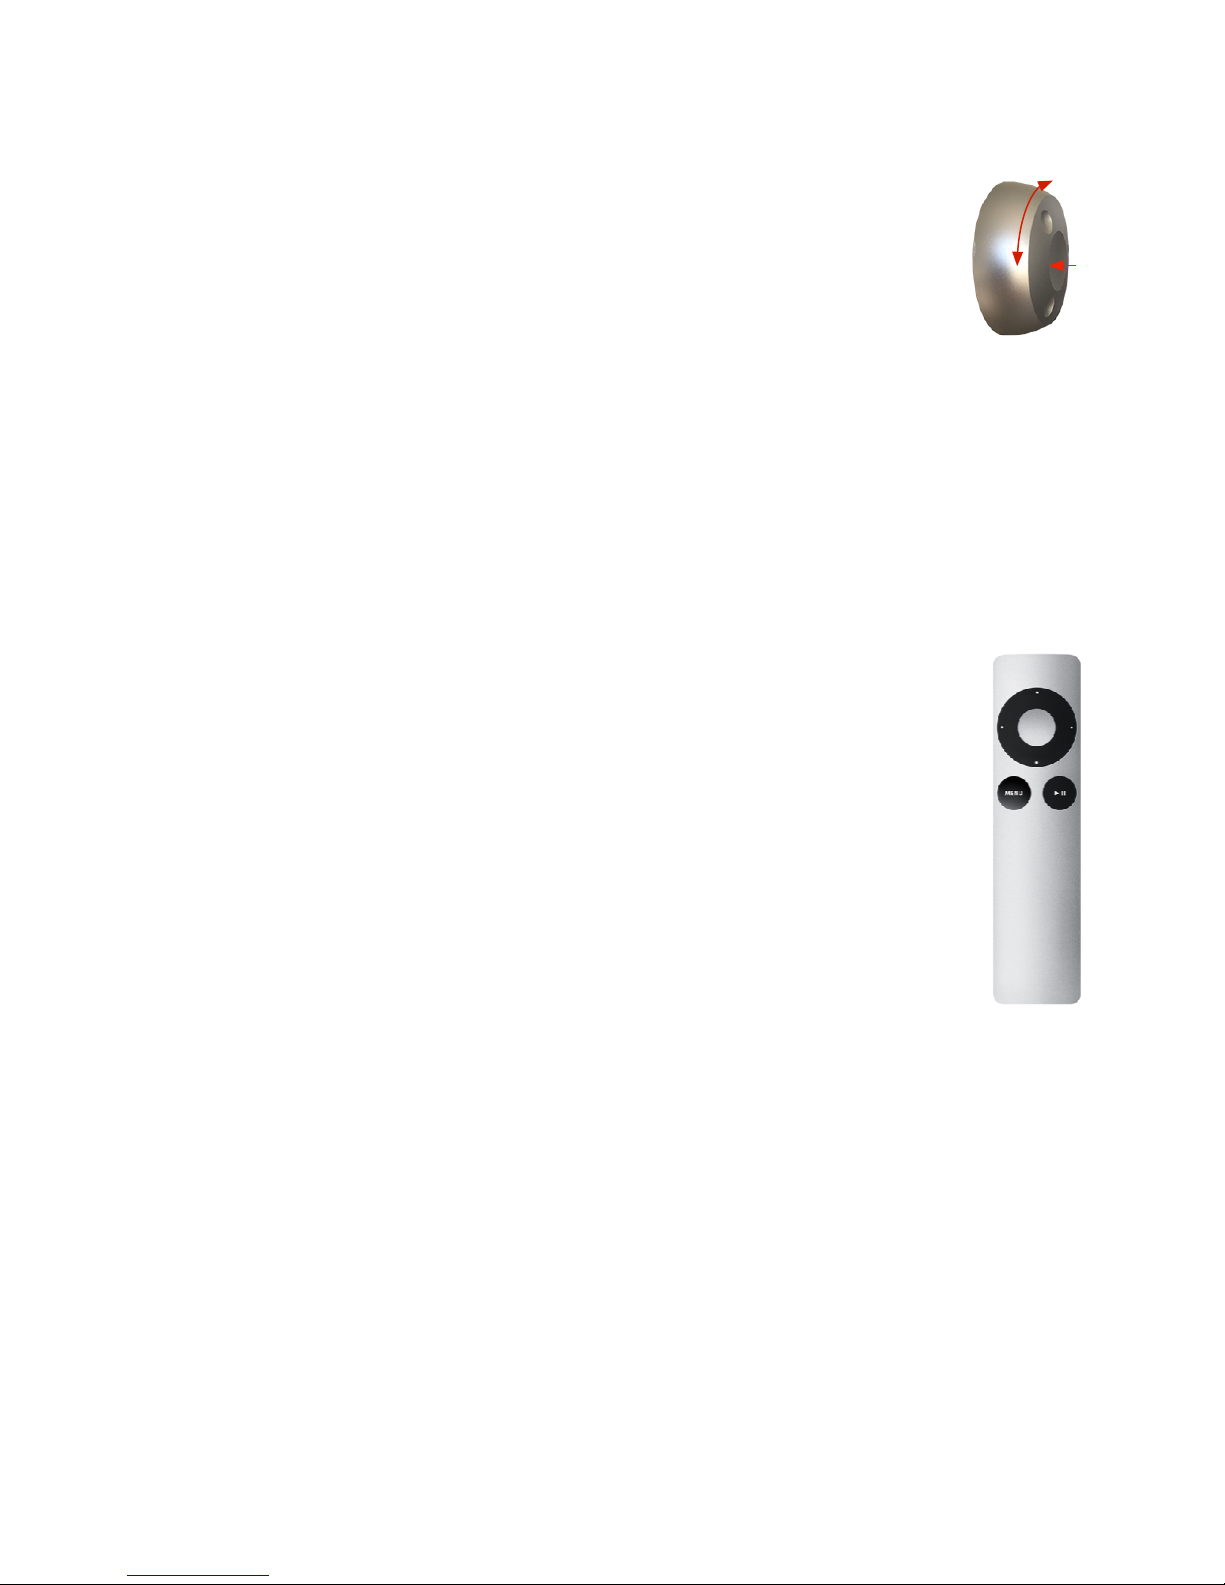
The encoder functions are as follows:
•Rotating clockwise
increases the selection
or moves toward the
end of a list.
•Rotating
counterclockwise
decreases the selection
or moves toward the start of a list.
•Normal Click (pushing like a mouse
click) is a normal selection, works like
an Enter key.
•Double-clicking (similar to a mouse).
•Long Click (holding the encoder
button down for 2 seconds).
The Apple Remote functions are as follows:
•Up or Right Arrows
function the same as a
clockwise rotation of
the encoder.
•Down or Left Arrows
function the same as a
counterclockwise
rotation of the encoder.
•Center button like a
normal click or long
click. There is no
double-click
functionality
•The Pause Button
functions like a double-click
•Menu is a hot key that eliminates the
need for the Source Selection mode
discussed below and offers a shortcut
to get back to volume mode.
3.7 DISPLAY MODES
There are three main modes and one
temporary mode:
•Splash
•Volume
•Source Selection
•Settings
3.6 CONTROL UNIT DISPLAY / MENU
The display/encoder consists of a 2x16
alphanumeric display and a rotary encoder
for control. The encoder rotates continuously
and also has a pushbutton shaft switch.
There is also an IR receiver that allows
alternative control from an Apple Remote.
The Apple remote is assumed to be the
newer style (silver) that has 7 buttons.
Ergonomically, the Encoder and Apple
Remote work in very similar fashion. Both
controls can operate at the same time.

!of !15 22
3.7.1 SPLASH SCREEN
The splash screen typically displays company
and product name along with version. It lasts
for about 5 seconds.
3.7.2 VOLUME MODE
The volume mode is the normal operating
mode. It displays the volume setting in 0.5dB
steps. 0dB is maximum setting. It also
displays the selected source. Volume level is
independent for each source.
Rotating the encoder changes the volume for
the selected source. Alternatively, you can
use the Up, Down, Left or Right buttons of the
Apple Remote. Double-clicking the encoder
or pressing the Pause button of the remote
causes the system to mute or unmute for all
sources. When the system is muted, it is
shown on the display as: MUTED.
3.7.3 SOURCE SELECTION
Source selection is invoked by a normal click
of the encoder when starting in Volume
Mode. Rotate the encoder to the desired
selection and press the encoder again. This
will accept the new source setting and return
to Volume Mode.
Alternatively, you can use the Apple Remote
Menu button to toggle through the
selections. This is quicker and bypasses the
Source Selection Mode (or returns to volume
mode if already in Source Selection mode).
Three types of input sources are available:
a. ANALOG: Both balanced and unbalanced
analog inputs are available.
b. USB AUDIO: A high-end USB Audio Class
2 input let’s you connect your computer
directly to the Control Unit to play HD
music. It accepts all types of HD music up
to 32 bits/384 kHz and DSD 64, 128 and
256.
c. S/PDIF 1: this digital input accepts up to
24 bits/192 kHz audio.
3.7.4 SETTINGS
Settings are a collection of configurations,
information or test features that are used
occasionally.
To enter Settings, press the encoder for
several seconds (Long click) until the display
toggles to Settings. Then release the button.
You can also do this with the Center button of
the Apple Remote.
You can rotate the encoder (or use the Apple
Remote arrows) to move through the various
selections. Generally, pressing the encoder
(Normal Click) will move you to a submenu or
return you back to the main Settings menu.
To leave Setting go to the last selection – Exit
and press the encoder. This takes you back to
the normal operation – Volume Mode. You
can alternately press the Menu button on the
Apple Remote.
Volume -96.5 dB
USB Audio
Source Selection
USB Audio
Settings
ADC Level
Eden Acoustique
ACU-01 v2.0.3.1

!of !16 22
DAC Filter
This sets the internal DAC filters of the AKM
AK4495 DACs. The super slow roll off setting
is generally preferred. The options are:
. Sharp Roll off
. Slow Roll off
. Short Delay Sharp Roll off
. Short Delay Slow Roll off
. Super Slow Roll off
ADC Filter
This sets the internal ADC filter of the
AKM5397 ADC. The minimum phase setting
is generally preferred. The options are:
. Sharp Roll off
. Short Delay
. Minimum phase
Low and High Freq Shelf
The low and high frequency shelf settings can
be used to apply gentle acoustic corrections
in the bass and adjust the treble to taste.
The low settings vary from flat (0 dB) to ±2.0
dB in 1 dB increments.
The high settings vary from flat (0 dB) to ±2.0
dB, but with a first increment of 0.5 dB.
Exit
To go back to Volume mode you can either
go to the Exit menu and press the encoder
or the Apple remote center button (Normal
Click) or on the Apple Remote just press
Menu once.
3.7.5 SETTINGS DESCRIPTION
DAC Level
The DAC Level adjusts the amplitude of the
signal going to the amplifiers. You will
normally set this to Consumer or Balanced.
Pro Audio: high level signal used in the audio
industry. Increases output DAC levels by +4
dB.
Consumer (-6 dB): suggested DAC output
level for most input types.
Balanced (-12 dB): optional DAC level setting
for high level source input.
Balanced (-18 dB): optional DAC level setting
for even higher level source input.
ADC Level
The ADC Level settings adjust the sensitivity
of the input for different types of analog
sources. You will normally set this to
Consumer or Balanced.
Pro Audio: high level signal used in the audio
industry. Decreases input sensitivity by 4 dB.
Balanced (+6 dB): normal sensitivity level
used when connecting to the balanced XLR
connectors.
Consumer (+12 dB): normal sensitivity signal
level used when connecting to the single
ended RCA input connectors.
Balanced (+18 dB): Some manufacturers offer
balanced outputs on their equipment, but
use a different standard, which gives a lower
signal level.

!of !17 22
3.8 TESTING THE INSTALLATION
With volume control turned all the way down
on your source, turn the Control Unit ON.
Start playing music and GENTLY raise the
volume of the source. You should hear sound
coming from all speakers.
3.9 POSITIONING THE LOUDSPEAKERS
Like all dipole loudspeakers, the TOMEI will
provide optimum performance when
installed at least three feet from the front wall.
To obtain the best separation and imaging,
we recommend sitting closer to the speakers
than customary. Try sitting within an
equilateral triangle with the speakers.
Start by placing the towers 7 to 8 feet (2.5
meters) apart, with their back four 4 feet (1.2
meters) from the front wall, and the seating
position seven 6 -7 feet (2 meters) from each
speaker. The bass module should be
positioned midway between the towers, but
one 1 foot (30 cm) behind the plane of the
speakers.
3.10 RUN IN PERIOD
Loudspeakers are mechanical transducers
whose tolerances adjust over time.
A proper run in period is therefore essential
to get the best from your loudspeakers. While
the TOMEI will sound great after about two
weeks, they will need at least 100 hours of
normal play to achieve their best sound.
Cone characteristics will improve during this
time and the resulting improvements in
sound will be clearly audible, offering a
smoother, more natural sound.
2 m
2 m
2.5 m
!of !18 22
TROUBLESHOOTING

!of !19 22
Unable to access the Control Unit menu
On power ON, the splash screen first appears
and while the initialization process is going
on, the menu items of the Control Unit can’t
be accessed. Initialization takes
approximately 3 - 5 seconds to complete.
USB - No sound
Please make sure you selected the USB input
on the Control Unit and that your USB cable
connection with the computer is well done.
Also make sure dspMusik is selected as the
Audio or Output Device in your HD music
player.
S/PDIF - No sound
Please make sure you selected the S/PDIF
input on the Control Unit and that your digital
cable connection with the digital source is
well done.
ANALOG - No sound
Please make sure you selected the ANALOG
input on the Control Unit.
Sound lower and distorted on analog inputs
Your must connect only one analog set of
cables on the analog inputs. Either to the
unbalanced or balanced analog inputs, but
not both.
REMOTE CONTROL - Does not respond or
erratic
The Apple remote uses infrared signals (IR) to
communicate. The Control Unit must be in
line of sight and aligned with the remote
control for it to work. It responds up to about
12 ft. away.
Front display does not lit
Make sure the power cord is connected and
well seated in its receptacle. Make sure the
Control Unit power switch is ON.
Hum or buzzing sound
If a hum or buzzing sound can be heard when
you are 3 feet or farther from one speaker,
this may be caused by incorrect grounding,
ground loop or improper connections
between components. Check all connections.
No sound
Make sure the Control Unit power on LED is
lighted and the display shows its entry level
menu. Make sure all cables going from the
Control Unit to the loudspeakers are
connected and properly seated. Make sure
you have one source component connected
to an input on the Control Unit.
Sound level lower on unbalanced analog
inputs
You can adjust the sensitivity of the analog
inputs to compensate for this. See section
3.7.5 on how to adjust the ADC or DAC
levels.
Absent or weak bass
Please make sure the bass module cable is
well connected between the Control Unit and
the bass module. Make sure the bass module
is at least 1 meter (3 feet) from any
boundaries at its back. Bass level will
gradually decrease as the bass module gets
closer to the back wall.

!of !20 22
SERVICE AND GUARANTEE
Table of contents


