EdenPURE Bio SpeedCLEAN XL200 User manual

PLEASE READ
AND SAVE THESE
INSTRUCTIONS
Model No. A5970
Owner’s Manual
Bio SpeedCLEAN
Bio SpeedCLEAN
XL200
TM
TM
Model No. A5970
Owner’s Manual
PLEASE READ
SAVE THESE
INSTRUCTIONS
z
TROUBLESHOOTING TIPS
uIf there is no power/the machine doesn’t turn on, it will need to be
charged.
uIf the bristles are not rotating, they will need to be cleaned.
uIf you are charging the battery and the charging light isn’t on, the
cord may not be inserted properly into the charging port. Try
pushing it in farther.
uIf the battery won’t hold a charge, you may need a replacement
battery. Go to www.edenpuresupport.com to purchase one.
is vacuum comes with a 1 year limited component warranty.
If your unit does not appear to be working properly, please
contact our service center by calling 1-800-225-6595. Prior to
your call, we encourage you to visit our service related website
www.edenpuresupport.com for troubleshooting tips and service
instructions if needed.
EdenPURE®
7800 Whipple Avenue NW
N. Canton, OH 44720
©2022 EdenPURE® I-5761 BR12181R-1
Model Number A5970
Volts 25.9V
Power 380W
Input 100-240V – 50/60Hz 0.5A
Output 2500mAh
z
PRODUCT SPECIFICATIONS

z
INSTRUCTIONS
PLEASE CAREFULLY READ THIS MANUAL BEFORE
OPERATING THIS MACHINE
Do not use this vacuum to clean up liquids such as water, detergent
or other wet uids.
Do not use this vacuum to clean up small granules such as our,
cement or plaster powder or large objects such as toys or balls of
paper. at will cause the vacuum to become blocked and overheat.
Use a damp cloth with mild detergent to clean the outside of this
machine. Make sure it is unplugged from the wall outlet before
cleaning it.
Do not store this vacuum in very high or low temperatures. Do not
let it sit in the sun. Store it in a cool, dry spot.
Charge the batteries fully before using it the rst time. If this unit
is stored a long time, you may need to recharge the batteries before
using it again.
When the usage time is becoming shorter as the batteries weaken, it
may be necessary to replace the battery pack.
Charge the battery pack only with the adaptor that is provided with
this machine. Do not disassemble the battery pack or get it close to
liquids. Do not place the battery pack near high temperatures. Do not
disassemble the battery pack.
If this vacuum is not working properly, contact custserv@edenpure.
com. Do not try to repair the unit yourself.
Do not let children play with or use this machine or the battery pack.
z
USES
uLow Speed, High Speed, Off
Press the Speed Control Button once to turn the unit on. Press it
again to turn the unit o. Use the Speed Control Button on the side of
the unit to switch the speed between low and high.
uUse of 2-in-1 Upholstery Brush
1. Insert the 2-in-1 Upholstery Brush into the hole below the
Dust Cup Assembly, then push out the brush head of the
2-in-1 Upholstery Brush by pressing the button and pushing the
brush out at the same time. You can then clean furniture, home
appliances, book shelves, wardrobes, vanity tables, PC keyboards
and many other places.
2. Pull the brush head back by pressing the button and pushing
the brush back in at the same time. You can then clean beds,
curtains, sofas and many other places.
uUse of Motorized Floor Brush
Insert the Motorized Floor Brush into the end of the lower Vacuum
Tube or into hole below the Dust Assembly. You can then clean
carpet, tile and other ooring.
uPet Brush
Insert the Pet Brush into the end of the lower Vacuum Tube or into
the hole below the Dust Assembly. Brush your pet’s fur with the
exposed brush. When the brush is full, turn the vacuum o and let go
of the brush release to clean the fur o.
uCharging the Unit
Use the included adaptor to charge the battery. Plug the adaptor into
the Charging Port on the Motor and plug the other end into a wall
outlet. When it is charging, the lights will turn blue one by one as it
charges up. When all 3 blue lights are on, it is fully charged and you
can remove the adaptor.
You can also charge the battery when it is outside the unit by plugging
the adaptor into the Charging Port on the battery and plugging the
other end into the wall.
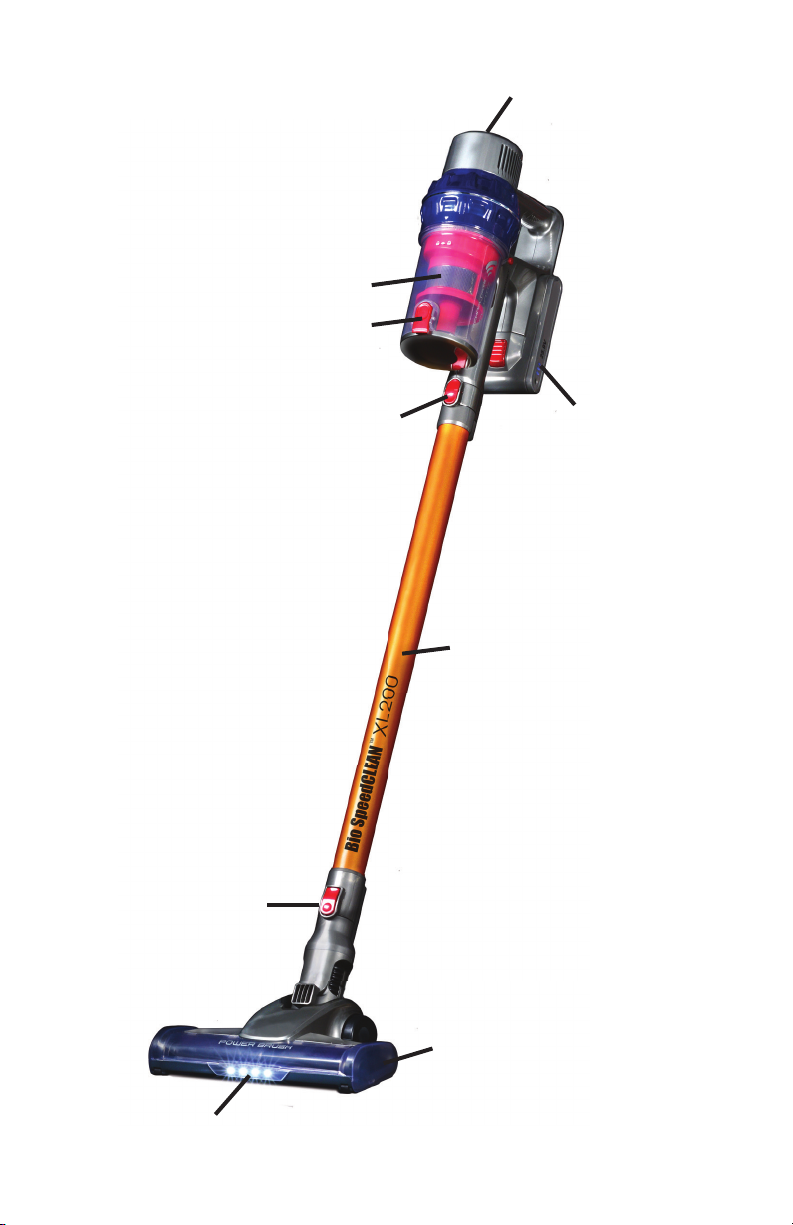
DUST CUP ASSEMBLY
RELEASE BUTTON
RELEASE BUTTON
VACUUM TUBE
UV LIGHT
RELEASE
BUTTON
MOTORIZED
FLOOR BRUSH
BATTERY
UNIT
DUST CUP
ASSEMBLY
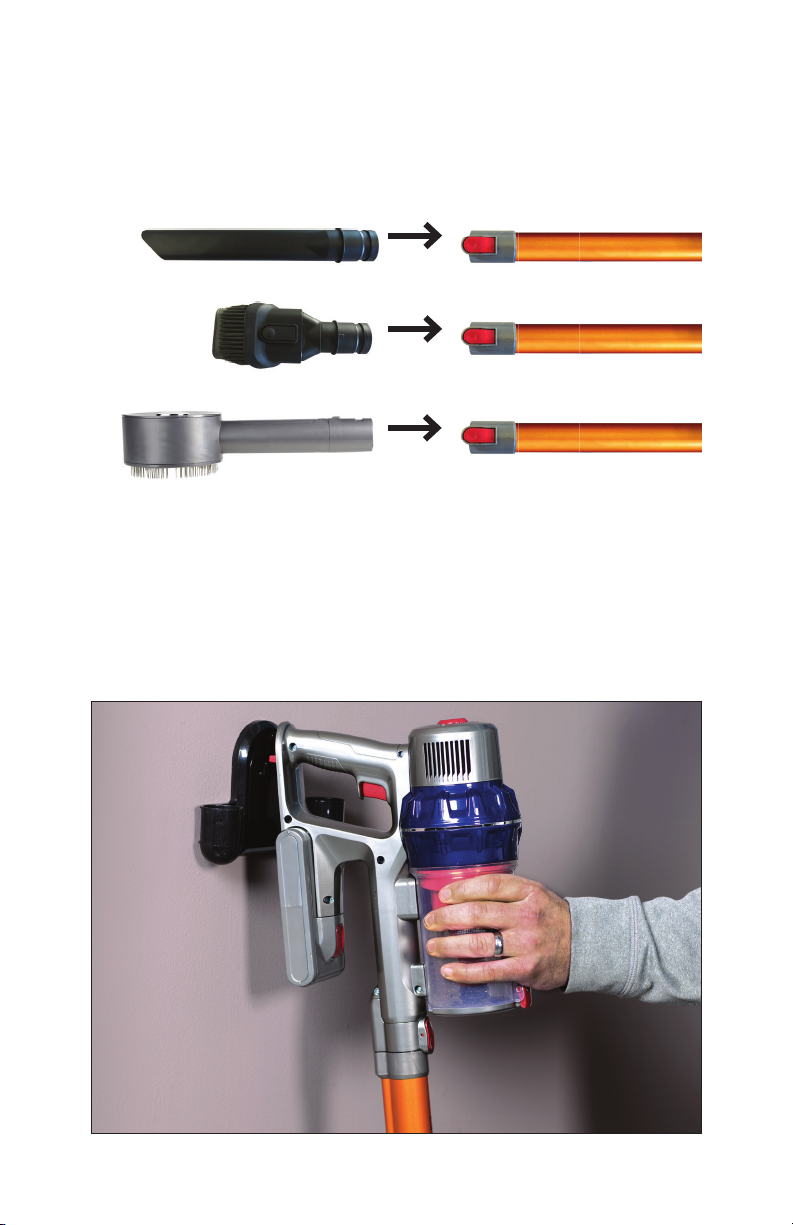
uConnection of the Vacuum Tube with
the accessory pieces
Insert the accessory brushes into the bottom of the Vacuum Tube
until you hear them click and lock into place.
z
WALL MOUNT
Attach wall mount to a wall using the screws and anchors that are
included. Flip the wall mount handle on the main vacuum unit down
to allow the unit to hang onto the wall mount.
DUST CUP
RELEASE BUTTON

CHARGING
INDICATOR LIGHTS
BATTERY UNIT
ON/OFF
BUTTON
DUST CUP
RELEASE
BUTTON
2-IN-1 UPHOLSTERY BRUSH
CHARGING CORD
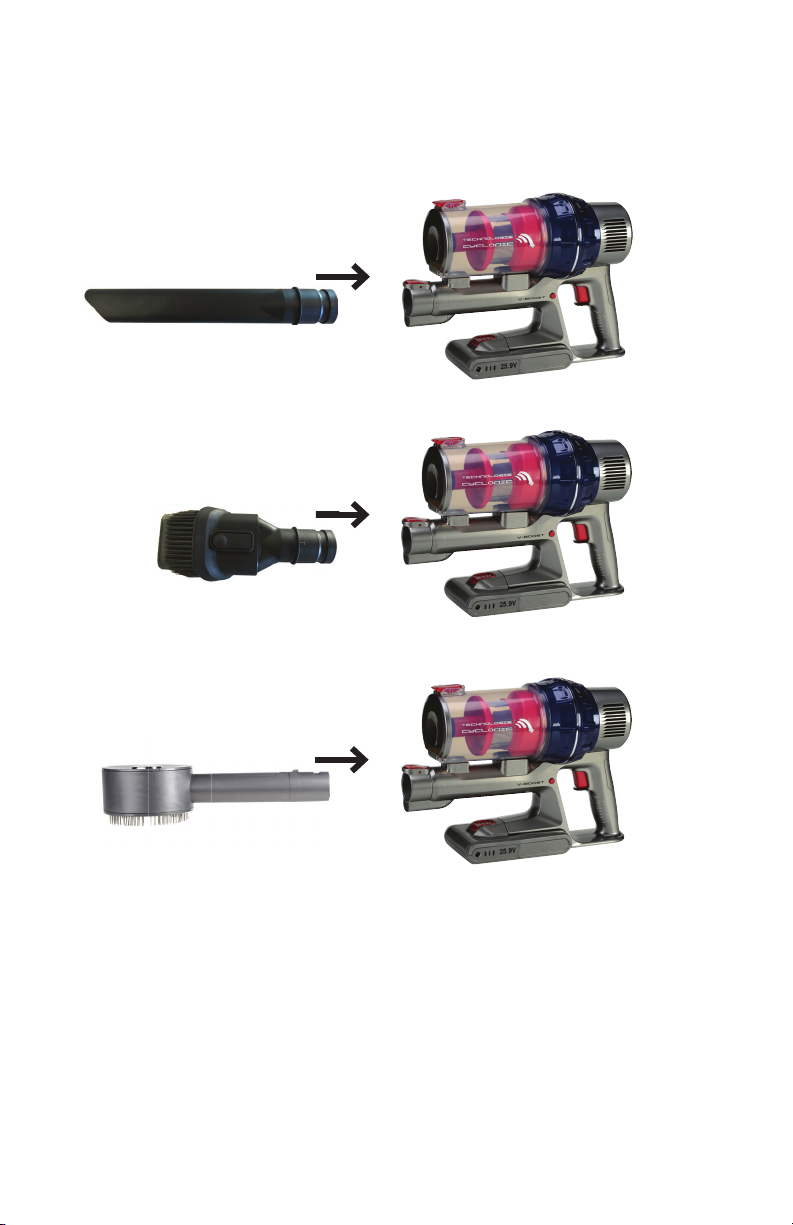
uConnection of accessory pieces to the Motor
Insert the accessory brushes into the main hole of the motor below
the Dust Cup until you hear them click in and lock into place.
DUST CUP
ASSEMBLY
CHARGING
NEEDLE PORT
SPEED CONTROL
BUTTON
BATTERY
RELEASE
BUTTON
DUST CUP
RELEASE
BUTTON
PET BRUSH LONG CREVICE TOOL

z
PARTS ASSEMBLY
uBattery Unit
Insert the battery unit into the bottom of the motor. When it is locked
into the motor, you will hear it click.
uDust Cup
Insert the lower plastic clip into the hole on the motor. en snap
the upper cover with the upper release button on the motor. Snap the
Dust Cup in place, then press down on the upper and lower release
button to lock the cup into place.
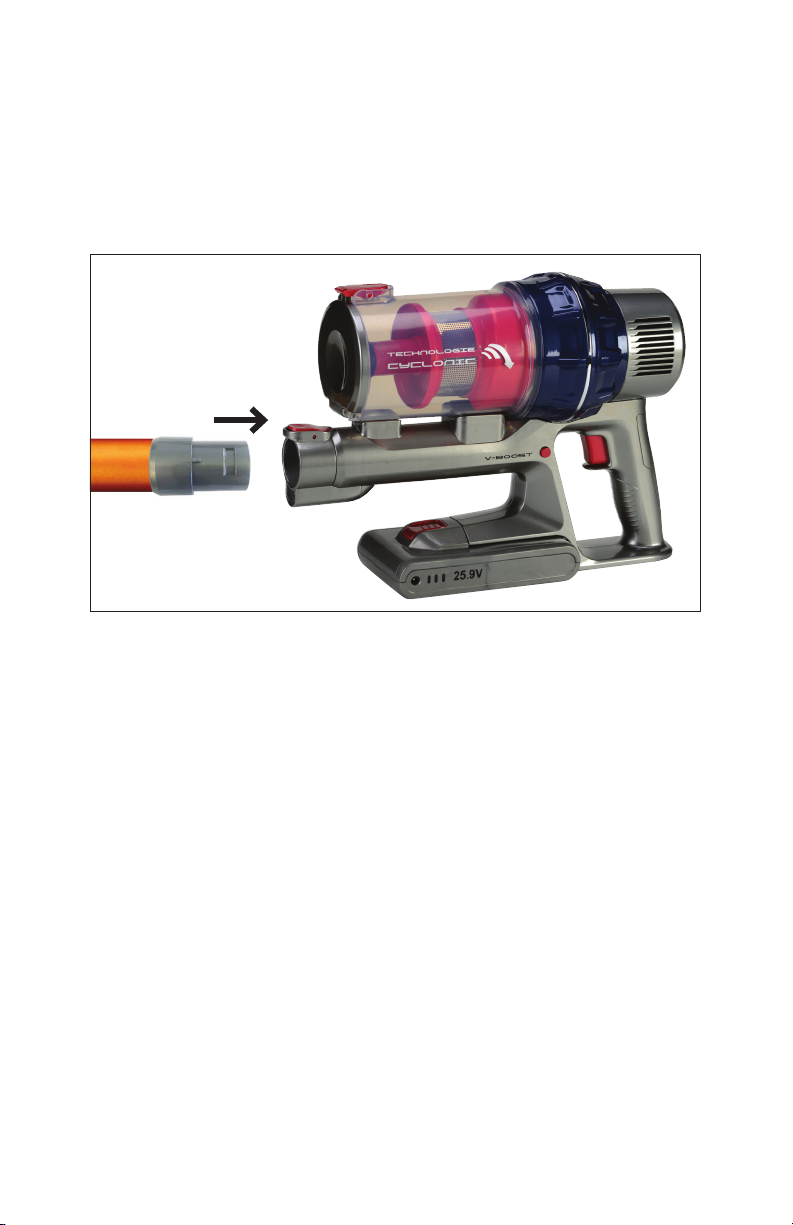
uConnection of the Motor and the Vacuum Tube
Insert the upper end of the Vacuum Tube in to the main hole of
the Motor below the Dust Cup until you hear it click in and lock
into place.
z
PARTS ASSEMBLY
uBattery Unit
Insert the battery unit into the bottom of the motor. When it is locked
into the motor, you will hear it click.
uDust Cup
Insert the lower plastic clip into the hole on the motor. en snap
the upper cover with the upper release button on the motor. Snap the
Dust Cup in place, then press down on the upper and lower release
button to lock the cup into place.
uConnection of the Motor and the Vacuum Tube
Insert the upper end of the Vacuum Tube in to the main hole of
the Motor below the Dust Cup until you hear it click in and lock
into place.
CHARGING
INDICATOR LIGHTS
BATTERY UNIT
ON/OFF
BUTTON
DUST CUP
RELEASE
BUTTON
2-IN-1 UPHOLSTERY BRUSH
CHARGING CORD
uConnection of accessory pieces to the Motor
Insert the accessory brushes into the main hole of the motor below
the Dust Cup until you hear them click in and lock into place.
DUST CUP
ASSEMBLY
CHARGING
NEEDLE PORT
SPEED CONTROL
BUTTON
BATTERY
RELEASE
BUTTON
DUST CUP
RELEASE
BUTTON
PET BRUSH LONG CREVICE TOOL
DUST CUP ASSEMBLY
RELEASE BUTTON
RELEASE BUTTON
VACUUM TUBE
UV LIGHT
RELEASE
BUTTON
MOTORIZED
FLOOR BRUSH
BATTERY
UNIT
DUST CUP
ASSEMBLY
uConnection of the Vacuum Tube with
the accessory pieces
Insert the accessory brushes into the bottom of the Vacuum Tube
until you hear them click and lock into place.
z
WALL MOUNT
Attach wall mount to a wall using the screws and anchors that are
included. Flip the wall mount handle on the main vacuum unit down
to allow the unit to hang onto the wall mount.
DUST CUP
RELEASE BUTTON

z
INSTRUCTIONS
PLEASE CAREFULLY READ THIS MANUAL BEFORE
OPERATING THIS MACHINE
Do not use this vacuum to clean up liquids such as water, detergent
or other wet uids.
Do not use this vacuum to clean up small granules such as our,
cement or plaster powder or large objects such as toys or balls of
paper. at will cause the vacuum to become blocked and overheat.
Use a damp cloth with mild detergent to clean the outside of this
machine. Make sure it is unplugged from the wall outlet before
cleaning it.
Do not store this vacuum in very high or low temperatures. Do not
let it sit in the sun. Store it in a cool, dry spot.
Charge the batteries fully before using it the rst time. If this unit
is stored a long time, you may need to recharge the batteries before
using it again.
When the usage time is becoming shorter as the batteries weaken, it
may be necessary to replace the battery pack.
Charge the battery pack only with the adaptor that is provided with
this machine. Do not disassemble the battery pack or get it close to
liquids. Do not place the battery pack near high temperatures. Do not
disassemble the battery pack.
If this vacuum is not working properly, contact custserv@edenpure.
com. Do not try to repair the unit yourself.
Do not let children play with or use this machine or the battery pack.
z
USES
uLow Speed, High Speed, Off
Press the Speed Control Button once to turn the unit on. Press it
again to turn the unit o. Use the Speed Control Button on the side of
the unit to switch the speed between low and high.
uUse of 2-in-1 Upholstery Brush
1. Insert the 2-in-1 Upholstery Brush into the hole below the
Dust Cup Assembly, then push out the brush head of the
2-in-1 Upholstery Brush by pressing the button and pushing the
brush out at the same time. You can then clean furniture, home
appliances, book shelves, wardrobes, vanity tables, PC keyboards
and many other places.
2. Pull the brush head back by pressing the button and pushing
the brush back in at the same time. You can then clean beds,
curtains, sofas and many other places.
uUse of Motorized Floor Brush
Insert the Motorized Floor Brush into the end of the lower Vacuum
Tube or into hole below the Dust Assembly. You can then clean
carpet, tile and other ooring.
uPet Brush
Insert the Pet Brush into the end of the lower Vacuum Tube or into
the hole below the Dust Assembly. Brush your pet’s fur with the
exposed brush. When the brush is full, turn the vacuum o and let go
of the brush release to clean the fur o.
uCharging the Unit
Use the included adaptor to charge the battery. Plug the adaptor into
the Charging Port on the Motor and plug the other end into a wall
outlet. When it is charging, the lights will turn blue one by one as it
charges up. When all 3 blue lights are on, it is fully charged and you
can remove the adaptor.
You can also charge the battery when it is outside the unit by plugging
the adaptor into the Charging Port on the battery and plugging the
other end into the wall.

uDust Cup Filter Cleaning
A. Press the button at the bottom of the Dust Cup to
release the Lower Cover of the Dust Cup to empty
it into the trash.
B. Hold the Dust Cup with one hand, and use your
other hand to open the top of the Dust Cup counter-
clockwise and take the upper part o the Dust Cup.
C. Take the lter out as shown below to clean it. Run it
under water to clean and let it air dry.
D. Clean the plastic part of the Dust Cup
by removing it from the dust cup. Wipe
clean with a damp cloth, let it dry and
put back into the Dust Cup.
uCleaning the Power Brush
Slide the lock clip on the back of the brush. Remove the bristle from
the brush and remove debris and hair from it. en put the bristle
back in and lock the clip.
B. C.
D.
z
CLEANING THE UNIT
uClean Dust Cup after each use
Press the upper button on the Motor to
release the Dust Cup Assembly Unit, then
press the lower button to release the Dust
Cup Lower Cover.
A.
the brush and remove debris and hair from it. en put the bristle
LOCK
CLIP

PLEASE READ
AND SAVE THESE
INSTRUCTIONS
Model No. A5970
Owner’s Manual
Bio SpeedCLEAN
Bio SpeedCLEAN
XL200
TM
TM
Model No. A5970
Owner’s Manual
PLEASE READ
SAVE THESE
INSTRUCTIONS
z
TROUBLESHOOTING TIPS
uIf there is no power/the machine doesn’t turn on, it will need to be
charged.
uIf the bristles are not rotating, they will need to be cleaned.
uIf you are charging the battery and the charging light isn’t on, the
cord may not be inserted properly into the charging port. Try
pushing it in farther.
uIf the battery won’t hold a charge, you may need a replacement
battery. Go to www.edenpuresupport.com to purchase one.
is vacuum comes with a 1 year limited component warranty.
If your unit does not appear to be working properly, please
contact our service center by calling 1-800-225-6595. Prior to
your call, we encourage you to visit our service related website
www.edenpuresupport.com for troubleshooting tips and service
instructions if needed.
EdenPURE®
7800 Whipple Avenue NW
N. Canton, OH 44720
©2022 EdenPURE® I-5761 BR12181R-1
Model Number A5970
Volts 25.9V
Power 380W
Input 100-240V – 50/60Hz 0.5A
Output 2500mAh
z
PRODUCT SPECIFICATIONS
This manual suits for next models
1
Table of contents
Other EdenPURE Vacuum Cleaner manuals


