EdgeStar GRLCART270IBNG User manual

Built-In BBQ Grills
Grill Models:
Owner’s Manual
V3.0-10262021www.edgestar.com
GRL270IBNG / GRL270IBLP
GRL300IBNG / GRL300IBLP
GRL360IBBNG / GRL360IBBLP
GRL420IBBNG / GRL420IBBLP
Built-in BBQ Grills Freestanding BBQ Grills
GRLCART270IBNG / GRLCART270IBLP
GRLCART300IBNG / GRLCART300IBLP
GRLCART360IBBNG / GRLCART360IBBLP
GRLCART420IBBNG / GRLCART420IBBLP

2
Important Safety Information
Improper handling can cause serious damage to the EdgeStar grill and/or injury to the user. This
grill is designed for domestic use only. Do not use the unit for industrial or commercial use.
Do not use in any enclosed areas, including buildings and garages. Any other use may invalidate
the warranty. Please review the rating label located on the bottom of the drip tray for technical data
related to this unit.
Please read and follow the safety information listed below to reduce the risk of re, electric
shock, or injury.
DANGER:
If you smell gas:
• Shut o gas to the appliance.
• Extinguish any open ame.
• Open lid.
• If odor continues, keep away from the appliance and immediately call your gas
supplier or your re department.
!
WARNING:
• Do not store or use gasoline or other ammable liquids or vapors in the vicinity
of this or any other appliance.
• An LP cylinder not connected for use shall not be stored in the vicinity of this or
any other appliance.
!
Important: Your gas grill is to be used outdoors only.
!
PROTECT CHILDREN: Keep children away from the grill during use and until the
grill has cooled after you are nished using it. Do not allow children to operate the
grill.
!

3
Gas and Electrical Safety
• This gas grill must be installed in accordance with all local codes. In addition, the gas grill(s) must
be installed in accord with the following codes, as applicable:
• National Fuel Gas Code, ANSI Z223.1 / NFPA 54
• Natural Gas and Propane Installation Code, CSA B149.1
• Propane Storage and Handling Code, CSA B149.2
• Where applicable, a standard electrical supply (115V, 60Hz) must be used for lights, rotisserie
motor(s), and all other apparatus that need to be plugged in. Electrical supplies must be properly
grounded in accordance with the National Electrical Code, ANSI / NFPA 70. Compliance with local
codes and ordinances is required.
• Never use dented, rusty, or damaged propane tanks.
•
• Check the tubes that lead into the burner for any blockage from insects, spiders, or food grease.
•
• Do not repair gas tanks yourself; seek repair from an authorized repair person.
• Do not repair damaged gas connectors, tank valves, or supply hoses.
•
car or car trunk.
•
•
•
• Keep any electrical supply cord and the fuel supply hose away from any heated surfaces.
• To protect against electric shock, do not immerse power cords or plugs in water or other liquids.
•
• Do not operate any apparatus or accessories with power plugs missing the ground plug, a
damaged cord, or a loose socket. Do not bypass, cut, or remove the grounding plug.
•
• Never plug or unplug the unit with wet hands.
•
if it is necessary to use a longer cord or if you do not have a grounded outlet. Do not modify the
power cord’s length or share the outlet with other appliances.
•
•
• Never repair the unit while it is plugged in.
• Immediately unplug the unit if it makes strange sounds, emits smells or smoke comes out of it,
and contact customer service.
•
if the unit needs service.
• Never use charcoal or any other non-approved or solid fuel sources. This manual covers grills
fueled by gas (LP and NG) only.
Important Safety Information

4
Important Safety Information
General Safety
• To prevent back and other types of injuries, use at least two people to move and install the grill(s)
and grilling equipment.
• This appliance is not intended for use by persons, including children, with reduced physical,
sensory or mental capabilities, unless they have been given supervision or instruction concerning
the use of the appliance by the person(s) responsible for their safety.
• Install the gas grill(s) in a well-ventilated area.
• Do not place hot or warm items into the cooler before they cool down to room temperature.
• This grill should not be installed indoors or in a garage, RV, under a carport, etc. Keep away from
• This grill should be installed in a well-ventilated area. It is recommended that it is protected from
direct rain, sleet, snow, and / or moisture.
• This grill is not intended to be used by children.
• Children should be supervised to ensure that they do not play with this product.
• Never allow children to crawl inside the grill.
• Do not use this appliance near combustibles such as gasoline, benzene, thinner, etc.
•
•
• Do not pinch or kink the power supply line between the unit and cabinet.
• Do not leave any cleaning solutions in the unit.
• Do not use solvent-based cleaning agents or abrasive solutions to clean the unit as they may
• Do not place any other appliances on top of the unit.
•
• The Consumer Product Safety Commission recommends keeping the grill at least 10 feet away
from your house or any building.
• Maintain all clearance requirements detailed in this user’s manual.
• Follow all food safety and handling requirements required by local codes. Do not let food sit
[unrefrigerated] for more than one hour before or after cooking.
• Never leave the grill unattended while cooking.
• Never cook without the drip tray in place.
!
NOTE: This owner’s manual is provided for reference use only. Specications may
change without prior notice. Refer to the product label on your grill for the latest
technical information.
!

5
PROPANE GAS SAFETY
• Your propane gas grill (models GRL****LP) is designed to operate on propane
gas only at a pressure regulated at 11 inches water column (WC) when equipped
with the correct propane orices on the valves and a propane regulator on the
supply line.
• EdgeStar LP grills are designed to be used with a standard 20 lb. (9.1kg)
Department of Transportation (DOT) approved LP cylinder. No tanks larger than
20 lbs. are to be used. The tank must be marked in accordance with the latest
DOT specication for LP gas tanks: Specications for LP gas Cylinders (DOT
CFR49).
• Burners must be inspected and cleaned before each use.
!
Beware of Spiders
Spiders and small insects occasionally spin webs or make nests
in the burners during warehousing, transit, and/or after long period
of not using the grill. These webs can lead to a gas ow obstruction, which
could result in a re in and around the burner tubes. This type of re is known
as “ashback” and can cause serious damage to your grill and create an unsafe
operating condition for the grill user. Although an obstructed burner tube is not the
only cause of “ashback,” it is the most common cause. Frequent inspection of the
burners is necessary.
!
WARNING:
• Do not store a spare LP gas cylinder under or near this appliance.
• Never ll the cylinder beyond 80 percent full.
• If the information above is not followed exactly, a re causing death or serious
injury may occur.
!
CAUTION:
• Never store an LP gas cylinder inside a building or in the vicinity of any gas-
burning appliance.
• Always keep LP gas cylinders fastened in an upright position.
• Never connect an unregulated LP gas cylinder to the grill.
• Do not subject LP gas cylinders to excessive heat.
!
Propane Gas Safety

6
Natural Gas Safety
NATURAL GAS SAFETY
• Your natural gas grill (models GRL****NG) is designed to operate on natural gas
only at a pressure regulated at 4 inches water column (WC) when equipped with
the correct natural gas orices on the valves and a natural gas regulator on the
supply line.
• Burners must be inspected and cleaned before each use.
!
Beware of Spiders
Spiders and small insects occasionally spin webs or make nests
in the burners during warehousing, transit, and/or after long period
of not using the grill. These webs can lead to a gas ow obstruction, which
could result in a re in and around the burner tubes. This type of re is known
as “ashback” and can cause serious damage to your grill and create an unsafe
operating condition for the grill user. Although an obstructed burner tube is not the
only cause of “ashback,” it is the most common cause. Frequent inspection of the
burners is necessary.
!
WARNING:
• Never connect the grill to an unregulated natural gas supply.
• Check with your gas company or with local building codes for instructions on
how to set up a proper gas supply line.
• Use a licensed and knowledgeable installer to connect the gas lines to your grill.
• Pipe sealing compound or pipe thread tape that is suitable for use with natural
gas must be used on all male pipe thread. Apply compound or tape to at least the
rst three threads when making the connection.
• The grill must be isolated from the gas supply piping system by closing its
individual manual shuto valve during any pressure testing of the gas supply
line at test pressures less than or equal to ½ PSI (3.5 kPa).
• Turn o your gas grill when the gas supply is being tested at low pressures. This
appliance must be isolated from the gas supply piping system by closing its
individual valve.
!

7
Table of Contents
Important Safety Information ..........................................................................................2
Gas and Electrical Safety........................................................................................ 3
General Safety ........................................................................................................4
Propane Gas Safety................................................................................................ 5
Natural Gas Safety.................................................................................................. 6
First-Time Operating Instructions ...................................................................................8
Introduction.....................................................................................................................8
.......................................................................................................... 9
Grill Dimensions .............................................................................................................13
Island / Cabinet Cutout Dimensions ............................................................................... 17
Maintaining Adequate Ventilation ................................................................................... 18
Unpacking the Gas Grill..................................................................................................18
Installing the Gas Grill ....................................................................................................19
Installation Location.................................................................................................19
Types of Installation.................................................................................................19
........................................................... 20
Liquid Propane (LP) Installation and Requirements:............................................... 21
To Connect the LP Gas Supply: .............................................................................. 22
Using an LP Gas Supply in an Enclosure ............................................................... 24
Natural Gas (NG) Installation and Requirements:................................................... 25
To Connect the NG Gas Supply: ............................................................................. 25
Checking for Gas Leaks .................................................................................................27
Electrical Requirements..................................................................................................28
Recommended Grounding Method ......................................................................... 29
Plugging in the Lights.............................................................................................. 29
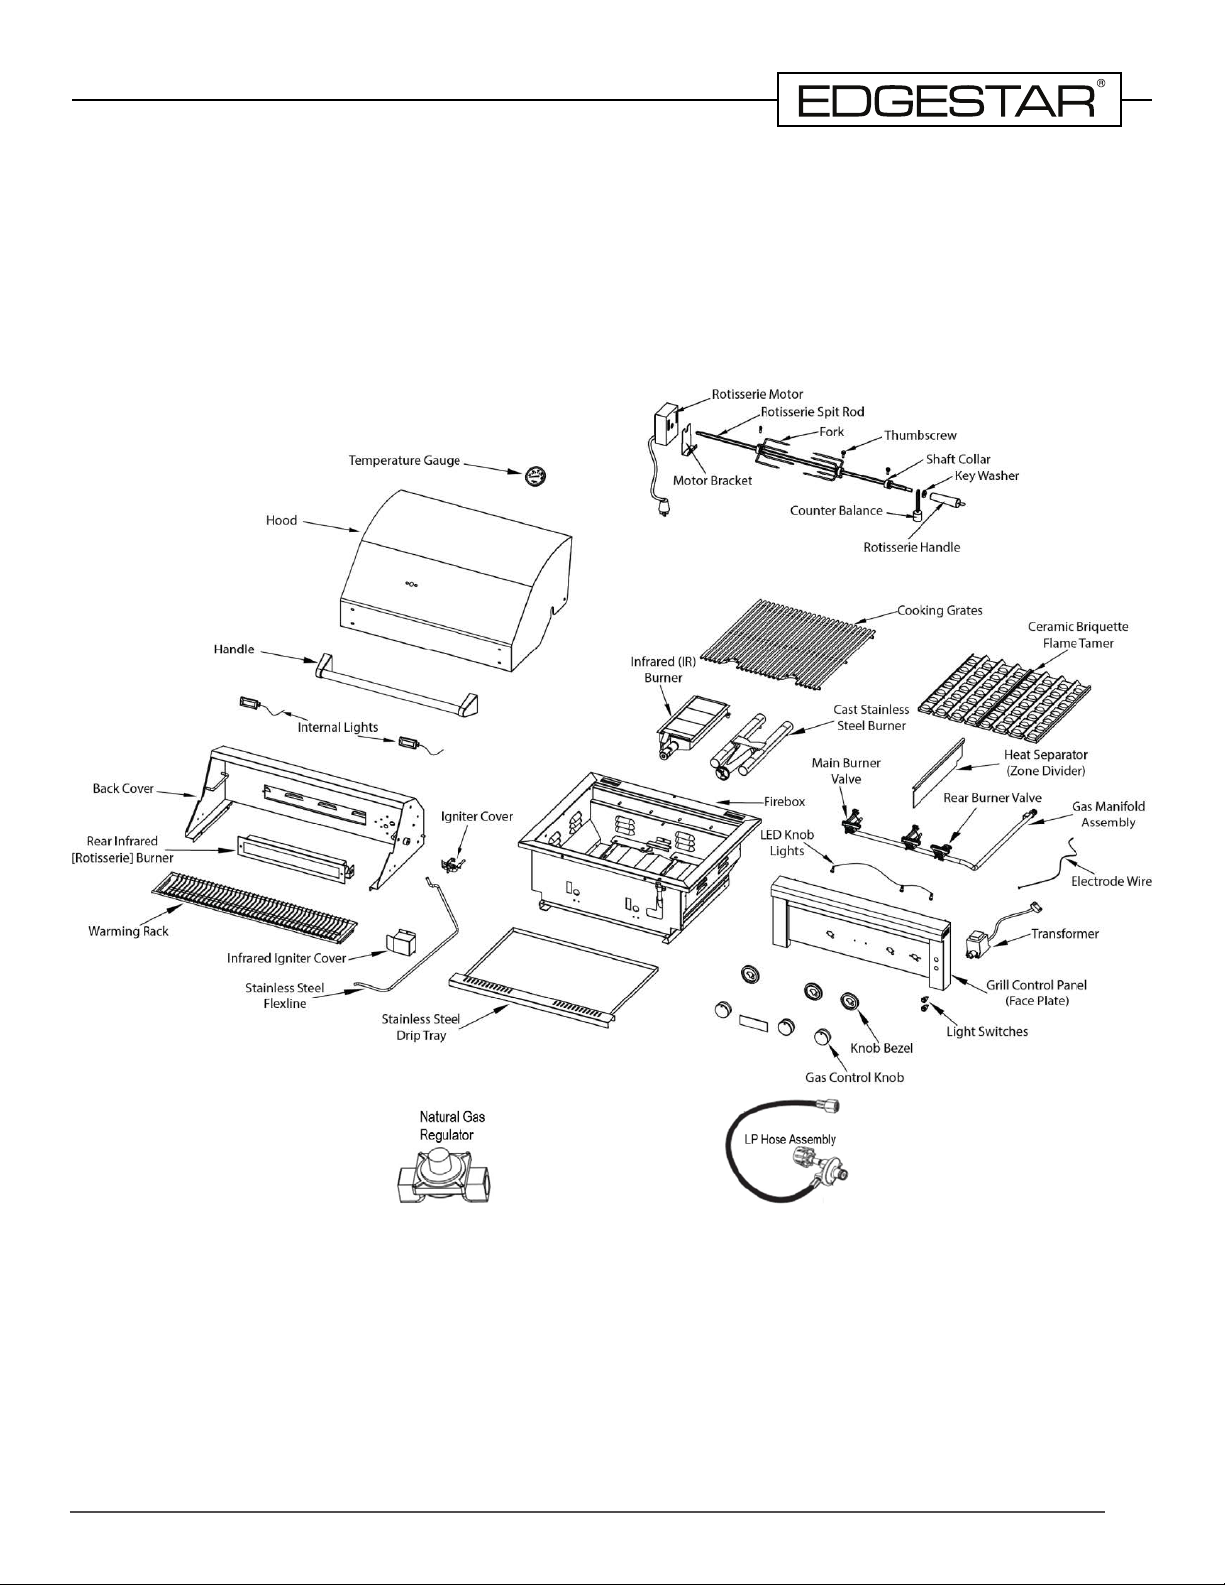
Included Cooking Components ...................................................................................... 30
Operation........................................................................................................................31
Lighting the Burner(s).............................................................................................. 32
Manually Lighting the Burner(s) .............................................................................. 33
Operating the Rotisserie and Rotisserie Burner...................................................... 34
Manually Lighting the Rear Burner.......................................................................... 35
Flare-Ups.................................................................................................................35
Cleaning and Maintenance.............................................................................................36
Cleaning the Main Burner(s) ................................................................................... 36
Cleaning the Infrared Burner(s)............................................................................... 37
Inspecting / Adjusting the Air Shutter.......................................................................38
Cleaning the Cooking Grates .................................................................................. 38
Cleaning the Ceramic Briquette Flame Tamers....................................................... 38
Cleaning the Drip Tray.............................................................................................39
..................................................................................................... 39
Caring for Stainless Steel........................................................................................ 39
Cart Dimensions............................................................................................................. 40
Cart Assembly Instructions............................................................................................. 44
.................................................................................................................47
EdgeStar Limited Warranty ............................................................................................48

8
First-Time Operating Instructions
Before use, make sure all packaging labels and materials are all removed from the unit and be sure
to keep track of all included parts and pieces before discarding packaging materials. It is advised that
in the future.
The instruction manual should be read in full before use.
Introduction
Thank you for purchasing this EdgeStar gas grill. We hope that this purchase will be the beginning of
a lasting and rewarding relationship between you and EdgeStar. We will provide the customer support
This manual contains important information regarding the proper installation, use, and maintenance of
your gas grill. Following this manual will ensure that your product will work at its peak performance and
Please save the original product packaging in case you need to safely transport your gas grill.
For Your Records:
Please write down the model number and serial number below for future reference. Both numbers are
located on the ratings label on the bottom of the drip tray and are needed to obtain warranty service.
needed for service under your warranty.
Model Number: ________________________________
Serial Number: ________________________________
Date of Purchase: ______________________________
• If you received a damaged product, immediately contact the retailer or dealer who sold the product.
• Read and follow this instruction manual carefully to help you install, use, and maintain your gas grill.
• Read the troubleshooting section of this manual. It will help you diagnose and solve common
issues.
• Visit us on the web at https:/www.edgestar.com to register your product, download product guides,
self-diagnostic tool at https://support.edgestar.com
• If you need warranty service, our friendly customer service representatives are available via email
at service@edgestar.com or by telephone at 1 (866) 319-5473.

9
Parts Identication
GRL270IBNG / GRL270IBLP
GRL300IBNG / GRL300IBLP
(Two Burner Gas Grills)

10
Part Name Quantity Included
Temperature Gauge 1
Hood 1
Handle 1
Internal Lights 2
Back Cover 1
Rear Infrared Burner 1
Warming Rack 1
Infrared Igniter Cover 1
Igniter Cover 1
1
Stainless Steel Drip Tray 1
1
Infrared (IR) Burner 1
Cast Burner 1
Gas Control Knob 3
Knob Bezel 3
Light Switch 2
Control Panel (Face Plate) 1
Transformer 1
Electrode Wire 1
LED Lights 3
Main Burner Valve 1
Rear Infrared Burner Valve 1
Gas Manifold Assembly 1
Heat Separator (Zone Divider) 1
Flame Tamer 1
Cooking Grates 2
Rotisserie Motor 1
Motor Bracket 1
Rotisserie Spit Rod 1
Fork 2
Thumbscrew 4
Shaft Collar 1
Key Washer 1
Rotisserie Handle 1
Counter Balance 1
LP Hose Assembly 1 ( Only LP Use )
Natural Gas Regulator 1 ( Only NG Use )

11
GRL360IBBNG / GRL360IBBLP
GRL420IBBNG / GRL420IBBLP
(Three Burner Gas Grills)

12
Part Name Quantity Included
Temperature Gauge 1
Hood 1
Handle 1
Internal Lights 2
Back Cover 1
Rear Infrared Burner 1
Warming Rack 1
Infrared Igniter Cover 1
Igniter Cover 1
1
Stainless Steel Drip Tray 1
1
Infrared (IR) Burner 1
Cast Burner 2
Gas Control Knob 4
Knob Bezel 4
Light Switch 2
Control Panel (Face Plate) 1
Transformer 1
Electrode Wire 1
LED Lights 4
Main Burner Valve 2
Rear Infrared Burner Valve 1
Gas Manifold Assembly 1
Heat Separator (Zone Divider) 2
Flame Tamer 2
Cooking Grates 3
Rotisserie Motor 1
Motor Bracket 1
Rotisserie Spit Rod 1
Fork 2
Thumbscrew 4
Shaft Collar 1
Key Washer 1
Rotisserie Handle 1
Counter Balance 1
LP Hose Assembly 1 ( Only LP Use )
Natural Gas Regulator 1 ( Only NG Use )

13
Grill Dimensions
GRL270IBNG / GRL270IBLP
27”
25-5/8”
36-1/2”
10-3/8”
28-1/16”
23-1/2”
21-1/2”
10-3/8”
2-1/2”
Right
Front Back
Left

14
GRL300IBNG / GRL300IBLP
26-1/2”
10-3/8”
28-1/16”
30”
25-5/8”
36-1/2”
2-1/2”
21-1/2”
10-3/8”
Front Back
Left
Right

15
GRL360IBBNG / GRL360IBBLP
36”
25-5/8”
28-1/16”
32-9/16”
10-3/8”
36-1/2”
2-1/2”
21-1/2”
10-3/8”
Front Back
LeftRight

16
GRL420IBBNG / GRL420IBBLP
42”
25-5/8”
28-1/16”
38-9/16”
10-3/8”
36-1/2”
2-1/2”
21-1/2”
10-3/8”
Front Back
Right Left

17
Island / Cabinet Cutout Dimensions
•
• All BBQ islands must be manufactured from non-combustible material(s).
• Minimum clearance to combustible construction material(s) is 24” from the back and sides.
• Built-in islands and cabinets must be equipped with vents to allow for proper ventilation and
prevent animals, critters, and foreign objects from entering the cabinet.
• For proper built-in installation, there must be a minimum of 4” of counter clearance space
available behind the grill in order for the grill hood to be able to fully open and properly clear.
Please see the image below.
4”
101.6mm
Non-combustible material(s)
W
Opening Width
H
Opening
Height
Non-Combustible material(s)
D
Opening
Depth
4″ 4-1/2″
4-1/2″
4″
6″
6″
4″ X 6″ vents shown with screens
Must remain unobstructed
Model Opening Width (W) Opening Depth (D) Opening Height (H)
GRL270 Series 23 ¹/” 24” 10 ¹/”
GRL300 Series 26 ¹/” 24” 10 ¹/”
GRL360 Series 32 ¹/ 24” 10 ¹/”
GRL420 Series 38 ¹/” 24” 10 ¹/”
NOTE: Each vent must be at least 20 sq inches in size and have access to outside/
fresh air. Two vents on each side will facilitate and improve airow and ventilation.
!

18
Maintaining Adequate Ventilation
When building a gas grill into outdoor cabinetry or an island, it is important to maintain proper
ventilation. Ventilation is required to prevent the build-up of gas, which could ultimately lead to
at least 24 inches away from the grill on all side.
Be sure to clean the grill vents of all dirt, debris, insects, and spider webs.
Additionally, the grill functions best when protected from outdoor elements. The grill should be
Unpacking the Gas Grill
WARNING: Use two more people to move and install the gas grill. Failure to do so
can result in back or other injury. Carefully remove the packaging materials. Remove
any shipping tape and glue from your gas grill before using. Do not use sharp
instruments, rubbing alcohol, ammable uids, or abrasive cleaners to remove tape
or glue. These products can damage the surface of your gas grill.
!
Important: Do not remove any safety, warning, or product information labels from
your gas grill.
!
Check the rating label on your grill to ensure that the fuel source is appropriate for your application
before trying to connect any gas lines.

19
Installing the Gas Grill
Notes About Installation
WARNING: Inspect all gas tanks, gas supply hoses, and regulators each time you
connect or disconnect the fuel source. Always turn o the gas supply when the gas
grill is not in use.
•
circumstances should this gas grill be installed indoors or in a garage. Additionally, it should not be
located under a carport, in a work shop, etc.
• The gas grill should also be placed in a location that is strong enough to support its total weight. A
• Do not install the gas grill within 24 inches of wood stockpiles, gyprock, paper, or plants. Place the
grill in an area where it can have a minimum of 24 inches clearance from combustible materials,
• Adequate ventilation must be maintained for the grill to function properly. This will ensure gas does
not build up.
• Keep the grill protected from inclement weather conditions, including direct rain and high winds.
• Once the gas grill is installed, you must still be able to access the gas supply line, regulator, gas
Installation Location
!
Tip: Gather the model and serial number from the product label and write them down
before installing the gas grill(s).
!
• The gas grill should be installed in accordance with all local code requirements in addition to the
National Fuel Gas Code, ANSI Z223.1 / NFPA 54.
•Installation by a professional is highly recommended for proper placement and functionality.
In the state of Massachusetts, installation and repairs MUST be performed by a
State of Massachusetts.
• This gas grill is not intended to be installed in or on boats or recreational vehicles (RVs).
• Make sure that there are no kinks and no twisting in gas supply hoses.
Types of Installation
This manual covers an EdgeStar gas grill series that includes models using either a Liquid Propane
(LP) or a Natural Gas (NG) fuel source. Select your appropriate fuel type and follow the relevant
installation instructions, as follows.
In each case, there must be adequate ventilation and access for service.

20
Liquid Propane (LP) Cylinder Specications
•
•
• A Type 1 compatible cylinder with a Type 1 cylinder valve has a back-check valve which does not
• The cylinder must be arranged for vapor withdrawal. It must also include a collar to protect
the cylinder valve. A safety relief device having direct communication with the vapor space of
• All LP gas cylinders used with this appliance shall be constructed and marked in accordance with
National Standard of Canada, CAN/CSA-B339, Cylinders, Spheres and Tubes for Transportation
of Dangerous Goods; and Commission, as applicable; and shall be provided with a listed
• Read labels on the LP Gas Supply Cylinder.
• New cylinders are always shipped empty for safety.
•
•
and in good repair.
Shut Off Valve
LP cylinder in upright position
for vapor withdrawal
For appliances designed to use a CGA No.791
connection:
Place dust cap on the cylinder valve outlet whenever
the cylinder is not in use. Only install the type of dust
cap on the cylinder valve outlet that is provided with
the cylinder valve. Other types of caps or plugs may
result in leakage of propane.
• LP cylinders must be upright for vapor withdrawal
and include a collar to protect the LP cylinder
valve. Always keep LP cylinders in upright
position during use, transit or storage.
• Storage of an outdoor cooking gas appliance
indoor is permissible only if the cylinder(s) is (are)
disconnected and removed from the outdoor
cooking gas appliance.
This manual suits for next models
15
Table of contents
Other EdgeStar Grill manuals
Popular Grill manuals by other brands

emerio
emerio RG-110282 instruction manual

Roller Grill
Roller Grill SALAMANDER 304.125 User instructions

Vitek
Vitek VT-2631 Manual instruction

The Flying Culinary Circus
The Flying Culinary Circus FCC-G-18400-00 Instructions, manual, maintenance

Meco
Meco 2000 Brazier instructions

Gasmate
Gasmate BQ1060 quick guide