eDrum Workshop PP13 User manual

1
End-User License Agreement (EULA)
Last updated: 27/09/2022
Please read this End-User License Agreement ("Agreement") carefully before using The eDrum Workshop
expansion programming, audio samples, documentation and updates provided to you by The eDrum Workshop
(collectively the "Product"). By purchasing a Product from The eDrum Workshop, you consent to the terms of
this Agreement.
License
The eDrum Workshop grants you an exclusive, non-transferable, non-sub licensable limited right to download
and use the Product solely for your personal, non-commercial use on a single computer and/or compatible
drum module.
Restrictions
You agree not to, and you will not permit others to:
license, copy, reproduce, resell, rent, distribute, transmit, host, translate (into any language, computer or
natural), or otherwise commercially exploit the Product or make the Product available to any third party. The
eDrum Workshop reserves all rights in the Product not expressly granted herein, including ownership and
proprietary rights.
License restrictions: You may not reproduce or distribute the Product. You may not copy the Product to any
media, server or location for distribution or reproduction. You may not attempt to derive the source code of
the product in any way, including but not limited to decompiling, disassembling or reverse-engineering. You
may not sublicense or transfer the rights to the Product, including but not limited to reselling, renting, leasing
or lending. The restrictions contained herein apply to any and all updates provided by The eDrum Workshop.
At a glance
✓
✘
Recorded music, recorded performance audio and
video, other “finished” recordings where individual
audio samples cannot be extracted
Extracting individual audio files or samples to
distribute, share, sell or reuse in another format than
which it was sold
Live performances
Selling, loaning, sharing or distributing the Product
files in any way
Limitation of Liability
In no event shall The eDrum Workshop be held liable to you or any third party for any costs or damages arising
directly or indirectly from the use of the Product, including but not limited to actual, incidental, consequential
or special damages, or for any loss of revenue, profits or data arising in any manner from any action or cause
related to this Agreement or the Product.
You acknowledge that you have read this Agreement and understand that, by purchasing and/or using the
Product, you agree to be bound by its terms and conditions.
The eDrum Workshop products are the Intellectual Property of The eDrum Workshop.

2
BEFORE PROCEEDING, PLEASE REFER TO YOUR ALESIS STRIKE MANUAL TO
FAMILIARISE YOURSELF WITH THE GENERAL MODULE FUNCTIONS
SD CARD Specification can be found in your Alesis Strike Module User Guide on page 31.
It is recommended to create a backup of your Strike’s SD card data before commencing.
If you would prefer a video demonstration of the loading process, you can watch now on
The eDrum Workshop's YouTube channel - https://www.youtube.com/watch?v=vHhjj5hKL6g
Contents
End-User License Agreement (EULA) 1
Introduction & Contents 2
Loading the Files to Your SD Card 3
Using the Kit Presets on Your Strike Module / Kit List & Notes 5
Assigning the Instruments on Your Strike Module 7
Instrument / Articulation List 8
Editing the Sounds or Performance 9
Common Troubleshooting 11
Thank you for downloading this Instrument and Kit
pack from The eDrum Workshop!
3
Loading the Files to Your SD Card
This guide has been written assuming that you are using the stock SD card that came with your Alesis Strike
module or one that is compatible and has the correct folder structure that the Strike module recognises.
Note: The drive letters and icons shown on your computer may not match those on these images.
1) Unzip the eDW PP13x7 Strike.zip file to a location on your
computer
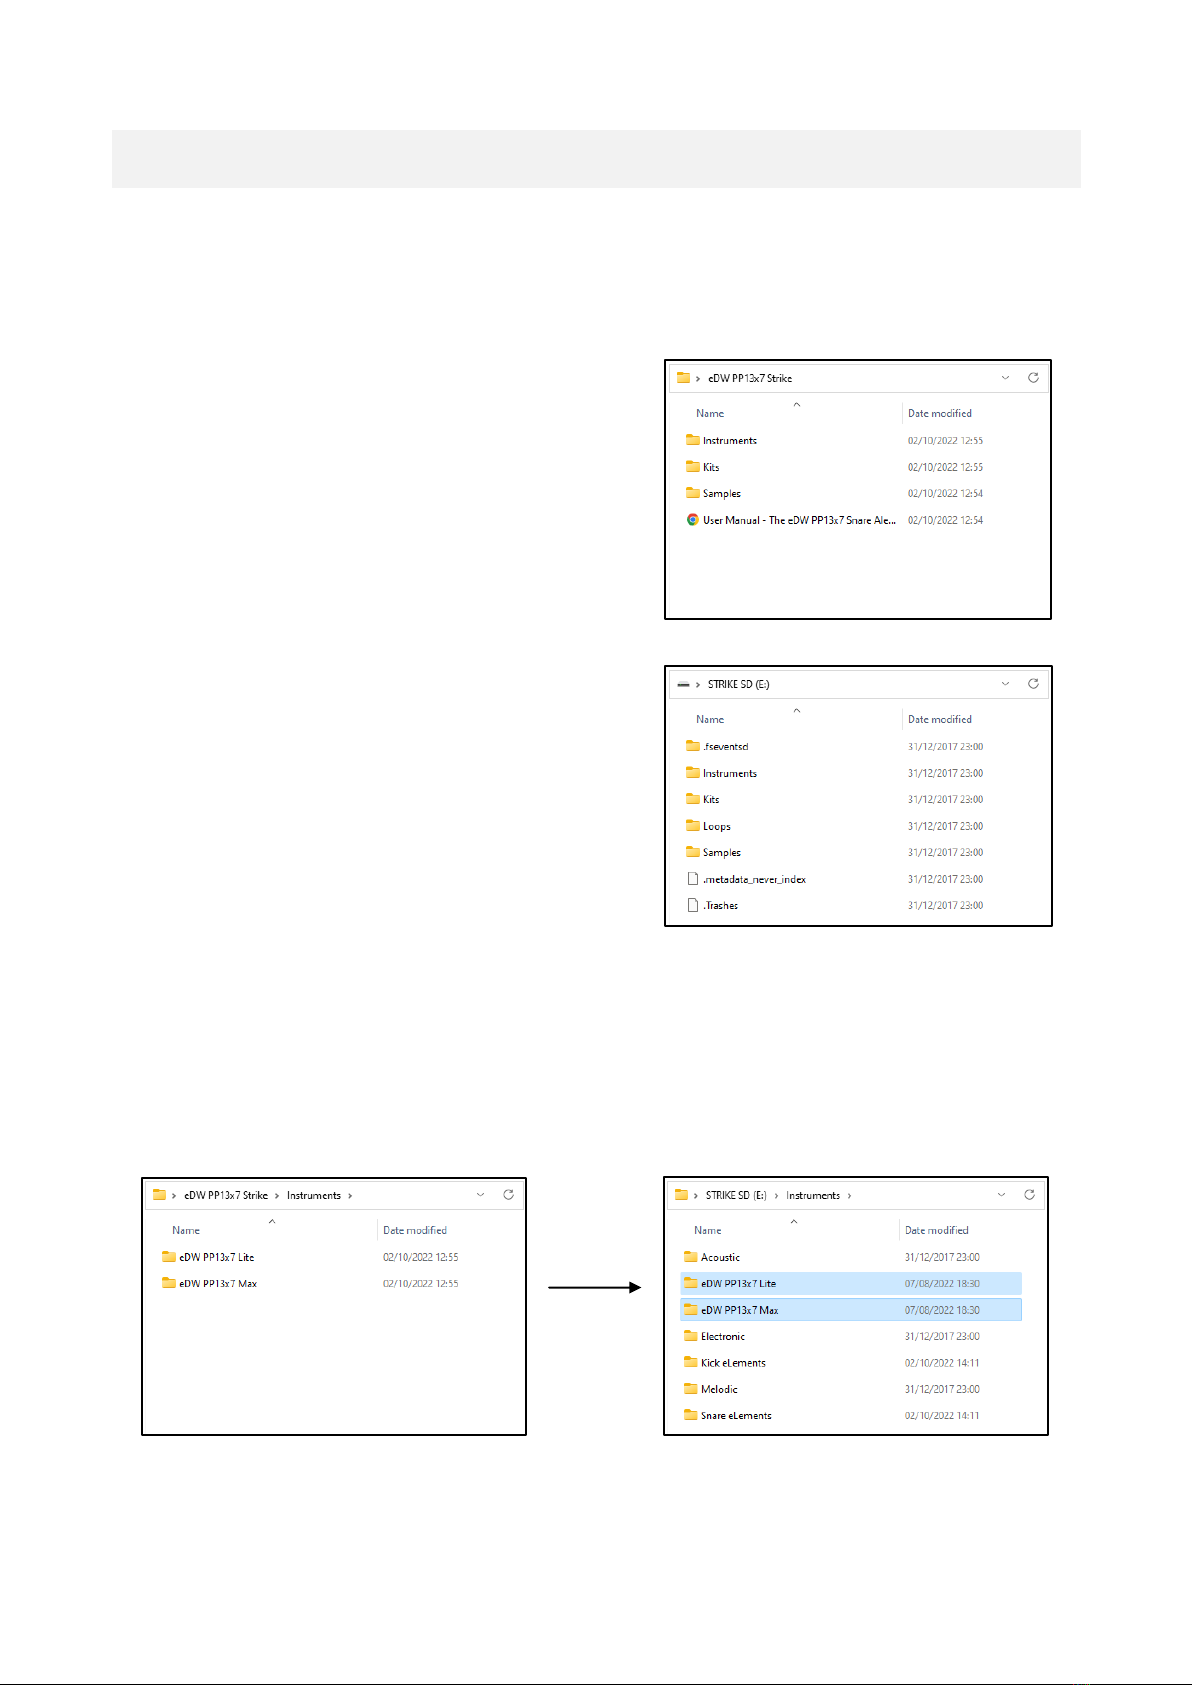
2) Open the unzipped folder. You will see three subfolders
and a PDF file (pictured).
These 3 subfolders - Instruments, Kits and Samples have
been named to mirror the folders on your Alesis Strike SD
card. The subfolders inside each of these folders must be
placed inside the corresponding folders on your Strike SD
card otherwise the kits and instruments will not work
3) Insert the Strike SD Card into your computer's
card reader
OR
Attach your Strike module to the computer using a USB A-B
cable and turn it on (this will access the Strike SD card
through the module)
4) Open the unzipped Instruments folder and the Instruments folder on the Strike SD card. Copy or drag the 2
folders named
eDW PP13x7 Lite
eDW PP13x7 Max
from the unzipped Instruments folder to the SD card Instruments folder
The other contents of your SD card Instruments folder may differ
from the image above, depending on your own User instruments
4
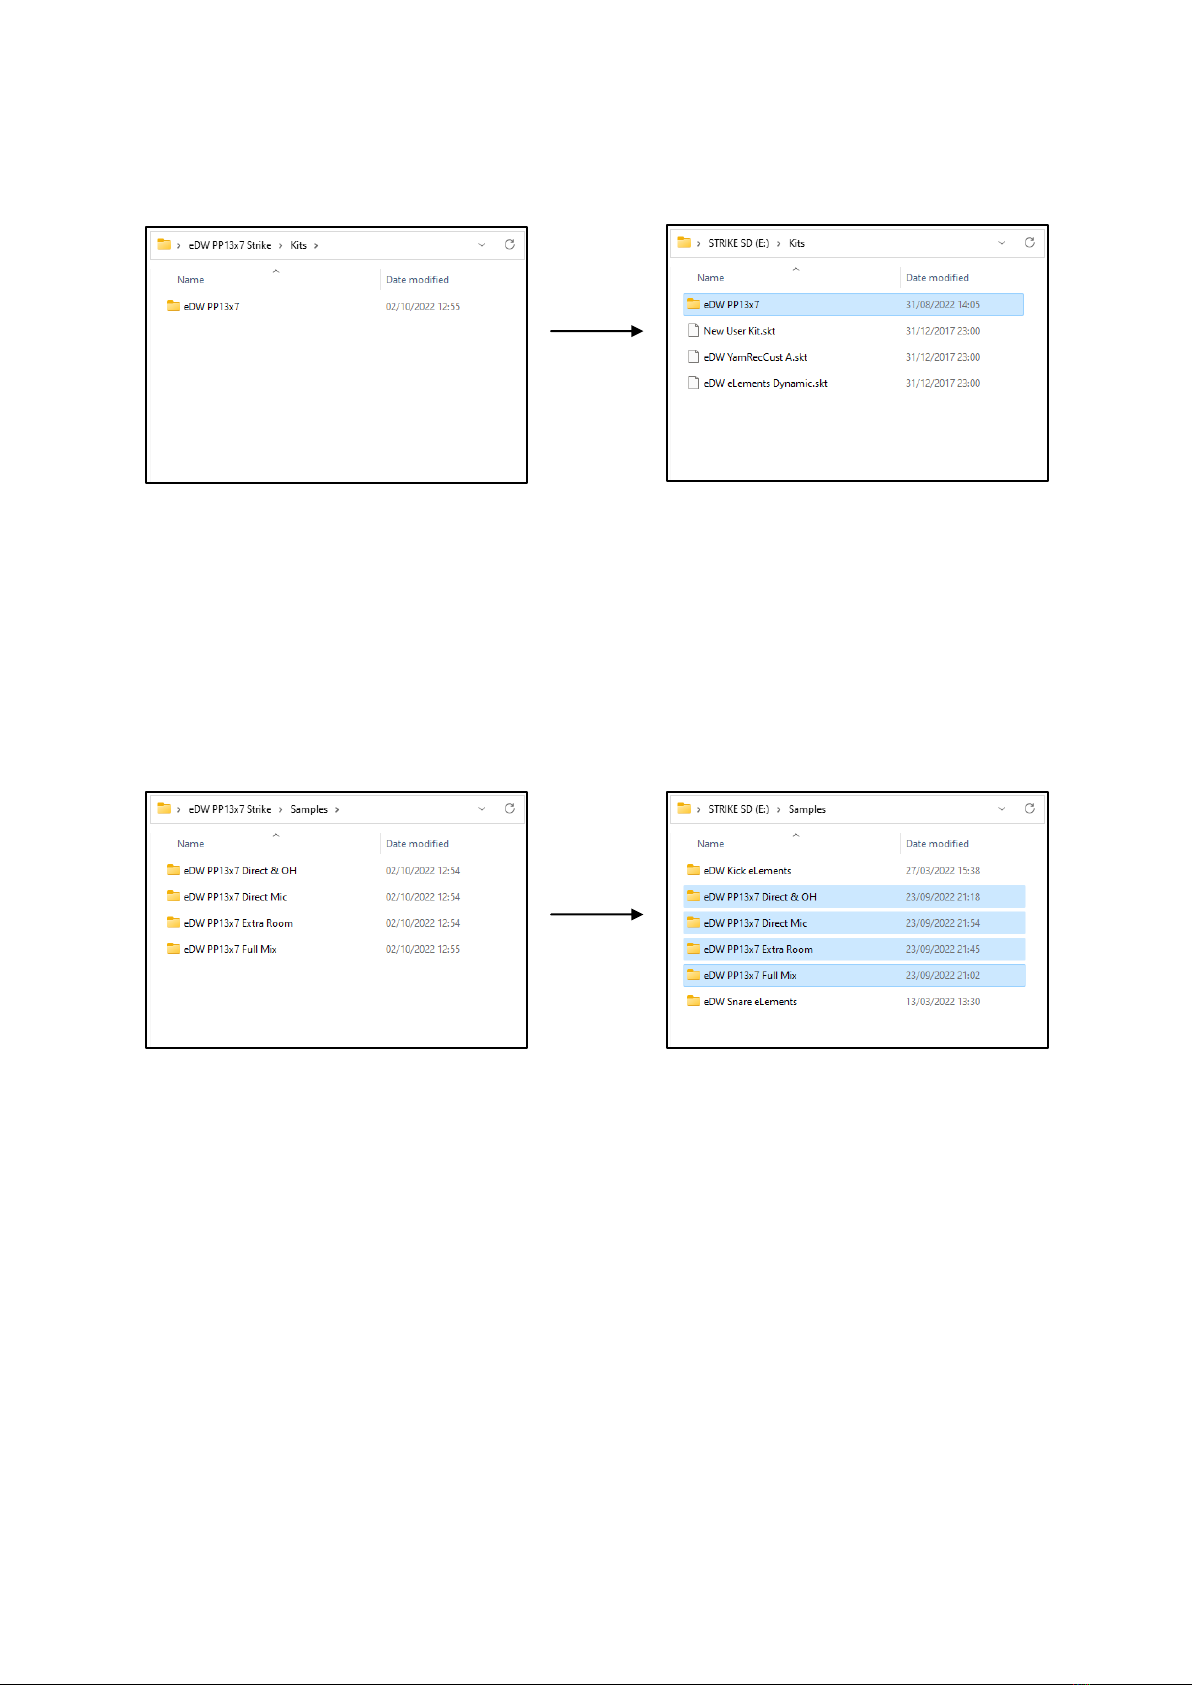
5) Return to the previous folder levels then open the unzipped Kits folder and the Kits folder on the Strike SD
card. Copy or drag the eDW PP13x7 folder from the unzipped Kits folder to the SD card Kits folder
6) Return to the previous folder levels and open the unzipped Samples folder and the Samples folder on the
Strike SD card. Copy or drag the 4 folders named
eDW PP13x7 Direct
eDW PP13x7 Direct & OH
eDW PP13x7 Extra Room
eDW PP13x7 Full Mix
from the unzipped Samples folder to the SD card Samples folder
7) Verify that the correct files are placed in each folder on your SD card
8) Safely eject the SD card from your
computer and return it to your module
OR
Safely eject the module’s USB from your
computer. Your module will stay powered on
Your new kit presets and instruments will now be accessible from the relevant module menus.
The other contents of your SD card Kit folder may differ
from the image above, depending on your saved User kits
The other contents of your SD card Samples folder may differ
from the image above, depending on your own User samples
5
Using the Kit Presets on Your Strike Module
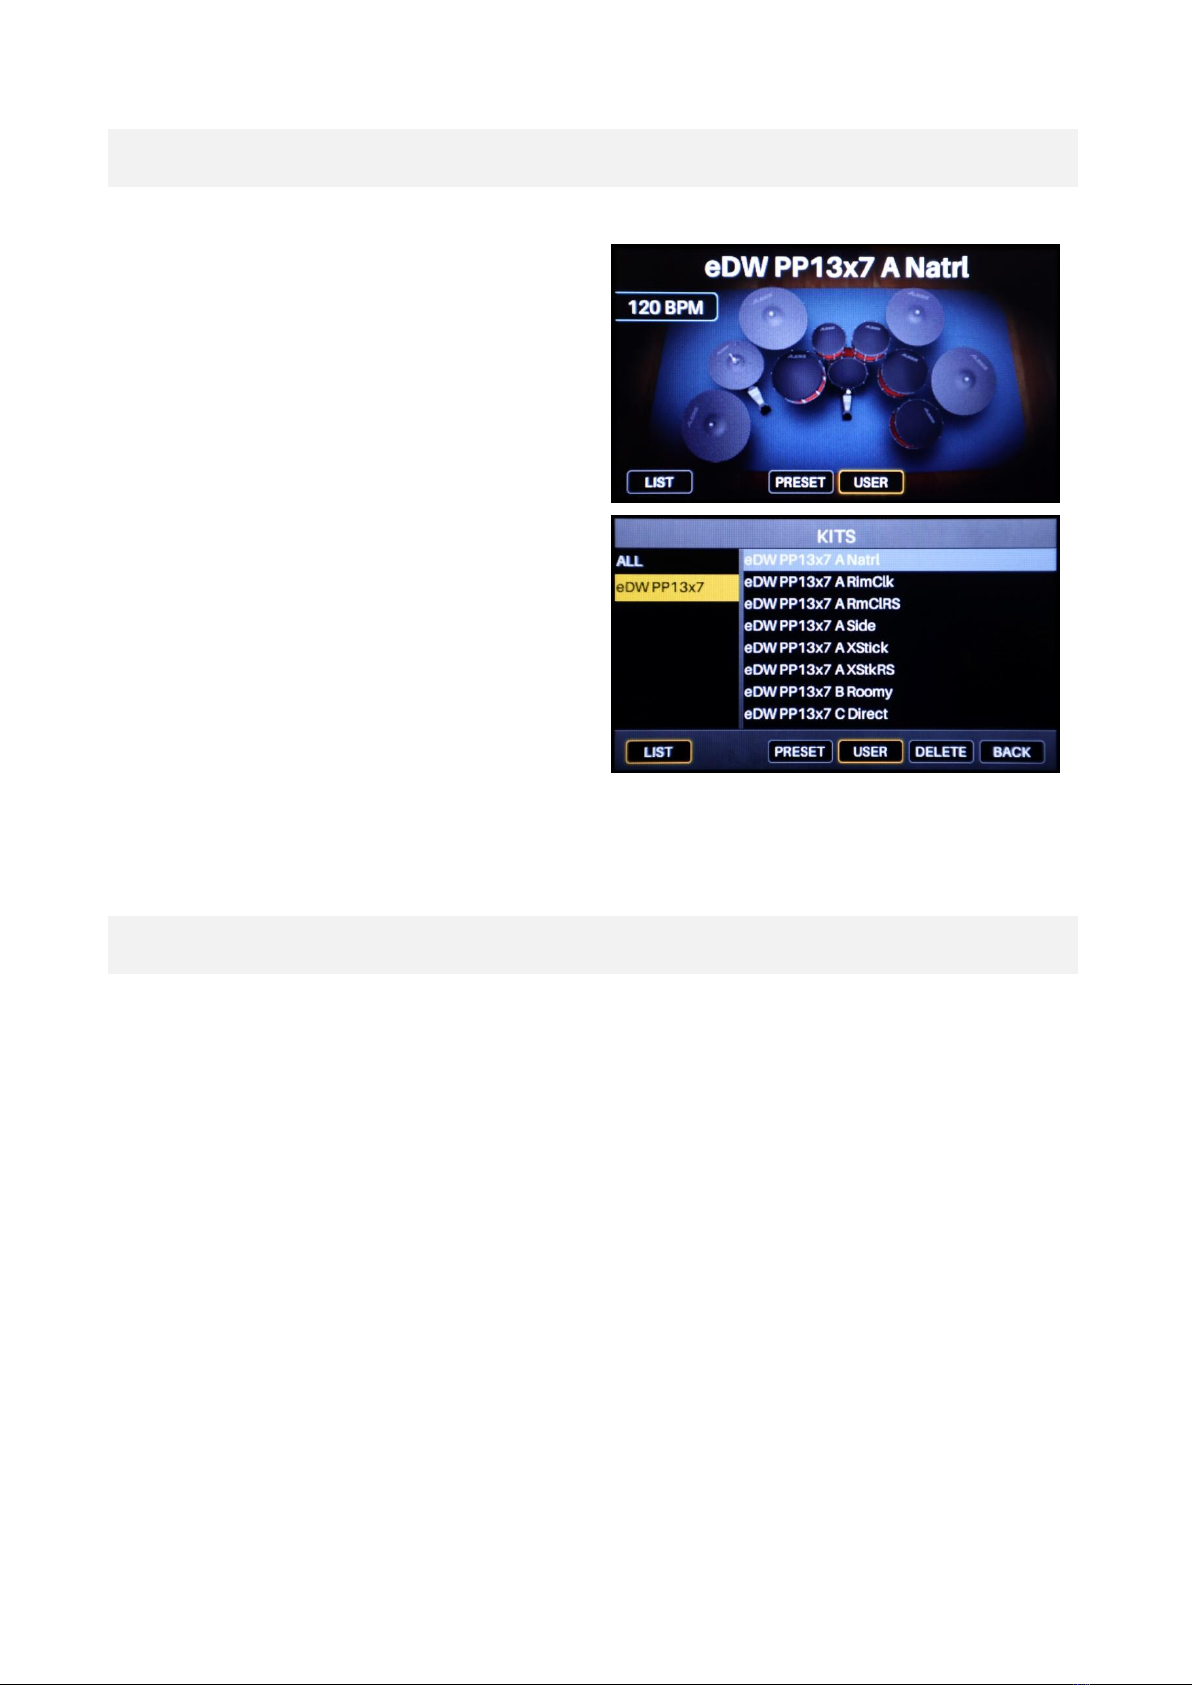
1) Press KIT to show the Kit menu
2) Press the F4/USER button to access the User Kits,
then use the data dial to scroll through the User Kits
and locate eDW PP13x7 A Natrl or continue scrolling
to the desired eDW PP13x7 kit
OR
Press F1/LIST to bring up the kit list, then press
F4/USER to view a list of the User Kits. You can locate
the eDW PP13x7 kits amongst your user kits in the
right panel.
Alternatively, there will now be a category labelled
eDW PP13x7 in the left panel - you can select this to
filter the kit list, showing only the eDW PP13x7 kits
Kit List & Notes
There are 8 unique kits included, ranging from natural mixes to more processed and genre styles.
Each kit uses the “Head Center”articulation on the Snare Head zone and “Rimshot” articulation on the Snare Rim zone,
except for the additional variations of the A kit. These are set up to demonstrate the other articulations that are included
(see page 8 for more information) and how you can layer articulations with velocity switching between them.
eDW PP13x7 A Natrl -This kit features the “Mixed” version of the PP13x7 snare. The other instruments have
been selected to reflect a small-to-medium room ambience with punchy drum tones
A RimC-S - Variation of A Natrl with “rim click” and “rimshot” articulations assigned to the rim zone,
set to swap at a defined velocity
A RimClk - Variation of A Natrl with the “rim click” articulation assigned to the rim zone
A Side - Variation of A Natrl, using the “head side” and “rimshot side” articulations
A XStick - Variation of A Natrl with the “cross-stick” articulation assigned to the rim zone
A XStkRS - Variation of A Natrl with “cross-stick” and “rimshot” articulations assigned to the rim zone,
set to swap at a defined velocity

6
eDW PP13x7 B Roomy - This kit features the “Roomy” version of the PP13x7 snare. The other instruments and
room ambience have been adjusted to reflect a larger, brighter room ambience.
eDW PP13x7 C Direct - This kit features the “Solo Direct” version of the PP13x7 snare. Ambience has been
removed and some instruments adjusted to simulate a “close mic” setup.
eDW PP13x7 D Dir&OH - This kit features the “OHDir” version of the PP13x7 snare. Ambience has been
reduced and some instruments changed to simulate an “overheads only” setup.
eDW PP13x7 E Proc’d - This kit features the “Roomy” version of the PP13x7 snare, with additional EQ and
compression applied, creating a big, punchy “processed” kit with added reverb.
eDW PP13x7 F Metal - This kit features a tuned up “Mixed” PP13x7 snare, a clicky kick drum, low-tuned attack-
heavy toms and dark cymbals, along with heavy processing to create a slamming metal kit
eDW PP13x7 G Small - This kit uses a tuned up “OHDir” PP13x7 snare with HIPASS filter applied, paired with a
smaller, higher-pitched instrument selection for that poppy, small kit vibe.
eDW PP13x7 H Vntge - This kit uses a down-tuned “Roomy” PP13x7 snare, resonant kick drum, low toms, dark
cymbals and big ambience for that open, vintage feel.

7
Assigning the Instruments on Your Strike Module
1) Press KIT to show the Kit menu and select the
desired kit to edit
2) Press the VOICE button
3) Activate the NOTE CHASE button and hit the kick
drum pad to select it
OR
Swap the TRIG type at the top of the screen to Snare
Head using the data dial
4) Press F4/INST to open the instrument list, then
press F4/USER again to select a user instrument from
the SD card
5) Verify that you are on the correct instrument Layer.
LAYER A is recommended if using the instrument
alone. Swap the layer with F1 or F2 if necessary
6) Using the cursors, select the PP13x7 Lite or PP13x7
Max category from the left panel
7) Use the cursors to navigate to the right panel and
select an instrument. The sounds can be auditioned
while this menu is open by hitting the pad
8) Swap to the Snare Rim trigger using either the Note
Chase or TRIG selection and follow steps 4 - 7 again,
where necessary
9) Press F6/BACK when finished to return to the
VOICE screen and continue to make any other
adjustments
(see Recommended Settings for more information)
Note: Don’t forget to SAVE your kit from the KIT screen once you have made your selections!

8
Instrument / Articulation List
There are 4 instrument mixes included with this pack -
Mixed contains the optimal mix of top, bottom,
overhead and room microphone levels for the most
natural sound and “in the room” feel
Roomy contains additional overhead and room
microphone levels for a more ambient sound with extra
character
Direct contains a mix of only the top and bottom
microphones, creating the most dry, “close mic” sound
and feel. This is the recommended starting point when
using this snare for live performance
OHDir contains a mix of top, bottom and overhead
microphones. This is the next level up from Direct,
retaining that “up close” feel with a bit more top-end
sparkle and mild ambience
Each of these instrument mixes contains 6 articulations -
Head Center (Head) - samples taken from the center of the snare head
Head Side (HeadS) - samples taken from the edge of the snare head
Rimshot (RS) - samples taken from playing a center rimshot strike
Rimshot Side (RSS) - samples taken from playing a rimshot strike towards the edge of the head
Rim Click (RC) - samples taken from playing the snare rim alone
XStick (XS)- samples taken from playing a cross-stick articulation (palm on head, striking the rim)
There are 2 versions of each instrument file included, separated into Lite and Max categories -
Max instruments contain all of the samples for each
articulation, resulting in increased playability. However,
the file size is much larger so using these versions may
cause you to exceed the kit size limit (200mb), depending
on the other instruments used within the kit.
Lite instruments contain fewer samples in total for each
articulation. These have been optimized to fit within the
kit size limit more easily and the samples have been
carefully selected to retain natural playability.
All included kit presets use the Lite instruments.

9
Editing the Sounds or Performance
Below are some settings that can be altered to adjust the sounds, performance or playability of the kits.
Note: When making changes, it is recommended to SAVE the edits as a new kit. This way there will always be an “original”
version on the SD card to recall if any undesired changes are accidentally saved. If the “original” kits are overwritten, you
can restore them by copying the files to the SD card again (see page 3).
Adjustment: Dynamics
VOICE -> F3/ VEL
Velocity > Level
This setting determines how much the velocity of your strike will
influence the volume of the instrument. 99 is the maximum value which
creates the widest dynamic difference between quiet and lout playing.
If you find that low dynamics feel too quiet, reduce this value.
If you find that low dynamics feel too loud, increase this value.
Adjustment: Polyphony
VOICE -> F4/ FX/MIDI -> F3/ OTHER
Playback
Recommended
POLY
This setting determines how the voice will sound on this trigger. MONO
will only allow once instance of the sound to play back at one time with
the next instance silencing the first. POLY will allow multiple instances to
overlap. For the PP13x7 snare instruments, POLY is recommended as
this allows for the most natural playing experience for acoustic sounds.
If you want to create an interesting effect or more electronic feel,
MONO mode can be fun to experiment with.
Note: This setting will affect both voice layers assigned to the trigger.
Adjustment: Ambience
KIT FX -> F1/ REVERB
For each kit, different Reverb settings have been applied to create either
a natural or processed ambience environment. In the REVERB menu, the
Size, Color (tone) and Level of the ambience can be adjusted to taste.
The ambience can also be adjusted by changing the preset (pictured:
top) or turning it off entirely.
Note: This setting is global for the entire kit. To adjust the level of
ambience on a single pad zone, use the dials found under
VOICE -> F4/ FX/MIDI -> F1/ FX
10
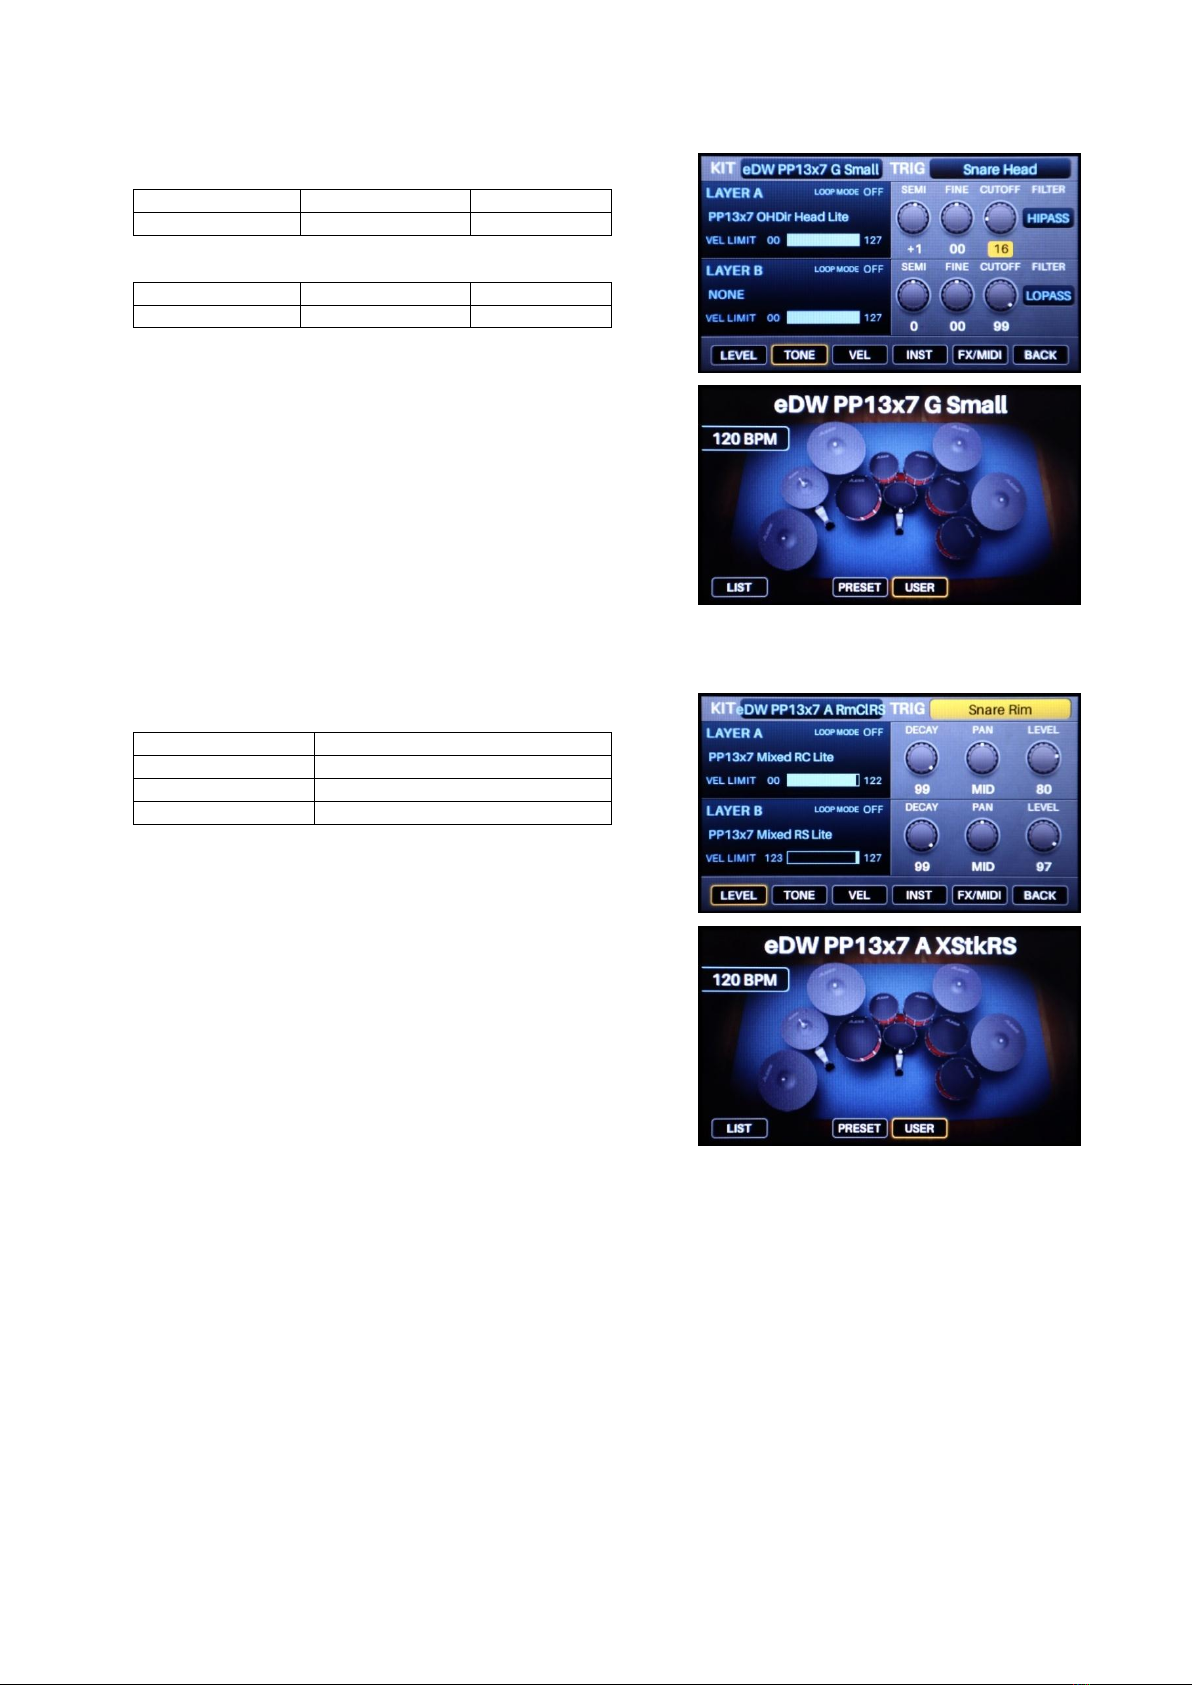
Adjustment: Frequency filters
VOICE - > F2/ TONE
Filter
Cutoff
HIPASS
0 - 99
VOICE - > F2/ TONE
Filter
Cutoff
LOPASS
0 - 99
These FILTER and CUTOFF settings will filter out low frequencies
(HIPASS) or high frequencies (LOPASS) depending on the values used.
These can be used in place of an equalizer (EQ) on any pad zone to
adjust the character of the sound.
Example: The kit eDW PP13x7 G Small has a HIPASS filter set to 16. This
removes low frequencies, creating a “thinner” sound which has less
“body”or “weight”. Combined with a higher tuning (SEMI +1), this
emulates a smaller snare drum.
Adjustment: Velocity switching between instruments
VOICE - > F1/ LEVEL
LAYER A VEL LIMIT
00 –[value]
VOICE -> F1/ LEVEL
LAYER B VEL LIMIT
[value] - 127
Use the VEL LIMIT values to control exactly where in the velocity range
each layer will play back.
The bottom value (left) will stop the layer from playing when you strike
below it, the top value (right) will stop the layer from playing when you
strike above it.
Some of the eDW PP13x7 A kit variations have this feature set up to
demonstrate their uses (pictured). The values can be adjusted to taste
for your own playing style –reducing the higher value (right) of LAYER A
and the lower value (left) of LAYER B will cause the second layer to
trigger at lower playing dynamics.
Overlapping the values of these layers will cause both sounds to play
together for those overlapped velocities. This is usually undesirable for an
“acoustic” drum experience, but can be an interesting creative tool for
different scenarios.

11
Common Troubleshooting
It sounds like the samples are "cutting off" when playing hits in succession
For most instruments, the trigger or pad should be set up in Playback: POLY mode. This allows multiple
instances of the instrument’s samples to overlap. See page 9of this guide for more information.
I get the message "Path Not Found" when loading an instrument
This message usually means that the instrument file (e.g. PP13x7 Mixed Head Lite.sin) cannot locate the
samples associated with the instrument (e.g. PP HC vel01-001.wav). It is likely that the file path of the samples
is incorrect. The .sin instrument files will look for the exact file path outlined in the installation instructions:
[SD Card]: Samples /
eDW PP13x7 Direct & OH
eDW PP13x7 Direct
eDW PP13x7 Extra Room
eDW PP13x7 Full Mix
Within each of these 4 folders, there should be 6 subfolders containing the sample files:
Cross-stick; Head Center; Head Side; Rim Click; Rimshot; Rimshot Side
If any of these folders are placed within another directory, the module will not be able to locate the samples
for the instrument and you will encounter this message. Please see page 3of this guide for more information.
I don’t have the listed folders on my Strike SD card
Your supplied SD card should have the correct file structure on it. If you are using a brand new SD card and it
does not contain any folders, or you have somehow lost the folders from your SD card, insert the SD card into
your Strike module and turn the module on. This should create the correct SD card file structure for you.
Note: The SD Card Specification for compatibility can be found on page 31 of the Alesis Strike Module User Guide.
I don’t have a copy of my Alesis Strike Module User Guide
You can download a copy of the Alesis Strike manual from their website here, found under the “Downloads”
tab - https://www.alesis.com/products/view/strike-drum-module
Note: The external link provided is valid, working and safe as of the time of compiling this guide. The eDrum Workshop
cannot be held liable for the content of external links or for any processes carried out by following the instructions within.
Table of contents


