oqan QP88S User manual

1
QP88S
88-keys Cabinet Digital Piano

2
• Thank you for choosing QK88P. Please read this manual carefully before operation to
ensure safety and keep it for future reference.
Attentions
1. Do not share a socket with other appliances. Socket sharing can easily cause overheating,
and unexpected accidents could happen because of wire burning.
2. Do not disassemble, repair and refit without permission. Self-disassembly or modification
can easily cause unanticipated failure and lead to accidents. It will seriously affect the
consumer's rights.
3. Disconnect the plug when it is out of service.
4. Pay attention to the wire keep and protection. Do not break, pull, distort, and lengthen the
wire to avoid unexpected accidents. Avoid heavy pressure when keeping and using.
5. Use it at the rated voltage. Playing at the lower voltage cannot get the normal tone and will
shorten its life; playing at the higher voltage will burn down the internal circuit, and
even lead to fire.
6. Do not rinse with water or use the bathroom to avoid malfunction and unexpected accidents.
Careful maintenance to the keyboard can extend its life and reduce the fault, please do
as the followings:
1. Dust-proof, moisture-proof
Clean appearance should be kept avoiding foreign matters falling into the body through the
cracks; the Keyboard should be wept with soft and dry cloth to prevent moisture intrusion; it
should be placed at a dry place but avoided for long time exposure under the
strong sunshine.
2. Shock-proof
The piano should be handled with care when moving. Violent shaking and collision can break
the shell and cause damage to the internal electronics.
3. Anti-corrosion
The instrument should be avoided to contact with acidic or alkaline substances and to work on
occasion with serious corrosive gases to prevent line oxidation.
4. Anti-disassembly
The keyboard is a precision instrument, any changes may cause problems and technical failure.
Any problems please contact the company maintenance department or distributor or
experienced maintenance personnel. Please do not arbitrarily replace the components.

3
Contenido
Attentions .................................................................................................................................. 2!
Function List .............................................................................................................................. 6!
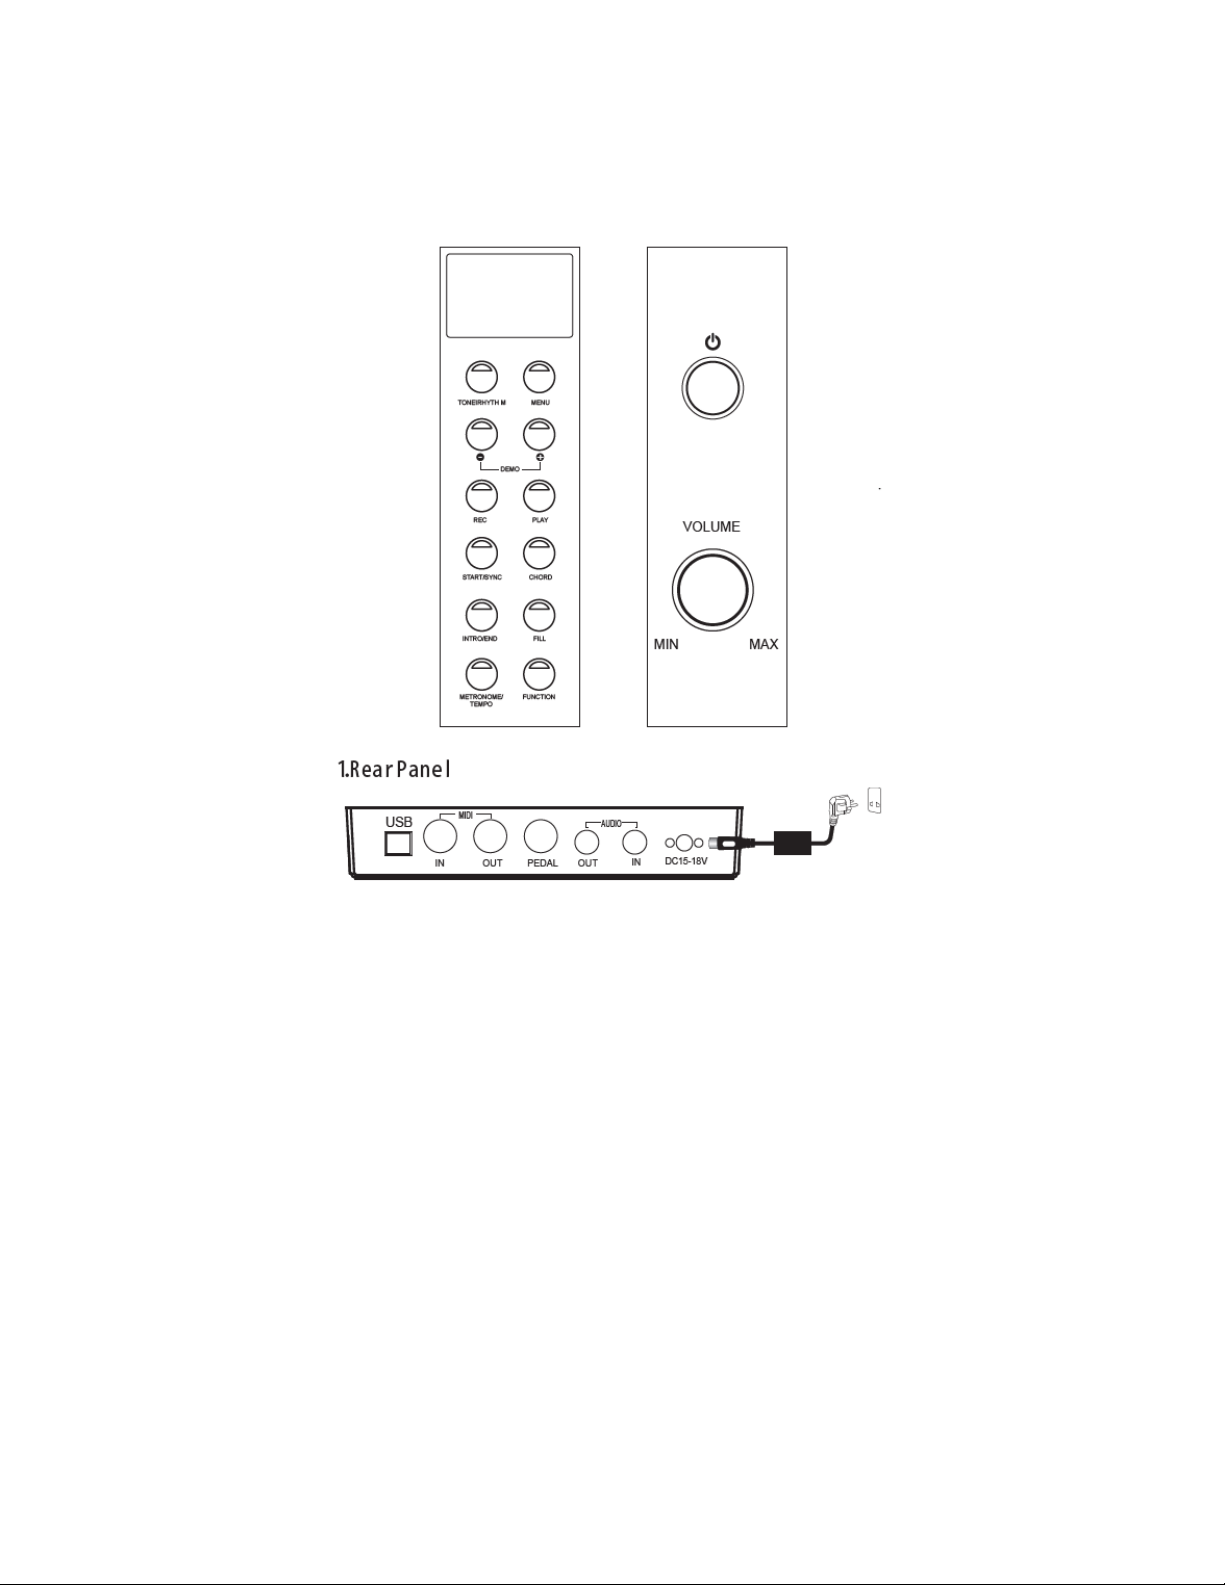
Overview ................................................................................................................................... 7!
Operation Guide ........................................................................................................................ 7!
1 - POWER ............................................................................................................................ 7!
2 - VOLUME LEVEL .............................................................................................................. 7!
3 - TONE / RHYTHM ............................................................................................................. 7!
4 - MENU ............................................................................................................................... 8!
5 - DEMOS ............................................................................................................................ 9!
6 - REC/PLAY ........................................................................................................................ 9!
7 - START/SYNC ................................................................................................................... 9!
8 - CHORD FUNCTION ....................................................................................................... 10!
9 - INTRO/END .................................................................................................................... 10!
10 - FILL .............................................................................................................................. 10!
11 - METRONOME / TEMPO .............................................................................................. 10!
12 - FUNCTION CONTROL ................................................................................................ 11!
13 – TONE/RHYTHM MEMORY STORAGE SETTING ...................................................... 13!
14 – BLUETOOTH FUNCTION ........................................................................................... 13!
15 – HEADPHONE JACKS ................................................................................................. 13!
16 – PEDAL ......................................................................................................................... 13!
TONE LIST .............................................................................................................................. 14!
DEMO LIST ............................................................................................................................. 16!
RHYTHM LIST ........................................................................................................................ 17!
ASSEMBLY ............................................................................................................................. 19!

6
Function List
Type
Digital Piano
Color
Black
Keyboard
Fully weighted hammer action keyboard
Polyphony
128 voices
Tones
200 tones, including 128 GM standard tones
Demo
60 demos
Record / Play
Convenient Record and Play function, accompaniment track
can be recorded.
Bluetooth
Connects to phone or computer to play songs, or to learning
software that supports Bluetooth operation.
Metronome
9 metronome types, measure selection, 20 to 280 bpm
Storage function
4 sets of storage via memory function keys
Accompaniment control
Start/Sync, Chord, Intro/End, Fill
Menu
Rhythm volume
Transpose (+/-12)
Touch (3 touch level)
Balance
Split note
Dual
Reverb Level
Chorus Level
Tempo Signature
Percussion
USB/MIDI
Compatible USB MIDI port for computer
Power
15V 3A

7
Overview
Operation Guide
1 - POWER
a. Press POWER button to turn on the digital piano, default tone is Grand Piano.
b. Hold POWER button for 2 seconds to turn off power.
2 - VOLUME LEVEL
Rotate VOLUME wheel to adjust the volume level.
3 - TONE / RHYTHM
200 tones available:
a) Press “TONE/RHYTHM button to start tone mode.

8
b) Use “-“ or “+” buttons or enter 3 digital number “000-199” to choose a tone.
100 rhythms available:
a) Press “TONE/RHYTHM” button again to start rhythm mode
4 - MENU
a) Press “MENU” button to enter the function menu options and select of the available
functions.
b) Under “MENU” function mode, press “TNOE/RHYTHM” button to exit the function
section interface.
LCD SHOW
Adjusting range
Rhythm volume
000-127
Transpose
+/-12
Touch
001-003
Balance
001-127
Split note
045-096
Reverb level
001-008
Chorus level
001-008
Signature
¼, 2/4, ¾, 4/4, 5/4, 6/4, 3/8, 6/8, 12/8
A. Rhythm volume
Press “-“ or “+” button to adjust the rhythm volume. Adjusting range: 000-127
B. Transpose
This function allows notes to be moved up or down by 12 semitones within an octave range.
Press “-“ or “+” buttons to adjust the transpose setting. Adjusting range: 12 semitones
C. Touch
The keyboard is touch sensitive. When keyboard starts, the function is selected automatically.
Press “-“ or “+” buttons to select the touch level. Adjusting range: 001-003
D. Dual Balance
Under dual voice setting mode, press “-“ or “+” buttons to adjust the dual balance. Adjusting
range: 000-0127.

9
E. Split note
Press “-“ or “+” buttons to adjust the split note position. Adjusting range: 045-096.
F. Reverb level
Press “-“ or “+” buttons to adjust the reverb level. Adjusting range: 001-008.
G. Chorus level
Press “-“ or “+” buttons to adjust the chorus level. Adjusting range: 001-008.
H. Signature
Press “-“ or “+” buttons to adjust the metronome signature. Signature types: ¼, 2/4, ¾, 4/4, 5/4,
6/4, 3/8, 6/8, 12/8
5 - DEMOS
Use “-“ or “+” buttons to choose tone or rhythm demos.
a) Hold “-“ or “+” buttons at the same time to enter Demo songs mode.
b) Hold “-“ or “+” buttons at the same time to exit Demo songs mode.
c) While in Demo mode, press “FUNCTION” button (button indicator light will flash), enter 3
digital number “000-059” on keys to choose a different demo song, and press
“FUNCTION” button or wait within 6 seconds to start the demo song.
6 - REC/PLAY
a) Press “REC” button (the button indicator light will flash). Metronome is enabled to enter
the recording by default. Press “METRONOME/TEMPO” button to stop the metronome.
b) Press “REC” button again (the button indicator light will stop) to exit recording model.
c) Press “PLAY” button (the button indicator light will flash), to play the previous recording.
d) After playing the recording, button indicator light will stop.
7 - START/SYNC
a) Press “START/SYNC” button to start auto accompaniment and play along the current
selected rhythm.
b) Hold “START/SYNC” button for 2 seconds (button indicator light will flash) to start SYNC
mode.

10
How to use Sync Start function
a) Press “CHORD” button to start chord mode, then press “SYNC START” button to start
synchro standby mode.
b) Play a chord to automatically start the accompaniment.
c) Press “START/SYNC” button again to stop synchro mode.
8 - CHORD FUNCTION
a) Press “CHORD” button, then press “START/SYNC” to start auto chord function.
b) Press “START/SYNC” button again to stop chord function, button indicator light will stop.
CHORD ACCOMPANIMENT
a) Press “START/SYNC” button to start performance of selected rhythm.
b) Press “START/SYNC” button to start chord mode
c) The auto accompaniment chord function will be assigned to keys 1-22 from the left.
d) Press “CHORD” button again to stop chord mode.
9 - INTRO/END
a) Press “INTRO/END” button to start INTRO mode.
b) Press “INTRO/END” button again to stop INTRO mode.
How to use INTRO/END function
a) Press “TONE/RHTYHM” button at first and select a rhythm.
b) Press “INTRO/END” button to enter INTRO mode, then press “START/STOP” or
“SYNC/START” button to insert INTRO pattern into the rhythm.
c) While playing a rhythm, hold “INTRO/END” button for 2 seconds (indicator light will flash)
to insert the end patter into the rhythm.
10 - FILL
a) Press “TONE/RHYTHM” button at first and select the required rhythm.
b) Press “START/SYNC” button to start the rhythm performance.
c) You can insert a fill pattern into the rhythm by pressing the “FILL” button.
11 - METRONOME / TEMPO
a) Press “METRONOME/TEMPO” button to start metronome function.
b) Press “METRONOME/TEMPO button again to exit the metronome function.

11
Tempo
a) Hold “METRONOME/TEMPO” button (button indicator light will flash) to start tempo
mode.
b) Press “-“ or “+” buttons to change the tempo speed. Adjusting range: 20-280 bpm.
(Note: restarting the piano will restore the default tempo value)
12 - FUNCTION CONTROL
Please check FUNCTION ON KEYS sticker delivered with the user manual. You can choose
whether to stick it on the product or not.
a) Press “FUNCTION” button (button indicator light will flash). Within 6 seconds, press the
function key on the keyboard to select the corresponding function.
b) Press “FUNCTION” button again (button indicator light will stop flashing) to exit the
corresponding function.
1 - Reverb effect
a) Press “FUNCTION” button (the button indicator light will flash), press “REVERB
ON/OFF” keys on keyboard within 6 seconds to start REVERB mode.
b) Press “FUNCTION” button (the button indicator light will flash), press “REVERB
ON/OFF” keys on keyboard within 6 seconds to exit REVERB mode.
c) Use “Reverb level” under “MENU” function to adjust the Reverb level.
2 - Chorus effect
a) Press “FUNCTION” button (the button indicator light will flash), press “CHORUS
ON/OFF” keys on keyboard within 6 seconds to start CHORUS mode.
b) Press “FUNCTION” button (the button indicator light will flash), press “CHORUS
ON/OFF” keys on keyboard within 6 seconds to exit CHORUS mode.
c) Use “Chorus level” under “MENU” function to adjust the Chorus level.

12
3 - Dual voice
a) Press “FUNCTION” button (the button indicator light will flash), press “DUAL VOICE”
keys on keyboard within 6 seconds to start DUAL VOICE mode.
b) Press “FUNCTION” button (the button indicator light will flash), press “DUAL VOICE”
keys on keyboard within 6 seconds to exit DUAL VOICE mode.
How to use Dual voice function
a) Start tone mode at first and select an instrument as main tone.
b) Press “DUAL VOICE ON/OFF” key to select second dual voice tone. Default second
tone is 049 STRINGS2.
c) Use “-“ or “+” buttons or “NUMBER KEYS” TO SELECT AN INSTRUMENT AS DUAL
VOICE TONE
d) Enter “Balance” option under “MENU” to adjust the level between both tones.
4 – Keyboard Split function
a) Press “FUNCTION button (the indicator light will flash), within 6 seconds press “SPLIT
ON/OFF” keys on keyboard to activate the SPLIT function mode.
b) Press “FUNCTION” button (the indicator light will flash), within 6 seconds press “SPLIT
ON/OFF” keys on keyboard to stop the SPLIT function mode.
How to use keyboard SPLIT function
a) Start tone mode at fist and select an instrument as main tone
b) Press “SPLIT ON/OFF” key to select keyboard split. Default 2nd tone is 049 STRINGS2
c) Use “-“ “+” buttons or “NUMBER KEY” to select an instrument as split tone.
d) Enter “MENU” function and choose “SPLIT NOTE” to adjust the split note position.
5 – Keyboard Percussion function
a) Press “FUNCTION” button (the indicator light will flash), within 6 seconds press
“PERCUSSION ON/OFF” keys on keyboard to start percussion mode.
b) Press “FUNCTION” button (the indicator light will flash), within 6 seconds press
“PERCUSSION ON/OFF” keys on keyboard to stop percussion mode.

13
13 – TONE/RHYTHM MEMORY STORAGE
SETTING
a) Choose the desired “TONE/RHYTHM”, press
“FUNCTION” button (the indicator light will flash), press
any key between “M0-M3”, the setting will be stored, and
the screen will show “Save”.
b) Press the corresponding function keys between “R0-R3”
to recall the stored setting.
14 – BLUETOOTH FUNCTION
When the piano is ON, the Bluetooth port is enabled by default. Bluetooth PIN: 8888
15 – HEADPHONE JACKS
There are two headphone jacks located on the left
underside of the piano, allowing up to two pairs o
headphones to be connected simultaneously.
16 – PEDAL
The piano has three pedals – just like a grand piano.
• Soft pedal
Depressing this pedal soften the sound and reduces its volume.
• Sostenuto pedal
Depressing this pedal after pressing the keyboard and before releasing the key sustains
the sound of only the keys just played.
• Sustain pedal
Depressing this pedal sustains the sound even after removing your hands from the
keyboard,

14
TONE LIST

15

16
DEMO LIST

17
RHYTHM LIST

18

19
ASSEMBLY
Be sure that all parts are included before starting to assemble digital piano:
Side board (A): 2 pcs
Back board (B): 1 pcs
Pedal board (C): 1 pcs
M 6 x 25 screw (D): 4 pcs
M 4 x 15 screw (E): 6 pcs
M 6 x 17 plastic screw (F): 4 pcs
1. Fasten side board (A) and
Pedal board (C) with 4 Screws
(D) M 6 x 25
2. Fasten side board (A) and
back board (B) / pedal(C) with 6
Screws (E)
Place the piano on side board
(A), fasten the piano and stand
with 4 plastic screw (F)

20
Table of contents
Other oqan Musical Instrument manuals
Popular Musical Instrument manuals by other brands

Studio Logic
Studio Logic Numa Organ Operation manual

Stein Mayer
Stein Mayer DP-220 user manual

Allen Organ Company LLC
Allen Organ Company LLC MDS-75 user manual

Allen Organ Company LLC
Allen Organ Company LLC MDS-15 user manual

Stein Mayer
Stein Mayer DP 361 owner's manual

Galileo
Galileo Milano II owner's manual