EDUGEAR ONEBOOK 801 User manual

Owner’s Manual
Any misuse of the product will void the warranty.
Before using, please read these operating instructions carefully.
They contain important advice concerning the use and safety of your
tablet. Use it for its intended purpose in accordance with these
operating instructions.
www.edugear.com
801

Contents
Before You Start
Taking Care of Your Tablet
Your Tablet Tour
Windows 10 Quick Guide
Specifications
2
3
4
7
22

2
Before You Start
Make Sure You Have Everything
When you receive your tablet, unpack it carefully, and check to make sure you have all the
items listed below. For a pre-configured model you should have the following:
• One ONEBOOK™ 801 tablet
• Micro USB to USB Cable
• AC adapter with power cord
• User Manual
Once you have checked and confirmed that your tablet system is complete, read through
the following pages to learn about all of your tablet components.
Depending on the model you purchased, the actual appearance of your
tablet may vary from that shown in this manual.

Call: 888.505.8878 Online: edugear.com Email: support@edugear.com 3
Taking Care of Your Tablet
• DO NOT place near a fire or other sources of heat.
• DO NOT expose to magnetic fields.
• DO NOT expose to direct sunlight.
• DO NOT expose to rain or moisture.
• DO NOT place heavy objects on or apply heavy pressure to the tablet.
• DO NOT drop the tablet.

4
Your Tablet Tour
Over View
1. Default Camera
Oen for taking self-portraits as well as for video conferencing.
2. Computer Display
Computer display with LED backlight provides a bright visual output.
3. Magnetic Connector
4. Keyboard
Allows for easy character input.

Call: 888.505.8878 Online: edugear.com Email: support@edugear.com 5
Your Tablet Tour
Keyboard
Search for
Play / Pause
Stop
Prev
Next
Groove Music
Mail
Home
Mute
Volume Down
Volume Up
By pressing the Fn key and a specific hotkey at the same time it will
activate the corresponding function:

6
Your Tablet Tour
Left View
1. Headphone Jack
Standard 3.5mm headphone jack.
2. Micro USB 2.0 Port
Connect USB devices.
1. Power Button
Press to enter standby/wake up mode;
Press and hold to switch On/O the unit.
2. Volume +/- Button
Press to increase/decrease the volume.
Front View
1. Keyboard Connector
Connect keyboard here.
2. Micro SD Card Slot
Insert a Micro SD card (not supplied) here.
Bottom View

Call: 888.505.8878 Online: edugear.com Email: support@edugear.com 7
Windows 10 Quick Guide
What’s New
Windows 10 is full of new features and improvements. Take a look at the highlights!
Ready, Set, Start Menu
The Start menu is back—and it’s more personal, more organized, and more fun than
before.
Go to Start on the taskbar. You’ll find your most used apps on the le, the All apps
list, and shortcuts to other locations on your PC, like File Explorer and Settings.
Get Apps, Music, and More
The Store is a one-stop shop for music, videos, games, and apps.
Try out an app before you buy it, or pick a free one. Your Windows 10 apps will work on all
your Windows 10 devices.
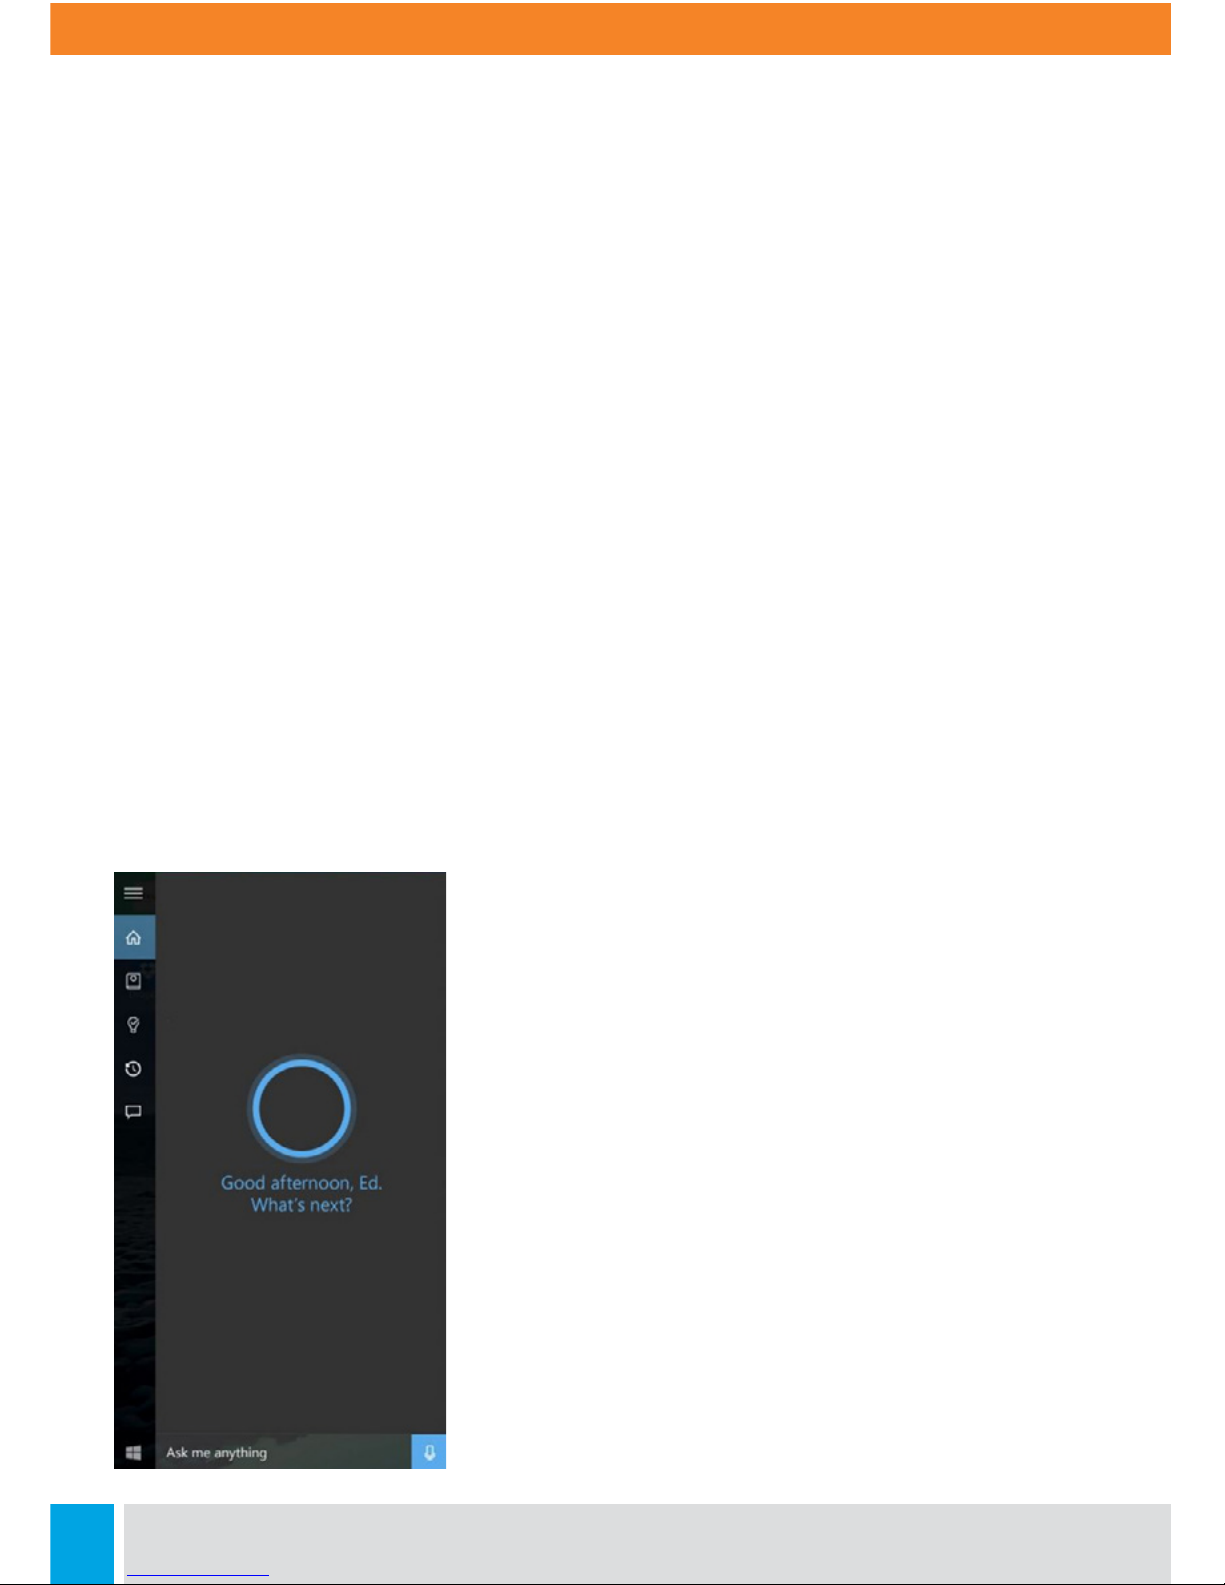
Cortana Can Get It Done
Cortana, your digital personal assistant, is right on your desktop. Ask Cortana to set up a
meeting or send an email to a friend—even find your files for you and tell you jokes. Select
the search box and type what you want Cortana to do, or just select the microphone to
talk with Cortana instead.
Rule the Web with Microsoft Edge
Microso Edge is the first browser that lets you take notes, write, doodle, and highlight
directly on webpages. Use the reading list to save your favorite articles for later, then
read them in reading view . Plus, Cortana is built in to Microso Edge to help you do
things faster and easier.
Where You Can Type, You Can Write
Microso Edge isn’t the only app you can write in. Use your tablet pen, finger, or your
mouse to write everywhere you could type before. Or just doodle in OneNote. We won’t
tell.

8
Sign In and Greet the Day with Windows Hello
If it’s available on your device, Windows Hello changes how you sign in—it uses your face
or fingerprint instead of a password. Go to Settings > Accounts > Sign-in options to set it
up.
All Your Photos In One Place
No more endless searching. The Photos app collects all your photos and videos in one
place. From your phone, and your PC, and OneDrive. Then, it organizes your memories
into albums for you to enjoy and share.
Search for Anything, Anywhere
Search your PC and the web from the taskbar to find help, apps, files, settings—you name
it. Your personal assistant Cortana will be your guide.
Cortana is your clever new personal assistant.
Cortana will help you find things on your PC, manage
your calendar, track packages, find files, chat with you,
and tell jokes. The more you use Cortana, the more
personalized your experience will be.
To get started, type a question in the search box on
the taskbar. Or select the microphone icon and talk to
Cortana. (Typing works for all types of PCs, but you need
a mic to talk.)

Call: 888.505.8878 Online: edugear.com Email: support@edugear.com 9
Here Are Some Things You Can Say to Cortana:
• How old are you?
• Tell me a joke.
• Show me the latest NBA scores.
• How many calories in a boiled egg?
• Put swimming on my calendar for tomorrow.
• Change my 3 PM event to 4.
• What’s happening this weekend?
Try This: Set a Reminder
One of the things Cortana can do for you is to give you reminders. For example, type or
say, “Remind me to call Alex at 2 PM.” Make the meeting recurring if you want to. The
reminder will appear at 2 PM, along with any info you’ve added to it.
Hey Cortana!
Set Cortana to hear you anytime you say “Hey Cortana.” Select the search box on the
taskbar to open Cortana home. Then select Notebook > Settings and turn on Let
Cortana respond when you say “Hey Cortana.”
Cortana is only available in certain countries/regions, and some Cortana features might
not be available everywhere. If Cortana isn’t available or is turned o, you can still use
search.
Sign In With a Microsoft Account
If you signed in with your Microso account when you set up Windows, hooray!
If not, that’s OK—you can sign in any time. And if you’re not quite sure what a Microso
account is, read on.
What it is? Have you ever used Outlook.com, Hotmail, Oice 365, OneDrive, Skype, Xbox,
or Windows? The email address and password you use for any of those services is your
Microso account. If not, it’s easy to create a free email account at Outlook.com and
make that your new Microso account.

10
Your Microso account gives you access to apps and games from the Windows Store, and
lets you see your settings and other stu across multiple Windows 10 devices. Read more
about the benefits of Microso account.
How to sign in:
1. Go to Start then select Settings > Accounts > Your account.
2. Select Sign in with a Microso account instead.
3. Follow the prompts to switch to a Microso account. You may need to verify your
identity by entering a confirmation code.
Your local account will switch to your Microso account. The next time you sign in to
Windows, use your Microso account name and password. Your apps and files will not be
aected.
If you find that you’re having issues signing in, or if you forgot the password for your
Microso account, the Microso account FAQ may have some helpful pointers

Call: 888.505.8878 Online: edugear.com Email: support@edugear.com 11
Set Up Accounts
If you plan to share your PC with other people, consider adding accounts for them. It’s
always nice to share, and that way your friends will have some personal space—including
separate files, browser favorites, and a desktop they can call their own.
Add an account:
1. Go to Start then select Settings > Accounts > Your account.
2. Select Family & other users (or Other users, if you’re using Windows 10 Enterprise).
3. Under Other users, select Add someone else to this PC.
Note:
1. If the person you’re adding has a Microso account, enter their email address, select
Next, and then select Finish. Aer they sign in, their online email, photos, files, and
settings will be waiting for them.
2. If the person you’re adding doesn’t have a Microso account, select Sign in without
a Microso account (it’s OK that it says “not recommended”), and then select Local
account. Set their user name, temporary password, and password hint, and then select
Next > Finish.

12
Get Online
To connect to a Wi-Fi network, select the Wi-Fi network icon on the taskbar.
Select the network you want > Connect, then enter the password and follow the
instructions. That’s it—you’re connected! This icon will appear in the taskbar.
If Wi-Fi isn’t available, or you just want the assurance of a wired connection, the Ethernet
cable is your friend—just connect your PC to your router or modem, and then do your
thing.
Get to Know Microsoft Edge
Welcome to the latest way to surf the web! Microso Edge gives you new ways to find
stu, read—and write—on the web, plus help from Cortana where you need it. To get
going, select Microso Edge on the taskbar.
Hub: All Your Stuff In One Place
Think of the Hub as the place where Microso Edge keeps the things you collect on
the web. Select Hub to view your favorites, reading list, browsing history, and current
downloads. Looking for your favorites? In the Hub, choose Favorites and then
select Import favorites.

Call: 888.505.8878 Online: edugear.com Email: support@edugear.com 13
Search Faster From the Address Bar
No need to go to a website to search for pictures of adorable penguins. Stay put and save
time by entering your search in the handy address bar. You’ll get search suggestions,
instant results from the web, and your browsing history right on the spot.
Find Your Files
To see all the files on your PC, select the File Explorer icon on the taskbar or press the
Windows logo key + E on your keyboard.
Get to Files Faster
When File Explorer opens, you’ll land in Quick access. This is place to find files you’ve
been working on and you oen use.
Here are a few ways to customize Quick access:
• Pin a folder there so it’s always close at hand. Right-click (or press and hold) the folder
and then select Pin to Quick access.
• Remove a file or folder from Quick access (like that list of birthday gis for Stan). Just
right-click it and select Remove from Quick access. It won’t show up there again, even if
you use it every day.
• Turn o recent files and frequent folders, so only your pinned folders show up in Quick
access. Select View > Options, then, under Privacy, clear the check boxes and select Apply.
(If you turn them back on later, any items you removed from Quick access—like Stan’s gi
list—might show up there again.)

14
Back Up and Restore Your Files
It’s always good to have a backup. Keep copies of your files on another drive in case
something happens to the originals.
Set up your backup:
Go to Start , then select Settings > Update & security > Backup > Add a drive and
choose an external drive or network location for your backups. All set. Every hour, we’ll
back up everything in your user folder (C:\Users\username). To change which files get
backed up or how oen backups happen, go to More options.
Restore your files:
If you’re missing an important file or folder, here’s how to get it back.
1. Search for Restore files from the taskbar and select Restore your files with File History.
2. Look for the file you need and then use the arrows to see all its versions.
3. When you find the version you want, select the Restore button to save it in its original
location. To save it in a dierent place, right-click (or press and hold) the Restore button,
select Restore to, and then choose a new location.
Make Start Full Screen
To make Start full screen and see everything in one view, go to Start , then Settings >
Personalization > Start, and then turn on Use Start full screen.

Call: 888.505.8878 Online: edugear.com Email: support@edugear.com 15
A New Look For Settings
Settings got a makeover—and dropped “PC” from its name.
Get to Settings by going to Start
> Settings. From there, browse the categories
or use search to find what you’re looking for,
including advanced options in Control Panel.
Most apps have their own settings—look for
this icon in the app.
Tip: Change common settings (like airplane mode and Wi-Fi) on the fly from action center
on the taskbar.
Personalize Your Lock Screen
To tweak your lock screen to your liking, go to Start , then Settings > Personalization >
Lock screen.
Try changing the background to a favorite
photo or slide show, or choose any
combination of detailed and quick status
notifications to show you upcoming calendar
events, social network updates, and other app
and system notifications.

16
Get Started with Themes
Go to Start , then Settings > Personalization > Themes and select Theme settings. Then
choose from a default theme, or select Get more themes online to download new themes
featuring cute critters, holiday cheer, and other smile-inducing options.
Change Desktop Background and Colors
Go to Start , then Settings > Personalization o choose a picture
worthy of gracing your desktop background, and to change the accent
color for Start, the taskbar, and other items.
The preview window gives you a sneak peek of your changes as you
make them.
In Background, select a picture, solid color, or create a slide show of
pictures.
See What’s On The Menu
The Start menu is back and better than ever! Just select the Start button on the
taskbar. Next, make it yours by pinning apps and programs, or moving and regrouping
tiles. If you need more space, resize the Start menu to make it bigger. Your apps and
programs—right at your fingertips .
Get to File Explorer, Settings, and other apps you use oen from the le side of the Start
menu. To see all your apps and programs, select All apps.

Call: 888.505.8878 Online: edugear.com Email: support@edugear.com 17
You Have the Power
Lock or sign out of your PC, switch to another account, or change
your account picture by selecting your name at the top of the Start
menu.
And when you’re ready to step away for a while, the power button is
right there at the bottom of the Start menu so you can put your PC to
sleep, restart it, or turn it o completely.
If you want to make other changes to how the Start menu looks, you can do so in Settings.
Open the Start menu , then go to Settings > Personalization > Start to change which
apps and folders appear in the Start menu.

18
Explore the Store
Windows 10 comes with great built-in apps including Skype and OneDrive, but that’s just
the beginning. The Store has tons more to help you stay in touch and get things done,
plus more games and entertainment than ever before—many free!
To find the Store, go to Start , and then select Store or select it from the taskbar.
(You’ll need an Internet connection and a Microso account.) Use Search to quickly find
what you’re looking for, or browse top charts, categories, and custom collections.
When you find something you want, choose it and then select Free if it’s free, the price
or Try, if it’s a paid app. Buy once, enjoy anywhere, on any compatible device—phone,
laptop, desktop, or Xbox.
Move Apps Around
To see several apps at the same time, grab the top of the window of one app and drag it to
the side or corner of the screen. You’ll see where the app will snap, along with other apps
that can automatically snap next to it. Select Task view on the taskbar to quickly switch
between open apps.
Group Apps Into Desktops
Group apps together for whatever you want by creating virtual desktops. Select Task view
on the taskbar, then New desktop, then open the apps you need.
To move apps between virtual desktops, select Task view, and then drag the app you
want from one desktop to another. Or create another virtual desktop by dragging an app
to New desktop.

Call: 888.505.8878 Online: edugear.com Email: support@edugear.com 19
Take Action Instantly
Action center puts important notifications from Windows and your apps right on the
taskbar, along with quick actions, which get you to your most-used settings and apps
instantly.
To see your notifications and quick actions, select the action center icon on the taskbar.
(You can also swipe in from the right edge of your screen, or press Windows logo key+A.)
Choose How Updates Are Installed
New features and a better running PC—get all of this and more when you download
updates to Windows.
And the great news is that you don’t have to do anything, because updates will be
automatically downloaded and installed whenever they’re available.
(Unless you’re on a metered connection, in which case the updates won’t download until
you opt to get them.)
But every now and then your PC may need to restart to install the updates. To prevent
those restarts from happening at the most inconvenient time:
1. Go to Start then select Settings
> Update & security > Windows
Update , and then select Advanced
options.
2. Under Choose how updates are
installed, use the drop-down menu
to choose an option:
• Schedule a restart
• Automatically restart
Table of contents
Other EDUGEAR Laptop manuals