EDUGEAR Onebook Flex360B4 User manual

Owner’s Manual
Any misuse of the product will void the warranty.
Before using, please read these operating instructions carefully.
They contain important advice concerning the use and safety of your
notebook. Please use it for its intended purpose in accordance with
these operating instructions.
www.edugear.com
FLEX 360B4

Contents
Before You Start
Taking Care of Your Notebook
Your Notebook Tour
Function Keys
Getting Started
Touchpad
Windows Interface
Setup and Connection
Battery
Windows Help and Troubleshooting
Specifications
FCC Declaration of Conformity
2
3
4
7
8
10
11
15
22
24
29
30

2
Before You Start
Make Sure You Have Everything
When you receive your notebook, unpack it carefully, and check to make sure you have all
the items listed below. For a pre-configured model you should have the following:
• One Flex 360B4 notebook
• AC adapter with power cord
• User Manual
Once you have checked and confirmed that your notebook system is complete, read
through the following pages to learn about all of your notebook components.
Depending on the model you purchased, the actual appearance of your
notebook may vary from that shown in this manual.

Call: 888.505.8878 Online: edugear.com Email: support@edugear.com 3
Taking Care of Your Notebook
• DO NOT place near fire or other sources of heat.
• DO NOT expose to magnetic fields.
• DO NOT expose to direct sunlight.
• DO NOT expose to rain or moisture.
• DO NOT place heavy objects on or apply heavy pressure to the computer.
• DO NOT drop the computer.
• Use of the notebook in an environment where the ambient temperature exceeds 35°C is
not recommended.
• There is a risk of explosion if the battery is replaced with an incorrect battery. Please
dispose of used batteries according to the instructions.
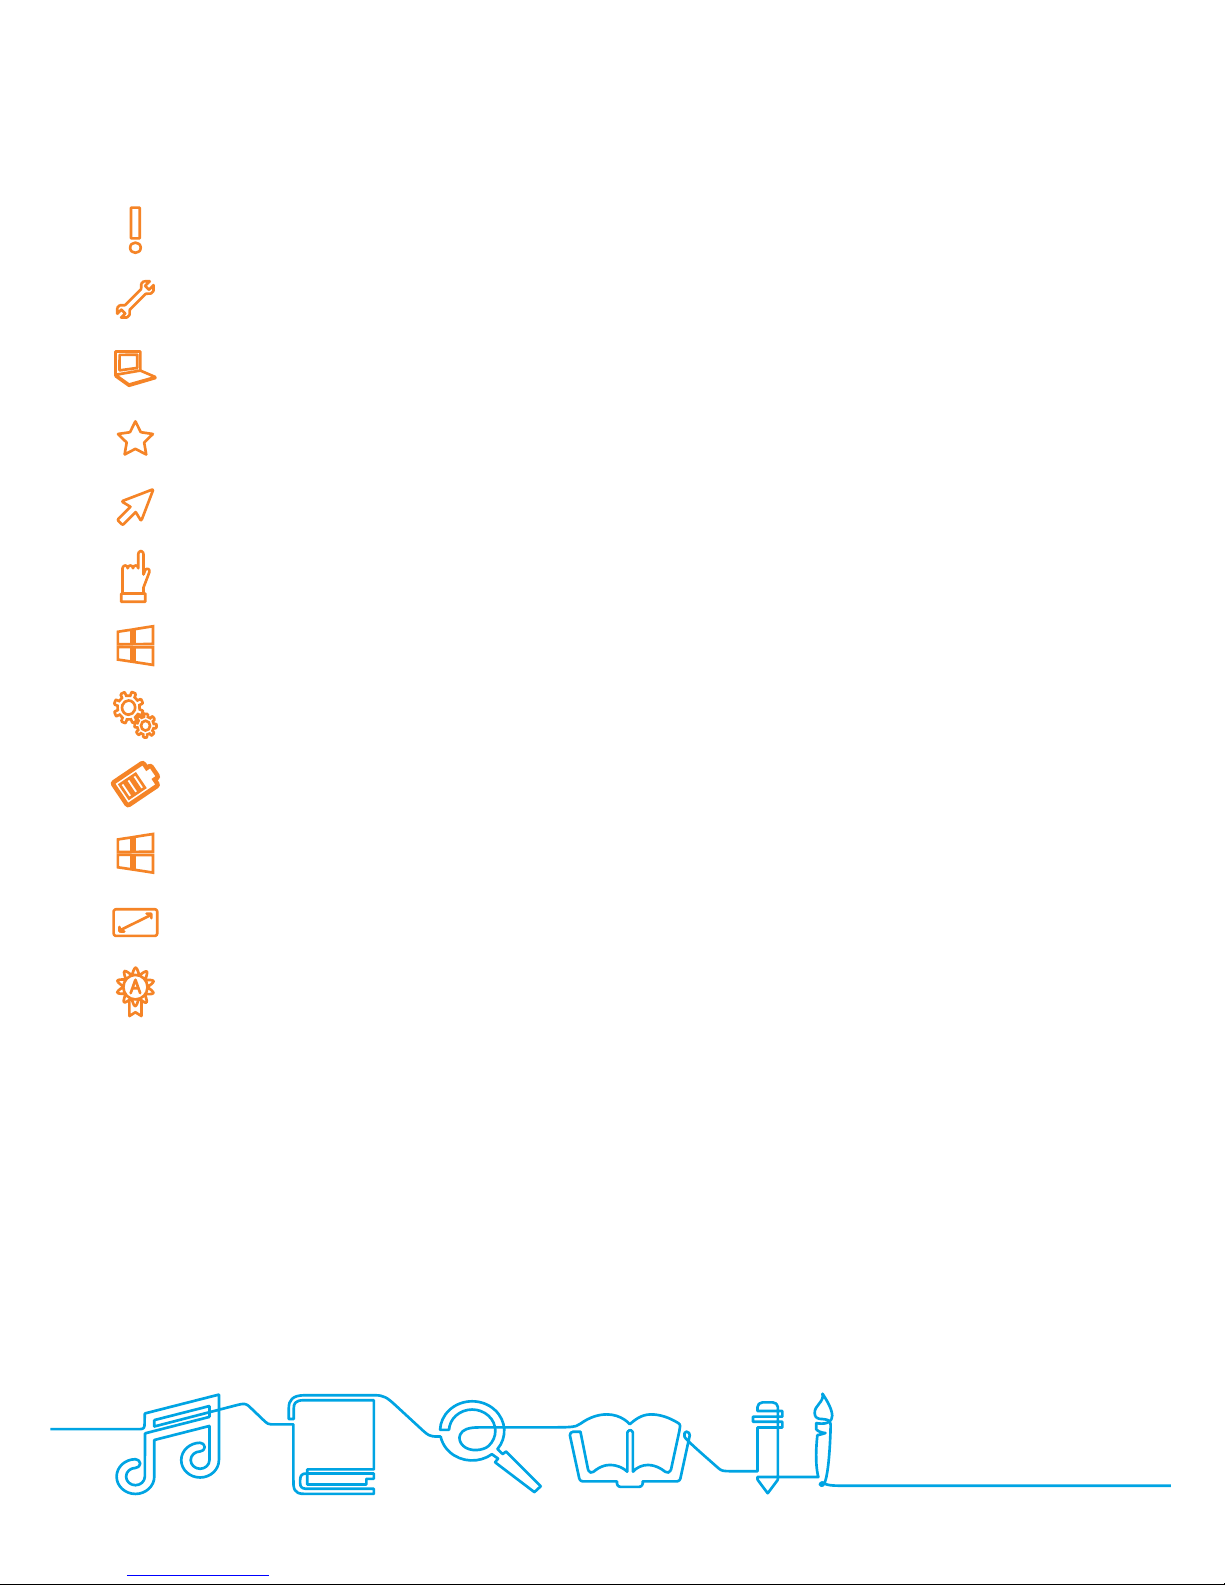
Folding the Keyboard
This laptop supports a swiveling 11.6-inch
touchscreen that can be used in several
dierent ways. Opening the device as a
standard laptop gives you access to the
keyboard and touchpad, while folding the
keyboard behind the screen turns it into a
tablet. You also can prop the notebook’s
screen up in stand mode, which is ideal for
viewing videos and presentations.

4
Your Notebook Tour
Front View
Now that you are done setting it up, let us show you around your new notebook.
1. Front-Facing Camera
Oen for taking self-portraits as well as for video conferencing.
2. Microphone
Used for sound and speech recording.
3. Touchscreen
The main display of your laptop. You can touch it with your fingers to control it.
4. Windows Key
Opens the Windows Start Menu at any time.
5. Touchpad
Allows you to control your system using finger gestures.
6. Caps-Lock
Lights up in blue when the caps lock is ON.

Call: 888.505.8878 Online: edugear.com Email: support@edugear.com 5
Your Notebook Tour
Right View
1. Speaker
The sound system has two speakers for
playing music, notification sounds, and
other audio data.
2. Stylus Hole
This is where you rest the provided stylus.
3. USB 2.0 Port
Plug your USB devices here.
4. Power button
Press it to power on/o your laptop.
5. Kensington Lock Slot
You can attach a Kensington lock here
to attach a cable from your laptop to a
stationary object such as table.
6. Stylus
Use it as an input device instead of your
fingers on the touchscreen.

6
Your Notebook Tour
Left View
1. Charging Indicator
It shows the charging status of your laptop.
It shows blue when the battery is fully
charged.
2. DC-in
Plug the adapter to charge the battery
here.
3. RJ-45 LAN Port
Plug your RJ-45 network cable to connect
your laptop to a wired network here.
4. USB 3.0 Port
Plug your USB devices here.
5. HDMI Port
Plug your HDMI-capable monitor here.
6. Micro SD Card Slot
Plug your micro SD card here.
7. Combo Audio Jack
Plug your 3.5mm headphone here.
8. Speaker
The sound system has two speakers for
playing music, notification sounds, and
other audio data.

Call: 888.505.8878 Online: edugear.com Email: support@edugear.com 7
Function Keys
Mute or unmute your system.
Decreases the volume level.
Increases the volume level.
Switches display output.
Decreases the display brightness.
Increases the display brightness.
Opens the Settings screen.
Play or Pause.
Push here to talk to Cortana.
+

8
Getting Started
Powering On/Off Your Notebook
If this is the first time you’re turning this computer on, connect the AC adapter and fully
charge the battery before pressing the power button.
Powering On
Press the power button for 1 to 2 seconds. You should see the blue power indicator light
turn on.
Powering Off
Save all your data before powering your computer o. To power o your system, follow
the steps below:
A. By Start Menu
1. Click the Windows
icon in the lower le
corner of the Desktop,
or press the Windows
key on the keyboard.
2. In the Start menu
click <Power>, then click
<Shut down>.
B. Using the Power Button
Press and hold the power button for at least 4 seconds and you will see an image with
instructions appear in the middle of the screen. Click and drag the image downward to
the bottom of the screen, or press the spacebar to power o the computer. If you don’t
want to power o the computer simply press any key other than the spacebar.

Call: 888.505.8878 Online: edugear.com Email: support@edugear.com 9
Putting Your Computer Into Sleep Mode
When you will be away from your computer for a short time, put the computer to sleep.
Do one of the following:
• Close the display panel
• Press the power button briefly one time.
• Open the Start menu and then select <Power> → <Sleep>.
Waking up Your Computer
Do one of the following:
A: Press the power button briefly one time.
B: Press any key on the keyboard, tap the touchpad, or open the lid of the notebook.

10
Touchpad
The most commonly used touchpad actions are gesture-based and provide shortcuts
for quickly opening and working with windows and files. However, the actual available
gestures are application dependent.
Tap: Tap once to single-click and twice to double-click the cursor.
Pinch: Move two fingers together or apart while touching the touchpad.
This is to zoom in and out on visual apps, such as pictures and maps.
Rotate: Place two fingers on the touchpad and then turn your hand.
his enables you to turn an object. (Note: Not all items can be rotated,
depending upon the app.)
Slide: Drag your finger across the touchpad. This can scroll through lists
and pages, and can also move an object or be used to draw or write,
depending upon your apps.
Swipe: Start from any edge of the touchpad, and then swipe toward the
center of the screen.

Call: 888.505.8878 Online: edugear.com Email: support@edugear.com 11
Windows Interface
Desktop and Virtual Desktop Experience
The Desktop screen is as shown below and natively provides a virtual desktop feature.
To launch the feature you can click the app icon as shown on the le
or just press Window key and and Tab key on your keyboard at the
same time.

12
Taskbar
The black bar on the bottom of the desktop is called Taskbar. It provides several key
features and they are:
• Start menu
• Search box
• App shortcuts area
• Notification area
Start Menu
To open the Start menu you can either click the Windows icon (also known as
the Start button) in the lower le of the screen or press the Windows key on the
lower le of the keyboard and the Start menu will appear as shown below.

Call: 888.505.8878 Online: edugear.com Email: support@edugear.com 13
Search - Cortana
When you select this box, a window will pop out as shown below.
This is the Cortana icon. Cortana is a new virtual assistant
built into your Windows 10. Click here to finish the setup
and you can control Cortana with either keyboard or voice
commands, and use it to perform intelligent searches and
more.
Aer you setup the Cortana settings, the search box will look like:

14
App Shortcuts Area
In this area, you can put the shortcuts of your frequently used apps.
Notification Area
The right part of the taskbar holds several icons that show you the status of your laptop,
as shown below.
Click here to show more status icons
Shows you the current battery status
Shows you the status of your wireless network connection
Click here to show the unread notifications

Call: 888.505.8878 Online: edugear.com Email: support@edugear.com 15
Setup and Connection
Settings Screen
To access to the Settings screen:
1. Click the Windows icon in the lower le corner of the
Desktop, or press the Windows key on the keyboard.
2. Select <Settings>. This will open the Settings screen,
as shown below:
Settings Screen

16
1. Open the Start menu and click <Settings >
2. Click <Update & security>
3. Select <Activate>
4. Follow the instructions to activate your windows
Setup Your Microsoft Account
To share files or settings with other devices running Windows 10, you need to setup a
Microso Account. Furthermore, if you want to download or purchase apps from the
Microso Store, a Microso Account is required.
To setup your Microso account:
Windows Activation
To use all features of your Windows laptop, you may need to activate your Windows
system. Follow the following steps to register and activate your Windows.
1. Open the Settings screen and select <Accounts>
2. Select <Your account >
3. Select <Sign in with a Microso account instead>
4. Follow the instruction to register your account information.

Call: 888.505.8878 Online: edugear.com Email: support@edugear.com 17
Replacing Desktop With Start Screen
If you are more familiar with the interface similar to the Start screen introduced in
Windows 8 series, you can set your laptop to show the Start screen instead of the Desktop
every time when you power on your laptop. To do so, do the following steps:
1. Open the Settings screen.
2. Select <Personalization>
3. In the Personalization screen, enable the option <Use
Start full screen>
Aer these steps, you will see the Start screen every time you turn on your laptop, as
shown below:

18
Pinning an App to the Start Menu or Taskbar
To add an app:
1. Open the Start menu and select <All Apps>
2. Right-click on the app that you want to appear on your
Start menu or taskbar, and an option menu appears.
3. Click <Pin to Start> or <Pin to taskbar> to add the app to
your Start menu or taskbar.
Removing an App From the Start Menu or Taskbar
To remove an app:
1. Right click the app that you want to remove from your Start menu or taskbar.
2. Click <Unpin from Start> or <Unpin from taskbar> to remove it from your Start menu
or taskbar.
Enabling Wireless Connection
1. Open Settings menu and select <Network & Internet>.
2. Select <Wi-Fi> and set the function
to ON, as shown:
3. If Wifi doesn’t work, it may be because Airplane mode is
enabled. Look at the right side notification area of the taskbar.
If an airplane icon is displayed, press Fn+F10 to disable Airplane
mode.

Call: 888.505.8878 Online: edugear.com Email: support@edugear.com 19
Connecting to a Wireless LAN
Once the wireless has been enabled, the computer automatically scans for available
wireless networks and displays them in the wireless LAN network list. To connect to your
desired wireless network, click the network’s name in the list, and then click Connect.
Some networks require a network security key or password for connection. If
necessary, ask the network administrator or the Internet service provider (ISP) for the
required information.
Micro SD Card Slot
You can utilize your micro SD cards as removable disks and conveniently exchange data
with digital devices such as a digital camera, digital camcorder, MP3, etc.
To utilize your micro SD card:
1. Insert the micro SD card into the card slot.
2. Follow the message on the screen, and choose to open and view files.
3. A Windows Explorer window will open and show all the of the files and folders on the
micro SD card. You can then save, move or delete data to and from the card as you would
with any other storage device.
To remove your memory card:
1. Press the card and release. The card will pop up.
2. Pull the card out by holding the end of the card.
This manual suits for next models
1
Table of contents
Other EDUGEAR Laptop manuals