EEPC NC2 Series User manual

INSTRUCTION MANUAL
Aluminium radiator with
special ceramic core
NC2 - EEPC
READ THESE INSTRUCTIONS CAREFULLY BEFORE USING
THIS DEVICE FOR THE FIRST TIME.
ATTENTION: to avoid overheating, do not cover the appliance.

2

3
CONTENTS
EEPC APP .................................................................................................... 4
PACK CONTENTS .......................................................................................... 5
SAFETY ADVICE .........................................................................................6-7
I / SPECIFICATIONS ....................................................................................... 8
II / HOW TO INSTALL THE DEVICE ............................................................... 9
WALL-MOUNTED USE ................................................................................... 9
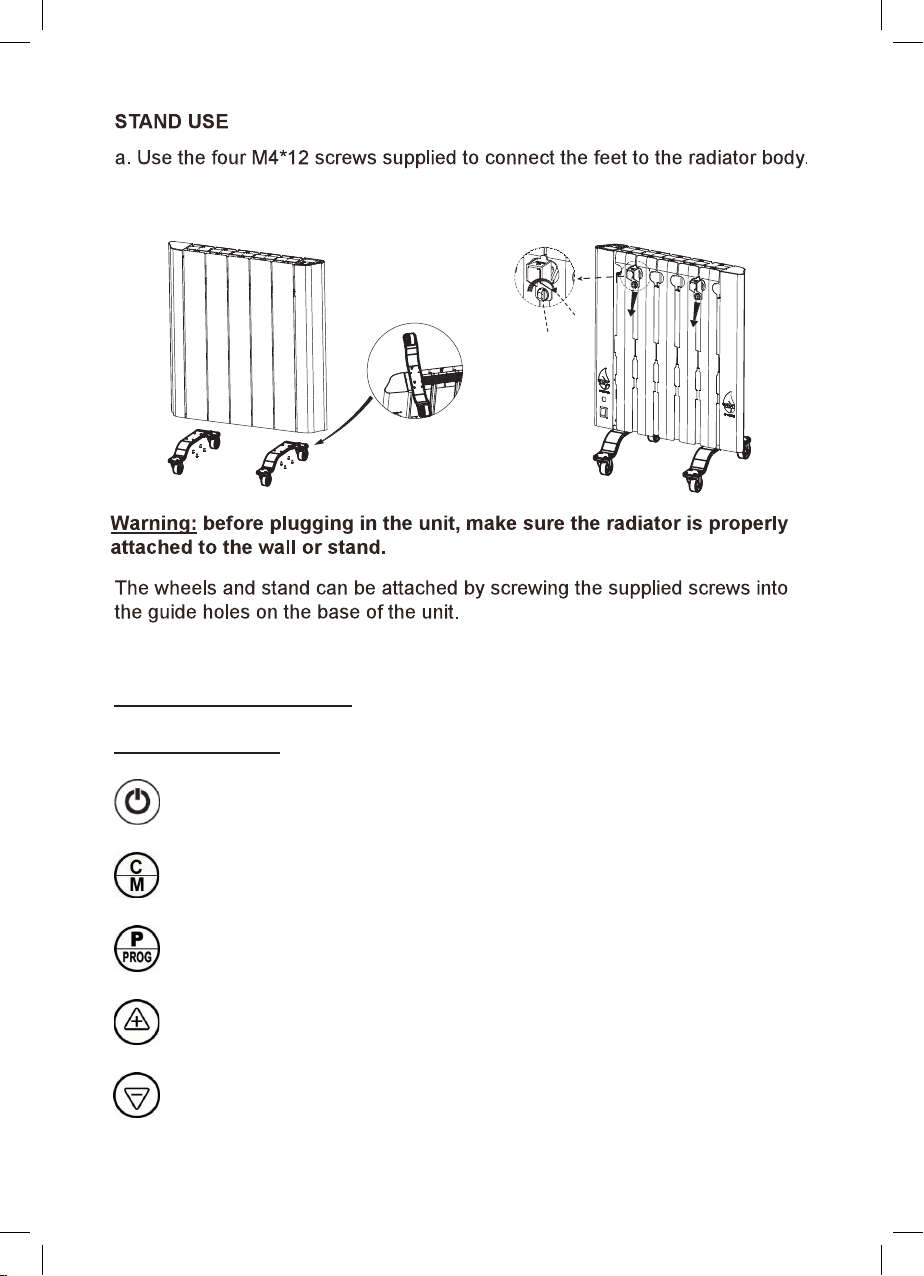
STAND USE ............................................................................. 10
III / DESCRIPTION ........................................................................................ 10
1 / Panel controls ........................................................................................... 10
2 / LCD display .......................................................................... 11
IV / Operating instructions........................................................................... 12
Turning on the radiator ............................................................. 12
Unlocking the Radiator .............................................................. 12
Setting the time and date .......................................................... 12
Free Operating Mode ..................................................................................... 12
Timer Mode ............................................................................... 13
Programming your radiator ............................................................................ 13
Program Mode ............................................................................................... 14
Changing the default Comfort and Eco temperature settings ....................... 14
Preset programs P1-P9 ............................................................ 14
Fine-tuning P1-P9 .......................................................................................... 15
Weekly Program Schedule Mode .................................................................. 15
The 9 preset programs .................................................................................. 16
V / OPEN WINDOW FUNCTION ................................................................... 17
VI / MAINTENANCE ...................................................................................... 18
VII / WARRANTY ........................................................................................... 18
Model identier: NC2-4WAUKP-FM............................................................. 19
Model identier: NC2-5HWAUKP-FM.......................................................... 20
Model identier: NC2-9WAUKP-FM............................................................. 21
Model identier: NC2-10HWAUKP-FM........................................................ 22
YOUR NOTES ............................................................................................... 24

4
EEPC App
Control your EEPC radiators
whenever and wherever you are.
With the new EEPC App,
the operation of your radiators
becomes child’s play!
Get the App here:

5
BOX CONTENTS:
• Aluminium Radiator
• Wall mount
• Floor stand with wheels
• Screws and wall plugs
• Instruction manual
International registered models, concept and trademark (CDR 2850180, i-depot 068637, 1277238, ....)

6
SAFETY ADVICE
READ THIS NOTICE CAREFULLY BEFORE
OPERATING THE APPLIANCE.
• This appliance can be used by children aged from 8 years and above
and persons with reduced physical, sensory or mental capabilities or
lack of experience and knowledge if they have been given supervision
or instruction con- cerning use of the appliance in a safe way and
understand the hazards involved. Children should not be allowed to play
with the appliance. Cleaning and maintenance of the appliance should
not be carried out by children without adult supervision.
• Children of less than 3 years should not be allowed near the device
except for when under continuous supervision.
• Children aged between 3 and 8 should not switch the appliance on or off
unless it has been it has been placed or installed in its intended normal
operating position and they have been given supervision or instruction
concerning use of the appliance in a safe way and understand the
hazards involved. Children aged between 3 and 8 should not be allowed
to plug in, congure or clean the appliance or to perform maintenance
tasks on it.
• CAUTION: some parts of this product can become very hot and
cause burns. Particular attention should be paid when children and
vulnerable people are present.
• Connecting the radiator to an outlet other than a standard UK 3 pin
socket MUST be entrusted to a qualied electrician.
• Make sure that the voltage indicated on the nameplate of the appliance
corresponds to that of your electrical installation. If this is not the case,
contact your dealer and do not do not connect the appliance.
• Regularly check the condition of the power cable. Do not use if the
power cable, plug or appliance is damaged.
• The device should not be placed underneath a power outlet.

7
• The power cable should never be in contact with hot parts of the device.
• CAUTION: to prevent overheating, do not cover the heater.
• Never immerse the appliance in water or other liquids.
• Keep the appliance at a minimum distance of one metre from ammable
objects such as curtains, textiles, etc.
• To satisfy RF exposure requirements, a separation distance of 20 cm
or more should be maintained between this device and persons during
device operation. To ensure compliance, operations at closer than this
distance is not recommended. The antenna used for this transmitter must
not be co-located in conjunction with any other antenna or transmitter.
• Do not clean the unit with abrasive chemicals.
• To avoid the risk of electric shock or other harm, do not poke metal
objects or your ngers into the unit.
• Do not use accessories other than those supplied or recommended by
the manufacturer. This can be dangerous and may damage the device.
• Attempting to repair the appliance yourself will render your guarantee
invalid. As with any electrical appliance, it must be repaired by a
qualied person. If the power cable is damaged, it must be replaced
by the manufacturer, a service agent of the manufacturer, or a similarly
qualied person in order to avoid danger.
• Any repairs requiring the opening of the radiator should be carried out by
the manufacturer or its distribution network.
• It is normal for new radiators to emit an odour for a day or two upon
rst use.
THE MANUFACTURER IS NOT RESPONSIBLE
FOR THE MISUSE OF THE SUPPLIED APPLIANCE.
PLEASE KEEP THESE INSTRUCTIONS FOR
FUTURE REFERENCE.

8
I / SPECIFICATIONS
• Digital LCD display
• Temperature control by digital display
• Clock
• Weekly schedule
• 2 modes:
○Manual
○Automatic with weekly preset
- 24h programmer, custom setting.
- 9 different daily presets
• Frost protection function (maintains a temperature of 7°C)
Model Power Voltage Number of
ns Insulation class
NC2-4WAUKP-FM 600W AC 230 50Hz 4 Class II
NC2-5HWAUKP-FM 1000W AC 230 50Hz 5 Class II
NC2-9WAUKP-FM 1500W AC 230 50Hz 9 Class II
NC2-10HWAUKP-FM 2000W AC 230 50Hz 10 Class II
FOR INDOOR USE ONLY
Live: brown
Neutral: blue
Avoid danger: If you have any doubts when installing this radiator, please
consult a qualied electrician.

9
≥300mm
≥300mm≥300mm
≥100mm
II / HOW TO INSTALL THE DEVICE
WALL-MOUNTED USE
Make sure that the the correct distance
(indicated on the right) from walls
and objects is respected.
10
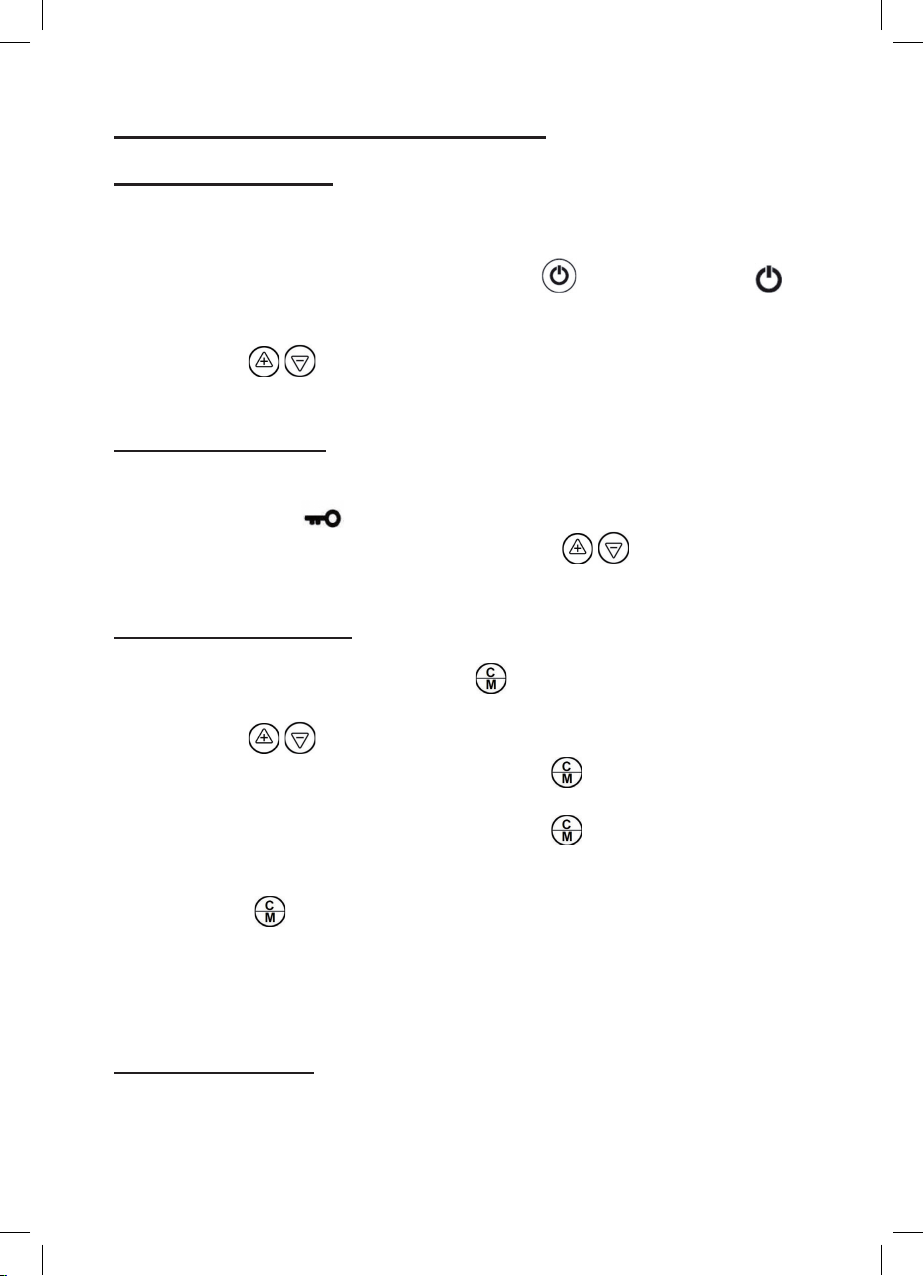
III / DESCRIPTION
1 / Panel controls
- on / off
- time, day and temperature settings
- mode selection and programs
- increase the selected criteria
- Decrease the selected criteria
b. Disassemble the hanging sheathing: twist the knob clockwise, then take
down the , refer to below picture.sheathing
Knob
Hanging
sheathing

11
2 / LCD display
1- hour
2- day
3- program number
4- programmed temperature
5- comfort mode
6- economic mode
7- frost mode
8- sleep mode
9- locking radiator
10 - heating on
11 - select program
12 - timer
13 - 24 hour display
14 - time scale
15 - wi
12
IV / OPERATING INSTRUCTIONS
Turning on the radiator
1. Plug in and turn on the radiator using the switch on the underside of the
appliance, where the power cable enters the radiator.
2. Next to the display panel: briey press button until the on/off icon
disappears from under the clock part of the display. Fr will appear in the
middle of the display: the radiator is now in Free Operating Mode.
3. Use buttons to select the desired temperature.
Unlocking the radiator
1. The radiator will automatically lock if left unattended for 30 seconds. When
locked, a key icon will be visible in the middle left pane of the display.
2. To unlock the radiator at any time press buttons simultaneously.
Setting the time and date
1. In Free Operating Mode, press button .
2. The time digits in the top left of the display will start to ash.
3. Use buttons to select the desired hour.
4. While the time digits are ashing, press button again to cycle to the
minutes and repeat process.
5. While the time digits are ashing, press button again to cycle through
to the day settings. These are displayed under the time: Monday to Sunday
are represented as 1-7.
6. Press button again to conrm.
Please note: if, during this process, no button is pressed within 5 seconds, the
process will be automatically restarted.
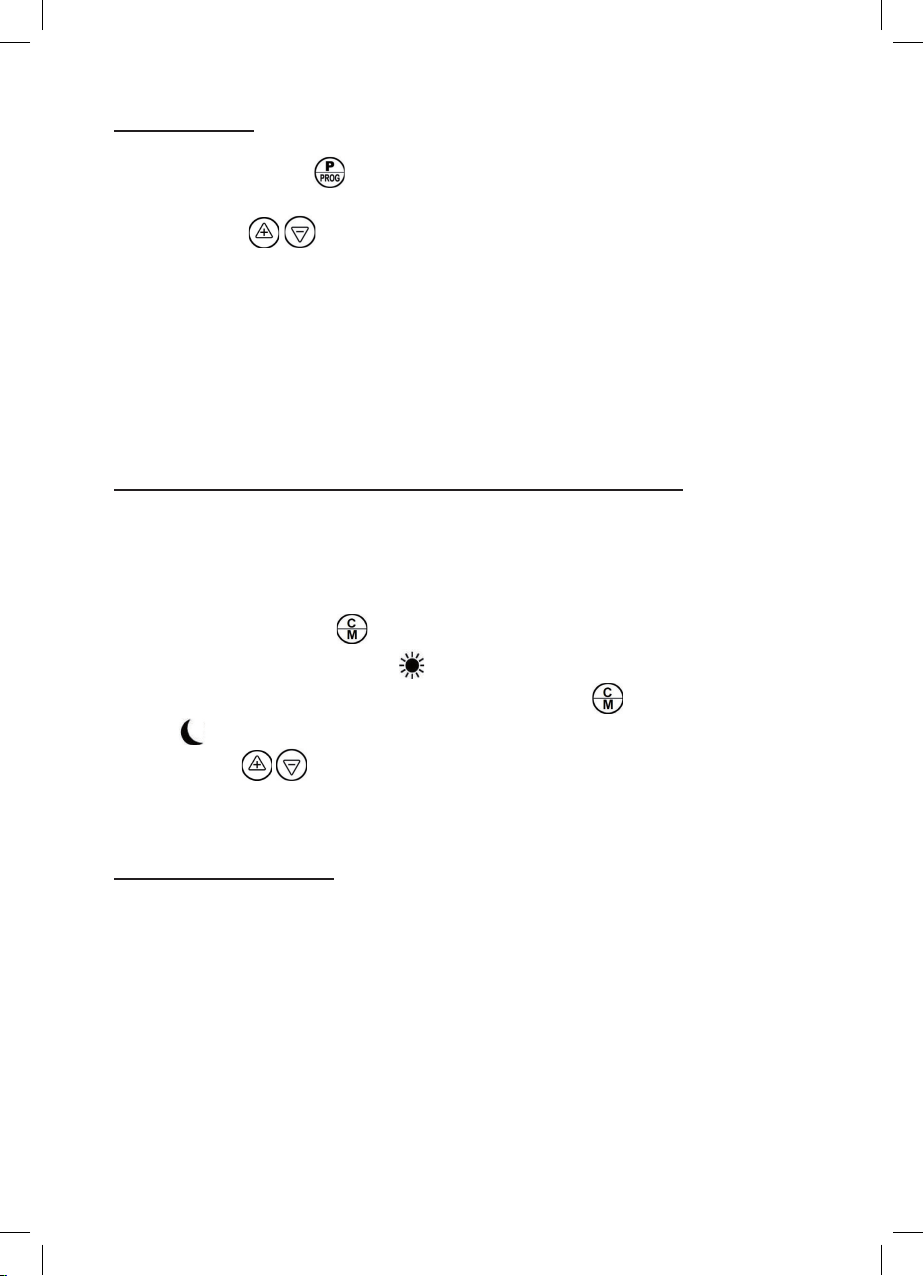
Free Operating Mode
Free Operating Mode is the simplest way to get started with your radiator and
allows you to set a temperature that is controlled by the thermostat.

13
1. Press and hold button until the on/off icon disappears from under
the clock part of the display.
2. Fr will appear in the middle of the display.
3. Use buttons to select the desired temperature.
Timer Mode
Timer Mode is convenient if you want to control your energy usage or program
the radiator to shut itself off after a certain time (programmable in increments
of 30 minutes).
1. Press and hold button until the clock icon appears in the middle of the
display.
2. Once the clock appears, use buttons to select the amount of time
you would like the radiator to stay on for. After the display has stopped
ashing, a clock icon will appear.
3. The radiator will switch off when the counter reaches zero.
4. To exit or congure Timer Mode, press and hold button for 3 seconds.
Please note: the radiator may rst need to be unlocked (see ‘Unlocking the
radiator’ above).
Programming your radiator
It is possible to program your radiator to work on a daily (24-hours) program
cycle or even on a weekly program schedule. All schedules can be ne-tuned
to suit your needs.
There are two main heating settings: Comfort (Sun icon) and Eco
(Moon icon). The default factory settings are 22° Celsius for Comfort
temperature and 17° Celsius for Eco temperature.
There is a third default setting, Frost Watch (Ice icon), which keeps the
temperature at 7° Celsius.
It is possible to modify the Comfort and Eco default settings (see ‘Changing
the default Comfort and Eco temperature settings’ below). The Frost Watch 7°
setting cannot be modied.
14
Program Mode
1. Briey press button : the middle panel of the display will start ashing
slowly.
2. Use buttons to cycle through the available modes: Fr (Free
Operating Mode), P1-P9 (Program Mode for one of the preset programs P1-
P9), AU (Weekly Program Schedule Mode), FO (Open Window Mode).
3. Select one of P1-P9 and wait until the middle panel has stopped ashing
slowly: the selected preset program is now activated.
Please note: the radiator may rst need to be unlocked (see ‘Unlocking the
radiator’ above).
Changing the default Comfort and Eco temperature settings
When the radiator is in Program Mode (P1-P9) or Weekly Program Schedule
Mode (AU), you can change the default Comfort and Eco temperature settings
as follows:
1. Press and hold button a few seconds until the temperature indicator
ashes with the Comfort icon highlighted.
2. For changing Eco temperature, briey press button again so that Eco
icon is highlighted.
3. Use buttons to select the desired temperature setting for Comfort or Eco.
4. Wait until the temperature indicator has stopped ashing: the selected
Comfort or Eco temperature is now set.
Preset programs P1-P9
The radiator can be programmed to provide a customized 24-hour heating
schedule. To keep things simple, the radiator comes with 9 preset programs
to choose from (see ‘THE 9 PRESET PROGRAMS’ below).
The time is indicated on the display in hourly increments: from midnight to
midnight (0-24), one bar per hour. A full bar represents an hour of Comfort
temperature, a half bar represents an hour of Eco temperature and an empty
(blank) bar represents an hour of Frost Watch temperature. A ashing bar
indicates the present hour.
The preset programs are provided to make things easier for you. However,
these programs remain 100% customizable.
15
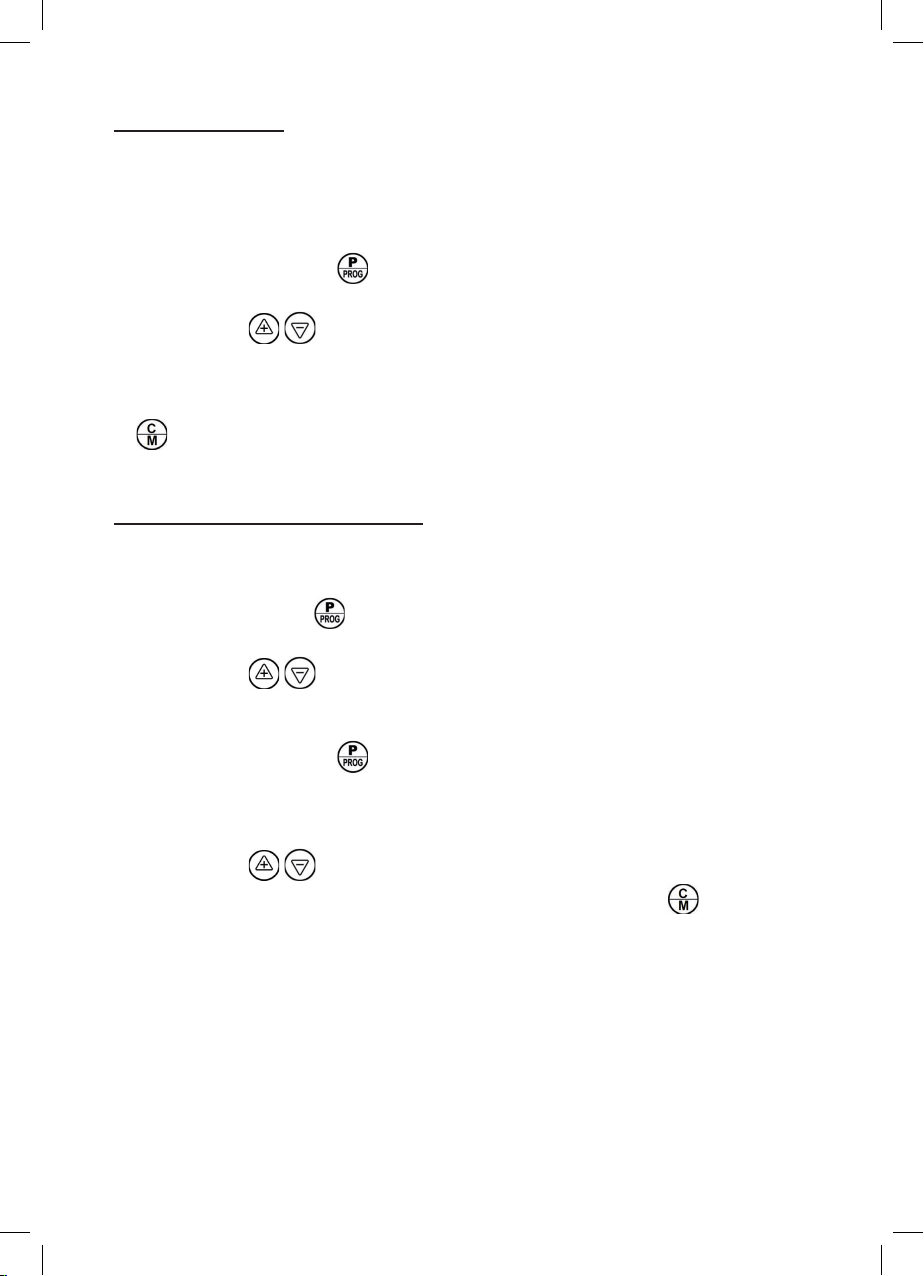
Fine-tuning P1-P9
For each hour of the day (0-24) in a program (P1-P9), you can modify the
heating mode: Comfort, Eco or Frost Watch. To ne-tune one of P1-P9,
proceed as follows:
1. Activate the program you wish to ne-tune (see ‘Program Mode’ above).
2. Press and hold button until the time digits in the top left of the display
show 00:00.
3. Use buttons to cycle through the hours and select the hour to ne-
tune: the selected hour will be displayed in the time digits (00:00 – 23:00)
and ash in the program time bar (0-24).
4. For each selected hour that you wish to change the mode for: use button
to cycle to either Comfort, Eco or Frost Watch mode.
Weekly Program Schedule Mode
The weekly program schedule allows you to program the radiator, taking into
account any differences in your weekday and weekend habits:
1. Briey press button : the middle panel of the display will start ashing
slowly.
2. Use buttons to cycle through the available modes, select AU,
and wait until the middle panel has stopped ashing slowly: the Weekly
Program Schedule Mode is now activated.
3. Press and hold button until the time digits in the top left of the display
disappear and the middle panel of the display starts ashing quickly.
4. The number 1 (indicating Monday) should be visible in the middle box on
the left-hand side of the display.
5. Use buttons to scroll through the preset programs from P1 to P9.
When the desired program has been selected, press button to cycle
through to Tuesday (number 2). Repeat until you have a schedule for the
whole week: Monday (1) till Sunday (7).

16
THE 9 PRESET PROGRAMS
17
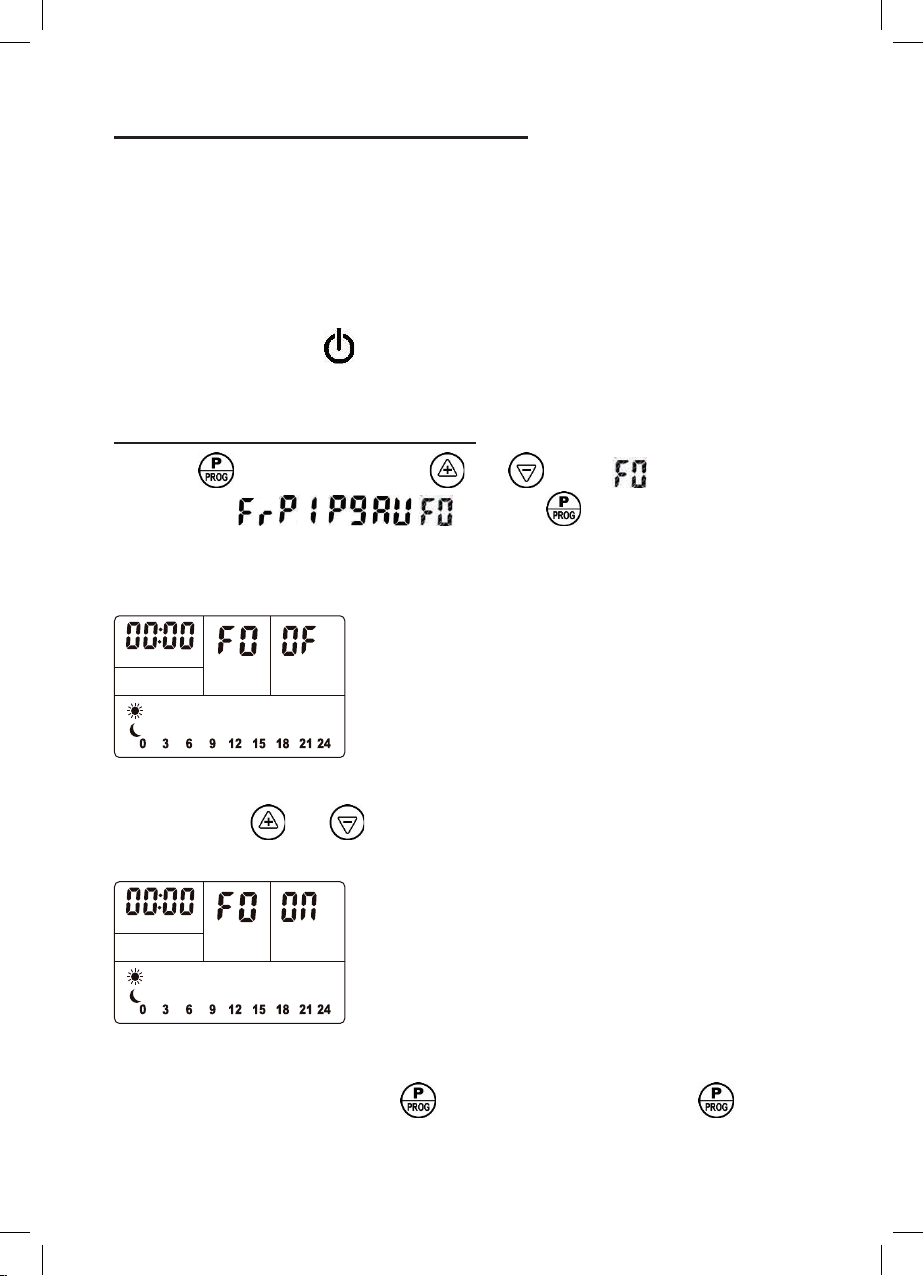
V / OPEN WINDOW FUNCTION:
Your radiator has an Open Window function. If you open a window widely in
the space where the radiator is located, a sensor will detect the sharp drop in
temperature.
The radiator switches out automatically and the symbol “FO”, ickers on your screen.
The radiator is re-ignited automatically after 10 minutes.
However you can manually relight the radiator before the 10 minutes end by
pressing on the button “ ” of the radiator.
The symbol “FO” disappears then of the screen.
Activating the Open Window function:
1- Press once. Using the keys and , select from the list of
abbreviations - ~ - - and press once to conrm your
choice.
2- Once in the Open Window program, the following screen appears:
1
The symbol OF indicates "function not in operation".
Using the keys and , change OF into ON, (ON meaning “function is in
operation”)
1
The Open Window function is now selected.
To conrm your selection, press once. If you do not press the button,
the activation of the function will be conrmed automatically after 5 seconds.

18
VI / MAINTENANCE:
Switching off the device
Place the function button on the back of the unit in the "OFF" position.
Clean with a damp cloth.
Caution: do not use abrasive cleaning products as these may damage the
appliance.
Clean the device at least once a year with a vacuum cleaner to remove any
accumulated dust. Never immerse the appliance in water or other liquids.
VII / WARRANTY:
This product has a warranty of two years (starting from the date of purchase) on
the electrical parts and 10 years on the special ceramic heating core and aluminium
casing. The warranty covers failures and malfunctions of the device through a
use consistent with the intended use and the information in the user manual.
To be covered under the warranty, original proof of purchase is required
(receipt or invoice) and the product must be complete with all its accessories.
This warranty clause does not cover damage resulting from normal wear, lack
of maintenance, negligence, faulty mounting or improper use (shocks, non-
compliance with recommendations of power, storage, conditions of use ...).
Also excluded from the warranty are any adverse consequences arising from
the use of non-original accessories or spare parts or from the removal or
modication of the appliance.
FOR MORE INFORMATION:
www.eepc.international
Appliances bearing the symbol shown here may not be disposed
of in domestic rubbish. You are required to dispose of old electrical
and electronic appliances like this separately.
Please visit www.recycle-more.co.uk or www.recyclenow.co.uk for
access to information about the recycling of electrical items.
Please visit www.weeeireland.ie for access to information about
the recycling of electrical items purchased in Ireland.
The WEEE directive, introduced in August 2006, states that all
electrical items must be recycled, rather than taken to landll.
Please arrange to take this appliance to your local Civic Amenity
site for recycling, once it has reached the end of its life.
19
6
Pagestodefine
-FILLOUTeachofthe4followingEcoDirectivetables,oneperradiatortype:NC2-4WAUKP-FM, NC2-5HWAUKP-FM, NC2-9WAUKP-FM andNC2-
10HWAUKP-FM.
-INSERTall4ofthetablessomewhereintheinstructionmanual,updatetheCONTENTStable.
Model identifier(s): NC2-4WAUKP-FM
Item
Symbol
Value
Unit
Item
Unit
Heat output
Type of heat input, for electric storage local space heaters only (select one)
Nominal heat output
Pnom
0,6
kW
manual heat charge control, with integrated thermostat
No
Minimum heat output (indicative)
Pmin
0,60
kW
manual heat charge control with room and/or outdoor temperature feedback
No
Maximum continuous heat output
Pmax,c
0,6
kW
electronic heat charge control with room and/or outdoor temperature
feedback
No
Auxiliary electricity
consumption
fan assisted heat output
No
At nominal heat output
elmax
N/A
kW
Type of heat output/room temperature control (select one)
At minimum heat output
elmin
N/A
kW
single stage heat output and no room temperature control
No
In standby mode
elSB
0,002
kW
Two or more manual stages, no room temperature control
No
with mechanic thermostat room temperature control
No
with electronic room temperature control
No
electronic room temperature control plus day timer
No
electronic room temperature control plus week timer
No
Other control options (multiple selections possible)
room temperature control, with presence detection
No
room temperature control, with open window detection
No
with distance control option
No
with adaptive start control
No
with working time limitation
No
with black bulb sensor
No
Contact details
EEPC 8210 BE

20
7
Model identifier(s): NC2-5HWAUKP-FM
Item
Symbol
Value
Unit
Item
Unit
Heat output
Type of heat input, for electric storage local space heaters only (select one)
Nominal heat output
Pnom
1,0
kW
manual heat charge control, with integrated thermostat
No
Minimum heat output (indicative)
Pmin
1,00
kW
manual heat charge control with room and/or outdoor temperature feedback
No
Maximum continuous heat output
Pmax,c
1,0
kW
electronic heat charge control with room and/or outdoor temperature
feedback
No
Auxiliary electricity
consumption
fan assisted heat output
No
At nominal heat output
elmax
N/A
kW
Type of heat output/room temperature control (select one)
At minimum heat output
elmin
N/A
kW
single stage heat output and no room temperature control
No
In standby mode
elSB
0,002
kW
Two or more manual stages, no room temperature control
No
with mechanic thermostat room temperature control
No
with electronic room temperature control
No
electronic room temperature control plus day timer
No
electronic room temperature control plus week timer
Yes
Other control options (multiple selections possible)
room temperature control, with presence detection
No
room temperature control, with open window detection
Yes
with distance control option
Yes
with adaptive start control
No
with working time limitation
No
with black bulb sensor
No
Contact details
EEPC 8210 BE
This manual suits for next models
4
Table of contents
Popular Heater manuals by other brands

Wacker Neuson
Wacker Neuson HI 110HD D Operator's manual

Jefferson Professional Tools & Equipment
Jefferson Professional Tools & Equipment INFERNO JEFHTSPC060 user manual

HeatPerformance
HeatPerformance Heated Underwear user guide

Trotec
Trotec IR 3050 operating manual

EMGA
EMGA MO-EL MAUI 840C Use and maintenance

Heatstore
Heatstore HS1500C operating instructions


