Silver 9300E User manual
Pattern numbers 341/ Pattern can be magnifled and mirrored/ Multiple sewing program/ Auto threader

SYMBOL INSTRUCTIONS
Raise needle Raise presser foot Lower presser foot

IMPORTANT SAFETY INSTRUCTIONS
When using an electrical appliance, basic safety should always be followed, including the
following:
Read all instructions before using this sewing machine.
-To reduce the risk of electric shock:
. An appliance should never be left unattended when plugged in.
2. Always unplug this appliance from the electric outlet immediately after using and before
cleaning.
3.
-To reduce the risk of burns, fire, electric shock, or injury to persons:
. Do not allow to be used as a toy. Close attention is necessary when this appliance is
used by or near children.
2. Use this appliance only for its intended use as described in this manual. Use only the
attachments recommended by the manufacturer as contained in this manual.
3. Never operate this appliance if it has a damaged cord or plug, if it is not working properly,
if it has been dropped or damaged, or dropped into water. Return the appliance to the
nearest authorized dealer or service center for examination, repair, electrical or
mechanical adjustment.
4. Never operate the appliance with any air openings block. Keep ventilation openings of the
sewing machine and foot controller free from accumulation of lint, dust, and loose cloth.
5. Keep fingers away from all moving parts. Special care is required around the sewing
machine needle.
6. Always use the proper needle plate, a wrong needle plate can cause the needle to break.
7. Do not use bent needles.
8. Do not pull or push fabric while stitching. It may deflect the needle causing it to break.
9. Switch the sewing machine off ("O") when making any adjustments in the needle area,
such as threading needle, changing needle, threading bobbin, or changing presser foot,
and the light.
0.Always unplug sewing machine from the electrical outlet when removing covers,
lubricating, or when making any other user servicing adjustments mentioned in the
instruction manual.
.Never drop or insert any object into any opening.
2.Do not use outdoors.
3.Do not operate where aerosol spray products are being used or where oxygen is being
administered.
4.To disconnect, turn all controls to the off ("O") position, then remove plug from outlet.
5.Do not unplug by pulling on cord. To unplug, grasp the plug, not the cord.
6.The sound pressure level under normal operating conditions is 75dB(A).
DANGER
WARNING
SAVE THESE INSTRUCTIONS
This sewing m chine is intended for household use only.
Always unplug before re-lamping. Replace bulb with same type rated 5 watts.

PRINCIPAL PARTS OF THE MACHINE . . . . . . . . . . . . . . . . . . . . . . . . . . . . . . . . . . . . . . . . . . . . . . . . . . . . 1
BUTTON OF THE MACHINE . . . . . . . . . . . . . . . . . . . . . . . . . . . . . . . . . . . . . . . . . . . . . . . . . . . . . . . . . . . 2-3
LCD SCREEN . . . . . . . . . . . . . . . . . . . . . . . . . . . . . . . . . . . . . . . . . . . . . . . . . . . . . . . . . . . . . . . . . . . . . . . 4-5
PATTERN CHART . . . . . . . . . . . . . . . . . . . . . . . . . . . . . . . . . . . . . . . . . . . . . . . . . . . . . . . . . . . . . . . . . . . . . 6
ACCESSORIES . . . . . . . . . . . . . . . . . . . . . . . . . . . . . . . . . . . . . . . . . . . . . . . . . . . . . . . . . . . . . . . . . . . . . . . 7
CONNECTING THE MACHINE TO THE POWER SOURCE. . . . . . . . . . . . . . . . . . . . . . . . . . . . . . . . . . . . . 8
STARTING SEWING . . . . . . . . . . . . . . . . . . . . . . . . . . . . . . . . . . . . . . . . . . . . . . . . . . . . . . . . . . . . . . . . . . . 9
CHANGING THE PRESSER FOOT . . . . . . . . . . . . . . . . . . . . . . . . . . . . . . . . . . . . . . . . . . . . . . . . . . . . . . . 10
REPLACING THE NEEDLE . . . . . . . . . . . . . . . . . . . . . . . . . . . . . . . . . . . . . . . . . . . . . . . . . . . . . . . . . . . . . 10
MATCHING NEEDLE/ FABRIC/ THREAD. . . . . . . . . . . . . . . . . . . . . . . . . . . . . . . . . . . . . . . . . . . . . . . . . . 11
TYPE OF PRESSER FOOT CHART . . . . . . . . . . . . . . . . . . . . . . . . . . . . . . . . . . . . . . . . . . . . . . . . . . . . . . 12
WINDING THE BOBBIN . . . . . . . . . . . . . . . . . . . . . . . . . . . . . . . . . . . . . . . . . . . . . . . . . . . . . . . . . . . . . 13-14
INSERTING THE BOBBIN . . . . . . . . . . . . . . . . . . . . . . . . . . . . . . . . . . . . . . . . . . . . . . . . . . . . . . . . . . . . . . 15
THREADING THE UPPER THREAD . . . . . . . . . . . . . . . . . . . . . . . . . . . . . . . . . . . . . . . . . . . . . . . . . . . 16-17
USING THE NEEDLE THREADER . . . . . . . . . . . . . . . . . . . . . . . . . . . . . . . . . . . . . . . . . . . . . . . . . . . . . . . 18
THREAD TENSION . . . . . . . . . . . . . . . . . . . . . . . . . . . . . . . . . . . . . . . . . . . . . . . . . . . . . . . . . . . . . . . . . . . 19
RAISING UP THE LOWER THREAD. . . . . . . . . . . . . . . . . . . . . . . . . . . . . . . . . . . . . . . . . . . . . . . . . . . . . . 20
CUTTING THE THREAD . . . . . . . . . . . . . . . . . . . . . . . . . . . . . . . . . . . . . . . . . . . . . . . . . . . . . . . . . . . . . . . 20
TWO-STEP PRESSER FOOT LIFTER . . . . . . . . . . . . . . . . . . . . . . . . . . . . . . . . . . . . . . . . . . . . . . . . . . . . 21
TO RAISE OR DROP THE FEED DOGS . . . . . . . . . . . . . . . . . . . . . . . . . . . . . . . . . . . . . . . . . . . . . . . . . . . 21
OPERATION BUTTONS . . . . . . . . . . . . . . . . . . . . . . . . . . . . . . . . . . . . . . . . . . . . . . . . . . . . . . . . . . . . . 22-23
FUNCTION BUTTONS . . . . . . . . . . . . . . . . . . . . . . . . . . . . . . . . . . . . . . . . . . . . . . . . . . . . . . . . . . . . . . 24-26
SELECTION BUTTONS . . . . . . . . . . . . . . . . . . . . . . . . . . . . . . . . . . . . . . . . . . . . . . . . . . . . . . . . . . . . . 27-28
USEFUL SKILLS. . . . . . . . . . . . . . . . . . . . . . . . . . . . . . . . . . . . . . . . . . . . . . . . . . . . . . . . . . . . . . . . . . . 29-30
STRAIGHT STITCHES AND NEEDLE POSITION . . . . . . . . . . . . . . . . . . . . . . . . . . . . . . . . . . . . . . . . . . . 31
ZIGZAG STITCHES . . . . . . . . . . . . . . . . . . . . . . . . . . . . . . . . . . . . . . . . . . . . . . . . . . . . . . . . . . . . . . . . . . . 31
Connecting the machine . . . . . . . . . . . . . . . . . . . . . . . . . . . . . . . . . . . . . . . . . . . . . . . . . . . . . . . . . . . . . . 8
Start/stop button . . . . . . . . . . . . . . . . . . . . . . . . . . . . . . . . . . . . . . . . . . . . . . . . . . . . . . . . . . . . . . . . . . . . 9
Foot control. . . . . . . . . . . . . . . . . . . . . . . . . . . . . . . . . . . . . . . . . . . . . . . . . . . . . . . . . . . . . . . . . . . . . . . . 9
Bobbin winding . . . . . . . . . . . . . . . . . . . . . . . . . . . . . . . . . . . . . . . . . . . . . . . . . . . . . . . . . . . . . . . . . 3- 4
Start/stop button . . . . . . . . . . . . . . . . . . . . . . . . . . . . . . . . . . . . . . . . . . . . . . . . . . . . . . . . . . . . . . . . . . . 22
Reverse button . . . . . . . . . . . . . . . . . . . . . . . . . . . . . . . . . . . . . . . . . . . . . . . . . . . . . . . . . . . . . . . . . . . . 22
Auto-lock button . . . . . . . . . . . . . . . . . . . . . . . . . . . . . . . . . . . . . . . . . . . . . . . . . . . . . . . . . . . . . . . . . . . 23
Needle up/ down position button . . . . . . . . . . . . . . . . . . . . . . . . . . . . . . . . . . . . . . . . . . . . . . . . . . . . . . 23
Stitch width adjustment button . . . . . . . . . . . . . . . . . . . . . . . . . . . . . . . . . . . . . . . . . . . . . . . . . . . . . . . . 24
Stitch length adjustment button. . . . . . . . . . . . . . . . . . . . . . . . . . . . . . . . . . . . . . . . . . . . . . . . . . . . . . . . 25
MODE selection button. . . . . . . . . . . . . . . . . . . . . . . . . . . . . . . . . . . . . . . . . . . . . . . . . . . . . . . . . . . . . . 25
Return button . . . . . . . . . . . . . . . . . . . . . . . . . . . . . . . . . . . . . . . . . . . . . . . . . . . . . . . . . . . . . . . . . . . . . 25
Arrow button. . . . . . . . . . . . . . . . . . . . . . . . . . . . . . . . . . . . . . . . . . . . . . . . . . . . . . . . . . . . . . . . . . . . . . 26
Elongation button (see page 53). . . . . . . . . . . . . . . . . . . . . . . . . . . . . . . . . . . . . . . . . . . . . . . . . . . . . . . 26
Mirror button (see page 54) . . . . . . . . . . . . . . . . . . . . . . . . . . . . . . . . . . . . . . . . . . . . . . . . . . . . . . . . . . 26
Twin needle button (see page 55) . . . . . . . . . . . . . . . . . . . . . . . . . . . . . . . . . . . . . . . . . . . . . . . . . . . . . 26
Direct pattern selection and number buttons . . . . . . . . . . . . . . . . . . . . . . . . . . . . . . . . . . . . . . . . . . . . . 27
Clear button . . . . . . . . . . . . . . . . . . . . . . . . . . . . . . . . . . . . . . . . . . . . . . . . . . . . . . . . . . . . . . . . . . . . . . 28
Memory button . . . . . . . . . . . . . . . . . . . . . . . . . . . . . . . . . . . . . . . . . . . . . . . . . . . . . . . . . . . . . . . . . . . . 28
Sewing corners . . . . . . . . . . . . . . . . . . . . . . . . . . . . . . . . . . . . . . . . . . . . . . . . . . . . . . . . . . . . . . . . . . . . 29
Reverse. . . . . . . . . . . . . . . . . . . . . . . . . . . . . . . . . . . . . . . . . . . . . . . . . . . . . . . . . . . . . . . . . . . . . . . . . . 29
Free arm . . . . . . . . . . . . . . . . . . . . . . . . . . . . . . . . . . . . . . . . . . . . . . . . . . . . . . . . . . . . . . . . . . . . . . . . . 29
Sewing on the heavy fabric. . . . . . . . . . . . . . . . . . . . . . . . . . . . . . . . . . . . . . . . . . . . . . . . . . . . . . . . . . . 30
CONTENTS

STRETCH STITCH . . . . . . . . . . . . . . . . . . . . . . . . . . . . . . . . . . . . . . . . . . . . . . . . . . . . . . . . . . . . . . . . . . . . 32
OVERCASTING STITCHES . . . . . . . . . . . . . . . . . . . . . . . . . . . . . . . . . . . . . . . . . . . . . . . . . . . . . . . . . . . . . 33
BLIND HEM/ LINGERIE STITCH . . . . . . . . . . . . . . . . . . . . . . . . . . . . . . . . . . . . . . . . . . . . . . . . . . . . . . . . . 34
BUTTON SEWING . . . . . . . . . . . . . . . . . . . . . . . . . . . . . . . . . . . . . . . . . . . . . . . . . . . . . . . . . . . . . . . . . . . . 35
BUTTONHOLE STITCHING . . . . . . . . . . . . . . . . . . . . . . . . . . . . . . . . . . . . . . . . . . . . . . . . . . . . . . . . . . 36-39
EYELET STITCH . . . . . . . . . . . . . . . . . . . . . . . . . . . . . . . . . . . . . . . . . . . . . . . . . . . . . . . . . . . . . . . . . . . . . 40
ZIPPER INSERTION . . . . . . . . . . . . . . . . . . . . . . . . . . . . . . . . . . . . . . . . . . . . . . . . . . . . . . . . . . . . . . . . 41-42
NARROW HEMMING . . . . . . . . . . . . . . . . . . . . . . . . . . . . . . . . . . . . . . . . . . . . . . . . . . . . . . . . . . . . . . . . . . 43
CORDING . . . . . . . . . . . . . . . . . . . . . . . . . . . . . . . . . . . . . . . . . . . . . . . . . . . . . . . . . . . . . . . . . . . . . . . . 44-45
SATIN STITCH SEWING . . . . . . . . . . . . . . . . . . . . . . . . . . . . . . . . . . . . . . . . . . . . . . . . . . . . . . . . . . . . . . . 45
QUILTING . . . . . . . . . . . . . . . . . . . . . . . . . . . . . . . . . . . . . . . . . . . . . . . . . . . . . . . . . . . . . . . . . . . . . . . . . . . 46
SCALLOP STITCH . . . . . . . . . . . . . . . . . . . . . . . . . . . . . . . . . . . . . . . . . . . . . . . . . . . . . . . . . . . . . . . . . . . . 46
GATHERING. . . . . . . . . . . . . . . . . . . . . . . . . . . . . . . . . . . . . . . . . . . . . . . . . . . . . . . . . . . . . . . . . . . . . . . . . 47
SMOCKING . . . . . . . . . . . . . . . . . . . . . . . . . . . . . . . . . . . . . . . . . . . . . . . . . . . . . . . . . . . . . . . . . . . . . . . . . 48
FREE MOTION DARNING, EMBROIDERY AND MONOGRAMMING . . . . . . . . . . . . . . . . . . . . . . . . . 49-50
WALKING FOOT . . . . . . . . . . . . . . . . . . . . . . . . . . . . . . . . . . . . . . . . . . . . . . . . . . . . . . . . . . . . . . . . . . . . . 51
FAGOTING . . . . . . . . . . . . . . . . . . . . . . . . . . . . . . . . . . . . . . . . . . . . . . . . . . . . . . . . . . . . . . . . . . . . . . . . . . 52
PATCHWORK STITCHING . . . . . . . . . . . . . . . . . . . . . . . . . . . . . . . . . . . . . . . . . . . . . . . . . . . . . . . . . . . . . 52
ELONGATION . . . . . . . . . . . . . . . . . . . . . . . . . . . . . . . . . . . . . . . . . . . . . . . . . . . . . . . . . . . . . . . . . . . . . . . 53
MIRROR . . . . . . . . . . . . . . . . . . . . . . . . . . . . . . . . . . . . . . . . . . . . . . . . . . . . . . . . . . . . . . . . . . . . . . . . . . . . 54
USING THE TWIN NEEDLE. . . . . . . . . . . . . . . . . . . . . . . . . . . . . . . . . . . . . . . . . . . . . . . . . . . . . . . . . . . . . 55
MEMORY. . . . . . . . . . . . . . . . . . . . . . . . . . . . . . . . . . . . . . . . . . . . . . . . . . . . . . . . . . . . . . . . . . . . . . . . . 56-60
WARNING FUNCTIONS . . . . . . . . . . . . . . . . . . . . . . . . . . . . . . . . . . . . . . . . . . . . . . . . . . . . . . . . . . . . . 61-62
REPLACING THE LIGHT BULB . . . . . . . . . . . . . . . . . . . . . . . . . . . . . . . . . . . . . . . . . . . . . . . . . . . . . . . . . 62
MAINTENANCE . . . . . . . . . . . . . . . . . . . . . . . . . . . . . . . . . . . . . . . . . . . . . . . . . . . . . . . . . . . . . . . . . . . 63-64
TROUBLE SHOOTING GUIDE . . . . . . . . . . . . . . . . . . . . . . . . . . . . . . . . . . . . . . . . . . . . . . . . . . . . . . . . 65-66
QUICK ADJUSTMENT REFERENCE CHART . . . . . . . . . . . . . . . . . . . . . . . . . . . . . . . . . . . . . . . . . . . . 67-68
Using the overcasting foot . . . . . . . . . . . . . . . . . . . . . . . . . . . . . . . . . . . . . . . . . . . . . . . . . . . . . . . . . . . 33
Using the all purpose foot . . . . . . . . . . . . . . . . . . . . . . . . . . . . . . . . . . . . . . . . . . . . . . . . . . . . . . . . . . . . 33
Making a buttonhole on stretch fabrics . . . . . . . . . . . . . . . . . . . . . . . . . . . . . . . . . . . . . . . . . . . . . . . . . . 39
Inserting a centered zipper . . . . . . . . . . . . . . . . . . . . . . . . . . . . . . . . . . . . . . . . . . . . . . . . . . . . . . . . . . . 4
Inserting a side zipper. . . . . . . . . . . . . . . . . . . . . . . . . . . . . . . . . . . . . . . . . . . . . . . . . . . . . . . . . . . . . . . 42
Single cording . . . . . . . . . . . . . . . . . . . . . . . . . . . . . . . . . . . . . . . . . . . . . . . . . . . . . . . . . . . . . . . . . . . . . 44
Triple cording . . . . . . . . . . . . . . . . . . . . . . . . . . . . . . . . . . . . . . . . . . . . . . . . . . . . . . . . . . . . . . . . . . . . . 44
Scallop edging . . . . . . . . . . . . . . . . . . . . . . . . . . . . . . . . . . . . . . . . . . . . . . . . . . . . . . . . . . . . . . . . . . . . 46
Darning . . . . . . . . . . . . . . . . . . . . . . . . . . . . . . . . . . . . . . . . . . . . . . . . . . . . . . . . . . . . . . . . . . . . . . . . . . 49
Embroidery . . . . . . . . . . . . . . . . . . . . . . . . . . . . . . . . . . . . . . . . . . . . . . . . . . . . . . . . . . . . . . . . . . . . . . . 50
Monogramming. . . . . . . . . . . . . . . . . . . . . . . . . . . . . . . . . . . . . . . . . . . . . . . . . . . . . . . . . . . . . . . . . . . . 50
Combining patterns or letters. . . . . . . . . . . . . . . . . . . . . . . . . . . . . . . . . . . . . . . . . . . . . . . . . . . . . . . 56-57
Adding patterns or letters . . . . . . . . . . . . . . . . . . . . . . . . . . . . . . . . . . . . . . . . . . . . . . . . . . . . . . . . . . . . 58
Editing patterns . . . . . . . . . . . . . . . . . . . . . . . . . . . . . . . . . . . . . . . . . . . . . . . . . . . . . . . . . . . . . . . . . 58-59
Clearing patterns or letters . . . . . . . . . . . . . . . . . . . . . . . . . . . . . . . . . . . . . . . . . . . . . . . . . . . . . . . . . . . 59
Recalling and sewing the memorized pattern . . . . . . . . . . . . . . . . . . . . . . . . . . . . . . . . . . . . . . . . . . 59-60
Warning animation message display . . . . . . . . . . . . . . . . . . . . . . . . . . . . . . . . . . . . . . . . . . . . . . . . . . . 6
Instruction animation message display. . . . . . . . . . . . . . . . . . . . . . . . . . . . . . . . . . . . . . . . . . . . . . . . . . 6
Warning beeping sound . . . . . . . . . . . . . . . . . . . . . . . . . . . . . . . . . . . . . . . . . . . . . . . . . . . . . . . . . . . . . 62
Cleaning the screen . . . . . . . . . . . . . . . . . . . . . . . . . . . . . . . . . . . . . . . . . . . . . . . . . . . . . . . . . . . . . . . . 63
Cleaning the sewing machine surface . . . . . . . . . . . . . . . . . . . . . . . . . . . . . . . . . . . . . . . . . . . . . . . . . . 63
Cleaning the hook . . . . . . . . . . . . . . . . . . . . . . . . . . . . . . . . . . . . . . . . . . . . . . . . . . . . . . . . . . . . . . . 63-64
CONTENTS
1
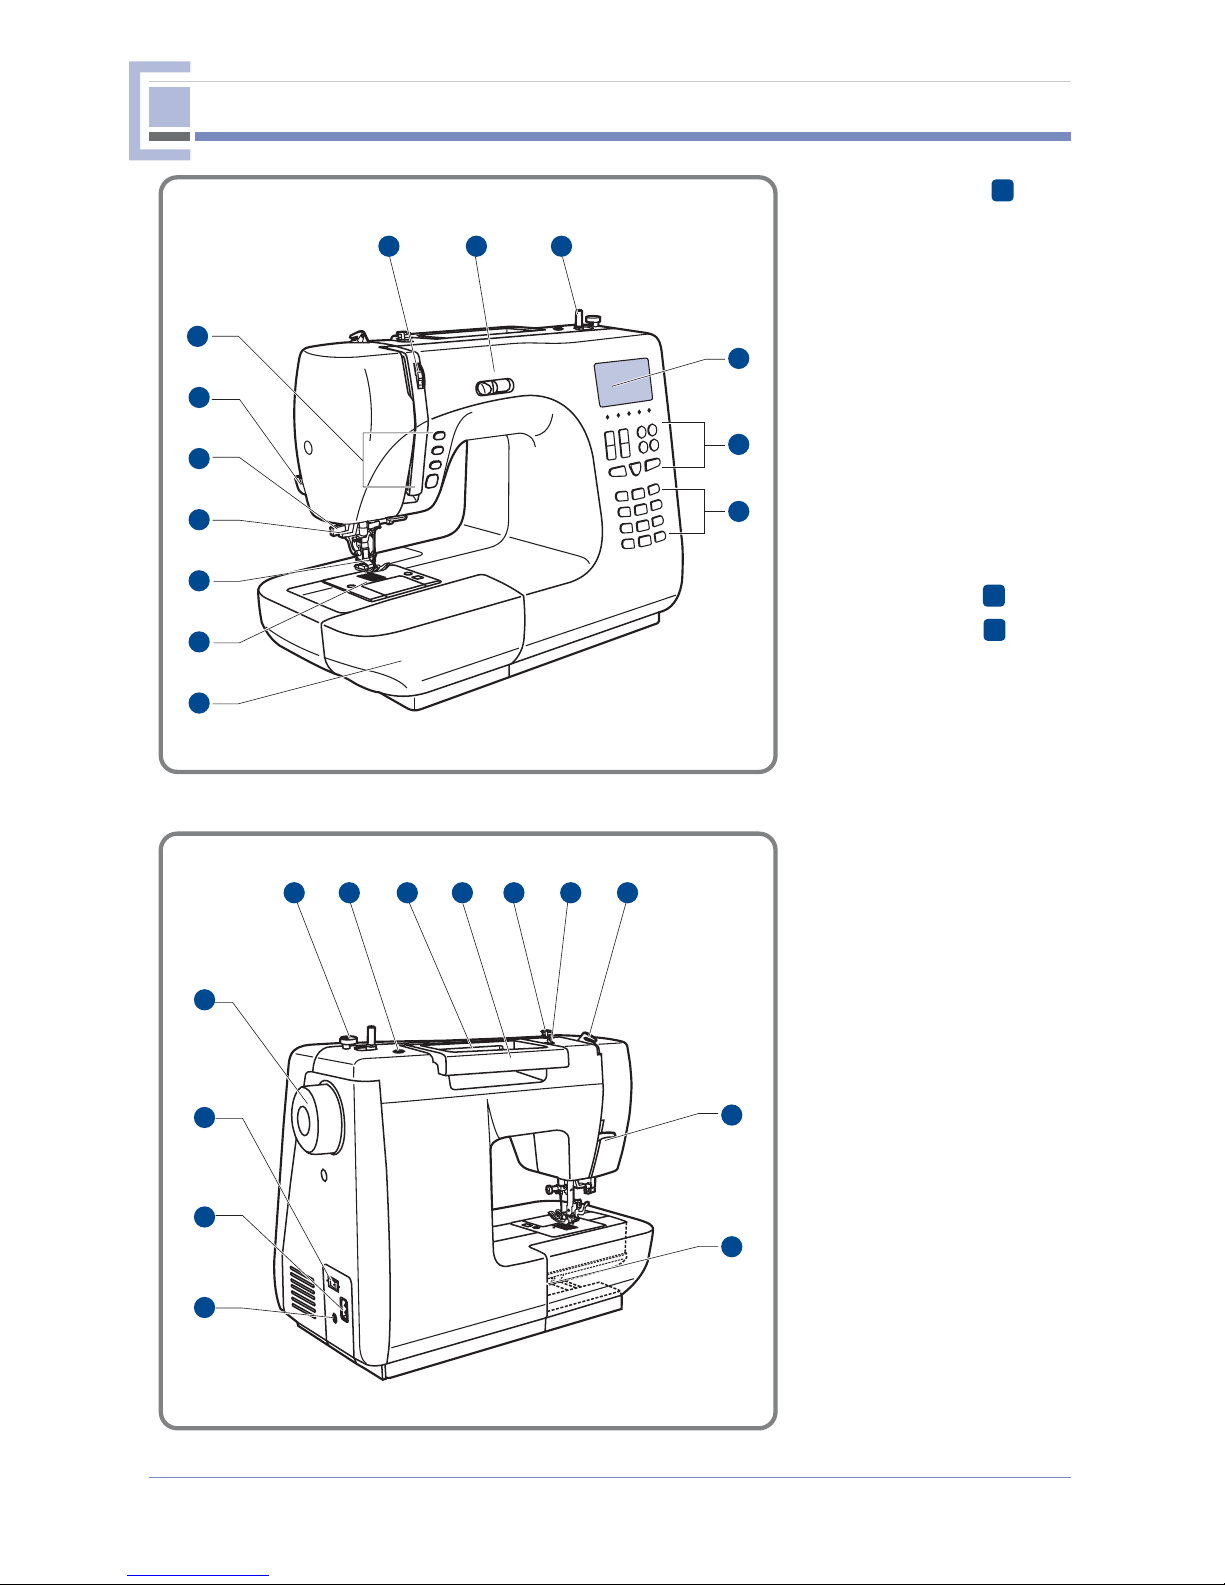
PRINCIPAL PARTS OF THE MACHINE
. Operation buttons
2. Thread cutter
3. Buttonhole lever
Auto needle threader
Presser foot
6. Needle plate
7. Sewing table and
accessory box
8. Tension dial
9. Speed limiting adjustment
lever
0. Bobbin winder
with on/off switch
. LCD screen
2. Function buttons
3. Selection buttons
4.
5.
4. Handwheel
5. Main power switch
6. Power cord
7. Foot controller connector
8 Bobbin stopper
Hole for second
spool pin
. Horizontal spool pin
2 . Handle
22. Bobbin thread guide
23. Upper thread guide
24. Thread take-up lever
25. Presser foot lifter
26. Drop feed lever
.
9.
20
A
B
C
25
26
4
5
6
7
8 9 20 2 22 23 24
2
3
4
5
6
7
2
3
8 9 0
2
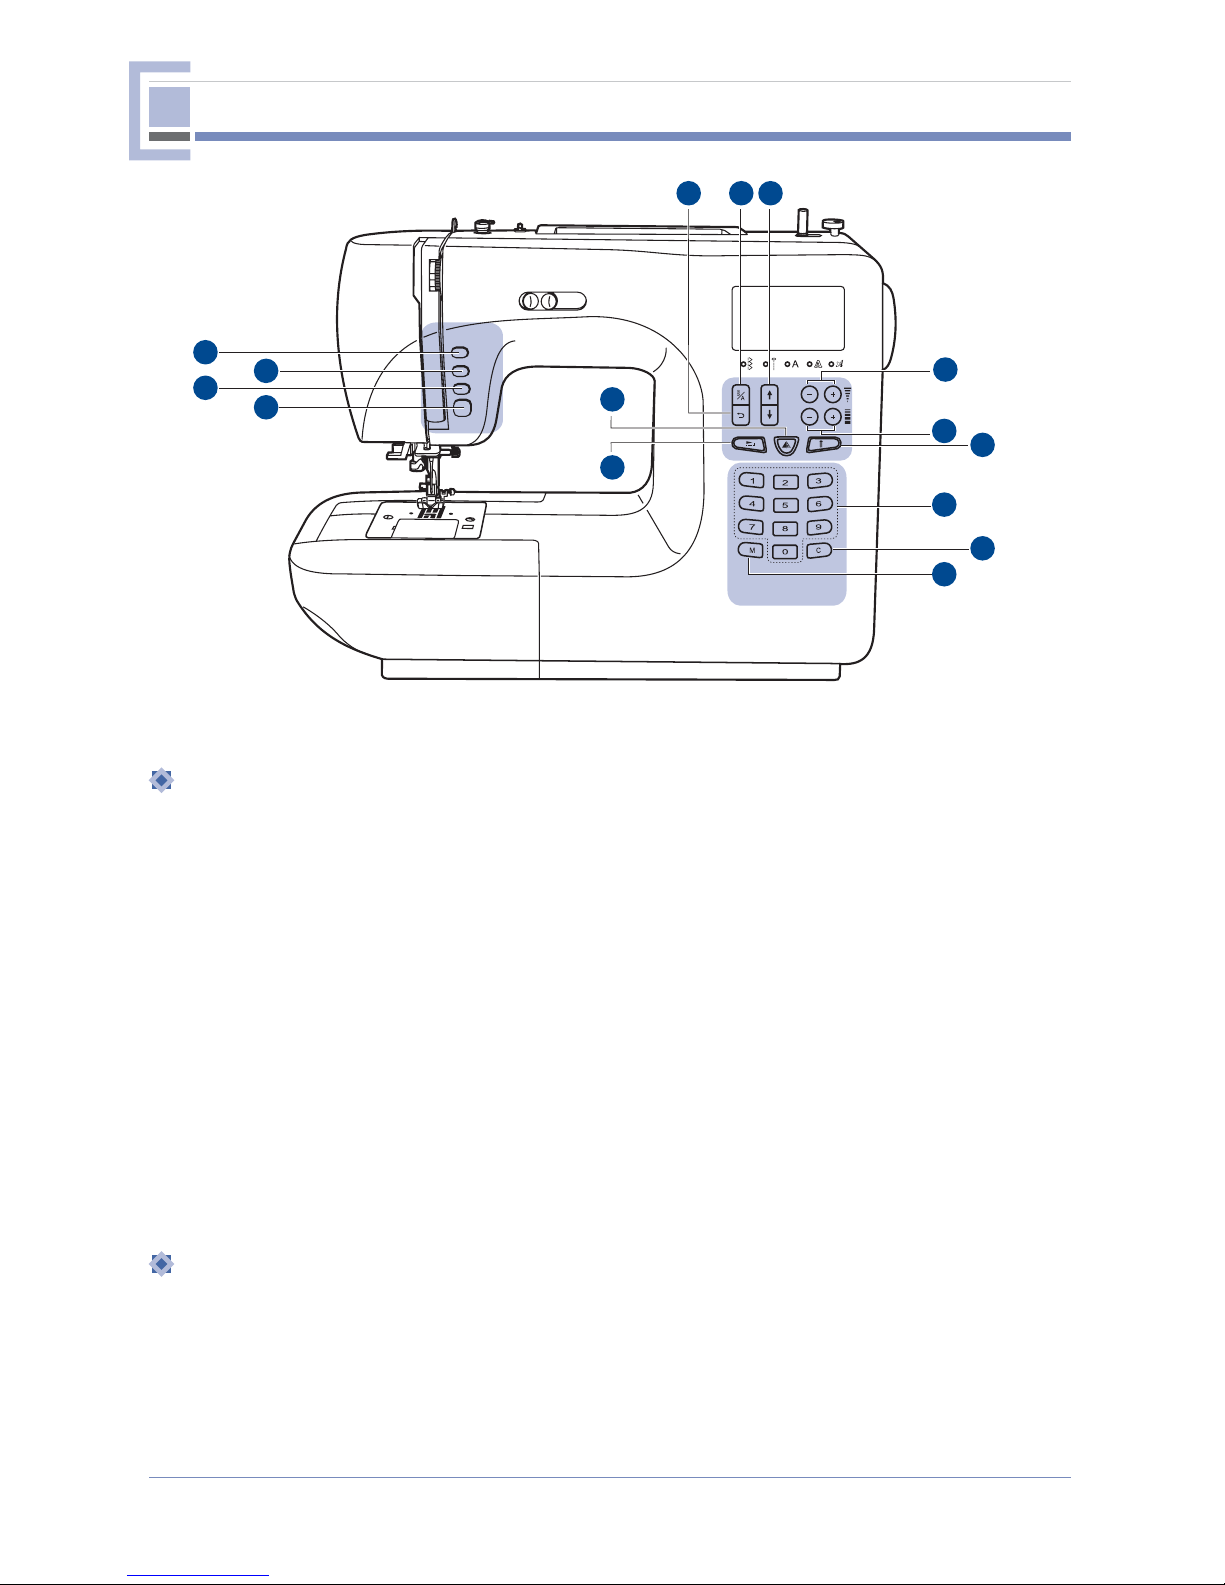
1. St rt/stop button
2. Reverse button
3. Auto-lock button
4. Needle up/down position button
Press this button to start or stop the machine.
Hold down this button to sew either backwards or a reinforcement stitch at a low speed.
Hold down this button to sew locking stitches immediately or at the end of the current
patterns and automatically stop.
Press this button to raise or lower the needle. Pressing the button twice sews one stitch.
A. Oper tion buttons (see page 22/23)
5. Return button
Press this button to return to the previous browse display.
The screen for browse display and memory function display can be exchanged in memory
mode.
B. Function buttons (see page 24/25/26)
BUTTONS OF THE MACHINE
C
B
A
56
8
9
10
11
12
13
14
15
1
23
4
7

6. Mode selection button
7. Arrow button
8. Stitch width djustment button
9. Stitch length djustment button
10. Elong tion button
11. Mirror button
12. Twin needle button
Press this button to select direct mode, utility and decorative pattern mode, block letter mode,
script letter mode and outline letter mode.
In the memory mode use these " ", " " buttons to move in the direction when selecting an
item displayed on the screen.
Press " " button, for selecting previous page, and press " " button, for selecting next page
in browse display.
Press these buttons to adjust the width of the zigzag stitch.
Press these buttons to adjust the length of the stitch.
Utility and decorative patterns 24 to 3 can be elongated up to five times its normal length by
pressing this button.
Press this button to sew a reflection pattern.
Press this button to fix the width range when using the twin needle to sew.
C. Selection buttons (see page 27/28)
Use these buttons to quickly select one of 0 of the most often used stitch. When the mode
button is set at the Direct mode. Or press number buttons of the pattern number to select the
desired pattern.
If an incorrect pattern is selected or memorized, pressing this button will clear it.
Press this button to enter or store the created pattern combination in the memory.
13.Direct p ttern selection nd number buttons
14.Cle r button
15.Memory button
3
BUTTONS OF THE MACHINE

4
The LCD screen, located on the front at the right of the sewing machine, displays the settings for
the selected stitch and error messages if operations are performed incorrectly.
LCD SCREEN
Elong tion
Mirror
Stitch width Stitch length
Needle up/down position
Twin needle
Pattern number
Suggested presser
foot and number
Pattern
Tension
Auto-stop
Reverse
Magnification
Pattern number
Pattern
Current page
Total page
Indication - select page up
Indication - select page down
Browse displ y - P ttern
For reviewing all patterns and then selecting any ones for sewing.
Pattern number
Pattern
Current page
Total page
Indication - select page down
Browse displ y - Alph bet
For reviewing all patterns and then selecting any ones for sewing.

5
LCD SCREEN
Stitch width
Auto-stop
Needle up/down position
Auto-lock
Reverse
Pattern
number
Pattern
Tension
Needle position Stitch length
Suggested presser foot and number
Mirror
Twin needle
Needle up/down position
Alphabet number
Pattern
Tension
Stitch length
Suggested presser foot and number
Stitch width
Number of current unit
Total number of unit
Memory group
Pattern for selecting Auto-Stop
Mirror
Memory
Stitch width
Stitch length
Needle up/down position
Norm l displ y - Alph bet
Norm l displ y - P ttern
For setting the functions of Auto lock, mirror, twin needle, reverse and so on. Press the
" Start/stop " button for starting sewing.
For setting the functions of Auto-Stop. Press the " Start/stop " button for starting sewing.
Auto-stop
Other Silver Sewing Machine manuals


