Egardia CAM-05 User manual
EN DE FR NL
INSTALLATION MANUAL
EGARDIA HD CAMERA
Congratulations for the purchase of the Egardia HD
Camera. You need an active Egardia account for
installing the camera.
Customer service
You can find more information about the installation
and use of the Egardia HD Camera on
www.egardia.com
This package has been carefully put together.
Should you need help with the installation or if
anything is missing from the package, contact the
customer service. Never send the package back
without return instructions from the customer
service.
1

EN DE FR NL
Camera possibilities
After you have installed the camera, you can:
● Watch live on your computer, mobile phone, or
tablet what the camera is observing;
● See what is happening at home, not only
during the day but also at night.
Alarm procedure
With the Egardia video surveillance service, in case
of alarm you directly receive a notification with a link
to the video recording in the Egardia app. This way,
you see immediately what is happening, no matter
where you are.
The camera is equipped with a built-in motion
detector. As soon as this detects movements during
an alarm, the camera will automatically continue
recording.
Mobile phone settings
The option of watching video footage on your
mobile phone depends on the type of the phone.
Watching footage on your mobile phone could incur
costs for data use. Get informed about this by your
mobile provider before you download the camera
footage on your mobile phone.
2
EN DE FR NL
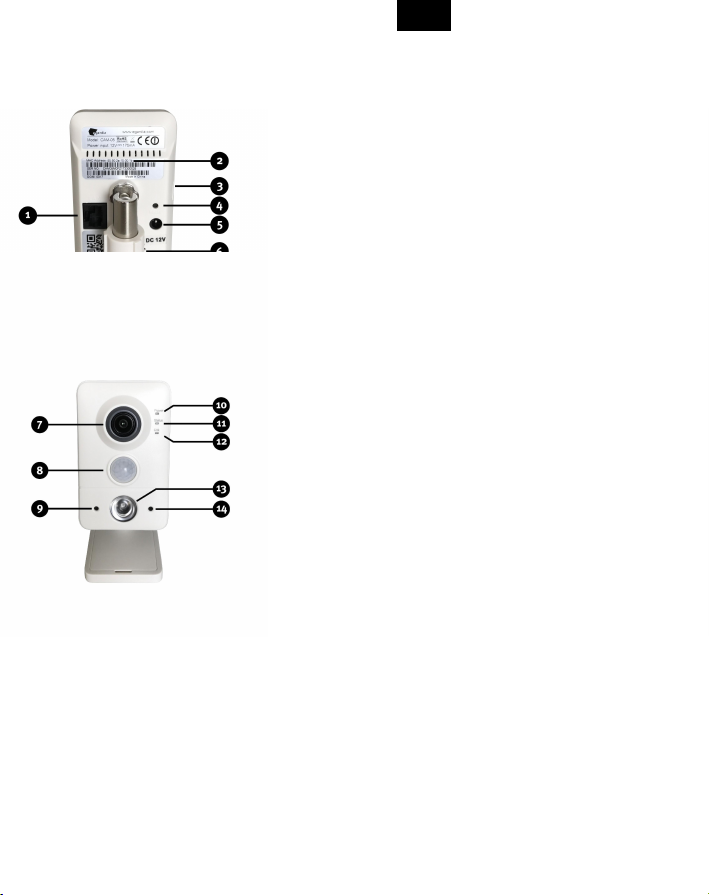
THE EGARDIA HD CAMERA
1. LAN port – For connecting the camera to your
modem or router via Ethernet cable.
2. MAC Address – Necessary for the registration
of the camera in your Egardia account.
3. Micro-SD card port – Not supported.
4. Reset button – Press only when instructed by
the Egardia customer service.
5. Power supply connection – For connecting
the camera to power.
6. Speaker – Pre-installation for listening to sound
(not yet supported).
7. Lens – Equipped with an automatic infrared
filter for optimal colour rendering by daylight.
8. Motion detector – Preparation for Motion
detection based on IR (not supported).
9. Microphone – For listening to sound.
10. Power indication – The light goes red as soon
as the camera is turned on.
11. Status indication – The light goes green as
soon as the camera is connected. The light is
flashing green when there is (still) no
connection.
12. Link indication – The light is flashing blue if
the camera is connected to your modem or
router via the Ethernet cable.
13. Night vision spotlight – Infrared light for night
vision.
14. Light sensor – For automatic (de)activation of
the night vision function.
Be advised! During the installation, the camera is
connected by means of the Ethernet cable. This is
necessary if the camera is ultimately going to be
used wirelessly.
If you want to make wired use of the camera and
you have no free Ethernet ports on your modem or
router, get informed from your internet provider or a
computer specialist about the possibilities to expand
the number of Ethernet ports.
3

EN DE FR NL
If you want to use the camera wirelessly and you
have no free Ethernet ports on your modem or
router, temporarily unplug the Ethernet cable from
your Egardia gateway. After you have completed
the installation of the camera, connect the Ethernet
cable again to the Egardia gateway.
4
EN DE FR NL
INSTALLING THE CAMERA
The installation process of the Egardia HD Camera
consists of four simple steps.
STEP 1.
CHECK CONTENT
CHECK THE CONTENTS OF
THE BOX
STEP 2.
ASSEMBLE THE CAMERA
PUT THE CAMERA
TOGETHER
STEP 3.
REGISTER THE CAMERA
REGISTER THE CAMERA TO
YOUR EGARDIA ACCOUNT
STEP 4.
USE WIRELESSLY
PUT THE CAMERA INTO
WIRELESS USE
5

EN DE FR NL
STEP 1: CHECK CONTENT
Check the content of the package for the following
parts:
● Camera
● Stand / wall mount
● Screws and plugs for mounting the stand on a
wall or the ceiling
● Ethernet cable
● Power supply
● 2 Egardia video surveillance stickers
STEP 2: ASSEMBLE THE CAMERA
You are now going to put the camera together.
Assemble the camera on the stand: Assemble
the camera on the stand by turning the camera. Use
the ring on the top side of the stand in order to
secure the camera in the desired position.
Connect to network: Connect the Ethernet cable
to the LAN port of the camera and to your modem
or router.
Connect to power: Connect the power supply to
the camera and plug it into the outlet.
STEP 3: REGISTER THE CAMERA
Do you already have a Egardia account? Then log in
and click on "Add camera" on the "Cameras" tab. If
you do not have a Egardia account yet, register via
the “register” button on the login page.
Camera properties
MAC address of the camera: Select the correct type
of camera and fill in the last 6 characters of the MAC
6

EN DE FR NL
address of the camera without colons. You will find
these on the back side of the camera.
Camera name: Choose a name so that the camera is
easy to recognise. For example: hall, front door,
kitchen, etc.
Wireless network
For putting the camera into wireless use, you need
the information of your network. This information can
often be found on your modem/router. In case of
questions, contact your internet provider.
Wireless encryption: Select the type of encryption of
your wireless network. Most modern modems/routers
are WPA- or WPA2-encrypted. This information can
often be found on the modem/router.
SSID (Network name): Fill in the correct name of
your wireless network. Beware of capital letters!
Network key: Fill in the password of your wireless
network. The password can often be found on your
modem/router or is provided by your internet
provider. If you have not set the password yourself,
contact whomever has configured your wireless
network.
Encryption: Select the method of encryption (AES or
TKIP) of your modem or router. AES can be chosen
for most modems and routers.
In order to activate the camera, you need to accept
once the payment conditions at the bottom of the
page.
STEP 4: USE WIRELESSLY
Carry out this step only if you want to use the
camera wirelessly.
1. Disconnect the Ethernet cable from the
camera.
2. Turn the camera off by unplugging it from the
outlet.
7

EN DE FR NL
3. After 20 seconds, plug the camera again into
the outlet. The camera now functions
wirelessly.
You can watch the footage of the camera with your
Egardia account under the tab "Cameras" or through
the Egardia app. The first time, it can take more than
2 minutes before the footage appears.
Congratulations! Your installation is completed.
Be advised! If after 3 minutes no live footage is
shown, unplug the camera from the outlet. First
connect the Ethernet cable again to the camera and
only then plug the camera again into the outlet. After
2 minutes, click on the "Adjust settings" button on the
“Cameras” tab and fill in again the right settings of
your wireless network.
Important recommendation
Recordings are stored for a limited period. In order
to save recordings for a longer time, check the
corresponding recording in your Egardia account
under the "Cameras" tab.
Legal obligations
Always make sure that the camera is pointed
exclusively towards your own premises. The
camera may never be pointed towards public
space. Check whether there are additional legal
obligations regarding the use of a security camera
in your country. We advise to place in any case the
Egardia video surveillance stickers at a visible
place.
8

EN DE FR NL
INSTALLATIONSANLEITUNG
EGARDIA HD KAMERA
Herzlichen Glückwunsch zum Kauf der Egardia HD
Kamera. Für die Nutzung der Kamera wird der
Egardia-Videosicherheitsdienst benötigt. Mit dem
Abonnement können Sie bis zu 4 Egardia-Kameras
nutzen – unabhängig vom Kameratyp.
Kundenservice
Weitere Informationen über Egardia finden Sie auf
www.egardia.com. Antworten auf häufig gestellte
Nutzerfragen sind auf
www.egardia.com/nutzerfragen zu finden. Eine
Online-Version der Anleitung finden Sie auf
www.egardia.com/anleitungen.
Sollten Sie Hilfe bei der Installation benötigen oder
etwas im Paket fehlen, nehmen Sie bitte Kontakt
mit dem Egardia-Kundenservice auf. Senden Sie
niemals ein Paket ohne Retourenanweisung des
Kundendienstes zurück.
Funktionen der Kamera
Nachdem die Kamera installiert wurde, ist es
möglich:
● In Echtzeit auf Ihrem Computer, Ihrem
Mobiltelefon und Tablet zu sehen, was die
Kamera wahrnimmt
● Nicht nur tagsüber, sondern auch nachts zu
sehen, was zu Hause geschieht
9

EN DE FR NL
Alarm verfahren
Mit dem Egardia Videoüberwachnungsdienst
erhalten Sie im Alarmfall direkt eine
Benachrichtigung und eine Videoaufnahme in der
Egardia App.
So sehen Sie direkt, was los ist – wo Sie auch sind.
Die Kamera verfügt über Bewegungsdetektion.
Wenn die Kamera bei einem Alarm eine Bewegung
wahrnimmt, fährt die Kamera fort, Aufnahmen zu
machen.
Einstellungen des Mobiltelefons
Die Möglichkeit, Bilder auf Ihrem Mobiltelefon
anzusehen, ist von dem Typ Ihres Mobiltelefons
abhängig. Um die Bilder auf Ihrem Mobiltelefon
anzusehen, können Kosten für den Datenverkehr
anfallen. Informieren Sie sich daher bei Ihrem
Mobilfunkanbieter, bevor Sie Bilder auf Ihr
Mobiltelefon herunterladen.
10
EN DE FR NL
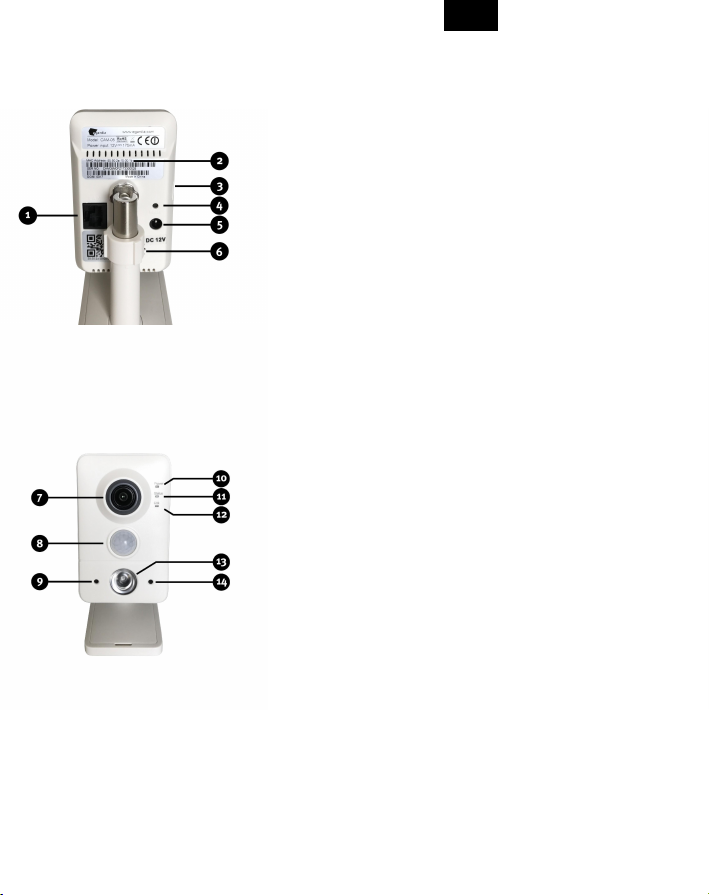
TEILE DER KAMERA
1. LAN-Port –Um die Kamera mit dem
Ethernetkabel an Modem oder Router
anzuschließen.
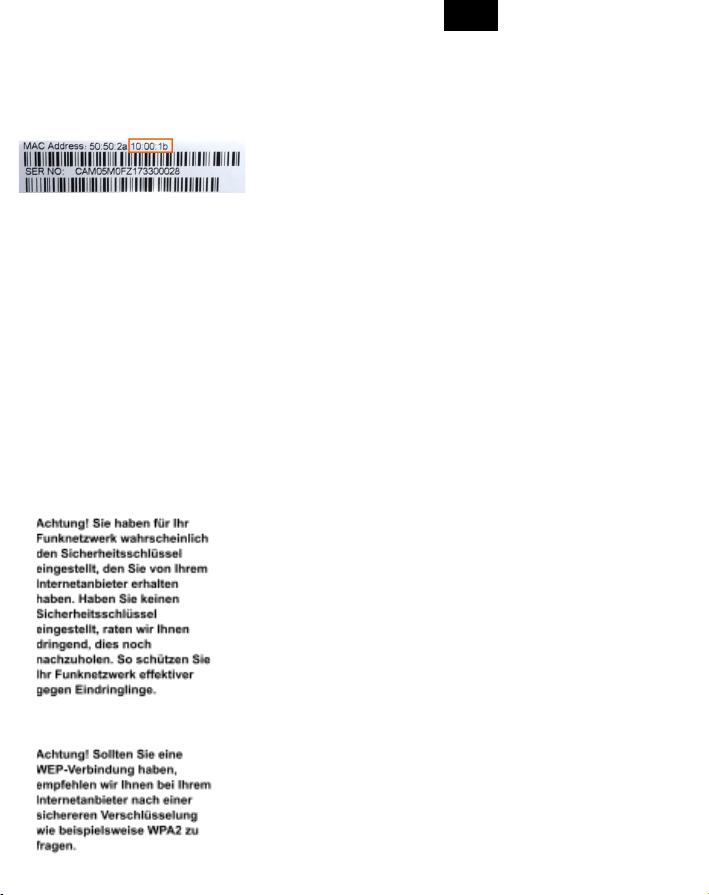
2. MAC-Adresse – Wird für die Registrierung der
Kamer in Ihrem Egardia Account benötigt.
3. Micro-SD-Schlitz – Wird nicht unterstützt.
4. Reset-Knopf – Nur auf Anweisung des Egardia
Kundendiensts gebrauchen.
5. Stromanschluss – Um die Kamera per Netzteil
mit Strom zu verbinden.
6. Lautsprecher – Mit automatischen
Infrarot-Filter für eine optimale Farbwiedergabe
bei Tageslicht.
7. Linse – Mit automatischen Infrarot-Filter für
eine optimale Farbwiedergabe bei Tageslicht.
8. Bewegungsmelder – Wird nicht unterstützt.
Die Bewegungserkennung erfolgt mit digitaler
Bildanalyse.
9. Mikrofon – Um Geräusche zu hören.
10. Indikationslampe Strom – Leuchtet rot, wenn
der Strom korrekt angeschlossen ist.
11. Indikationslampe Status – Leuchtet grün,
wenn die Kamera verbunden ist. Blinkt grün,
wenn die Verbindung (noch) nicht hergestellt ist.
12. Indikationslampe Link – Blinkt blau, wenn die
Kamera per Ethernetkabel mit Modem oder
Router verbunden ist.
13. Nachtsicht-Lampe – Infrarotlicht für
Nachtsicht.
14. Lichtsensor – Für automatische
(De-)Aktivierung der Nachtsichtfunktion.
Achtung! Während der Anmeldung muss die
Kamera mit einem Ethernetkabel am Router
angeschlossen sein. Das ist auch notwendig, falls
die Kamera später drahtlos genutzt wird.
Falls Sie die Kamera verkabelt benutzen wollen,
aber alle Ethernetanschlüsse Ihres
Routers/Modems besetzt sind, informieren Sie sich
11

EN DE FR NL
bitte über die Möglichkeiten, die Anzahl der
Ethernetanschlüsse zu erweitern. Dazu nehmen Sie
bitte Kontakt zu Ihrem Internetanbieter oder
Computer-Spezialisten auf.
Falls Sie die Kamera drathlos benutzen wollen,
aber alle Ethernetanschlüsse Ihre Routers/Modems
sind bei der Installation besetzt, sollte zeitweise der
Stecker der Egardia Alarmzentrale entfernt werden.
Der frei gewordene Ethernetanschluss kann dann
verwendet werden. Nachdem die Installation der
Kamera abgeschlossen wurde, kann die Egardia
Alarmzentrale wieder an den Router / das Modem
angeschlossen werden.
INSTALLATION DER KAMERA
Die Installation der Kamera besteht aus vier
Schritten.
SCHRITT 1.
KONTROLLE
DES INHALTS
KONTR
INHALT
SCHRITT 2.
MONTAGE
DER KAMERA
BAUEN
KAMER
12

EN DE FR NL
SCHRITT 3.
ANMELDEN
DER KAMERA
MELDE
AM EGA
SCHRITT 4.
DRAHTLOSER
GEBRAUCH
DIE KAM
BENUTZ
13
EN DE FR NL
SCHRITT 1: KONTROLLE DES INHALTS
Kontrollieren Sie den Inhalt der Verpackung auf
folgende Teile:
● Kamera mit Wandbefestigung/Halter
● Ethernetkabel
● Netzadapter
● Plastikbeutel mit 2 Schrauben und 2 Dübeln
● Bohrschablonen-Aufkleber
● 2 Videoüberwachungsaufkleber
SCHRITT 2: MONTAGE DER KAMERA
Bauen Sie nun die Kamera zusammen.
Montage der Kamera auf die Halterung:
Schrauben Sie die Kamera aufs Stativ, indem Sie
die Kamera drehen. Verwenden Sie den Ring an
der Oberseite des Stativs, um die Kamera in der
gewünschten Position zu fixieren.
Netzwerkanschluss: Schließen Sie das
Ethernetkabel an den LAN-Port der Kamera und an
das Modem oder den Router an.
Netzanschluss: Schließen Sie den Netzadapter an
die Kamera an und stecken Sie den Netzstecker in
die Steckdose.
SCHRITT 3: ANMELDEN DER KAMERA
Haben Sie bereits einen Account? Melden Sie sich
in Ihrem Egardia Konto an und klicken Sie auf die
Registerkarte "Kameras". Wenn Sie noch keinen
Account haben, führen Sie die Registration mit
“Registrieren” auf der Infoseite durch.
14
EN DE FR NL
Kamera Spezifizierung
MAC-Adresse der Kamera: Geben Sie die letzten
6 Ziffern und Buchstaben der MAC-Adresse der
Kamera ein. Sie finden sie auf der Rückseite der
Kamera.
Kamera-Name: Benennen Sie die Kamera nach
Belieben. Beispiele sind: Flur, Eingangstür, Küche
etc.
Funk-Netzwerk
Um die Kamera drahtlos zu benutzen, benötigen
Sie die Details Ihres Netzwerks. Meistens befinden
Sie diese am Router / Modem selbst. Nehmen Sie
bei Fragen dazu bitte Kontakt zu Ihrem
Internetanbieter auf.
Verschlüsselungsmethode: Wählen Sie den
Verschlüsselungstyp aus, den Sie in Ihrem
Funknetzwerk verwenden. Bei modernen Routern
ist dies meistens WPA2 (Personal). Die Information
finden Sie meist auf Ihrem Modem/Router.
Netzwerkname (SSID): Geben Sie den korrekten
Namen Ihres Funknetzwerks ein.
Gemeinsamer Schlüssel: Der gemeinsame
Schlüssel (auch WLAN-Schlüssel, WLAN Network
Key, WLAN Netzwerkschlüssel) ist die _ Zahlen-
und Buchstabenkombination, die Zugriff auf Ihr
Drahtlosnetzwerk (WLAN) ermöglicht. Sie finden
diese Kombination ebenfalls zumeist auf der
Unterseite Ihres Routers. Beachten Sie unbedingt
Groß- und Kleinschreibung des Schlüssels. Dieser
Schlüssel wird z.B. auch verwendet, wenn Sie Ihr
Smartphone / Ihren Laptop im privaten
Drahtlosnetzwerk gebrauchen wollen.
Verschlüsselung: Wählen Sie zwischen AES oder
TKIP. Welche Verschlüsselung Sie haben, steht
meist auf Ihrem Router/Modem.
Zur Aktivierung der Kamera müssen Sie unten auf
der Seite einmalig die Zahlungsbedingungen
15

EN DE FR NL
akzeptieren. Mit diesem Abonnement können Sie
bis zu 4 Kameras anschließen.
Klicken Sie anschließend auf „Speichern“. Die
Kameraeinstellungen werden übernommen. Das
kann bis zu 10 Minuten dauern. Sobald die Kamera
installiert ist, wird die Seite neu geladen und Sie
sollten nun in Ihrer Egardia-App und – Account
Livebilder sehen können.
SCHRITT 4: DRATHLOSER GEBRAUCH
Führen Sie diesen Schritt nur aus, wenn Sie die
Kamera drahtlos benutzen wollen.
1. Trennen Sie die Kamera vom Ethernetkabel.
2. Schalten Sie die Kamera aus, indem Sie sie vom
Strom trennen.
3. Schließen Sie die Kamera nach einer
20-sekündigen Wartezeit wieder an den Strom
an. Sie funktioniert nun drahtlos.
Die Bilder der Kamera können Sie in Ihrem Egardia
Account in der Registerkarte „Kameras“ oder in der
Egardia App ansehen. Beim ersten Mal kann es bis
zu 2 Minuten dauern, bis Sie die Bilder sehen
können
Glückwunsch! Die Installation ist abgeschlossen
Achtung! Falls nach 3 Minuten keine Livebilder
sichtbar sind, trennen Sie die Kamera vom
Netzwerk und Strom. Schließen Sie dann erst das
Ethernetkabel und dann das Stromkabel wieder an.
Klicken Sie nach 2 Minuten auf “Einstellungen
ändern” in der Registerkarte “Kameras” und geben
16

EN DE FR NL
Sie erneut die richtigen Daten Ihres
Drahtlosnetzwerkes ein.
Wichtige Empfehlung
Aufnahmen werden für einen begrenzten Zeitraum
gespeichert. Um Aufnahmen länger zu speichern,
setzen Sie einen Haken bei der Aufnahme in Ihrem
Egardia Account in der Registerkarte “Kameras”.
Rechtliche Verpflichtungen
Stellen Sie immer sicher, dass die Kamera
ausschließlich auf Ihr Gelände gerichtet ist.
Überprüfen Sie, ob es weitere rechtliche
Verpflichtungen für den Gebrauch von
Sicherheitskameras in Ihrem Land gibt. Wir raten
dazu, die Egardia Videosicherheits-Aufkleber an
einer gut sichtbaren Stelle aufzukleben.
17
EN DE FR NL
MANUEL D’INSTALLATION DE LA CAMÉRA
Merci d’avoir acheter la caméra HD. Pour installer
la caméra, il vous faut un compte Egardia actif.
Service client
Vous trouverez de plus amples informations sur
l’installation et l’utilisation du système d’ alarme
Egardia sur le site web www.egardia.com. Les
réponses aux questions les plus fréquemment
posées se trouvent sur notre site web
www.egardia.com/questions.
Ce paquet a été préparé avec soin. Si vous avez
besoin d’aide au moment d’ installation ou s’ il
manquait un élément dans le paquet, n’hésitez pas
à contacter le service client. Ne renvoyez jamais
votre paquet sans avoir convenu de cela au
préalable avec notre service client.
18

EN DE FR NL
Possibilités de la caméra
Après l’installation de la caméra, vous pouvez:
● Voir ce que la caméra détecte en live, sur votre
ordinateur, téléphone mobile ou tablette;
● Voir ce qui passe dans votre maison, non
seulement le jour mais également la nuit.
Procédure d’alarme
En cas d’alarme, vous recevrez directement un
message contenant une référence à
l’enregistrement vidéo dans l’application de
Egardia. De cette manière, vous pouvez
immédiatement voir ce qu’il passe, où que vous
soyez.
La caméra dispose d’un détecteur de mouvement
intégré. Tant que le détecteur de mouvement
détecte un mouvement en cas d’ alarme, la caméra
fera automatiquement les enregistrements.
Paramètres de téléphone portable/ GSM
La possibilité d’images vidéo à afficher sur votre
téléphone portable dépend du type de téléphone
portbale que vous avez.
Veuillez noter, que pour visionner la vidéo sur votre
téléphone il peut y avoir des frais de données.
Renseignez-vous à votre fournisseur de téléphonie
mobile avant les télécharger les images sur votre
téléphone portable.
19

EN DE FR NL
ÉLEMENTS DE LA CAMÉRA HD
1. Port LAN – Permet de connecter la caméra à
votre routeur/ modem à l’aide du câble
ethernet.
2. Adresse MAC (Media Access Control) –
requis pour l’ enregistrement de la caméra dans
votre compte Egardia.
3. Porte carte micro SD – non pris en charge.
4. Bouton de réinitialisation – que utilisation sur
indication de service client d’ Egardia.
5. Raccordement alimentation – pour connecter
la caméra au réseau d’électricité.
6. Haut parleur – non pris en charge.
7. Objectif– équipé de filtre infrarouge
automatique pour la reproduction de couleur
optimale pendant le jour.
8. Détecteur de mouvement – detecteur
infrarouge (non pris en charge).
9. Micro d’enregistrement – pour
l’enregistrement du son.
10. Indicateur de puissance – si le voyant rouge
de la caméra s’effectue.
11. Indicateur de statut – si l’appareil est
connecté il y a un voyant vert. Si le voyant
clignote en vert, il n’y a pas (encore) de
connexion.
12. Indicateur de lien – si la caméra est
connectée à votre modem ou routeur via la
câble ethernet le voyant clignote en bleu.
13. Lumière de vision de nuit – voyant infrarouge
pour la vision nocturne.
14. Capteur de lumière – Pour l’activacation
automatique de la fonction de vision nocturne.
Attention! Au cours d’installation, la caméra est
connectée à l’aide du câble ethernet. C’est aussi
nécessaire même si vous souhaitez utiliser la
caméra sans fil par la suite.
Si vous souhaitez utiliser la caméra avec fil et que
vous n’avez plus de port ethernet disponible sur
20
This manual suits for next models
2
Table of contents
Languages:


