Eicon Technology DIVA ISDN+CT User manual

DIVA ISDN+CT
Installation Guide

First Edition (April 2000) 206-334-01
DIVA ISDN and Eicon Technology are registered trademarks of Eicon Technology
Corporation.
Microsoft, Windows, and Windows NT are registered trademarks of Microsoft Corporation.
All other brand and product names are trademarks or registered trademarks of their
respective owners.
Changes are periodically made to the information herein; these changes will be incorporated
into new editions of the publication. Eicon Technology may make improvements and/or
changes in the products and/or programs described in this publication at any time.
Copyright©1996-2000 Eicon Technology Corporation. All rights reserved, including those
to reproduce this publication or parts thereof in any form without permission in writing from
Eicon Technology Corporation.

Contents
Introduction.......................................................................................... 5
Step 1: Install Your DIVA ISDN+CT Adapter ...................................... 6
Step 2: Connect Your ISDN Line......................................................... 7
Step 3: Connect Your Microphone, Loudspeaker, Hand- or
Headset................................................................................................. 8
Step 4: Install the DIVA ISDN+CT Software ....................................... 9
Prepare to install the DIVA ISDN+CT software ........................................ 9
Install the DIVA ISDN+CT software........................................................ 10
Install the virtual modems ........................................................................ 14
Appendix A: Troubleshooting........................................................... 16
Using the Line Check utility..................................................................... 16
Checking the status LEDs......................................................................... 17
Appendix B: Monitoring Your ISDN Connection ............................. 18
Appendix C: International Regulatory Information ........................ 19
Regulatory information for Europe .......................................................... 19
User/installer instructions for the United Kingdom ................................. 19
Regulatory information for France ........................................................... 21
Customer Services ............................................................................ 22


Introduction ◆5
Introduction
This Installation Guide describes how you can quickly install and use your
DIVA ISDN®+CT adapter and the corresponding software under
Windows NT 4.0.
The DIVA ISDN+CT is a passive ISDN-based computer telephony adapter,
designed to enable computer telephony applications for OEM
(original-equipment manufacturers) and system integrator customers. Equipped
with an on-board DSP (digital-signal processor) for voice, and headset/handset
ports, the DIVA ISDN+CT can be used in a variety of applications that require
data and real-time voice communications, such as call centers and multimedia
kiosks.
Before you start
In addition to your DIVA ISDN+CT package, make sure you have the following
items before you begin the installation.
Important: The DIVA ISDN+CT adapter has been tested and was
found to comply with the Electromagnetic compatibility, Safety, and
Network connection regulations within the European Union.
Item Description
✔Desktop
computer
Your computer must have:
• a free PCI slot
• Windows NT 4.0 (Service Pack 3 or higher)
• at least 4 MBytes of free hard-disk space for the software
✔CD-ROM or
diskettes for
Windows NT
You might be prompted to provide the CD-ROM or diskettes for
your operating system during the software installation.
✔ISDN basic rate
interface line
Your line is installed by your local telephone company.
Make sure that the ISDN wall jack is close to your computer.
✔Information
about your ISDN
line
Your ISDN service provider has to supply the following information.
• ISDN switch type: This depends on your geographic location (in
Europe, your switch type is probably ‘Euro-ISDN DSS1’,
commonly referred to as ‘ETSI standard’).
• ISDN phone numbers
✔Internet access If you want to connect to the Internet, get an Internet account with
an Internet service provider that supplies ISDN Basic Rate Interface
service. Your Internet service provider has to supply the following:
• user name and password
• dial-up ISDN number of the Internet service provider
• TCP/IP properties: host name, domain name, domain name server
address, IP address, and gateway address (some properties might
not be required for your connection)

6 ◆Step 1: Install Your DIVA ISDN+CT Adapter
Step 1: Install Your DIVA ISDN+CT
Adapter
1. For your safety, turn off the power to your computer and all peripheral
devices.
2. Drain static electricity from your body by touching the metal chassis (the
unpainted metal at the back of your computer).
3. Remove the power cord from your computer. The computer might still be
receiving power if it is plugged.
4. Remove the cover of your computer, as described in your computer’s manual.
5. Locate a PCI slot in your computer. If your computer has both ISA and PCI
slots, the PCI slots are shorter, as shown.
6. If there is a metal plate at the end of the slot, remove it and keep the screw or
retaining clip.
Warning: Install the adapter in your computer before connecting your
ISDN line.
PCI slots
ISA slots
metal plates
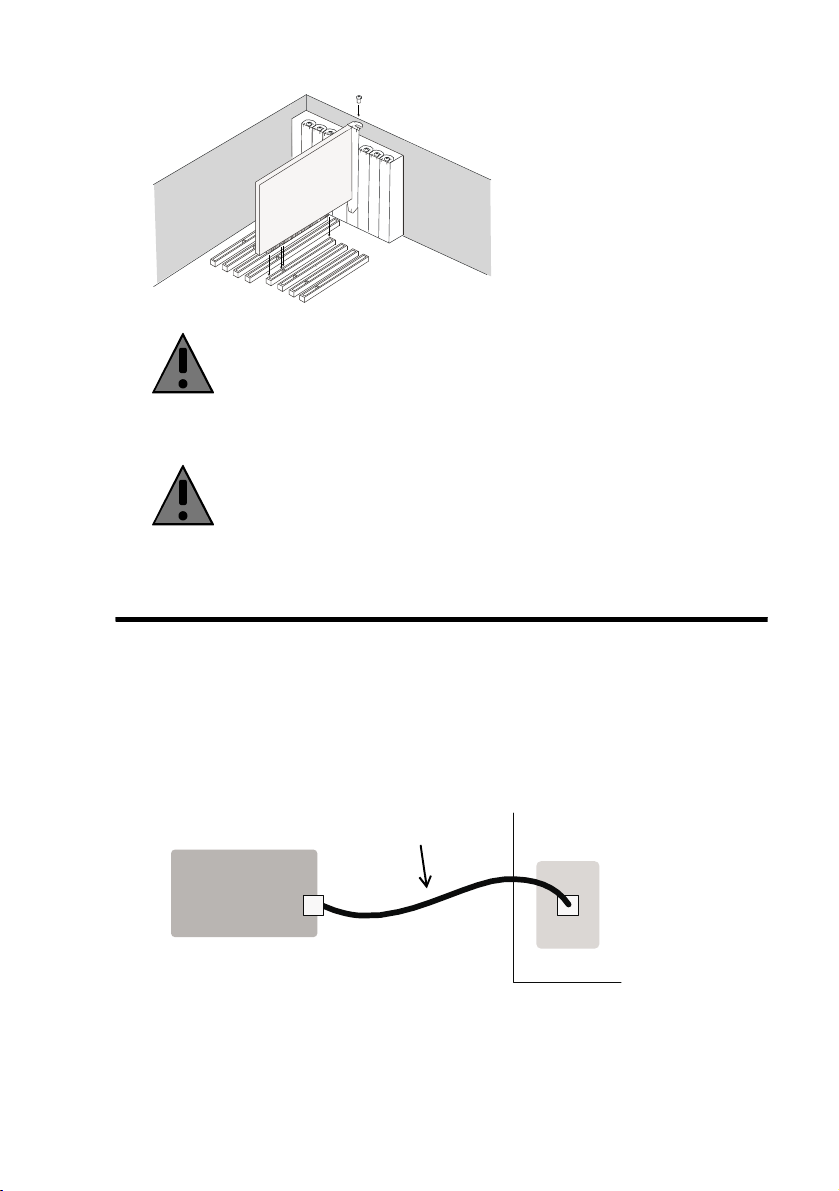
Step 2: Connect Your ISDN Line ◆7
7. Firmly insert the adapter into the PCI slot, as shown.
8. Fasten the adapter with the screw or the retaining clip.
9. Replace the cover of your computer as described in your computer’s manual.
10. Reconnect the power cable.
Step 2: Connect Your ISDN Line
After you have installed your DIVA ISDN+CT adapter, connect your ISDN line.
In Europe as well as most countries outside of North America and Japan, your
DIVA ISDN+CT adapter can be connected directly to your ISDN line using the
cable included with your DIVA ISDN+CT adapter.
1. Take the cable included with your DIVA ISDN+CT adapter.
2. Plug one end into the DIVA ISDN+CT adapter.
3. Plug the other end into the ISDN wall jack.
Warning: To avoid damaging your hardware, insert the
DIVA ISDN+CT adapter only into a PCI slot. Inserting the adapter
into any other type of slot can damage your adapter, your computer,
or both.
Warning: For your safety, make sure that the adapter’s bracket is
properly secured to the computer’s chassis by fastening the adapter
with the screw. This will ensure proper grounding.
1.
DIVA
ISDN+CT
2.
3.
ISDN wall jack
8 ◆Step 3: Connect Your Microphone, Loudspeaker, Hand- or Headset
Step 3: Connect Your Microphone,
Loudspeaker, Hand- or Headset
The DIVA ISDN+CT adapter has different ports to connect a microphone,
loudspeakers, hand- or headsets. See the illustration below:
Note: Recommended microphone types are electret microphones.
0,&
6SHDNHU
ISDN BRI connector
Microphone connector
Loudspeaker connector
Hand-/Headset 1 connector
Hand-/Headset 2 connector

Step 4: Install the DIVA ISDN+CT Software ◆9
Step 4: Install the DIVA ISDN+CT
Software
This section describes how to install and configure the software for
DIVA ISDN+CT. You must follow these procedures:
•‘Prepare to install the DIVA ISDN+CT software’below.
•‘Install the DIVA ISDN+CT software’on page 10.
•‘Install the virtual modems’on page 14.
Note: Virtual modems allow you to use your DIVA ISDN+CT adapter for a
variety of applications such as fax, analog, and V.120 applications.
Prepare to install the DIVA ISDN+CT software
• Make sure Windows NT networking is installed
Before you install the DIVA ISDN+CT software, make sure that Windows NT
networking is installed on your system. If you do not have a network interface
card (which is required to complete the Windows NT networking installation),
install the MS Loopback adapter. This adapter appears in the list of available
adapters in the ‘Network’dialog box, which is displayed during the
Windows NT networking installation.
• Make sure that the protocols you need to use are installed on your
computer
If you will be connecting to a Windows NT RAS server, you need to use one or
more of the following protocols: NetBEUI, TCP/IP, or IPX. You must use
protocols that are supported by the RAS server.
If you will be connecting to a TCP/IP router or an Internet service provider, you
need to use the TCP/IP protocol.
Follow the procedure below to install the required protocols.
To install protocols
1. Open the ‘Network’dialog box: click ‘Start > Settings > Control Panel’.
Double-click the ‘Network’icon.
2. Click the ‘Protocols’tab.
If all the required protocols appear in the ‘Network Protocols’list, then they are
already installed on your computer. Click ‘Cancel’to close the ‘Network’
dialog box. Continue with ‘Install the DIVA ISDN+CT software’on page 10.

10 ◆Step 4: Install the DIVA ISDN+CT Software
3. If a required protocol does not appear in the ‘Network Protocols’list, you
must add it. To add a protocol:
•Click ‘Add’.
•In the ‘Select Network Protocol’dialog box, select the required protocol,
then click ‘OK’.
•Follow the on-screen instructions.
•In the ‘Network’dialog box, click ‘Close’. If prompted, restart your
computer.
Install the DIVA ISDN+CT software
(A) Install your DIVA ISDN+CT as a network adapter
1. At the Windows NT console, logon as Administrator or equivalent.
2. Create a new folder on your hard-disk drive.
3. Copy the DIVA ISDN+CT software into the folder you created. Note that you
can download the DIVA ISDN+CT software from the Eicon Technology Web
site at: http://www.eicon.de/download/PUBLIC/dindex.htm
4. Extract the software as described in the instructions that were provided to you
with the software, or follow the instructions on the Eicon Technology Web
site.
5. From Windows Explorer, navigate to the folder you created in step 2. Then,
double-click the ‘setup.bat’file. This starts the DIVA ISDN+CT software
installation.
6. The ‘Windows NT Setup’screen appears. In the ‘Select OEM Option’dialog
box, select ‘DIVA ISDN+CT (PCI)’, then click ‘OK’.
7. If your computer has more than one bus type (for example, ISA and PCI), the
‘Passive ISDN S0 Adapter Bus Location’dialog box appears.
•In ‘Type’, select PCI.
•In ‘Number’, keep the default setting.
Click ‘OK’.
8. The ‘Eicon DIVA ISDN+CT Adapter Setup’dialog box appears. Select the
switch type specified by your ISDN service provider from ‘ISDN Protocol
(Switch Type)’.
In Europe, select ‘Europe, other countries, Euro-ISDN (ETSI-DSS1)’
(commonly referred to as ETSI standard).
Click ‘OK’.
Step 4: Install the DIVA ISDN+CT Software ◆11
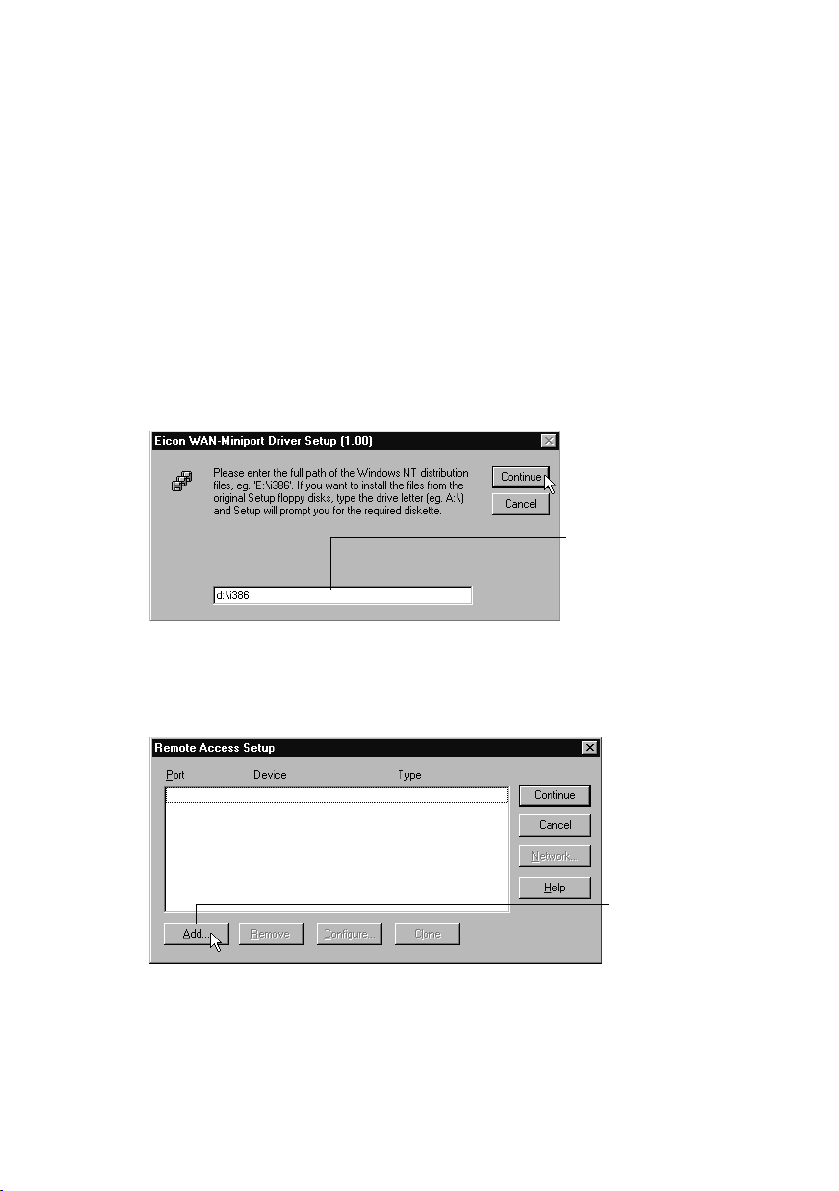
(B) Install the WAN-Miniport driver
1. In the displayed message box, click ‘Yes ’to install the WAN-Miniport Driver.
Installing the WAN-Miniport driver allows you to use Dial-Up Networking
over ISDN.
2. In the ‘Eicon WAN-Miniport Driver Setup’dialog box, keep the default
settings, then click ‘OK’.
(C) Install and configure Remote Access Service (RAS)
1. In the displayed message box, click ‘Yes ’to install RAS (if it is not already
installed) and configure RAS.
Note: If you install RAS, you also have to re-install your Windows NT Service
Pack.
2. If the ‘Eicon WAN-Miniport Driver Setup’ dialog box appears: Insert your
Windows NT CD-ROM or Setup diskette into the appropriate drive. In the
‘Eicon WAN-Miniport Driver Setup’dialog box, do the following:
Click ‘Continue’.
3. If the ‘Remote Access Setup’ dialog box appears: In the ‘Remote Access
Setup’dialog box, do the following:
Type D:\I386
(where Dis the drive that
contains the
Windows NT CD-ROM or
Setup diskette).
Click ‘Add’.
12 ◆Step 4: Install the DIVA ISDN+CT Software
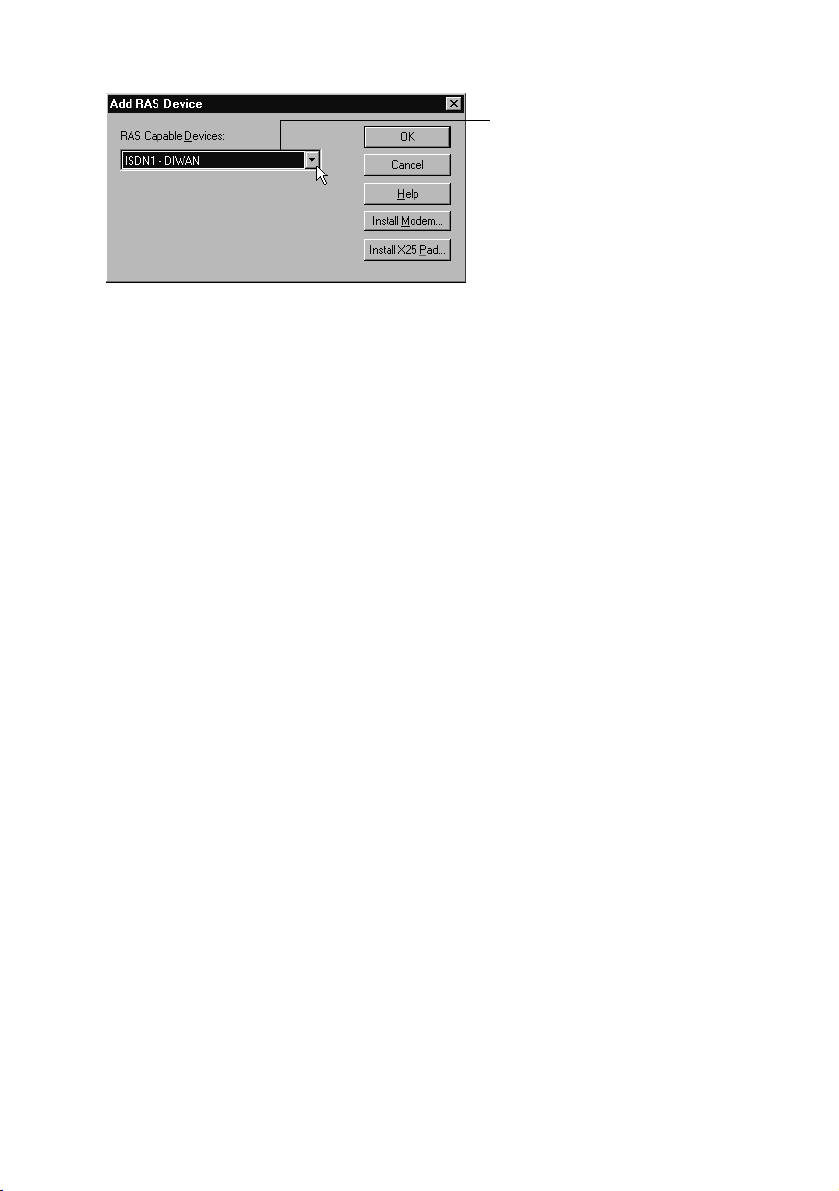
4. In the ‘Add RAS Device’dialog box, do the following:
Click ‘OK’.
This adds the first port.
5. In the ‘Remote Access Setup’dialog box, select ‘ISDN1 DIWAN’, then click
‘Configure’.
6. In the ‘Configure Port Usage’dialog box select ‘Dial out only’, then click
‘OK’.
7. In the ‘Remote Access Setup’dialog box, click ‘Clone’to add a new port
with the same configuration as the first port.
8. In the ‘Remote Access Setup’dialog box, click ‘Network’.
9. In the ‘Network Configuration’dialog box, select the dial-out protocols,
server settings, and encryption settings you want to use.
•If you will be connecting to a Windows NT RAS server, you have to select a
protocol that is supported by the RAS server.
•If you will be connecting to a TCP/IP router or an Internet service provider,
select only TCP/IP.
Click ‘OK’.
10. In the ‘Remote Access Setup’dialog box, click ‘Continue’.
(D) Install the Eicon Port driver
1. From the displayed message box, click ‘Ye s ’to install the Eicon Port driver.
The port driver lets you install various virtual modems for fax, V.110, V.120,
or analog modem support.
2. The port driver is automatically installed.
Note: After you restart your computer to complete the DIVA ISDN+CT
software installation, you have to install the required virtual modems. To do so,
see ‘Install the virtual modems’on page 14.
Select ‘ISDN1-DIWAN’.

Step 4: Install the DIVA ISDN+CT Software ◆13
(E) Install CAPI 2.0
1. In the displayed message box, click ‘Yes ’to install CAPI 2.0. Installing
CAPI 2.0 allows you to use ISDN applications that require a CAPI driver. We
recommend that you install CAPI 2.0.
2. In the ‘Select OEM Option’dialog box, select ‘Eicon CAPI 2.0 Driver’, then
click ‘OK’.
3. In the ‘Eicon CAPI 2.0 Driver Setup’dialog box, keep the default settings and
click ‘OK’.
(F) Complete the installation
1. From the displayed message box, click ‘OK’to launch the ‘Network’Control
Panel.
Note: Use the ‘Network’Control Panel to modify any part of the installation.
2. In the ‘Network’dialog box, click ‘OK’.
3. When prompted, restart your computer to complete the installation.

14 ◆Step 4: Install the DIVA ISDN+CT Software
Install the virtual modems
The DIVA ISDN+CT software provides several virtual modems that allow you to
use your DIVA ISDN+CT adapter for a variety of applications (for example, fax,
analog, V.120, and so on).
You can install one or more of the following virtual modems:
Modem Description
Eicon ISDN analog modem Use this modem for analog V.34 (33.6 kbps) data
communications to analog (non-digital) modems, over the
ISDN network.
Eicon ISDN BTX modem Use this modem in conjunction with banking applications
in Germany, such as Amaris or Microsoft Money.
Eicon ISDN fax modem Use this modem, in conjunction with a third-party faxing
software, to send and receive Group III faxes directly from
your computer (not from a separate fax machine). This
modem provides fax capability for fax applications that
cannot use CAPI.
Eicon ISDN V.110 modem Use this modem with some asynchronous terminal
applications, such as Home Banking.
Eicon ISDN V.120 modem* Use this modem in conjunction with certain asynchronous
terminal applications.
Eicon ISDN X.75 modem* Use this modem to connect to certain ISDN bulletin board
systems in Europe.
Eicon ISDN Digital modem* Use this modem, in conjunction with certain PPP
applications, to connect to the Internet or to a corporate
intranet router. This modem is needed if the PPP
application does not use Windows 2000 Dial-Up
Networking to establish a connection.
* These modems are available for both 56 kbps or 64 kbps connections. When connecting
to or calling from certain locations in North America, some switches do not support
64 kbps connections, and you must limit the speed to 56 kbps.

Step 4: Install the DIVA ISDN+CT Software ◆15
To install a virtual modem
1. Click ‘Start > Settings > Control Panel’.
2. Double-click the ‘Modems’icon.
If this is the first time you install a modem: In the ‘Install New Modem’dialog
box, select ‘Don’t detect my modem; I will select it from a list’. Then, click
‘Next’.
If this is not the first time you install a modem: In the ‘Modem Properties’
dialog box, click ‘Add’.
3. In the displayed dialog box, click ‘Have Disk’.
In the displayed dialog box, type the path to the DIVA ISDN+CT software
(which you copied to a folder on your hard-disk drive).
Click ‘OK’.
4. Select the modem you want to install, then click ‘Next’.
5. Select a port for the modem.
Note: In general, you can select either COM ports 5 or 6 or any DiPort as they
have the same functionality. However, some applications do not detect a DiPort
and require a COM port.
Also, you can install the modems several times; for example, the same modem
on different COM ports or several modems on the same COM port.
Click ‘Next’.
6. Click ‘Finish’, then click ‘Close’.
7. If you want to use the configured modem with RAS: Click ‘Ye s ’in the
displayed dialog box. Then, do the following:
•In the ‘Remote Access Setup’dialog box, click ‘Add’.
•In the ‘Add RAS Device’dialog box, select the port you selected in step 5,
then click ‘OK’.
•In the ‘Remote Access Setup’dialog box, click ‘Continue’.
•Before you can use the modem, you have to reboot your computer.
8. If you do not want to use the configured modem with RAS: Click ‘No’if you
only want to use the configured modem with applications such as
Hyperterminal.
After you install a virtual modem, simply select it from within the
communications software that will be using the modem.

16 ◆Appendix A: Troubleshooting
Appendix A: Troubleshooting
If you are having problems with your adapter or with the corresponding software,
the following suggestions can help you diagnose and solve the problems.
Using the Line Check utility
The Line Check utility performs a check of your adapter, cabling, and ISDN
connection.
To use the Line Check utility
•Click ‘Start > Programs > Eicon ISDN Tools (Common) > Line Check’. In the
‘DIVA Line Check’window, click ‘Start’.
If the Line Check returns an error, check the following items:
•cabling
•DIVA configuration (ISDN numbers and switch type)
•hardware configuration
Note: Take note of the error code returned by the Line Check utility. This error
code can help your ISDN service provider diagnose the problem.
If the Line Check does not return an error, and you cannot get your adapter to
work properly, there is probably a problem in the configuration of the application
you are using with your DIVA ISDN+CT adapter (such as Dial-Up Networking).
Contact your software vendor for further assistance.
Appendix A: Troubleshooting ◆17
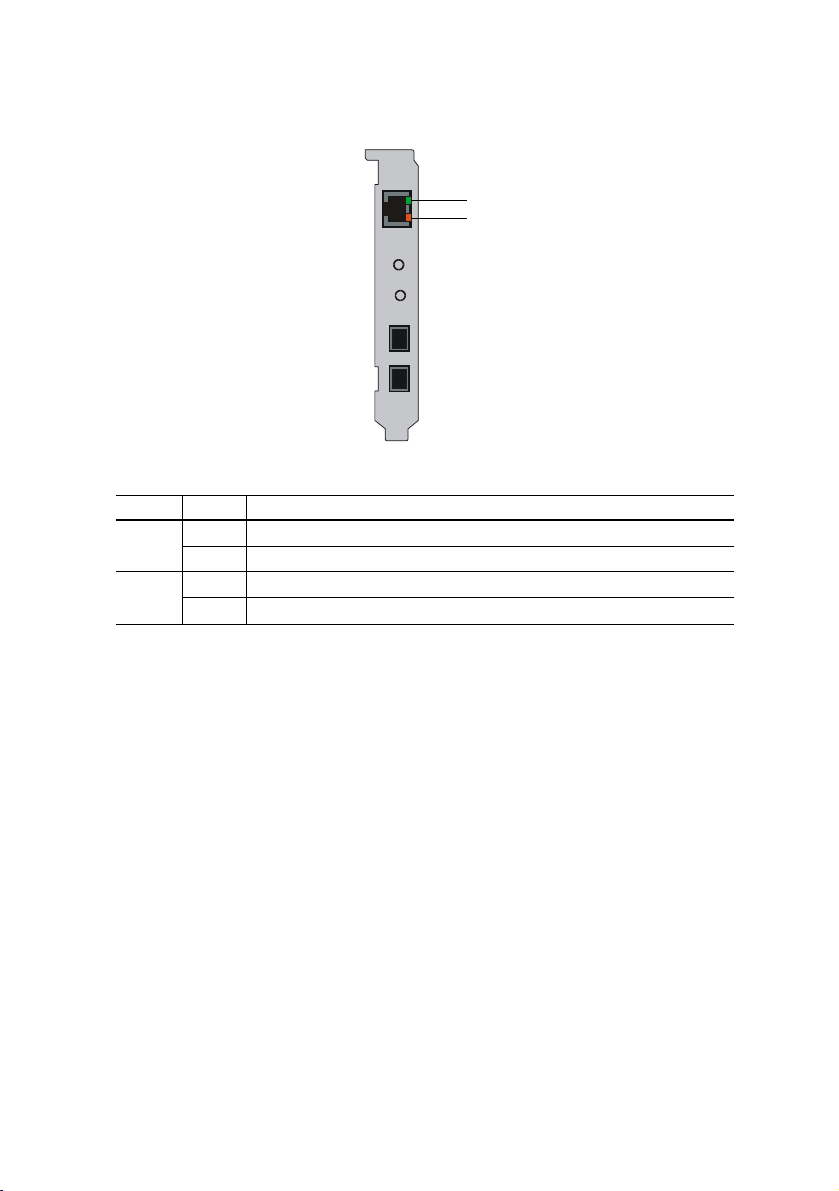
Checking the status LEDs
The DIVA ISDN+CT adapter has two status LEDs on the ISDN connector as
shown:
The table below shows the function of the two LEDs:
Color Status Description
green off The D-channel is not active.
on The D-channel is active. A connection is established.
orange off There might be a cabling problem.
on The cabling and the connection to ISDN work properly.
0,&
6SHDNHU
Green LED
Orange LED

18 ◆Appendix B: Monitoring Your ISDN Connection
Appendix B: Monitoring Your ISDN
Connection
The ‘Monitor’shows the status of both B-channels at any time. It appears as an
icon in the system tray, as shown:
The two lights on the icon represent the status of your two B-channels, as
described in the table below:
You can also view the status of the B-channels by placing your cursor over the
‘Monitor’icon for a few seconds. A tooltip displays the status of both B-channels.
Note: The ‘Monitor’is automatically loaded each time you start your computer.
Color of light Status of the corresponding B-channel
Red Not connected.
Green Connected.
•An up arrow indicates an outgoing call.
•A down arrow indicates an incoming call.
Depending on your connection, ISDN charges might apply.
Grey Inactive (Your adapter is not plugged into your computer or there is a
configuration error in the DIVA ISDN+CT software).
System tray
Monitor
2:45 PM

Appendix C: International Regulatory Information ◆19
Appendix C: International
Regulatory Information
Regulatory information for Europe
This equipment displays the CE 168 mark to show that it has been tested and
found to be in full compliance with the requirements of the Terminal Equipment,
EMC and Low Voltage Directives (91/263/EEC, 89/336/EEC and 72/23/EEC, as
amended by Directive 93/68/EEC).
Safety status:
SELV: No voltages within this equipment exceed SELV voltages. All
interconnection points and ports are SELV.
User/installer instructions for the United Kingdom
DIVA adapter Communications Board (internal models only)
Important safety considerations when installing into a host computer system
Warning: The ISDN cord(s) must remain disconnected from the
telecommunications system until the card has been properly installed
within the host which provides the necessary protection of the operator.
Proper installation of the ISDN card requires that the ISDN card is
screwed to the metal backplate of the PC. This ensures proper
grounding, which is necessary for your safety.
If it is subsequently desired to open the host equipment for any reason,
the ISDN cord(s) must be disconnected prior to effecting access to the
ISDN communications card.

20 ◆Appendix C: International Regulatory Information
Installation within a spare slot position
The equipment must be installed such that with the exception of the connections
to the host, clearance and creepage distances shown in the table below are
maintained between the card and any other assemblies which use or generate a
voltage shown in the table below.
The larger distance shown in brackets applies where the local environment within
the host is subject to conductive pollution or dry non-conductive pollution which
could become conductive due to condensation. Failure to maintain these
minimum distances would invalidate the approval.
These distances can be checked by measuring between the adjacent parts as
shown below. X shows the clearance distance which is the shortest distance in air
between two points. Y shows the creepage path (along surfaces) between the
same two points.
Warning: It is essential that, when other option cards are introduced
which use or generate a hazardous voltage, the minimum creepages
and clearances specified in the table below are maintained. Suitable
user protection to ensure compliance with EN 60950 should be present
on the card. A hazardous voltage is one which exceeds 42.4V peak a.c
or 60V d.c. If you have any doubt, seek advice from a competent
engineer before installing other adapters into the host equipment.
Clearance
X mm
Creepage
Y mm
Voltage used or generated by other parts of the
host or expansion card Vrms or Vdc
2.0 2.4 (3.8) up to 50
2.6 3.0 (4.8) up to 125
4.0 5.0 (8.0) up to 250
4.0 6.4 (10.0) up to 300
Table of contents


