Eight HDR1 User manual


1
Table of Contents
Safety Instruction ……………………………………………………………………
…
2
Introduction …………………………………………………………………………
…
3-4
Front Panel …………………………………………………………………………
…
5
Rear Panel …………………………………………………………………………… 6
Remote Control Guide ……………………………………………………………… 7-8
Using the Remote Control …………………………………………………………
…
9
Cable Connections …………………………………………………………………
…
10-11
Main Menu …………………………………………………………………………… 12-15
Basic Operation ……………………………………………………………………
…
16-20
Channel Search …………………………………………………………………… 16-17
Changing Channel/Info Box/Changing Volume/………………………………
…
18
Subtitle/Audio/Mute/Time Shift Function ………………………………………
…
19
Real Standby Function …………………………………………………………
…
20
Recording Function …………………………………………………………………
…
21-23
Network ………………………………………………………………………………
…
23-26
Electronic Program Guide (EPG) …………………………………………………
…
27
Troubleshooting ……………………………………………………………………
…
28
Technical Specification ……………………………………………………………
…
29

2
Safety Instructions
•Always read the safety instructions carefully.
•Keep this User's Manual for future reference.
•Keep this equipment away from humidity.
•Place this equipment on a reliable flat surface before setting it up.
•Do not stand it on soft furnishings.
•If any of the following situation arises, get the equipment checked by a service
technician:
- The equipment has been exposed to moisture.
- The equipment has been dropped and damaged.
- The equipment has obvious signs of breakage.
- The equipment has not been working well or you cannot get it to work according to
the User's Manual.
Warning
•To prevent the risk of electric shock, do not open the cover or the back of unit.
•Do not block the ventilation holes of the device. Leave appropriate gap above and
around it to allow for adequate ventilation.
•Do not place the device in an unventilated cabinet or on top of a unit which emits
heat.
•Danger of explosion if battery in incorrectly replace. Replaced only with the same
or equivalent type.
•The apparatus shall not be exposed to dripping or splashing and no objects filled
with liquids, such as vases, shall be placed on the apparatus.
•The main plug is used as the disconnected device, the main plug shall remain
readily operable.
•To reduce the risk of fire or electric risk, do not expose this apparatus to rain or
colds.
Copyright Statement
No part of this publication may be reproduced in any form by any means without the
prior written permission. Other trademarks or brand names mentioned herein are
trademarks or registered trademarks belong to EIGHT Limited.
Disclaimer
Information in this document is subject to change without notice. The manufacturer
does not make any representations or warranties (implied or otherwise) regarding the
accuracy and completeness of this document and shall in no event be liable for any
loss of profit or any commercial damage, including but not limited to special, incidental,
consequential, or other damage.
This symbol indicates that this product incorporates double insulation
between hazardous mains voltage and user accessible parts. When
servicing use only identical replacement parts.

3
Introduction
Applications/Features
zSupport DMB-TH digital broadcast standard
zSupport DAB+ digital Radio broadcast standard
zTime Shift supports with record function up to 2 hours
z7 days Electronic Program Guide (EPG)
zPersonal Video Recorder (PVR) with schedule/EPG recording
zAspect Ratio Conversion (16:9, 4:3)
zChannel List
zLogical Channels (0-999) Number Display
zOSD Language support Traditional Chinese/English
zSupport Ethernet
zSupport Channel Search in Automatic and Manual methods
zUSB 2.0 supported
zSoftware upgradeable via USB 2.0
zSupport HD or SD output (HDMI, YPbPr, CVBS)
zOutput display support 1080p/1080i/720p/576p/576i/480i
zHDMI output: 1080p/1080i/720p/576p/576i/480i
zYPbPr output: 1080p/1080i/720p/576p/576i/480i
zSupport PCM digital audio output
zDigital Audio Output SPDIF (Optical/Coaxial)
zTick Play in Time Shift mode and in PVR playback mode: Fast Forward &
Rewind (2X/4X/8X/16X/32X/64X), Instant Replay, Pause, Quick Skip Play

4
Introduction
Package Contents
Before installation, please check the items of the package. The package should
contain the following items:
1. MainUnit x1
2. RemoteControl x1
3. “AAA” Batteries (for remote) x2
4. Instruction Manual x1
5. Composite Cable x1
6. DAB Antenna x1
7. RF Cable x1

5
Front Panel
Front Panel
1. STAND BY: To turn the Standby mode ON/OFF.
2. MENU: To enter the Main Menu.
3. OK: To confirm the selected menu item.
4. CH-/CH+:To change Channel up/down or move cursor up/down in the menu.
5. VOL-/VOL+:To control volume level up/down or move cursor up/down in the
menu.
6. USB Slot: Connect for software upgrade or proceed the recording function..
(USB2)
6
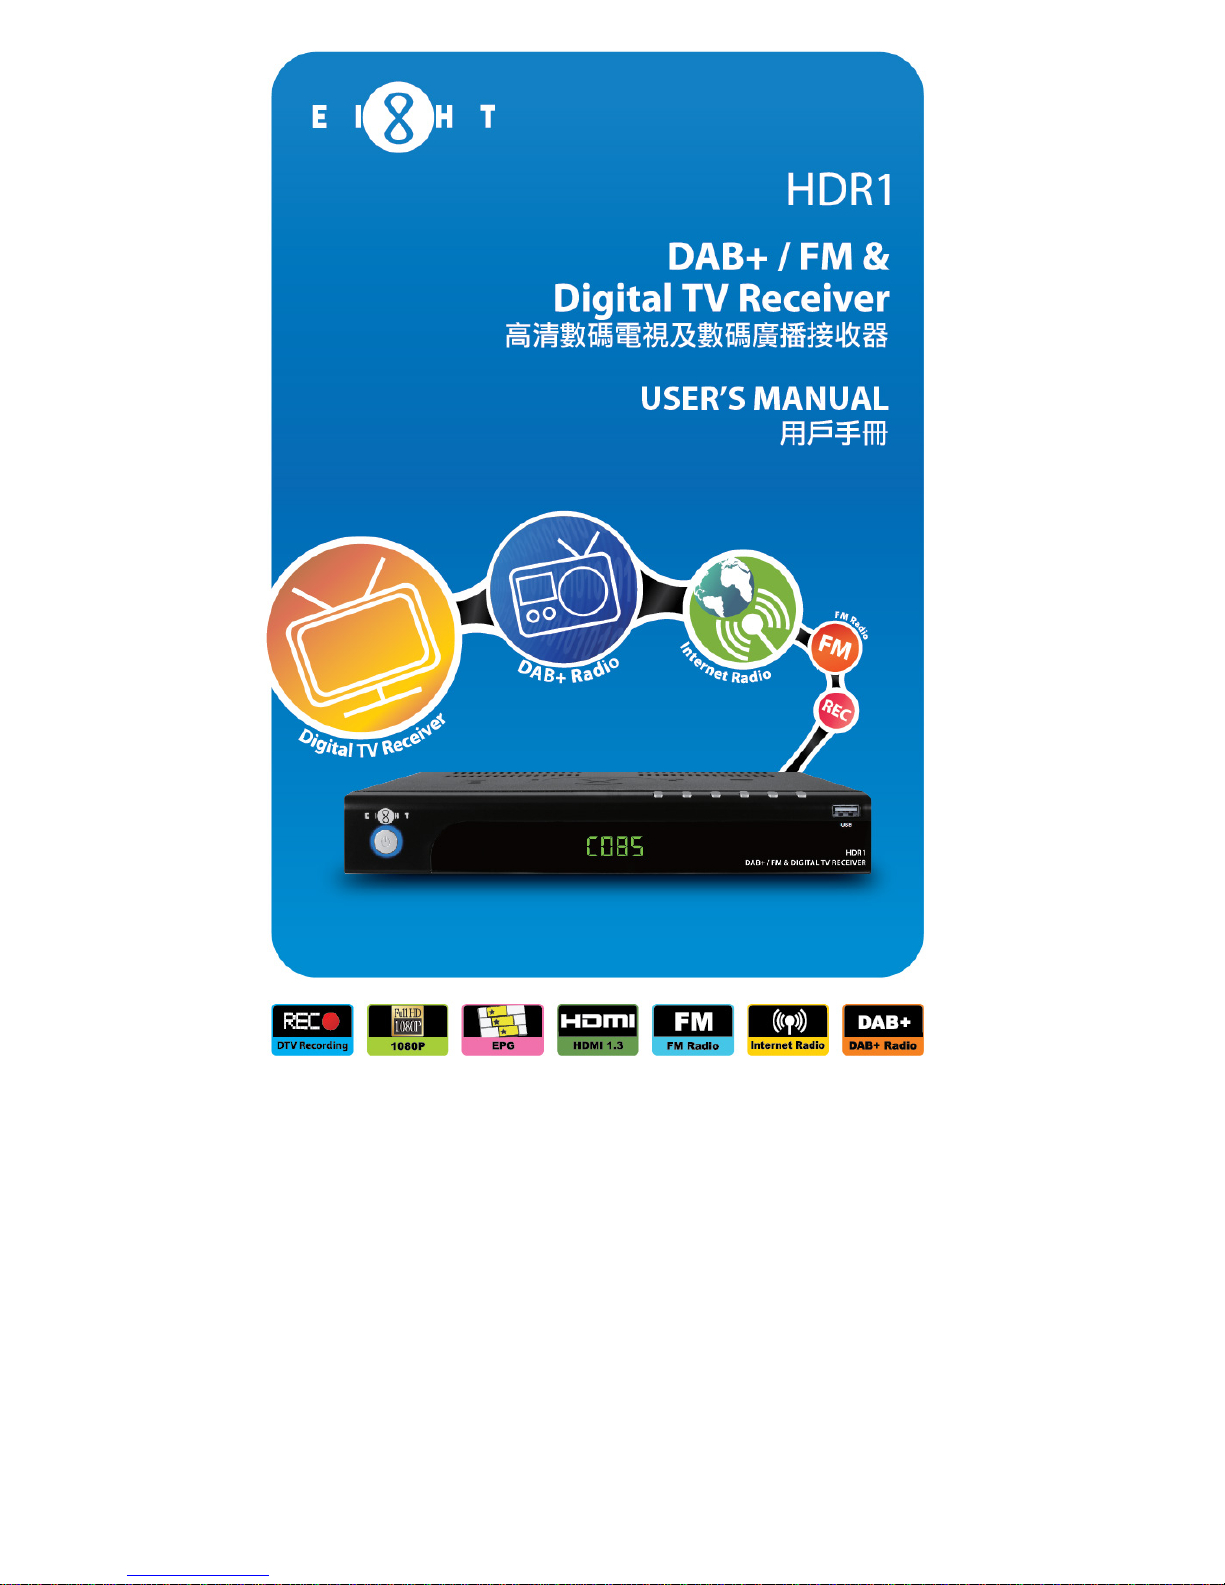
Rear Panel
Rear Panel
1. LOOP OUT: Loop output RF signal to another receiver or DAB+ IN.
2. ANT IN: Connect to terrestrial antenna.
3. ETHERNET: Connect to Ethernet.
4. SPDIF: Output digital audio signal to amplifier.
5. USB: Connect to specific USB device.
(USB1)
6. HDMI: Output video and audio signal to TV (support high definition
Output).
7. YPbPr: Output Y/Pb/Pr video signal to TV (support high definition output).
8. DAB+ IN: To connect the DAB+ antenna or RF Cable
9. COAXIAL: Output digital audio signal to amplilfier.
10. CVBS: Ouput CVBS video signal to TV.
11. AUDIO L/R: Output right/left audio signal to TV or Amplifier.

7
Remote Control Guide
Key functions for remote control:
1. POWER: To turn unit ON/OFF.
2. TV: Shortcut key to TV function.
3. PVR: Shortcut key to PVR function.
4. DAB+: Shortcut key to DAB+
function.
5. INTERNET: Shortcut key to Internet
function.
6. REW: Rewind playing record or time
shift (support 2X, 4X, 8X, 16X, 32X,
64X).
7. PREV: Go to the start point of a
program (in time shift or PVR mode).
8. PAUSE: Pause to play or start time
shift function.
9. PLAY: Start to playing or resume
time shift.
10. AUDIO: To switch audio mode.
11. CH+/- : Change the channel.
12. SUBT: To switch ON/OFF Subtitle
function.
13. 4 COLOR KEYS: For referring usage
shown on the screen.
14. MENU: To open Main Menu.
15. ▲▼: To move up/down or switch
channel.
16. OK: To confirm the selected item.
17. EPG: Shortcut key to EPG list.
18. NUMERIC BUTTON(0-9) : For channel change by LCN or setting input.
19. RECALL: Back to previous watching channel.
20. MUTE:To mute or recover the sound of the unit.
21. MEDIA: Shortcut key to Media function.
22. A. RATIO: To change Aspect Ratio.
23. FM: Shortcut key to FM function.
24. T-SHIFT: To switch ON/OFF Time shift function (must connect external
Harddisk/USB device).
25. FF: Forward playing record or time shift (support 2X, 4X, 8X, 16X, 32X, 64X).
26. NEXT: Go to the end of the program.

8
Remote Control Guide
27. STOP: Stop to run existing recording or time shift.
28. REC: To start instant record on current program.
29. PAGE UP: Go to previous page.
30. VOL+/-: To control the level of volume.
31. PAGE DOWN: Go to next page.
32. EXIT:Exit current screen.
33. ◀▶:Move between left and right.
34. TIMER: Shortcut key to Timer function.
35. INFO: To display the current and next program information.

9
Using the Remote Control
To install AAA size batteries for remote control:
Remove the battery cover from the remote control and put two AAA size batteries
inside the compartment. The diagram shows the correct way to install the batteries.
Caution:
1. Keep batteries out of children’s reach.
2. Don’t attempt to recharge, short-circuit, disassemble, heat or throw the batteries
into the fire.
3. Always replace both batteries at the same time. Never mix new and old batteries
or batteries of a different type.
4. If you don’t intend to use the remote control for an extended period, remove the
batteries to prevent possible leakage and corrosion.
5. Do not drop, apply shock or step on the remote control.
6. Do not spill water on the remote control.
Notes: If the receiver does not operate when operating the remote control from a close
range, you need to replace the batteries.
Using the Remote Control
1. To use the remote control, point it towards the front of the unit.
2. The remote control has as range of up to 8 meters from the unit at an angle of up
to 60 degrees (30 degrees for left hand side and 30 degrees for right hand side).
3. The remote control will not operate if its path is blocked.
Note: Sunlight or very bright light will affect the sensitivity of the remote control.
10
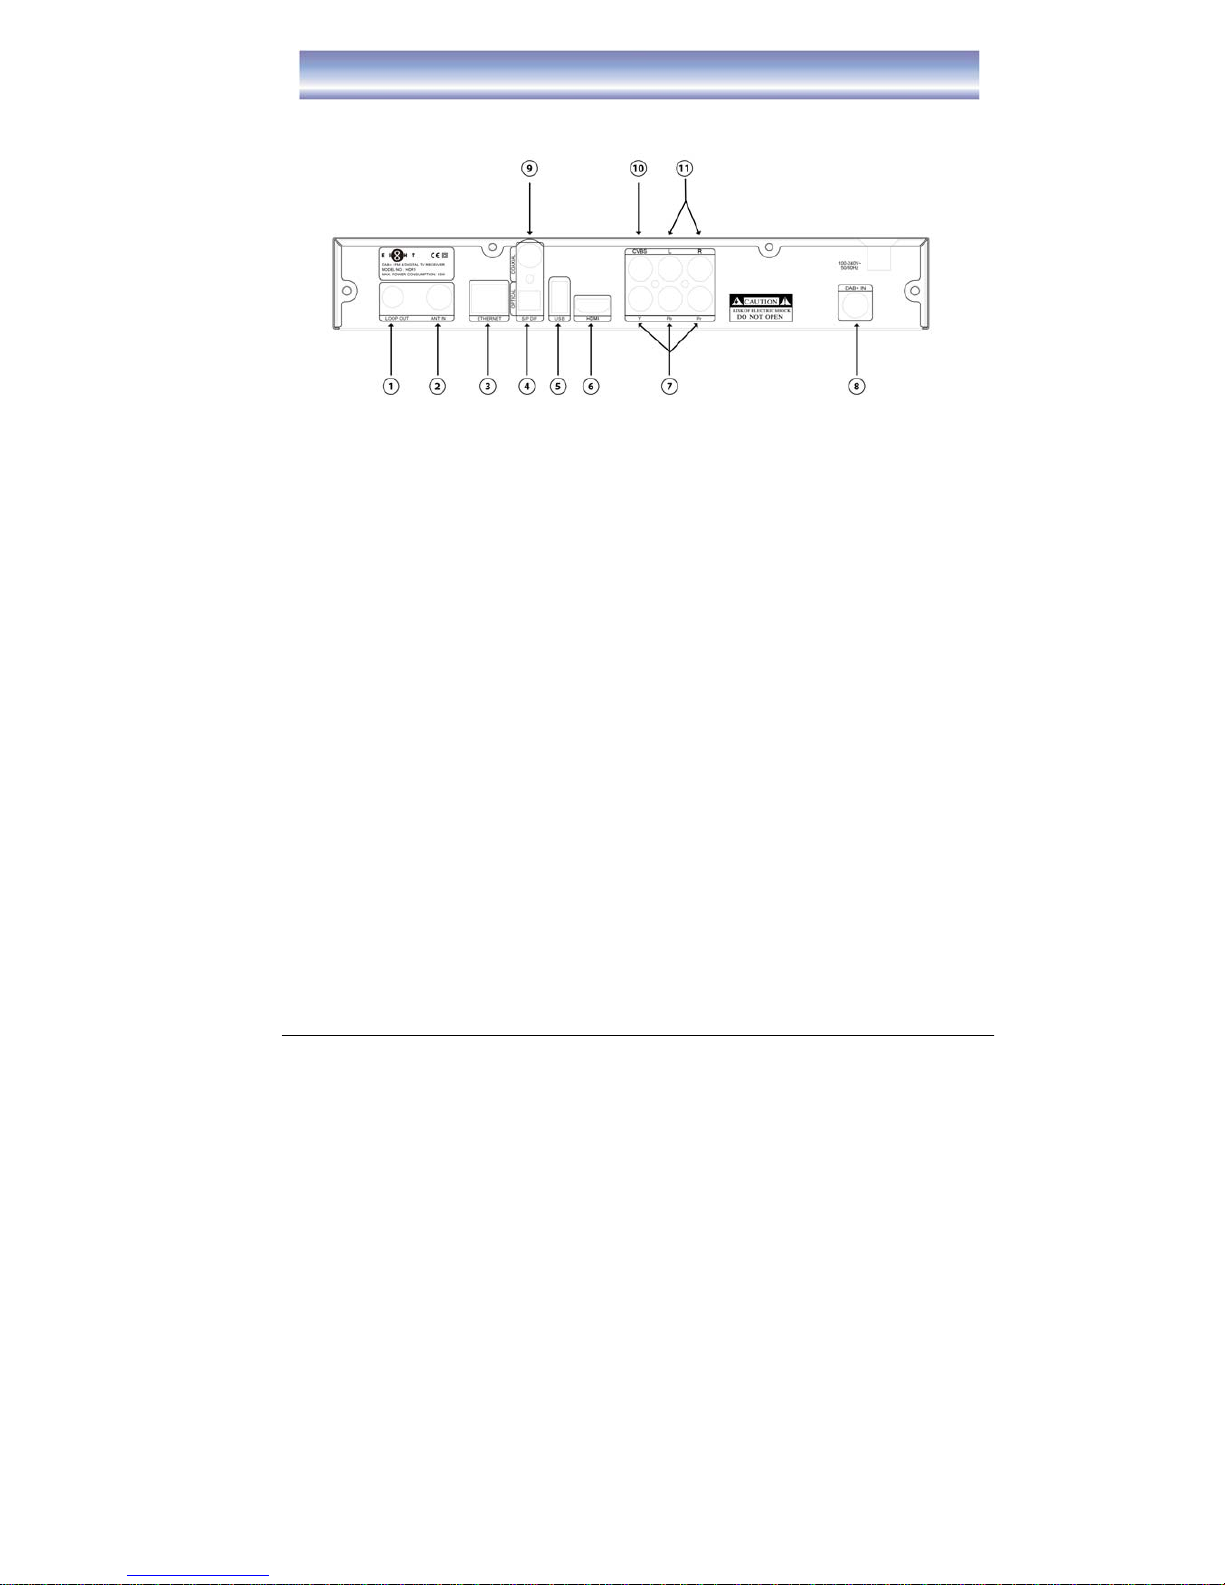
Cable Connections
The following figure shows cable connections required for TV and other related
electrical equipment.
Connection Diagram:
A) Basic Connections
1. Connect the antenna with ANT IN on the unit.
2. Connect the DAB antenna with DAB+ IN on the unit.
3. Connect the unit via CVBS and AUDIO L/R.
B) Connect YPbPr Ports
1. Connect the antenna with ANT IN on the unit.
2. Connect the DAB antenna with DAB+ IN on the unit.
3. Connect the unit to TV via YPbPr cable as the following figure.
11
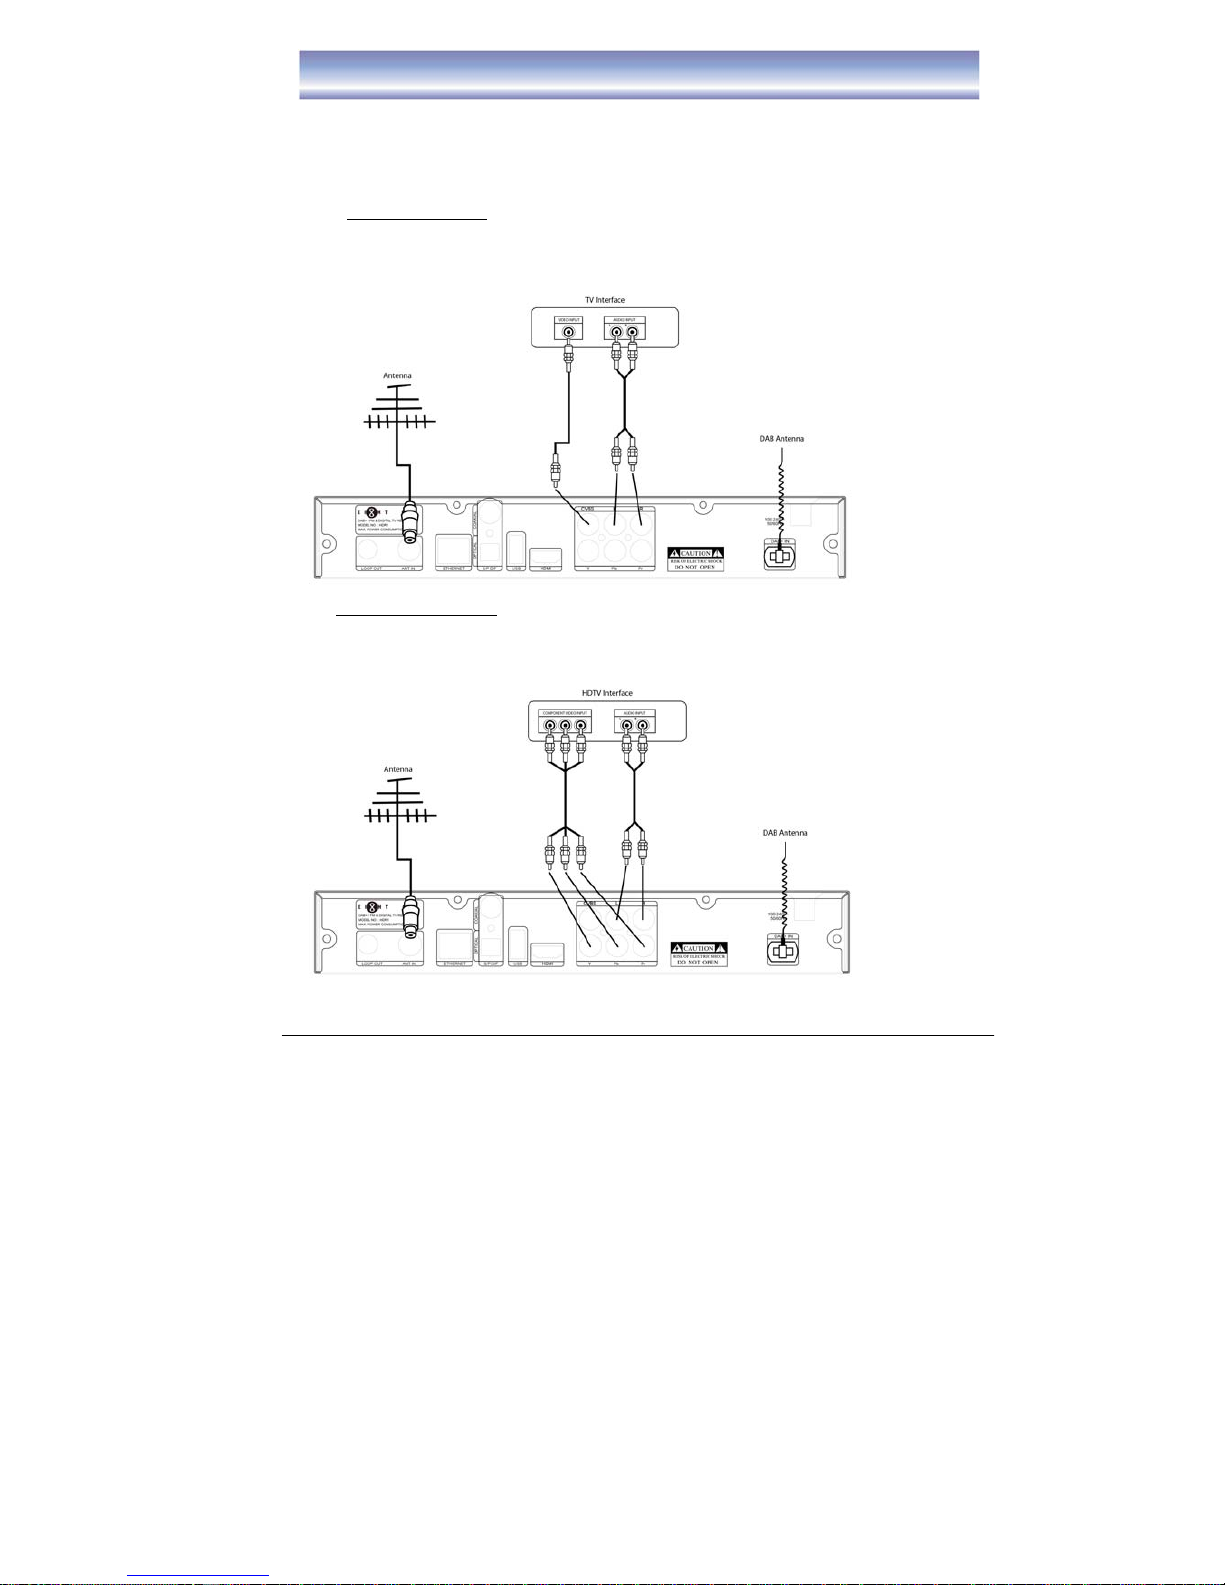
Cable Connections
C) Connect HDMI Port
1. Connect the antenna with ANT IN on the unit.
2. Connect the DAB antenna with DAB+ IN on the unit.
3. Connect the unit to TV via HDMI cable as the following figure.
D) Audio connection via SPDIF/ Audio L/R Ports
1. Connect the antenna with ANT IN on the unit.
2. Connect the DAB antenna with DAB+ IN on the unit.
3. Connect the unit to TV/ home theater via AV cable as the following figure.
Note: If the reception of the DAB signal is not good, please change to use RF Cable
instead of DAB Antenna. Please connect the RF Cable in LOOP OUT and DAB+ IN.

12
MAIN MENU
Pressing [MENU] to open MAIN MENU.
Description on each setting items are as below:
LIVE TV mode
Press [OK]/[▶]to enter the Channel List.
EPGMenu
Press [OK]/[▶]to enter EPG List.
zElectronic Program Guide
PVRMenu
Press [OK]/[▶]to enter PVR List, to select
others function.
zMedia Browser
zTimer List
zStorage
zTo view the status of the Harddisk
zFormat HDD
zPVR Setting
zTime Shift Function (Enable/Disable)
zTime Shifting Duration
- Support from 2 min up to 2 hours
zRecording Storage
-This is the storage device for
recording. All related files for
incoming recordings will be stored in
the specific device.
13
MAIN MENU
-There are 2 options: USB1 (at the back USB slot), USB2 (in the front USB
slot)
zPlayback Start Position
To select the start point for playing of recorded program.
Available: Beginning, Continuing (from the point which stop in last playing)
zAutomatic Play Next Program
-If select “Enable”, will continue to play next program after current program
finished.
-If select “Disable” will only play the program which selected.
zPicture Browser
Support jpeg , png & gif format file
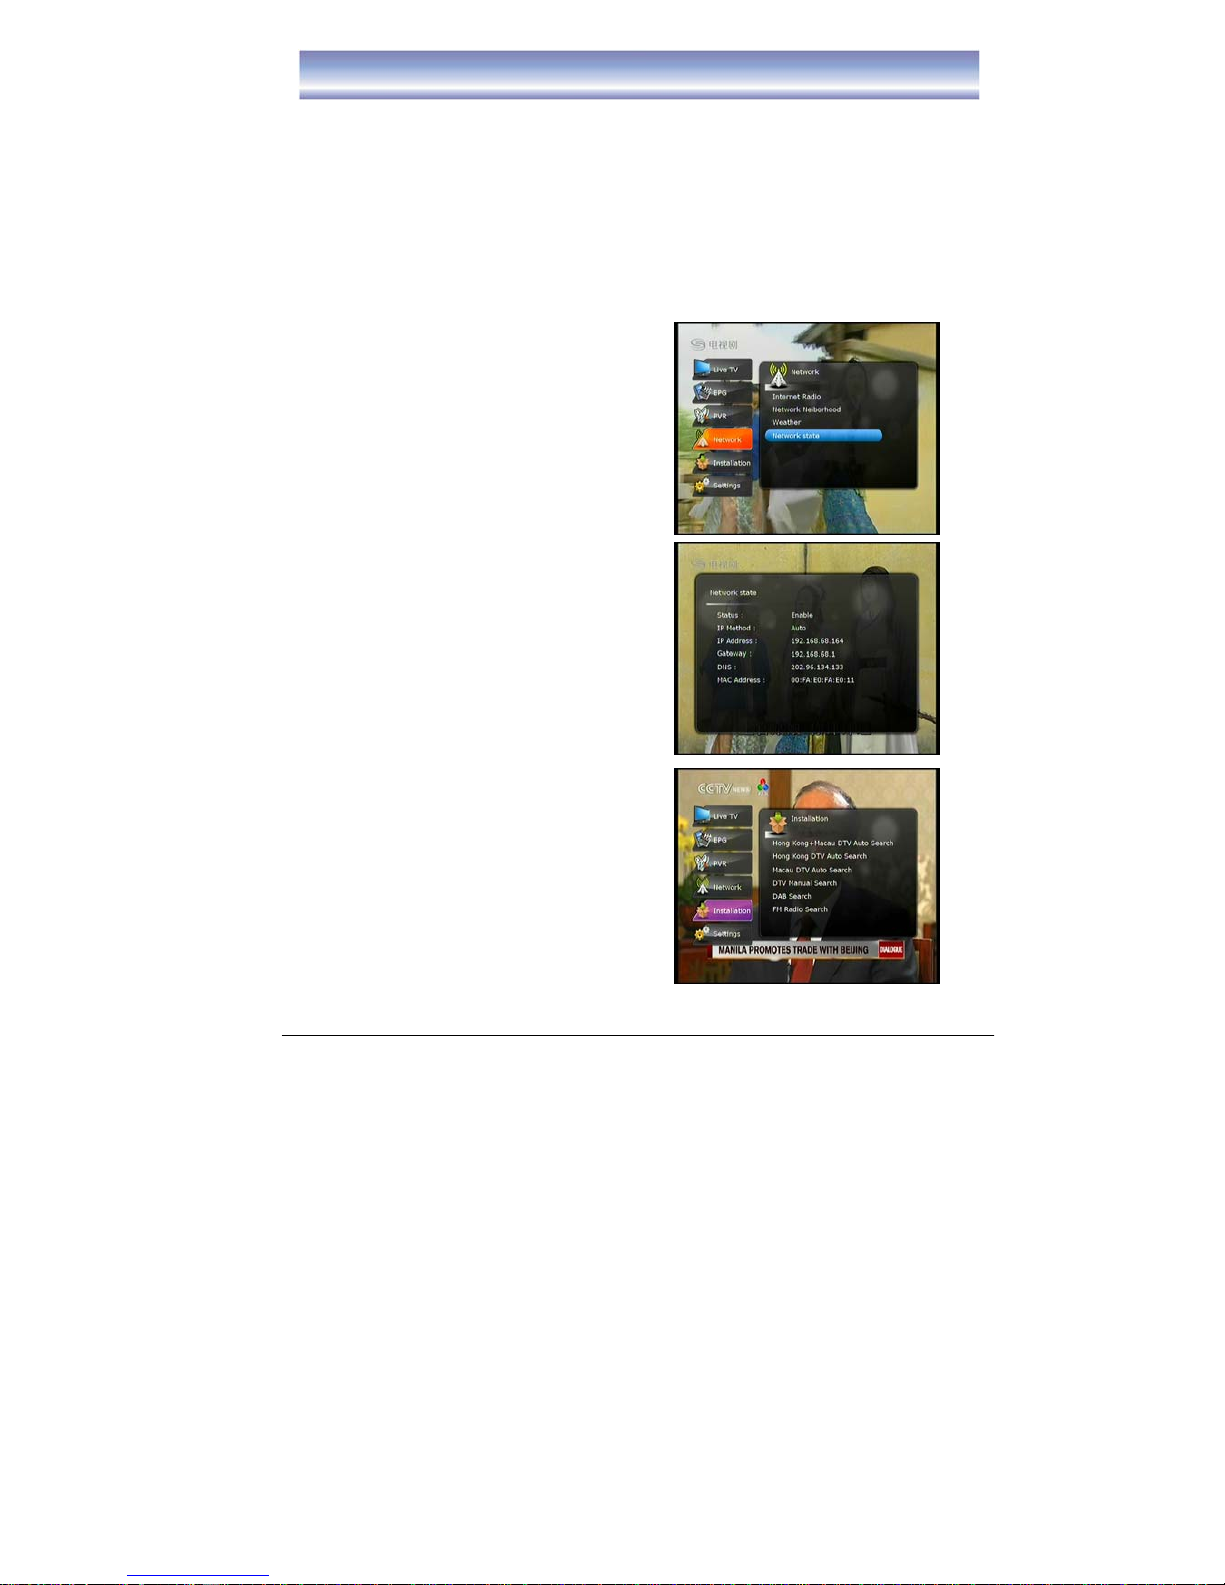
NETWORK Menu
Press [OK]/[▶]to enter Network Menu.
zInternet Radio
zNetwork Neiborhood
zWeather
zNetwork State
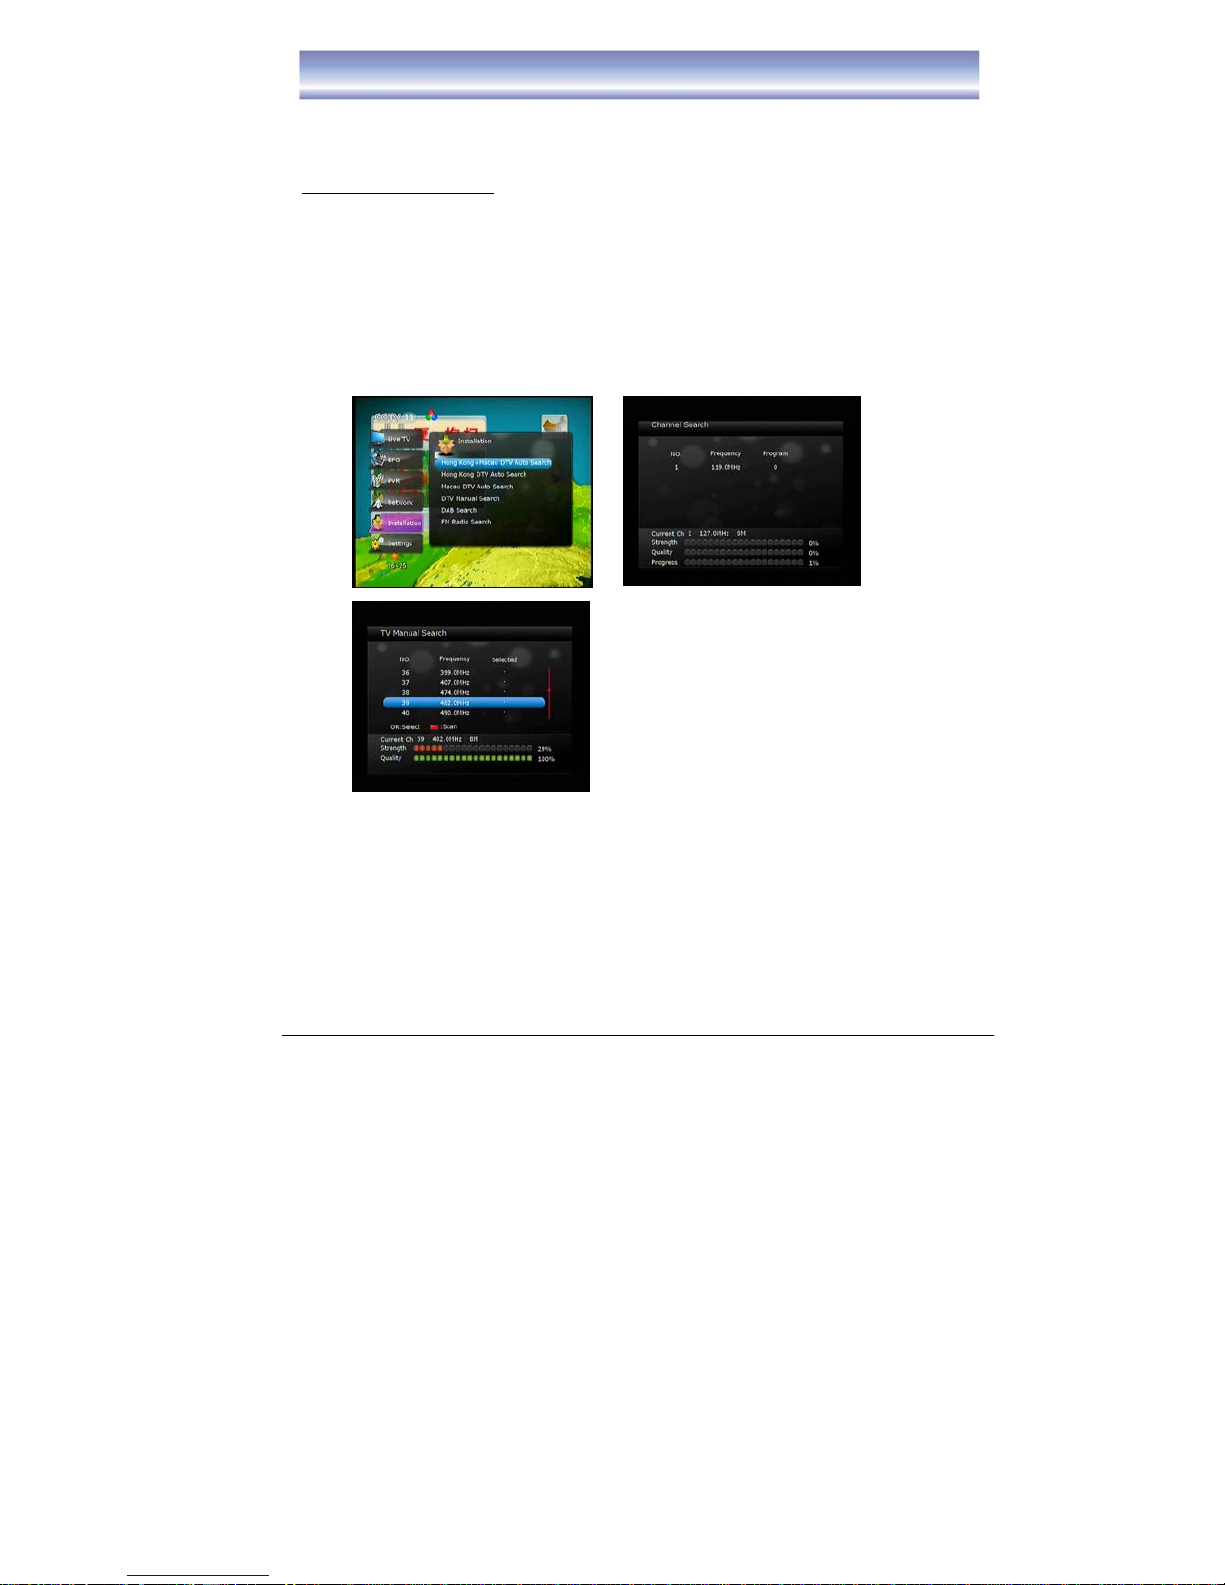
INSTALLATION Menu
Press [OK]/[▶]to enter Installation Menu, to
select others function.
zHong Kong + Macau DTV Auto Search
(details refer to page 16)
zHong Kong DTV Auto Search (details
refer to page 16)
zMacau DTV Auto Search (details refer to
page 16)
zDTV Manual Search (details refer to page
16)
zDAB Search (details refer to page 17)
zFM Radio Search (details refer to page
17)
14
MAIN MENU
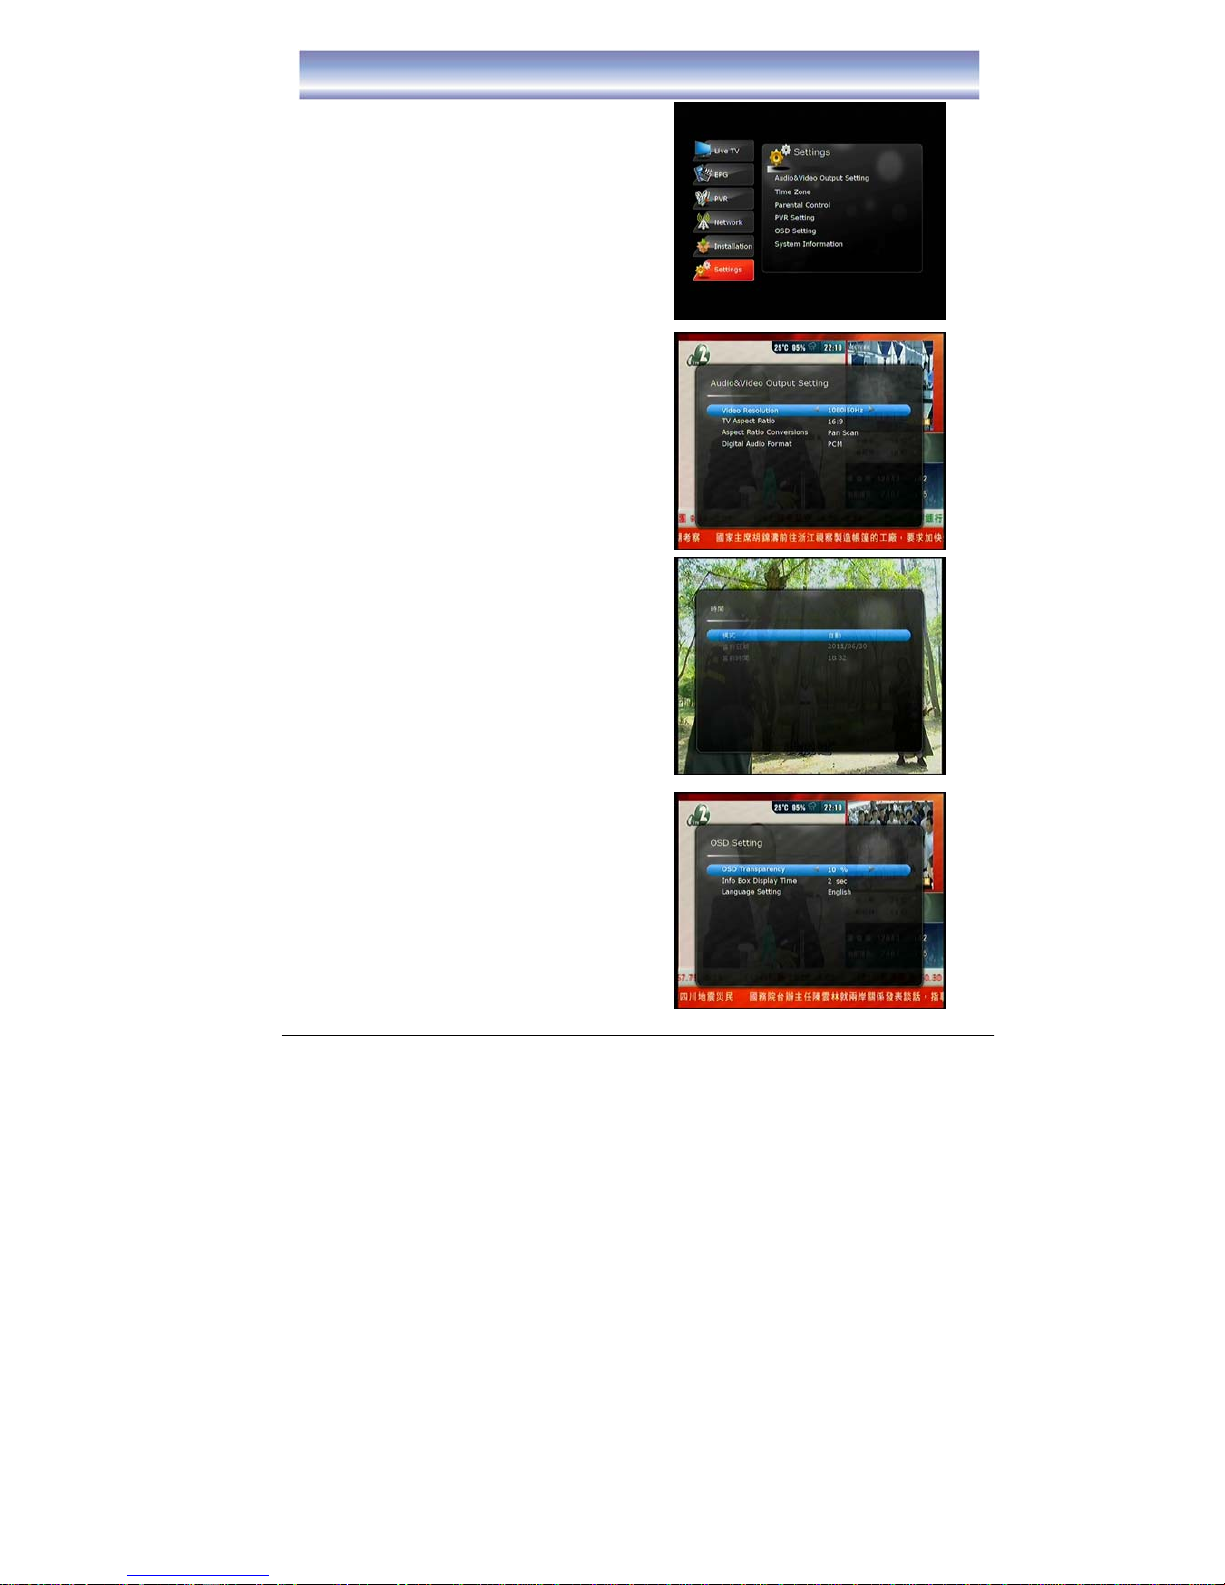
SETTINGS Menu
Press [OK]/[▶]to enter Settings Menu.
Audio & Video Output Setting
zVideo Resolution:
-1080p, 1080i, 720p, 576p, 576i,
480i
zTV Aspect Ratio:
-16:9, 4:3
zAspect Ratio Conversions:
-Auto, Letter Box, Pan Scan
zDigital Audio format
-PCM, Bit Stream
zTime
zMode
zDisplay Current Date
zDisplay Current Time
zOSD Settings
zOSD Transparency
zInfo Box Display Time
zLanguage Setting
-Traditional Chinese, English

15
MAIN MENU
zSystem Information
To view software information of the unit.
Firmware Upgrade
Upgrade software via USB slot.
1. Plug in USB device (the update software must be loaded in the USB device).
2. Press [MENU] to open MAIN MENU.
3. Press [▲]/[▼]to select “Setting”
4. Press [OK]/[▶]to select “Firmware upgrade”.
5. Press [YES] to confirm.
Factory Default
This option will restore to default factory setting.
1. Press [MENU] to open MAIN MENU.
2. Press [▲]/[▼]to select “Setting”
3. Press [OK]/[▶]to select “Factory Default”.
4. Press [YES] to confirm.
NOTE: Factory default PIN is “0000”.
*Warning: During firmware upgrade/restoring default, DO NOT shut down the
power otherwise the unit will be damaged and need to be returned to EIGHT
Limited for repair. Proceeding firmware upgrade it will delete all the recorded
clips on the box.
16
Basic Operation
Channel Search
Included DTV channels, DAB channels & FM Radio channels.
For DTV channels search
1. Press [MENU] and then click [▲]/[▼]to [Installation].
2. Press [OK]/ [▶]to enter [Installation] menu.
3. Press [
▲]/[▼]to select the method of channel scan, press [OK] to confirm.
Auto Search: can select – Hong Kong & Macau DTV Auto Search, Hong Kong
DTV Auto Search, Macau DTV Auto Search.
Manual Search: Suitable when specific channel to be searched, press [◀/▶] to
navigate.
4. Press [OK]/Red button to start search when search method is selected.
Note: Any added timer in time list will be cleared when any channel search is performed.

17
Basic Operation
For DAB channels search
1. Press [MENU] and then click [▲]/[▼]to [Installation].
2. Press [OK]/ [▶]to enter [Installation] menu.
3. Press [▲]/[▼]to select DAB Search, then press [OK] to start.
4. After channels search, data will save automatically.
For FM Radio channels search
1. Press [MENU] and then click [▲]/[▼]to [Installation].
2. Press [OK]/ [▶]to enter [Installation] menu.
3. Press [▲]/[▼]to select FM Radio Search, then press [OK] to start.
4. After channels search, data will save automatically.
18
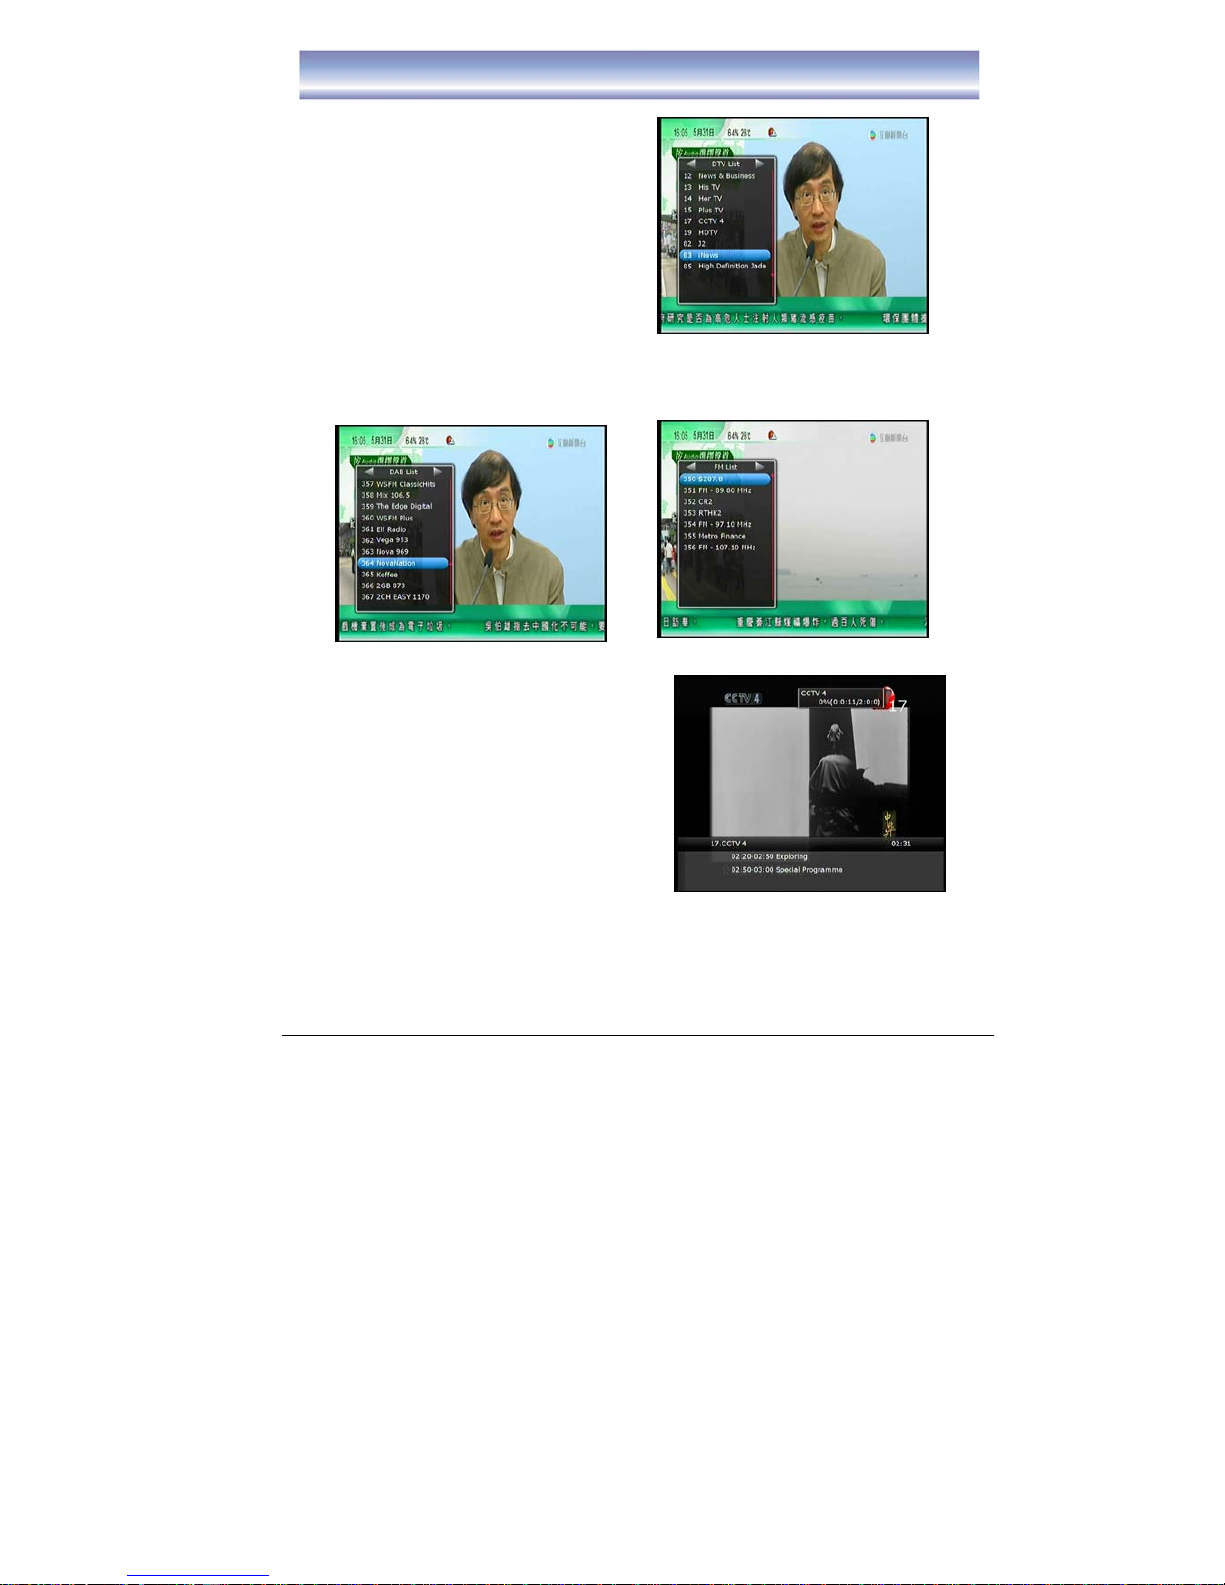
Basic Operation
Changing Channels
1) Open Channel List menu by pressing
[OK] .
2) Press [◀]/[▶] key to switch between
DTV List/DAB List/FM Radio list.
3) Press [▲]/[▼]key to navigate for the
channels.
4) Press [OK] key to play the channel.
5) Channel Change can also be done by:
zPress [CH+][CH-].
zInput the Channel LCN by keypad.
Note: When recording program, only can view the Live TV Channels which inside in
recorded frequency, the programs of others frequency will be hide. And there is a
red square show near the channel which under recording.
Info Box
1. Open Info Box by pressing [INFO] in Live
TV Mode.
2. It shows the current and next program and
the relative information of the program.
3. Wait a moment or press [EXIT] to quit.
4. When recording, the record status will
show on the top right corner of the
screen.
Changing Volume
Press the [VOL+]/[VOL-] to increase or decrease the volume accordingly.
The current volume level will show on the bottom of the screen.
Table of contents


