EINHELL Expert TE-XS 28 User manual

mManual de instrucciones original
Lijadora múltiple
tOriginal operating instructions
Multiple Grinder/Sander
TE-XS 28
South America
Anleitung_TH_XS_28_SPK8__ 24.09.12 15:21 Seite 1
2
1
3
21 4
7
11
910
b
a
c
6
5
8
32
10
1
a 5
Anleitung_TH_XS_28_SPK8__ 24.09.12 15:21 Seite 2
3
4 5
6 7
d8 d 7 6ab
6
c
11
b
a
e
a
8 9
a
9
—
0
I
+
1
6
3
2
Anleitung_TH_XS_28_SPK8__ 24.09.12 15:21 Seite 3

4
E
“Aviso - Leer el manual de instrucciones para reducir cualquier riesgo de sufrir daños”
Usar protección para los oídos.
La exposición al ruido puede ser perjudicial para el oído.
Es preciso ponerse una mascarilla de protección.
Puede generarse polvo dañino para la salud cuando se realicen trabajos en madera o en otros
materiales. ¡Está prohibido trabajar con material que contenga asbesto!
Llevar gafas de protección.
Durante el trabajo, la expulsión de chispas, astillas, virutas y polvo por el aparato pueden
provocar pérdida de vista.
Anleitung_TH_XS_28_SPK8__ 24.09.12 15:21 Seite 4

¡Atención!
Al usar aparatos es preciso tener en cuenta una
serie de medidas de seguridad para evitar lesiones o
daños. Por este motivo, es preciso leer atentamente
estas instrucciones de uso. Guardar esta
información cuidadosamente para poder consultarla
en cualquier momento. En caso de entregar el
aparato a terceras personas, será preciso
entregarles, asimismo, el manual de instrucciones.
No nos hacemos responsables de accidentes o
daños provocados por no tener en cuenta este
manual y las instrucciones de seguridad.
1. Instrucciones de seguridad
AVISO Lea todas las instrucciones de
seguridad e indicaciones. El incumplimiento de
dichas instrucciones e indicaciones puede provocar
descargas, incendios y/o daños graves.
Guardar todas las instrucciones de seguridad e
indicaciones para posibles consultas
posteriores.
El término de “herramienta eléctrica” que se usa en
las instrucciones de seguridad se refiere a las
herramientas que funcionan en red (con cable de
conexión) y con batería (sin cable de conexión).
1. Seguridad en el lugar de trabajo
a) Mantener limpia y bien iluminada la zona de
trabajo. Las zonas de trabajo desordenadas o
sin luz pueden conllevar accidentes.
b) No trabajar con este aparato eléctrico en un
entorno explosivo en el que se hallen
líquidos, gases o polvos inflamables. Las
herramientas eléctricas generan chispas que
pueden inflamar el polvo o los vapores.
c) Mantener alejados a niños y a otras personas
fuera del alcance de la herramienta eléctrica.
Las distracciones pueden hacer perder el control
sobre el aparato.
2. Seguridad eléctrica
a) El enchufe del aparato eléctrico debe ser el
adecuado para la toma de corriente. El
enchufe no debe ser modificado de ningún
modo. No emplear adaptadores de enchufe
con aparatos eléctricos puestos a tierra. Los
enchufes sin modificar y las tomas de corriente
adecuadas reducen el riesgo de una descarga
eléctrica.
b) Evitar el contacto corporal con superficies
con toma de tierra como tubos,
calefacciones, fogones y frigoríficos. Existe
un gran riesgo de descarga eléctrica si su cuerpo
se halla puesto a tierra.
c) Mantener los aparatos eléctricos alejados de
la lluvia o la humedad. Si entra agua en el
aparato eléctrico existirá mayor riesgo de una
descarga eléctrica.
d) No utilizar el cable de forma inadecuada, no
utilizarlo para transportar el aparato, colgarlo
o retirarlo de la toma de corriente. Mantener
el cable alejado del calor, aceites, cantos
afilados o partes del aparato en movimiento.
Los cables dañados o mal enrollados aumentan
el riesgo de descarga eléctrica.
e) Si se trabaja con una herramienta eléctrica al
aire libre, emplear sólo alargaderas que
también sean adecuadas para el exterior. El
empleo de una alargadera apropiada para
trabajos en el exterior reduce el riesgo de
descarga eléctrica.
f) Si no se puede evitar tener que utilizar la
herramienta eléctrica en un entorno húmedo,
utilizar un dispositivo de protección
diferencial. El uso de un dispositivo de
protección diferencial reduce el riesgo de sufrir
una descarga eléctrica.
3. Seguridad de personas
a) Prestar atención al trabajo, comprobar lo que
se está haciendo y proceder de forma
razonable durante el trabajo de una
herramienta eléctrica. No emplear la
herramienta eléctrica si se está cansado o
bajo la influencia de drogas, alcohol o
medicamentos. Una mínima falta de atención
durante el uso de la herramienta eléctrica puede
causar lesiones graves.
b) Llevar equipamiento de protección personal
y siempre unas gafas protectoras. El hecho
de llevar equipamiento de protección personal
como mascarilla, calzado de seguridad
antideslizante, casco de protección o protección
para los oídos, según el tipo y uso de la
herramienta eléctrica, reduce el riesgo de sufrir
lesiones.
c) Evitar una puesta en marcha no
intencionada. Asegurarse de que la
herramienta está desconectada antes de
enchufarla a la red eléctrica y/o a la batería,
tomarla en la mano o transportarla. Peligro de
sufrir accidentes si la herramienta eléctrica se
traslada pulsando el interruptor o si se enchufa a
la toma de corriente cuando está encendida.
d) Retirar las herramientas de ajuste o la llave
antes de conectar la herramienta eléctrica.
Una herramienta o llave que se haya olvidado en
partes giratorias del aparato puede producir
5
E
Anleitung_TH_XS_28_SPK8__ 24.09.12 15:21 Seite 5

lesiones.
e) Evitar trabajar en una posición corporal
inadecuada. Adoptar una posición segura y
mantener en todo momento el equilibrio. Ello
permite controlar mejor la herramienta eléctrica
en situaciones inesperadas.
f) Llevar ropa de trabajo adecuada. No llevar
ropa holgada ni joyas durante el trabajo.
Mantener el cabello, la ropa y los guantes
alejados de las piezas en movimiento. La ropa
holgada, las joyas o los cabellos largos pueden
ser atrapados por las piezas en movimiento.
g) Si el aparato permite instalar dispositivos de
aspiración y recogida del polvo, es preciso
asegurarse de que estén conectados y se
empleen de forma correcta. La utilización de un
aspirador de polvo puede reducir los peligros
provocados por el mismo.
4. Empleo y tratamiento de la herramienta
eléctrica
a) No sobrecargar el aparato. Usar la
herramienta eléctrica específica para cada
trabajo. Con la herramienta eléctrica adecuada
se trabaja mejor y con más seguridad
permaneciendo dentro de la potencia indicada.
b) No usar ninguna herramienta eléctrica cuyo
interruptor esté defectuoso. Una herramienta
eléctrica que ya no pueda conectarse o
desconectarse conlleva peligros y debe
repararse.
c) Desenchufar el cable de la toma de corriente
y/o retirar la batería antes de ajustar el
aparato, cambiar accesorios o abandonar el
aparato. Esta medida de seguridad evita que la
herramienta eléctrica arranque accidentalmente.
d) Guardar las herramientas eléctricas que no
se usen fuera del alcance de los niños. No
permitir el uso del aparato a personas que no
estén familiarizadas con él o no hayan leído
estas instrucciones. Las herramientas
eléctricas son peligrosas si las usan personas sin
experiencia.
e) Cuidar la herramienta eléctrica de forma
adecuada. Comprobar que las piezas móviles
funcionen de forma correcta y no se
bloqueen, controlar también si existen piezas
rotas o están tan dañadas que ponen en
peligro el funcionamiento de la herramienta
eléctrica. Reparar las piezas dañadas antes
de usar el aparato. Numerosos accidentes se
deben a herramientas eléctricas mal cuidadas.
f) Mantener limpias y afiladas las herramientas
de corte. Las herramientas de corte bien
cuidadas con cantos afilados se bloquean con
menor frecuencia y pueden manejarse de forma
más sencilla.
g) Respetar estas instrucciones cuando se
desee utilizar la herramienta eléctrica, los
accesorios, piezas de recambio, etc. Para
ello, tener en cuenta las condiciones de
trabajo y la tarea a ejecutar. El uso de
herramientas eléctricas para otros fines
diferentes a los previstos puede originar
situaciones peligrosas.
5. Servicio
a) Sólo especialistas cualificados deben reparar
la herramienta eléctrica, empleando para ello
únicamente piezas de repuesto originales.
Esta forma de proceder garantiza la seguridad de
la herramienta eléctrica.
Instrucciones de seguridad especiale
nUse el aparato sólo para lijar en seco.
nTire del cable siempre hacia atrás para que se
mantenga en la parte trasera del aparato en todo
momento.
nNo se deben trabajar materiales que contengan
asbesto.
n¡Antes de todo trabajo en la máquina (limpieza,
cambio de papel abrasivo, etc.) se debe
desconectar de la red!
nDesconecte el cable de red de la toma de
corriente, tirando siempre del enchufe.
n¡Utilice en trabajos de lijado una máscara contra
el polvo así como gafas de protección, en bien de
su salud!
nEl puesto de trabajo debe ser limpio y bien
iluminado.
nCuido de que la pieza a trabajar esté bien fija.
nMantenga alejados los niños del lugar de trabajo.
nEn interés propio, mantenga siempre la máquina
limpia y después de los trabajos efectúe un
control respecto a posibles deterioros.
nAsegurese que al conectar la máquina a la red el
interruptor esté desconectado.
nCuide de un apoyo firme, ante todo en escaleras
y andamios.
nEl contacto o aspiración de estos polvos puede
representar un peligro para el operario o las
personas que se encuentren en las
inmediaciones.
nSujetar el aparato por las empuñaduras aisladas
puesto que la cinta abrasiva puede topar con el
propio cable de conexión. Si se daña un cable de
corriente se pueden electrificar las piezas
E
6
Anleitung_TH_XS_28_SPK8__ 24.09.12 15:21 Seite 6

metálicas del aparato o provocar una descarga
eléctrica.
nSi determina deterioros, en base a los dibujos de
montaje desarmado así como la lista de piezas,
defina exactamente los repuestos y solicítelos al
servicio postventa.
n¡Atención! ¡Utilice gafas de protección y
máscara contra el polvo!
Guardar las instrucciones de seguridad en lugar
seguro.
2. Descripción del aparato y Volumen
de entrega
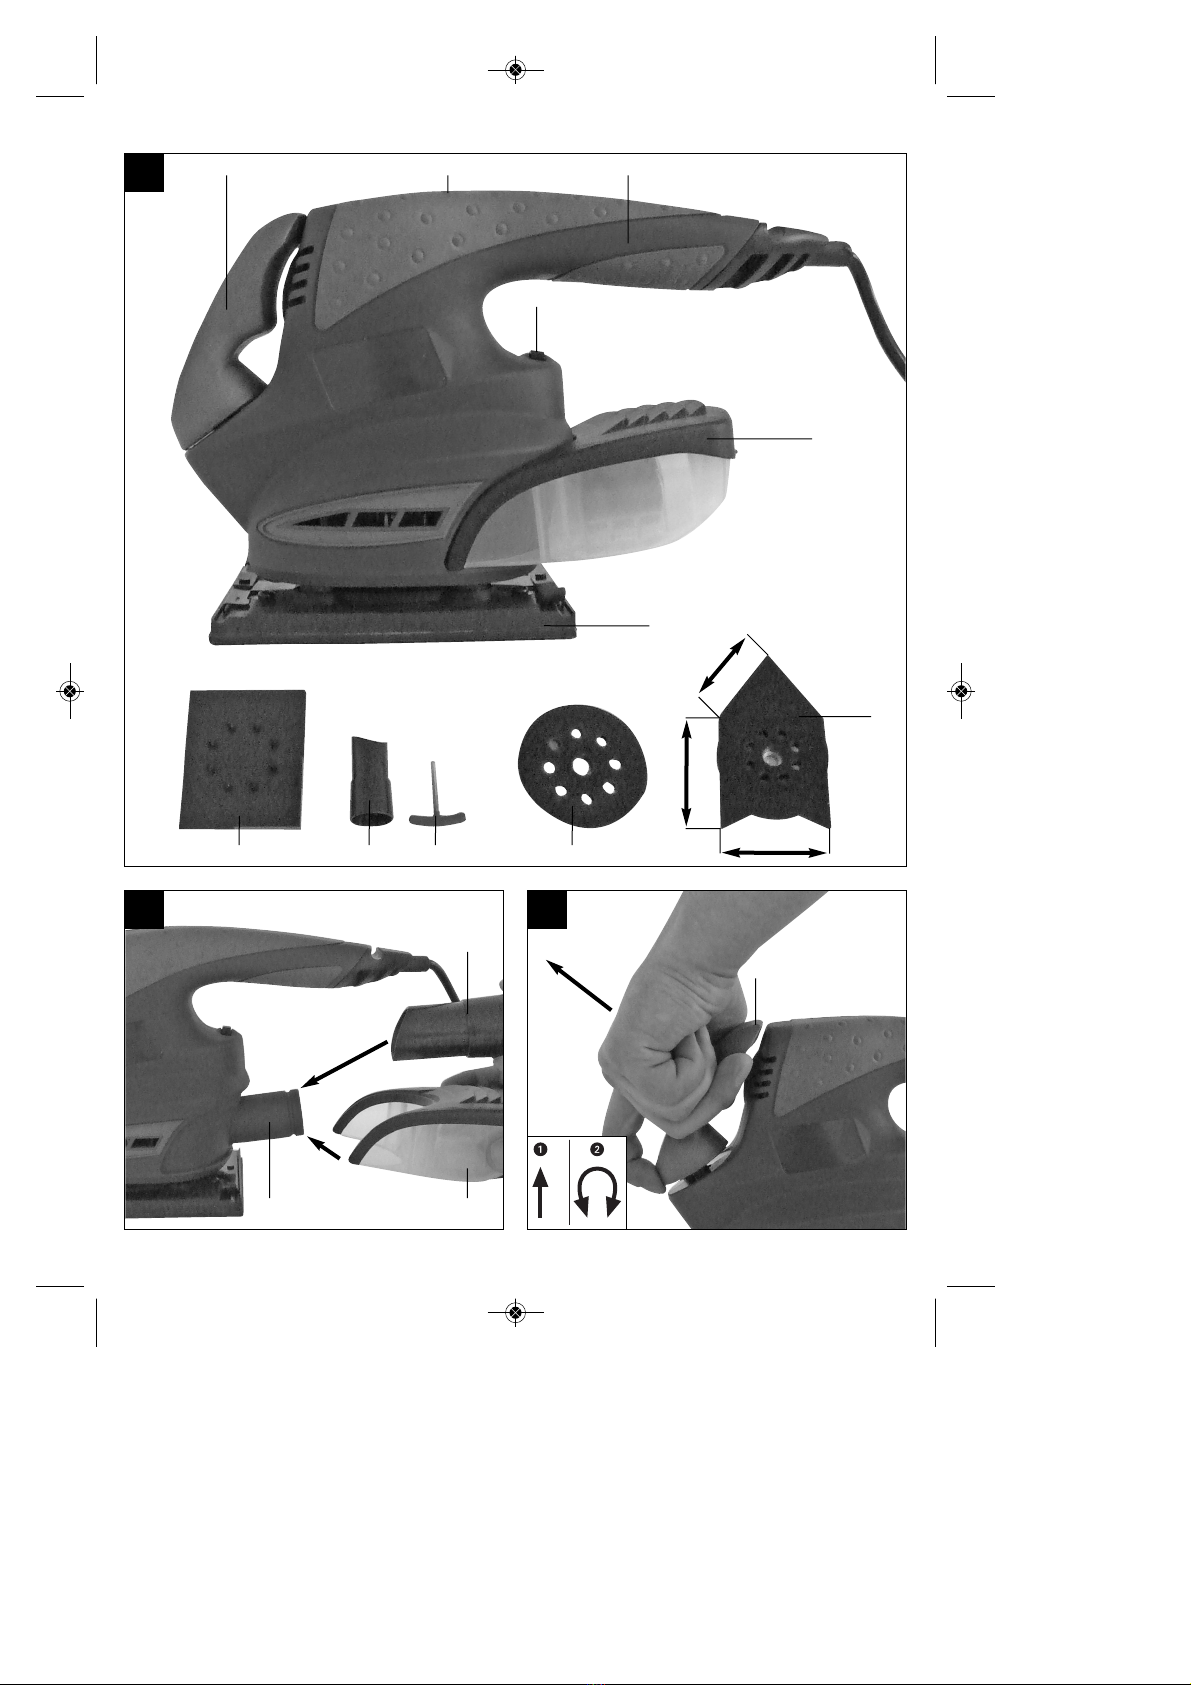
2.1 Descripción del aparato (fig. 1)
1. Empuñadura adicional
2. Interruptor de servicio
3. Regulador de velocidad
4. Empuñadura
5. Recipiente de recogida de polvo
6. Plancha abrasiva rectangular
7. Plancha abrasiva excéntrica
8. Plancha abrasiva triangular
9. Troqueladora para papel abrasivo
10. Adaptador para aspirador
11. Llave allen
2.2 Volumen de entrega
nAbrir el embalaje y extraer cuidadosamente el
aparato.
nRetirar el material de embalaje, así como los
dispositivos de seguridad del embalaje y para el
transporte (si existen).
nComprobar que el volumen de entrega esté
completo.
nComprobar que el aparato y los accesorios no
presenten daños ocasionados durante el
transporte.
nSi es posible, almacenar el embalaje hasta que
transcurra el periodo de garantía.
ATENCIÓN
¡El aparato y el material de embalaje no son un
juguete! ¡No permitir que los niños jueguen con
bolsas de plástico, láminas y piezas pequeñas!
¡Riesgo de ingestión y asfixia!
nPlancha abrasiva excéntrica
nPlancha abrasiva triangular
nTroqueladora para papel abrasivo
nAdaptador para aspirador
nLlave allen
nManual de instrucciones original
3. Uso adecuado
La máquina ha sido concebida para lijar madera,
hierro, plástico y materiales similares utilizando el
papel abrasivo correspondiente. La máquina no está
indicada para lijar en húmedo.
Utilizar la máquina sólo en los casos que se indican
explícitamente como de uso adecuado. Cualquier
otro uso no será adecuado. En caso de uso
inadecuado, el fabricante no se hace responsable de
daños o lesiones de cualquier tipo; el responsable es
el usuario u operario de la máquina.
Tener en consideración que nuestro aparato no está
indicado para un uso comercial, industrial o en taller.
No asumiremos ningún tipo de garantía cuando se
utilice el aparato en zonas industriales, comerciales o
talleres, así como actividades similares.
4. Características técnicas
Tensión de red: 230 V~ 50 Hz
Consumo de energía: 280 W
Vibraciones: 0 – 10.000 r.p.m
Clase de protección: II / 쏾
Peso: 2,2 kg
Plancha abrasiva rectangular:
Superficie abrasiva: 140 x 115 mm
Tamaño del papel abrasivo
(cierre de velcro): 140 x 115 mm
Tamaño del papel abrasivo (sujeción): 180 x 115 mm
Plancha abrasiva excéntrica:
Superficie abrasiva: Ø 125 mm
Tamaño del papel abrasivo: Ø 125 mm
Plancha abrasiva triangular:
Tamaño del papel abrasivo 82 x 109 x 106 mm
(a x b x c; véase fig. 1)
E
7
Anleitung_TH_XS_28_SPK8__ 24.09.12 15:21 Seite 7

Ruido y vibración
Los valores con respecto al ruido y la vibración se
determinaron conforme a la norma EN 60745.
Nivel de presión acústica LpA 80 dB(A)
Imprecisión KpA 3 dB
Nivel de potencia acústica LWA 91 dB(A)
Imprecisión KWA 3 dB
Usar protección para los oídos.
La exposición al ruido puede ser perjudicial para el
oído.
Los valores totales de vibración (suma de vectores
en las tres direcciones) se determinaron conforme a
la norma EN 60745.
Valor de emisión de vibraciones ah= 14,495 m/s2
Imprecisión K = 1,5 m/s2
Información adicional sobre herramientas
eléctricas
¡Aviso!
El valor de emisión de vibraciones indicado se ha
calculado conforme a un método de ensayo
normalizado, pudiendo, en algunos casos
excepcionales, variar o superar el valor indicado
dependiendo de las circunstancias en las que se
utilice la herramienta eléctrica.
El valor de emisión de vibraciones indicado puede
utilizarse para comparar la herramienta con otras.
El valor de emisión de vibraciones indicado también
puede utilizarse para una valoración preliminar de los
riesgos.
¡Reducir la emisión de ruido y las vibraciones al
mínimo!
nEmplear sólo aparatos en perfecto estado.
nRealizar el mantenimiento del aparato y limpiarlo
con regularidad.
nAdaptar el modo de trabajo al aparato.
nNo sobrecargar el aparato.
nEn caso necesario dejar que se compruebe el
aparato.
nApagar el aparato cuando no se esté utilizando.
nLlevar guantes.
Riesgos residuales
Incluso si esta herramienta se utiliza
adecuadamente, siempre existen
riesgos residuales. En función de la estructura y
del diseño de esta herramienta eléctrica pueden
producirse los siguientes riesgos:
1. Lesiones pulmonares en caso de que no se
utilice una mascarilla de protección antipolvo.
2. Lesiones auditivas en caso de que no se utilice
una protección para los oídos adecuada.
3. Daños a la salud derivados de las vibraciones de
las manos y los brazos si el aparato se utiliza
durante un largo periodo tiempo, no se sujeta del
modo correcto o si no se realiza un
mantenimiento adecuado.
5. Antes de la puesta en marcha
Antes de conectar la máquina, asegurarse de que
los datos de la placa de identificación coincidan con
los datos de la red eléctrica.
Desenchufar el aparato antes de realizar ajustes.
5.1 Montaje del recipiente de recogida de polvo
(fig. 2/pos. 5)
nEl recipiente de recogida de polvo (5) se encaja
en la conexión del aspirador (a).
nLa aspiración del polvo tiene lugar directamente
a través del papel abrasivo y de la plancha
abrasiva en el recipiente de recogida de polvo.
5.2 Montaje del adaptador para aspirador
(fig. 2/pos. 10)
Encajar el adaptador para aspirador (10) en la
conexión pertinente (a) según se muestra en la
figura 2. Conectar el adaptador a un aspirador
adecuado.
¡Atención!
Por motivos de seguridad es preciso utilizar el
recipiente para la recogida de polvo o un aspirador.
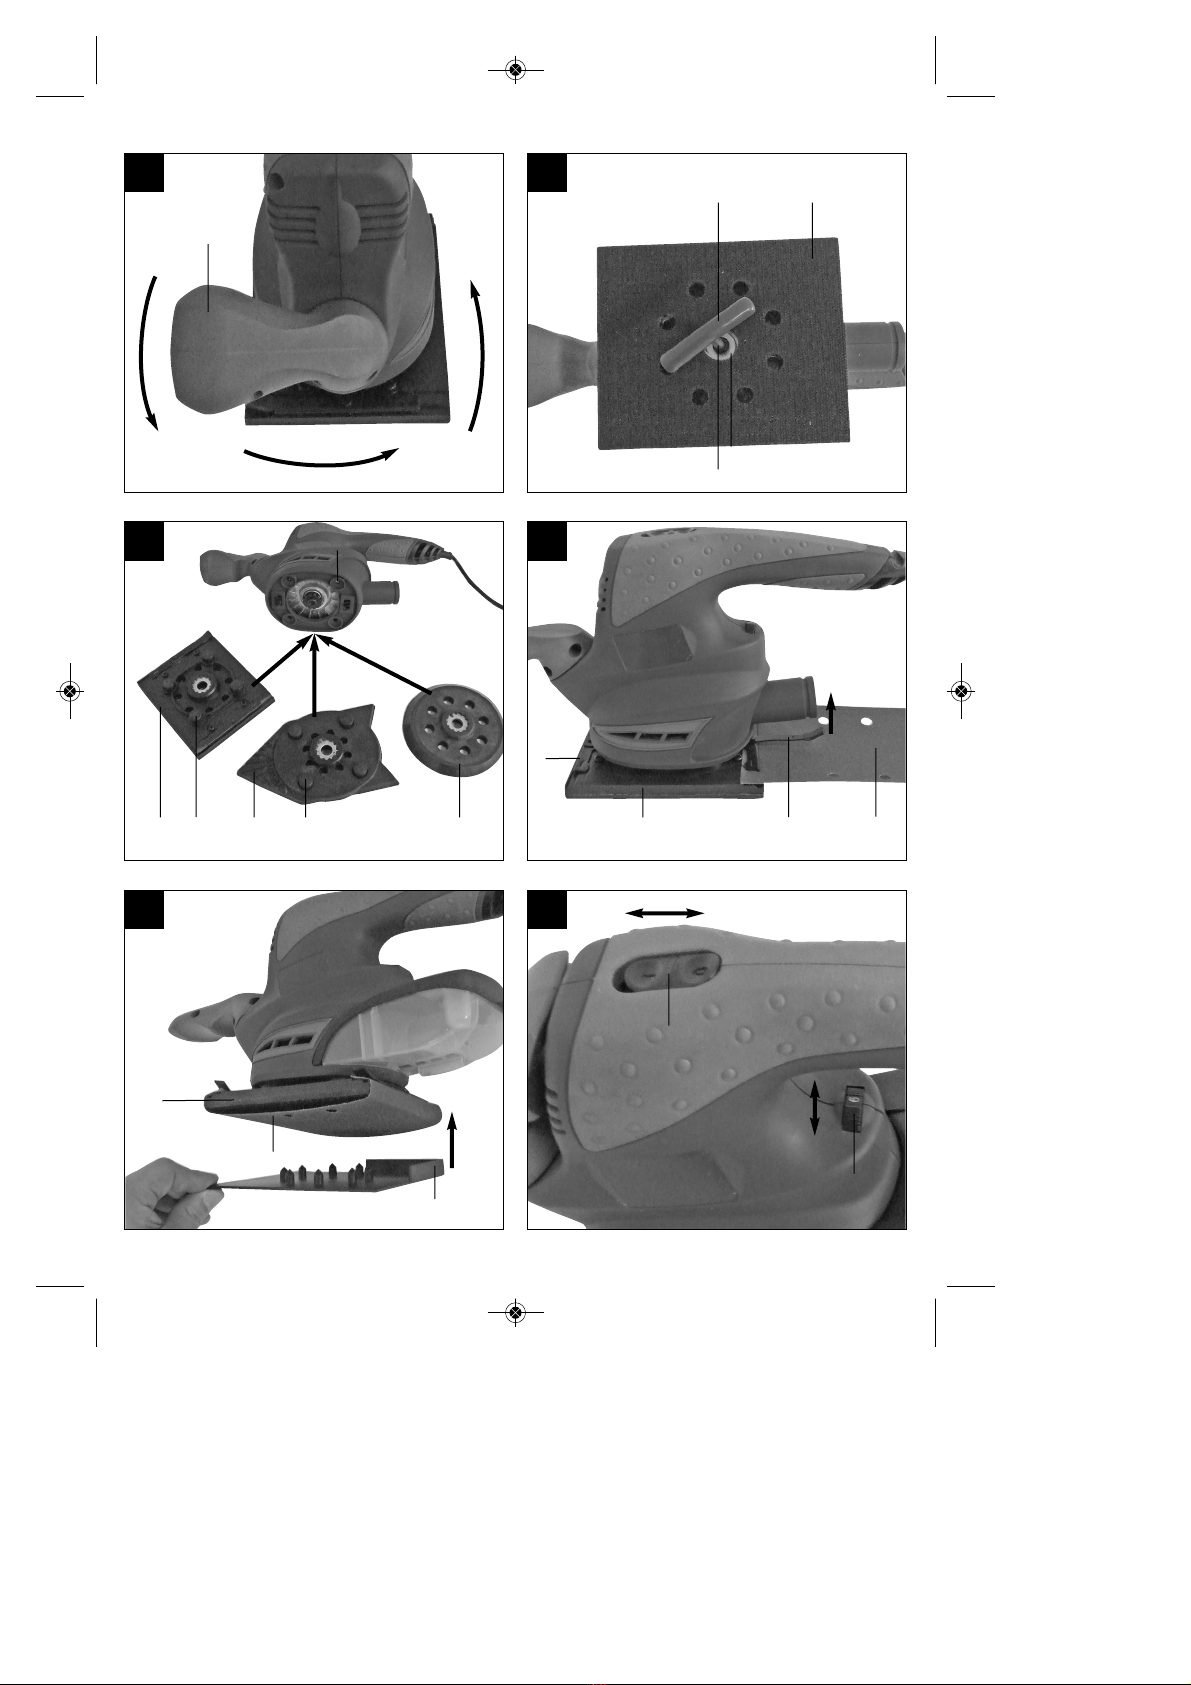
5.3 Ajuste de la empuñadura adicional (fig. 3/4)
nLa empuñadura adicional se encaja en 4
posiciones (pasos de 90°).
nTirar de la empuñadura adicional (1) hacia
arriba. (fig. 3)
nGirar la empuñadura adicional (1) hasta
conseguir la posición de trabajo deseada. (fig. 4)
nSoltar la empuñadura adicional.
nComprobar si la empuñadura se ha enclavado
en la posición deseada.
5.4 Montaje/desmontaje de las planchas
abrasivas (fig. 5/6)
nCon la llave allen (11) retirar el tornillo de
hexágono interior (a) y la arandela (b) (fig. 5).
8
E
Anleitung_TH_XS_28_SPK8__ 24.09.12 15:21 Seite 8

nA continuación retirar la plancha abrasiva (c) (fig.
5).
nEl montaje se lleva a cabo realizando la misma
secuencia pero en sentido contrario.
nDurante el montaje de la plancha abrasiva (6/8)
asegurarse de introducir los 4 topes de goma (d)
en los alojamientos correspondientes (e). (Fig. 6)
nComprobar que la plancha abrasiva esté bien
sujeta.
5.5 Plancha abrasiva rectangular (fig. 6 / 7 / 8)
Con la plancha abrasiva rectangular (6) se puede
utilizar la máquina como lijadora orbital.
5.5.1 Sujeción del papel abrasivo mediante
dispositivo de sujeción:
Utilización del papel abrasivo con las dimensiones y
perforaciones correspondientes (fig. 7):
nPulsar la palanca (a) hacia arriba.
nColocar el papel abrasivo (b) en el dispositivo de
sujeción abierto y, seguidamente, cerrarlo.
nColocarlo de forma tensada sobre la plancha y
sujetarlo otra vez.
nAsegurarse de que las perforaciones coincidan
con las de la plancha.
Utilización de papel abrasivo sin las
dimensiones/perforación correspondientes (fig. 7/8):
nCortar el papel abrasivo de forma que presenta
las dimensiones correspondientes.
nMontar el papel en la plancha según se indica
anteriormente.
nPoner la plancha rectangular (6) con el papel
abrasivo montado (a) en la troqueladora (9) para
el papel abrasivo. (Fig. 8)
nEn el papel abrasivo se troquelan las
perforaciones necesarias.
nA continuación, volver a quitar la troqueladora
(9) de la plancha abrasiva (6).
nComprobar las perforaciones en el papel
abrasivo.
5.5.2 Fijación del papel abrasivo mediante cierre
de velcro:
Fácil de cambiar gracias al cierre de velcro.
Asegurarse de que coincidan los orificios de
aspiración en el papel abrasivo y el disco abrasivo.
5.6 Plancha abrasiva triangular (fig. 6)
Con la plancha abrasiva triangular (8) se puede
utilizar la máquina como lijadora triangular.
Fijación del papel abrasivo:
Fácil de cambiar gracias al cierre de velcro.
Asegurarse de que los orificios de aspiración en el
papel abrasivo coincidan con los del disco abrasivo.
5.7 Plancha abrasiva excéntrica (fig. 6)
Con la plancha abrasiva excéntrica (7) se puede
utilizar la máquina como lijadora excéntrica.
Fijación del papel abrasivo:
Fácil de cambiar gracias al cierre de velcro.
Asegurarse de que coincidan los orificios de
aspiración en el papel abrasivo y el disco abrasivo.
6. Manejo
6.1 Conectar/desconectar (fig. 9/pos. 2)
Conexión: Presionar el interruptor (2) hacia delante
(posición I).
Desconexión: Presionar el interruptor (2) hacia
atrás (posición 0).
6.2 Regulador de velocidad (fig. 7/pos. 3)
Girando el tornillo moleteado en el interruptor (3) se
podrá seleccionar la velocidad.
Sentido MÁS: mayor velocidad
Sentido MENOS: menor velocidad
6.3 Trabajar con el aparato:
¡Atención! No sujetar nunca con la mano la pieza a
trabajar. Asegurar la pieza sobre una base estable o
con un tornillo de banco.
nApoyar toda la superficie del disco abrasivo.
nConectar la máquina y aplicar una presión
moderada sobre la pieza, realizando
movimientos longitudinales y transversales o
circulares.
nSe recomienda usar un granulado de mayor
tamaño para el lijado en grueso y un
granulado más fino para el lijado de precisión.
Se puede determinar el granulado más
apropiado realizando pruebas de lijado.
¡Atención!
El polvo que se genera al trabajar con la herramienta
puede ser nocivo para la salud:
nllevar siempre unas gafas protectoras y una
mascarilla mientras se realicen trabajos de
lijado.
nTodas las personas que trabajen con el aparato
o accedan al lugar de trabajo deben llevar una
mascarilla.
nEn el puesto de trabajo no se puede comer,
beber ni fumar.
nNo trabajar pinturas que contengan plomo.
9
E
Anleitung_TH_XS_28_SPK8__ 24.09.12 15:21 Seite 9

7. Cambio del cable de conexión a la
red eléctrica
Cuando el cable de conexión a la red de este
aparato esté dañado, deberá ser sustituido por el
fabricante o su servicio de asistencia técnica o por
una persona cualificada para ello, evitando así
cualquier peligro.
8. Mantenimiento y limpieza
Desenchufar siempre antes de realizar algún trabajo
de limpieza.
8.1 Limpieza
nReducir al máximo posible la suciedad y el polvo
en los dispositivos de seguridad, las rendijas de
ventilación y la carcasa del motor. Frotar el
aparato con un paño limpio o soplarlo con aire
comprimido manteniendo la presión baja.
nSe recomienda limpiar el aparato tras cada uso.
nLimpiar el aparato con regularidad con un paño
húmedo y un poco de jabón blando. No utilizar
productos de limpieza o disolventes ya que se
podrían deteriorar las piezas de plástico del
aparato. Es preciso tener en cuenta que no entre
agua en el interior del aparato.
8.2 Escobillas de carbón
En caso de formación excesiva de chispas,
ponerse en contacto con un electricista
especializado para que compruebe las escobillas
de carbón.
¡Atención! Las escobillas de carbón sólo deben
ser cambiadas por un electricista.
8.3 Mantenimiento
No hay que realizar el mantenimiento a más
piezas en el interior del aparato.
9. Eliminación y reciclaje
El aparato está protegido por un embalaje para
evitar daños producidos por el transporte. Este
embalaje es materia prima y, por eso, se puede
volver a utilizar o llevar a un punto de reciclaje.
El aparato y sus accesorios están compuestos de
diversos materiales, como, p. ej., metal y plástico.
Depositar las piezas defectuosas en un contenedor
destinado a residuos industriales. Informarse en el
organismo responsable al respecto en su municipio
o en establecimientos especializados.
10
E
Anleitung_TH_XS_28_SPK8__ 24.09.12 15:21 Seite 10

11
GB
“Caution - Read the operating instructions to reduce the risk of inquiry”
Wear ear-muffs.
The impact of noise can cause damage to hearing.
Wear a breathing mask.
Dust which is injurious to health can be generated when working on wood and other materials.
Never use the device to work on any materials containing asbestos!
Wear safety goggles.
Sparks generated during working or splinters, chips and dust emitted by the device can cause
loss of sight.
Anleitung_TH_XS_28_SPK8__ 24.09.12 15:21 Seite 11

12
GB
Important!
When using equipment, a few safety precautions
must be observed to avoid injuries and damage.
Please read the complete operating manual with due
care. Keep this manual in a safe place, so that the
information is available at all times. If you give the
equipment to any other person, give them these
operating instructions as well.
We accept no liability for damage or accidents which
arise due to non-observance of these instructions
and the safety information.
1. Safety regulations
CAUTION: Read all safety regulations and
instructions. Any failures made in following the
safety regulations and instructions may result in an
electric shock, fire and/or serious injury.
Keep all safety regulations and instructions in a
safe place for future use.
The term “electric tool” used in the safety instructions
refers to electric tools operated from the mains power
supply (with a power cable) and to battery operated
electric tools (without a power cable).
1. Workplace safety
a) Keep your work area clean and well
illuminated. Untidy or unlit work areas can result
in accidents.
b) Do not operate the electric tool in an
environment where there is a risk of
explosions and where there are inflammable
liquids, gases or dust. Electric tools produce
sparks which could set the dust or vapours alight.
c) Keep the electric tool out of the reach of
children and other persons. If there is a
distraction, you may lose control of the appliance.
2. Electrical safety
a) The connector plug from this electric tool
must fit into the socket. The plug should
never be altered in any way. Never use
adapter plugs together with earthed electric
tools. Unaltered plugs and correct sockets
reduce the risk of an electric shock.
b) Avoid bodily contact with earthed surfaces
such as pipes, heating, ovens and fridges.
The risk of electric shock is increased if your body
is earthed.
c) Keep the tool out of the rain and away from
moisture. The ingress of water into an electric
tool increases the risk of an electric shock.
d) Do not use the cable to carry the electric
tool, to hang it up or to pull it out of the
socket. Keep the cable away from heat, oil,
sharp edges and moving parts of the
appliance. Damaged or entangled cables
increase the risk of an electric shock.
e) If you are working outdoors with an electric
tool, only use extension cables which are
designed specifically for this purpose. Using
specially designed outdoor extension cables, the
risk of electric shock is reduced.
f) If operation of the electric tool in a damp
environment can not be avoided, use a earth-
leakage circuit-breaker. The earth-leakage
circuit-breaker reduces the risk of an electric
shock.
3. Safety of persons
a) Be careful, watch what you are doing and
use an electric tool sensibly. Do not use the
tool if you are tired or under the influence of
drugs, alcohol or medication. A moment of
inattention when using the electric tool can result
in serious injuries.
b) Wear personal protection equipment and
always wear safety goggles. Wearing personal
protection (such as dust masks, non-slip safety
shoes, safety helmet or ear protection, depending
upon the type and use of the electric tool)
reduces the risk of injury.
c) Make sure that the appliance cannot start up
accidentally. Ensure that the electric tool is
switched off before you connect it to the
power supply and/or insert the battery, or
pick up or carry the tool. If your finger is on the
switch whilst carrying the electric tool or if you
connect the appliance to the mains when it is
switched on, this can lead to accidents.
d) Remove keys and wrenches before switching
on the electric tool. A tool or key which comes
into contact with rotating parts of the appliance
can lead to injuries.
e) Avoid abnormal working postures. Make sure
you stand squarely and keep your balance at
all times. In this way, you can control the electric
tool better in unexpected circumstances.
f) Wear suitable work clothes. Do not wear
loose clothing or jewellery. Keep hair,
clothes and gloves away from moving parts.
Loose clothing, jewellery or long hair can get
trapped in moving parts.
g) If vacuuming devices and draining devices
can be fitted, make sure that these are
correctly attached and correctly used. The
use of a dust extraction system can reduce the
danger posed by dust.
Anleitung_TH_XS_28_SPK8__ 24.09.12 15:21 Seite 12

GB
13
4. Usage and treatment of the electric tool
a) Do not overload the appliance. Use the
correct tool for your work. You will be able to
work better and more safely within the given
performance boundaries.
b) Do not use an electric tool with a defective
switch. An electric tool that cannot be switched
on or off is dangerous and must be repaired.
c) Pull the plug out of the socket and/or remove
the battery before making any adjustments to
the appliance, changing accessories or put
the appliance down. This safety measure
prevents starting the electric tool unintentionally.
d) Keep unused electric tools out of the reach
of children. Do not allow people who are not
familiar with the appliance or who have not
read these instructions to use the appliance.
Electric tools are dangerous if they are used by
inexperienced people.
e) Clean your electric tool carefully. Check
whether moving parts are functioning
properly and not jamming, whether parts are
broken or damaged enough that the
functioning of this electric tool is affected.
Have damaged parts repaired before using
the appliance. Many accidents are caused by
badly maintained electric tools.
f) Keep your cutting tools sharp and clean.
Carefully maintained cutting tools with sharp
cutting edges will jam less and are easier to
control.
g) Make sure to use electric tools, accessories,
attachments, etc. in accordance with these
instructions. Take the conditions in your
work area and the job in hand into account.
Using electric tools for any purpose other than the
one for which they are intended can lead to
dangerous situations.
5. Service
a) Have your electric tool repaired only by
trained personnel using only genuine spare
parts. This will ensure that your electric tool
remains safe to use.
Additional safety instructions
nThis tool may only be used for dry
grinding/sanding operations.
nAlways guide the power cable away from the
back of the tool.
nUse of the tool on materials containing asbestos
is prohibited.
nAlways remove the plug from the power supply
socket before carrying out any work on the
machine (cleaning the sander, changing the
sandpaper, etc.).
nAlways disconnect the machine by removing the
plug from the socket, not by pulling on the power
cable.
nTo protect your health, always wear safety
goggles and a dust mask during sanding work.
nKeep your workplace clean and well illuminated.
nMake sure that the workpiece is sufficiently
secured so that it cannot slip.
nKeep children away.
nFor your own sake, keep the machine clean at all
times and check it for signs of damage each time
after using it.
nMake sure that the switch is set to OFF before
you insert the plug into the power supply socket.
nMake sure of your footing, particularly when
working on ladders and platforms.
nTouching or inhaling this dust can be harmful for
the operator and other persons nearby.
nHold the equipment by the insulated handles
because the grinding/sanding belt may strike the
equipment’s own power cable. Damaging a live
cable may make the metal parts of the equipment
live and cause an electric shock.
nIf you discover any damage to the machine, use
the exploded diagram and the spare parts list to
determine which parts need to be ordered from
Customer Service.
nImportant! Wear safety goggles and a dust
mask.
Do not lose these safety instructions
2. Layout and Items supplied
2.1 Layout (Fig. 1)
1. Additional handle
2. Operating switch
3. Speed controller
4. Handle
5. Dust container
6. Rectangular sanding/grinding plate
7. Eccentric sanding/grinding plate
8. Triangular sanding/grinding plate
9. Punch for sanding/grinding paper
10. Chip extractor adapter
11. Allen key
Anleitung_TH_XS_28_SPK8__ 24.09.12 15:21 Seite 13

14
GB
2.2 Items supplied
nOpen the packaging and take out the equipment
with care.
nRemove the packaging material and any
packaging and/or transportation braces (if
available).
nCheck to see if all items are supplied.
nInspect the equipment and accessories for
transport damage.
nIf possible, please keep the packaging until the
end of the guarantee period.
IMPORTANT
The equipment and packaging material are not
toys. Do not let children play with plastic bags,
foils or small parts. There is a danger of
swallowing or suffocating!
nEccentric sanding/grinding plate
nTriangular sanding/grinding plate
nPunch for sanding/grinding paper
nChip extractor adapter
nAllen key
nOriginal operating instructions
3. Proper use
The equipment is designed for the grinding/sanding
of wood, iron, plastic and similar materials using the
appropriate grinding/sanding paper. The machine is
not suitable for wet grinding/sanding.
The equipment is to be used only for its prescribed
purpose. Any other use is deemed to be a case of
misuse. The user / operator and not the
manufacturer will be liable for any damage or injuries
of any kind caused as a result of this.
Please note that our equipment has not been
designed for use in commercial, trade or industrial
applications. Our warranty will be voided if the
machine is used in commercial, trade or industrial
businesses or for equivalent purposes.
4. Technical data
Mains voltage: 230 V~ 50 Hz
Power input: 280 W
Orbits: 0 – 10,000 rpm
Protection class: II / 쓑
Weight: 2.2 kg
Rectangular sanding/grinding plate:
Grinding/sanding area: 140 x 115 mm
Abrasive paper size
(Velcro fastening system): 140 x 115 mm
Abrasive paper size
(clamping system): 180 x 115 mm
Eccentric sanding/grinding plate:
Grinding/sanding area: Ø 125 mm
Abrasive paper size: Ø 125 mm
Triangular sanding/grinding plate:
Abrasive paper size: 82 x 109 x 106 mm
(a x b x c; see Fig. 1)
Sound and vibration
Sound and vibration values were measured in
accordance with EN 60745.
LpA sound pressure level 80 dB(A)
KpA uncertainty 3 dB
LWA sound power level 91 dB(A)
KWA uncertainty 3 dB
Wear ear-muffs.
The impact of noise can cause damage to hearing.
Total vibration values (vector sum of three directions)
determined in accordance with EN 60745.
Vibration emission value ah= 14.495 m/s2
K uncertainty = 1.5 m/s2
Additional information for electric power tools
Anleitung_TH_XS_28_SPK8__ 24.09.12 15:21 Seite 14

15
GB
Warning!
The specified vibration value was established in
accordance with a standardized testing method. It
may change according to how the electric equipment
is used and may exceed the specified value in
exceptional circumstances.
The specified vibration value can be used to compare
the equipment with other electric power tools.
The specified vibration value can be used for initial
assessment of a harmful effect.
Keep the noise emissions and vibrations to a
minimum.
nOnly use appliances which are in perfect working
order.
nService and clean the appliance regularly.
nAdapt your working style to suit the appliance.
nDo not overload the appliance.
nHave the appliance serviced whenever
necessary.
nSwitch the appliance off when it is not in use.
nWear protective gloves.
Residual risks
Even if you use this electric power tool in
accordance with instructions, certain residual
risks cannot be rules out. The following hazards
may arise in connection with the equipment’s
construction and layout:
1. Lung damage if no suitable protective dust mask
is used.
2. Damage to hearing if no suitable ear protection is
used.
3. Health damage caused by hand-arm vibrations if
the equipment is used over a prolonged period or
is not properly guided and maintained.
5. Before starting the equipment
Before you connect the equipment to the mains
supply make sure that the data on the rating plate
are identical to the mains data.
Always pull the power plug before making
adjustments to the equipment.
5.1 Installing the dust container (Figure 2/Item 5)
nSlip the dust container (5) onto the vacuum
cleaner connector (a).
nThe dust is extracted directly through the
grinding/sanding paper and the grinding/sanding
plate and into the dust container.
5.2 Installing the dust extractor adapter
(Figure 2/Item 10)
Slip the dust extractor adapter (10) onto the vacuum
cleaner connector (a) as shown in Figure 2. Connect
the dust extractor adapter to a suitable dust
extraction system.
Important.
For health safety reasons it is imperative that you
use a dust container or a dust extraction system.
5.3 Adjusting the additional handle (Fig. 3/4)
nThe additional handle engages in 4 positions
(90° steps).
nPull the additional handle upwards (1). (Fig. 3)
nTurn the additional handle (1) into the required
working position. (Fig. 4)
nLet go of the additional handle.
nEnsure that the additional handle is securely
engaged in the required position.
5.4 Fitting/removing the sanding/grinding plates
(Fig. 5/6)
nUse the Allen key (11) to remove the Allen screw
(a) and the washer (b) (Fig. 5).
nThen remove the sanding/grinding plate (c) (Fig.
5).
nTo assemble, proceed in reverse order.
nWhen fitting the sanding/grinding plate (6 / 8)
make sure that the 4 rubber stoppers (d) are
inserted into the corresponding mounts (e). (Fig.
6)
nCheck that the sanding/grinding plate is secure.
5.5 Rectangular sanding/grinding plate
(Fig. 6/7/8)
Fit the rectangular sanding/grinding plate (6) to use
the equipment as an orbital sander/grinder.
5.5.1 Fasting the sanding/grinding paper with a
clamping system
Use of sanding/grinding paper with the
corresponding dimensions and perforations (Fig. 7):
nPress the lever (a) upwards.
nInsert the sanding/grinding paper (b) into the
open clamp and close the clamp.
nLay the sanding/paper over the oscillating plate
so that the paper is taut and clamp it again.
nMake sure that the perforations in the
sanding/grinding paper coincide with the
oscillating plate.
Anleitung_TH_XS_28_SPK8__ 24.09.12 15:21 Seite 15

Use of sanding/grinding paper without the
appropriate dimensions and perforations (Fig. 7/8):
nCut the sanding/grinding paper to fit the
corresponding dimensions.
nFit the sanding/grinding paper to the
sanding/grinding plate as described above.
nPlace the rectangular sanding/grinding plate (6)
together with the fitted sanding/grinding paper (a)
onto the punch (9) for the sanding/grinding
paper). (Fig. 8)
nNow punch the required holes into the
sanding/grinding paper.
nRemove the punch (9) from the sanding/grinding
plate (6).
nCheck the correct position of the punch holes in
the sanding/grinding paper.plate.
5.5.2 Fasting the sanding/grinding paper with
Velcro fastening system
The Velcro fastener enables easy changing of
sanding/grinding paper. Make sure that the
extraction holes on the sanding/grinding paper and
the sanding/grinding disk are aligned.
5.6 Triangular sanding/grinding plate (Fig. 6)
Fit the triangular sanding/grinding plate (8) to use the
equipment as delta sander/grinder.
Fastening the sanding/grinding paper:
The Velcro fastener enables easy changing of
sanding/grinding paper. Make sure that the vacuum
extraction holes on the sanding/grinding paper and
the sanding/grinding disk are aligned.
5.7 Eccentric sanding/grinding plate (Fig. 6)
Fit the eccentric sanding/grinding plate (7) to use the
equipment as eccentric sander/grinder.
Fastening the sanding/grinding paper:
The Velcro fastener enables easy changing of
sanding/grinding paper. Make sure that the vacuum
extraction holes on the sanding/grinding paper and
the sanding/grinding disk are aligned.
6. Operation
6.1 Switching the equipment ON/OFF
(Fig. 9/Item 2)
To switch on: Slide the ON/OFF switch (2) forwards
(position I)
To switch off: Slide the ON/OFF switch (2)
backwards (position 0)
6.2 Speed control (Fig. 7/Item 3)
To pre-select the speed turn the knurled screw (3) on
the switch.
Plus direction: Higher speed
Minus direction: Lower speed
6.3 Working with the equipment:
Important. Never hold the workpiece you wish to
sand/grind in your hand. Secure the workpiece on a
sturdy surface or with a vise.
nPlace the whole surface area of the sanding disk
on the material.
nSwitch on the machine and move it with gentle
pressure over the workpiece completely circular
movements or moving it to and fro and up and
down.
nUse a coarse paper for coarse sanding and a
finer paper for finish sanding. You can find the
best paper for the job by means of testing.
Important.
The dust generated when working with the machine
may be harmful.
nAlways wear goggles and a dust mask when
carrying out sanding/grinding work.
nEverybody who uses the machine or enters the
workplace must wear a dust mask.
nDo not eat, drink or smoke at the workplace.
nDo not use the machine on paints which contain
lead.
7. Replacing the power cable
If the power cable for this equipment is damaged, it
must be replaced by the manufacturer or its after-
sales service or similarly trained personnel to avoid
danger.
16
GB
Anleitung_TH_XS_28_SPK8__ 24.09.12 15:21 Seite 16

8. Cleaning and maintenance
Always pull out the mains power plug before starting
any cleaning work.
8.1 Cleaning
nKeep all safety devices, air vents and the motor
housing free of dirt and dust as far as possible.
Wipe the equipment with a clean cloth or blow it
with compressed air at low pressure.
nWe recommend that you clean the device
immediately each time you have finished using it.
nClean the equipment regularly with a moist cloth
and some soft soap. Do not use cleaning agents
or solvents; these could attack the plastic parts of
the equipment. Ensure that no water can seep
into the device.
8.2 Carbon brushes
In case of excessive sparking, have the carbon
brushes checked only by a qualified electrician.
Important! The carbon brushes should not be rep
laced by anyone but a qualified electrician.
8.3 Maintenance
There are no parts inside the equipment which
require additional maintenance.
9. Disposal and recycling
The unit is supplied in packaging to prevent its being
damaged in transit. This packaging is raw material
and can therefore be reused or can be returned to
the raw material system.
The unit and its accessories are made of various
types of material, such as metal and plastic.
Defective components must be disposed of as
special waste. Ask your dealer or your local council.
17
GB
Anleitung_TH_XS_28_SPK8__ 24.09.12 15:21 Seite 17

18
La reimpresión o cualquier otra reproducción de documentos e
información adjunta a productos, incluida cualquier copia, sólo se
permite con la autorización expresa de ISC GmbH.
The reprinting or reproduction by any other means, in whole or in part,
of documentation and papers accompanying products is permitted only
with the express consent of ISC GmbH.
Salvo modificaciones técnicas
Technical changes subject to change
Anleitung_TH_XS_28_SPK8__ 24.09.12 15:21 Seite 18

19
Anleitung_TH_XS_28_SPK8__ 24.09.12 15:21 Seite 19

20
Anleitung_TH_XS_28_SPK8__ 24.09.12 15:21 Seite 20
This manual suits for next models
1
Table of contents
Languages:
Other EINHELL Expert Grinder manuals

EINHELL Expert
EINHELL Expert 44.308.61 User manual

EINHELL Expert
EINHELL Expert TE-AG 230 DP User manual

EINHELL Expert
EINHELL Expert TE-AG 125 CE User manual

EINHELL Expert
EINHELL Expert TE-AG 180 DP User manual

EINHELL Expert
EINHELL Expert TE-DS 20 E User manual

EINHELL Expert
EINHELL Expert TE-AG 230 User manual
Popular Grinder manuals by other brands


Cornwell Tools
Cornwell Tools CAT530R Operating and parts manual

Rockwood
Rockwood 31818 instructions

Makita
Makita GA7020R instruction manual

Stanley
Stanley V20 LITHIUM ION SCG400 Original instructions

Bosch
Bosch Professional GWS 18V-10 PC Original instructions

Black & Decker
Black & Decker KG115 Original instructions


