EK EKS213-BT User manual

INSTRUCTION MANUAL
WITH LED DISCO LIGHT EFFECTS, MICROPHONE
TABLET CRADLE AND KARAOKE DEMO DISC
BLUETOOTH CD+G
KARAOKE SYSTEM
148mm
210mm
FOR THOUSANDS OF THE BEST FREE KARAOKE
easykaraoke.com/youtube
SONGS GO TO

Page 2
May we take this opportunity to thank you for purchasing this EKS213-BT Easy Karaoke machine.
We strongly suggest that you carefully study these instructions before attempting to operate the system, and that you
note all the listed precautions.
Contents
P2 Precautions
P3 Mains Power Information
P3 Safety information
P4-5 Control Locations
P5 Media Dock Cradle Connection
P6 Connections
P6 Connecting the power
P6 DC Operation
PRECAUTIONS
• Avoid exposure of the system to rain or moisture.
.
• Handle the microphone carefully, dropping or other shocks may cause failure.
• Avoid using the system where it may be subjected to heat, such as in direct sunlight, near radiators or other heat
sources.
• Should any liquid be spilt on the system, stop using it immediately. It may be possible to dry the system, but you
• Take care with the mains power supply. If damaged in any way, do not use the system, and
technician for repair.
• Only use the system with the supplied components, do not attempt to use with any other mains power supply
adapter or microphone.
• Please dispose of old batteries in an environmentally friendly manner in accordance with the relevant legislation.
• Do not use any solvents to clean any part of the EKS213-BT system.
shall be placed on the apparatus.
• Where the mains plug is used as the disconnect device, the disconnect device shall remain readily accessible.
P7 Connecting to your TV
P7 Selecting Your Karaoke Machine
P7 Audio Connections
P8-9 Disc Operations
P11-12 Troubleshooting
P10 Bluetooth Operations
P13
P14 Contact Details
EKS213-BT
Instruction Manual
• Under the environment with electrostatic discharge the sample may malfunction and need user reset to recover
sometimes.

Page 3
CAUTION CLASS 1 LASER PRODUCT
hazardous radiation exposure.
LASER SAFETY
DANGER: Invisible laser radiation when open and interlock failed or defeated avoid direct exposure to beam.
CAUTION: hazardous laser radiation when open and interlock defeated.
This symbol means that this unit is double insulated. An earth connection is not required.
SAFETYINFORMATION
MAINSPOWERINFORMATION
CAUTION
RISK OF ELECTRIC SHOCK!
DO NOT OPEN!
CAUTION: TO REDUCE THE RISK OF ELECTRIC SHOCK
DO NOT REMOVE COVER (OR BACK)
This symbol indicates that there are
important operating and maintenance
instructions in the literature accompanying
this unit.
This symbol indicates that dangerous
voltage constituting the risk of electric
shock is present in this unit.
CAUTION
RISK OF ELECTRIC SHOCK!
DO NOT OPEN!
CAUTION
RISK OF ELECTRIC SHOCK!
DO NOT OPEN!
Mains power using the supplied AC adaptor
1. Connect the mains adaptor to a UK mains outlet.
2. Connect the adaptor plug into the rear mains socket (22)
NOTE: Please ensure you only use
the supplied mains adaptor with
this unit.
3. Switch the mains power on.

Page 4
CONTROL LOCATIONS
21
19
20
15
25
24
23
22
16
14
18
28
26
29
30
27
1 4
17
65 97 8 10 11 12 132 3
TOP PANEL
1. STANDBY button with
STANDBY indicator
2. FUNCTION button
3. PROGRAM/ REPEAT button
4. STOP/ PAIR button
5. CDG INDICATOR
6. PLAY/PAUSE INDICATOR
7. LED DISPLAY
8. PROGRAM INDICATOR
9. REPEAT INDICATOR
10. PLAY/PAUSE button
11. SKIP button
12. SKIP button
13. Light ON/OFF button
14. BALANCE Control
15. Auto Voice Control
16. ECHO Control
17. Loudspeaker
18. Disco Light
19. MIC Volume Control
20. Master Volume Control
21. Handle
BACK PANEL
22. VIDEO OUT Socket
23. AUDIO OUT Socket (R)
24. AUDIO OUT Socket (L)
25. DC IN Jack
26. Battery Door
27. LINE IN Jack
28. MIC 1 Jack
29. MIC 2 Jack
30. CD Door

Page 5
CONTROL LOCATIONS
MEDIA DOCK CRADLE CONNECTION
BATTERY PRECAUTIONS
The battery precautions below should be followed when
using batteries in this device.
Be sure to follow the correct polarity when installing
the batteries as indicated in the battery compartment.
Reversed batteries may cause damage to the device.
Do not mix different type of batteries together (e.g.
Alkaline and Carbon Zinc) or old batteries with
fresh ones.
If the device is not to be used for a long period of time,
remove the batteries to prevent damage or injury from
possible battery leakage.
Do not try to recharge batteries not intended to be
recharged, they can overheat and rupture
(Follow battery manufacturer’s directions).
Rechargeable batteries are to be removed from the
product before being charged.
Rechargeable batteries are only to be charged under
adult supervision.
Exhausted batteries are to be removed from the product.
The supply terminals are not to be short-circuited.
Batteries shall not be exposed to excessive heat such
1 .
Gently snap in the dock cradle via the 2 mounting
holes at the back of the karaoke machine
until the cradle is locked in place on both
ends securely.
Cradle
2. Insert your mp3 player / tablet / smart phone into the
cradle and connect via Bluetooth or the supplied
3.5mm cable to your device at the headphone or
aux out to the line in input at the back of the unit.
3. The line input and Bluetooth selction will override
the CD audio playback features of the machine.
Page 6
CONNECTIONS
CONNECTING THE POWER
Plug the supplied AC power adaptor to DC IN jack located on the rear panel of the product and the main power.
STANDBY indicator will light up to half brightness.
CAUTION: The unit is designed to operate from a mains supply of AC 100-240V~50/60Hz.
The supplied AC power adaptor has a polarized plug that fits into the wall outlet only one way.
NOTES: When the unit is not operated by the AC power or unused for long periods of time, please remove the
AC mains plug from the wall outlet and unplug from the main unit.
label located on the rear or base of the unit. If the socket outlets in your home are not suitable for the plug supplied
The mains plug is used as the disconnect
device, the disconnect device shall remain readily operable.
DC OPERATION
1. Lift battery door to reveal battery compartment. Insert six (6) “C” size alkaline batteries (not provided) as
indicated.
2. Replace cover tightly before operating.
3. When not using batteries for a long period of time, remove batteries to prevent leakage in compartment.
Replace all batteries at the same time. Do not mix old batteries with new ones.
IMPORTANT: The AC power adaptor MUST be disconnected from the unit or it will not operate on battery power.
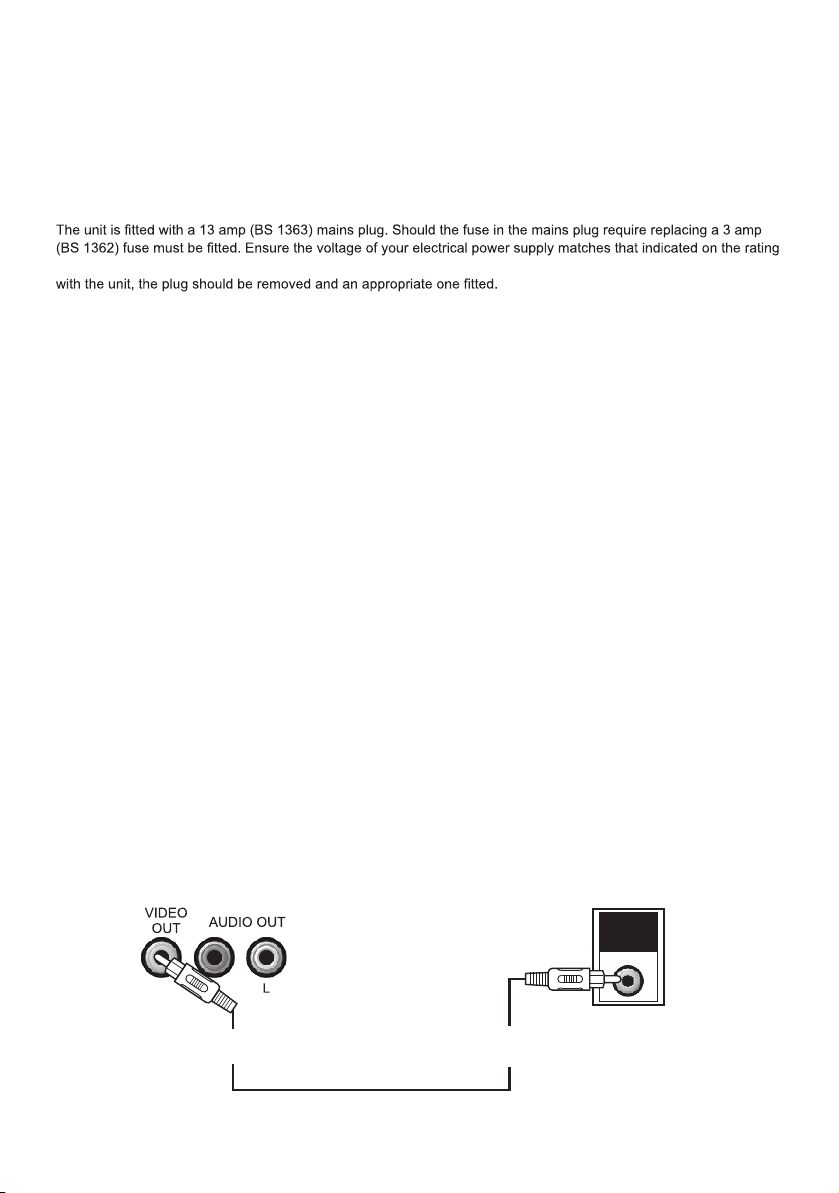
CONNECTING TO YOUR TV OR VCR / DVD PLAYER
Your karaoke machine is designed to connect to your TV the same way you would connect most video cameras,
VCR / DVD players or video games consoles.
We have provided RCA cables to connect your unit to a TV, VCR / DVD player, video device or an external audio
/ sound system. The RCA cables have three connections at each end (white and red are for left and right audio
connections and the yellow is for video connections).
Please follow the steps below to display CD+G lyrics on the TV screen:
1. Locate the multi-coloured RCA cables
2. Connect video cable (yellow) to the video out of the back of the Karaoke Machine
3. Connect the other end of the video cable (yellow) to the video input on your TV or VCR / DVD player
VIDEO
INPUT
REAR VIEW OF TV
VIDEO INPUT
(Yellow Jack)
REAR VIEW OF
KARAOKE SYSTEM
VIDEO OUTPUT
(Yellow Jack)
Page 7
CONNECTIONS
SELECTING YOUR KARAOKE MACHINE AS YOUR SOURCE/INPUT
Selecting your Karaoke Machine as a source / input on your TV is very similar to connecting a VCR/DVD or Satellite
system.
We’ve listed below the most common ways of selecting the source from your TV or VCR / DVD player:
1. In the set up menu of the TV or VCR / DVD player there may be an option for “Input Select” where you can choose
between “Cable/Ant., Video 1,Video 2, etc” as the input source.
2. Look for a TV channel between the highest and lowest on your TV or VCR / DVD player (i.e AUX,EXT,LINE 1 or
LINE IN)
3. Your remote control for either your TV or VCR / DVD player may have source input selections as well as detailed
as the following: “Video,Video 1,Game,AUX,EXT or LINE-IN.” Choosing one of those sources in most cases
should display the lyrics from your Karaoke Machine as well.
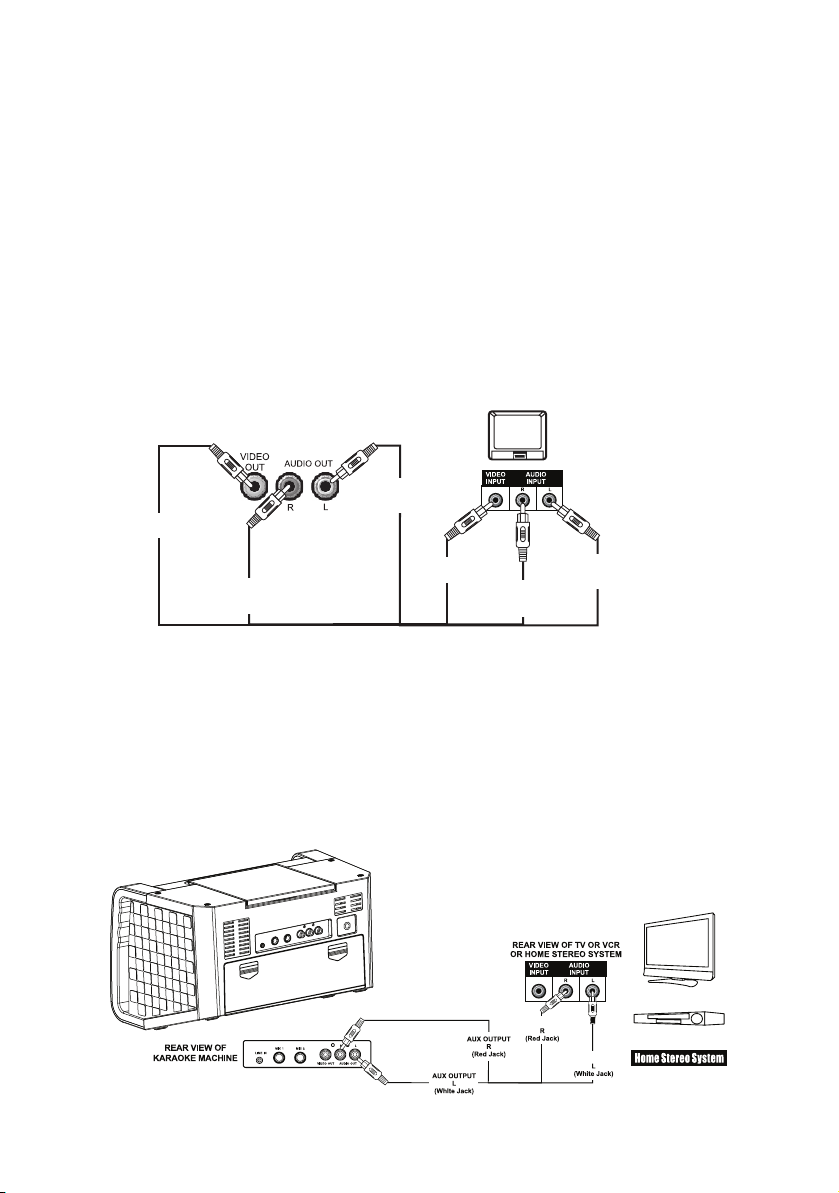
AUDIO CONNECTION
As an alternative to listening to the audio through your TV, you can listen through your home stereo system.
Connect the unit to your home stereo system using the White and Red connections on the supplied AV cable.
You may require an additional red/white lead (not included) to reach your home stereo system.
Plug the white end of the cable into the white AUDIO OUT socket on the unit. Plug the red end of the cable into
the red AUDIO OUT socket on the unit. Now connect the other end of the cable’s white (left channel) and red (right
channel) plugs to your home stereo system’s ‘AUX IN’ sockets.
AUX INPUT
AUX INPUT
REAR VIEW OF TV
AUDIO INPUT
L
(White Jack)
TV
SCART INPUT
0000000000
0000000000
AUDIO INPUT
R
(Red Jack)
VIDEO OUTPUT
(Yellow Jack)
REAR VIEW OF
KARAOKE SYSTEM
AUDIO OUTPUT
SCART ADAPTER CONNECTION
(FOR TV WITH SCART INPUT)
AUDIO OUTPUT
L
(White Jack)
R
(Red Jack)
VIDEO INPUT
(Yellow Jack)

Page 8
DISC OPERATIONS
WARNING - Tapping or dropping the microphone while it is on can permanently damage your microphone.
Resist the urge toswing the microphone around by the cord!
PREPARATION
This unit is designed to play CD’s bearing the
not play properly.
●Fingerprints and dust should be carefully wiped off with a soft cloth. Wipe in a straight motion from the
centre of the disc tothe outside edge.
●Never use chemicals, such as record cleaning sprays, antistatic
clean compact discs. These chemicals will permanently damage the plastic surface of the disc.
●Always place the compact disc on the disc tray with the label facing upward. Compact discs can be
played on only one side.
●To remove a disc from its storage case, press down on the centre of the case and lift the disc out, holding it
carefully by the edges.
●Discs should be returned totheir cases after use to protect them from dust and scratches.
●To prevent warping the disc, do not expose it to direct sunlight, high humidity or high temperatures for
extended periods of time.
●Do not apply paper or write anything on either side of the disc. The inks used in some felt-tip pens may
damage the surfaces of the disc.
TURNING ON/OFF
●To turn on the unit, press the STANDBY button, the Standby Indicator will light to full brightness.
●To turn it off, press the STANDBY button again, the Standby Indicator will light to half brightness.
LOADING ADISC
●Lift up CD door to open CD/CDG compartment door. Place a disc in the compartment with the printed
side facing toward you.
●Gently close the CD door tothe CD/CDG compartment. The karaoke system begins to read the disc. After that,
press PLAY/ PAUSE to play the disc. (If no disc is loaded, it will display “no”). (Refer tothe Trouble Shooting
Guide on page 10 if a disc is loaded but the total tracks do not appear).
PLAY/PAUSE MODE
●To start playing, press the PLAY/PAUSE 1 ] will be displayed on the LED display.
●To temporarily stop playing, press the PLAY/PAUSE button.
●To resume play, press this button again. PLEASE NOTE: Pressing pause when a CDG is playing may cause
distorted lyrics on the monitor. Any distortion will remain until the whole screen is refreshed during an
instrumental break or you stop the song and start it from the beginning.
PLAYING CD OR CD+G DISC
●Adjust MASTERVOLUMEcontrol on your unit, TV or audio system toacomfortable level.
●Adjust MIC VOLUME/A.V.C./ECHO/BALANCEcontrols as needed to achieve the desired mix of music
and vocals through your sound system.
●Do not press the disc cover of the CD compartment while it’s playing.
●Never place anything except acompact disc on the disc tray. Foreign objects can damage the unit.
●Do not apply excessive force to disc cover.
●Only place one disc on the disc tray at atime.

Page 9
STOP MODE
If the STOP button is pressed during playback, the disc will cease to play. (The total number of tracks will be shown on the
LED display).
SKIP (FOR BOTH CD &CDG DISCS)
●During STOP mode, you can skip up or down to your desired track by pressing or holding a SKIP button
( SKIP ).
●To resume playing the selected song, press PLAY/PAUSE button.
SEARCH (FOR AUDIO CD DISC ONLY)
When playing any audio CD, press and hold the SKIP button ( SKIP ). The CD will search at high speed in the
forward or backward direction. Normal play will continue when you release the SKIP button.
REPEAT
●To repeat the track currently playing, press the REPEAT button once. The REPEAT LEDwill blink.
●To repeat all tracks, press the REPEAT button twice. The REPEAT LEDwill stay lit.
●To clear the REPEAT function, press the REPEAT button again. The REPEAT LEDwill turn off.
PROGRAM
●Use this button to program and play back songs in a preselected order.
Step 1: Programming should be done in the stop mode only. Press the PROGRAMbutton. The PROGRAM
LEDwill turn on and the LEDwill read “0“
Step 2: Press the double arrow keys ( SKIP ) toselect a desired track.
Step 3: Press PROGRAM Step 2: Press PLAY button when you
have completed programming and you are ready tostart singing.
●Press the STOP button to clear all the programmed entries.
DISCO LIGHT FUNCTION
●To illuminate the Disco Light, press the Disco LightON/OFFbutton to switch it ON
●Press it again toswitch if OFF
KARAOKE FUNCTIONS
Sing along with the music by plugging in the provided microphone into either one of the microphone sockets on the unit.
ECHO
Adjust the ECHOcontrol to enhance your voice for a concert hall effect.
BALANCE
Adjust the
Energy Saving (Auto Power System-APS)
The unit will automatically turn to ‘Standby’ mode in 15 minutes in the following situations:
1) There is no CD in the compartment or the playback of CD has been stopped.
2) No line-in cable plugged into the AUX IN jack.
The unit can be resumed to turn on by pressing the STANDBY button once.
APS is for energy saving purpose.
BALANCEcontrol between the pre-recorded singer’s voice and the music when using a multiplex karaoke disc.
AUTOVOICE CONTROL
AUTO VOICE CONTROL can be activated by the AVC control. The vocals on the multiplex recording will be muted when
the singer starts tosing through the microphone. When the singer stops singing, the vocals will resume to normal.
LINE IN OPERATION
USING LINE INConnect an audio cable (not included) from the LINE INSocket on this unit tothe external unit’s LINE OUT
Socket. This will allow you to broadcast the external unit’s sound through this unit’s speaker
DISC OPERATIONS

Page 10
BLUETOOTH OPERATIONS
BLUETOOTH SETUP
Pairing is the term used when two Bluetooth devices are connected wirelessly for the first time.
2. The LED display shows “BT” and flashes quickly.
3. Using the native controls on your Bluetooth Device, select the "EKS213BT" in your Bluetooth setting to pair.
4. When successfully paired, “BT” on LED display will stop flashing.
After initial pairing, the unit will stay paired unless unpaired manually by the user or erased due to a reset of the devices.
If your device become unpaired, follow the above steps to pair again.
If any pairing issues occur, un-pair the unit on your Bluetooth device and follow the above steps and try again.
1. Follow the instructions for Pairing a Bluetooth Device.
2. Use the native controls on the connected Bluetooth Device to select a track.
3. To play, pause or skip the selected track, use the native controls on the connected Bluetooth Device.
4. Audio playback from the connected Bluetooth device can now be heard through the speaker.
PLAYING MUSIC VIA BLUETOOTH
1 Press FUNCTION button to toggle to Bluetooth mode.
5. Now go to easykaraoke.com/youtube for thousands of the best karaoke songs available.

Page 11
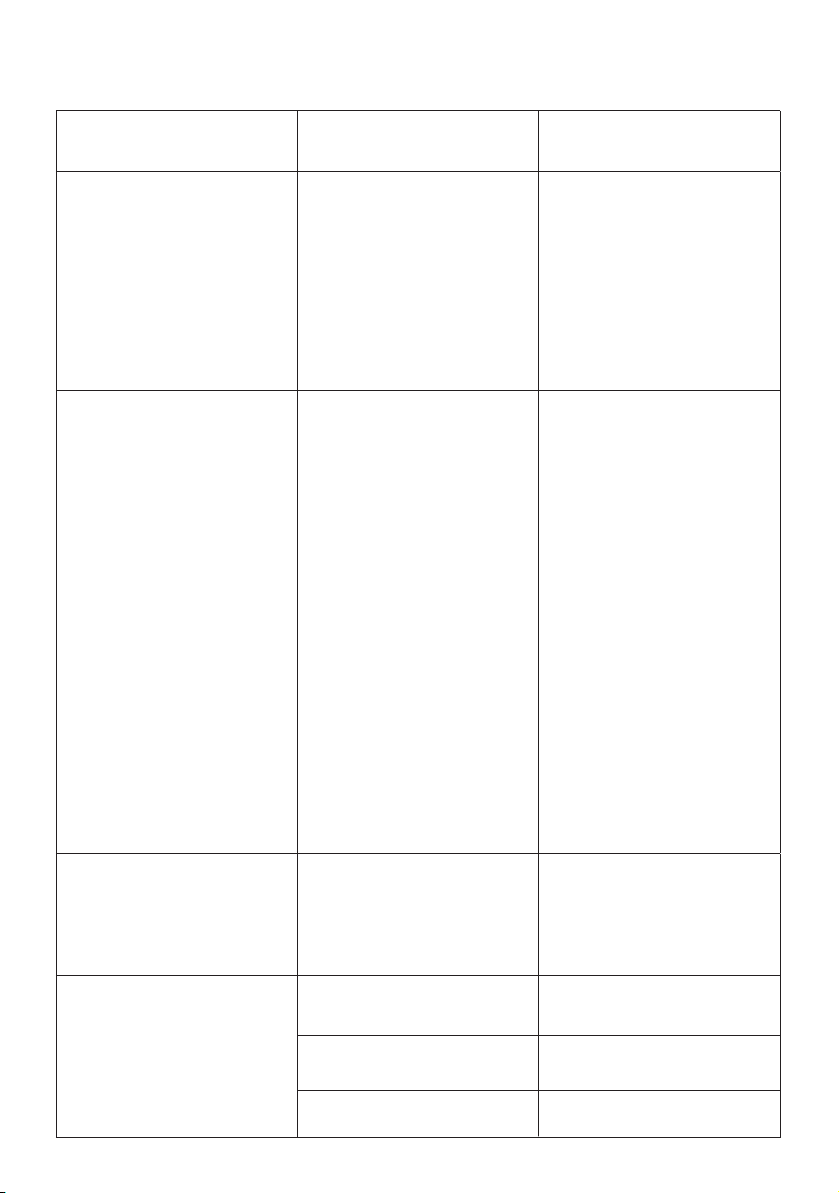
PROBLEM POSSIBLE CAUSE SOLUTION
No power when plugged in. • No power plug connection at the
AC outlet.
• Improper connection between
the unit and the AC power adaptor.
• Insert the power plug into the
AC outlet
• Check the connection between
the unit and the AC power adaptor.
• The AC outlet may not have
power.
• Check the outlet with a working
lamp or other electrical appliance.
No sound from TV or PA. • TV or PA system is set to
minimum
• TV or PA system is powered Off
• Patch cords are not connected
securely.
• Turn up the volume on the TV or
PA system
• Power the TV or PA system on.
• Ensure white and red patch
cords are securely inserted into
both the karaoke system and the
TV/ PA system.
CD Player does not work
normally or the LED
displays “ ”, “ ”, or “ ”.
• Disc is inserted upside down
• Disc is dirty
• Disc is scratched
• Disc is warped
•A non standard disc is inserted
• Moisture has formed inside the
CD deck
• Karaoke system needs resetting
• Insert the disc correctly
• Wipe clean with a soft cloth
• Use a new disc
• Use a new disc
• Only use discs bearing the
standard logo as described on
page 8
• Wait about 20 - 30 mins to let
it dry out.
• Disconnect the machine from the
power source for 30 seconds then
reconnect
No sound - If audio is going
through TV or VCR.
• Source Selection on TV or VCR
is not correct.
• Patch cords are not connected
securely
• Follow directions on page 7.
• Ensure white and red patch
cords are securely inserted into
both the karaoke system and the
home stereo system.
TROUBLESHOOTING
• Turn off the unit, disconnect the
mains plug, and reconnect after
a few seconds.
The unit does reset to
operation of any button.
• Under the influence of
electrostatic phenomenon, the
product may malfunction and
require user to disconnect.
Page 12
PROBLEM POSSIBLE CAUSE SOLUTION
No sound - when audio
is connected to a home
stereo.
• Source Selection on your stereo
is not set properly
• Improper Connection to stereo
system or PA
• Patch cords are not connected
securely.
• Select AUX IN as the source for
your home stereo
• Follow direction on page 7 for
connecting to a home stereo
system
• Ensure white and red patch
cords are securely inserted into
both the karaoke system and the
home stereo system
No song lyrics appear on
the TV screen
• Video cable is not connected
properly to the TV
• Source selector on TV is not set
to VIDEO
• TV does not have video line
input
•A CDG is loaded but the CD+G
icon is not lit
• Connect the video cable to the
karaoke system’s VIDEO OUT
and to the TV VIDEO IN. Refer to
page 8 under Connecting to your
TV or VRC / DVD player
• Using your TV remote to select
VIDEO input or select the proper
VIDEO input on the TV itself.
(Refer to page 6 under Connect-
ing to your TV or VRC / DVD
player.
• Connect from VIDEO OUT of
the system to the VIDEO IN on
your VCR or connect to an RF
Modulator and then to the TV
cable input. Refer to “Connec-
tions” on page 7.
• Check the disc to be sure it is
a CDG.
No sound from mic • Mic volume control is set to
minimum
• Mic is off
• Adjust mic volume to max, and
then re-adjust to a comfortable
level
• Turn on mic with the ON/OFF
switch located on the microphone
TROUBLESHOOTING
No sound when playing audio via
Bluetooth.
• Your Bluetooth device does not
paired properly.
• Pair your Bluetooth device
according to the "Bluetooth setup"
section.
• The volume control of your
Bluetooth device is set at too
low.
• Increase the volume of your
Bluetooth device.
• The volume control of the unit
is set at too low.
• Increase the volume of the unit
by VOLUME control.

Page 13
SPECIFICATIONS
Audio Section
Output power
Output impedance 8 Ohms
CD player
Frequency response
Signal - to - noise ratio
Number of programs
Sampling system
100 Hz - 20 kHz
50 dB
20 STEPS RANDOM ACCESS PROGRAMMING
8 TIMES OVER SAMPLING
Microphone -73 dB 600 OHMS IMPEDANCE WITH
Ø 6.3mm DYNAMIC MICROPHONE
Mains Input Power AC 100-240V ~ 50/60Hz
Dimensions 314W x 192D x 210H mm
Weight 2 kg
Accessories AV CABLE
PRE-RECORDED KARAOKE CD+G DISC
DYNAMIC MICROPHONE
incurring any obligation.
TABLET CRADLE
AC POWER ADAPTOR
5 watt + 5 watt RMS

Page 14
CONTACT DETAILS
WEEE marking Information for the consumer
Disposal of your old product
Your product is designed and manufactured with high quality materials and components, which
can be recycled and reused. When this crossed out wheeled bin symbol is attached to a product it
means the product is covered by the European Directive 2002/96/EC. Please make yourself aware
of the local collection system for electrical and electronic products. Please act according to your
local rules and do not dispose of your old products with your normal household waste. The correct
disposal of your old product will help prevent potential negative consequences for the environment
and human health.
This appliance complies with the following EEC directives: 2006/95/EEC/ Low voltage directive /
EMC directive
In the event of any problems installing or using this Easy Karaoke machine, please contact your local retailer
We will endeavour to reply to all correspondence within 24 hours of receipt
Easy Karaoke Ltd
Graham Lloyd Building
Midland Structures Industrial Estate
Ampthill Road
Bedford
MK42 9JJ
www.easykaraoke.com

END OF LIFE DISPOSAL
Warning!
This logo
set onthe
pro duct means that
the
re cycling of this
apparatus
comes within
the
framework of
the
Dire ctive
2002/96/CE
of January
27, 2003
concerning
the
Waste of Electrical
and
Electronic Equipment (WE
EE).
This symbol means that
used
elect rical
and
ele ctronic products should not
be
m ixed
with general household wste. There
is a
separate collection system for
these
products.
If
you want to dispose of this equipment, please do not
use
the ordinary dust bin!
-
The presence of dangerous substances in
the
electrical
and
ele ctronic equipments
can have
potential consequences
on the
environment
and
hu man health in
the
cycle of reprocessing
this
product.
-
Therefore,
at theend
of its lifetime, this product shall not
be
disposed with other
non -rec
ycled
waste. Used electrical
and
electronic equipment must
be
treated separately
and
in
ac
cordanc
e
with legislation that requires proper treatment, recovery
and
recycling of
used
electrical
and
electronic
equipment.
-
Local authorities
and
resellers have
set
special pro cedures for
the
purpo se of collecting
and
recycling this product (please contact your local authority for further detail s). You have
the
obligation to
use the
selective waste collection systems put in pla ce by your local
authority
.
-
If your
used
electrical or electronic equipment
has
batteries or accumulators, please dispose of
these
separately beforehand according to local
requirements.
-
By disposing.of this product correctly you will help en sure that
the
wa ste undergoes the
necessary
treatment, recovery
and
recycling
and
thus prevent potential negati ve effects
onthe
environment
and
human health which could oth erwise arise
due
to inappropriate wa ste handling.
This appliance complies with the
RED
Directive 2014/53/EU
&
the EMC
Directive 2014/30/EU of the European Parliament and the Council and
the
mutual recognition of their
confo
rmity.
https://cdn.shopify.com/s/files/1/0364/6701/5819/files/EKS213_RED_certificate.pdf?v=1620223608
Table of contents
Other EK Karaoke System manuals


