EKF Diagnostics SensLab Lactate Scout Vet User manual

Lactate Scout Vet
Instruction manual


Copyright © 2022 SensLab GmbH
This document is protected by copyright.
Any duplication, copying or distribution
is prohibited without the prior written
consent of SensLab GmbH
Part-No: 7023-9016-0299
Rev.01 04/2022
Lactate Scout Vet instruction manual
Manufacturer:
SensLab GmbH
Bautzner Str. 67, 04347 Leipzig
Germany
Sales and service:
EKF-diagnostic GmbH
Ebendorfer Chaussee 3, 39179 Barleben
Germany
Service: +49 (0) 39 203 511 414
Email: [email protected]
www.ekfdiagnostics.com

Contents
0Safety instructions and required accessories 7
1Introduction 9
1.1 Lactate Scout Vet measuring device 9
1.2 Lactate Scout Vet Test Strips 9
1.3 Inserting the batteries 10
1.4 Switching the device on and off 11
1.5 Display 11
1.6 Code setting for the Test Strips 12
2Performing a test 13
2.1 Preparing for a test 13
2.2 Blood collection and test 14
2.3 Checking the code setting 16
2.4 Checking the ambient temperature 16
3Settings, functions and displays 17
3.1 Volume control 18
3.2 Date and time settings 19

3.3 Displaying information about the device 21
3.4 Functionality test 22
3.5 Displaying stored values 25
3.6 Battery level indicator 26
4Storage, cleaning and disposal 27
5Error messages and warning indicators 28
6Technical specications 34
7Symbols 36
8Consumables and accessories 38

7
• The Lactate Scout Vet measuring system is
intended to measure lactate concentration in
animal capillary and whole blood.
• The Lactate Scout Vet measuring device can
only be used with Lactate Scout Test Strips.
• Lactate Scout Test Strips are designed for
single use.
• Lactate Scout Vet measuring system is not
intended for use in humans.
Safety instructions
PLEASE READ THE INSTRUCTION MANUAL
BEFORE USE AND KEEP IT IN A SAFE PLACE!
Failure to comply with any text marked as
a “WARNING” can result in serious damage
to health.
Failure to comply with any text marked
“ATTENTION” can lead to incorrect tests or
damage to the device.
Please ensure you observe the separate warn-
ing and safety instructions specied on the
labels of the batteries and lancets that you
are using.
WARNING
There is a risk of small parts being ingested,
such as batteries, Test Strips, screw caps or
drop dispensers on check solution bottles.
The Lactate Scout Vet measuring device and
all related accessories must be kept out of the
reach of children.
Description
0 Safety instructions and required accessories

8
WARNING
The method for obtaining blood samples for
lactate tests involves a risk of infection. Test
Strips, lancets, lint free cloths and measuring
devices contaminated with blood carry a risk
of infection.
Please make sure that lancets and Test Strips
are intact and unused before use.
Make sure you dispose of any used Test Strips,
lancets and lint free cloths safely.
WARNING
Lactate Scout Vet is intended for professional
veterinary use. Blood collection from pets is at
your own responsibility. If you want to take a
blood sample from your pet yourself, ask your
veterinarian for advice how to measure lactate
levels at your pet in advance. You will get
information about the most appropriate sites
for blood sampling
ATTENTION
Make sure you only use accessories that
have been provided or recommended by the
manufacturer.
The measuring device must not be used
if it is not functioning correctly or has
been damaged.
Your warranty will be voided and all liability
claims will be excluded if the housing of the
device is forcefully opened.
Required accessories
To carry out lactate measuring the following
accessories are needed:
- Lactate Scout Vet measuring device
- Lactate Scout Test Strips
- Sterile needles and blood tubes for
venous sampling
- Sterile lancets for capillary sampling
- Lint free cloths or paper tissues
- Clean water
Please note that sterile lancets, blood drawing
equipment, cloths, and water are not included
in the scope of delivery and need to be
provided separately.
To carry out functionality tests, Lactate Scout
Check Solutions are available in different
concentrations (see chapter 8)
9
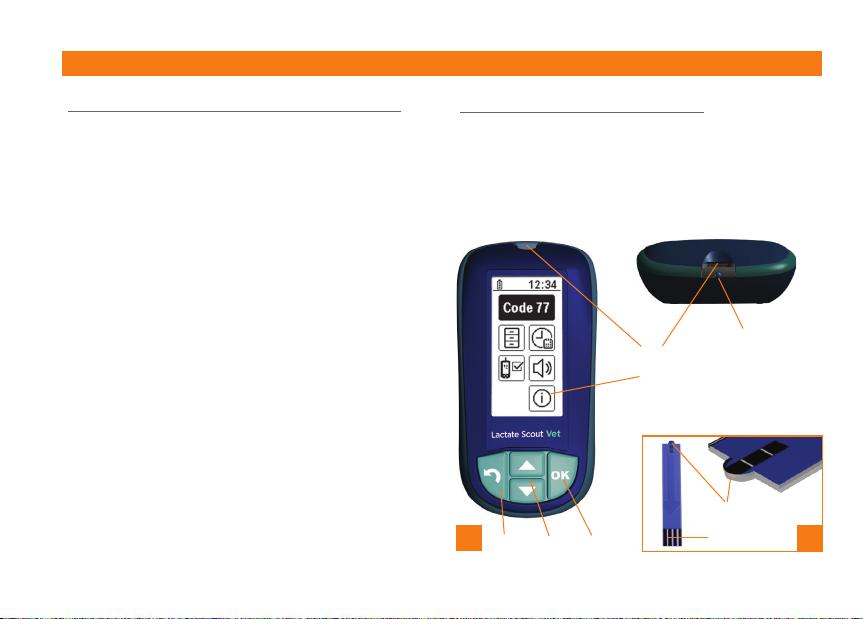
Introduction
1.1 Lactate Scout Vet measuring device
Opening (1A) for inserting the Test Strip
Display (1B) Display screen
will indicate the following:
device ready, blood lactate concentration, warning
messages, conguration options and status
information.
Keypad for operating the measuring device
• Arrow keys (1C):
- for moving between menus, sub-menus and
menu items
- for adjusting values
• OK button (1D):
- for selecting menus, sub-menus and
menu items
- for conrming choices
- for activating and deactivating
conguration mode
• Back button (1E):
for undoing the last step/cancelling
• Temperature sensor (1F):
for reading the ambient temperature
1.2 Lactate Scout Test Strip
The Test Strip has an opening for the blood
sample (2A). The contacts (2B) connect the
Test Strip to the measuring device.
1A
1B
2B
1E 1C 1D
2A
21
1F

10
1.3 Inserting the batteries
The Lactate Scout Vet requires two CR2450
(3V lithium button cell) batteries.
The device is supplied with batteries included.
Firstly, remove both of the battery
insulating strips 1. The device is now
ready to use.
Replacing Batteries
The measuring device must be turned off to
replace the batteries. Gently push the battery
cover on the back outwards. Remove the
discharged batteries. When inserting the new
batteries, ensure that the polarity is correct.
Push the battery cover back in until it
completely locks into place 2.
If the time to replace the batteries exceeds
30 seconds, the date and time setting will be
lost and must be re-entered. However, any
stored data and settings will be retained.
1
2
PLEASE NOTE
Used batteries must not be disposed of
with household waste. End users should
follow local regulation regarding the recycling
of batteries to help reduce the environmental
impact that waste batteries have on our planet.
11
1.4 Switching the device on and off
The Lactate Scout Vet has a Conguration
and Display mode and a Measuring mode,
both of which can be switched on and off
independently.
Conguration and Display mode can be
switched on or off by holding down the OK
button for two seconds.
Measuring mode is switched on when a
Test Strip is inserted into Lactate Scout Vet
regardless of the mode already selected.
Removing the Test Strip from the device will
switch off the Lacate Scout Vet.
The device can be switched off by holding
down the OK button for two seconds.
The device will switch itself off if it is not used
for two minutes in Conguration and Display
mode or if the device is not used for two
minutes while a Test Strip is inserted.
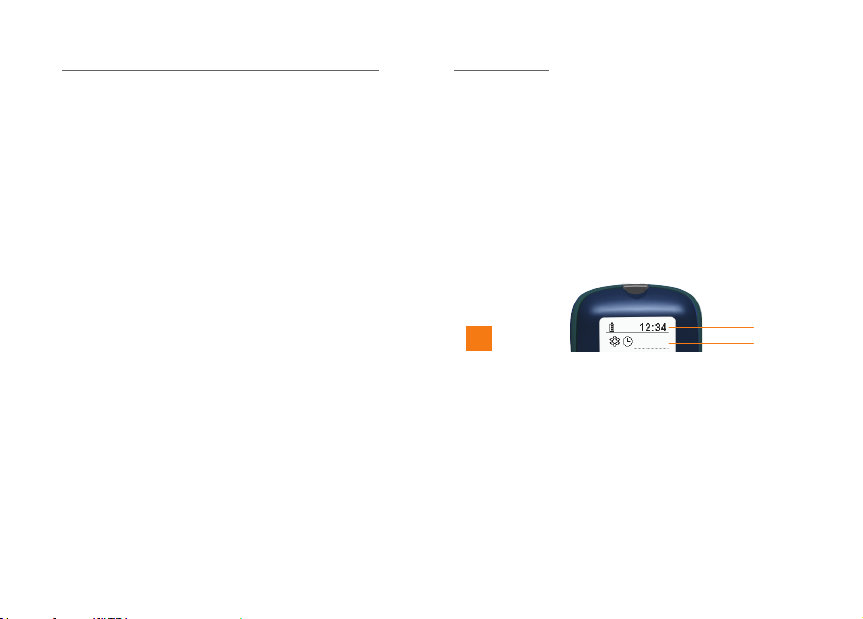
1.5 Display
An information line will be displayed in both
modes at the top of the display when the device
is switched on. This line provides information
about the battery level, the current time and the
active functions of the measuring device (3A).
In Conguration and Display mode, a symbol line
will also be displayed beneath the info line (3B).
This line uses corresponding symbols to indicate
the Conguration and Display mode menu/sub-
menu currently selected.
If symbols or numbers have a black background,
this means they can be selected and conrmed.
If symbols or numbers have a grey background,
this means they cannot be selected and
conrmed. The associated function is activated in
the main menu (Chapter 3).
3A
3B
3
12
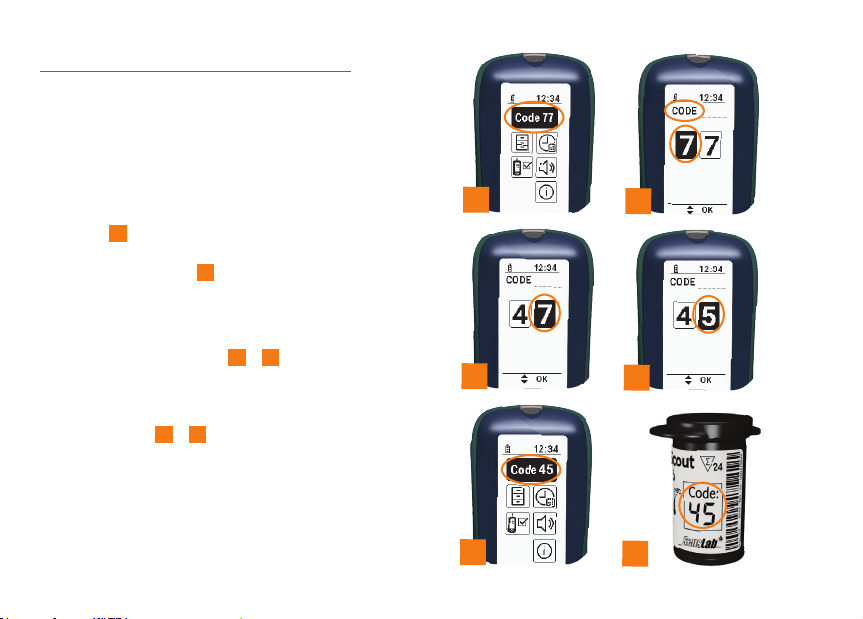
1.6 Code setting for the Test Strips
Test Strips exhibiting a two-digit code which
must be entered when setting up the Lactate
Scout Vet or when using Test Strips from a
new Test Strip container; this code is printed
on the label of the Test Strip container.
First switch on the Conguration and Display
mode by holding down the OK button for two
seconds 4. Press the OK button again. The
code setting menu will open. The symbol line
will display “CODE” 5.
Enter the two digits of the Test Strip code,
starting from the left. Enter the digits of the
code using the arrow keys and conrm by
pressing the OK button 6- 7. A signal tone
will conrm that the code has been set. The
Lactate Scout Vet measuring system is now
ready to take measurements using Test Strips
with this code 8- 9.
You can now either insert a Test Strip or
switch off the device.
4
6
89
7
5
13
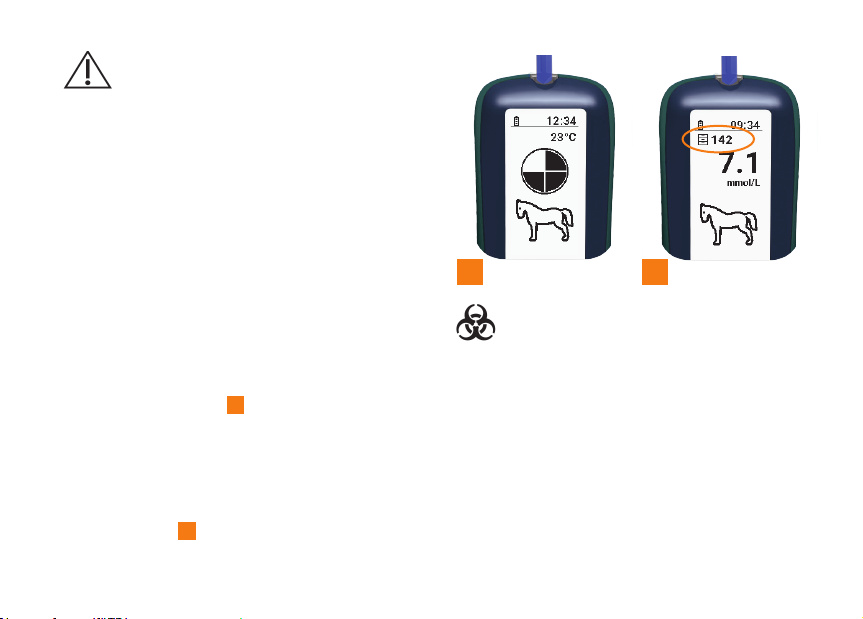
2 Performing a test
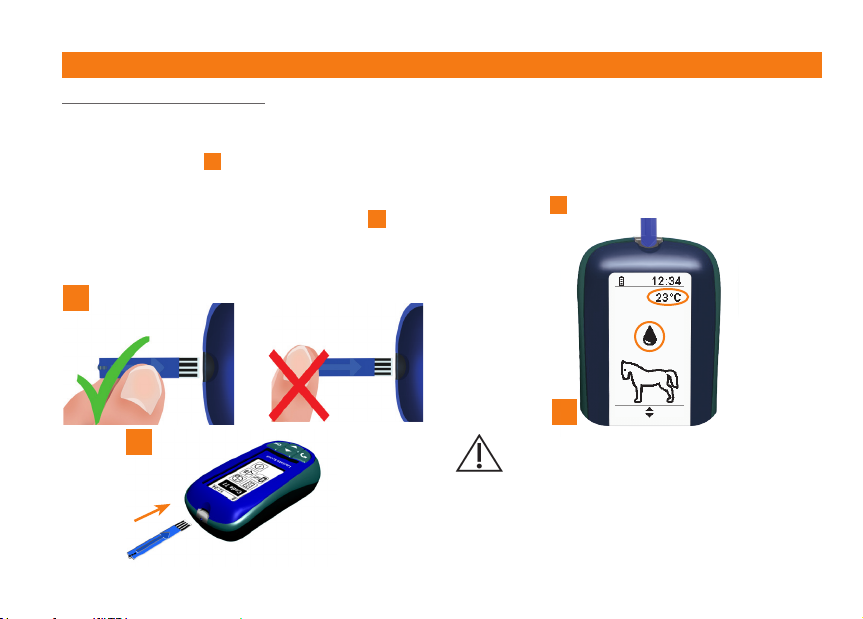
2.1 Preparing for a test
Remove a Test Strip from the container.
Make sure you do not touch the opening for
the blood sample 1. As soon as you have
removed the Test Strip, insert it into the
measuring device opening in the direction of
the arrow until you can feel resistance. 2.
The contacts must be facing up.
3
The display will briey show the current code
setting. A blinking drop symbol and an animal
icon will then be displayed. Use the arrow
keys to change the animal icon to the species
desired. The ambient temperature of the
measuring device will be displayed beneath
the info line 3.
ATTENTION
Before you use a Test Strip from a new Test Strip
container, you must check that the code on the
label is the same as the code currently congured
in the device. If the code does not match, then it
must be recongured (see section 1.6).
2
1

14
ATTENTION
The Test Strip and the Lactate Scout Vet must
be at the same temperature when performing
a test. If you take the Test Strip container
out of the refrigerator, you must wait for at
least 20 minutes until the Test Strip container
has reached the ambient temperature before
you opening the container. If you take the
Test Strip container out of the freezer,
you must wait for at least 2 hours until
the Test Strip container reaches ambient
temperature. Only remove Test Strips to be
used immediately for testing purposes. Reseal
the container immediately after removing
Lactate Scout Test Strips
After removing Lactate Scout Test Strips
from the container measurement of the Test
Strips must be accomplished within 2 minutes.
Please do not store Lactate Scout Tests Strips
for more than 2 minutes outside the storage
container or at relative humidity >85%.
2.2 Blood collection and test
Wash the sample site with clean water. Dry the
sample site. In order to take a capillary blood
sample, puncture the site using a sterile lancet.
Wipe away the rst droplet of blood. Apply
gentle pressure to the puncture site. The
second droplet must be large enough to ll
the measurement chamber of the Test Strip
in one go.
WARNING
Avoid pressing on the puncture site too
heavily as sweat and/or tissue uid can merge
with the droplet of blood and interfere with
the test result.
The droplet of blood must not run. Position
the tip of the Test Strip on the sample site
and the Test Strip will draw blood into the
measuring chamber 4.
4
15
ATTENTION
The Test Strip must draw the blood in one
smooth ow. The device must therefore be
kept steady when taking the sample. Failure
to do so results in the risk of insufcient lling
of the Test Strip.
To measure venous blood, aliquot a small
sample (50-100 µL) from a blood tube
(fresh or heparinized (lithium heparin) onto
a hydrophobic surface, eg plastic lm or
aluminium foil and bring the Test Strip tip
to the surface of the droplet. The Test Strip
will draw blood into the measuring chamber
and when the measurement chamber is full,
an acoustic signal will sound and the test
will begin. A circular symbol with a progress
bar will be displayed 5. After ten seconds, a
second acoustic signal will sound and the test
result will be displayed in the measurement
unit “mmol/L”. The allocated memory space
number will be displayed next to the memory
symbol. The test result is stored along with
the date and time of the test and the memory
space number 6.
5 6
WARNING
Lancets and Test Strips may only be
used once.
Used lancets and Test Strips carry a risk of
infection. Ensure any used lancets and Test
Strips are disposed of safely in waste along
with contaminated lint free paper wipes.
Observe local laws and regulations for disposal
of potentially contaminated equipment.

16
8
7
9
2.4 Checking the ambient temperature
To ensure consistent results are achieved
under different climatic conditions, the
measuring device is equipped with a
temperature sensor. The temperature sensor
is located underneath the opening for the
Test Strips 9.
2.3 Checking the code setting
The code is displayed briey when you switch
measuring mode on 7. If more than 24
tests are performed with the same code, a
reminder to check the code will be displayed
for three seconds 8. Pressing the OK button
within three seconds will take you to the code
conguration menu.
WARNING
Do not touch or cover the temperature sensor
with your hand. Failure to do so may result
in the risk that the temperature sensor will
read the ambient temperature incorrectly and
report incorrect test results.

17
Briey press one of the two arrows to select
a symbol. The selected symbol is displayed
with a black background. Pressing the OK
button enters the sub-menu. Once changes
to the conguration are complete, conrm
selection by pressing the OK button to
return to the main menu. Pressing the Back
button will also return to the main menu
but changes to conguration will not be saved.
3 Settings, functions and displays
Settings can be changed in Conguration and
Display mode. In order to access Conguration
and Display mode, there must not be a Test
Strip inserted in the measuring device. The
Conguration and Display mode can be
switched on or off by holding down the OK
button for two seconds. An acoustic signal will
sound, and the main menu will be displayed
along with its symbols. The symbols display
the sub-menus 1:
• Stored test results (1A)
• Functionality test (1B)
• Test Strip code conguration (1C)
1C
1D
1A
1B
1F
1
Choose a symbol to move to the associated
sub-menu:
- Set Date Time (1D)
- Set Volume (1E)
- Info (1F)
1E
18
3A
3B
3C
3
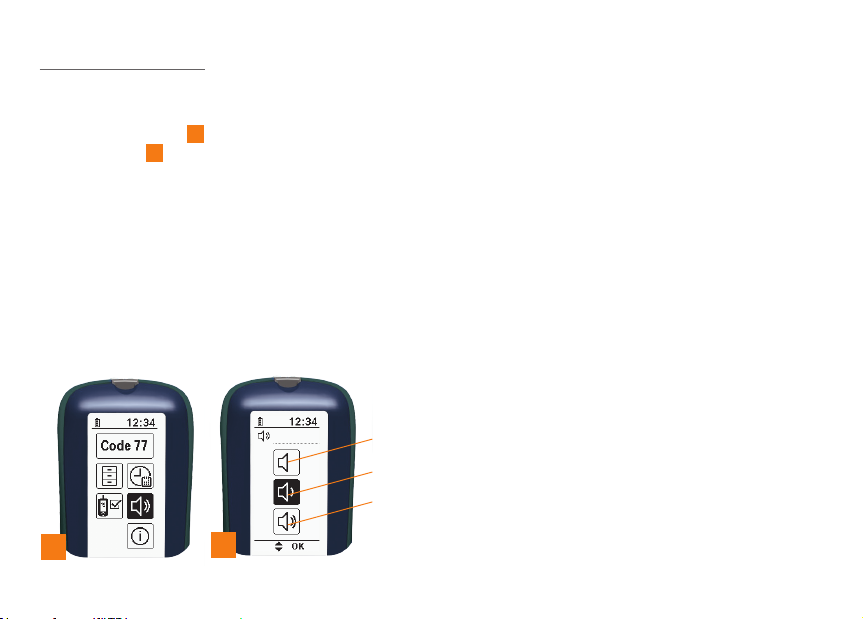
3.1 Volume control
If you choose the “Loudspeaker” symbol in the
“Device settings” menu and conrm by press-
ing the OK button 2. The following settings
are available: 3.
• mute (3A)
• medium volume (3B)
• loud (3C)
Set the volume using the arrow keys and
conrm your selection by pressing the OK
button. Once you have conrmed your
selection, you will be taken directly back to
the Device Settings menu.
2

19
Next, set the hours and minutes using the
arrow keys 6 and conrm by pressing the OK
button. After conrming the selection, you will
return to the Device Settings menu.
If the date and time are not (re)set when
the device is congured or reset, the time
will be displayed in the info line with a black
background.
3.2 Date and time settings
Select “Date and Time Settings” symbol in
the Device Settings menu by pressing the
OK button 1. To set the year, use the arrow
keys to select the correct year 2 and conrm
by pressing the OK button. Once the year
is conrmed, set the month 3by using the
arrow keys and conrm with the OK button.
Next, select the day 4. Using the arrow keys
and conrm with the OK button. To set the
time format, use the arrow keys to move
between the following settings 5
• 24-hour clock
• 12-hour clock

20
12 3
4 5 6
21
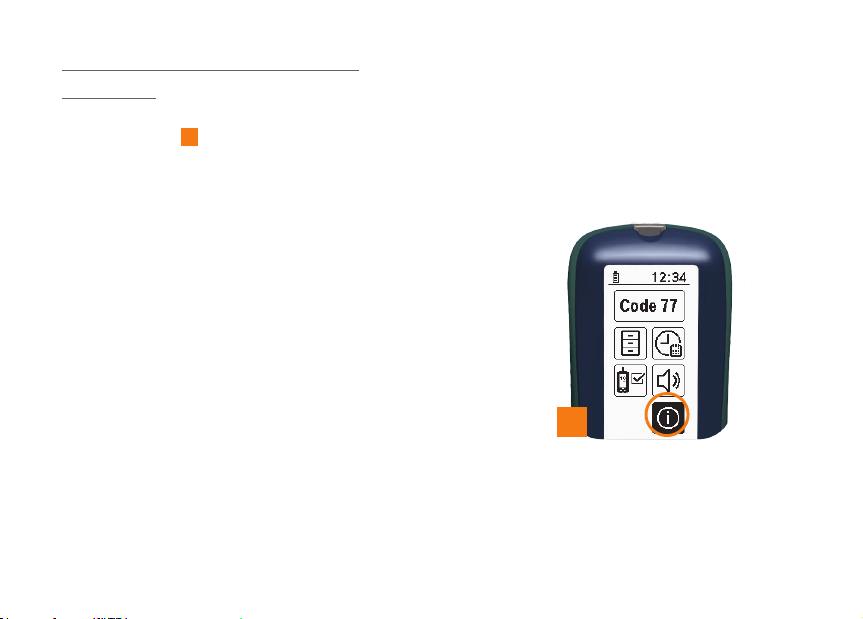
3.3 Displaying information about
the device
If you choose the “Info” symbol in the Device
Settings menu 7by using one of the two
arrow keys and conrm your selection by
pressing the OK button, you will be shown
the following information about the device,
rmware and device components. If you use
the arrow keys to browse through the pages in
this menu item, then the following information
will be displayed:
• Serial number of the measuring device
• Firmware version of the measuring device
• QR link to the Lactate Scout Vet website
• Licensing information on the font used
Once you have pressed the OK button again,
you will be taken directly back to the Device
Settings menu.
7
Table of contents
Other EKF Diagnostics Medical Equipment manuals


Popular Medical Equipment manuals by other brands


Cooper Medical Supplies
Cooper Medical Supplies CMS-50H instruction manual

Orliman
Orliman Arnetec 1015 Use and maintenance instructions

Pari
Pari VORTEX 051D0048 Instructions for use

Nellcor
Nellcor N-180 Service manual

BlackBox Biometrics
BlackBox Biometrics Blast Gauge quick start guide

3M
3M Ranger 245 Operator's manual