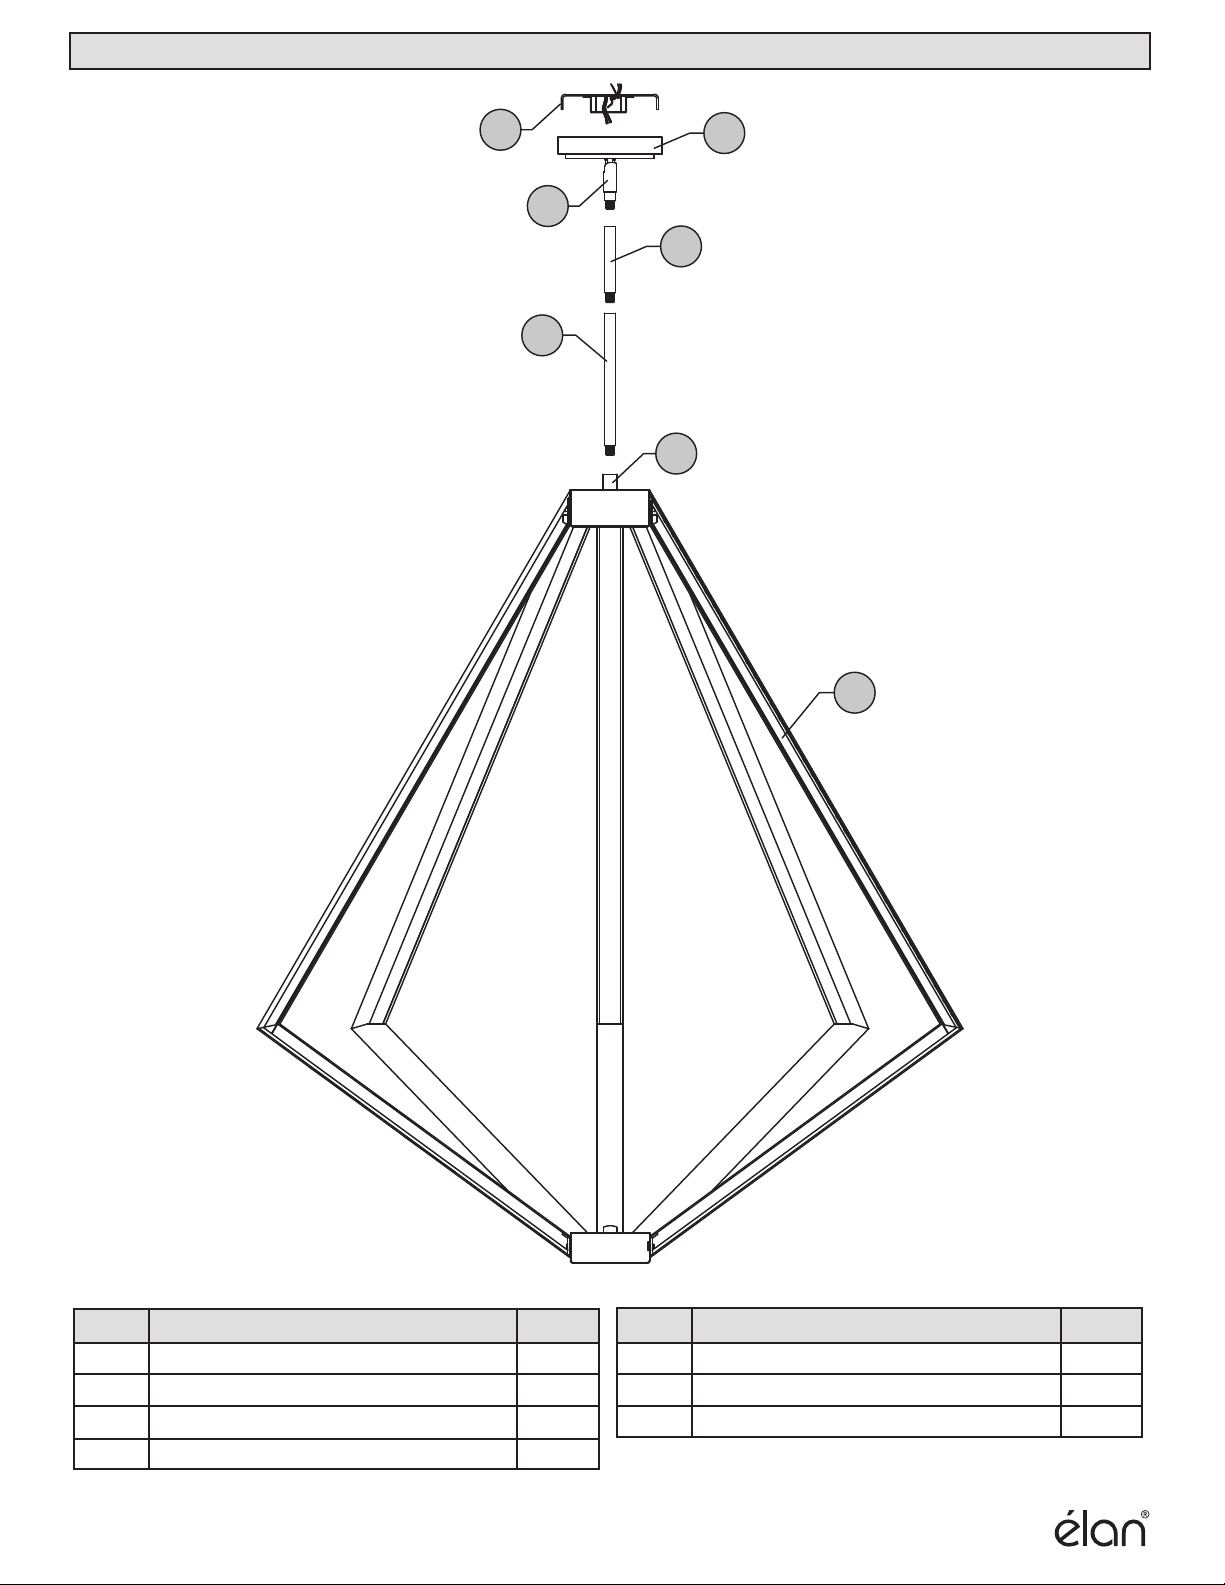
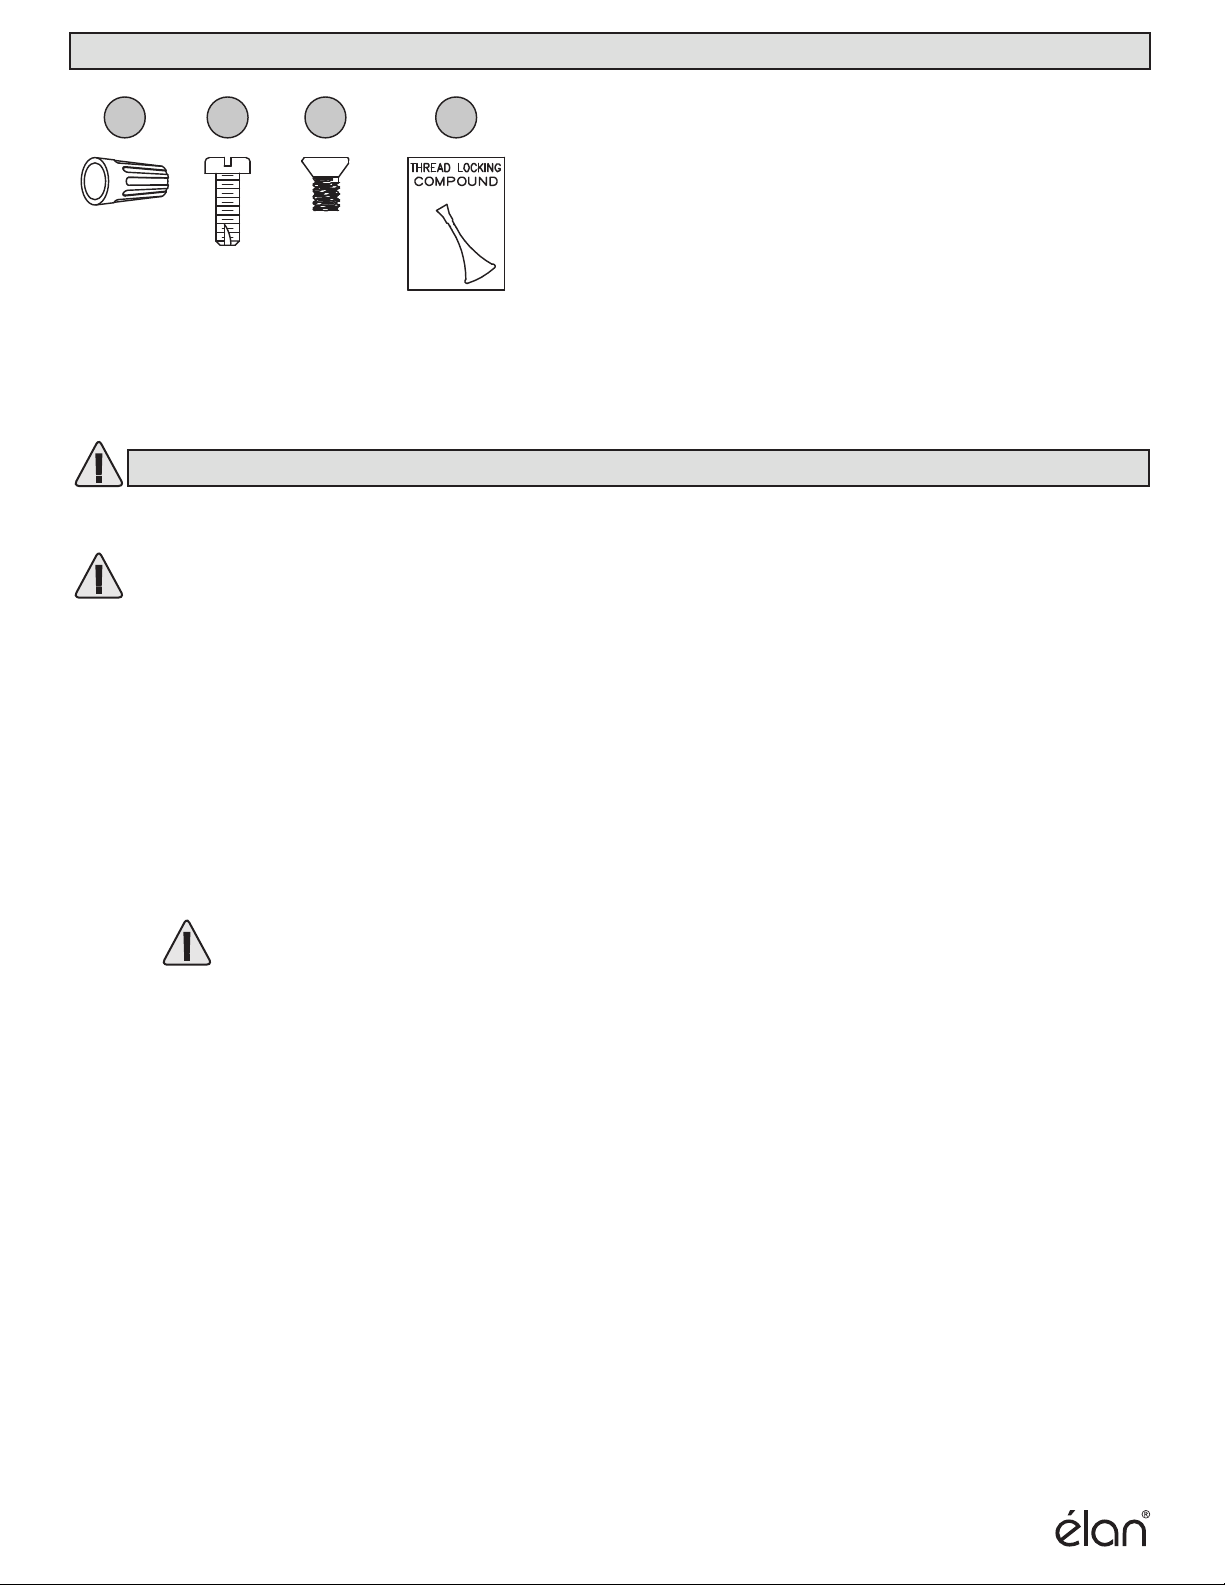
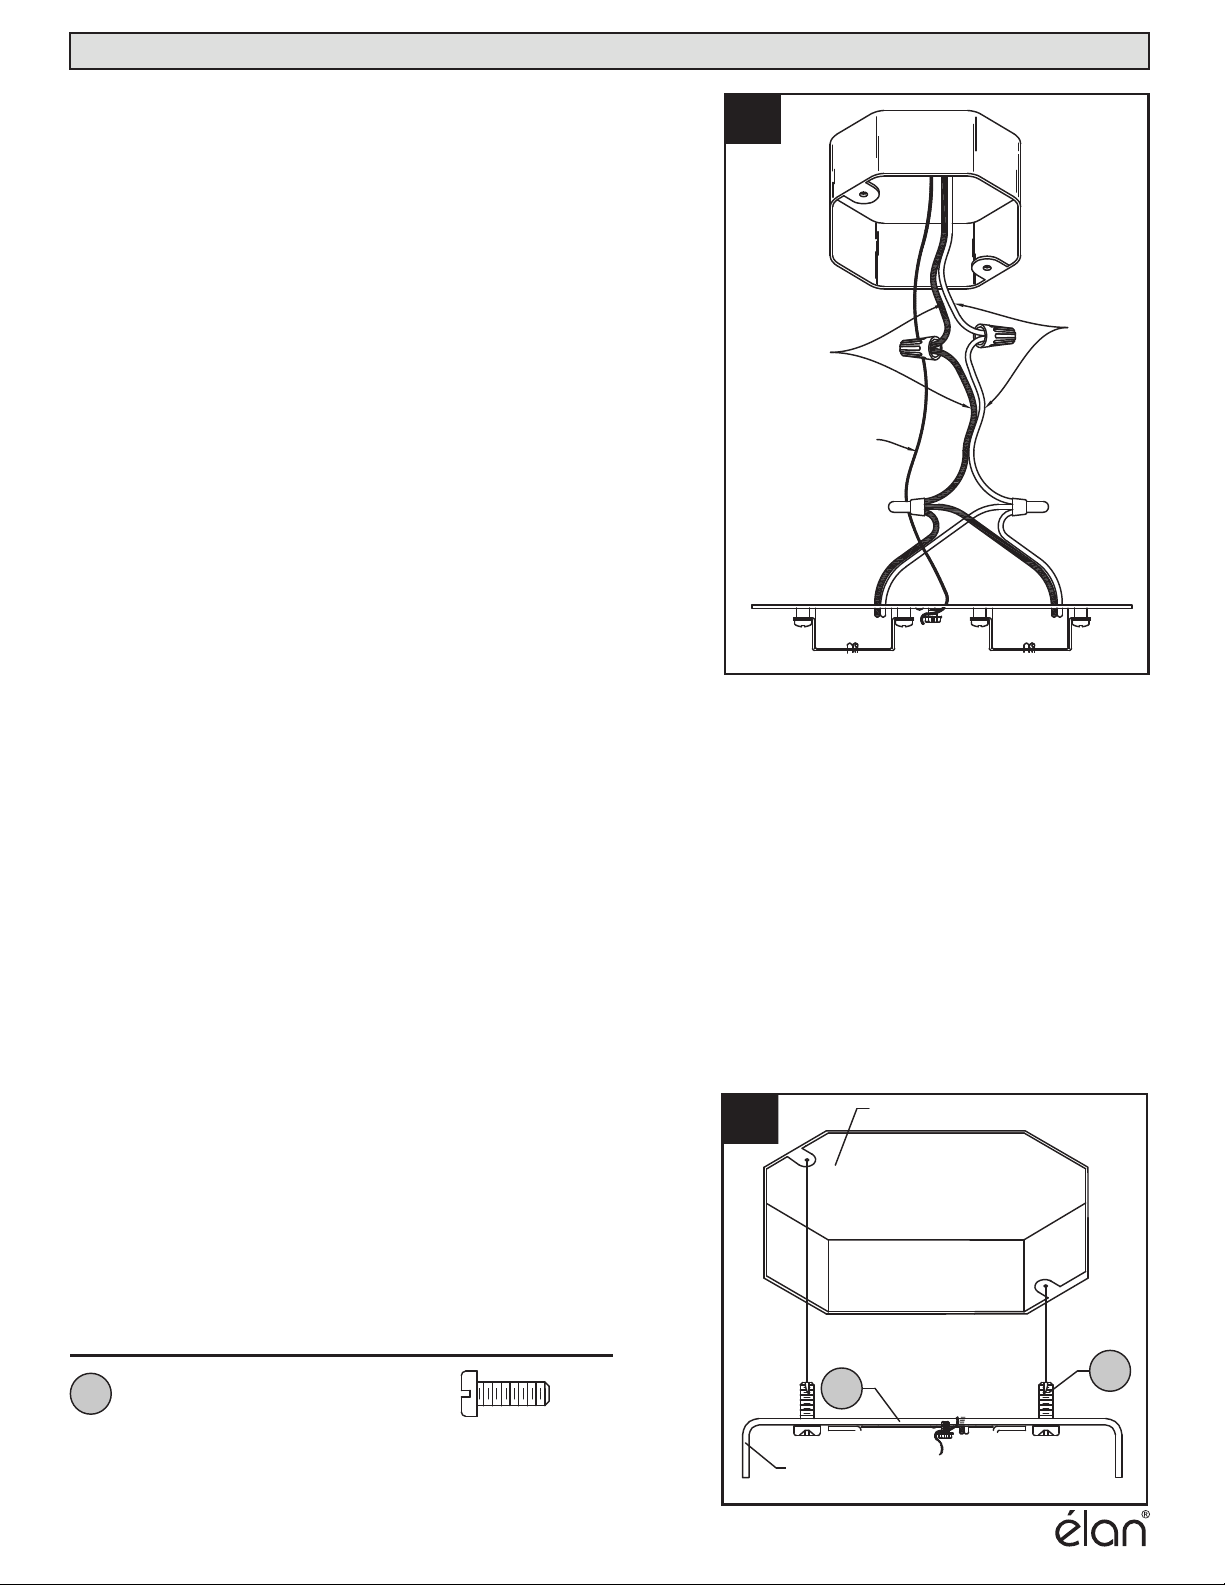
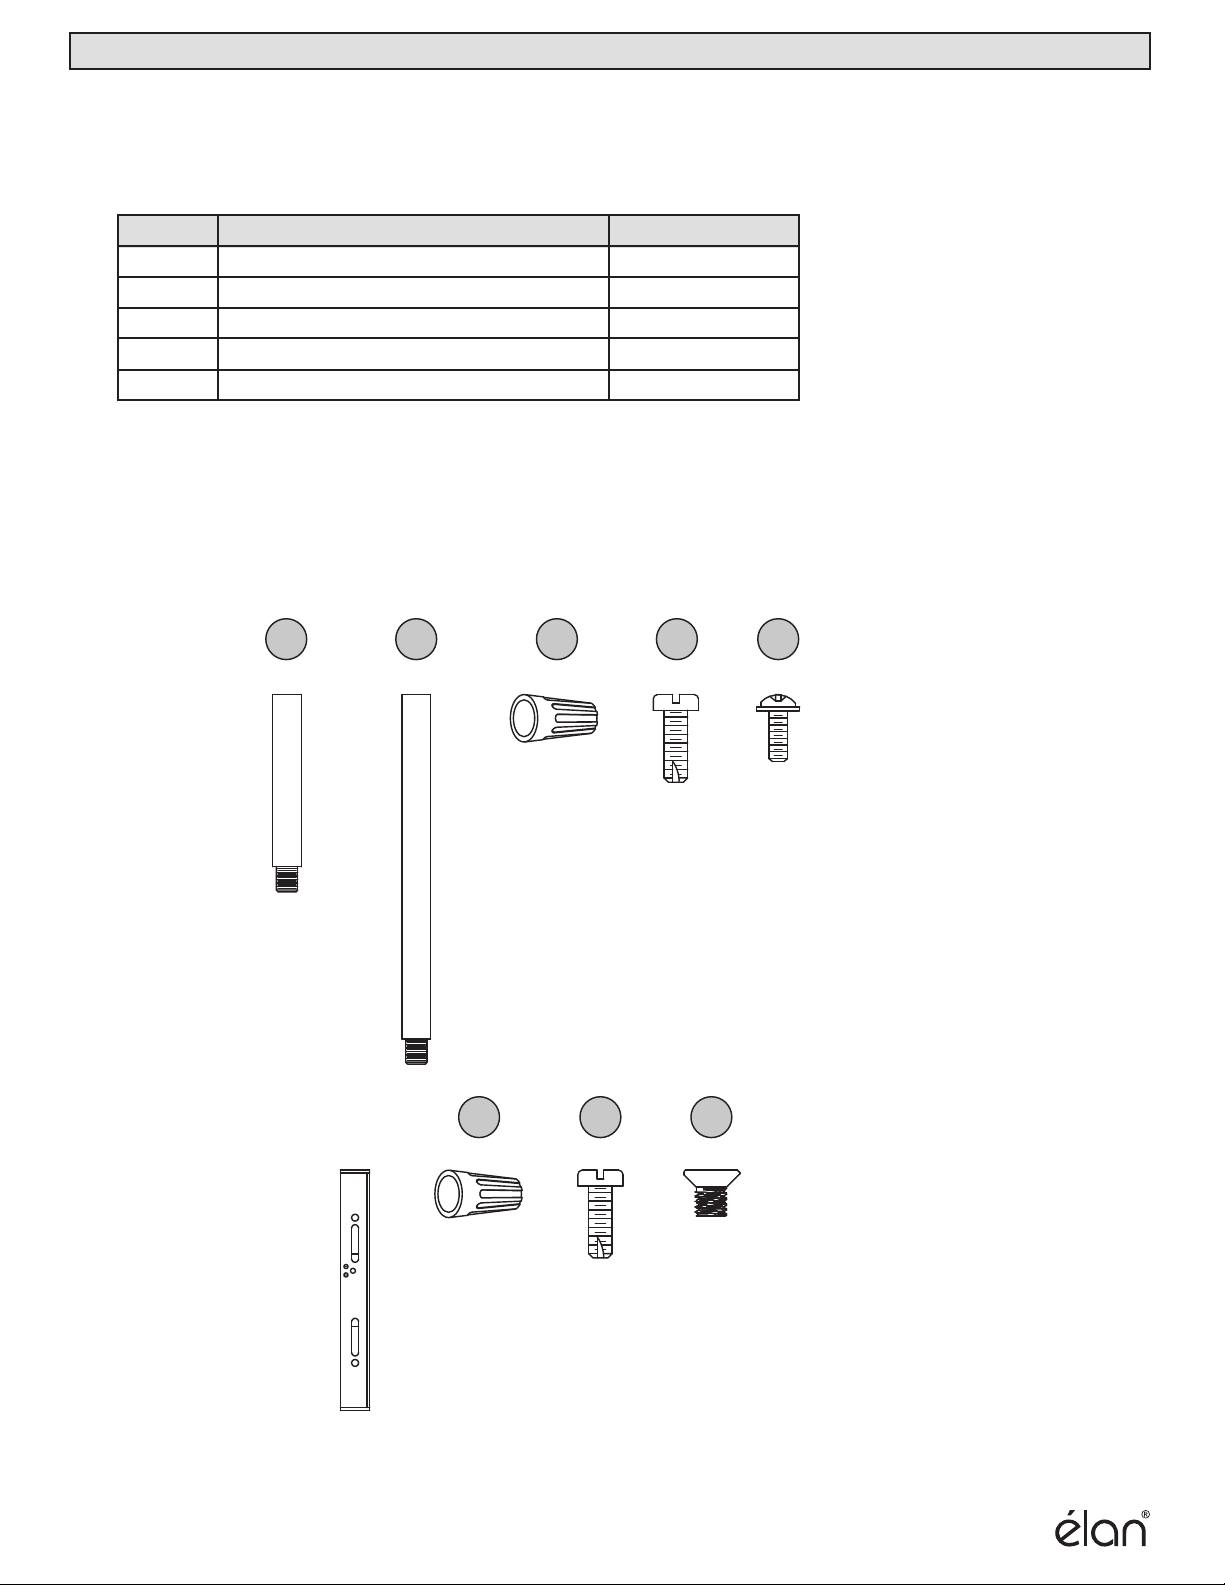
Elan 84200 User manual

1
LED CHANDELIER
MODEL #84200
Français p. 9
ATTACH YOUR RECEIPT HERE
Serial Number Purchase Date
Questions, problems, missing parts? Before returning to your retailer, call our
customer service department at 1-866-558-5706, 8 a.m. - 4 p.m., EST, Monday - Friday.

2
PACKAGE CONTENTS
PART DESCRIPTION QTY. PART DESCRIPTION QTY.
BA
E
G
D
F
A
Canopy
Mounting Bracket
LED Assembly
Swivel Connector
B
C
D
1
1
1
1
6” Threaded Pipe
12” Threaded Pipe
Coupling
E
F
G
2
2
1
C

Wire
Connector Short
Machine
Screw
Qty: 3
Qty: 2
Canopy
Screw
Qty: 2
3
Please read and understand this entire manual before attempting to assemble, operate or install the product.
WARNING
• IMPORTANT: NEVER attempt any work without shutting o the electricity.
• Go to the main fuse box, or circuit breaker, in your home. Place the main power switch in
the “OFF” position and unscrew the fuse(s), or switch “OFF” the circuit breaker switch(es),
that control the power to the fixture or room that you are working on.
• Place the wall switch in the "OFF" position. If the fixture to be replaced has a switch or
pull chain, place those in the "OFF" position.
• Do not touch hot LED.
• The LED light output is strong enough to injure human eyes. Precautions must be taken to
prevent looking directly at the LEDs with unaided eyes for more than a few seconds.
• California Proposition 65
WARNING: This product can expose you to lead, which is known to the State of
California to cause cancer, birth defects or other reproductive harm. For more
information go to www.p65warnings.ca.gov
CAUTION
• Read and understand all instructions and illustrations completely before proceeding with
assembly and installation of this fixture.
• If you have any doubts about how to install this lighting fixture, or if the fixture fails to
operate completely, please contact a qualified licensed electrical contractor.
• All parts must be used as indicated in these instructions. Do not substitute any parts, leave
parts out, or use any parts that are worn out or broken. Failure to obey this instruction
could invalidate the UL listing, C.S.A. certification, and/or ETL listing of this fixture.
• This fixture is intended for installation in accordance with the National Electric Code (NEC)
and all local code specifications.
• This fixture is for indoor use only.
• Use ONLY the supplied LED driver to power fixture.
• Driver cable is not intended for use through or concealed behind walls, floors, or ceilings.
• This fixture is dimmable when using an electronic low voltage (ELV) dimmer. Note: dimmers
that specify use with LED, but are not ELV, are NOT sucient. They are designed to work
with LED “bulbs” not integrated LED fixtures.
HARDWARE CONTENTS
SAFETY INFORMATION
AA BB CC DD
Thread Locking
Compound
Qty: 1

4
Before beginning assembly of product, make sure all parts are present. Compare parts with
package contents list. If any part is missing or damaged, do not attempt to assemble the
product.
Estimated assembly time: 30 minutes to 1 hour
Tools Required for Assembly (not included): Phillips screwdriver, flathead screwdriver, wire
strippers, electrical tape, ladder, safety glasses.
Safety goggles
Phillips
screwdriver
Flathead
screwdriver Wire strippers Electrical tape
Ladder
4
ASSEMBLY INSTRUCTIONS
PREPARATION
Note: The electrical cable will need to get
pulled through the individual parts as they
are installed on this and later steps.
Note: The hanging height for this fixture is
adjustable. Add or subtract threaded pipes
to achieve the desired height.
1. Place a drop of locking compound (DD) on
the threads on the threaded pipes. Screw 6
in. threaded pipe (E) onto 12 in. threaded
pipe (F). Connect the assembled pipes onto
coupling (G). Finially, screw swivel connector
(D) onto 6 in. threaded pipe (E).
Thread Locking
Compound x 1
Hardware Used
1
DD
D
E
DD
F
G

5
ASSEMBLY INSTRUCTIONS
2. Wire connection guide (outlet box to driver):
Ground wire:
For installation in the United States: Wrap
ground wire from outlet box around ground
screw preassembled on mounting bracket
(B) no less than 2 in. from wire end. Tighten
ground screw.
Supply wires:
• Connect the Neutral (White) supply wire
fromthe outlet box to the Neutral driver
input wire (White).
• Connect the Live (Black) supply wire from
theoutlet box to the Live driver input wire
(BLACK).
LIVE (HOT)
BLACK WIRE
OUTLET BOX GROUND
WIRE BARE COPPER
OR GREEN
NEUTRAL
WHITE
WIRE
2
Short Machine
Screw x 2
Hardware Used
3
3. Orient the mounting bracket (B) so that the
arms are facing away from the outlet box
(not included). Connect the mounting
bracket (B) to the outlet box with short
machine screws (BB).
Outlet Box
Arm
BB BBB

66
6
ASSEMBLY INSTRUCTIONS
BLACK
SHRINK
TUBE
DRIVER
NEUTRAL
(-) BLUE
WIRE
OUTLET BOX GROUND WIRE
BARE COPPER OR GREEN
FIXTURE LIVE
(+ HOT) RED WIRE
FIXTURE
NEUTRAL
(-) BLACK WIRE
DRIVER LIVE
(+ HOT)
RED WIRE
FIXTURE GROUND
WIRE BARE
COPPER OR GREEN
4. Wire connection guide (fixture to driver):
Ground wire: Connect fixture ground wire to the outlet ground wire that has been
attached to the mounting bracket ground screw.
Supply wires: **NOTE: Connect one pair of fixture wires to each driver. Wire "pairs" are
bundled by shrink tubing.
• Connect the Neutral (Blue) driver output wire to the Neutral (Black) fixture wire.
• Connect the Live (Red) driver output wire to the Live (Red) fixture wire.
4
x 2
Canopy
Screw
Hardware Used
5.
Pass canopy (A) over the arms protruding
from mounting bracket (B) then secure in
place with canopy screws (CC).
CC
5
CC
CC
CC
A
CC
B

•Always be certain that electric current is turned o before cleaning this item.
•Use a soft, moist cloth with mild non-abrasive soap to clean fixture. Never use glass
cleaner on fixture, as it will damage the metal finish.
7
Fixture does not light. 1. Fixture may be wired incorrectly. 1. Check wiring.
7
PROBLEM POSSIBLE CAUSE CORRECTIVE ACTION
TROUBLESHOOTING
CARE AND MAINTENANCE
LIMITED WARRANTY ON KICHLER® ÉLAN BRAND LIGHT FIXTURES
Kichler Lighting LLC warrants its light fixtures to the original consumer purchaser to be free from defects in material and workmanship
for the applicable period specified below:
Kichler® élan Light Fixtures
One (1) year from the date of purchase by the original consumer purchaser.
Kichler® élan Light Fixtures with LED Light Engines and Electrical Components
three (3) years from the date of purchase by the original consumer purchaser on the Light Engine and all other electrical
components.
What We Will Do
Kichler Lighting LLC will repair or replace, free of charge, during the applicable warranty period (as described above), any light
fixture that proves defective in material and/or workmanship under normal installation, use and service. If repair or replacement is
not practical, Kichler Lighting LLC may elect to refund the purchase price in exchange for the return of the product. These are your
exclusive remedies.
What Is Not Covered
Polished brass product finishes and non-LED light bulbs carry no warranty. Any labor charges incurred by the original consumer
purchaser to repair or replace this product are not covered by this warranty. Kichler Lighting LLC shall not be liable for any damage
to the product resulting from reasonable wear and tear, voltage overload, outdoor use (where the annual average ambient
temperature is below 27° or above 95° Fahrenheit), misuse (including use of the product for an unintended application), abuse,
neglect or improper or incorrectly performed installation, maintenance or repair, including failure to follow the applicable care and
cleaning instructions. Kichler Lighting LLC recommends using a professional electrician for all installation and repair of light fixtures. We
also recommend that you use only genuine Kichler® replacement parts.
What You Must Do to Obtain Warranty Service or Replacement Parts
A warranty claim may be made, and replacement parts may be obtained by contacting the distributor from whom you purchased
the light fixture. If the distributor is not available, please call 866-558-5706 or contact us by mail as follows (please include your
model number and date of purchase):

8
WARRANTY (continued)
Kichler Lighting LLC
7711 East Pleasant Valley Rd
Cleveland, OH 44161-8010
Proof of purchase (original sales receipt) from the original purchaser must be made available to Kichler Lighting LLC for all warranty
claims.
Limitation on Duration of Implied Warranties
TO THE EXTENT PERMITTED BY LAW, ANY IMPLIED WARRANTY, INCLUDING THE IMPLIED WARRANTIES OF MERCHANTABILITY AND
OF FITNESS FOR A PARTICULAR PURPOSE, IS LIMITED TO THE STATUTORY PERIOD OR THE DURATION OF THIS WARRANTY,
WHICHEVER IS SHORTER. Some states/provinces do not allow limitations on how long an implied warranty lasts, so the above
limitation may not apply to you.
Limitation of Special, Incidental or Consequential Damages
KICHLER LIGHTING LLC SHALL NOT BE LIABLE FOR ANY SPECIAL, INCIDENTAL OR CONSEQUENTIAL DAMAGES (INCLUDING LABOR
CHARGES TO REPAIR, REPLACE, INSTALL OR REMOVE THIS PRODUCT), WHETHER ARISING OUT OF BREACH OF ANY EXPRESS OR
IMPLIED WARRANTY, BREACH OF CONTRACT, TORT, OR OTHERWISE. KICHLER LIGHTING LLC SHALL NOT BE LIABLE FOR ANY
DAMAGE TO THE PRODUCT RESULTING FROM REASONABLE WEAR AND TEAR, OVERLOAD, OUTDOOR USE (WHERE THE ANNUAL
AMBIENT TERMPERATURE IS BELOW 27° OR ABOVE 95° FAHRENHEIT), MISUSE (INCLUDING USE OF THE PRODUCT FOR AN
UNINTENDED APPLICATION), ABUSE, NEGLECT OR IMPROPER OR INCORRECTLY PERFORMED INSTALLATION, MAINTENANCE OR
REPAIR, INCLUDING FAILURE TO FOLLOW THE APPLICABLE INSTALLATION, CARE AND CLEANING INSTRUCTIONS. Some states/provinces
do not allow the exclusion or limitation of special, incidental or consequential damages, so the above limitations and exclusions may
not apply to you. Notice to residents of the State of New Jersey: The provisions of this warranty, including its limitations, are intended
to apply to the fullest extent permitted by the laws of the State of New Jersey.
Additional Rights
This warranty gives you specific legal rights, and you may also have other rights which vary from state/province to state/province.
This is Kichler Lighting LLC's exclusive written warranty and the warranty is not transferable.

Rev. 11-13-18
For replacement parts, call our customer service department at 1-866-558-5706,
8 a.m. - 4 p.m., EST, Monday - Friday.
9
PART DESCRIPTION PART #
REPLACEMENT PART LIST
Printed in China
Distributed by:
Kichler Lighting LLC
88 Long Hill St.
East Hartford, CT 06108
E F AA BB CC
AA BB CC
6” Threaded Pipe PIPEX06-MBK
12” Threaded Pipe
PIPEX12-MBK
Wire Connector WC001
Short Machine Screw SCR832X050
Canopy Screw CS84087
E
F
AA
BB
CC

10
LUSTRE À DEL
MODÈLE #84200
JOIGNEZ VOTRE REÇU ICI
Numéro de série Date d’achat
Des questions, des problèmes, des pièces manquantes? Avant de retourner l’article au
détaillant, appelez notre service à la clientèle au 1 866 558-5706, entre 8 h et 16 h
(HNE), du lundi au vendredi.

PIÈCE
DESCRIPTION QTÉ.
PIÈCE
DESCRIPTION QTÉ.
11
BA
E
G
D
F
A
Pavillon
Support de fixation
Ensemble DEL
Raccord pivotant
B
C
D
1
1
1
1
Tube fileté de 15,2 cm
Tube fileté de 30,5 cm
Accouplement
E
F
G
2
2
1
C
CONTENU DE L’EMBALLAGE

12
AA BB CC DD
QUINCAILLERIE INCLUSE
Qté : 1
Canopy
Screw
Qté : 2
Capuchon
connexion
Short
Machine
Screw
Qté : 3
Qté : 2
Adhésif
frein-filet
Veuillez vous assurer de lire et de comprendre l’intégralité du présent guide avant d’assembler,
d’utiliser ou d’installer ce produit.
AVERTISSEMENT
• IMPORTANT : Coupez l’électricité avant TOUTE manipulation.
• Accédez au panneau central de disjoncteurs ou de fusibles de votre demeure. Placez l'interrupteur principal
en position d'arrêt « OFF » et dévissez le(s) fusible(s), ou placez en position « OFF » le(s) interrupteur(s) du
disjoncteur qui contrôle l'alimentation électrique du luminaire ou de la pièce où vous travaillez.
• Placez l'interrupteur mural en position d'arrêt « OFF ». Si le luminaire à remplacer est doté d’un interrupteur
à bouton ou à chaîne, placez-le en position d’arrêt « OFF ».
• Ne touchez pas les DEL chaudes.
• La lumière produite par les DEL est assez puissante pour blesser les yeux humains. Des précautions doivent
être prises pour éviter de recevoir directement dans les yeux non protégés la lumière des DEL pendant plus
de quelques secondes.
• Proposition 65 de la Californie.
AVERTISSEMENT: ce produit peut vous exposer au plomb, ce qui est reconnu par
l'État de Californie comme cause de cancer, d'anomalies congénitales ou
d'autres dommages à la reproduction. Pour plus d'informations, visitez
www.p65warnings.ca.gov
ATTENTION
• Prenez soin de lire et de comprendre l'intégralité des instructions et des illustrations avant de commencer
l’assemblage et l’installation de ce luminaire.
• Si vous avez des doutes à propos de l’installation, ou si le luminaire ne fonctionne pas correctement, veuillez
contacter un électricien qualifié agréé.
• Toutes les pièces doivent être utilisées tel qu’il est indiqué dans ces instructions. Ne remplacez pas les
pièces, n'en laissez pas de côté et ne les utilisez pas si elles sont usées ou brisées. Le non-respect de ces
instructions peut annuler les homologations UL, CSA et/ou ETL de ce luminaire.
• Ce luminaire est conçu pour une installation en conformité avec le code électrique national des États-Unis
(National Electric Code - NEC) et avec toutes les spécifications du code électrique local.
• Ce luminaire est conçu pour une utilisation en intérieur uniquement.
• Utilisez UNIQUEMENT le pilote de DEL fourni pour faire fonctionner le luminaire.
• Le câble du pilote n'est pas conçu pour une utilisation à travers ou dissimulée derrière les murs, les sols ou
les plafonds.
• Ne PAS allumer le luminaire si certaines lumières ne fonctionnent pas ou fonctionnent mal ou si le luminaire
se révèle endommagé de toute autre manière.
• Este accesorio es regulable cuando se usa un atenuador electrónico de bajo voltaje (ELV). Nota: los
reguladores que utilizan LED, pero no son ELV, NO son suficientes. Están diseñados para funcionar con
"bombillas" LED y no con dispositivos LED integrados.
CONSIGNES DE SÉCURITÉ

4
13
INSTRUCTIONS POUR L’ASSEMBLAGE
1. Placez une goutte d'adhésif frein-filet (DD) sur
le filetage des tubes filetés. Vissez le tube fileté
de 15,24 cm (E) au tube fileté de 30,48 cm
(F). Raccordez les tubes assemblés au raccord
(G). Vissez l'anneau de suspension du
luminaire (D) sur le tube fileté de 30,48 cm (E).
Adhésif
frein-filet x 1
Quincaillerie utilisée
DD
1
D
E
DD
F
G
Avant de commencer l’assemblage du produit, assurez-vous d’avoir toutes les pièces.
Comparez les pièces dans l’emballage avec la liste du contenu. S’il y a des pièces manquantes
ou endommagées, ne tentez pas d’assembler le produit.
Temps d’assemblage approximatif : de 30 à 60 minutes
Outils requis pour l’assemblage (non fournis) : tournevis cruciforme, tournevis à tête plate,
pinces à dénuder, ruban isolant, échelle, lunettes de sécurité.
lunettes de sécurité
tournevis
cruciforme
tournevis
à tête plate pinces à dénuder ruban isolant
échelle
PREPARATION
Remarque : le câble électrique devra être tiré
à travers les diérents éléments au fur et à
mesure de leur montage, lors de cette étape
et des suivantes.
Remarque : La hauteur de suspension de ce
luminaire est réglable. Ajoutez ou enlevez des
tubes filetés pour obtenir la hauteur
souhaitée.

14
INSTRUCTIONS POUR L’ASSEMBLAGE
Vis à métaux
courtes x 2
Quincaillerie utilisée
3
3. Orientez le support de fixation (B) de sorte
que les bras soient dirigés à l'opposé de la
boîte de sortie (non fournie). Fixez le
support de fixation (B) à la boîte de sortie à
l'aide des vis à métaux courtes (BB).
Boîte de sortie
Bras
BB BBB
2. Guide de raccordement électrique (de la
boîte de sortie au pilote) :
Fil de mise à la terre :
Pour une installation aux États-Unis :
enroulez le fil de terre provenant de la boîte
de sortie autour de la vis de mise à la terre
préassemblée sur le support de fixation (B),
à au moins 5 cm (2 po) de l’extrémité du fil.
Serrez la vis de mise à la terre.
Fils d'alimentation :
• Connectez le fil Neutre de l'alimentation
(Blanc) provenant de la boîte de sortie au
fil Neutre d'entrée du pilote (Blanc).
• Connectez le fil de Phase de l'alimentation
(Noir) provenant de la boîte de sortie au
fil de Phase d'entrée du Pilote (NOIR).
FIL DE
PHASE NOIR
FIL DE TERRE DE
LA BOÎTE DE SORTIE,
VERT OU CUIVRE NU
FIL NEUTRE
BLANC
2

66
15
INSTRUCTIONS POUR L’ASSEMBLAGE
4. Guide de raccordement électrique (du luminaire au pilote) :
Fil de mise à la terre : connectez le fil de terre du luminaire à celui de la boîte de sortie,
préalablement attaché à la vis de terre du support de fixation.
Fils d'alimentation : **REMARQUE : connectez une paire de fils du luminaire à chaque
pilote. Les « paires » de fils sont regroupées par des gaines thermorétractables.
• Connectez le fil Neutre (Bleu) de sortie du pilote au fil Neutre (Noir) du luminaire.
• Connectez le fil de Phase (Rouge) de sortie du pilote au fil de Phase (Rouge) du
x 2
Vis du
pavillon
Quincaillerie utilisée
5.
Placez le pavillon (A) sur les bras sortant
du support de fixation (B) et fixez-le à
l'aide des rondelles (DD) et vis du pavillon
(CC).
CC
5
CC
CC
CC
A
CC
B
GAINE
THERMORÉTRACTABLE
NOIRE FIL BLEU
NEUTRE
(-) DU PILOTE
FIL DE TERRE DE LA BOÎTE
DE SORTIE, VERT OU CUIVRE
NU
FIL ROUGE DE PHASE
(+) DU LUMINAIRE
FIL NOIR NEUTRE
(-) DU LUMINAIRE
FIL ROUGE DE
PHASE (+) DU
PILOTE
FIL DE TERRE DU
LUMINAIRE, VERT
OU CUIVRE NU
4

7
16
LIMITED WARRANTY ON KICHLER® ÉLAN BRAND LIGHT FIXTURES
Kichler Lighting LLC warrants its light fixtures to the original consumer purchaser to be free from defects in material and workmanship
for the applicable period specified below:
Kichler® élan Light Fixtures
One (1) year from the date of purchase by the original consumer purchaser.
Kichler® élan Light Fixtures with LED Light Engines and Electrical Components
three (3) years from the date of purchase by the original consumer purchaser on the Light Engine and all other electrical
components.
What We Will Do
Kichler Lighting LLC will repair or replace, free of charge, during the applicable warranty period (as described above), any light
fixture that proves defective in material and/or workmanship under normal installation, use and service. If repair or replacement is
not practical, Kichler Lighting LLC may elect to refund the purchase price in exchange for the return of the product. These are your
exclusive remedies.
What Is Not Covered
Polished brass product finishes and non-LED light bulbs carry no warranty. Any labor charges incurred by the original consumer
purchaser to repair or replace this product are not covered by this warranty. Kichler Lighting LLC shall not be liable for any damage
to the product resulting from reasonable wear and tear, voltage overload, outdoor use (where the annual average ambient
temperature is below 27° or above 95° Fahrenheit), misuse (including use of the product for an unintended application), abuse,
neglect or improper or incorrectly performed installation, maintenance or repair, including failure to follow the applicable care and
cleaning instructions. Kichler Lighting LLC recommends using a professional electrician for all installation and repair of light fixtures. We
also recommend that you use only genuine Kichler® replacement parts.
What You Must Do to Obtain Warranty Service or Replacement Parts
A warranty claim may be made, and replacement parts may be obtained by contacting the distributor from whom you purchased
the light fixture. If the distributor is not available, please call 866-558-5706 or contact us by mail as follows (please include your
model number and date of purchase):
•Vérifiez toujours que le courant est coupé avant de nettoyer le luminaire.
•Les abat-jour en verre peuvent être nettoyés dans un évier couvert de serviettes, à l’aide
d’eau tiède et de savon doux. Ne nettoyez pas les abat-jour dans un lave-vaisselle.
TROUBLESHOOTING
ENTRETIEN
DÉPANNAGE
Le luminaire
ne s’allume pas. 1. Le luminaire est mal branché. 1. Vérifiez si le luminaire
est bien branché.
PROBLÈME CAUSE POSSIBLE MESURE CORRECTIVE

17
GARANTIE (suite)
Kichler Lighting LLC
7711 East Pleasant Valley Rd
Cleveland, OH 44161-8010
Proof of purchase (original sales receipt) from the original purchaser must be made available to Kichler Lighting LLC for all warranty
claims.
Limitation on Duration of Implied Warranties
TO THE EXTENT PERMITTED BY LAW, ANY IMPLIED WARRANTY, INCLUDING THE IMPLIED WARRANTIES OF MERCHANTABILITY AND
OF FITNESS FOR A PARTICULAR PURPOSE, IS LIMITED TO THE STATUTORY PERIOD OR THE DURATION OF THIS WARRANTY,
WHICHEVER IS SHORTER. Some states/provinces do not allow limitations on how long an implied warranty lasts, so the above
limitation may not apply to you.
Limitation of Special, Incidental or Consequential Damages
KICHLER LIGHTING LLC SHALL NOT BE LIABLE FOR ANY SPECIAL, INCIDENTAL OR CONSEQUENTIAL DAMAGES (INCLUDING LABOR
CHARGES TO REPAIR, REPLACE, INSTALL OR REMOVE THIS PRODUCT), WHETHER ARISING OUT OF BREACH OF ANY EXPRESS OR
IMPLIED WARRANTY, BREACH OF CONTRACT, TORT, OR OTHERWISE. KICHLER LIGHTING LLC SHALL NOT BE LIABLE FOR ANY
DAMAGE TO THE PRODUCT RESULTING FROM REASONABLE WEAR AND TEAR, OVERLOAD, OUTDOOR USE (WHERE THE ANNUAL
AMBIENT TERMPERATURE IS BELOW 27° OR ABOVE 95° FAHRENHEIT), MISUSE (INCLUDING USE OF THE PRODUCT FOR AN
UNINTENDED APPLICATION), ABUSE, NEGLECT OR IMPROPER OR INCORRECTLY PERFORMED INSTALLATION, MAINTENANCE OR
REPAIR, INCLUDING FAILURE TO FOLLOW THE APPLICABLE INSTALLATION, CARE AND CLEANING INSTRUCTIONS. Some states/provinces
do not allow the exclusion or limitation of special, incidental or consequential damages, so the above limitations and exclusions may
not apply to you. Notice to residents of the State of New Jersey: The provisions of this warranty, including its limitations, are intended
to apply to the fullest extent permitted by the laws of the State of New Jersey.
Additional Rights
This warranty gives you specific legal rights, and you may also have other rights which vary from state/province to state/province.
This is Kichler Lighting LLC's exclusive written warranty and the warranty is not transferable.

PIÈCE
DESCRIPTION
Nº DE PIÈCE
Rev. 11-13-18
18
E F AA BB CC
AA BB CC
Tube fileté de 15,2 cm PIPEX06-MBK
Tube fileté de 30,5 cm
PIPEX12-MBK
Capuchon de connexion
WC001
Vis à métaux courte
SCR832X050
Vis du pavillon CS84087
E
F
AA
BB
CC
Pour obtenir des pièces de rechange, appelez notre service à la clientèle au 1 866 558-5706,
entre 8 h et 16 h (HNE), du lundi au vendredi.
LISTE DES PIÈCES DE RECHANGE
Imprimé en Chine
Distribué par:
Kichler Lighting LLC
88 Long Hill St.
East Hartford, CT 06108
Table of contents
Languages:
Other Elan Outdoor Light manuals
Popular Outdoor Light manuals by other brands

Regent Lighting Solutions
Regent Lighting Solutions Kazo installation instructions

LIGMAN
LIGMAN HA-60386-S installation manual

Atexbeam
Atexbeam PL-AT800 manual

Kogan
Kogan SMARTERHOME KALTSGSPW3A user guide

Campania International
Campania International LED-KIT3 Assembly instructions

Vollmer
Vollmer Heitronic 35904 Installation and operating instructions