Elba DELUXE 31 Setup guide

31 Litre Manual Microwave
Read the Instructions carefully and Keep for Future Reference
Owner s Instruction Manual
DELUXE 31

-The temperature of accessible surfaces may be high when the appliance
is operating.
IMPORTANT SAFETY INSTRUCTIONS
READ CAREFULLY AND KEEP FOR FUTURE REFERENCE
-WARNING: when the appliance is operated in the combination mode,
children should only use the oven under adult supervision due to
the temperatures generated;
-WARNING: if the door or door seals are damaged, the oven must not be
operated until it has been repaired by a competent person;
-WARNING: it is hazardous for anyone other than a competent person to
carry out any service or repair operation that involves the removal
of a cover which gives protection against exposure to microwave
energy;
-WARNING: liquids and other foods must not be heated in sealed
containers since they are liable to explode
-WARNING: Only allow children to use the oven without supervision
when adequate instructions have been given so that the child is
able to use the oven in a safe way and understands the hazards of
improper use;
-only use utensils that are suitable for use in microwave ovens
-when heating food in plastic or paper containers, keep an eye on the
oven due to the possibility of ignition;
-if smoke is observed, switch of or unplug the appliance and keep the
door closed in order to stifle any flames;
-microwave heating of beverages can result in delayed eruptive boiling,
therefore care must be taken when handling the container;
-the contents of feeding bottles and baby food jars shall be stirred or
shaken and the temperature checked before consumption, in order to
avoid burns;
-eggs in their shell and whole hard-boiled eggs should not be heated in
microwave ovens since they may explode, even after microwave
heating has ended;
-the oven should be cleaned regularly and any food deposits removed;
-failure to maintain the oven in a clean condition could lead to
deterioration of the surface that could adversely affect the life of the
appliance and possibly result in a hazardous situation;
-if the supply cord is damaged, it must be replaced by the manufacturer,
its service agent or similarly qualified persons in order to avoid a
hazard.
-2-

BEFORE YOU CALL FOR SERVICE
1. If the oven will not perform at all, the display does not
appear or the display disappears:
a) Check to ensure that the oven is plugged in securely. If it
is not, remove the plug from the outlet, wait 10 seconds
and plug it in again securely.
b) Check the premises for a blown circuit fuse or a tripped
main circuit breaker. If these seem to be operating properly,
test the outlet with another appliance.
2. If the microwave power does not function:
a) Check to see whether the timer is set.
b) Check to make sure that the door is securely closed to
engage the safety interlocks. Otherwise, the microwave
energy will not flow into the oven.
IF NONE OF THE ABOVE RECTIFIES THE SITUATION, THEN CONTACT THE AUTHORIZED SERVICE AGENT.
RADIO INTERFERENCE
Microwave oven may cause interference to your radio, TV, or similar equipment. When interference occurs, it may be
eliminated or reduced by the following procedures.
a. Clean the door and sealing surface of the oven.
b. Place the radio, TV, etc. as far away from your microwave oven as possible.
c. Use a properly installed antenna for your radio, TV, etc. to get a strong signal reception.
Note:
The appliance is for household use for heating food and beverages using electromagnetic energy and for indoor
use only.
SPECIFICATIONS
220V~6 0Hz,1450W
900W
1200W
2,450MHz
592mm(W) X 430mm(D) X 390mm(H)
350mm(W) X 372mm(D) X 232mm(H)
31litres
Approx. 17.5kg
Power consumption:
Output:
Grill Heater:
Operating Frequency:
Outside Dimensions:
Oven Cavity Dimensions:
Oven Capacity:
Uncrated Weight:
-3-

-4-
INSTALLATION
1. Make sure all the packing materials are removed from
the inside of the door.
2. Inspect the oven after unpacking for any visual
damage such as:
Misaligned Door
Damaged Door
Dents or Holes in Door Window and Screen
Dents in Cavity
If any of the above are visible, DO NOT use the
oven.
3. This Microwave Oven weighs 17.5 kg and must be
placed on a horizontal surface strong enough to
WARNING-THIS APPLIANCE MUST BE EARTHED.
1. The plug socket should be within easy reach
of the power cord
2. This oven requires 1.5 KVA for its input.
consultation with service engineer is
suggested when installing the oven.
support this weight.
4. The oven must be placed away from high temperature
and steam.
5. DO NOT place anything on top of the oven.
6. DO NOT remove the turn -table drive shaft.
7. As with any appliance, close supervision is necessary
when used by children.
CAUTION:This oven is protected internally by
ac 250V,10 Amp Fuse.
IMPORTANT
The wires in this mains lead are coloured in accordance with the following code:
Green-and-yellow : Earth
Blue : Neutral
Brown : Live
As the colours of the wires in the mains leads of the appliance may not correspond with the coloured markings
identifying the terminals in your plug, proceed as follows:
The wire which is coloured green-and-yellow must be connected to the terminal in the plug which is marked with the
letter E or by the earth symbol coloured green of green-and-yellow.
The wire which is coloured blue must be connected to the terminal which is marked with the letter N or coloured black.
The wire which is coloured brown must be connected to the terminal which is marked with the letter L or coloured red.

SAFETY INSTRUCTIONS FOR GENERAL USE
Listed below are, as with all appliances, certain rules to follow and safeguards to assure top performance from
this oven:
1. Always have the glass tray, roller arms, coupling and roller track in place when operating the oven.
2. Do not use the oven for any reason other than food preparation, such as for drying clothes, paper, or any
other nonfood items, or for sterilizing purposes.
3. Do not operate the oven when empty. This could damage the oven.
4. Do not use the oven cavity for any type of storage,such a papers, cookbooks, etc.
5.Do not cook any food surrounded by a membrane,such as egg yolks,potatoes,chicken livers,etc without
first being pierced several times with a fork.
IMPORTANT SAFETY INSTRUCTIONS
-WARNING: When the appliance is operated in the combination mode, children should only use the oven under adult
supervision due to the temperatures generated; (Only for the model with grill function)
-WARNING: If the door or door seals are damaged, the oven must not be operated until it has been repaired by a
competent person;
-WARNING: It is hazardous for anyone other than a competent person to carry out any service or repair operation
that involves the removal of a cover which gives protection against exposure to microwave energy;
-WARNING: liquids and other foods must not be heated in sealed containers since they are liable to explode.
-WARNING: Only allow children to use the oven without supervision when adequate instructions have been given
so that the child is able to use the oven in a safe way and understands the hazards of improper use;
- The oven must have sufficient air flow.Keep 10 cm space at back;15 cm at both sides and 30cms from top of the
oven.Don't remove oven's feet, do not block air events of the oven.
- Only use utensils that are suitable for use in microwave ovens.
- When heating food in plastic or paper containers, keep an eye on the oven due to the possibility of ignition;
- If smoke is observed, switch off or unplug the appliance and keep the door closed in order to stifle any flames;
- Microwave heating of beverages can result in delayed eruptive boiling, therefore care must be taken when handling
the container;
- The contents of feeding bottles and baby food jars shall be stirred or shaken and the temperature checked before
consumption, in order to avoid burns;
- Eggs in their shell and whole hard-boiled eggs should not be heated in microwave ovens since they may explode,
even after microwave heating has ended;
- When cleaning surfaces of door, door seal, cavity of the oven, use only mild, nonabrasive soaps, or detergents
applied with a sponge or soft cloth.
- The oven should be cleaned regularly and any food deposits removed;
- Failure to maintain the oven in a clean condition could lead to deterioration of the surface that could adversely affect
the life of the appliance and possibly result in a hazardous situation;
- If the supply cord is damaged, it must be replaced by the manufacturer, its service agent or
similarly qualified persons in order to avoid a hazard.
-5-

6. Do not insert any object into the openings on the outer
case.
7. Do not at any time remove parts from the oven such as
the feet, coupling, screws, etc.
8. Do not cook food directly on the glass tray. Place food
in/on proper cooking utensil before placing in the oven.
9. IMPORTANT-COOKWARE NOT TO USE IN YOUR
MICROWAVE OVEN
Do not use metal pans or dishes with metal handles.
Do not use anything with metal trim.
Do not use paper covered wire twist-ties on plastic bags.
Do not use melamine dishes as they contain a material
which will absorb microwave energy. This may cause
the dishes to crack or char and will slow down the
cooking speed.
Do not use Centura Tableware. The glaze is not suitable
for microwave use. Corelle Livingware closed handle
cups should not be used.
Do not cook in a container with a restricted opening,
such as a pop bottle or salad oil bottle, as they may
explode if heated in a microwave oven.
Do not use conventional meat or candy thermometers.
There are the thermometers available specifically for
microwave cooking. These may be used.
10. Microwave utensils should be used only in
accordance with manufacturer's instructions.
11. Do not attempt to deep-fry foods in this oven.
12. Please remember that a microwave oven only
heats the liquid in a container rather than the
container itself.Therefore, even though the lid
of a container is not hot to the touch when
removed from the oven, please remember that
the food/liquid inside will be releasing the same
amount of steam and/or spitting when the lid is
removed as in conventional cooking.
13. Always test the temperature of cooked food
yourself especially if you are heating or cooking
food/liquid for babies. It is advisable never to
consume food/liquid straight from the oven but
allow it to stand for a few minutes and stir food/
liquid to distribute heat evenly.
14. Food containing a mixture of fat and water,
e.g.stock,should stand for 30-60 seconds in the
oven after it has been turned off. This is to allow
the mixture to settle and to prevent bubbling when
a spoon is placed in the food/liquid or a stock cube
is added.
15. When preparing/cooking food/liquid and remember
that there are certain foods, e.g. Christmas
puddings, jam and mincemeat, which heat up very
quickly. When heating or cooking foods with a high
fat or sugar content do not use plastic containers.
16. Cooking utensil may become hot because of heat
transferred from the heated food. This is especially
true if plastic wrap has been covering the top and
handles of the utensil. Potholders may be needed
to handle the utensil.
17.To reduce the risk of fire in the oven cavity:
(a)Do not overcook food. Carefully attend microwave
oven if paper, plastic, or other combustible materials
are placed inside the oven to facilitate cooking.
(b)Remove wire twist-ties from bags before placing
bag in oven.
(c)If materials inside the oven should ignite, keep oven
door closed, turn the oven off at the wall switch, or
shut off power at the fuse or circuit breaker panel.
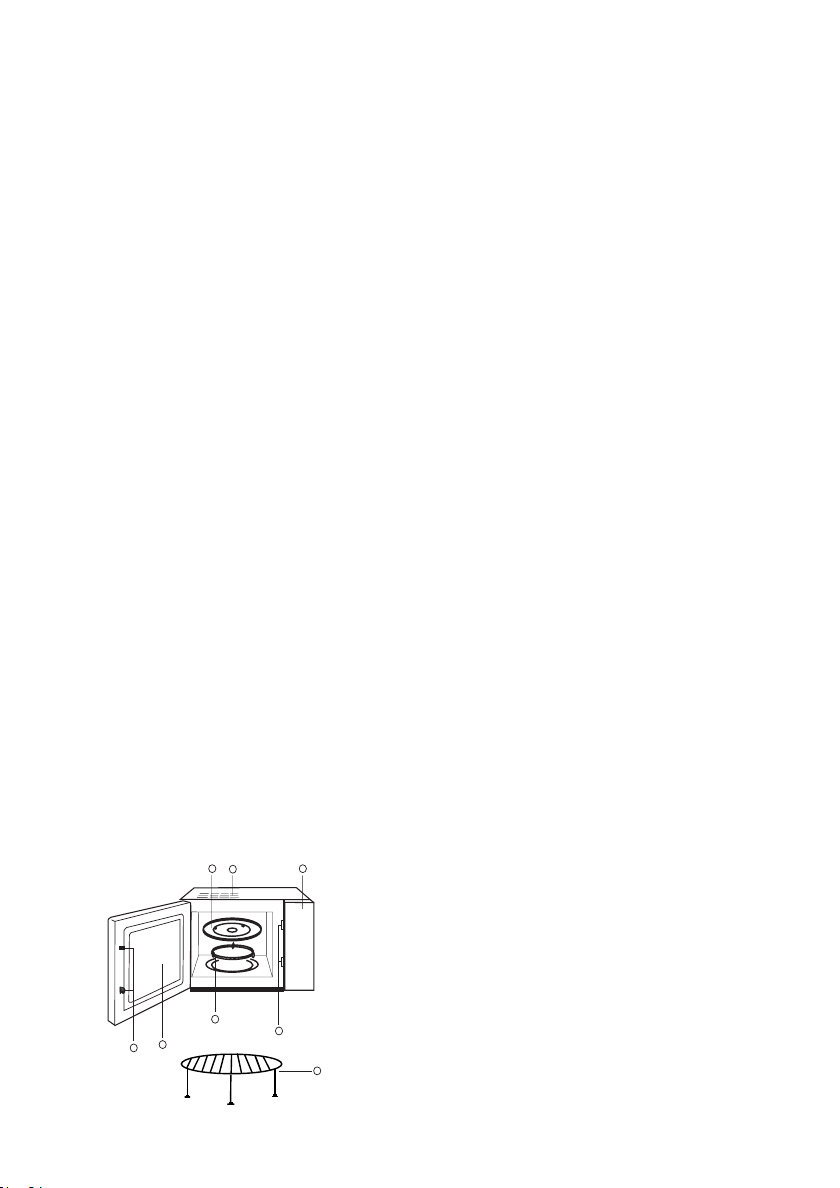
FEATURE DIAGRAM
(1) Door Safety Lock System
(2) Oven Window
(3) Oven Air Vent
(4) Roller Ring
(5) Glass Tray
(6) Control Panel
(7) Grill rack
4
2
1
536
1
7
-6-

COMPUTER CONTROL PANEL
-7-
1 Micro/
Defrost
Start/Reset
/Combi
2
3
5
Time+
6
Time-
7
6

4.Auto-Menu
You only need to select the food type and weight, it will help you to automatically adjust
the power and time.
Example: Auto cooking 0.4 kg fish
Touching times
1
2
3
4
5
Microwave power
100%
70%
50%
30%
10%
Display
P100
P70
P50
P30
P10
b) Press the button "Start/Reset", the microwave oven will work on 100% power for 1 minutes.
etc.
1.
2.
completed.
a) Press "Micro/Grill/Combi" button, select "70%" power;
"Start/Reset"
"Start/Reset"
milk
milk
-8-
Example:defrost 0.5kg frozen meat.
3.Auto weight defrost
Select the food weight, it will automatically help you to adjust the power level and time.
a) Press "Auto Menu" button until "A-5"displayed.
b) Rotate the knob "Defrost/Time Setting" to set the weight 0.4kg.
c) Press "Start/Reset"
THe weight of meat must be less than 2 kg.
a) Rotate the knob left "Defrost/Time Setting" to set the weight 0.5kg
b) Press "Start/Reset".

5. Grill
This function has two patterns, you may press "Micro/Grill/Combi" to select such functions: (the longest cooking time is
60 minutes).
Pattern 1: 85% grill power, display G-1
Pattern 2: 50% grill power, display G-2
Example: Cooking food with grill for 20 minutes
A) Press "Micro/Grill/Combi" until the LED displayed "G-1".
B) Set cooking time "20:00"
C) Press "Start/Reset"
When grilling, the food isn't heated by microwave, heat is radiated from the metal heater at the top of the oven.
When grill is working, the cooking time has 2 stages, after the 1st half of the cooking, the program will automatically
pause and sound 2 beeps, indicating you to open the oven and turn food over, close the door after turn the food over,
press "Start/Reset" button, the cooking will continue for the 2nd half. If you do not want to turn the food over, the oven
will re-start after 1 min pause.
6 Combination Cooking
This appliance offers you a choice of two methods of combination cooking.
Option 1 : Combination cooking (55% microwave + 45% grill)
It will display "C-1"
Option 2 : Combination cooking (30% microwave + 70% grill)
It will display "C-2".
Example : Cooking food using option 2 for 15 minutes.
a) Press "Micro/Grill/Combi" until the LED displayed "C-2"
b) Set cooking time for "15:00"
c) Press "Start/Reset"
-9-
Weight
Touching Times
1 0.1
0.2
(A-1) (A-2) (A-3) (A-4) (A-5) (A-6)
0.3
0.4
0.5
0.1
0.2
0.3
0.4
0.5
0.6
0.2
0.3
0.4
0.5
0.6
0.8
1.0
1.0
2.0
2
3
4
5
6
7
8
9
10
Menu Rice Vegetable Meat
0.2
0.1
0.3
0.4
0.5
0.6
0.7
0.8
0.9
1.0
0.2
0.4
0.6
0.8
1.0
1.2
1.4
1.6
1.8
2.0
Fish
kg
Spaghetti Chicken

a) Press "Clock/Timer", the display will flash, adjust the hour with buttons "Defrost/Time Setting"
b) Press "Clock/Timer" again, adjust the minute with buttons "Defrost/Time Setting".
c) Press "Clock/Timer" again and the clock will be set.
e) If you want to change the time, repeat above procedure.
8.Timer
This allows you to set the microwave oven start and finish cooking at pre-set time.
The clock must be set before you use this feature.
Example:The current time is 16:30 and you want to start cooking at 18:15 on 70% power for 10minutes:
a) Rotate the knob"defrost/Time Setting",set the time to "18:15"(same procedure as setting clock)
b) Press "Micro/Grill/Combi" to select 70% power.
c) Set cooking time for 10 minutes.
d) Press "Start/Reset"
If you do not set the power and cooking time and directly press the start button once you have programmed
the time, the appliance will only work as a clock.
At 18:15 there will be 10 bleeps and the appliance will be switched off.
9. Child-safety-lock .
10. Start/Reset
a) In the course of operation, pressing "Start/Reset" button will stop operation.
b) If any program was set before pressing start, pressing this button will cancel all the set program.
-10-
To activate the child safety lock, press "Auto menu" and "Clock/Timer" at the same time for 2 seconds.
Press "Auto menu" and "clock/Timer" at the same time for 2 seconds again, it will unlock the machine.
7.Clock
The oven has a 24-hour digital clock,
To input the time, for example to 4:30pm:

CARE OF YOUR MICROWAVE OVEN
1.Turn the oven off and remove the power plug from the wall socket before cleaning.
2.Keep the inside of the oven clean.When food splatters or spilled liquids adhere to oven walls,wipe with a
damp cloth.The use of harsh detergent or abrasives is not recommended.
3.The outside oven surface should be cleaned with a damp cloth.To prevent damage to the operating parts
inside the oven,water should not be allowed to seep into the ventilation openings.
4.Do not allow the Control Panel to become wet. Clean with a soft, damp cloth, Do not use detergents,
abrasives or spray-on cleaners on the control Panel.
5.If steam accumulates inside or around the outside of the oven door, wipe with a soft cloth.This may occur
when the microwave oven is operated under high humidity conditions and in no way indicates malfunction
of the unit.
6.It is occasionally necessary to remove the glass tray for cleaning.Wash the tray in warm sudsy water or in
a dishwasher.
7.The roller ring and oven cavity floor should be cleaned regularly to avoid excessive noise.Simply wipe the
bottom surface of the oven with mild detergent,water or window cleaner and dry.The roller ring may be
washed in mild sudsy water or dish washer.Cooking vapour collect during repeated use but in no way
affect the bottom surface or roller ring wheels.
When removing the roller ring from cavity floor for cleaning,be sure to replace it in the proper position.
8.Remove odors from your oven by combining a cup of water with the juice and skin of one lemon in a
deep microwaveable bowl. Microwave for 5 minutes,wipe thoroughly and dry with a soft cloth.
9.When it becomes necessary to replace the oven light,please consult a dealer to have it replaced.
TRANSFORMER MAGNETRON
H: HEATER
TM: TURNTABLE MOTOR
FM: FAN MOTOR
L: LAMP
SWC: THE MONITOR INTERLOCK SWITCH
SWB: SECONDARY INTERLOCK SWITCH
SWA: PRIMARY INTERLOCK SWITCH
*CIRCUIT SUBJECT TO CHANGE WITHOUT NOTICE
( DOOR OPENED,COOK OFF CONDITION)
SCHEMATIC DIAGRAM
R4-1
C4
D2 RY
N
R3
D1 R2
CONTROLLER
JP1-2
JP1-1
RY
K4 K2 GNDK3 D_ SW
RY
H( OUT)
SW2
R4-2 T( IN)
N
P( OUT)
C2
RY SWB
SO
D
NEL
L
L
C1
R1
F1
NOISEFILTER
L
C3 FU
LFM TM
SWA
HSH
F2
C
SWC
FA
F
-11-

FRAME
20L 25L 31L FULL BUILT-IN MICROWAVE
OVEN INS LAUNAMNOITA LLAT
MICROWAVE OVEN CABINETRY
COMPONENTS
Cabinet measurement Requirements(illustrated above):
1. Cabinet's inner dimension in transverse direction is 566-580mm.
This is the minimum distance from the left batten to right batten. Do not alter.
2. Cabinet's inner dimension in longitudinal direction is 365-380mm.
This is the minimum distance from the left batten to right batten. Do not alter.
3. Cabinet's depth should be no less than 550mm.
4. Outside dimension of cabinet should be no less than 596mm,
as the frame length is 592mm.
5. Cabinet's board less than 15mm or 20mm thick.
FRAME dimensions
Width 592mm
Height 390mm
Depth 20mm
Cavity dimensions
Width 566-580mm
Height 365-380mm
Depth 550mm
TRIM KIT SPECIFICATIONS
1
2
bolt
screwcover
2bolt
1PCS
1PCS
-12-
MICROWAVE LOCATION

2 Open the microwave oven,
1 Put the microwave oven into the cabinet and keep
the microwave oven in a horizontal direction and keep
the edge distance of two side as same.Then fix the
bolt(component 1) on the top of microwave oven and beat it into the cabinet.
fix the bolt (Component 5) and
beat it into the cabinet, then install
screw cover
FRAME INSTALLATION STEPS
-13-


14
1 -
.
" .
2– "
.
2 -–
)5(
.
)(. 4

13
)17/23/30(
:
1-3×202
2-
1
3-4
×451
:
:566:592
:365:390
:550:20
:
:( )
1-566.
. –
2-365.
. –
3-550.
4-596592.
5-"15" "20. "
365
566
vent
MIROWAVE LOCATION
vent
vent
100
550
550
100
100
IMPORTANT SIZE
450
566

12
ϲτϴτΨΗϢγέ
(ΡϮΘϔϤϟΏΎΒϟϭ –ϲϬτϟϑΎϘϳ· ϟΎΣ)
ϢϜΤΘϟ ΣϮϟ
SWAβϴήϟϲΠηϮΘϟΡΎΘϔϤϟ :LΔΒϤϟ :
SWBϱϮϧΎΜϟϲΠηϮΘϟΡΎΘϔϤϟ :FMΔΣϭήϣϙήΤϣ :
SWCΔΒϗήϤϠϟϲΠηϮΘϟΡΎΘϔϤϟ :TMΓέϭΪϟΓΪπϨϤϟϙήΤϣ :
HϥΎΨγ :
έΎτΧ·ϖΑΎγϥϭΪΑήϴϴϐΘϠϟΓέΪϟϊπΨΗ
TRANSFORMER MAGNETRON
R4-1
C4
D2 RY
N
R3
D1 R2
JP1-2
JP1-1
RY
K4 K2 GNDK3 D_ SW
RY
H( OUT)
SW2
R4-2 T( IN)
N
P( OUT)
C2
RY SWB
SO
D
NEL
L
L
C1
R1
F1
NOISEFILTER
L
C3 FU
LFM TM
SWA
HSH
F2
C
SWC
FA
F

11
5-ΓΩΎϋάϫΙΪΤϳϭ .ΔϤϋΎϧεΎϤϗΔότϘΑϪΤ ϣˬϲΟέΎΨϟϥήϔϟΏΎΑϝϮΣϭϞΧΩέΎΨΒϟϢϛήΗΫ·
ϝϮΣϷϦϣϝΎΣϱ΄ΑϲϨόϳϻϪϨϜϟϭˬΔόϔΗήϣΔΑϮσέϑϭήχΖΤΗϒϳϭϭήϜϳΎϤϟϥήϓϞϤόϳΎϣΪϨϋ
.ΓΪΣϮϟϲϓϞτϋ
6-ήϴΜϛΊϓΩ˯ΎϣϲϓΔϴϨϴμϟϞ Ϗ .ϒϴψϨΘϠϟΔϴΟΎΟΰϟΔϴϨϴμϟΝήΧ·ήΧϵϦϴΣϦϣϱέϭήπϟϦϣ
.ϕΎΒσΔϟΎ ϏϲϓϭˬΓϮϏήϟ
7-ΔσΎ ΒΑ .ΪΰϟΞϴΠπϟΐϨΠΘϟϡΎψΘϧΎΑϒψϨΗϥΐΠϳϥήϔϟϒϳϮΠΗΔϴοέϭ –έϭΪϟϦΤμϟϥ·
έϭΪϟϦΤμϟϞ ϏϦϜϤϳϭ .ϪϔϔΟϢΛάϓϮϧϒψϨϣϭˬϝΪΘόϣϒψϨϣ˯ΎϤΑϥήϔϟωΎϗτγ ϣ
ϡΪΨΘγϻ˯ΎϨΛΓΩΎϋϲϬτϟέΎΨΑϊϤΠΘϳϭ .ϕΎΒσΔϠ ϐϣϲϓϭˬΓϮϏήϟήϴΜϛΊϓΩ˯Ύϣϲϓ
.έϭΪϟϦΤμϟΕϼΠϋϭˬϥήϔϟωΎϗτγϰϠϋήΛΆϳϻϝΎΣΔϳϰϠϋϪϨϜϟϭέήϜΘϤϟ
ϲϓΔΤϴΤλΔϘϳήτΑϪΗΩΎϋ·ϦϣΪϛ΄ΗˬϒϴψϨΘϠϟϥήϔϟϑϮΟΔϴοέϦϣέϭΪϟϦΤμϟωΰϧΪϨϋ
.ϒϴψϨΘϟΪόΑϴΤμϟϪόοϭ
8-)ΪϠΟϭήϴμϋϭˬ˯ΎϣΏϮϛΝΰϤΑϚϟΫϭϚϧήϓϦϣΔϬϳήϜϟϭήϟΔϟίΈΑϢϗ1ΪΣϲϓΓΪΣϭΔϧϮϤϴϟ (
)ΓΪϤϟϒϳϭϭήϜϳΎϤϟϥήϓϞϐηϭΎϬόο .ΔϘϴϤόϟϒϳϭϭήϜϳΎϤϟΔϴϋϭ5˱ΪϴΟΎϬΤ ϣϢΛ .ϖΎϗΩ (
.ΔϤϋΎϧεΎϤϗΔότϘΑϥήϔϟϒϔΟϭ
9-ϞϴϛϭΓΪϋΎ ϣΐϠτΗϭήϴθΘ ΗϥϮΟήϧ .ϥήϔϟΓ˯Ύο·ΕΎΒϤϟϝΪΒΘγϻΓέϭήοϙΎϨϫϥϮϜΗΎϣΪϨϋ
.ϚϟΫϲϓΔϧΎϴμϟΔϣΪΧ

10
Ρ˨(έίϰϠϋςϐο"START/RESET".
7-ϋΎδϟ
ϡΎψϨΑϞϤόΗΔϴϤϗέΔϋΎγίΎϬΠϟΎΑΪΟϮΗ24ΔϋΎ ϟ˱ϼΜϣΖϗϮϟςΒπϟ .ΔϋΎγ4:30.˱˯ Ύ ϣ
˨-έίςϐο[CLOCK/TIMER]έΰΑΕΎϋΎ ϟςΒο .νήόϟΔηΎηξϣϮΘγ
[TIME Weight - ]ϭ[TIME Weight+].
˨Ώ-έίςϐο[CLOCK/TIMER]έΰϟΎΑϖΎϗΪϟςΒπϟϯήΧΓήϣ[TIME DOWN]ϭ
[TIME UP].
˨Ν-έίςϐο[CLOCK/TIMER].ΖϗϮϟΖΒΛϭΖτΒοΪϗΔϋΎ ϟϥϮϜΘγϭϯήΧΓήϣ
˨Ω-.ϖΑΎ ϟ˯ήΟϹβϔϧέήϛΖϗϮϟήϴϴϐΗϲϓΖΒϏέΫ·
8-ΖϗΆϤϟ
ϲϓωϭήθϟϞΒϗΔϋΎ ϟςΒοΐΠϳϭ .ϲϬτϟϦϣ˯ΎϬΘϧϻϭ˯ΪΒϟΖϗϭΪϳΪΤΗΔϴλΎΨϟϩάϫϚϟϴΘΗ
.ΔϴλΎΨϟϩάϫϡΪΨΘγ
:ϮϫϲϟΎΤϟΖϗϮϟ :ϝΎΜϣ16:30)4:30ΔϋΎ ϟϲϬτϟϲϓϙίΎϬΟΪΒϳϥΪϳήΗΖϧϭ (˯Ύ ϣ
18:15)6:15ΓϮϘΑ (˯Ύ ϣ70)ΓΪϤϟ %10:ϖΎϗΩΓήθϋ (
˨-ΪϨϋΔϋΎ ϟςΒπϟ "ΔϋΎ ϟ"ϥϮϨόϟΖΤΗΔϘΑΎ ϟ (Ν–Ώ –)ΕϮτΨϟΎΑϢϗ18:15.
˨Ώ-έίςϐο[MICRO/ Defrost/GRILL/Combi.])ΓϮϘϟέΎϴΘΧϻ70.(%
˨Ν-"ϲϬτϟΖϗϭςΒο10.ϖΎϗΩ "
˨Ω-έίςϐο"START/RESET"
έί "Ω"ΓϮτΨϠϟΖϠϘΘϧϭΔϴϨϣΰϟΓΪϤϟϭˬΖϗϮϟΪϳΪΤΗϢΘϳϢϟΫ·"START/RESET"ΪόΑΓήηΎΒϣ
.ςϘϓΔϋΎ ϛίΎϬΠϟϞϤόϴγΖϗϮϟΔΠϣήΑ
ΔϋΎ ϟϡΎϤΗϲϓϭ18:15)ΔϴΗϮλΕέΎη·έΪμϴγ10.˯ϲϔτϨϳϢΛ (ΐϴΑ)Εήϣ (
9-ϝΎϔσϷ ϣϼδϟ ϳΎϤΤϟϞϔϗ
έΰϟϦϣϞϛϰϠϋςϐοΔϴλΎΨϟϩάϫϞϴόϔΘϟ[Auto menu]ϭˬ[CLOCK/TIME]βϔϧϲϓ
)ΓΪϤϟΖϗϮϟ2.ϯήΧΓήϣΕϮτΨϟβϔϧϊΒΗΔϴλΎΨϟϩάϫϑΎϘϳϹϭˬϦϴΘϴϧΎΛ (
10-˯ΎϐϟϹϭΖϗΆϤϟϒϗϮΘϟ
˨-έίϰϠϋςϐπϟϥΈϓϥήϔϟϞϴϐθΗϝϼΧϲϓ"START/RESET".ϞϴϐθΘϟΔϴϠϤϋϒϗϮϴγ
Ώ˨-έίϰϠϋςϐπϟϞΒϗΞϣΎϧήΑϱςΒοΔϟΎΣϲϓ[START]έΰϟάϫϰϠϋςϐπϟϥΈϓˬ
.ϪτΒοϢΗϱάϟΞϣΎϧήΒϟϲϐϠϴγ
ϒϳϭϭήϜϳΎϤϟϥήϔΑ ϳΎϨόϟ
1-.ϪϔϴψϨΗϲϓωϭήθϟϞΒϗϱέΪΠϟβΑΎϘϟϦϣέΎϴΘϟϞϴλϮΗϚϠγωΰϧϭ –ϥήϔϟΊϔσ
2-ϖϠόΘΗϭϞϮ ϟΐϜ ϨΗϭˬϡΎότϟ˯ΰΟήΛΎϨΘΗΎϣΪϨϋϭ .ϥήϔϠϟϲϠΧΪϟ˯ΰΠϟΔϓΎψϧϰϠϋφϓΎΣ
άϫϲϓΔτηΎϜϟϭˬΔϨθΨϟΕΎϔψϨϤϟϡΪΨΘγάΒΤϳϻϭ .ΔϠϠΒϣεΎϤϗΔότϘΑΎϬΤ ϣϥήϔϟϥέΪΠΑ
.ιϮμΨϟ
3-ΔϴϠΧΪϟ˯ΰΟϷΔϳΎϤΤϟϭ .ΔΒσέεΎϤϗΔότϗϡΪΨΘγΎΑϒψϨϳϥϲϐΒϨϳϲΟέΎΨϟϥήϔϟτγ
.ΔϳϮϬΘϟΕΎΤΘϓήΒϋϝϮΧΪϟϭϞϏϮΘϟΎΑ˯ΎϤϠϟϤ ϳϻΐΠϳˬϒϠΘϟϦϣϥήϔϠϟΔϠϐθϤϟϭ
4-ϡΪΨΘ Ηϻ –ΔΒσέεΎϤϗΔότϘΑΎϬϔψϧ –ϢϜΤΘϟΔΣϮϟϰϟ·ϝϮλϮϟϦϣϞϠΒϟϭ˯ΎϤϠϟϤ Ηϻ
.ϢϜΤΘϟΔΣϮϟϰϠϋΔηΎηήϟΕΎϔψϨϤϟϭˬΕΎτηΎϜϟϭˬΕΎϔψϨϤϟ

9
έίϰϠϋςϐο -ΝςΒπϟΓΩΎϋ·/ϞϴϐθΘϟ˯ΪΑ"START/RESET".
ΔϤΎϘϟ
A-1
ίέ
A-2
έΎπΧ
A-3
ϢΤϟ
A-4
ΔϧϭήϜόϣ
A-5
ϚϤγ
A-6
ΝΎΟΩ (ϢΠϛ)ϥίϮϟ
βϤϠϟΕήϣΩΪϋ
10.10.10.210.10.2
20.20.20.320.20.4
30.30.30.40.30.6
40.40.40.50.40.8
50.50.50.60.51.0
60.60.80.61.2
71.00.71.4
80.81.6
90.91.8
101.02.0
5-: ϳϮθϟ
έίϰϠϋςϐπϟϚϨϜϤϳϭˬϥΎτϤϧΔϴλΎΨϟϩάϬϟ[MICRO/ Defrost/GRILL/Combi]έΎΘΨΘϟ
ϲϬτϟϦϣΰϟΓΪϣϰμϗϭ )ΎϤϬϨϴΑ60.(ΔϘϴϗΩ
)ςϤϨϟ1ϱϮηΓϮϗ (85ΰϣήϟήϬψϳϭ - %"G-1".
)ςϤϨϟ2ϱϮηΓϮϗ (50ΰϣήϟήϬψϳϭ - %"G-2".
ΓΪϤϟˬΔϳϮθϟϡΪΨΘγΎΑϡΎόσϲϬσ :ϝΎΜϣ20:ΔϘϴϗΩ
έίςϐο ([MICRO/ Defrost/GRILL/Combi.]ΰϣήϟήϬψϳϰΘΣ"G-1".
"ϲϬτϟΖϗϭςΒπϟΖϗϮϟέίςϐο (Ώ"20.00.
Ν˨(έίϰϠϋςϐο"START/RESET".
ϲϧΪόϤϟϥΎΨ ϟϦϣϊθΗΓέήΤϟϥΫ·.ϒϳϭϭήϜϳΎϤϟΔτγϮΑϡΎότϟϦΨ ϳϦϟΔϳϮθϟϞϴϐθΗΪϨϋ
ϦϣϝϭϷ˯ΰΠϟΪόΒϓϦϴΘϠΣήϤΑήϤϳϲϬτϟϦϣίϥΈϓΔϳϮθϟϞϴϐθΗΪϨϋϭ .ϥήϔϟϰϠϋΩϮΟϮϤϟ
ϙήϛάΘϟ – "ΐϴΑ"ϦϴΘϴΗϮλϦϴΗέΎη·ϊϤ Ηϭ .˱ΎϴϜϴΗΎϣϮΗϭ˱ΎΘϗΆϣϒϗϮΘϴγΞϣΎϧήΒϟϥΈϓˬϲϬτϟ
˯ΪΒϟ"έΰϟϰϠϋςϐοϢΛˬϡΎότϟΐϴϠϘΗΪόΑϥήϔϟΏΎΑϖϠϏ .ϡΎότϟΐϴϠϘΗϭϥήϔϟΘϔΑStart"
ϲϓήϤΘ ϴγϥήϔϟϥΈϓˬϡΎότϟΐϴϠϘΗϲϓΐϏήΗϻΖϨϛΫ·ϭ .ϲϧΎΜϟϒμϨϠϟήϤΘ ϴγϲϬτϟϥΈϓ
.ΓΪΣϭΔϘϴϗΩΓΪϤϟΖϗΆϣϒϗϮΗΪόΑ˱ΎϴϜϴΗΎϣϮΗϭϲϬτϟΔόΑΎΘϣ
6-ΝϭΩΰϤϟϲϬτϟ ϔϴχϭ
έίϰϠϋςϐπϟΎΑΎϬϨϴΑϦϣέΎϴΘΧϻϚϨϜϤϳϭˬϥέΎϴΧΔϔϴχϮϟϩάϬϟ[MICRO/GRILL]ϰμϗ)
ΓΪϣ60.(ΔϘϴϗΩ
)έΎϴΨϟ1)ΝϭΩΰϣϲϬσ (55+ϭήϜϳΎϣ %45ΰϣήϟήϬψϳϭϱϮη %"C-1".
)έΎϴΨϟ2)ΝϭΩΰϣϲϬσ (30+ϭήϜϳΎϣ %70ΰϣήϟήϬψϳϭϱϮη %"C-2".
)έΎϴΨϟϡΪΨΘγΎΑϡΎόσϲϬσ :ϝΎΜϣ2ΓΪϤϟˬ (15:ΔϘϴϗΩ
έίςϐο ([MICRO/ Defrost/GRILL/Combi.]ΰϣήϟήϬψϳϰΘΣ"C-1".
"ϲϬτϟΖϗϭςΒπϟΖϗϮϟέίςϐο (Ώ"15.00.
Table of contents
Other Elba Microwave Oven manuals

Elba
Elba EMO-H3880TFT(BK) User manual

Elba
Elba IMM 25 BG User manual

Elba
Elba EMO-F2074(SV) User manual

Elba
Elba EMO-2306BI User manual

Elba
Elba EMO-2505 User manual

Elba
Elba 300-00SS User manual

Elba
Elba EMO-B2361BI(SS) User manual

Elba
Elba EMO-2305 User manual

Elba
Elba EMO-2305BI User manual

Elba
Elba DARK 23 User manual