ELBOX Latte User manual

MMOKOK
English
Read this manual before installation and use.
OWNER'S MANUAL
SET TOP BOX
Digital receiver
Latte

TO REDUCE THE RISK OF FIRE AND ELECTRIC SHOCK, DO NOT EXPOSE THIS UNIT TO RAIN OR
MOISTURE.
IMPORTANT SAFEGUARDS
: To reduce the
risk of fire and electric shock, do
not remove the cover (or back panel)
of the unit. Refer servicing to qualified service personnel.
The lightning flash with arrow head symbol, within an equilateral
triangle, is intended to alert the user to the presence of uninsulated
"dangerous voltage" within the product's enclosure that may be of
sufficient magnitude to constitute a risk of electric shock.
The exclamation point within an equilateral triangle is intended to
alert the user to the presence of important operation and servicing
instructions in the literature accompanying the appliance.
WARNING: TO REDUCE THE RISK OF FIRE OR ELECTRIC SHOCK, DO
NOT EXPOSE THIS APPLIANCE TO RAIN OR MOISTURE.
CAUTION: TO PREVENT ELECTRIC SHOCK, MATCH WIDE BLADE OF
PLUG TO WIDE SLOT AND FULLY INSERT.
In addition to the careful attention devoted to quality standards
in the manufacturing of your set-top box, safety is a major factor
in the design of every instrument. However, safety is your
responsibility, too. This sheet lists important information that will
help assure your enjoyment and proper use of the set-top box
and its accessories. Please read them carefully before installing
and operating your set-top box.
Installation
10.
11.
12.
13.
14.
15.
16.
17.
18.
19.
20.
21.
22.
23.
CAUTION
The apparatus shall not be exposed to dripping or splashing, and no
objects filled with liquids, such as vases, shall be placed on the apparatus.
SAFETY INFORMATION
1.
2.
3.
4.
5.
6.
7.
8.
9.
Read and Follow Instructions- All the safety and operation instructions
should be read before the set-top box is operated. Follow all operating
instructions.
Retain Instructions- The safety and operating instructions should be
retained for future reference.
Heed all Warnings-Comply with all warnings on the set-top box and
operating instructions.
Power - This set-top box is supplied with a DC power. To prevent
electric shock, ensure the adaptor is inserted correctly into
the power outlet.
Power Sources- This set-top box should only be operated with the
ratting specified on the label on the back panel of the set-top box.
If you are not sure of the type of power supply to your home or office,
please consult your set-top box dealer or electrician. For set-top boxes
intended to operate from battery power, or other sources, refer to the
operating instructions.
Overloading- Do not overload wall outlets or extension cords as this can
result in a risk of fire or electric shock. Overloaded AC outlets, extension
cords, frayed power cords, damaged or cracked wire insulation, and
broken plugs are dangerous, They may result in a shock or fire hazard.
Periodically examine the cord, and if its appearance indicate damage or
deteriorated insulation, have it replaced by your service technician.
Power-Cord Protection- Power-supply cords should be routed so that
they are not likely to be walked on or damaged by items placed upon or
against them, paying particular attention to the point where they exit
from the set-top box.
Ventilation- Slots and openings in the case are provided for ventilation
to ensure reliable operation of the set-top box and to protect it from
overheating. These openings must not be blocked or covered. The
openings should never be blocked by placing the set-top box on a
bed, sofa, rug, or heat register. This set-top box should not be placed in a
built-in installation such as a book case or rack, unless proper ventilation
is provided or the set-top box manufacturer's instructions have been
followed.
Attachments- Do not use attachments unless recommended by the
set-top box manufacturer as they may cause hazards.
The apparatus shall not be exposed to dripping or splashing and no objects
filled with liquids ,such as vases shall be placed on the apparatus.
Caution: Maintain electrical safety. Powerline operated equipment or accessories
connected to this unit should bear safety certification mark on the accessory itself
and should not be modified so as to compromise the safety features. This will help
avoid any potential hazard from electrical shock or fire. If in doubt, contact a
qualified service personnel.
Accessories- Do not place this set-top box on an unstable cart, stand, tripod,
bracket, or table. The set-top box may fall, causing serious injury to a child or
adult as well as serious damage to the set-top box. Use this set-top box only
with a cart, stand, tripod, bracket, or table recommended by the manufacturer's
or sold with the set-top box. Any mounting of the product should follow the
manufacturer's instructions and use of a mounting accessory recommended by
the manufacturer.
A set-top box and cart combination should be moved with care. Quick stops,
excessive force, and uneven surfaces may cause damage to the set-top box.
Outdoor Antenna Grounding- If an outside antenna or cable system is connected to
the set-top box, be sure the antenna or cable system is grounded so as to provide
some protection against voltage surges and built-up static charges. Section 810 of
the National Electrical Code, ANSI/NFPA No.70-1984 (Section 54 of Canadian
Electrical Code, Part1) provides information with respect to proper grounding of
the mast and supporting structure, grounding of the lead-in wire to an antenna-
discharge unit, connection to grounding electrodes, and requirements for the
grounding electrode.
Power Lines-An outside antenna system should not be located in the vicinity of
overhead power lines, other electric light or power circuits, or where it can fall into
such power lines or circuits. When installing an outside antenna system, extreme
care should be taken to keep from touching or approaching such power lines or
circuits, as contact with them might be fatal. Installing an outdoor antenna can be
hazardous and should be left to a professional antenna installer.
Use
Cleaning- Unplug the set-top box from the wall outlet before cleaning.
Do not use liquid cleaners or aerosol cleaners. Use a damp cloth for cleaning.
Objects that may touch dangerous voltage points or "short-out" parts could result in
a fire or electric shock. Never spill liquid of any kind on the set-top box.
Lightning-For added protection for this set-top box during a lightning storm, or
when it is left unattended and unused for long periods of time, unplug it from the
wall outlet and disconnect the antenna or cable system. This will prevent damage to
the set-top box due to lightning and power line surges.
Service
Servicing-Do not attempt to service this set-top box yourself, as opening or
removing covers may expose you to dangerous voltage or other hazards. Refer all
servicing to qualified service personnel.
Conditions Requiring Service-Unplug the set-top box from the wall outlet and
refer servicing to qualified service personnel under the following conditions:
A. When the DC power adaptor or connecting power cord is damaged.
B. If liquid has been spilled, or objects have fallen into the set-top box.
C. If the set-top box has been exposed to rain or water.
D. If the video does not operate normally by following the operating
instructions.
Adjust only those controls that are covered by operating instructions.
Improper adjustment of other controls may result in damage and will often
require extensive work by a qualified technician to restore the set-top box
to its normal operation.
E. If the set-top box has been dropped or cabinet has been damaged.
F. When the set-top box exhibits a distinct change in performance-this
indicates a need for service.
Replacement Parts-When replacement parts are required, have the service
technician verify that the replacements he uses have the same safety characteristics
as the original parts. Use of replacements specified by the set-top box manufacturer
can prevent fire, electric shock, or other hazards.
Safety Check-Upon completion of any service or repairs to this set-top box, ask
the service technician to perform safety checks recommended by the manufacturer
to determine that the set-top box is in safe operating condition.
Wall or Ceiling Mounting- The product should be mounted to a wall or ceiling only
as recommended by the manufacturer.
Heat-The product should be situated away from heat sources such as radiators,
heat registers, stoves, or other products (including amplifiers) that produce heat.

CONTENTS
SAFETY INFORMATION
INTRODUCTION
Front panel
Rear panel
Remote control
SYSTEM CONNECTION
General
Connecting the TV
GETTING STARTED
Welcome
Main Menu
Installation
OPERATION
Changing channels
Access the Electronic Programme Guide(EPG)
EDIT CHANNEL
Edit Channel menu
TV Channel list
Radio Channel list
Delete All
SYSTEM SETUP
System setup menu
Language
TV System
Display Setting
Local Time Setting
Timer Setting
Parental Lock
OSD Setting
Favorite
PVR Storage Information
PVR Setting
Other
TOOLS
Tools main menu
Information
Factory Setting
Software Upgrade
Remove USB device safely
MULTIMEDIA
Multimedia main menu
Media Playback
Game
CA INFORMATION
CA Information main menu
TIMESHIFT/RECORD
Timeshift
Record
TROUBLESHOOTING
SPECIFICATIONS
1
1
2
3
3
4
4
4~5
5
5
6
6
6
6
7
7
7
7
8
8
8
9
9
9
10
10
11
11
11
11
11
12
12~13
13
14
15
15
16

MOK
Front panel
Rear panel
INTRODUCTION
1
English
Composite Video
Down Mix Audio
2 Channel L/R
DC mains
Remote sensor
Channel Up/Down
USB port
Power
OK button
Volume -/+
LNB IN
Connect a satellite
antenna cable
Menu

INTRODUCTION
2
English
8
9
11
10
12
13
15
14
4
5
6
7
16
17
18
19
20
21
22
1
2
Remote control
1
2
3
14
15
17
12
18
19
20
5
6
9
10
13
21
22
STANDBY
(switch the STB on and standby)
OK button
(Confirm a selection within a menu)
Numeric entry
(Enter numeric values and select the channel
directly by entering it's number)
AUDIO
(Select audio mode and audio track)
CH+/-( Channel Up and Down)
MAIL
EPG
(Open up Electronic Program Guide Menu)
Cursor/CH+, -/VOL+,-
(Cursor: Navigation buttons used to navigate
menu's items)
(CH+/-: Channel Up and Down)
(VOL+/-: Volume Up and Down)
3FAV
(Open the Favorite list)
RED/GREEN/YELLOW/BLUE Buttons
(For interactive function/Submenu
function buttons
Press "BLUE" button to Switch to previous channel)
VOL+/-( Volume Up and Down)
STOP
(Stop program playback or recording)
TV/RADIO
(Switch between TV and Radio)
EXIT (Exit from menu)
4
7
8
11
16
INFO
(Press for current channel information/
Operation guide )
FWD
(Press FWD button to fast forward
the playback)
REW
(Press REW button to rewind the playback)
MUTE (Turn off/on the volume)
Menu
(Open and close the menu screen)
PLAY
PAUSE(Pause/Active timeshift function)
RECORD
(Record the TV program)

Connecting the TV
General
SYSTEM CONNECTION
There are many different types of TV and other equipment that you can connect to the STB.
In this manual you will see some of the most common ways to connect your equipment.
3
English
Antenna
RF cable
DC adapter

GETTING STARTED
Installation
Select "Blind Scan", press the "OK" button to enter the
Blind Scan menu.
Press cursor button to select a satellite, press "OK"
button to start the blind scan .
1
1
2
2
4
Press the cursor button to set "FTA Only.
1
2
3
English
4
Satellite List
Blind Scan
Press the "MENU" button to enter main menu.
Press cursor button to highlight "Installation".
Please input the default password "0000" as requested.
Press "UP" or "DOWN" cursor button to highlight the desired item
and press "OK"button to enter the sub-menu .
Press "EXIT" button to exit.
Select the "Satellite List", press "OK" button to enter the satellite
list menu.
Blind Scan
Satellite List
Manual Scan
Installation
3Press the cursor button to select your desired satellite and press
"BLUE"button to search the program.
Main Menu
If you use the STB for the first time, you can watch the TV
directly, thenpress "MENU"button, the main menu appears.
Press cursor button to select your desired item, then pree
"OK" button to enter the sub menu.
Installation
Edit Channel System Setup
Tools Multimedia CA Information
1
2
3
4
5
6
7
8
9
10
Blind Scan
xxxxxxxx xxxxx
xxxxxxxx xxxxx
xxxxxxxx xxxxx
xxxxxxxx xxxxx
xxxxxxxx xxxxx
xxxxxxxx xxxxx
xxxxxxxx xxxxx
xxxxxxxx xxxxx
xxxxxxxx xxxxx
xxxxxxxx xxxxx
OK Search
Press "0" button, then all of the satellites are selected,press
"BLUE"button to search programs.
Press "color" button, then press "OK" button to edit the
corresponding function.
Press "INFO" button, then press cursor button to edit the
Antenna parameter.
Satellite List
1
2
3
4
5
6
7
8
9
10
XXXXX XXXXXX
XXXXX XXXXXX
XXXXX XXXXXX
XXXXX XXXXXX
XXXXX XXXXXX
XXXXX XXXXXX
XXXXX XXXXXX
XXXXX XXXXXX
XXXXX XXXXXX
XXXXX XXXXXX
0All Info
Antenna
SearchDeleteEdit Add
Accessing the Electronic Program Guide (EPG)
OPERATION
Changing Channels
There are three ways of channel selection - stepping through the channel list, selection by number
and from the on-screen channel list.
Stepping through the channel list:
To move through the channel list, press the upward arrow or downward arrow key on the
remote control.
Selected by number:
Enter the channel number directly by pressing numeric buttons ,and press the "OK" button
to select desired channel.
Selected by on-screen channels list:
You can also select the required channel directly from on-screen channel list. This is
displayed using the STB's main menu. See "Edit Channel" in this manual for operation detail.
1
2
3
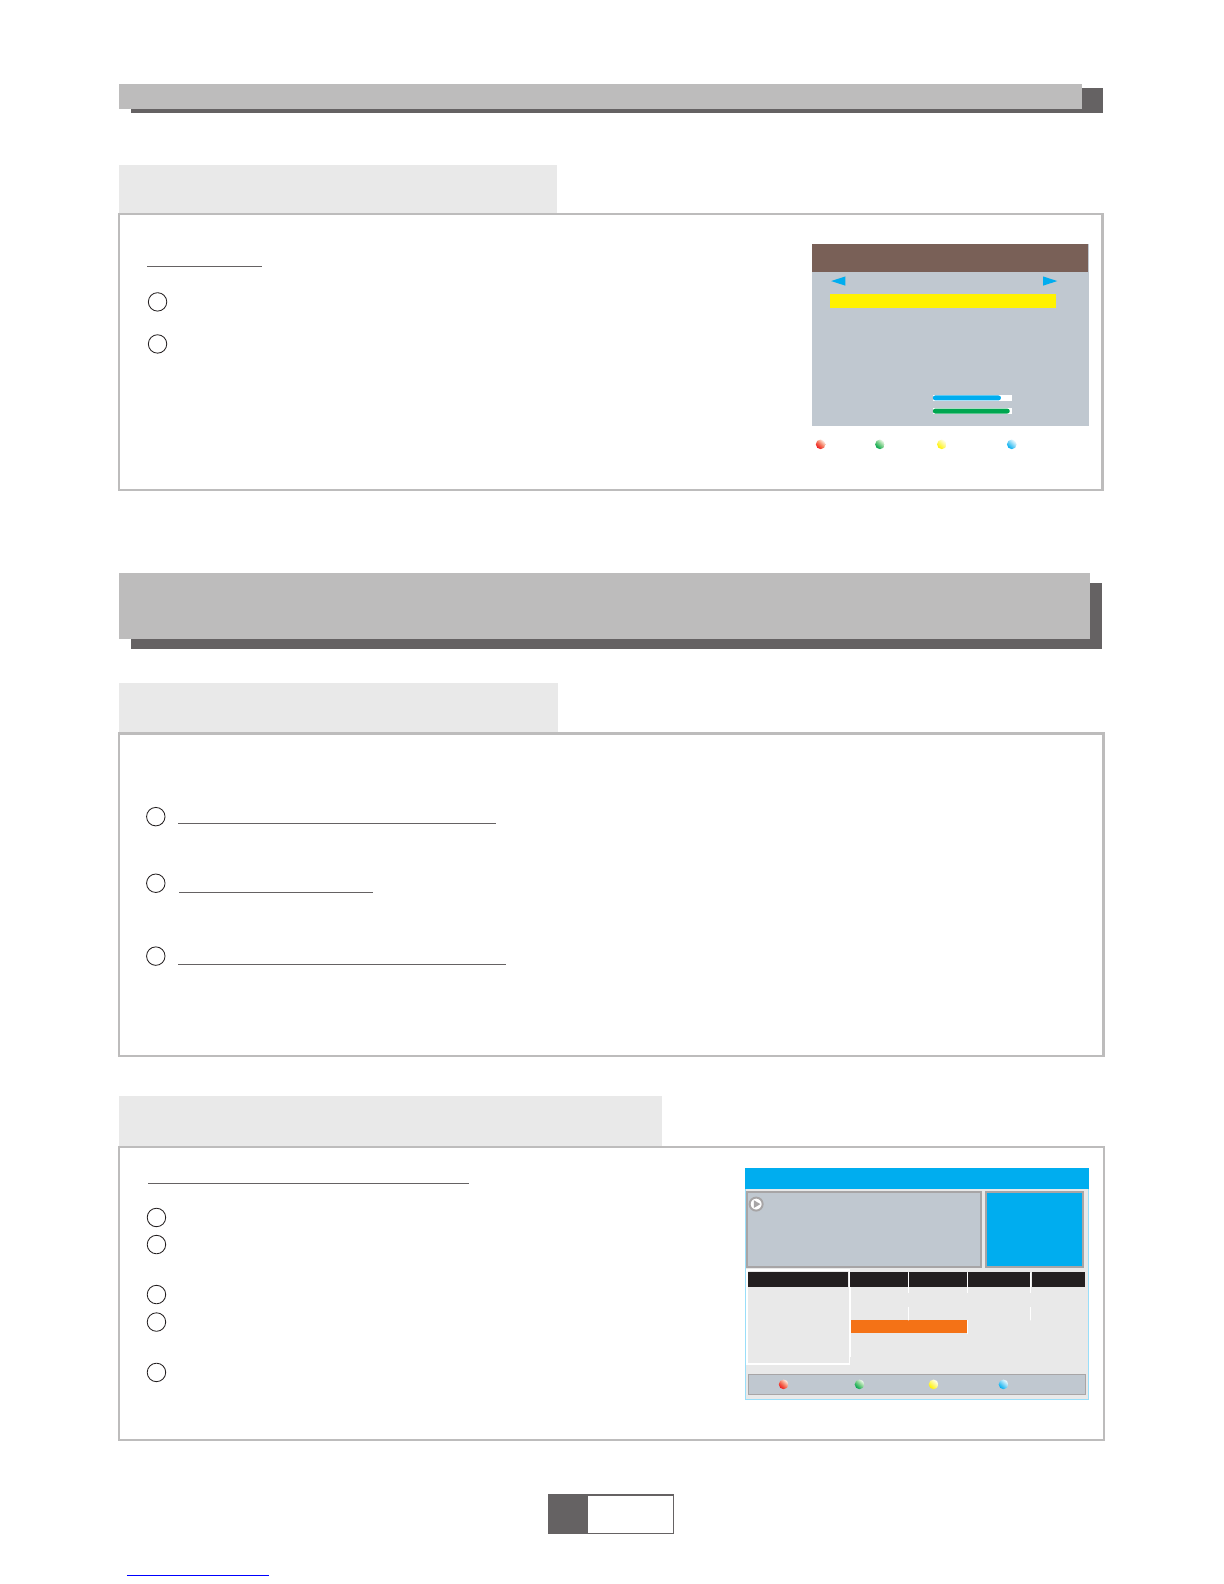
Accessing the EPG of all channels:
1
2
4
Press "EPG" button to enter EPG menu .
Press cursor button to switch between channel list, events
schedule of the selected channel and now/next events.
Press "GREEN" or "YELLOW"button to view the different
day's program..
Press "RED" button to open the book menu.
5
English
5
0008
0009
0010
0011
0012
Interecon
BBC Parl
BBC FO
CBeebie
301
0010 BBC FOUR
The Recor
Auntie's War on Smut
This is CBeebies!
The Recor
Commons Questions
Proms on FOUR
Auntie's War on Smut
01:30-02-30
DetailDay-
EPG 01:39 xx/xx/xxxx
3
Press "BLUE" button to open the detail menu.
GETTING STARTED
Installation
3/19 01:30 02:00 02:30 03:00
Book Day+
Select "Manual Scan", press the "OK" button to enter the
Manual Scan menu.
Press "LEFT" or "RIGHT" button to select a satellite, press "UP"
or "DOWN" button to select the Frequency , then press "BLUE"
button to start the manual scan .
1
2
Manual Scan
Manual Scan
1
2
3
4
5
6
Signal Intensity
Signal Quality
81%
97%
[LNB1] PalapaD
XXXXX XXXXXX X
XXXXX XXXXXX X
XXXXX XXXXXX X
XXXXX XXXXXX X
XXXXX XXXXXX X
XXXXX XXXXXX X
SearchDeleteEdit Add

Radio Channel list
Edit Channel menu
TV Channel list
EDIT CHANNEL
In the Edit Channel menu, select "TV Channel List"; Press "OK"
button .Please input the default password "0000" as requested.
1
2
Use this menu to favor, lock, skip, move, sort, delete and rename
channel.
Press "FAV" button, then press "OK" button to edit the FAV
function.
Press "UP" or "DOWN" button to highlight channel. Then press the
"OK" button to preview the desired TV channel.
English
6
4
1
2
3
Press the "MENU" button to enter main menu.
Press cursor button to highlight "Edit Channel".
Please input the default password "0000" as requested.
Press "UP" or "DOWN" cursor button to highlight the desired item
and press "OK" button to enter the sub-menu .
Press "EXIT" button to exit.
Sort
YooPlay Ga
xxxxxxxx
xxxxxx
xxxx
xxx
TV Channel List
FAV Lock Skip
Move
Edit
All TV
0001 No Name
0002 YooPlay Ga
0003 E4+1
0004 UKTV Histor
0005 SKY THREE
0006 Sky Spts Ne
0007 Sky News
0001 No Name
0002 YooPlay Ga
0003 E4+1
0004 UKTV Histor
0005 SKY THREE
0006 Sky Spts Ne
0007 Sky News
i
In the Edit Channel menu, select "Radio Channel List". Then press "OK" button to enter the Radio
Channel list menu.
Press "UP" or "DOWN" button to highlight channel. Then press the "OK" button to listen the desired Radio
channel.
1
2
NOTE:
Basically, the operation of "Radio Channel List" is the same as "TV Channel List",
but there is one point different: In "Radio Channel List" mode, there is no video
information, so it will always display Radio's logo in the right side preview window.
Press "color" button, then press "OK" button to edit the
corresponding function.
Rename
Delete
YooPlay Ga
xxxxxxxx
xxxxxx
xxxx
xxx
Edit Channel
All TV
i
TV Channel List
Radio Channel List
Delete All
Edit Channel
Delete All
1
2
Warning! Do you really want to delete
all channels?
Yes No
A warning window appears.
Select "Yes", and press "OK" button to delete all channels.
Select "No", and Press "OK" button to cancel deleting.
In the Edit Channel menu, select "Delete All", then press "OK" button.
Please input the default password "0000" as requested.
System setup menu
System setup menu allows us to set Language, TV System, Local Time
Setting, Timer Setting, Parental Lock, OSD Setting, Favorite, PVR
Storage Information, PVR Setting and Other.
Language
This menu allows you to set Language.
SYSTEM SETUP
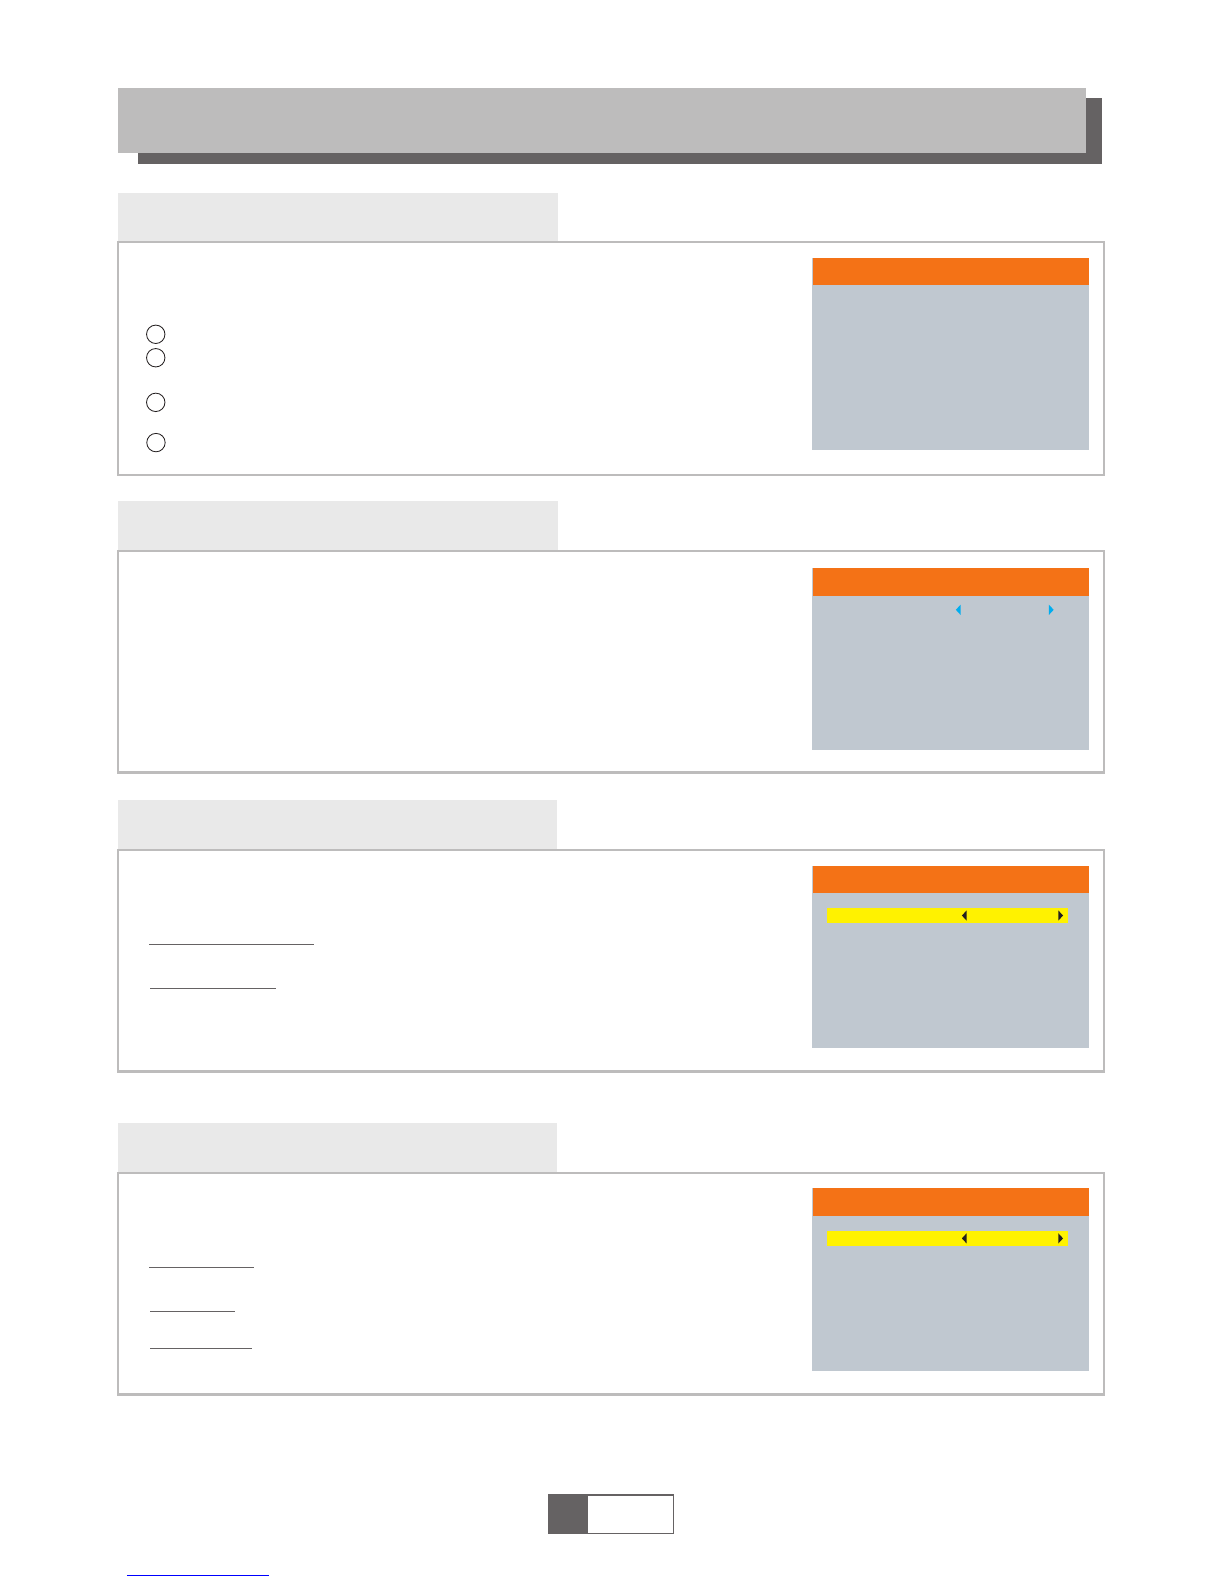
TV System
This menu allows us to set Video Resolution, Aspect Mode
and Digital Audio Out.
Aspect Mode:
Auto/4:3PS/4:3LB/16:9
Video Resolution:
English
7
TV System
Video Resolution
Aspect Mode
576i
4:3LB
4
1
2
3
Press the "MENU" button to enter main menu.
Press cursor button to highlight "System Setup", press "OK" button
to enter the System Setup menu.
Press "UP" or "DOWN" cursor button to highlight the desired
item and press "OK" button to enter the sub-menu.
Press "EXIT" button to exit.
Language
Language
First Audio
Second Audio
English
Indonesia
Indonesia
System Setup
Language
TV System
Display Setting
Local Time Setting
Timer Setting
Parental Lock
OSD Setting
Favorite
PVR Storage Information
PVR Setting
Other
480i/576i
Display Setting
This menu allows us to set Brightness, Contrast and Saturation.
Contrast:
0~100
Brightness:
Display Setting
Brightness
Contrast
Saturation
50
50
50
0~100
Saturation:
0~100

SYSTEM SETUP
English
8
Local Time Setting
This menu allows you to set the region and time.
Time Zone: This menu is valid only when selected "Manual"
in Mode .
The Time Zone is "-11:30 ~ +12:00", increasing
half hour progressively.
Date:
Time:
"Date" and "Time" menus are valid only when selected "Off" in GMT Usage menu.
Press numeric button to input the time.
Mode:
Local Time Setting
Mode
Region
Time Zone
Summer Time
Date
Time
Auto
Medan
UTC+01:00
Off
xxxx/xx/xx
01:51
xxxx,xxx,xxxx
Summer Time: The options are: On/Off
Parental Lock
In "System Setup" menu, select "Parental Lock" and press "OK" button,
you are asked to input a password(the default password is"0000").
After inputting the correct password by pressing numeric buttons,
the parental lock menu appears.
1
2
Menu Lock:
New Password: To change the password.
Confirm Password: To confirm the new password.
Channel Lock:
On/Off
To lock the Edit channel/ Installation menu. When you
want to enter these menus, you must input the password.
You can set menu lock to on/off.
This menu allows you to protect menu and channel, and change the
Password.
Parental Lock
Menu Lock
Channel Lock
New Password
Confirm Password
Off
Off
----
----
Timer Setting
This menu allows us to set the program timer. You can set 8 timers.
Timer Mode:
Timer Service:
Wakeup Channel:
Wakeup Date:
On Time:
Duration:
Off/Once/Daily
Channel/Record
You can select a desired channel as the wakeup channel.
Press numeric button to input date.
Press numeric button to input the time.
Press numeric button to input the duration time.
Save Cancel
xx/xx/xxxx
Timer Mode
Timer Service
Wakeup Channel
Wakeup Date
On Time
Duration
PS Record
Daily
Channel
BBC FOUR
xx/xx/xxxx
xx:xx
xx:xx
No
Region: This menu is used for changing the region setting.
The options are: Manual/Auto
SYSTEM SETUP
English
9
OSD Setting
This menu allows you to set Channel List Timeout, Banner Timeout and
OSD Transparency .
Channel List Timeout: 1-15
OSD Transparency: To set the OSD transparency to Off/10%/20%/30%/
40%.
OSD Setting
Channel List Timeout
Bannel Timeout
OSD Transparency
5
5
Off
Banner Timeout: 1-15
This menu allows you to rename the favorite group.
Favorite
In Channel menu, select "Favorite", press "OK" button to enter
Favorite menu.
Select desired group, press "OK" button to open the mock keypad.
Input letter and numeric one by one by pressing the cursor button
and press "OK" button to confirm. After finishing input, highlight
"OK" on mock keypad to confirm, you change Favorite group name
successfully.
Press "EXIT" button to quit the group rename menu.
1
2
3
Favorite
1
2
3
4
5
6
7
8
Favorite 1
Favorite 2
Favorite 3
Favorite 4
Favorite 5
Favorite 6
Favorite 7
Favorite 8
CAPS
A
Fav group 1
G
M
S
Y
4
SP
Name
Del OK
B C D E F
K LH J
I
N
T
Z
5
O
U
0
6
?
P
V
1
7
<-
Q
W
2
8
OK
R
X
3
9
DVR Set
DVR Type REC& TMS
OK Cancel
PVR Storage Information
In "REC" menu, select "HDD Information", press "OK"
button to open HDD information window.
Press "EXIT" button to exit.
This menu can display some parameters of Removable Disk.
1
2
PVR Storage Information
USB Disk A: xxxG bytes
Volume
Total Size
Free Size
Rec Size
TMS Size
File System
xxxx
xxxx
xxxx
xxxx
xxxx
xxx
Format DVR Set
DVR Set REC&TMS/Record/Timeshift
Press BLUE button to open DVR Set menu.
Press "LEFT" or "RIGHT" cursor button to change DVR Type.
Select "OK" to confirm. Select "Cancel" to cancel.
Press YELLOW button to open Format menu.
Press "LEFT" or "RIGHT" cursor button to change Disk Mode.
Select "OK" to format. Select "Cancel" to cancel.
Format FAT/NTFS
Format
Disk Mode
OK
FAT
Cancel

SYSTEM SETUP
English
10
This menu allows us to set the PVR Setting.
Press "UP" or "DOWN" cursor button to select desired item,
press "LEFT" or "RIGHT" cursor button to change the setting.
TimeShift ON/OFF
Jump 30sec/1min/5min/10min/30min
PVR Setting
PVR Setting
Timeshift
Jump
OFF
30sec
Other
Other
LNB Power
Antenna Power
Channel Play Type
Auto Standby
On
On
All
Off
LNB Power:
Antenna Power:
Auto Standby:
This menu allows us to set LNB Power, Antenna Power, Channel Play
Type and Auto Standby.
When "LNB Power" is selected "On", the STB will provide 5V power
to antenna.
It will not provide when selected "Off".
On/Off
On/Off
Channel Play Type: All/Free/Scrambled
On/Off
Tools main menu
Information
In "Tools" menu, select "Information", and press "OK" button to open
information window.
Press "EXIT" button to exit.
1
2
TOOLS
This menu can display some parameters information in this STB.
Factory Setting
This menu allows user to re-set the STB back to factory settings and
clear all existed channels.
In the "Tools" menu, select "Factory Default", then press "OK" button.
Please enter the default password "0000" when requested.
1
2A confirmation window is displayed.
Select "Yes" to return back to factory settings and clear all channels.
Select "No" to cancel back to factory settings.
Press "EXIT" button to exit .
4
1
2
3
Press the "MENU" button to enter main menu.
Press cursor button to highlight "Tools". Then press "OK" button.
Please enter the default password "0000" when requested.
Press "UP" or "DOWN" cursor button to highlight the desired item
and press "OK" button to enter the sub-menu.
Press "EXIT" button to exit.
3
Tools
Information
Factory Setting
S/W Upgrade by OTA
Upgrade By USB
Remove USB device safely
English
11
Information
x.x.x
xxxxx
xxxxx
x.x.x
x.x.x
xxx
xxxxx
xxxxx
xxx
xxx
Factory Setting
This operation will load default and erase allthe channels
that user added, continue?
Yes No
Software Upgrade
Press "EXIT" button to exit.
Enter "Tools" menu, select "S/W Upgrade by OTA" or "Upgrade by
USB", and press "OK" button. The Software Upgrade menu will appear.
1
2Press cursor button to select the desired item, then highlight
"Start" and press "OK" button to start upgrade.
3
We offer the functions for user to upgrade software version by OTA
or by USB .
Upgrade by USB
Upgrade Mode
Upgrade File
Start
Allcode
No File
0%
Remove USB device safely
In "Tools" menu, select "Remove USB device safely",
Press "OK" button to confirm. A window will appears.
Press "OK" button again.
Disk Remove
Remove
OK
USB Disk A-3 GB
Cancel

Multimedia main menu
Multimedia
English
12
4
1
2
3
Press the "MENU" button to enter main menu.
Press "UP"or "DOWN" button to highlight "REC".
Please enter the default password "0000" when requested.
Press "UP" or "DOWN" cursor button to highlight the desired item
and press "OK"button to enter the sub-menu.
Press "EXIT" button to exit.
Multimedia Playback
3
In "Multimedia" menu, select "PVR", "Video", "Music" or"Image" ,
press "OK" button to enter Media Playback mode.
First you enter media player window, the highlight is on the
USB/HDD device. Press "Down" button to move the highlight to
directory and file field.
Press "RED" button ,you can switch TAB between
Music/Image/Video/PVR.
Press "UP" or "DOWN" cursor button to select a desired item,
and press "OK" button to play the desired files.
Press "EXIT" button to exit.
1
2
This function allows you to play files from USB port .
Multimedia
PVR
Video
Music
Image
Game
Music:
Image:
Press "GREEN" button to open the sort window.
Press "YELLOW" button to set repeat mode. The option is Repeat Folder/
Random Folder/Repeat One.
Press "Blue" button to enter to edit sub-menu.
Return to parent directory.
4
5
"GREEN" button:
"YELLOW" button:
"BLUE" button:
"EXIT" button:
I swear.mp3
3319KB
00:03:32
00:03:15 00:03:32
1
2
3
4
5
6
7
Music
840.mpg
I swear.mp3
Why.mp3
Lonely.mp3
Because.mp3
Rose.jpg
Fly.jpg
USB 1
/..
Switch Repeat
Sort
MPG
MP3
MP3
MP3
MP3
JPG
JPG
Edit
Exit
Image Video Record
EXI T
Press "GREEN" button to open the sort window.
Press "YELLOW" button to enter multiview mode.
Press "Blue" button to enter to edit sub-menu.
Return to parent directory.
"GREEN" button:
"YELLOW" button:
"BLUE" button:
"EXIT" button:
Video:
Press "GREEN" button to open the sort window.
Press "YELLOW" button to set repeat mode. The option is Repeat Folder/
Random Folder/Repeat One.
Press "Blue" button to enter to edit sub-menu.
Return to parent directory.
"GREEN" button:
"YELLOW" button:
"BLUE" button:
"EXIT" button:

English
13
REC
Record:
Press "Blue" button to open rename window.
Move the highlight to the program which you want to lock. Pressing "Green"
button, it will ask you to input password. Default password is "0000". After
input correct password, the program is locked. If you want to unlock the
program, press the "Green" button again.
Press "Yellow" button to make a delete mark on the program which
you want to delete.
Return to parent directory.
"BLUE" button:
"GREEN" button:
"YELLOW" button:
"EXIT" button:
Game
This menu allows user to play games.
Game
Othello
Sudoku

English
14
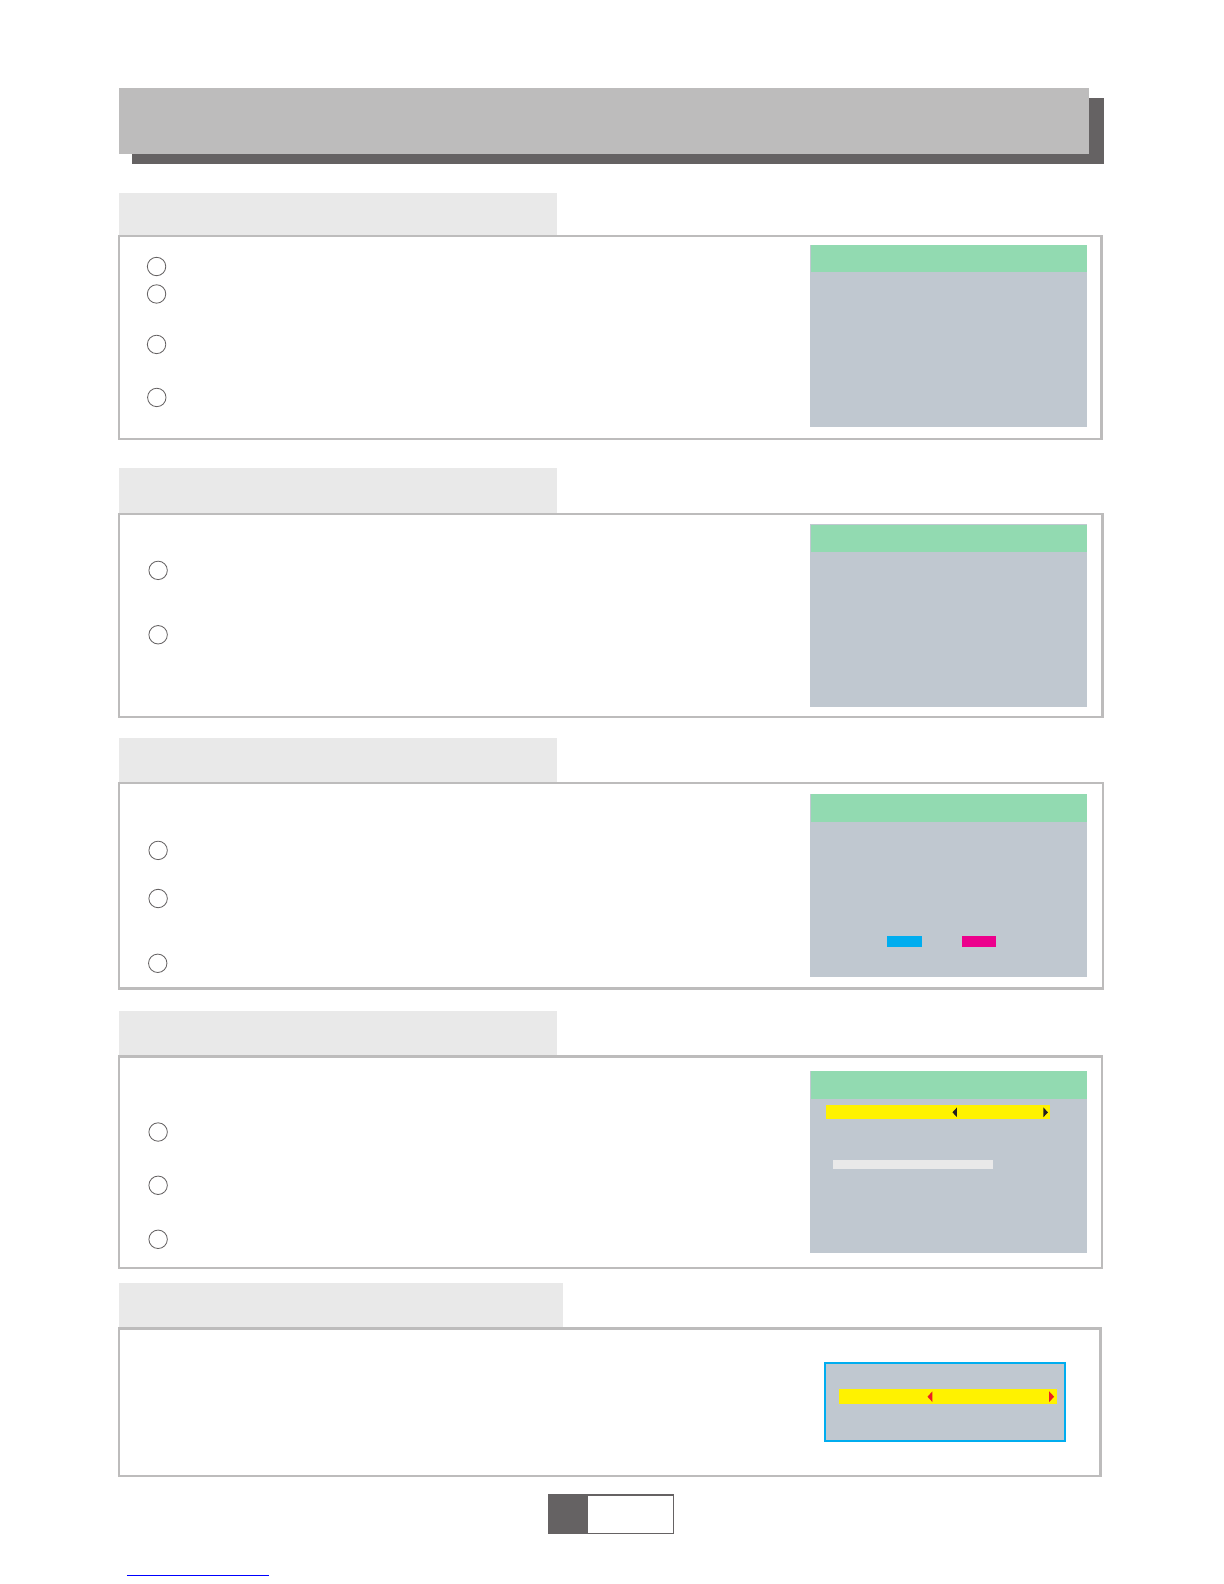
CA Information
CA Information main menu
4
1
2
3
Press the "MENU" button to enter main menu.
Press "UP"or "DOWN" button to highlight "CA Information".
Please enter the default password "0000" when requested.
Press "UP" or "DOWN" button to highlight the desired
item, and then press "OK" button to enter the sub-menu.
Press "EXIT" button to return the upper menu.
The menu allows the following operations:
Operator Info
Maturity Rating
Pin Code
CAS Info
Mail Info
Advanced Security Info
Opertator Info
Maturity Rating
PinCode
CAS Info
Mail Info
Advanced Security Info
CA Information

TIMESHIFT/RECORD
Timeshift
Plugging an external Mass Storage Device on the USB port gives you access to Time Shift/Record
a broadcast programme.
Pause a broadcast programme and continue watching it later (Time Shift )
Record a broadcast programme.
When the space available on the Mass Storage Device runs out, recording operation of
broadcast will stop.
Initiate
Trickmodes
Stop the Time Shift
Time Shift can be done in viewing mode by pressing the
"PAUSE" button.
Press "RIGHT" or "LEFT" button to move the cursor to
the time you desired to view. Press "OK" button to confirm.
During the playback, it is possible to perform the following actions :
Press "PAUSE" button to pause the playback
Press "FORWARD" button to fast forward the playback
Press "BACKWARD" button to rewind the playback
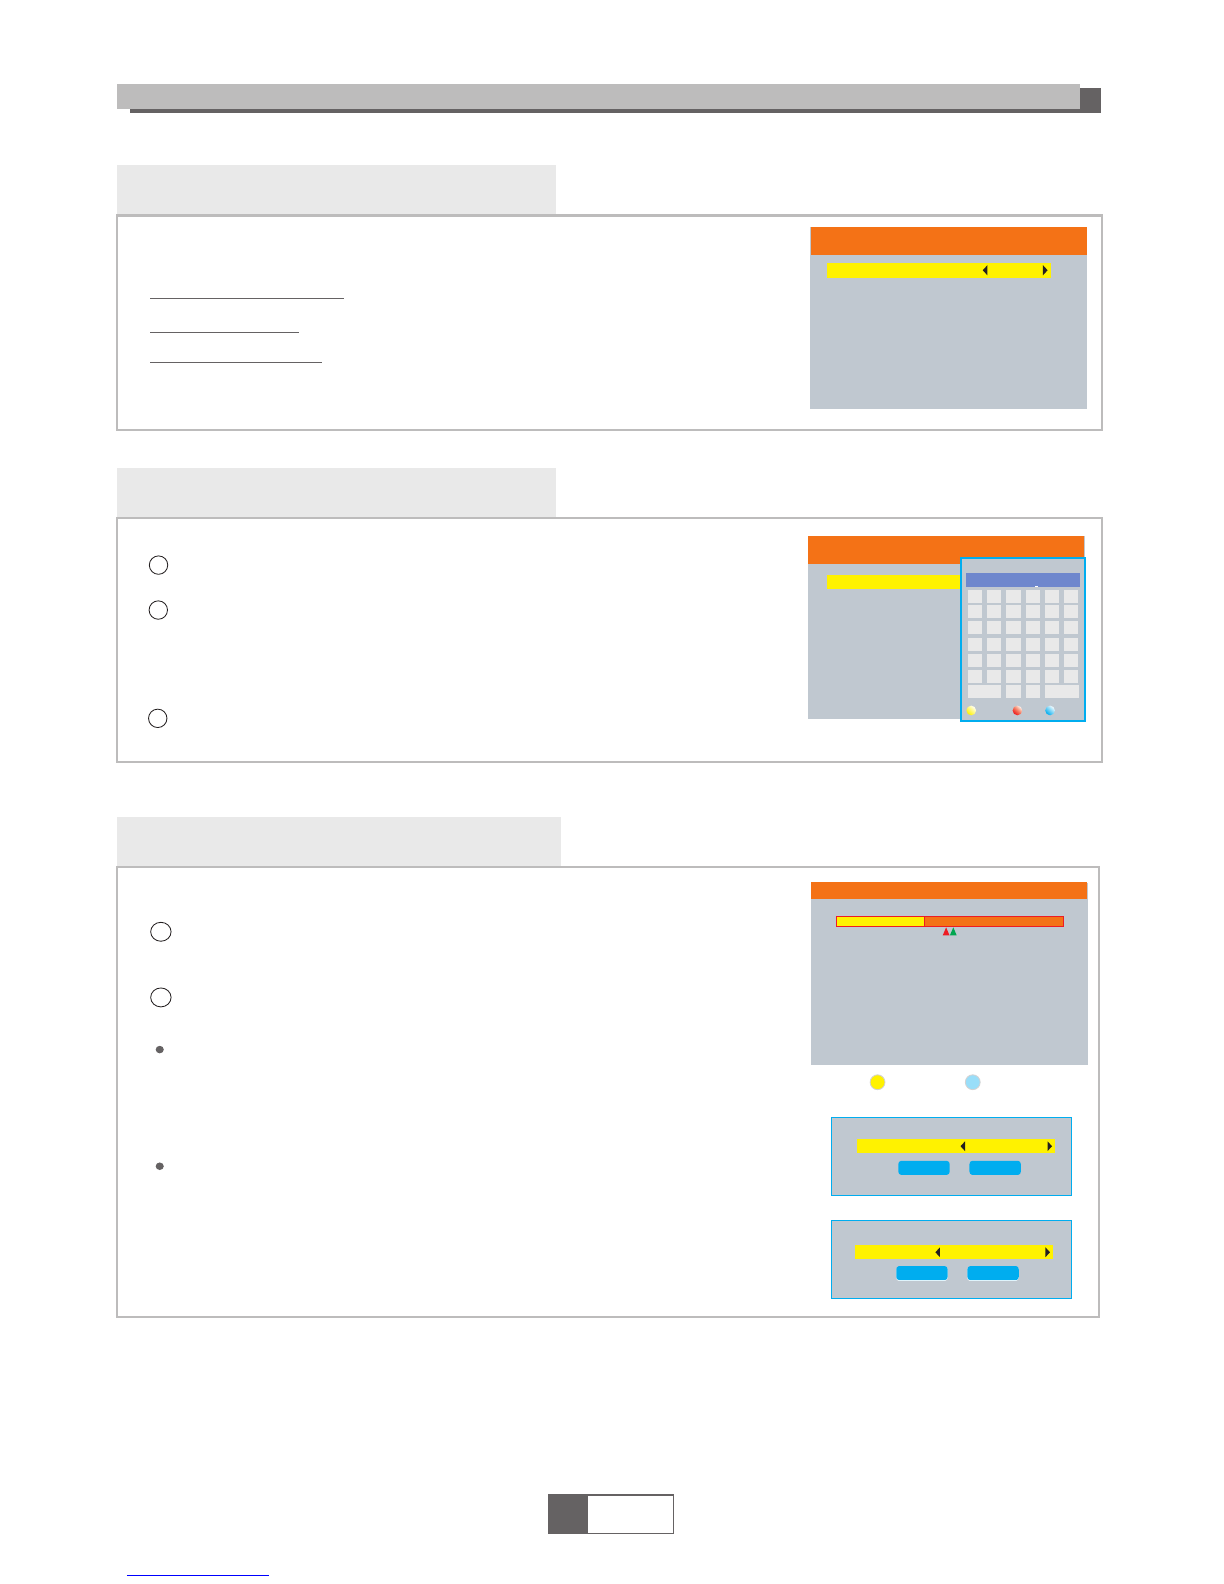
Record
Instant record
In viewing mode, press "RECORD" button to instantaneously start a record on the current channel.
Press "RECORD" button again can input duration.
Press "STOP" button to stop recording, then a confirmation window appears.
Select "Yes" to stop recording. Select "No" to continue recording.
Press "STOP" button to stop TimeShift.
BBC FOUR
Play 00:02:37 00:07:12
TS
2%
03/19 01:36
English
15
NOTE:
Please use USB 2.0 disk when recording or timeshift.
For timeshift and recording feature, you need take bigger size USB pen
driver or HDD (>2GB) for recording.
Please select famous brand USB 2.0 USB HDD or USB stick for Recording and Timeshift, such as SAMSUNG,
HITACHI and SONY. Some USB devices maybe can't be supported due to its quality.
NOTE:

In some region, the digital terrestrial signal may be weak. So you'd better use the antenna in
which the booster was built, for watching the weak signal channels.
TROUBLESHOOTING
Problem
Standby light not lit
No signal found
No picture or sound
Scrambled channel
message
No response to remote
control
Forgotten channel lock
code
Forgotten menu lock
code
The remote control will
not operate your STB
After moving the STB to
another room you find you
are no longer able to
receive digital reception
Possible cause What to do
Mains lead unplugged
Mains fuse blown
Aerial is disconnected
Aerial is damaged/misaligned
Out of digital signal area
Scart/AV is not selected on your TV
Channel is scrambled
Receiver off
Handset not aimed correctly
Front panel obstructed
Hand set batteries exhausted
(1) The batteries in your remote
control need replacing
(2) There is an obstruction
blocking the signal path
between the remote control
and the box.
The aerial feed former new point
may come through a distribution
system which may reduce the
digital signal now received by the
box.
Check mains lead
Check fuse
Check aerial lead
Check aerial
Check with dealer
Reduce to another channel
Select alternative channel
Plug in and turn on plug
Aim handset at front panel
Check for obstructions
Replace handset batteries
Re-install channels to cancel
channel lock
Contact help line
(1) Replace the batteries
(2) Check that there is nothing in
the way of the path between
the remote control and the
receiver
Try a direct feed from the antenna
English
16

DC INPUT 12V 1.5A
Design and Specifications are subject to change without notice.
TUNER & CHANNEL RF INPUT CONNECTOR x1
(F-TYPE, IEC169-24, FEMALE)
FREQUENCY RANGE:
950MHz~2150MHz
SIGNAL LEVEL:
-25 ~ -78 dBm
FEATURES
Video decoder
Audio decoder
VIDEO FORMATS
MODULATION
VIDEO OUTPUT
4:3/16:9
CVBS
QPSK,8PSK
CONNECTION
MAIN POWER CABLE
TUNER
FIXED TYPE
LNB INx1
POWER SUPPLY
POWER CONSUMPTION 6W
SPECIFICATIONS
NOTE:
MPEG-2 MP@HL, MPEG-4 SP, DIVX13.11, 4.X, 6.X,
FLV Format, H.264, MP@HL, AP@L3,RM&RMVB
MPEG-1,MPEG-2 (Layer I/II),MP3,AAC-LC
DATA PORT USB slot
RCA OUTPUT CVBS/L/RX1
Table of contents


