Elecdan ePowerSwitch 8XM User manual

© Copyright
All rights reserved
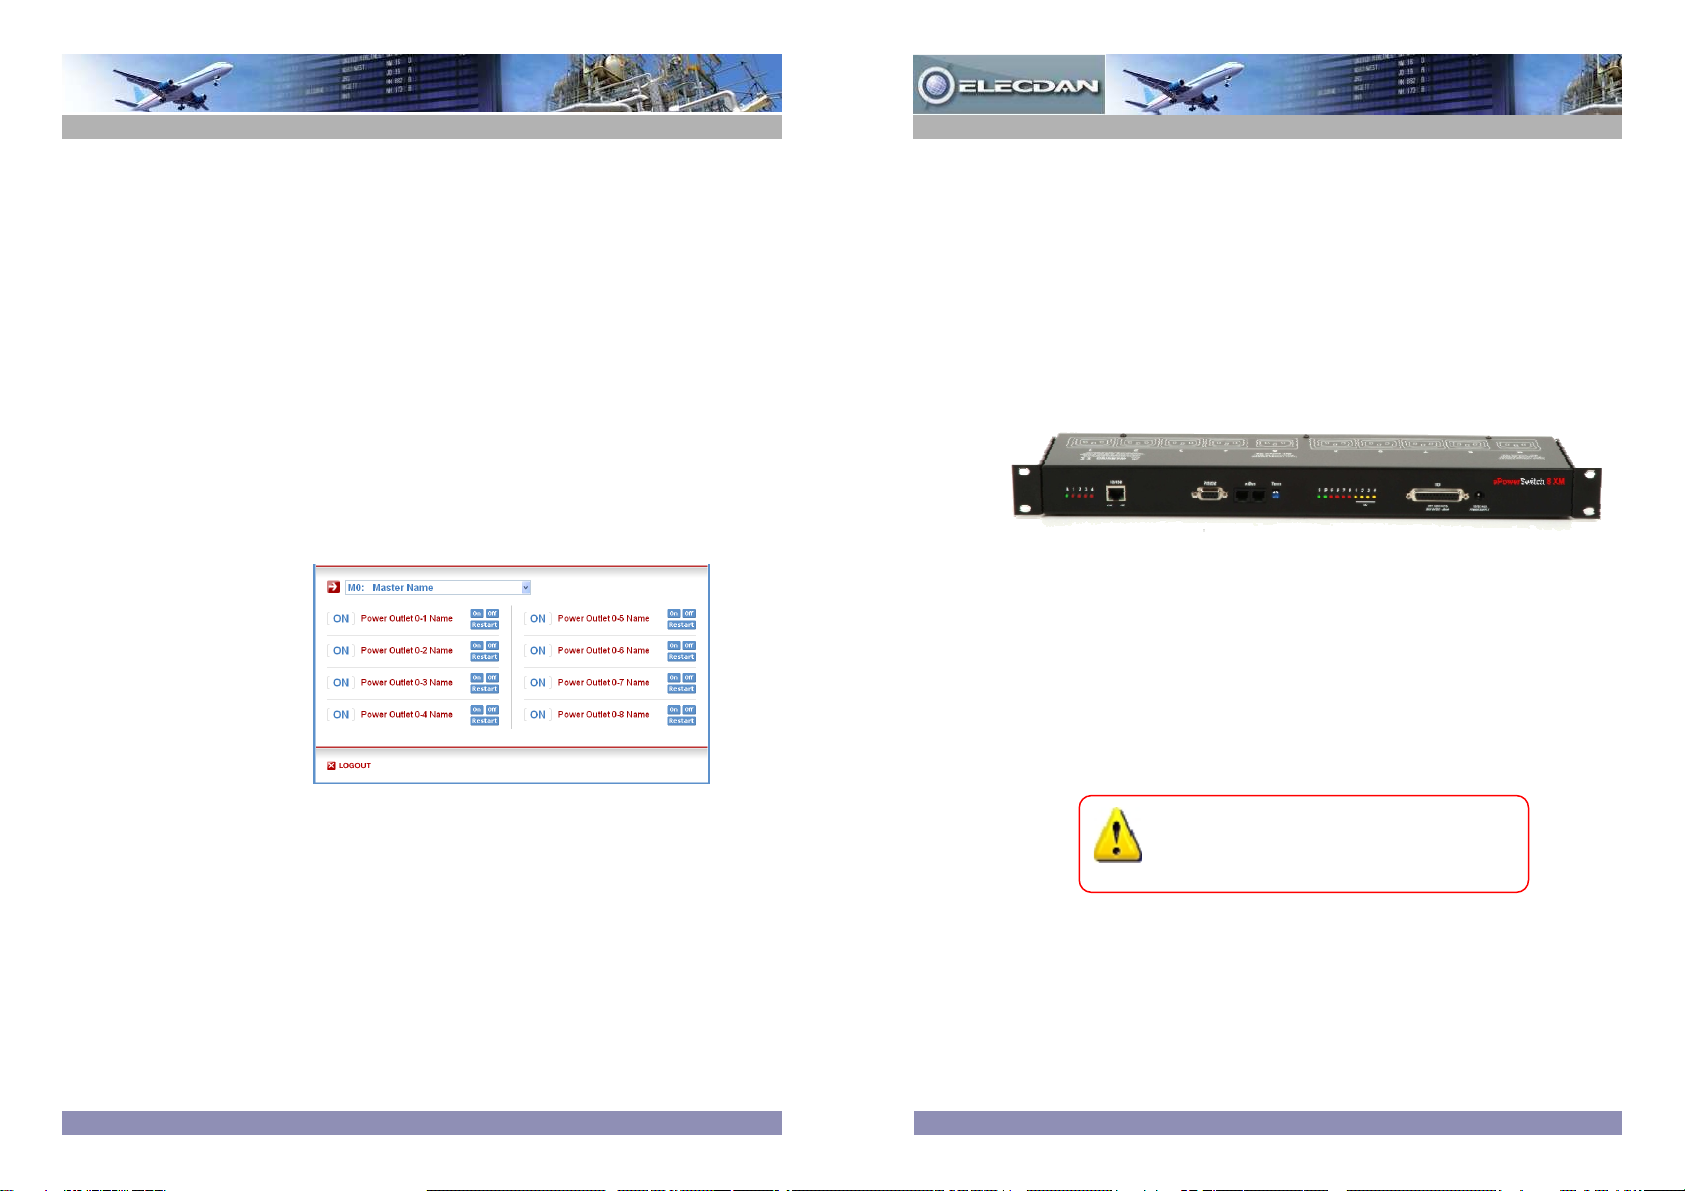
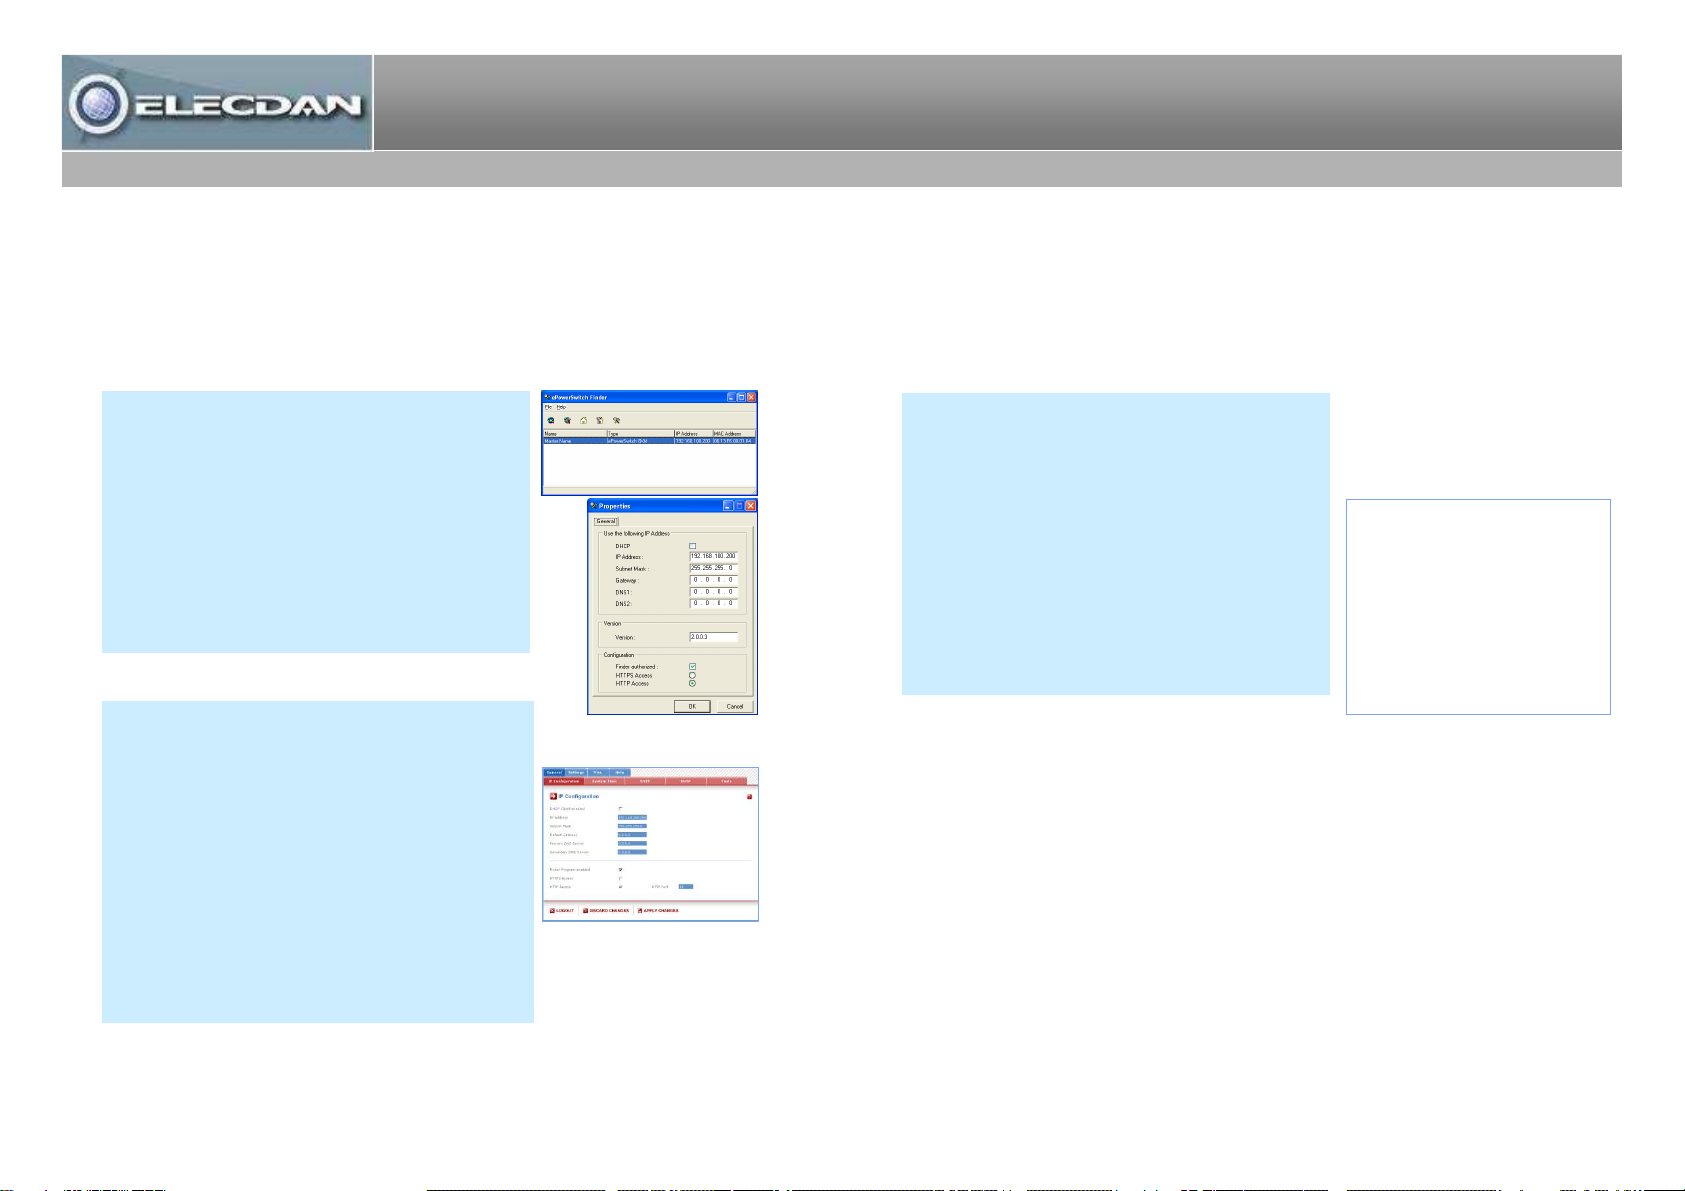
ePowerSwitch 8XM Master is an enhanced power distribution and control unit
that enables remote power management of 8 devices (extendable up to 136) over
the Internet and Intranet.
This high security device supports the HTTPS protocol and also includes IP device
and environmental monitoring functionalities. It supports the HTTP, HTTPS,
DHCP, Syslog, SNMP, SMTP and SNTP protocols.
An internal clock allows to timestamp syslog messages, e-mails and internal logs.
Before operating your ePowerSwitch, please
read the safety instructions in the User Guide
on the provided CD-ROM.
Detailed information can be found in the
User Guide on the provided CD-ROM
Quick Start Guide
ePowerSwitch
1. Installation
Connect the ePowerSwitch-8XM to your Local Area Network.
Power-up the ePowerSwitch through properly grounded outlets.
After configuring the network parameters using one of the
previous methods, start your browser and enter the address of
your ePowerSwitch.
By using the administrator account (default name and password
= admin) you will be able to do all settings and to control all
power outlets.
By using one of the 255 user accounts you will only be able to
control the power outlets for which one the users has the rights.
3. Controlling the power outlets over IP
May 2010
ePower
ePowerSwitch
Switch 8XM
8XM
ELECDAN • 2 impasse de la noisette • 91374 VERRIERES-LE-BUISSON • FRANCE

2. Configuration
Use one of the three following methods:
Configuration through the LAN using a standard
Browser
During the first installation, change temporarily the network
settings of your PC according to the default network settings
of the ePowerSwitch.
Factory network settings of the ePowerSwitch-8XM
IP Address: 192.168.100.200 - Port: 80
Gateway: 255.255.255.0
Default factory protocol is HTTP !!!
1. Start your Web browser and type following IP address:
http://192.168.100.200/sysadmin.htm
2. Enter the administrator name and password
(default for both = admin)
The home page appears, allowing you to configure the
settings of your ePowerSwitch 8XM.
Configuration through the LAN using the Finder
program contained on the CD-ROM
It is the simplest and fastest configuration method if you use
Windows as operating system and allows to configure your
ePowerSwitch-8XM through your local network even if its
network parameters are not compatible with those of your
PC.
1. Start the ElecFinder.exe program.
2. In the tool bar, click on the first left button to discover the
ePowerSwitch connected on your LAN.
3. In the tool bar click on the second left button and
configure the network parameters.
Configuration through an RS232 Terminal connection
1. Use the provided RS232 cable to connect the
ePowerSwitch to an available serial port of your PC.
2. Run a Terminal program such as Windows
HyperTerminal.
3. Configure the appropriate serial port @ 9.600, n, 8, 1 and
no flow control.
4. On your computer, press <ENTER> until the network
settings appears on your screen.
5. Press the M key on your keyboard and follow the menu to
configure your ePowerSwitch-8XM.
NETWORK INTERFACE PARAMETERS:
Should this target obtain IP
settings from the network?[N
]
Static IP address [192.168.1.250]?
Subnet Mask IP address
[255.255.255.0]?
Gateway address IP address
[192.168.1.2]?
Primary DNS Server address IP
address [192.168.1.2]?
Secondary DNS Server address IP
address [0.0.0.0]?
MISCELLANEOUS:
Finder program enabled?[Y]
ePower
ePowerSwitch
Switch 8XM
8XM
© Copyright
Document non contractuel
ePowerSwitch 8XM Master est une solution haute performance de gestion
d'alimentation qui permet de commander à distance 8 prises secteurs (extensibles
à 136) au travers d’un réseau Intranet ou Internet.
L'interface Web supporte le protocole HTTPS pour garantir le plus haut niveau de
sécurité possible. Cet équipement offre de nombreuses fonctions de surveillance
d'équipements IP ainsi que de l'environnement (température, humidité, fumée…).
Il supporte les protocoles HTTP, HTTPS, DHCP, Syslog, SNMP, SNTP et SMTP.
Une horloge interne permet une gestion précise des actions programmées et la
datation des messages Syslog, des e-mails et des évènements.
Avant d’utiliser votre ePowerSwitch, lisez
attentivement les consignes de sécurité
indiquées dans le User Guide contenu sur le
CD-ROM.
Des informations détaillées se trouvent dans le
User Guide sur le CD-ROM fourni
Guide d'installation rapide
ePowerSwitch
1. Installation
Connectez l'ePowerSwitch-8XM à votre réseau local.
Mettez-le sous tension en utilisant des prises secteur avec terre.
Après avoir configuré les paramètres réseau, démarrez votre
navigateur et saisissez l’adresse IP de votre ePowerSwitch.
Le compte administrateur (nom et mot de passe par défaut =
admin) vous permet de commander toutes les prises secteur.
Les 255 comptes utilisateur permettent de commander
uniquement les prises secteur pour lesquelles l’utilisateur dispose
des droits d'accès.
3. Commandes des prises via Ethernet
Mai 2010
ePower
ePowerSwitch
Switch 8XM
8XM
ELECDAN • 2 impasse de la noisette • 91374 VERRIERES-LE-BUISSON • FRANCE
Configuration via l’interface série RS232 et une
connexion Terminal.
1. Utilisez le cordon série fourni pour relier
l’ePowerSwitch-8XM à un port série de votre PC.
2. Démarrez un programme Terminal comme Windows
Hyper Terminal.
3. Configurez le port série de votre PC à 9.600, n, 8, 1,
sans contrôle de flux.
4. Sur le clavier de votre PC, appuyez sur <ENTER>
jusqu’à ce que les paramètres de configuration
apparaissent.
5. Appuyez maintenant sur la touche M et suivez les
instructions affichées à l’écran pour configurer votre
ePowerSwitch-8XM.
2. Configuration
Utilisez l’une des trois méthodes suivantes pour configurer
votre ePowerSwitch-8XM :
Configuration via le réseau local en utilisant le
programme Finder contenu sur le CD-ROM.
C’est la méthode la plus simple et la plus rapide si vous
utilisez Windows. Elle permet de configurer votre
ePowerSwitch-8XM au travers de votre réseau local
même si ses paramètres réseau ne sont pas compatibles
avec ceux de votre PC.
1. Démarrez le programme ElecFinder.exe.
2. Dans la barre d’outils, cliquez sur le premier bouton
pour parcourir votre réseau local et rechercher
l’ePowerSwitch que vous venez de connecter.
3. Dans la barre d’outils, cliquez sur le deuxième bouton
et configurez les paramètres réseau.
Configuration via le réseau local en utilisant un
navigateur standard
Lors de la toute première installation, modifiez
momentanément les paramètres réseau de votre PC en
fonction des paramètres réseau par défaut de
l’ePowerSwitch-8XM.
Paramètres réseau par défaut :
Adresse IP : 192.168.100.200 – Port : 80
Passerelle : 255.255.255.0
Par défaut, le protocole usine est HTTP !!!
1.Démarrez votre navigateur et saisissez l’adresse IP :
http://192.168.100.200/sysadmin.htm
2.Saisissez le nom et le mot de passe administrateur
(admin par défaut pour les deux).
La page d’accueil apparaît et vous permet de configurer
votre ePowerSwitch 8XM.
NETWORK INTERFACE PARAMETERS:
Should this target obtain IP
settings from the network?[N
]
Static IP address [192.168.1.250]?
Subnet Mask IP address
[255.255.255.0]?
Gateway address IP address
[192.168.1.2]?
Primary DNS Server address IP
address [192.168.1.2]?
Secondary DNS Server address IP
address [0.0.0.0]?
MISCELLANEOUS:
Finder program enabled?[Y]
ePower
ePowerSwitch
Switch 8XM
8XM
Table of contents
Languages:
Other Elecdan Switch manuals


Popular Switch manuals by other brands


Busch-Jaeger
Busch-Jaeger Busch-Infoline 1511 U operating instructions

Hirschmann
Hirschmann MACH1000 Series user manual

3Com
3Com 4200G 12-Port Configuration guide

Moxa Technologies
Moxa Technologies EtherDevice EDS-P206A-4PoE Series Quick installation guide

D-Link
D-Link DGS-1008MP Quick installation guide

Extron electronics
Extron electronics mediaport 200 Setup guide


