Elechomes UC5501W User manual

HUMIDIFIER
UC5501W
USER MANUAL

Go green. Stay healthy. Count on Elechomes.

THANK YOU FOR PURCHASING THE HUMIDIFIER
BY ELECHOMES
Should you have any questions or concerns about your new product, feel free to contact us via support@
elechomes.com. We hope you enjoy your new product!
GET LATEST INFO & INSPIRATION
Find @Elechomes on social media for
wellness + recipes + parenting inspiration. Share your life with us.
@Elechomes
#Elechomeslifestyle • #Elechomeslifelover

TABLE OF
CONTENTS


1
Diagram
Thank you for choosing Elechomes!Please read this manual carefully to
ensure safe use and keep it on hand for future reference.
1
6
8
918 10 11
12
13
14
15
16
17
7
2
3
4
5
21
19 20
1. Mist nozzle
2. Tank handle
3. Water tank
4. Water level sensor
5. Water tank cover
6. Air channel
7. Power cable
8. Aromatherapy box
9. ON/OFF button
10. Timer button
11. Sleep button
12. Control panel
13. LED display
14. Max/Min button
15. Humidity button
16. Heating button
17. Remote controller
18. PTC Heater
19. Atomizing plate
20. Air outlet
21. Anti-scale plate
NOTE:
Keep the humidier (especially the humidity sensor INSIDE the aroma box)dry before use to guarantee its
accurate humidity detection.

2
Specications
Electrical Schematic Diagram
Model
Capacity
Voltage
Power
Frequency Band
Maximum Transmission Power
Space Application
Max Cool Mist Capacity
Max Warm Mist Capacity
Safety Precautions
Failure to follow the instructions exactly as shown may result in fire, electric shock, and/or
serious injuries.
● Only operate the device on a smooth, stable surface.
● Keep the device away from heat sources like radiators, ovens, and vents.
● Aim the mist away from furniture, appliances, and people.
● Do not scratch the atomizing plate.
● Do not touch the water or internal elements while the device is operating.
● Do not move the device while it is operating.
AC 120V / 60Hz
Heater
DC Fan
12V DC
36V DC
Atomizing Plate

3
● Do not cover the mist nozzles.
● Do not touch the mist when in warm mist mode.
● Do not attempt to repair or replace the power cord. All repairs must be performed by a qualified
service professional.
● Do not attempt to repair the device. All repairs must be performed by a qualified service
professional.
● Do not let children operate the device without adult supervision.
● Do not dismantle the air channel if the tank is filled with hot water.
● Always unplug the device when not in use and store it in a cool, dry place.
● Turn off the device immediately if strange sounds or odors occur.
● Always unplug the humidifier when not in use. Drain the water tank and sink,clean, wipe, and dry all
parts, and then store them in original packing box.
Note: It is suggested to place on a
hard level desktop rather than on
carpets or towels. Otherwise, the
fan at the bottom of the base will
intake the cotton fiber, causing
damage to the machine and
resulting in breakdown.
● This device can humidify a large area quickly and evenly.
● This humidifier can emit both warm and cool mist to cater to diverse needs.
● Thanks to the intelligent humidification, the room will remain at a fixed humidity percentage
automatically.
● The steam level can be adjusted among low, medium, and high.
● The sleep function ensures ultra-quiet operation.
● The dual mist nozzles can be rotated 360° independently.
● The humidifier is equipped with 12 preset timing settings.
● Add a few drops of essential oil into the aromatherapy box for a soothing aromatherapy experience.
● For your safety, the humidifier will turn off automatically once the tank has been removed.
● Water shortage protection prevents dry operation and maximizes product lifespan.
● An included remote can be used to control all functions of the humidifier.
● For better humidification, use a filter (not included).
● The Elechomes Warm and Cool Mist Humidifier is compliant with hazardous substances
management ordinances.
Essential Function

4
Operating Environment
●
Only operate the humidifier in indoor environments between 41-113°
F and lower than 80% relative humidity.
● Do not fill the tank with water hotter than 105° F.
● Filling the tank with purified water is recommended.
Getting Familiar with the Control Panel
ON/OFF Button
Once the power cable has been successfully plugged into an outlet, a beep will sound and the
humidifAier will be in standby. The LED screen will display the current ambient humidity.
Press the ON/OFF button to begin operation. The LED screen will display the current humidity and
the humidifying grade.
Press the ON/OFF button again to cease operation. The humidifier will go into standby and will
display the current ambient humidity.
Manually turn off the LED display:
1. Press and hold the ON/OFF button (on the humidifier itself, other than remote) for 3 seconds in any
working state to menuslly turn off the LED display.It won't affect the previous operating effects.
2. Press any button to restore LED display. The humidifier beeps 6 times and the LED display restores
when the water tank is short of water or is lifted under any working state except sleep mode.
Note:
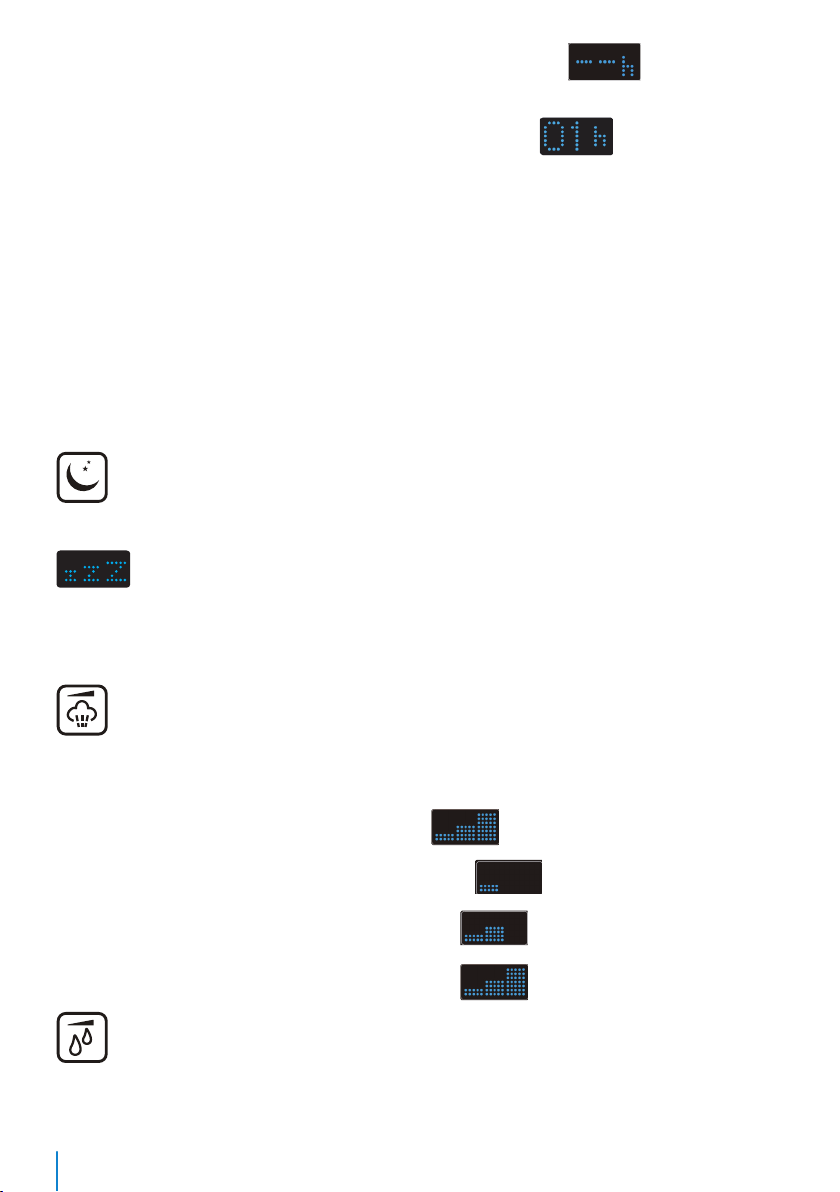
Timer Button
Press the timer button to set your desired humidifying time ranging from 1 to 12 hours. Each button press adjusts
the time by 1 hour. (Press and hold the button for 2s to turn off the timing setting.)
Humidier Operation
ON/OFF Max/Min
Timer Humidity
Sleep Heating
5
The first time the Timer button is pressed, the LED screen will display (default mode). In
default mode, the device will humidify continuously until the water runs out.
The second time the button is pressed, the LED screen will display .
The humidifier will automatically turn off after one hour. Each subsequent press of the button will
increase the time by 1 hour.
LED screen displays remaining time in Hour after you complete settings. The humidifier will
automatically stop work and enter standby state after time completes. The LED screen will display
and flash the current ambient humidity.
You need to press ON/OFF button again to restore humidifying (it doesn't work if the device is in water
shortage protection state). Once the time setting has been selected, the LED screen will display the
remaining time.
Sleep Button
Once the Sleep button is pressed, the humidifier will enter sleep mode and the LED screen will display
3 times and then will turn off. While in sleep mode, button tones will be silenced. All
functions can be activated in sleep mode, The heating function will turn off by default (to avoid
boiling noise). If you want to activate this function (in sleep mode), just press the Heating button
again. The humidifier will continue to work as sleep mode after setup completes.
Max/Min Button
Press the Min/Max button to adjust mist strength. Press Max/Min once for low, twice for medium, and
three times for high.
After once button press, the LED screen will display (default high).
After the second button press, the LED screen will display (low).
After the third button press, the LED screen will display (medium).
After the fourth button press,the LED screen will display (back to high).
Humidity Button
Press the Humidity button to set your desired humidity value(from 30% to 90%, each press increases
level 5% ). Once the room has reached your specified humidity level, the device will shut off

6
automatically(The LED screen will display the current humidity continually). The humidifier will
automatically spray mist for 1 minute after being turned on, even if the room has reached the set
humidity level.
When the ambient humidity drops to 5%RH(Relative Humidity)below the set humidity, the
humidifier will reactivate. The cycle will continue until the tank runs out of water or until the device is
turned off.
After one button press, the LED screen will display (default). Mist will spray no matter the
ambient humidity level.
After the second button press, the LED screen will display “30%”. Each subsequent press increases
the humidity level by 5 %, until the maximum 90% is reached. (Press and hold the button for 2s to
turn off the humidity setting.)
Heating Button
Press this button for a warm mist. Press the button again to increase mist temperature.
After one button press, the LED screen will display (cool).
After the second button press, the LED screen will display (low heat).
After the third button press, the LED screen will display (medium heat).
After the fourth button press, the LED screen will display (high heat).
It cycles when you continue to press the button.
Note:
Note 1:
Water Shortage Alert:
The device beeps 6 times and the “ERR” icon (see above) will appear on the LED screen display if
the water is insufficient. The humidifier will shut off automatically and will resume once the water is
sufficient.
Important Notes

7
Note 2:
High Temperature Alert:
When the detected surface temperature of PTC is ≥ 140 ° C / 284 ℉ or the atomized plate is detected
to run dry during operation, the humidifier will automatically enter high temperature alert program.
The device displays “HOT” and beeps once every second for continuous 8 times. The atomizing
plate and PTC stop work, while the fan stops work after continuing 3 minutes. All buttons are invalid
except ON/OFF button (the device will alert again if you press the ON/OFF button). You can only
restart the humidifier after all malfunctions have been settled.
How to Use the Humidifier
4. Fill the water tank with cool water.
8
5. Screw the cap onto the water tank tightly and reattach the tank.
6. Reattach the handle cover.
7. Plug the power cord into an outlet and press the ON/OFF button to activate the device.
For information on setting adjustment, see the“Getting Familiar With the Control Panel”
section.
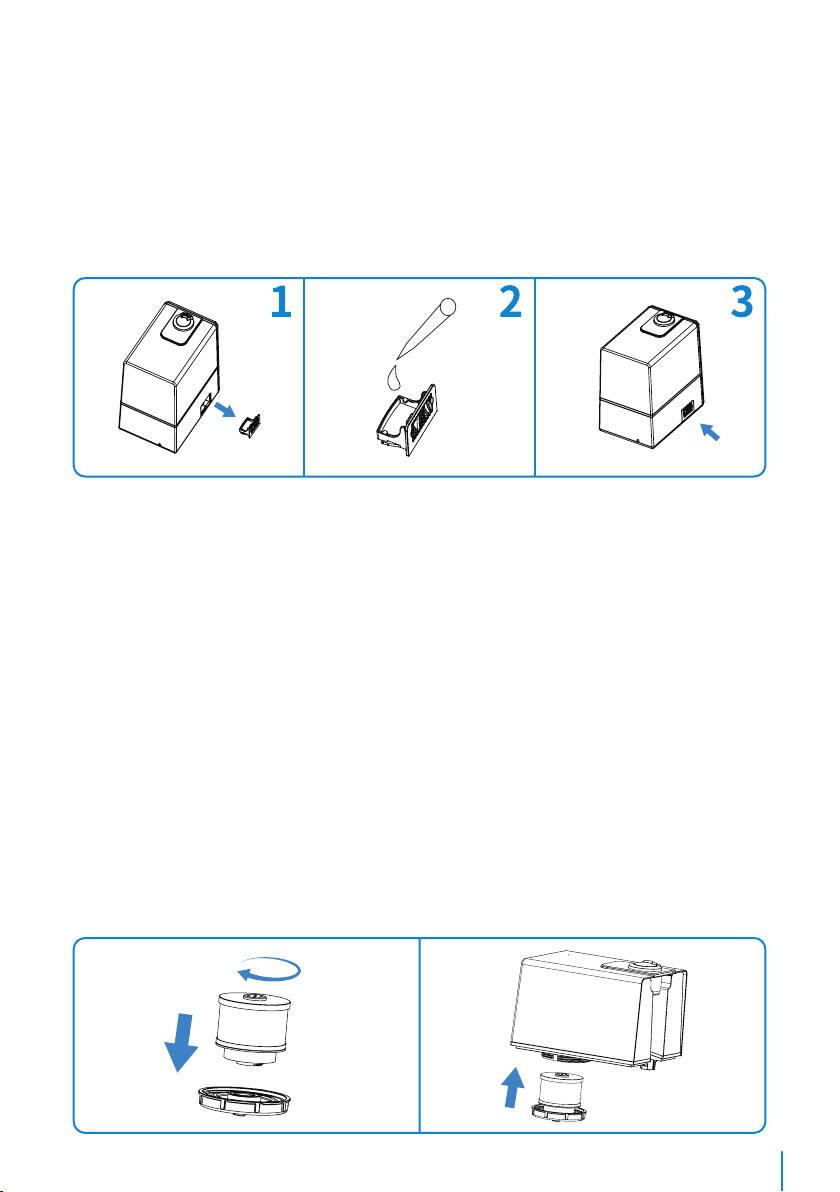
8. For aromatherapy , follow the steps below.
a) Remove the aromatherapy box (Figure 1).
b) Pour several drops of fragrance or essential oil into the box until the cotton is wet (Figure 2).
c) Reinsert the aromatherapy box and turn on the humidifier (Figure 3).
Note:
a. If you no longer wish to use the aromatherapy function, simply remove the cotton, wash it in warm
water, and reinsert it once it is dry.
b. You can remove the aroma therapy box to insert fragrance at any time.
c. Do not pour fragrances, essential oils, or abrasive liquids directly into the water tank.
9. For filtration, follow the steps below:
a) Lift the water tank to remove.
b) Twist the cap counterclockwise to open the water tank.
c) Mount a filter on the cap and twist the filter clockwise.
d) Screw the cap onto the water tank tightly and reattach the tank.
e) Restart the device.
Note:
a. Filters are not included.
b. Replace the filter at least every 3 months.
c. Clean the filter surface regularly and rinse the internal components with a powerful stream of water.
d. Dry and store the filter in a cool, dry place when not in use.

9
Cleaning the Atomizing Plate and Heater
The atomizing plate and heater are particularly prone to limescale accumulation.
Clean the anti-scale cotton with clean water each time you fill the water tank, and clean the atomizing
plate with dish detergent regularly (once two week).
Follow the cleaning method specified below:
1.Remove and clean the air channel and mist tube.
a) Grip and pull up on the end of the air channel to remove (Figure 1).
b) Clean up any debris (Figure 2).
c) Rotate the mist tube in the direction of the arrow to remove.(Figure 3).
d)Clean the air channel and mist tube thoroughly (Figure 4).
e) Reinstall the air channel and mist tube.
2. Place 5 drops of dish soap on the surface of the atomizing plate and 5 drops of dish soap on the
heater.
3. Pour in approximately 30mL of water.
4. Use a dish brush or sponge to clean the atomizing plate, heater, and sink until all limescale is
removed.
5. Drain the dirty water and rinse the device twice.
Note: DO NOT let water enter the Air outlet.
Cleaning the Water Tank and Sink
Clean the water tank and sink regularly, at least once two week.
Maintenance
Air outlet

10
Follow the cleaning method specified below:
1.Twist the cap counterclockwise to open the tank.
2.Pour 10mL of vinegar into the tank and add water until the tank is 1/4 full.
3.Screw the cap on tightly and shake the tank repeatedly.
4. Empty the tank and rinse it thoroughly.
If possible, insert your hand into the tank and use a clean cloth to dry the interior.
1. Press the locking tab toward the pulling slot to remove the battery compartment (figure 1).
2. Properly dispose of the old battery.
3. Place a new 3V CR2025 battery into the battery compartment with positive side facing up (figure 2).
4. Replace the battery compartment into the remote.
Note:
Replacing the Remote Control Battery
Figure 1 Figure 2
Battery Safety Warning
1.WARNING: Chemical Burn Hazard. Keep batteries away from children.
2.This product contains a lithium button/coin cell battery. If a new or used lithium button/coin cell battery is
swallowed or enters the body, it can cause severe internal burns and can lead to death in as little as 2 hours.
Always completely secure the battery compartment. If the battery compartment does not close securely,
stop using the product, remove the batteries, and keep it away from children if you think batteries might
have been swallowed or placed inside any part of the body, seek immediately medical attention.
3.The cells shall be disposed of properly, including keeping them away from children
4.Even used cells may cause injury.
Troubleshooting
Problem Possible Reasons Solution
The device doesn't work or
shuts down abnormally. The device is not plugged. Plug and start the device.

11
The device stops working and
"001" is displayed on the LED
screen.
Abnormal working
temperature of the PTC heater.
Unplug the device and clean the water
box and PTC heater after the water
temperature gets down.
The device stops working and
"002" is displayed on the LED
screen.
Abnormal working
temperature of the atomizing
plate.
Unplug the device and clean the water
box and atomizing plate after the water
temperature gets down.
There is no wind and mist or
"003" is displayed on the LED
screen.
The device has not been
plugged in. Plug the cord into an outlet.
The device has not been
turned on.
Press the ON/OFF button to start the
device.
There is foreign matter on the
atomizing plate. Clear away the foreign matter.
There is foreign matter on mist
nozzle. Clear away the foreign matter.
The water level in the water
box is too high.
1.Unplug the device and make sure
the water tank cover is covered in right
place and the water level in the water
box is not too high.
2.Pour out the water and refill the
water tank under the guide ofthe user
manual.
There is not enough water in
the tank. Pour more water to into the tank.
The mist has a strange smell.
The machine is new.
Remove the humidifier from the
packaging and let it sit in a well-
ventilated area for 12 hours.
The water in tank is dirty. Empty the tank and pour in clean water.
The humidifier is making an
odd noise.
There is not enough water in
the tank. Pour more water to into the tank.
The device has been placed on
an uneven surface. Pour more water to into the tank.
Mist is emitted from the sides
of the nozzle. The mist nozzle is too dry.
Soak the mist nozzle in water for a
few minutes or the phenomenon will
automatically disappear 30 minutes
after being powered on.
The water tank is leaking.
The water tank may leak. Do not add essential oil into the water
tank.
The cap of water tank isn't
sealed tightly.
Lift the water tank and screw the cap
tightly, then reattach the tank into the
correct position.
"Err" is displayed on the LED
screen.
Water shortage. Fill more water into the water tank.
The water tank is not installed
correctly. Reinstall the water tank.

12
The mist leaves white marks on
the furniture.
The hardness ofthe water is
too high.
Fill distilled water or puried water into
the water tank.
Please use the dedicated lter of
Elechomes UC5501 humidifier. (This
filter is available on amazon. Just
search ELECHOMES and buy it)
The mist wets the oor.
The humidifier is placed
directly on the ground or on
a low position,therefore the
vapor does not have enough
time to volatilize.
It's recommended to place the
humidifier on a table or chair in a
higher position to allow more time to
volatilize in the air.
The warm mist doesn't work.
Sleep mode is set. The
humidifier won't emit warm
mist in sleep mode.
Reset to other working modes.
The humidifier stops working
after cleaning.
The water may come into the
air vent.
Follow the cleaning instructionsin the
user manual to prevent water from
entering the air vent.
The remote control doesn't
work.
The plastic insulation sheet
isn't removed from the remote
battery compartment.
Remove the plastic insulation sheet
from the battery compartment.
Low battery Please replace with new batteries of the
same model.
There is fan spinning sound
after turning o the device.
The fan will continue to work
3 minutes to blow-dry the
air channel so asto eliminate
germs after powering off the
humidier.
The fan will automatically stop spinning
3 minutes later.
If your device does not work for unknown reason, please unplug the power cable and restart the machine. If this still
doesn't work, please contact our Elechomes customer service for support.
FCC Statement
Changes or modifications not expressly approved by the party responsible for compliance could void the user's
authority to operate the equipment.
This equipment has been tested and found to comply with the limits for a Class B digital device, pursuant to Part
15 of the FCC Rules. These limits are designed to provide reasonable protection against harmful interference in a
residential installation. This equipment generates uses and can radiate radio frequency energy and, if not installed
and used in accordance with the instructions, may cause harmful interference to radio communications. However,
there is no guarantee that interference will not occur in a particular installation. If this equipment does cause
harmful interference to radio or television reception, which can be determined by turning the equipment off and on,
the user is encouraged to try to correct the interference by one or more of the following measures:
-- Reorient or relocate the receiving antenna.
-- Increase the separation between the equipment and receiver.
-- Connect the equipment into an outlet on a circuit dierent from that to which the receiver is connected.
-- Consult the dealer or an experienced radio/TV technician for help
This device complies with part 15 of the FCC rules. Operation is subject to the following two conditions (1)this
device may not cause harmful interference, and (2) this device must accept any interference received, including
interference that may cause undesired operation.
This equipment complies with FCC radiation exposure limits setforth for an uncontrolled environment. This equipment should
be installed and operated with minimum distance 20cm between the radiator & your body.

13
WiFi Instructions
Scan and Download
Download"Elechomes"APP
Log in the APP after registration (suitable for Android or ios system)
Note:
The rst-time conguration, please keep the device and your phone consistent WiFi, which is not
required later.
Make sure your phone is connected to a secure 2.4GHz WiFi network. The Humidier can only be set
up on a secure 2.4GHz network.
Your phone may not be able to access the internet while connecting. This is normal and temporary.
Bluetooth Mode Connection
Step 1 Step 2
Step 3 Step 4
Click the icon on
the top right corner on
the home page.
Click Humidifier on the
device list.
Click the icon on the top
right corner on the page
to change to Bluetooth
Mode. Select WiFi name
(it must be 2.4GHz WiFi),
and enter the password.
Click [Next].
Plug in your humidifier
and do not turn on the
humidier. Click [Next].

14
AP Mode Connection
Step 1 Step 2
Step 6
Step 7
Step 5
Click the icon on
the top right corner on
the home page.
Click Humidifier on the
device list.
It will automatically
search for devices on
this page. You can check
the WiFi name and
password through the
pop-up window. If either
is wrong, click [Retry]
enter the "Configure
Wi-Fi" to modify WiFi or
password.
If this page appears,
your humidifer has been
successfully added. You
can modify the device
name or set the room it
locates. Click [Finish].
Press and hold the
device's Max / Min
button for 3s to make
sure its WiFi indicator
blinks quickly. Click
[Next].
If the Bluetooth mode connection fails, please refer to the AP mode connection guide
on the back to connect.

15
Step 6Step 5
Press and hold the
device's Max / Min
button for 3s to make
sure its WiFi indicator
blinks quickly. Click
[Next].
Then Press and hold
the device's Max / Min
button for 3s again
to make sure its WiFi
indicator blinks
slowly. Click [Next].
Step 3 Step 4
Step 8
Click the icon on the
top right corner on the
page to change to AP
Mode. Select WiFi name
(it must be 2.4GHz WiFi),
and enter the password.
Click [Next].
Plug in your humidifier
and do not turn on the
humidier. Click [Next].
Go to Wi-Fi setting
interface of your
phone,Connect to the
hotspot named
"Elechomes-SL-xxx".
Click [Go to Connect].
Step 7
Table of contents
Other Elechomes Humidifier manuals


Popular Humidifier manuals by other brands

air&me
air&me CLARENCE user manual

Carel
Carel humiSonic UU02 user manual

DriSteem
DriSteem VAPORFAN Installation instructions & maintenance operations manual

TCS
TCS HE360A - Whole House Powered Humidifier owner's guide

Neptronic
Neptronic SK300 series Installation instructions and user manual

Aircare
Aircare 7d6100 Use and care guide

 instruction manual")


