Electrify America HomeStation User manual

HomeStation
Level 2 Charger
INSTALLATION AND OPERATION MANUAL
Version 1.0.0
Issue Date: December 11, 2020

ELECTRIFYHOME.COM
Customer Support: (833) 532-2778

Contents
INFORMATION
o Copyright
o About This Document
o Intended Use
o Charger – Intended Use
o IMPORTANT SAFETY INSTRUCTIONS
o EMC Compliance Statement: FCC Part 15
PRODUCT OVERVIEW
o Included Component List
o Recommended Tools
INSTALLATION INSTRUCTIONS
o Before Installing
o Installation Steps
o Installation with Hardwiring
OPERATING INSTRUCTIONS
CHARGER STATUS
o Status Indicator
o Indicator Definition
o Understanding Status Indicator Patterns
o Faults
TROUBLESHOOTING
SPECIFICATIONS
MOVING, TRANSPORTATION AND STORAGE
CLEANING
WARRANTY
DISPOSAL

Information
1) Copyright
Copyright © 2020 Electrify America, All Rights Reserved. This document is copyright protected.
It may not be changed, reproduced, or distributed without prior agreement issued in writing
by Electrify America.
2) About this Document
These operating instructions describe how to operate the charger properly. For your personal
safety, follow these operating instructions exactly. Hardwiring must be performed by a
certified electrician. Do not carry out any work that is not described here. When in doubt,
consult a certified electrician.
3) Intended Use
These operating instructions apply to the charger and its use in the USA. Follow all federal,
provincial, and local laws, regulations, ordinances, codes, and safety standards.
4) Charger – Intended Use
1) This device is intended for indoor and outdoor use. Do not obscure the label of the
chargers. All persons using the charger must first read and understand these instructions
2) This device is intended exclusively for the charging of electric vehicles fitted with a Type-1
plug (SAE J1772) and charging current control via the pilot signal (IEC 61851-1). Do not use
the charger to charger or supply other devices. Follow all federal, provincial, and local
laws, regulations, ordinances, and safety standards regarding use of this device.
5) IMPORTANT SAFETY INSTRUCTIONS
SAVE THESE INSTRUCTIONS
READ ALL THE INSTRUCTIONS BEFORE INSTALLING, OPERATING, MAINTAINING, OR USING
THIS PRODUCT. SAVE THESE INSTRUCTIONS. THEY MUST BE PROVIDED TO EACH NEW OWNER.
DANGER: RISK OF ELECTRICAL SHOCK
INSTRUCTIONS PERTAININED TO A RISK OF FIRE OR ELECTRIC SHOCK
1) Do not use any adapters, converters, extension cords, or extension cables to increase the
length of the charging cable or supply power cord.
2) Do not install this charger on a GFCI circuit breaker.
3) Supervise children when device is in use. Children under 16 should not operate this device.
Also, small parts are dangerous for children. Do not install in the presence of children.
4) Do not put fingers into the electric vehicle connector.
5) Do not use this product if the power cord or the electric vehicle cable is frayed, has broken
insulation, or shows any other signs of damage.
6) Do not use this product if the enclosure or the electric vehicle connector is broken,
cracked, open, or shows any other indication of damage.

7) The ambient operating temperature range for this device is -22°F (-30°C) to 122°F (50°C).
Do not operate the charger outside this operating range.
8) Electrify America is not responsible for physical injury, damage to property or equipment
caused by the installation, usage, repair, or maintenance of this product.
9) These operating instructions describe the usage of the charger in most commonly used
installation and mounting scenarios. If situations arise in which it is not possible to
perform an operation following the procedures provided in this document, contact
Electrify America. Electrify America is not responsible for any damages that may occur
resulting from custom installations or operations that are not described in this document.
10) Personal Protection Equipment: Use of proper personal protection equipment, including, but not
limited to, eye protection, shock protection, gloves, and other appropriate protection, is
recommended when installing or servicing any electrical equipment. To reduce the risk of fire, only
connect this equipment to a maximum 50 amperes overcurrent protection device in accordance
with the National Electrical Code, ANSI/NFPA.
11) Do not use this equipment in an area with hazardous or flammable materials or vapors.
12) Arcing Component in Contactor: The charger includes contactors that, when opened or closed, will
cause a short duration arc. The contactor is enclosed in an appropriate electrical enclosure, but
caution is required if this arc occurs in the presence of flammable vapors as the vapors could ignite,
creating an explosion. Store hazardous and flammable vapors and materials away from all electrical
equipment. If hazardous or flammable sources are present, allow sufficient time for ventilation
before operating the charger.
13) Do not open the charger at any time during installation or operation! Only trained personnel should
open the charger.
14) Handling live components incorrectly may cause grievous injuries or death.
15) If the electricity service to the charger is damaged, immediately shut down the power to the
charger by switching off the circuit breaker and contact a licensed electrician.
16) Turn off circuit before remounting or replacing the charger.
17) To reduce the risk of fire, connect only to a circuit provided with the proper maximum branch
circuit overcurrent protection in accordance with the National Electrical Code and local laws,
regulations, codes, and standards.
18) Ensure that all components are dry throughout the installation.
19) Product subject to modification without prior notice. This document might not contain the latest
changes to the product’s specifications or processes described herein. For the most up-to-date
information, please visit electrifyhome.com
6 ) EMC Compliance Statement: FCC Part 15 Subpart B, Class B
FCC ID: 2AX8SEA2R040JPA1000
1) RF Exposure warning
This equipment must be installed and operated in accordance with provided instructions and the
antenna(s) used for this transmitter must be installed to provide a separation distance of at least 20
cm from all persons and must not be co-located or operating in conjunction with any other antenna
or transmitter. End-users and installers must be provide with antenna installation instructions and
transmitter operating conditions for satisfying RF exposure compliance.
2) FEDERAL COMMUNICATIONS COMMISSION INTERFERENCE STATEMENT

This equipment has been tested and found to comply with the limits for a Class B digital device,
pursuant to part 15 of the FCC Rules. These limits are designed to provide reasonable protection
against harmful interference in a residential installation. This equipment generates, uses and can
radiate radio frequency energy and, if not installed and used in accordance with the instructions,
may cause harmful interference to radio communications. However, there is no guarantee that
interference will not occur in a particular installation. If this equipment does cause harmful
interference to radio or television reception, which can be determined by turning the equipment off
and on, the user is encouraged to try to correct the interference by one or more of the following
measures:
-Reorient or relocate the receiving antenna.
-Increase the separation between the equipment and receiver.
-Connect the equipment into an outlet on a circuit different from that to which the receiver is
connected.
-Consult the dealer or an experienced radio/ TV technician for help.
CAUTION:
Any changes or modifications not expressly approved by the grantee of this device could void the user's authority
to operate the equipment.

Product Overview
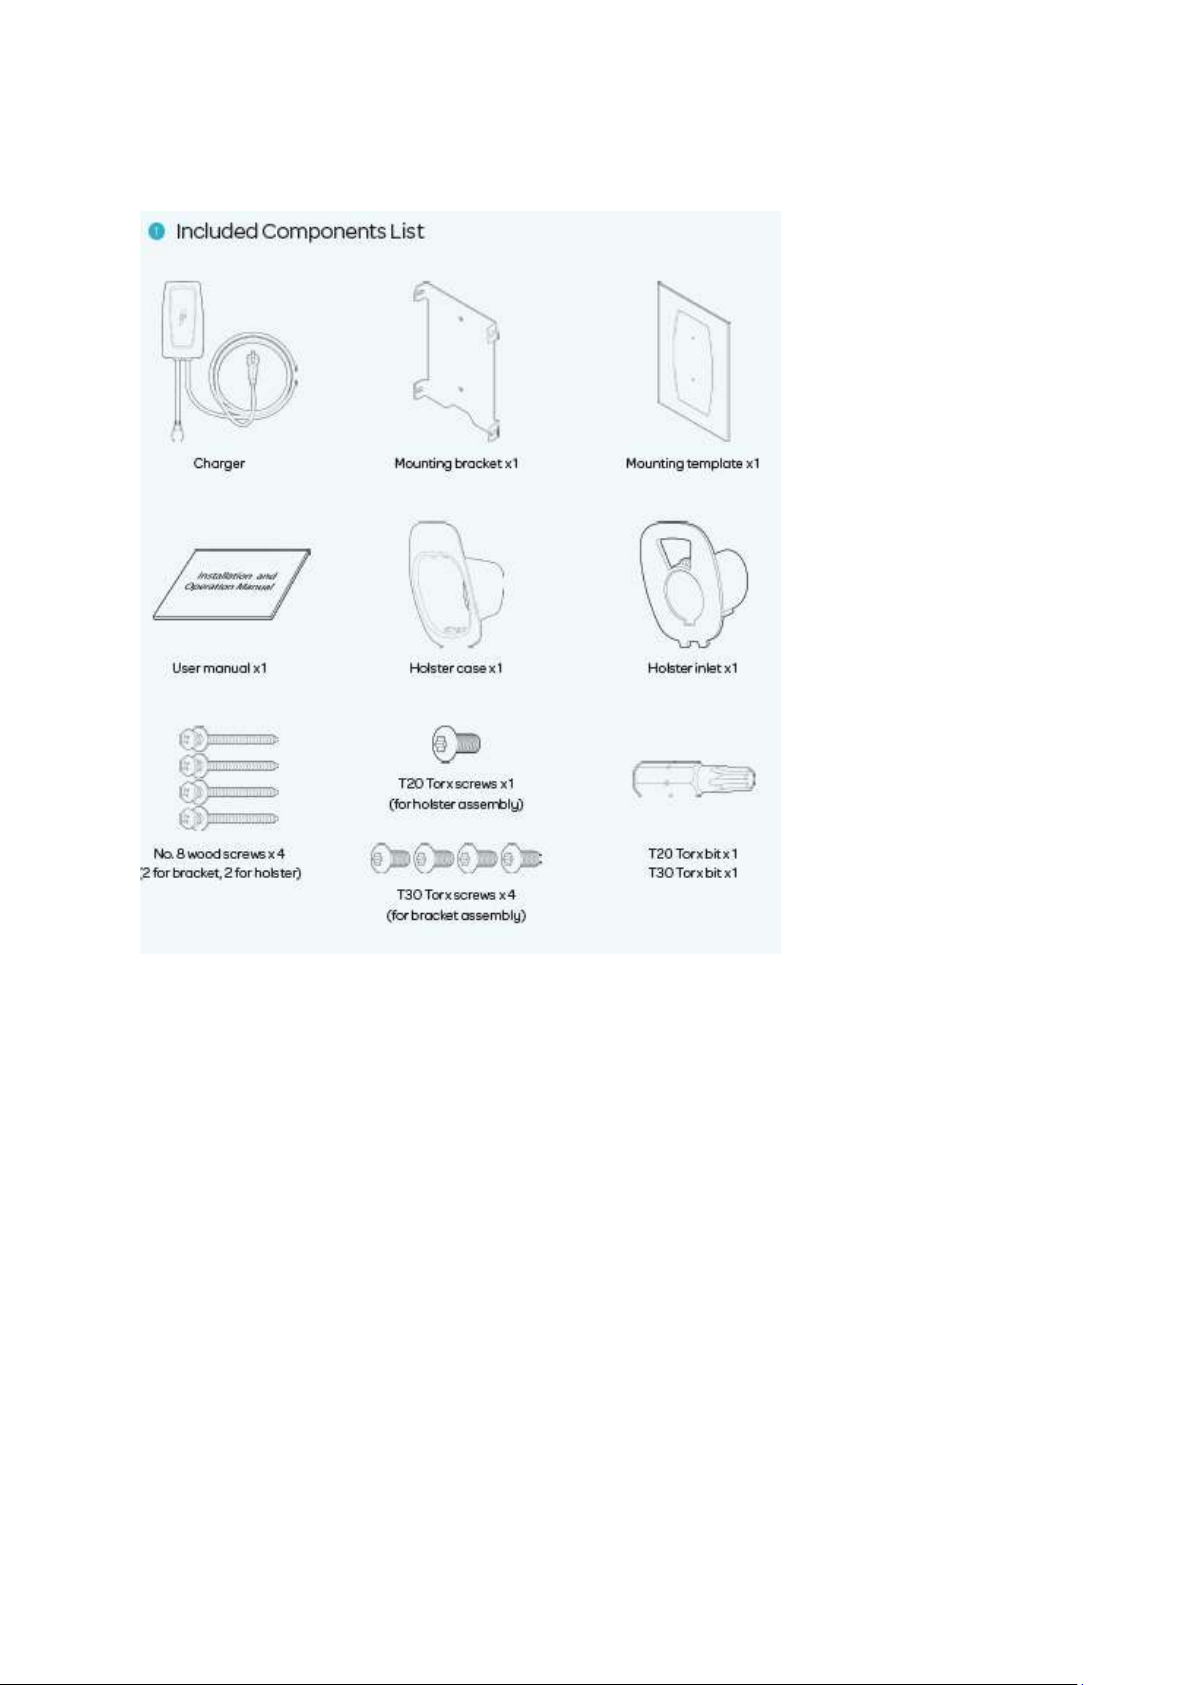
Recommended Tools
1 TOOLS FOR PLUG-IN INSTALLATION
1. Level
2. Pencil
3. Electric Drill
4. Philips-head Screwdriver
2 TOOLS FOR HARDWIRED INSTALLATION
1. Level
2. Pencil
3. Electric Drill
4. Phillips Head Screwdriver
5. Diagonal Cutter
6. Needle-Nose Pliers
7. Wire Stripper
8. Ferrule Crimping Tool
Installation Instructions
Before Installing
These installation instructions are intended for specialized electricians. Only qualified, specialized electricians
should hardwire the charger. In addition to the charger installation instructions, follow all federal, provincial
and local laws, regulations, ordinances, codes and safety standards.
When considering installation locations, there are a few things to keep in mind:
1. Make sure to follow all local codes and regulations for safety and accessibility.
Determine Your Power Rating
1. Prior to installing your charger, work with your electrician to determine the amperage setting that best fit your
home’s electrical capacity. This may determine which type of installation you will need and the best location
for the charger.
Configuration
Installation Type
16A
Hardwire Only
30A
Plug
-
In or Hardwire
32A
Plug
-
In or Hardwire
40A
Plug
-
In or Hardwire
Pick your Location
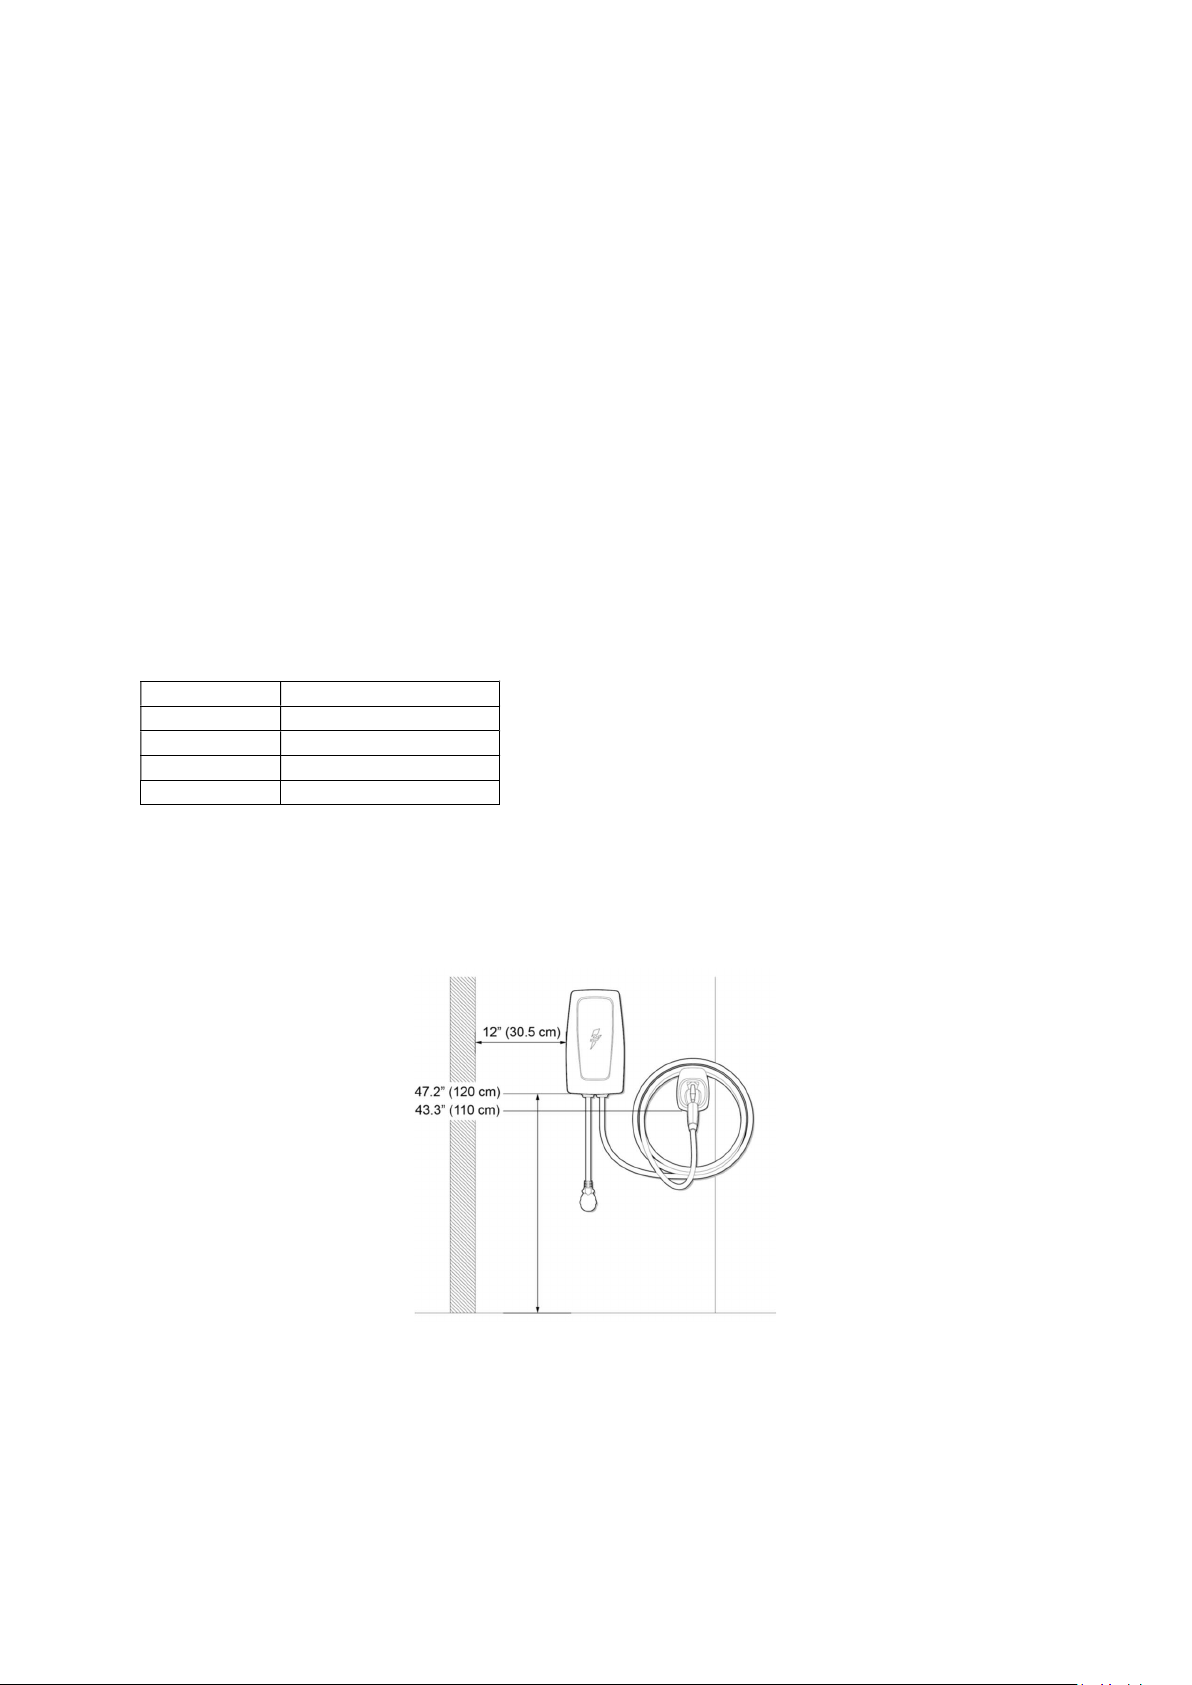
1. Install the mounting bracket for the charger measured from the bottom of the bracket between 31.5 (80 cm)
and 47.2" (120 cm) above the ground.
2. Install the holster measured from the bottom between 31.5" (80 cm) and 43.3" (110 cm) above the ground.
1. To allow for proper airflow and working room, the charger should be located 12" (30.5 cm) from any other
equipment, walls, or other obstructions.
2. The bracket must be mounted on a flat surface so that the bracket does not deform when properly secured.

3. Plug-In Installation Note: Prior to mounting the charger, turn off the circuit breaker for the desired outlet and
plug in the charger. This will allow for proper placement of the charger. Be sure the plug cord has a gentle
curve and is not stretched.
1. When selecting a location to install the charger, make sure that when your electric vehicle is parked, the
charge cable can easily connect to the vehicle. Keep in mind where the vehicle’s charging port is located (it
varies from vehicle to vehicle) and how the vehicle will usually be parked.
2. The best installation locations have enough space to easily store the cable around the charger itself or the
holster provided with the charger and will not interfere with pathways or other items in the garage or
driveway.
Installation Steps
This product must have a proper electrical ground connection. Proper electrical grounding reduces the
risk of electric shock. This product is equipped with a power supply cable that includes an equipment
grounding conductor. The power supply cable must be plugged into a compatible outlet that is properly
installed and grounded in accordance with all local codes and ordinances.
WARNING - Improper connection of the power supply cable can result in a risk of electric shock. Check
with a qualified electrician to ensure the product is properly grounded. Do not modify the power supply
cable provided with the product. Ensure the proper outlet is installed by a licensed and qualified
electrician.
1
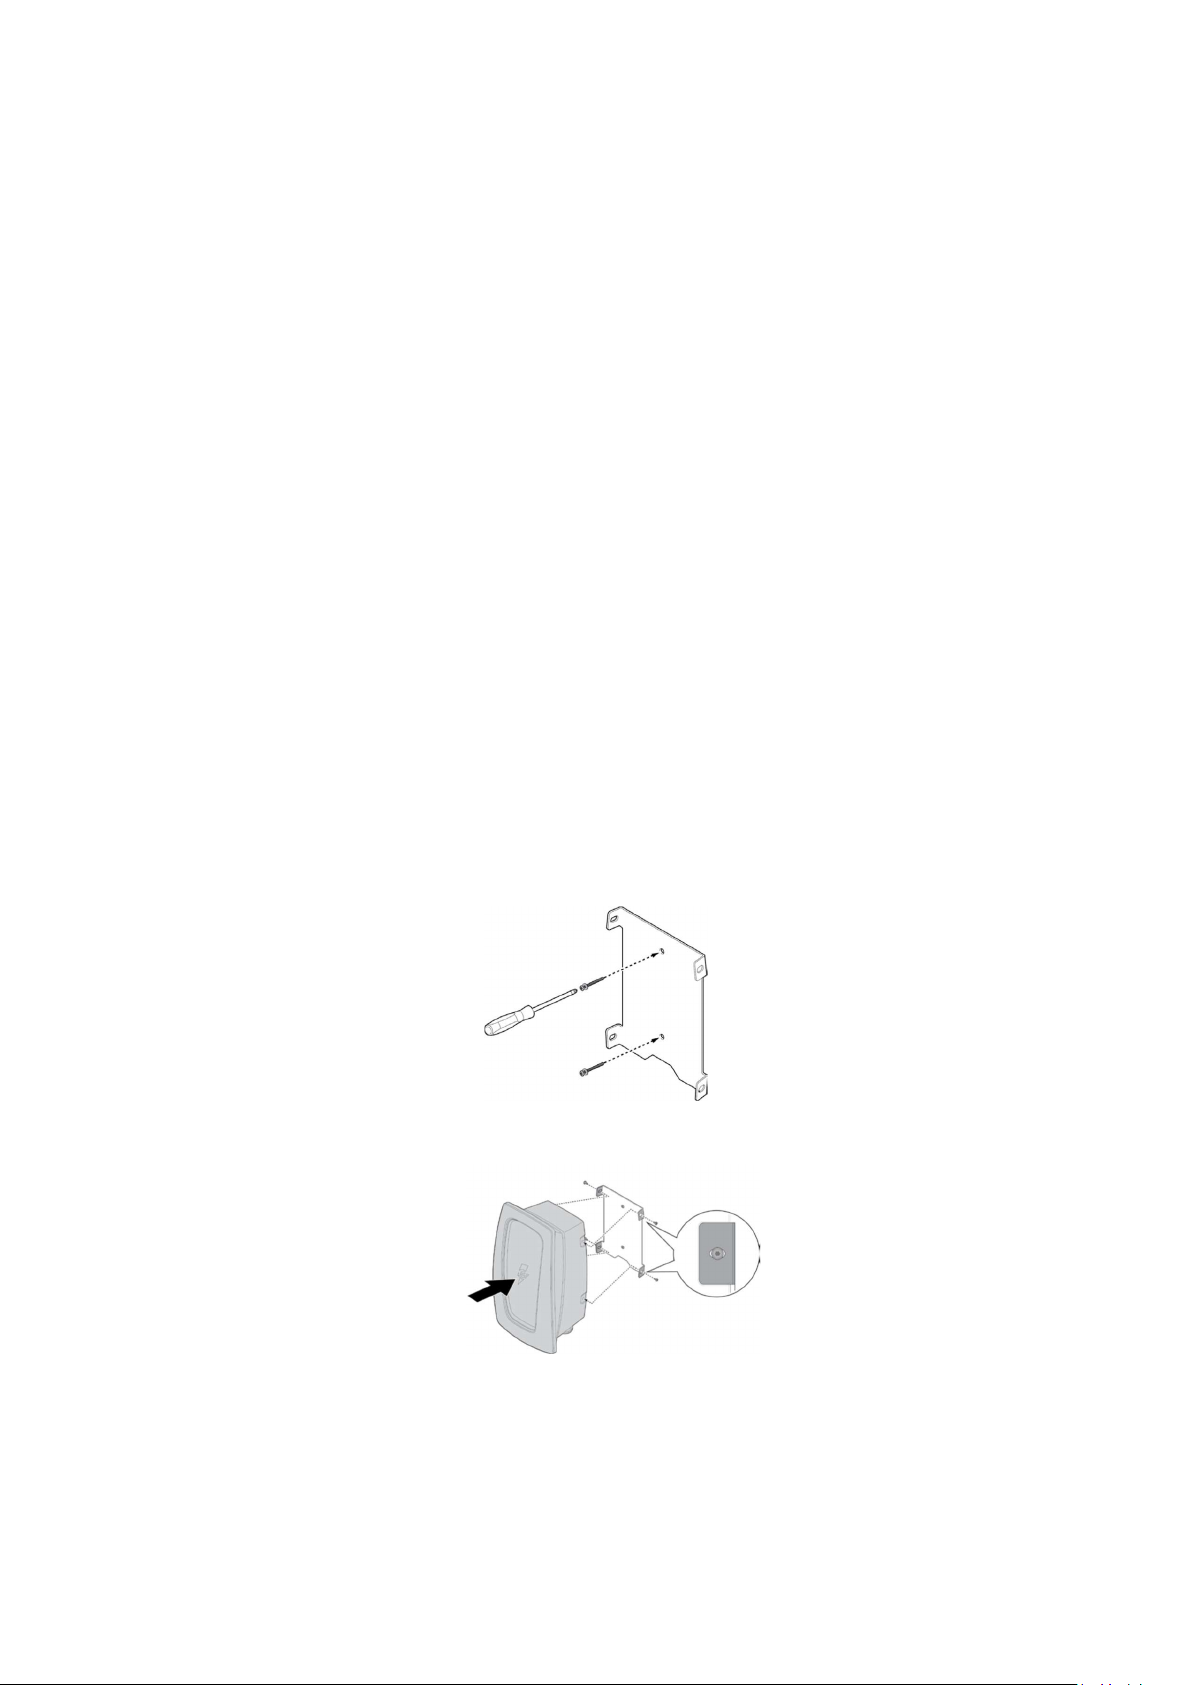
INSTALL THE MOUNTING BRACKET
1. The product is a stationary piece of equipment that is designed to be mounted on a wall. The mounting
template, included with the product, shows the proper location to drill pilot holes for the mounting bracket
screws.
2. Using a level, place the mounting template in the location where you would like to mount the charger.
3. Tape the template in place and measure the height to ensure the charger is between 31.5" (80 cm) and 47.2"
(120 cm) above the floor.
NOTE: The bracket must be mounted on a flat surface so that the bracket does not deform when properly
secured.
1. Install the mounting bracket securely to the wall, aligning the holes in the bracket with those marked on the
wall, and secure the mounting bracket using the provided screws or other fasteners that best suit your specific
installation needs.
1. Once the mounting bracket is installed, place the charger into the bracket and secure the charger to the
bracket using the 4 supplied T30 Torx screws.
2
INSTALL THE HOLSTER
The cable holster is optional. Install the holster measured from the bottom between 31.5" (80 cm) and 43.3"
(110 cm) above the ground. Please select the proper mounting hardware for your particular installation.
3
PLUG-IN INSTALLATION USING THE ATTACHED SUPPLY POWER PLUG
Insert the power plug into the power outlet (NEMA 14-50 receptacle).
Amperage Configuration with the Electrify America App
1. Download and install the Electrify America App on your smartphone (available for iOS and Android).
2. Ensure that your phone’s Wi-Fi is turned on. It is not required to be connected to a network.
3. Follow the instructions in the App to connect to your charger and configure your amperage setting.
3 Installation with Hardwiring
These installation instructions are intended for specialized electricians. Only qualified, specialized electricians
should hardwire the charger. In addition to the charger installation instructions, follow all federal, provincial
and local laws, regulations, ordinances, codes and safety standards.
This product must be properly grounded, either to a grounded, metal, permanent wiring system, or an
equipment-grounding conductor run with the supply power circuit conductors and connected to the
grounding terminal on the product.
CAUTION: To reduce the risk of fire, connect only to a circuit provided with 50 amperes maximum branch circuit
overcurrent protection in accordance with the National Electrical Code, ANSI/NFPA 70.
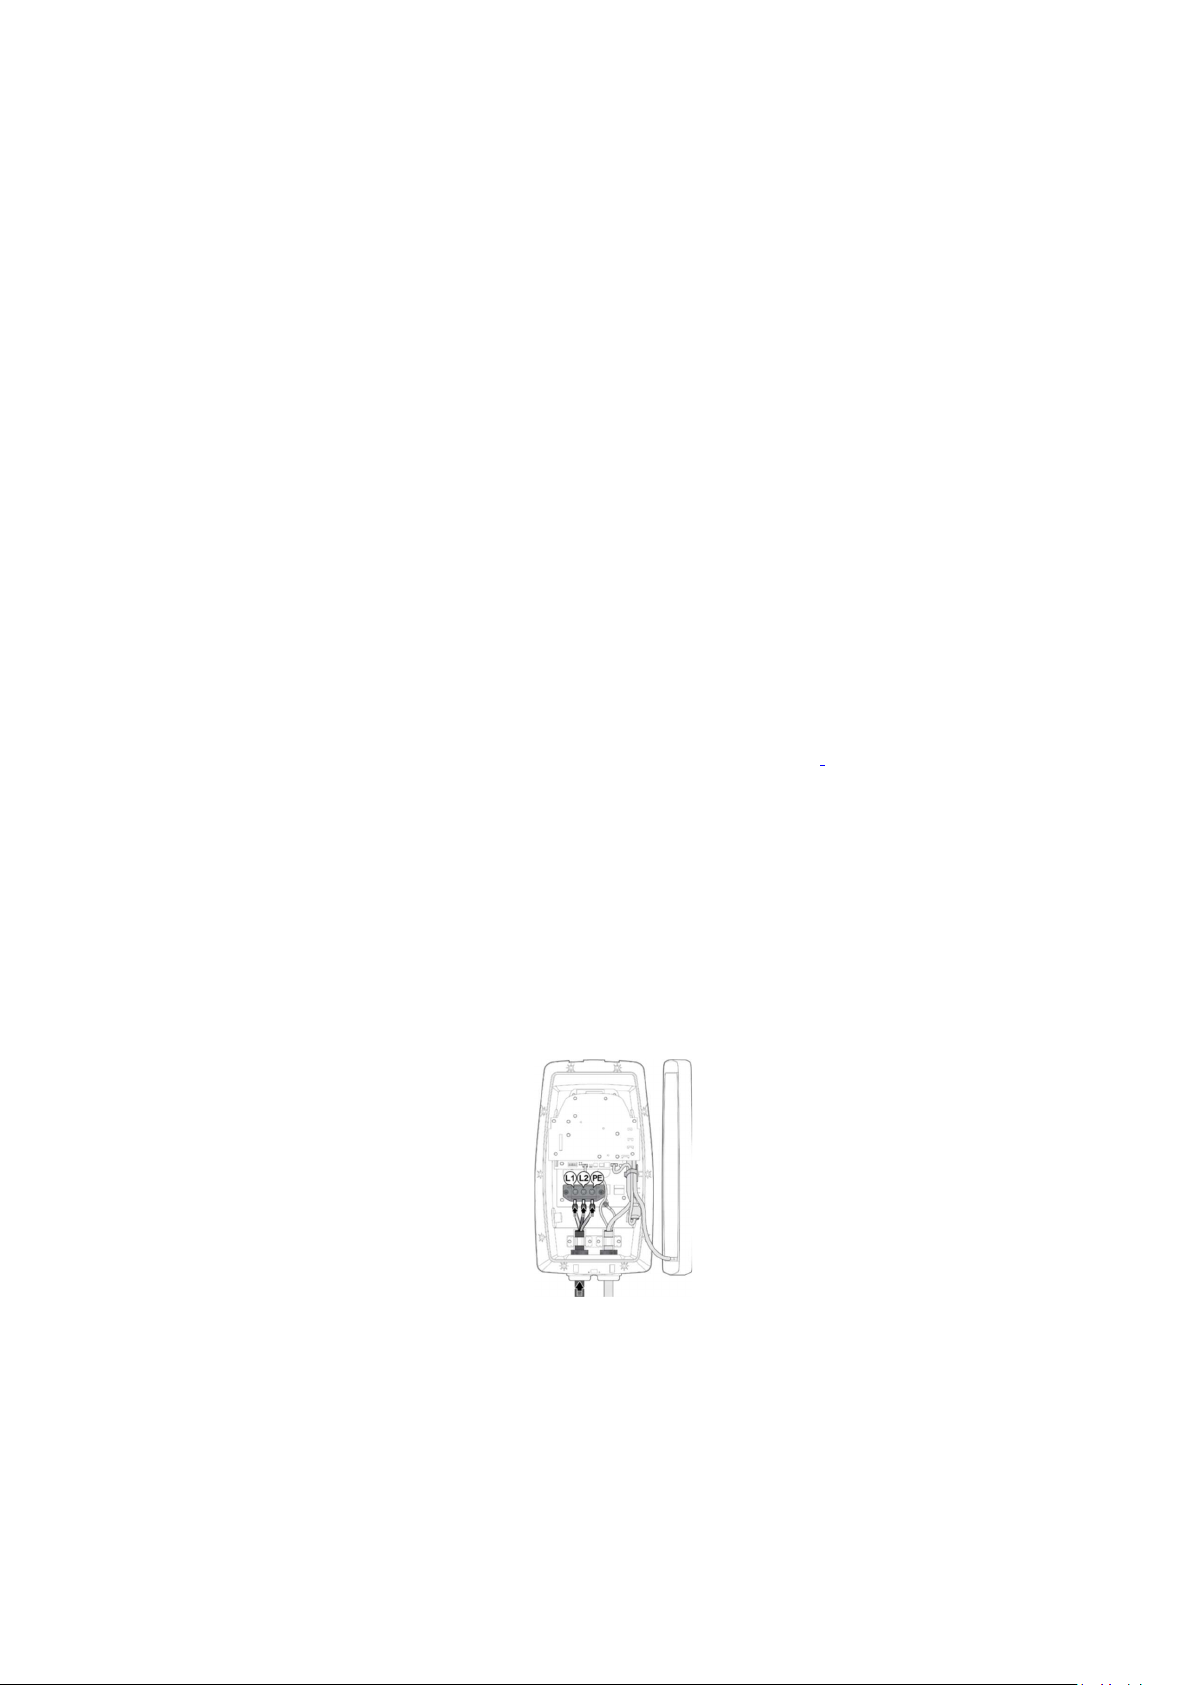
1) Remove the cosmetic and middle cover Remove the screw located at the bottom of cosmetic cover by
using T20 Torx bit.
2) Tilt the cosmetic cover upward and separate it from the middle cover.
3) Remove the screws using the T20 Torx bit.
4) Place the middle cover on the body of the charger by hanging the two hooks on the back of the middle
cover to the ledges at the bottom of the body.
5) Once the cover has been removed, open the cable management clip on the right hand side of the
enclosure to release the LED cable attached to the cover. This will allow the cover to be hung on the
bottom of the enclosure
Remove the plug cable
1) Remove the plug cable by loosening the 3 center screws (shown as L1, L2, and PE) in the terminal block.
Do not loosen the screws securing the terminal block to the body.
2) This product has two means of strain relief: a metal bracket on the interior of the body and a black nut on
the outside of the body.
3) Loosen the left strain relief nut on the outside of the body.

4) Remove the left strain relief strap from the inside of the body.
5) Pull the wire down through the strain relief nut and remove the strain relief nut from the plug cable.
Flip the cosmetic cover upward to separate from the body. Insert the new wire through the conduit, then into the
body of the charger.
NOTE: The conductor size shall be enough for 6 AWG.
During installation be sure to use proper personal protective equipment and do not touch wiring terminals with
your fingers
1. Crimp insulated wire ferrules onto each supply power wire, including ground. Follow the ferrule
manufacturer’s instructions for crimping the ferrules onto each wire.
2. Insert each ferrule terminated wire in the terminal block, ensuring the wires are located properly.
1. Tighten terminal block screws to 33-40 in-lb (3.73-4.5 N-M) of torque.
2. Reinstall and tighten the strain relief strap, ensuring the wires are not strained between the strain relief strap
and the terminal block.
3. Tighten the strain relief nut to the conduit.
4. Prior to replacing the cover, place the wire connecting the charger and the cover back into the wire
management clip and secure it. Failure to do so may result in interference with the LED signal and erratic LED
indicator light behavior.
5. Prior to reattaching the charger cover, work with your electrician to determine the proper method for
configuring your amperage rating. It is always preferable to configure the amperage via the Electrify America
App. If you are not required to manually configure the amperage, go to the Reattach The Cover section.
Manual Amperage Configuration (Optional)
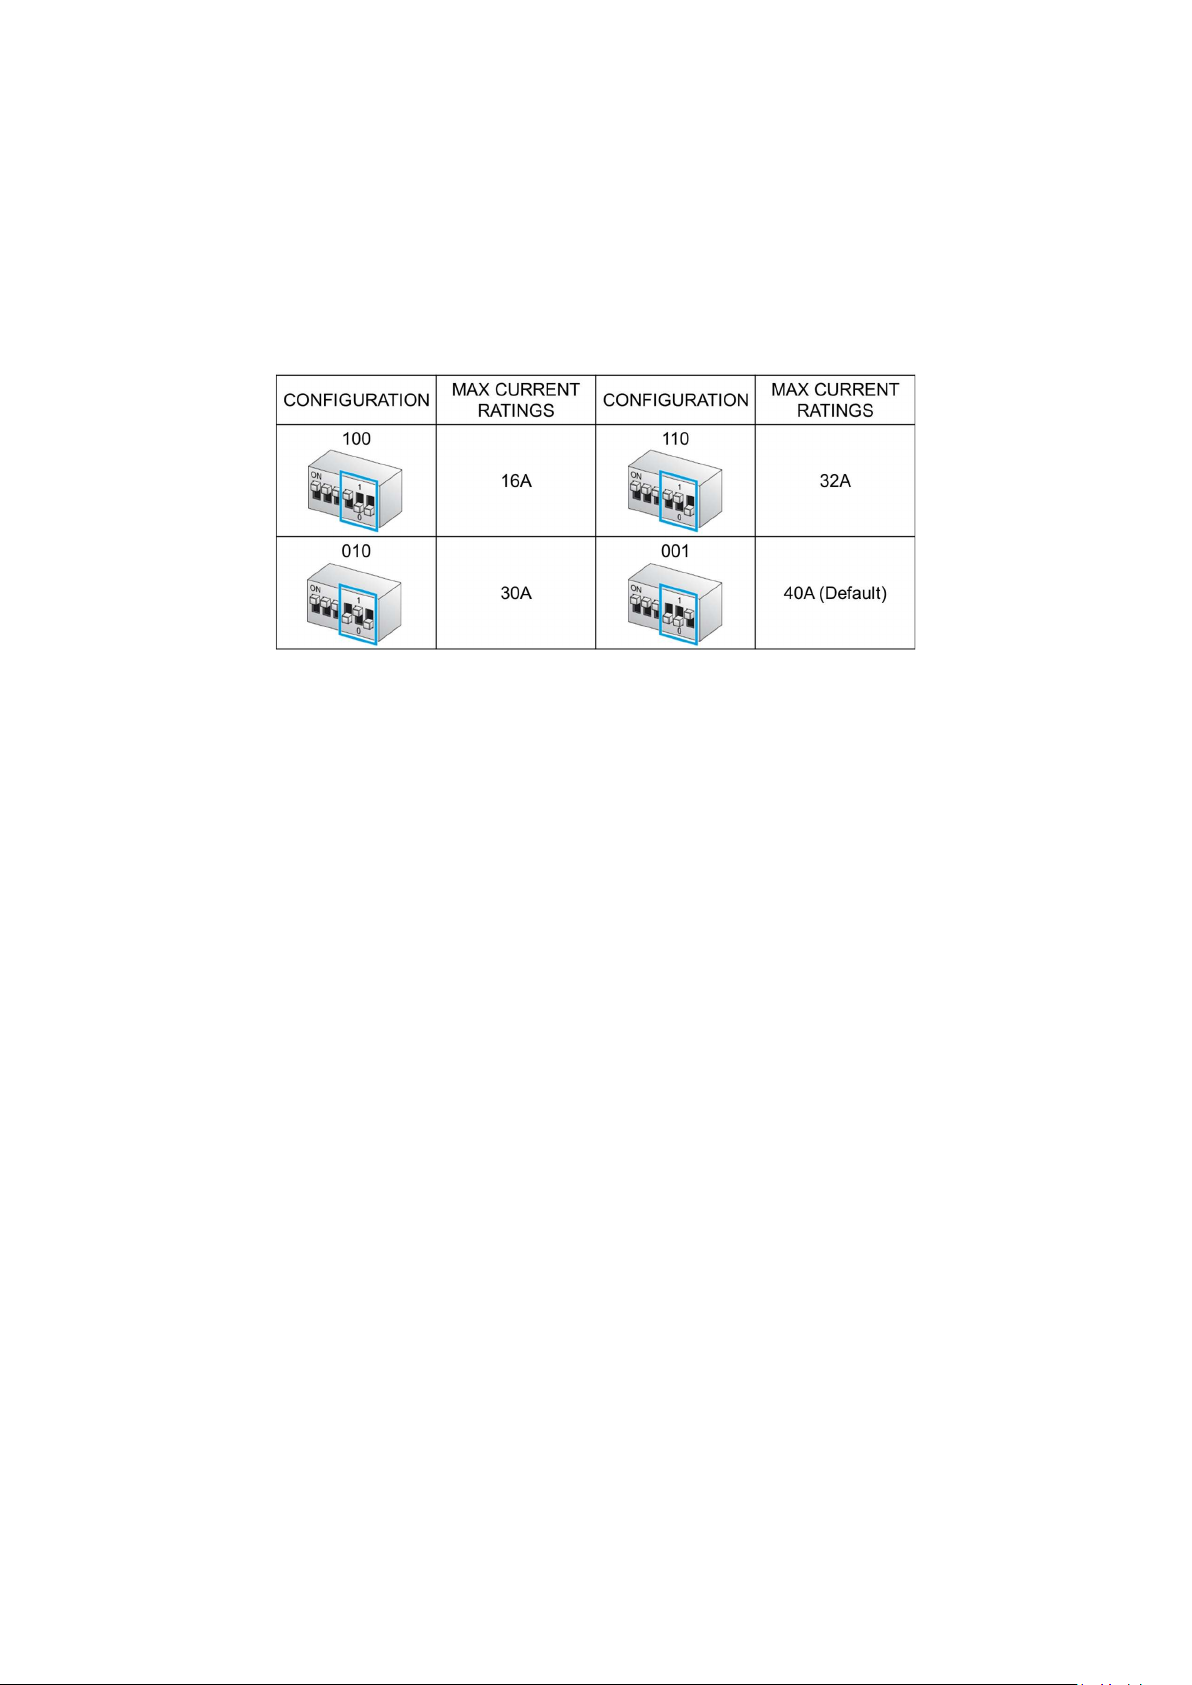
Use this method only if required by local code otherwise use the Electrify America
app to set the amperage configuration.
The amperage of the charger can be manually set by configuring the dipswitches as shown below. It is always
preferable to configure the amperage via the Electrify America App.
NOTE: The circuit breaker must be rated for 125% of the chosen operating current.
Reattach the Cover
1. Secure the middle cover with the screws removed in the previous steps.
2. Attach the cosmetic cover by placing the top edge of the cosmetic cover over the middle cover and gently
pushing the cosmetic cover into place.
3. Secure the cover with the T20 Torx screws.
Amperage Configuration with the Electrify America App
1. Download and install the Electrify America App on your smartphone (available for iOS and Android).
2. Ensure that your phone’s Wi-Fi is turned on. It is not required to be connected to a network.
3. Follow the instructions in the App to connect to your charger and configure your amperage setting.
4 Wi-Fi Setup (Plug-in or Hardwired Installation)
4. To connect the charger to a Wi-Fi network, download and install the Electrify America App on your
smartphone (available for iOS and Android).
5. Follow the instructions in the App to setup with Wi-Fi connection.
Operating Instructions
1) Insert the vehicle connector into the charging port on your electric vehicle. The charger will light
up green when a connection is detected.
2) Once the charger is plugged into the vehicle, the charger will begin flashing blue as it links with
the vehicle. When the charger is flashing solid blue, the vehicle is charging. The charger light will
dim on the front and remain blue on the bottom for the entire charging session.
3) Charging is complete when the charger turns green once more.
4) Press the thumb lever on the vehicle connector to disconnect from the vehicle.

Charger Status
If you are experiencing difficulty charging, a fault indicator light, or any other issue using the charger,
please see section 7 (Troubleshooting) for assistance.
If the issue persists, please contact Electrify America Customer Support at (833) 532-2778.
Status Indicator
The charger is equipped with an integrated LED ring to allow for clear communication of the charger’s
status. For energy efficiency, only the bottom section of the LED ring will remain illuminated after
(approximately two minutes) since the last user interaction.
Indicator Definition
PATTERN DEFINITION
Slow flashing
2 seconds between flashes.
Fast flashing
Less than 1 second between flashes.
1 flash
1 second on, 5 seconds off.
2 flashes
1 second on, 1 second off, 1 second on,
5 seconds off.
3+ flashes
These follow the same patterns as
above.
Understanding Status Indicator Patterns
LED COLOR INDICATOR
DESCRIPTION
No color
Power off.
Blue & green, alternating and fast
flashing
Initial and self
-
test.
Green, solid
Standby.
Blue, fast flashing
EV connected.
Blue, slow flashing
Preparing to charge.
Blue, solid
Charging.
Green, slow flashing
Charging finished or stopped by user.
Yellow, bottom section only
First successful connection to Wi
-
Fi
Red, constant, and/or flashing
Fault indicator. See section 6.4 for
troubleshooting.
Faults
LED INDICATOR
DESCRIPTION
Red, 1 flash
High or low input voltage detected.
Red, 2 flashes
Ground fault detected.
Red, 3 flashes
Ground connection error.
Red, 4 flashes
High input current detected.
Red, 5 flashes
Operating temperature limit
exceeded. Disconnect the unit from
power.
Red, 6 flashes
Installation error. Line and neutral are
swapped.
Red, 7 flashes
Vehicle communication error.

Red, solid
Self-test error or general error. Disconnect the
charger from power and reconnect to power
after 10 seconds to power cycle the charger.

Troubleshooting
SITUATION CAUSE ACTION
Status indicator does
not illuminate.
Charger is not receiving power.
Ask the certified electrician to check the power input is
connected correctly and the power is within operating
range of the unit.
Disconnect the charger from power and reconnect to power
after 10 seconds to power cycle the charger.
If the problem persists, contact Customer Support at (833)
532-2778.
Indicator does not flash
blue after plugging in
the vehicle connector.
Vehicle battery is fully charged.
Plug is not properly connected.
Check if the battery is full on EV.
Check if the vehicle connector is fully inserted to EV.
If the problem persists, contact Customer Support at (833)
532-2778.
Indicator starts to flash
red while charging.
Charger has detected an error.
Charger has encountered a
fault.
Wait until the temporary error is resolved and the charger
returns to normal condition, typically less than 10 seconds.
Disconnect the charger from the vehicle, wait for the error
to clear, and reconnect the charger to the vehicle.
If the error persists, disconnect the charger from power and
reconnect to power after 10 seconds to power cycle the
charger.
If the error is not resolved, contact Customer Support at
(833) 532-2778.
Indicator illuminates
red.
Charger has detected a fault.
Disconnect the charger from the vehicle, wait for the error
to clear, and reconnect the charger to the vehicle.
If the error persists, disconnect the charger from power and
reconnect to power after 10 seconds to power cycle the
charger.
If the error is not resolved, contact Customer Support at
(833) 532-2778.

Specifications
Model
HomeStation,
EA2R040JPA10
-
00
Measurements H x W x D
15.75" x 8.66" x 6.75" approx.
Cable Length
24 Feet
Installation Type
Fixed Wall Mounted
Weight
19.85 lbs. approx.
Enclosure Rating
NEMA Type 3R
Input Power
208
-
240V AC Split Phase (3
-
Wire
–
L1, L2, Ground)
AC Plug
-
In Cord
NEMA 14
-
50
Max. Current Rating
40 Amps
Output Power
Up to 9.6kW (240V AC @ 40A)
Power Metering
Accuracy +/
-
1% at Full
Load
Charge Connector
SAE J1772
Charging Protocol
SAE J1772
Vehicle to Grid Protocol
ISO 15118
User Interface/HMI
LED Light Ring
Wireless
WLAN with 2.4GHz b/g/n with WPA2
Communication Protocol
OCPP 1.6 JSON Compliant
AC Fault Monitor
GFCI Integrated (20mA CCID for AC)
Short Circuit/ Overload
Protection
50 A Circuit Breaker (No GFCI) for 40 A Output (Refer to local codes for proper
breaker sizing)
Plug and Charge
ISO 15118 Ready
Vehicle Communication
Pilot Signal (IEC 61851
-
1:2017) and ISO 15118
Certifications
UL2594, UL2231
-
1,
UL2231
-
2, FCC Part 15 Class
B
Operating Temperature
-
22°F to +122°F (
-
30°C to +50°C) Full Load Thermal Overload Protection: Output
power reduced at higher temperatures
Storage Temperature
-
40°F to +176°F (
-
40°C to 80°C)
Humidity
5%
—
95% Non
-
Condensing

Moving, Transportation and Storage
WARNING: Improper moving or storage of this device may result in a risk of fire of electric shock.
Do not lift or carry the charger by the cords. Do not allow the connector cable to drag or touch the ground
when moving the charger.
This device should be stored in a dry location between -40°F and 176°F.
Cleaning
The charger may only be cleaned with water; the use of lukewarm water is recommended. Do not use cleaning
agents containing solvents. Dry the charger with a clean paper towel or soft cloth prior to use.
Do not use this product if the power cord or the electric vehicle cable is frayed, has broken insulation, or any
other signs of damage. Do not use this product if the enclosure or the electric vehicle connector is broken,
cracked, open, or shows any other indication of damage.
For further assistance, contact us at: (833) 532–2778.
Warranty
Customer Support can provide more information on the terms of the warranty. However, the following cases
are not covered by the warranty:
A. Defects or damage caused by not using the product as specified in the Installation and Operation Manual.
B. Costs and damage caused by repair work which is not provided by an Electrify America—approved
authorized specialist or electrician.
Disposal
The charger is an electrical device. Follow all federal, provincial, and local laws, regulations,
ordinances, and safety standards regarding disposal of this device.
This manual suits for next models
1
Table of contents


