ElectrIQ SLIM30I User manual

SLIM30I
EVAPORATIVE COOLER
HUMIDIFIER AND AIR CLEANER
USER MANUAL
Thank you for choosing ElectriQ
Please read this user manual before using this innovative Air Cooler and keep it
safe for future reference.
Visit our page www.electrIQ.co.uk for our entire range of Intelligent Electricals

Page 2of 11
CONTENTS
1ˊ
ˊˊ
ˊSAFETY INSTRUCTIONS ……………………………….. 3
2ˊ
ˊˊ
ˊFEATURES AND OPERATION ……………….……….... 4
3ˊ
ˊˊ
ˊPARTS LIST AND INSTALLATION ………………………. 5
4ˊ
ˊˊ
ˊCONTROL PANEL AND SETTINGS …..…………………. 6
6ˊ
ˊˊ
ˊMAINTENANCE ……………………………………………… 8
7ˊ
ˊˊ
ˊTROUBLESHOOTING …………………………………. …. 9
8ˊ
ˊˊ
ˊAPPENDIX ……………………………………………………. 10

Page 3of 11
SAFETY INSTRUCTIONS
Important!
•Carefully read the instructions before operating the unit
•This appliance is for indoor use only.
•Rating: This unit must be only connected to a 220-240 V / 50 Hz earthed outlet.
•Installation must be in accordance with regulations of the country where the unit is used.
•If you are in any doubt about the suitability of your electrical supply have it checked and, if
necessary, modified by a qualified electrician.
•This air cooler has been tested and is safe to use. However, as with any electrical appliances
- use it with care.
•Disconnect the power plug from socket before changing filters, dismantling, assembling or
cleaning.
•Avoid touching any moving parts of the appliance.
•Never insert fingers, pencils or any other objects though the guard
•This appliance is not intended for use by persons (including children) with reduced physical,
sensory or mental capabilities. It is also not intended for use by those with a lack of
experience and knowledge, unless they have been given supervision or instruction
concerning the use of the appliance by a person responsible for their safety.
Do not leave children unsupervised with this appliance.
•Do not clean the unit by spraying it or immersing it in water.
•Never connect the unit to an electrical outlet using an extension cord. If an outlet is not
available, one should be installed by a qualified electrician.
•Never operate this appliance if the cord or plug is damaged. Ensure the power cord is not
stretched or exposed to sharp object/edges.
•A damaged supply cord should be replaced by the manufacturer or a qualified electrician in
order to avoid a hazard.
•Any service other than regular cleaning or filter replacement should be performed by an
authorized service representative. Failure to comply could result in a voided warranty.
•Do not use the appliance for any other purposes than its intended use.
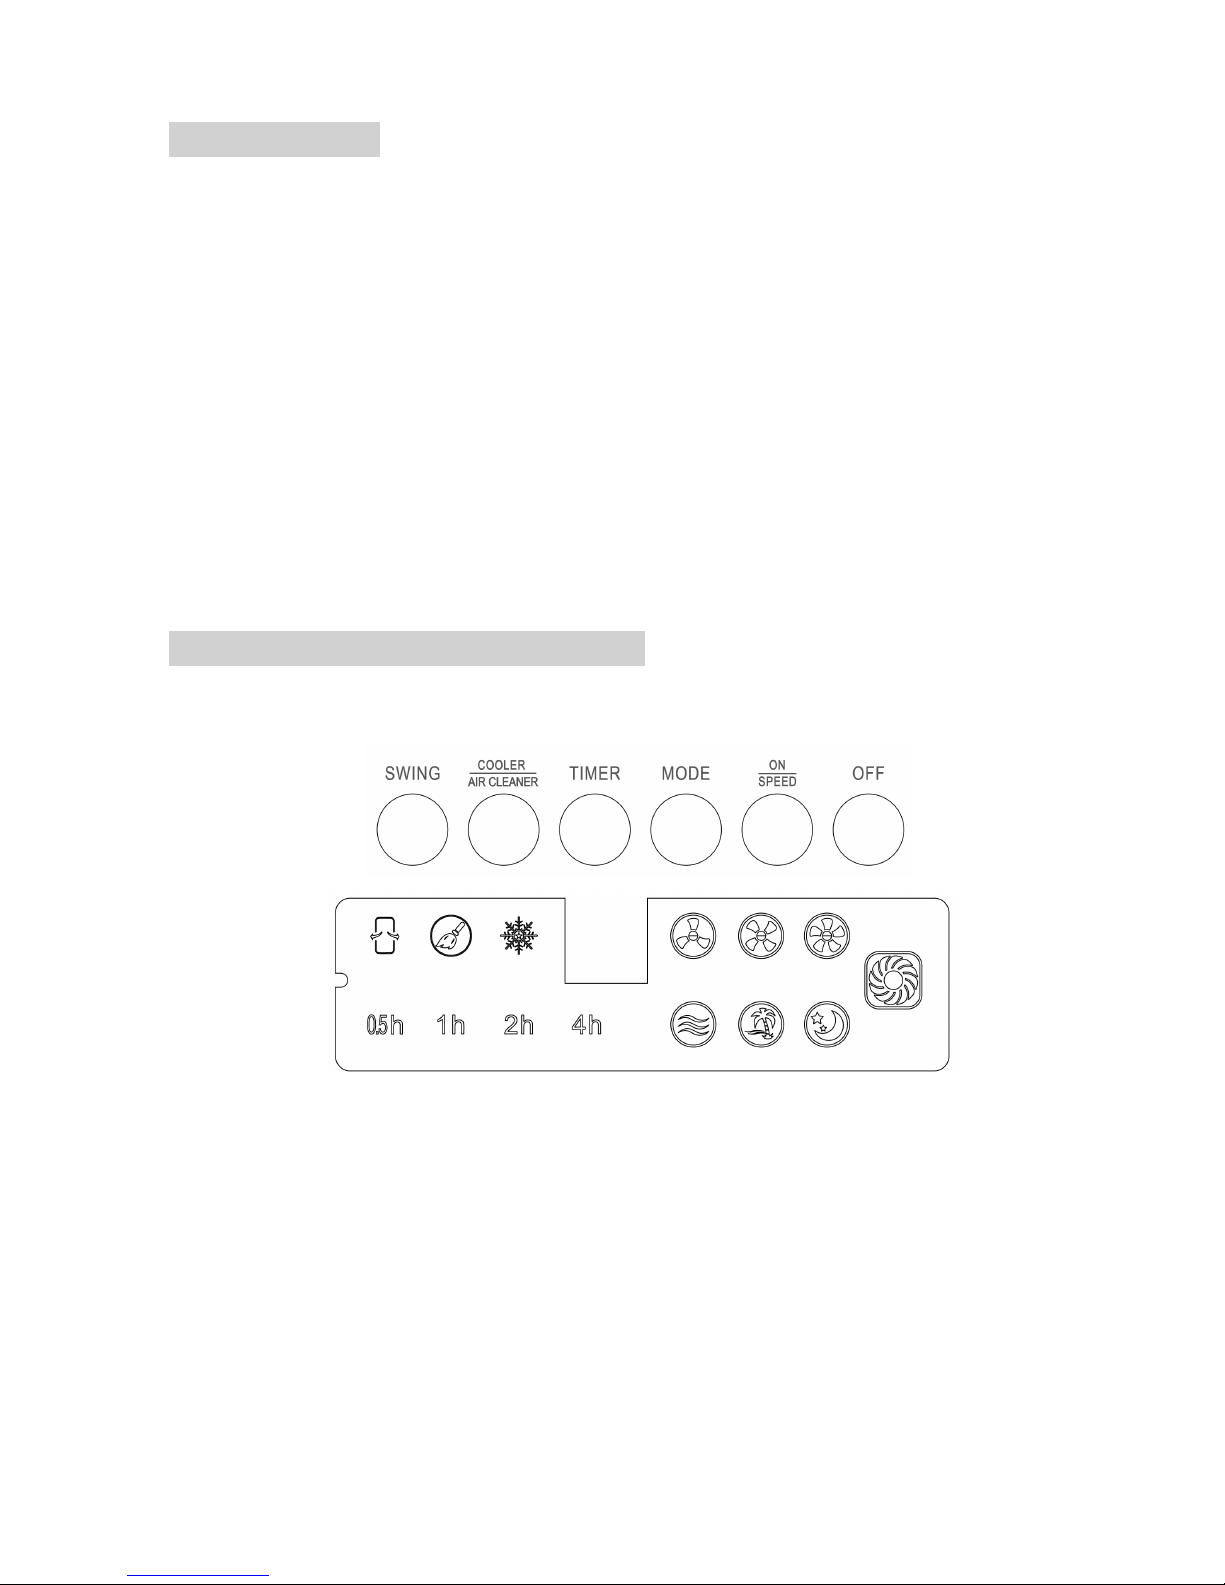
•Never use the mains plug as a switch to start and turn off the air unit. Use the provided
ON/OFF switch located on the control panel.
•Always place the unit on a dry and stable surface. Do not move or tilt the unit while water
tanks is full.
•The appliance should not be installed in laundry or wet rooms
•Do not use this unit in environments with flammable and explosive gases.
•Avoid keeping the unit in direct sunlight for a long period of time
Energy Saving and Unit Safety Protection Tips
•Do not cover or restrict the airflow from the outlet or inlet grills.
•For maximum performance the minimum distance from a wall or objects should be 50cm.
•Please make sure, while in operation, the water in the water tank does not exceed the MAX
level and does not fall below MIN.
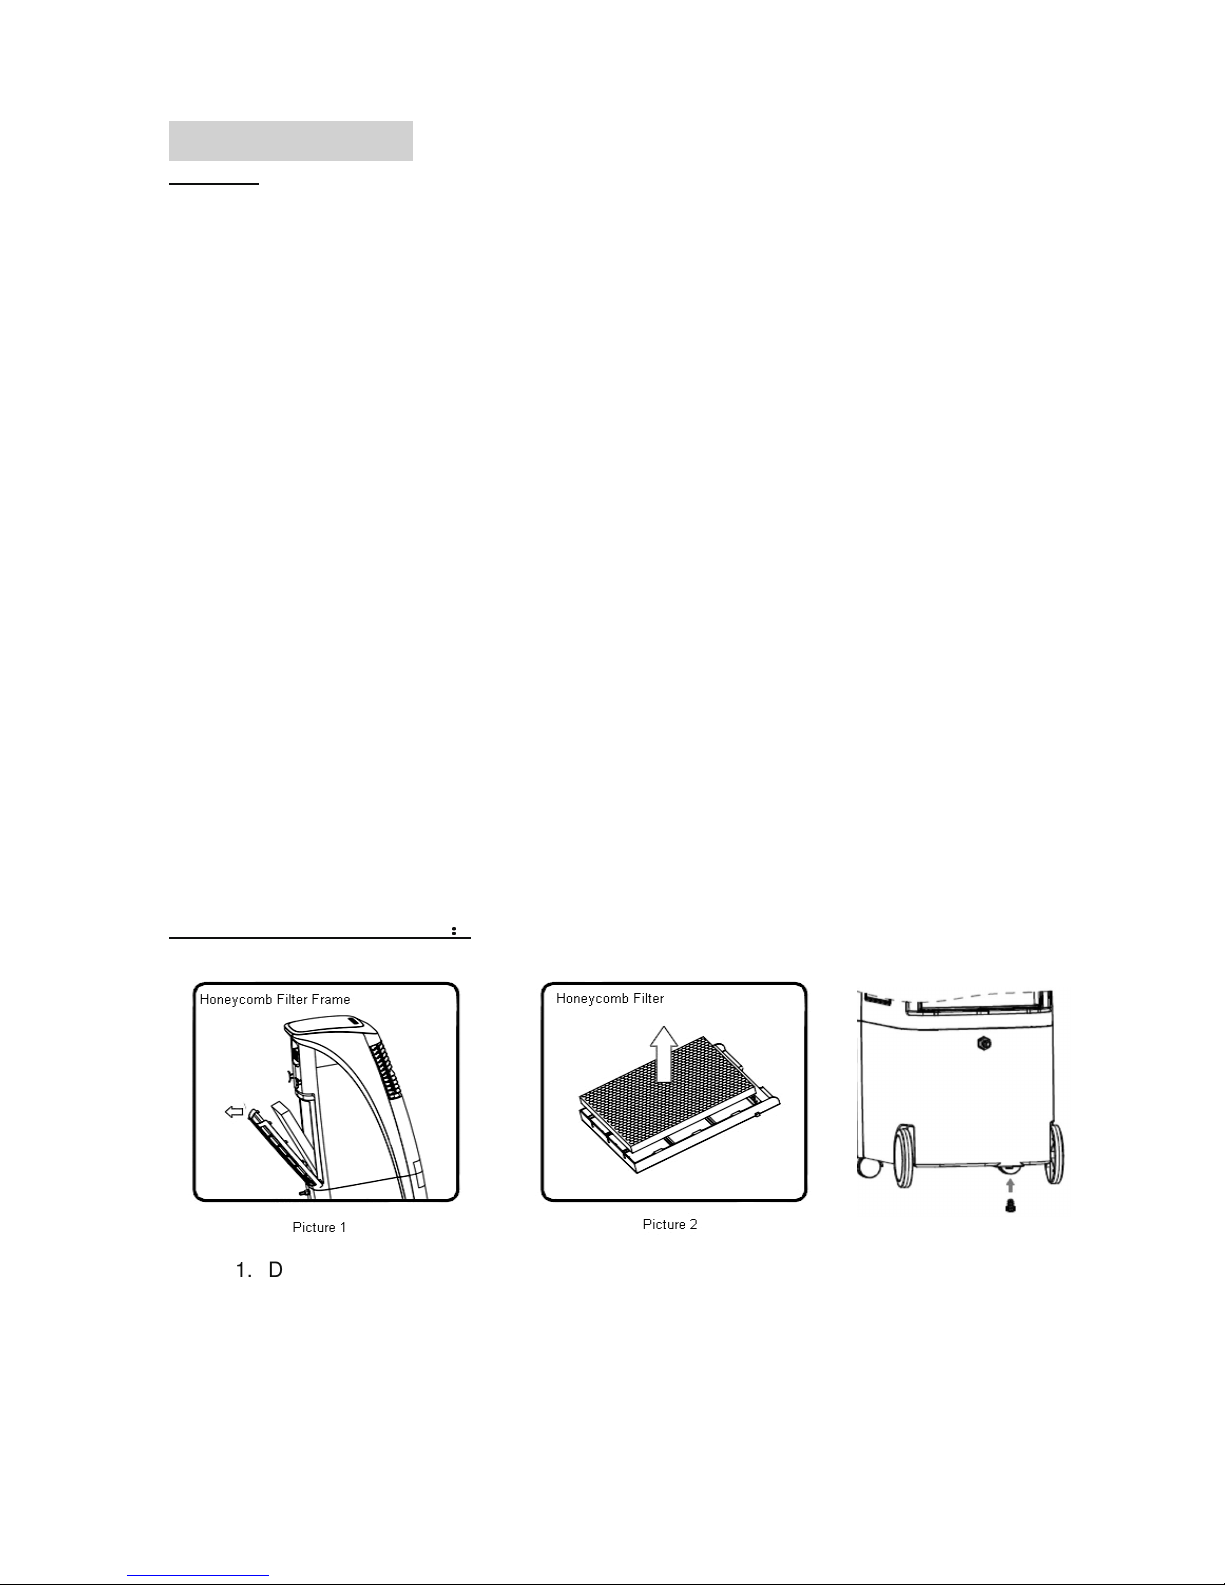
•Keep the filters clean. Under normal conditions, filters should only need cleaning once every
three weeks (approximately). Since the filters remove airborne particles, more frequent
cleaning may be necessary, depending on the air quality.
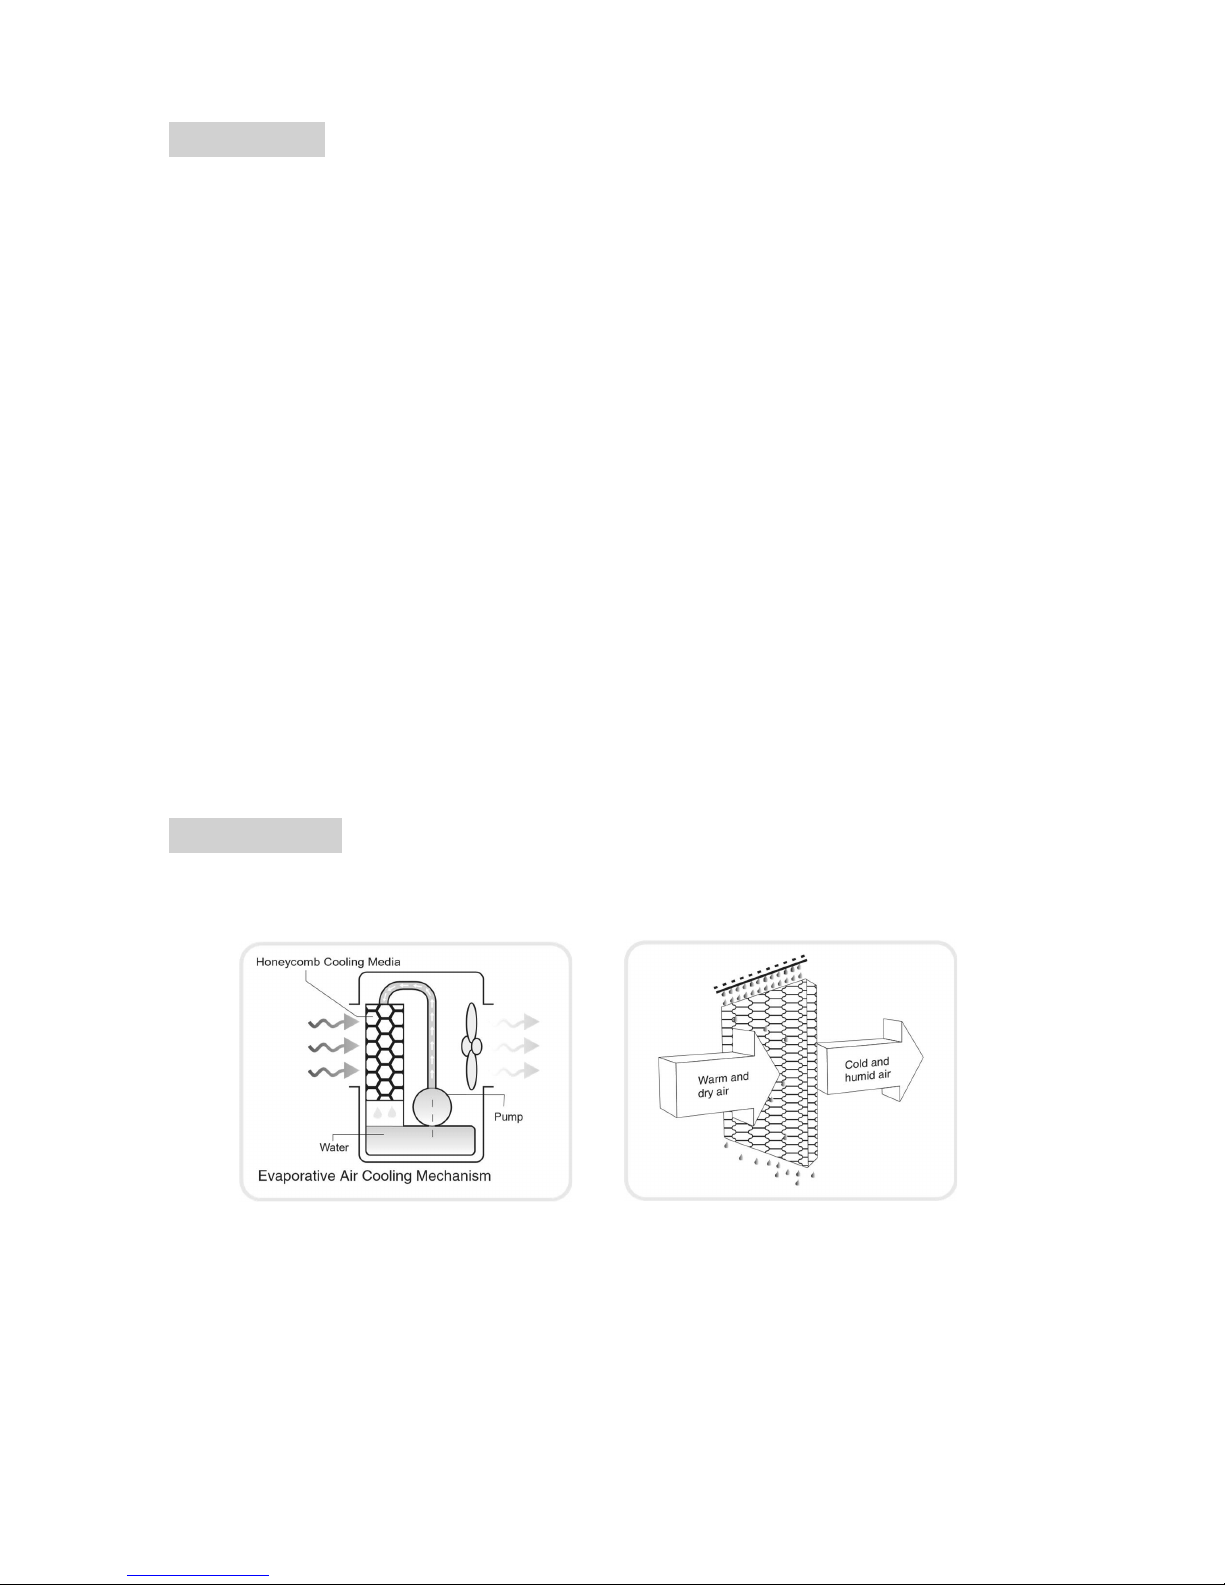
•In order to achieve maximum efficiency please place the unit near an open door or window.
Evaporative Air Coolers work with an evaporative cooling mechanism which requires cross
ventilation
•This unit will lose efficiency if humidity in the room reaches a relative humidity of over 60%
•The ambient
operating temperature range is from 5°C to 40°C.
If used in low temperatures (as a humidifier) it is recommended to fill the water tank with
warm (but not hot) water.

Page 4of 11
FEATURES
zSlim30i - 3 in 1 Eco Air Cooler with 30 litre tank
zSpot cooling, humidifier and air cleaner
zEco Cooler saves energy
zIdeal for shop floors or rooms which cannot be sealed or traditionally air conditioned
zSlim design takes minimal space
z4 fan speeds and oscillation setting for improved air flow
zDirectional louvres to create a cooling spot
zEasy to use controls
zLarge 30 litres tank capacity – gives uninterrupted daily cooling also featuring easy to use unique
automatic water refilling system
zEnhanced honeycomb filters for improved cooling and air cleaning
zTimer settings from 0.5 – 7.5hrs
zRemote control
zSmart memory with auto-restart
zEasy to use digital control panel and intelligent remote
zHandle and large wheels for great mobility
zStandard, breeze and sleep cooling modes
Specifications
Air flow: up to 1000 m3/hr
Water tank: 30 Litres
4 speed fan: low/ medium/ high/ TURBO
Up to 7.5 hrs Timer
Versatile and mobile
Left/Right Auto Swing
OPERATION
The air cooler cools the air by means of evaporation. When water evaporates into the air, the result is a mixture
of air and water molecules. This chemical change requires heat which is taken from the water molecules,
resulting in a spot cooling effect.
TIPS
• The recommended relative humidity for optimum operation is 60% or lower. Adrierclimate makes
for more noticeable cooling.

Page 5of 11
•The evaporative air cooler should not be used in enclosed or sealed
spaces. It must be kept level and there must always be water in the water
tank. Doors and windows should be open to allow free air flow. The
evaporative air cooler works best when placed near an open window/air
current.
•The evaporative air cooler can also be used to humidify dry
environments (during cool weather). To be used for humidification the
windows and doors should be closed to allow the humidified air to
accumulate. The evaporative air cooler is not an air conditioner as it does not
use a compressor or refrigerant. It should not be expected to cool as
efficiently as a refrigerated air conditioner.
•When the product is used for the first time the Honeycomb cooling media
will have an odour, this should dissipate within a week of use.
PARTS LIST
1. Control panel 2. Function display window 3. Air outlet
4. Water filling port 5. Water level display window 6. Large rear wheels
7. Front casters 8. Remote control holder 9. Handle
10. Cable storage 11. Power cord 12. Dust filter
13. Automatic filling port 14. Water tank 15. Water drain and plug
Remote Control

Page 6of 11
INSTALLATION
This unit can easily be moved from one room to another. While moving the unit please
note that it must always be kept upright and then placed on an even surface.
•Remove any packaging - keeping the air cooler in a vertical position.
•Make sure all parts are present and unit is assembled correctly - including the castor
wheels (these need to be pushed into place on the base of the unit)
•Water tank: Pull the water tank out from the body of the unit and pour water into the water
tank; ensuring not to fill above the MAX level.
•When humidifying, the water level must not be lower than the MIN water line.
•If you want to increase the cooling effect, you can put ice or the charged ice packs into
the water tank, but be sure that by adding ice or icepacks the water level does not go
over the MAX limit. Empty some water if necessary.
•Make sure filter pad is properly inserted at the back of the unit
•Connect the power plug to a working socket, and then press the power button.
Note: If you want to remove the water tank, please pull out after unit has been powered-
off for 2 minutes.
CONTROL PANEL AND SETTINGS
ElectriQ SLIM30i control panel and display
•ON/SPEED: Press this key to turn on the device. The initial speed of the devices is medium and
turns down to low automatically after 3 seconds. The corresponding LED will be lit. It will default
to normal mode. The timer, fan direction and cooling / humidification functions are not active in
this mode. Once the unit is on, pressing this key will change the fan speed from Low >Medium
High>Strong>Low…etc. The fan speed LED will light up to the corresponding speed.
•COOLER / AIR CLEANER: When the unit is powered on, press this key to switch on/off the
cooling / humidification function. The pump will start and the cooling / humidification LED will
light up. Press the key again to turn it off. Unit can be used as an air cleaner only with water not
being pumped via the cooling pads.
•SWING: When the unit is powered on, press this key to switch on / off the left and right fan
direction adjustment function. Press this key once to turn on the swing function the LED will light
OFF: In power on state, press this key to turn off the device, and the system returns to standby.
•

Page 7of 11
up, press it again to turn it off.
•TIMER: When the unit is powered on the timer is not automatically active. The timer LED will
be off. Press this key to turn on the timer. Repeatedly pressing this key will cycle through the
timer options as follows: 0.5h 1.0h 1.5h 2.0h (30 min increases) 7.5h timer off
0.5h… etc. The timer indicator LED will change accordingly.
•
MODE: When the unit is powered on it will default to the normal mode. Press this key to switch
the mode in the following sequence: normal > breeze > sleeping > normal…etc. The mode LED
will change accordingly. NOTE: when the fan is set to TURBO, the breeze and sleeping modes
are unavailable.
Normal – the fan mode remains set to initial selection e.g. low, medium, high or TURBO unless
manually changed
Breeze – the unit will vary the fan speeds in an intelligent mode to simulate the natural breeze. Fan
speed can still be selected and the unit will work most of the time at selected speed
Sleep – unit will operate on the following patterns according to selected fan speed
High: Breeze mode on high for 30 minutes > Breeze mode on medium for 30 minutes > Breeze mode in
low speed for the rest of its operation
Medium: Breeze mode on medium for 30 minutes > Breeze mode in low speed for the rest of its operation
Low: Breeze mode in low speed
Remote Control
•Open the remote control rear cover and install
2 x 1.5V AAA batteries
•The buttons have the same function as the
main control panel
•The remote has an effective control distance
of 6 meters
Water Filling
Before turning on the cooling and humidification function, please add water to the tank. You can use the
unit without water in air cleaner mode only. There are two methods – Automatic and Manual.
Automatic Filling
Connect the device to an outlet with a piece
of hose and then turn on the outlet.
Manual Filling
Before filling with water, open the water inlet,
fill the water tank slowly and then return the
water inlet into the original position.
For manual water filling, please note the level
indicator on the front of the unit (Fig. 3).
•Do not fill the water beyond the
maximum water level
•Use clean tap water
•It is completely normal and in no
way dangerous if the device has a
slight odour or the water tank has a
slight discolouration when it is used
for the first time.
FILTER CLEANING WARNING: The clean filter indicator comes on automatically as a reminder to
clean the air filter. The indicator led will light on after 200 hours of operation. The unit will continue to
operate with the normally while the indicator is on. Please clean the filters then press the COOLER / Air
Cleaner key for 3 seconds to reset the reminder.
•

Page 8of 11
MAINTENANCE
Cleaning
ATTENTION: Please shut off the unit and unplug from the mains before cleaning or
performing any maintenance.
Cleaning the surface
Clean the plastic housing with a duster or a soft wet cloth.
Do not use chemical solvents (such as benzene, alcohol or gasoline) as they may cause irreversible
damage. Make sure no water enters the control panel. Cleaning the water tank
Unplug the power cord, remove the honeycomb filter bracket, and then remove the water tank.
With a cloth (dipped in a mild detergent), wipe the water tank, rinse it with water, and then
carefully place it back in the unit.
Draining the water reservoir and refilling with fresh water at least once a week will help reduce
any mineral deposits and keep the filters clean.
Do not run the unit in Humidify mode with stale water in the tank.
We recommend emptying the tank and refilling it with fresh water if water has been standing in
the tank for an extended period of time.
MAINTAINING AND CHANGING THE HONEYCOMB FILTER PADS
The appliance is supplied with Honeycomb cooling / filters pads. The cleaning frequency for the
Honeycomb filter depends on local air and water conditions. In areas where the mineral content of
water is high (hard water), mineral deposits may build up on the honeycomb cooling filter and restrict
air flow. If mineral deposits remain on the Honeycomb pads, the filter should be removed and
washed under fresh water. We recommend cleaning the honeycomb filter at least every two months,
depending on your needs.
For best results, allow the honeycomb filter to dry after each use by turning off the humidify
function for 15 minutes (with empty water tank) before turning the unit off.
Unplug the power cord, then remove the honeycomb filter frame, and take the honeycomb filter
out of the bracket.
With a mild detergent and a soft brush, scrub the honeycomb filter, clean with water and dry
End of Season Maintenance
˖
˖˖
˖
1. Drain the tank by removing the rubber plug at the bottom
2. Clean the Honeycomb pads
3. On a dry day run the unit in air cleaning mode for 2-3 hours until the inside is dry
4. Resit the clean and dry honeycomb pads back into the unit
5. Cover the unit and keep it in a dry place.

Page 9of 11
Troubleshooting
Do not repair or disassemble the unit by yourself, unauthorized repair attempts will invalidate
the warranty and may cause bodily harm.
Issue Possible Reason Solution
No power 1. Power cord is unconnected
2. Honeycomb filter support is not
installed correctly
3. The master switch is not turned
on.
4. The power key is not pressed.
1. Connect the power cord
2. Install the honeycomb filter
correctly.
3. Turn on the master switch
4. Press the power key.
No dust elimination 1. The honeycomb filter is blocked.
2. The air inlet is blocked
1. Remove the honeycomb
filter and clean it.
2. Remove the obstruction
Water tank does not move The pump supporter is loosened
and blocks the water tank.
Reset the pump supporter.
Odour emission from unit 1. New unit. When the unit is used
for the first time, the Honeycomb
cooling media will have an odour,
which will dissipate within a week
of use
2. Honeycomb filter may have
developed mold or bacterial growth
1. No action required
2. Clean the filter pads with
mild antibacterial solution.
Dry before use.
If the above solutions do not resolve the problem please contact the service centre.

Page 10 of 11
APPENDIX
Disposal: Do not dispose this product as unsorted municipal waste. Collection of
such waste must be handled separately as special treatment is necessary.
Recycling facilities are now available for all customers at which you can deposit your
old electrical products. Customers will be able to take any old electrical equipment
to participating civic amenity sites run by their local councils. Please remember that this
equipment will be further handled during the recycling process, so please be considerate
when depositing your equipment. Please contact the local council for details of your local
household waste recycling centres.
TECHNICAL DATA:
SLIM30I
Evaporative Air Cooler and Humidifier
Water Tank 30 Litres
Rated Input 170 Watt
Running Current 0.7Amps
Air Flow
Up to 1000 m
3
/hr
Power Supply
220-240V/50Hz
Net Weight 10.7 kg
Size 360.5x523.5x1030mm

Page 11 of 11
ElectrIQ UK SUPPORT
www.ElectrIQ.co.uk/support
Please, for your own convenience, make these simple
checks before calling the service line.
If the unit still fails to operate call: 0871 620 1057 or
complete the online form
1. Is the unit plugged into the mains?
2. Is the fuse OK?
3. Switch the unit off and wait three minutes to see if
the issue is resolved. Restart the unit.
Office hours: 9AM - 5PM Monday to Friday
www.ElectrIQ.co.uk
Unit 2, The Nursery
Berristow Lane
South Normanton
Derbyshire, DE55 2FX
Table of contents
Other ElectrIQ Humidifier manuals
Popular Humidifier manuals by other brands

Honeywell
Honeywell HH210E operating instructions

Air-O-Swiss
Air-O-Swiss AOS W490 Instructions for use

Honeywell
Honeywell HE225 manual

Stadler Form
Stadler Form Fred operating instructions

Air-O-Swiss
Air-O-Swiss AOS S450 Quick setup guide

Honeywell
Honeywell HCM-6009 - QuietCare Lon Console Humidifier owner's manual