Electro Depot Valberg 4D 511 E DX625C User manual


EN
WARRANTY CONDITION
This product is guaranteed for a period of 2 years from the date of purchase* against
any failure resulting from a manufacturing or material defect. This warranty does not
cover defects or damage resulting from incorrect installation, improper use or abnormal
wear of the product.
*as shown on the sales receipt.
FR
CONDITION DE GARANTIE
Ce produit est garanti pour une période de 2 ans à partir de la date d’achat*, contre
toute défaillance résultant d’un vice de fabrication ou de matériau. Cette garantie ne
couvre pas les vices ou les dommages résultant d’une mauvaise installation, d’une
utilisation incorrecte ou de l’usure anormale du produit.
*sur présentation du ticket de caisse.
NL
GARANTIEVOORWAARDEN
Dit product wordt gegarandeerd voor een periode van 2 jaar vanaf de aankoopdatum*,
voor elke storing die het gevolg is van een fabricagefout of het materiaal. Gebreken of
schade door slechte installatie, onjuist gebruik of abnormale slijtage van het product
worden niet gedekt door deze garantie.
*op vertoon van kassabon.
ES
CONDICIONES DE GARANTÍA
El certificado de garantía de este producto tiene una duración de 2 años a partir de la
fecha de compra* que se limita a los defectos de fabricación y averías del material.
Se excluyen de la garantía deficiencias o daños originados por una mala instalación,
errores en la manipulación o por un uso inadecuado.
*previa presentación del comprobante de compra.
IT
CONDIZIONI DI GARANZIA
Il presente prodotto è garantito per un periodo di 2 anni dalla data di acquisto* contro
qualsiasi guasto derivante da un difetto di produzione o del materiale. La presente
garanzia non copre difetti o danni dovuti a scorretta installazione, uso improprio o
usura anomala del prodotto.
*Fa fede la data riportata sullo scontrino di acquisto.
ELECTRO DEPOT
1 route de Vendeville
59155 FACHES-THUMESNIL - FRANCE

971816 - 4D 511 E DX625C
INSTRUCTIONS FOR USE ....................02
CONSIGNES D'UTILISATION ....................20
GEBRUIKSAANWIJZINGEN ....................38
INSTRUCCIONES DE USO ....................56
ISTRUZIONI PER L'USO ....................74
11/2021 – V2
Refrigerator - Freezer
Réfrigérateur-congélateur
Koelkast - Diepvriezer
Frigoríco - Congelador
Frigorifero - Congelatore


2
2
2
3
4
5
6
7
7
7
1


2 EN2 EN
Thanks!
Thank you for choosing this VALBERG product.
Chosen, tested and recommended by ELECTRO DEPOT,
the products of the VALBERG brand are easy to use,
reliable and of an impeccable standard.
Thanks to this appliance, you can be sure that each
use will bring you satisfaction.
Welcome to ELECTRO DEPOT.
Visit our website: www.electrodepot.fr

3 EN3 EN
Table of contents
APreview of the
appliance
CUseful information
BUsing the appliance
Description of the appliance
Proper use of refrigerators
Structure and functions
Maintenance and care of the refrigerators
Troubleshooting

4EN
Preview of the appliance
A
Description of the appliance
1LED lighting 5Middle drawer
2Shelf 6Lower drawer
3Big drawer 7Door tray
4Top drawer

5EN
Using the appliance
B
Proper use of refrigerators
Placement
• Before use, remove all packing materials, including bottom cushions, foam pads and tapes
inside of the refrigerator; tear off the protective film on the doors and the refrigerator body.
• Keep away from heat and avoid direct sunlight. Do not place the freezer in moist or watery
places to prevent rust or reduction of insulating effect.
• The refrigerator is placed in a well-ventilated indoor place; the ground shall be flat, and
sturdy (rotate left or right to adjust the wheel for levelling if unstable).
• The top space of the refrigerator shall be greater than 30cm, and the refrigerator should
be placed against a wall with a free distance more than 10cm to facilitate heat dissipation.
6EN
Using the appliance
B
PRECAUTIONS BEFORE INSTALLATION:
Before installation or adjusting of accessories, it shall be
ensured that the refrigerator is disconnected from power.
Precautions shall be taken to prevent fall of the handle from
causing any personal injury.
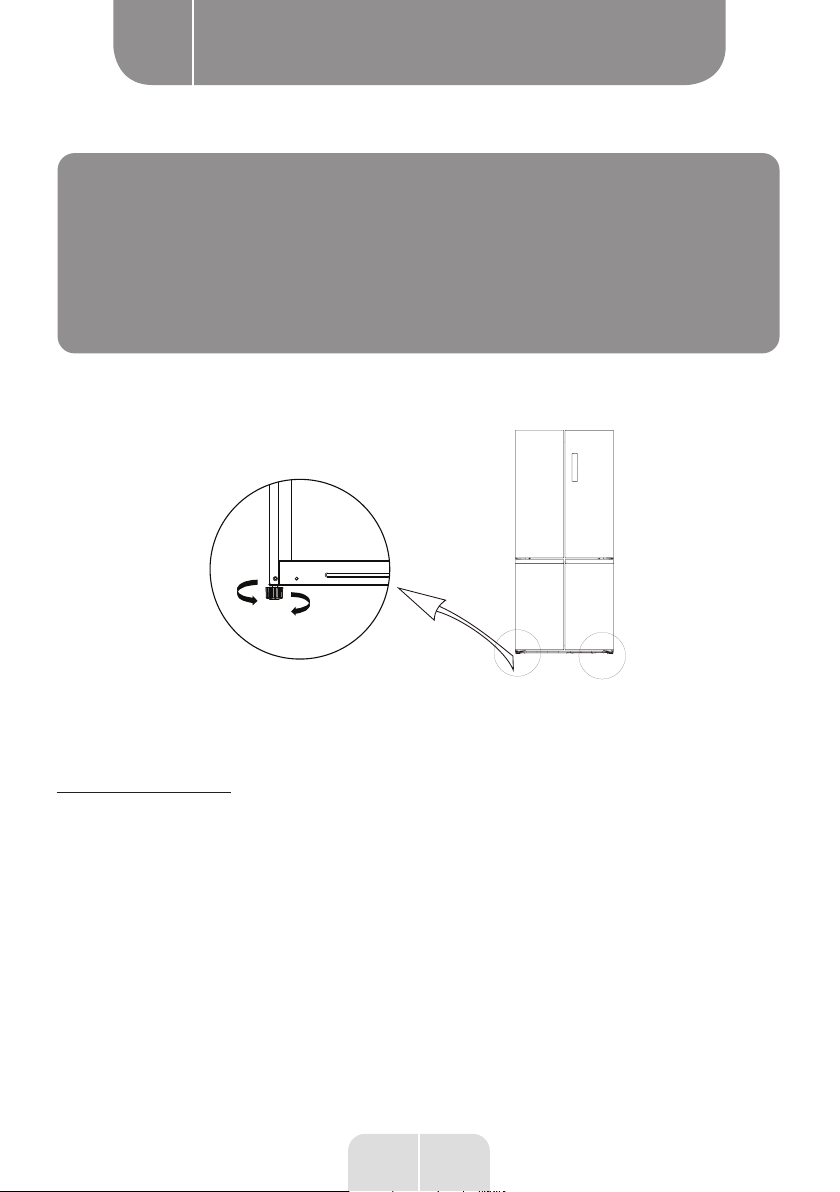
Levelling feet
Schematic diagram of the levelling feet
LH
(The picture above is only for reference. The actual configuration will depend on the physical
product or statement by the distributor.)
Adjusting procedures:
a. Turn the feet clockwise to raise the refrigerator;
b. Turn the feet counterclockwise to lower the refrigerator;
c. Adjust the right and left feet based on the procedures above to a horizontal level.
7EN
Using the appliance
B
Levelling door
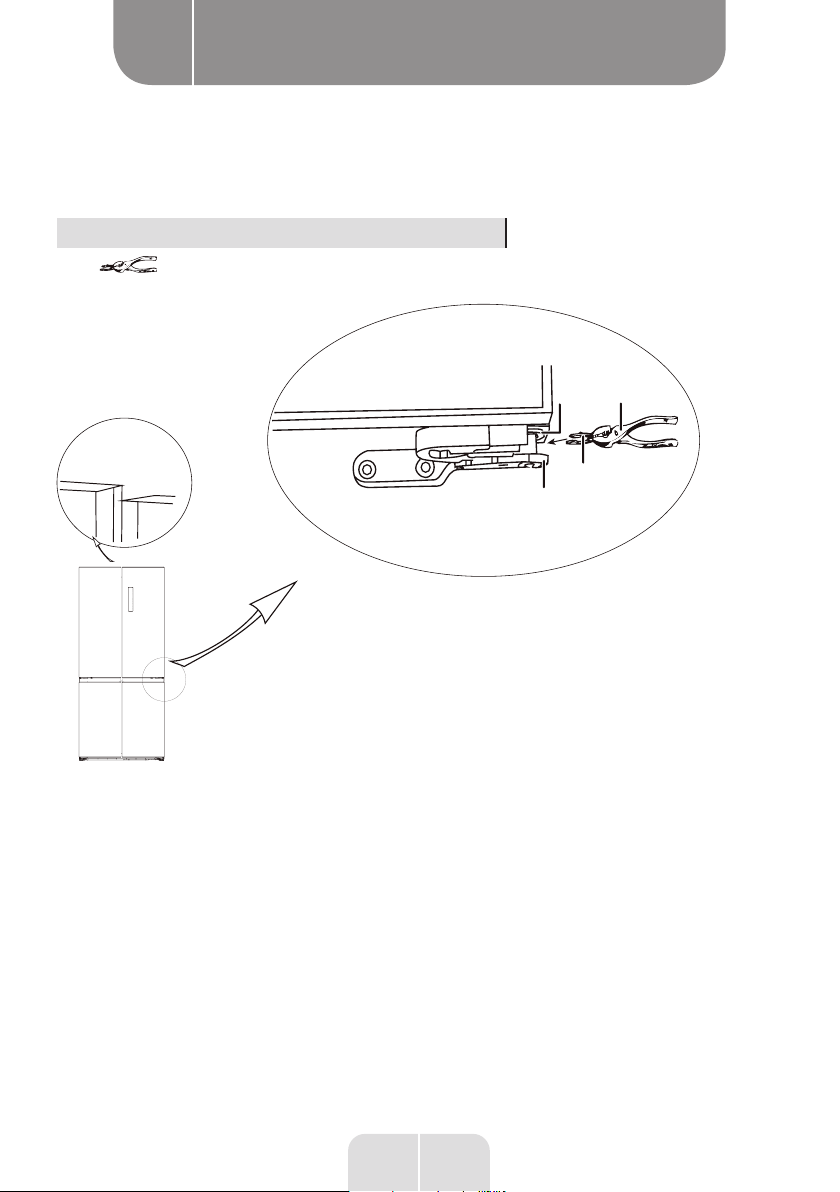
Schematic diagram of leveling the door
List of tools to be provided by the user
Plier
Hinge
grommet
Fastener-ring
Lower hinge
Pliers
Not level
1. Raise the lower door up to the level of the higher door.
2. Insert the supplied fastener-ring by using plier in the gap between the hinge-grommet
and the lower hinge.The number of fasten-rings you will need to insert depends on the gap.

8EN
Using the appliance
B
Changing the Light
This product contains a light source of energy efficiency class F.
Light source in this product can only be replaced by qualified professionals.
Please contact after-sales service if the light source fails.
The light source shall be removed at the end of the product’s useful life, with sorting and
recycling done separately.
Starting to use
• Before initial start, keep the refrigerator still for two hours before connecting it to power
supply.
• Before putting any fresh or frozen foods, the refrigerator shall have run for 2-3 hours, or
for above 4 hours in summer when the ambient temperature is high.
830 mm
135°
570 mm
1400 mm
1000
mm
• Spare enough space for convenient opening of the doors and drawers or statement by the
distributor.

9EN
Using the appliance
B
Energy saving tips
• The appliance should be located in the coolest area of the room, away from heat producing
appliances or heating ducts, and out of the direct sunlight.
• Let hot foods cool to room temperature before placing in the appliance. Overloading the
appliance forces the compressor to run longer. Foods that freeze too slowly may lose quality,
or spoil.
• Be sure to wrap foods properly, and wipe containers dry before placing them in the
appliance. This cuts down on frost build-up inside the appliance.
• Appliance storage bin should not be lined with aluminum foil, wax paper, or paper toweling.
Liners interfere with cold air circulation, making the appliance less efficient.
• Organize and label food to reduce door openings and extended searches. Remove as many
items as needed at one time, and close the door as soon as possible.

10 EN
Using the appliance
B
Structure and functions
Key components
Refrigerating chamber
• The Refrigerating Chamber is suitable for storage of a variety of fruits, vegetables,
beverages and other food consumed in the short term, suggested storage time 3 days to
5days.
• Cooking foods shall not be put in the refrigerating chamber until cooled to room
temperature.
• Foods are recommended to be sealed up before putting into the refrigerator.
• The glass shelves can be adjusted up or down for a reasonable amount of storage space
and easy use.
Freezing chamber
• The low temperature freezing chamber may keep food fresh for a long time and it is
mainly used to store frozen foods and making ice.
• The freezing chamber is suitable for storage of meat, fish, rice balls and other foods not
to be consumed in short term.
• Chunks of meat are preferably to be divided into small pieces for quick freezing and easy
access. Please be noted food shall be consumed within the shelf time.
Drawers, food boxes, shelves, etc. placed according to the position in the picture above
are the most energy efficient.
NOTE: Storage of too much food during operation
after the initial connection to power may adversely
affect the freezing effect of the refrigerator. Foods
stored shall not black the air outlet; or otherwise
the freezing effect will also be adversely affected.

11 EN
Using the appliance
B
Functions
A
B
C
D
1
3
5
8
2
4
6
79
1. Screen
1Radar icon 2Refrigerating icon 3Freezing icon
4OFF icon 5Lock/Unlock icon 6Temperature display area
7Super cool icon 8AUTO icon 9Super freezing icon
2. Control buttons
ARefrigerating butlon BFreezing butlon
CMode button DLock/Unlock button
12 EN
Using the appliance
B
3. 0peration instructions
Display
When electrify the refrigerator, the display screen will total display for 3 seconds. Meanwhile
the starting up bell rings and then the screen enters the normal display of the operation.
The first time for using the refrigerator, the default set temperature of refrigerating chamber
and freezing chamber is 5 °C/-18 °C respectively.
When the error occurs, the display shows the error code (see next page); during normal
running, the display shows the set temperature of the refrigerating chamber or freezing
chamber. Under normal circumstances, if there is no operation on display panel or door
opening action within 30s, then the display is Iock, and the sate goes out.
Lock /unlock
In the unlocked state, long press the Iock button for 3 seconds, enter the Iock state.
The logo goes outand buzzer sounds, il means the display panel is locked, at this time,
button operation cannot be implemented;
In the locked state, long press the Iock button for 3 seconds, enter the unlocked state.
The logo lights up and buzzer sounds, it means the display panel is unlocked, at this time,
button operation can be implemented;
Temperature setting of refrigerating chamber
Press temperature adjusting button of the refrigerating chamber to change the
setting temperature of refrigerating chamber, and then each time a press of temperature
adjusting button of the refrigerating chamber, the temperature will be reduced 1 °C;
The temperature setting range for refrigerating chamber is 2-8 °C. When the temperature
is 2 °C, press the button again, and the temperature of refrigerating chamber will be set at
8 °C, and it circulates accordingly.
Temperature setting of freezing chamber
Press temperature adjusting button of the freezing chamber to change the setting
temperature of freezing chamber and then each time a press of temperature adjusting
button of the freezing chamber, the temperature will be reduced 1 °C;
The temperature setting range for freezing chamber is -24 °C ~ -16 °C).
When the temperature is -24 °C, press the button again, and the temperature of freezing
chamber will be set at -16 °C, and it circulates again and again.
Mode setting
When super cool mode is set, temperature of refrigerating chamber will automatically
set at 2 °C; Super cool exits for 6h.
Exit super cool mode , temperature of refrigerating chamber will automatically return
back to temperature set before super cool mode.
When super freezing mode is set, temperature of freezing chamber will automatically
set at -24 °C; Super freezing exits for 24h.

13 EN
Using the appliance
B
Exit super freezing mode , temperature of freezing chamber will automatically return
back to temperature set before super freezing mode.
When vacation mode AUTO is set, temperature of freezing chamber will be automatically set
at -18 °C; the temperature of refrigerating chamber will be automatically set at 5 °C.
Recommended setting: refrigerating chamber 4 °C, freezing chamber - 18 °C.
Storage upon power failure
In case of power failure, the instant working state will be locked and maintained till
re-electrification.
Fault indication
The following warnings appearing on the display indicate corresponding faults of the
refrigerator. Though the refrigerator may still have cold storage function with the following
faults, the user shall contact a maintenance specialist for maintenance, so as to ensure
optimized operation of the appliance.
Error code Error description
E1 Temperature sensor failure of refrigerating chamber
E2 Temperature sensor failure of freezing chamber
E4 Failure of defrosting sensor in refrigerating chamber
E5 Freezing defrost sensor detection circuit error
E6 Communication error
E7 Circulation of temperature detection circuit errer
EH Moisture sensor error
Other manuals for Valberg 4D 511 E DX625C
1
This manual suits for next models
1
Table of contents
Languages:
Other Electro Depot Refrigerator manuals


 installation instructions")


