Electro Depot VALBERG CNF 327 E X742C User manual

EN
WARRANTY CONDITION
This product is guaranteed for a period of 2 years from the date of purchase* against any failure
resulting from a manufacturing or material defect. This warranty does not cover defects or
damage resulting from incorrect installation, improper use or abnormal wear of the product.
*as shown on the sales receipt.
FR
CONDITION DE GARANTIE
Ce produit est garanti pour une période de 2 ans à partir de la date d’achat*, contre toute
défaillance résultant d’un vice de fabrication ou de matériau. Cette garantie ne couvre pas les
vices ou les dommages résultant d’une mauvaise installation, d’une utilisation incorrecte ou
de l’usure anormale du produit.
*sur présentation du ticket de caisse.
NL
GARANTIEVOORWAARDEN
Dit product wordt gegarandeerd voor een periode van 2 jaar vanaf de aankoopdatum*, voor
elke storing die het gevolg is van een fabricagefout of het materiaal. Gebreken of schade door
slechte installatie, onjuist gebruik of abnormale slijtage van het product worden niet gedekt
door deze garantie.
*op vertoon van kassabon.
ES
CONDICIONES DE GARANTÍA
El certificado de garantía de este producto tiene una duración de 2 años a partir de la fecha de
compra* que se limita a los defectos de fabricación y averías del material. Se excluyen de la
garantía deficiencias o daños originados por una mala instalación, errores en la manipulación
o por un uso inadecuado.
*previa presentación del comprobante de compra.
972066 - CNF 327 E X742C
MADE IN PRC
ELECTRO DEPOT
1 route de Vendeville
59155 FACHES-THUMESNIL
FRANCE
INSTRUCTIONS FOR USE ....................02
CONSIGNES D'UTILISATION ....................24
GEBRUIKSAANWIJZINGEN ....................46
INSTRUCCIONES DE USO ....................68
09/2022 – V5
Refrigerator Freezer
Réfrigérateur-congélateur
Koelkast-diepvriezer
Frigorífico-congelador
2/2
1
2
3
4
5
6
7
2 3EN EN3 EN
Table of contents
2 EN
Thanks!
Thank you for choosing this VALBERG product.
Chosen, tested and recommended by ELECTRO DEPOT,
the products of the VALBERG brand are easy to use,
reliable and of an impeccable standard.
Thanks to this appliance, you can be sure that each
use will bring you satisfaction.
Welcome to ELECTRO DEPOT.
Visit our website: www.electrodepot.fr
APreview of the
appliance
CUseful information
BUsing the appliance Installation
User interface
Daily use
Cleaning
Replace the lamp
Helpful hints and tips
Troubleshooting
Description of the appliance

5EN
Using the appliance
B
4EN
Preview of the appliance
A
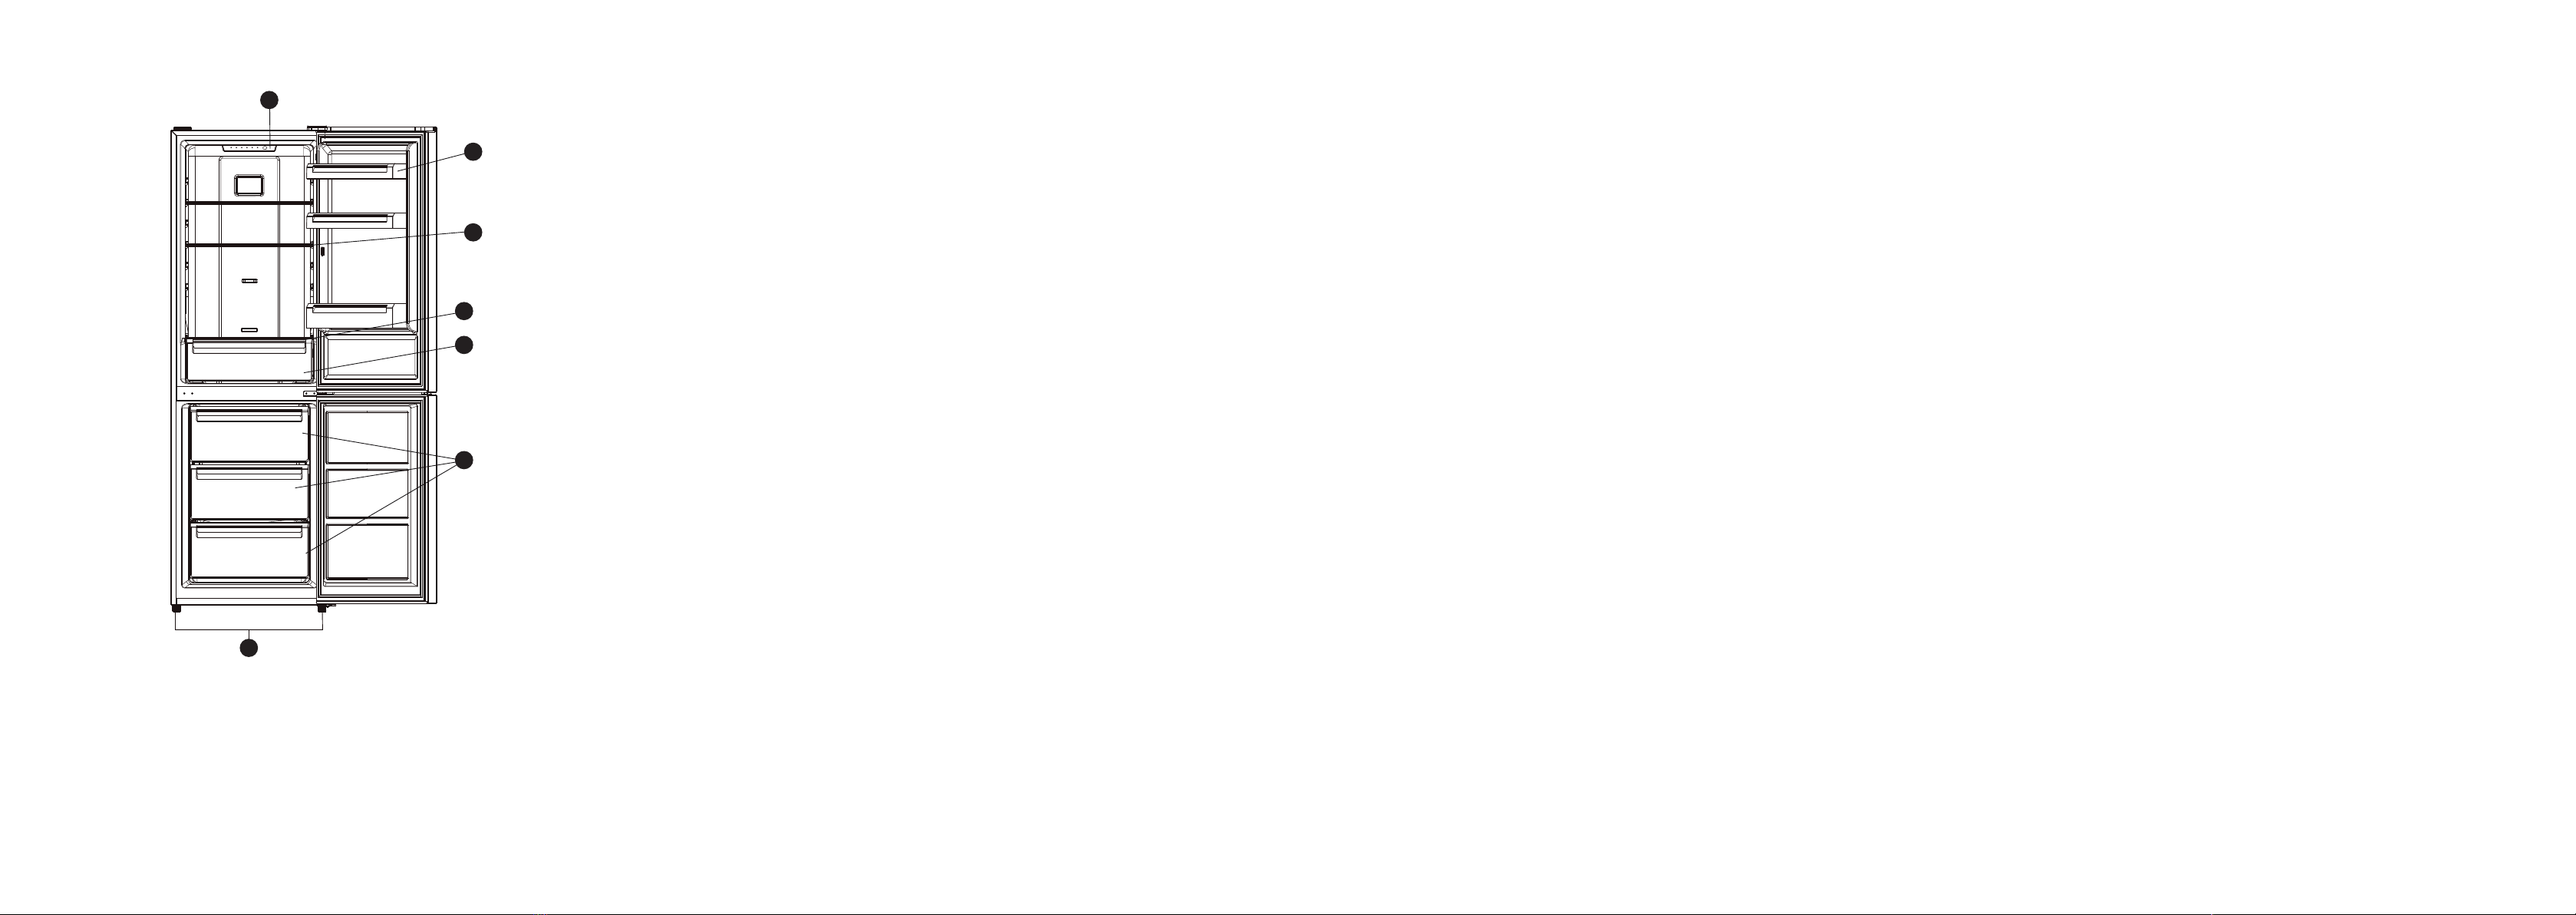
Description of the appliance
1Thermostat and Light
2Fridge Balconies
3Fridge Shelves
4Crisper Cover
5Crisper
6Freezer Drawers
7Leveling Feet
NOTE:
Above picture is for reference only. Real appliance probably
is different.
Installation
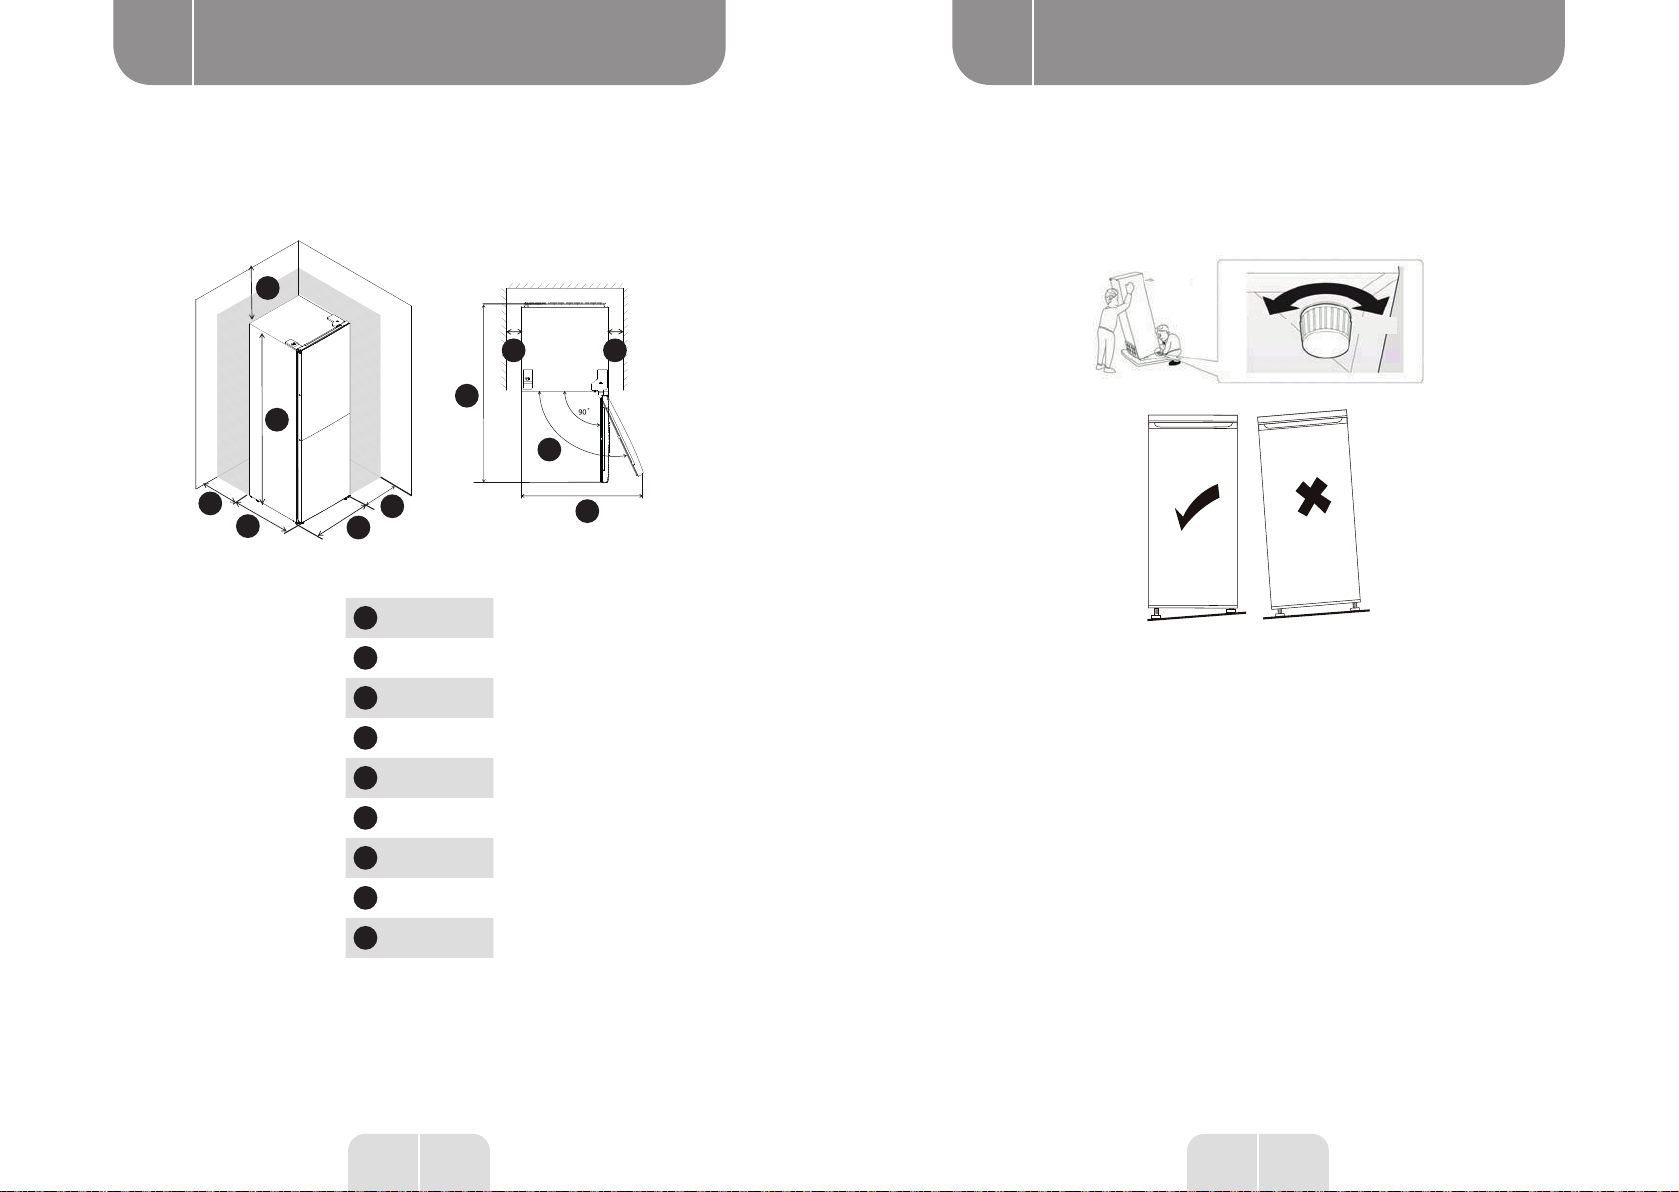
Space Requirement
• Select a location without direct exposure to sunlight;
• Select a location with enough space for the refrigerator doors to open easily;
• Select a location with level (or nearly level) flooring;
• Allow sufficient space to install the refrigerator on a flat surface;
• Allow clearance to the right, left, back and top when installing. This will help reduce power
consumption and keep your energy bills lower.
• Keep at lest 50mm gap at two sides and back.
Positioning
Install this appliance at a location where the ambient temperature corre sponds to the climate
class indicated on the rating plate of the appliance:
for refrigerating appliances with climate class:
- extended temperate: this refrigerating appliance is intended to be used at ambient
temperatures ranging from 10 °C to 32 °C;(SN)
- temperate: this refrigerating appliance is intended to be used at ambient
temperatures ranging from 16 °C to 32 °C;(N)
- subtropical: this refrigerating appliance is intended to be used at ambient
temperatures ranging from 16 °C to 38 °C;(ST)
- tropical: this refrigerating appliance is intended to be used at ambient
temperatures ranging from 16 °C to 43 °C;(T)
Location
The appliance should be installed well away from sources of heat such as radiators, boilers, direct
sunlight etc. Ensure that air can circulate freely around the back of the cabinet. To ensure best
performance, if the appliance is positioned below an overhanging wall unit, the minimum distance
between the top of the cabinet and the wall unit must be at least 50 mm. Ideally, however, the
appliance should not be positioned below overhanging wall units. Accurate leveling is ensured by
one or more adjustable feet at the base of the cabinet. This refrigerating appliance is not intended
to be used as a built-in appliance.
6 7
EN EN
Using the appliance Using the appliance
B B
WARNING:
It must be possible to disconnect the appliance from the
mains power supply; the plug must therefore be easily
accessible after installation.
Electrical connection
Before plugging in, ensure that the voltage and frequency shown on the rating plate correspond
to your domestic power supply. Tha appliance must be earthed. The power supply cable plug
is provided with a contact for this purpose. If the domestic power supply socket is not earthed,
connect the appliance to a separate earth in compliance with current regulations, consulting a
qualified electrician. The manufacturer declines all responsibility if the above safety precautions
are not observed. This appliance complies with the E.E.C. Directives.
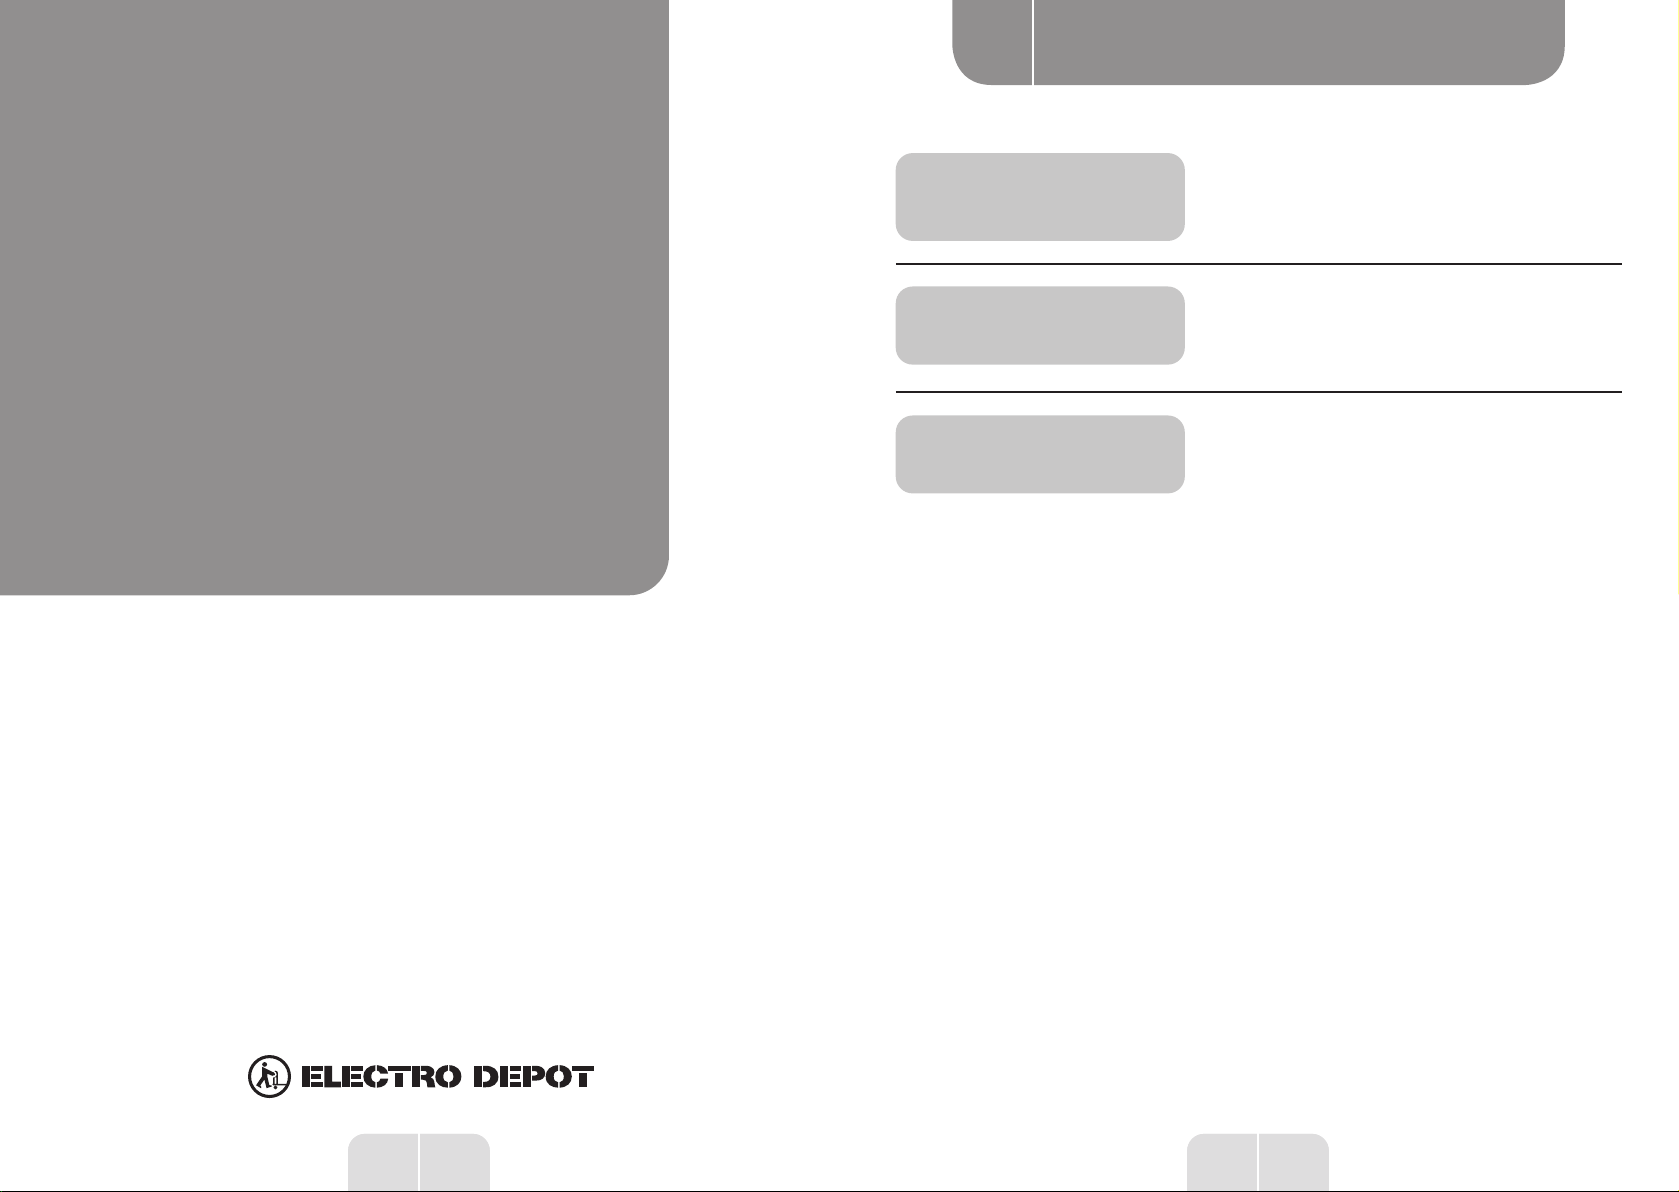
Door Reversibility
Before reversing the door, please be prepared below tools and material: straight screwdriver,
cross screwdriver, spanner and the components included in the poly bag:
Left Door Hinge Cover x 1 Left Aid-Closer on Upper
Door x 1
Left Aid-Closer on Lower
Door x 1
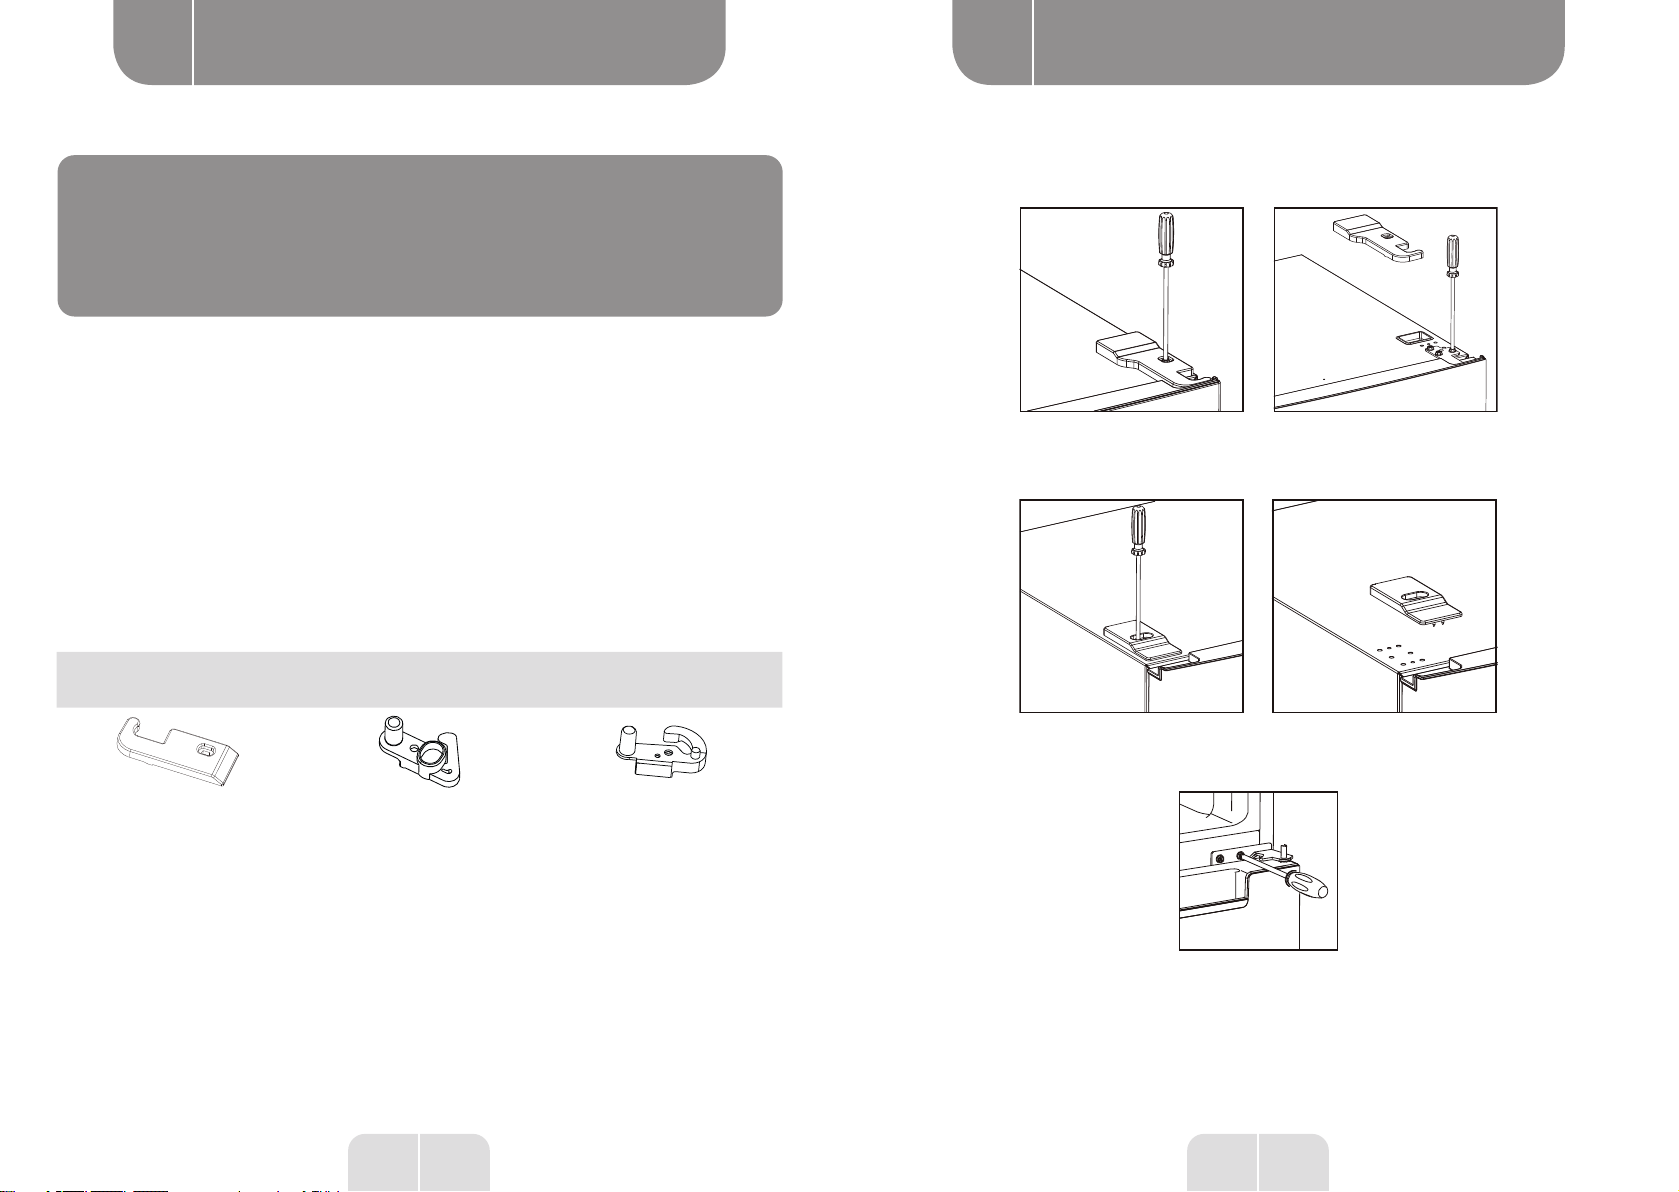
1. Unscrew top hinge cover and then unscrew the top hinge . Then lift upper door and place it on
a soft pad to avoid scratch and damage.
2. Remove the top left screw cover
3. Take off the upper door, take out the screw from the middle hinge by cross screwdriver, then
take off the lower door.
8 9
EN EN
Using the appliance Using the appliance
B B
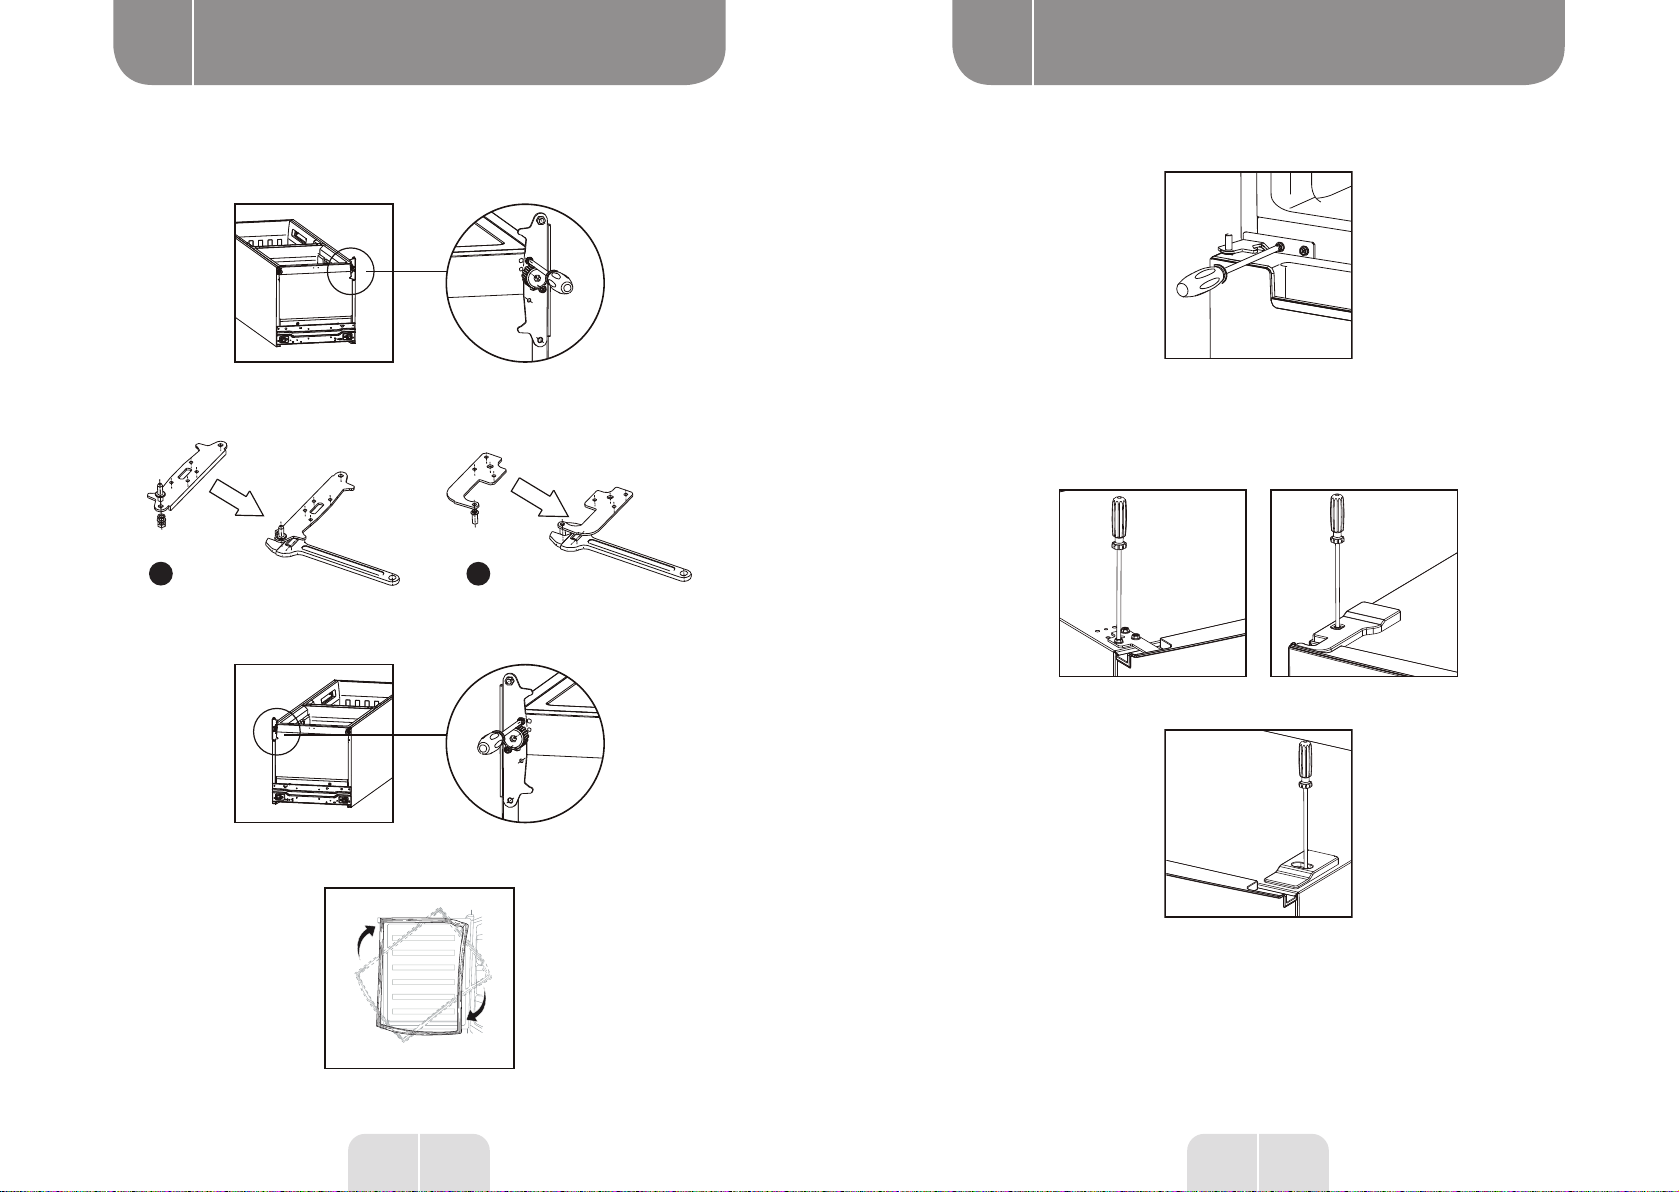
4. Laying down the refrigerator, take out the adjusting feet as below, then take off the lower hinge
by cross screwdriver.
5. Adjusting the hinge core position of the lower hinge and upper hinge to opposite position
12
6. Install the lower hinge under to the refrigerator like below, screwing in the adjusting feet, make
sure the position in horizon.
7. Detach the Fridge and the Freezer door gaskets and then attach them after rotating.
8. Install the lower door, adjust and fix the middle hinge onto the cabinet.
9. Place the upper door back on. Ensure the door is aligned horizontally and vertically so that the
seal are closed on all sides before finally tightening the top hinge. Then inert the top hinge and
screw it to the top of unit and then fix hinge cover (in accessary bag) by screw.
10. Fix the screw cover.
10 11
EN EN
Using the appliance Using the appliance
B B
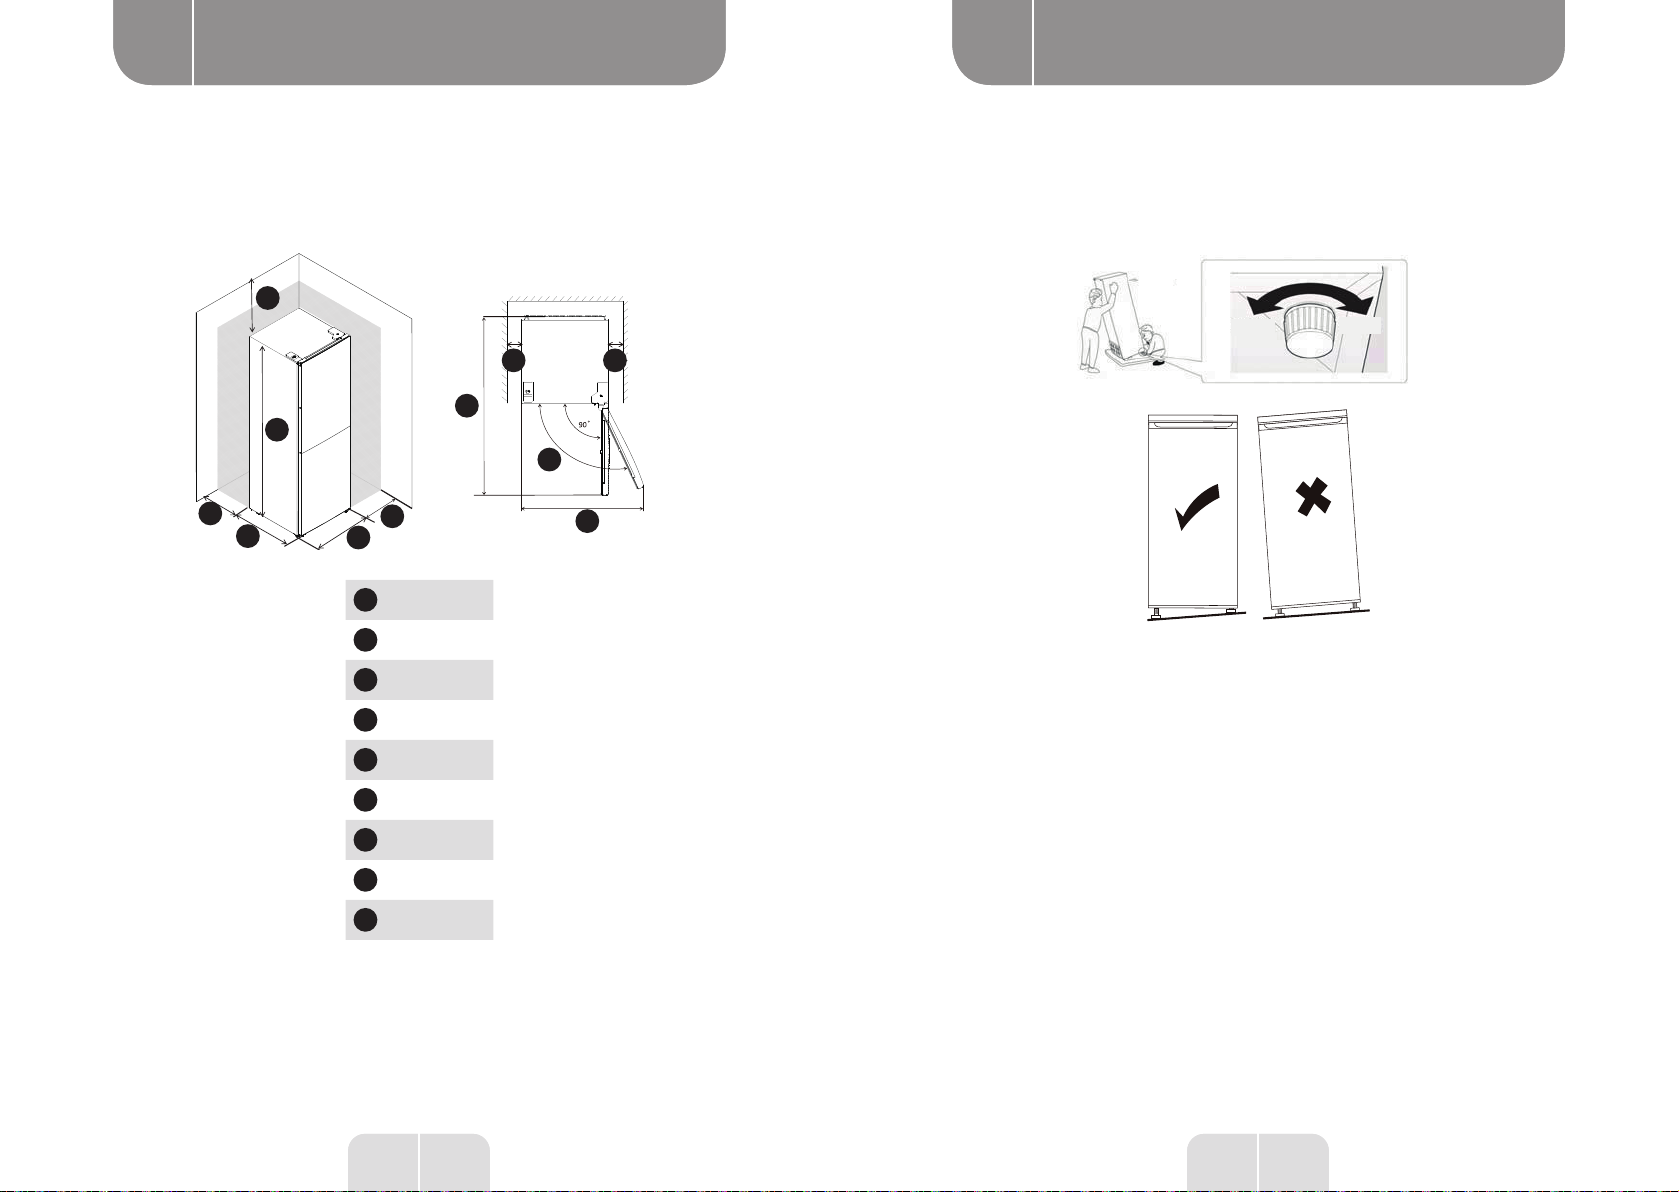
Space Requirement
• Keep enough space of door open.
• Keep at least 50mm gap at two sides and back.
E
C
DBAF
F F
H
I
G
A600
B685
C1850
Dmin=50
Emin=50
Fmin=50
G1200
H1285
I135°
Levelling the unit
To do this adjust the two levelling feet at front of the unit.
If the unit is not level, the doors and magnetic seal alignments will not be covered properly.
Doors
Lengthen Shorten
12 13
EN EN
Using the appliance Using the appliance
B B
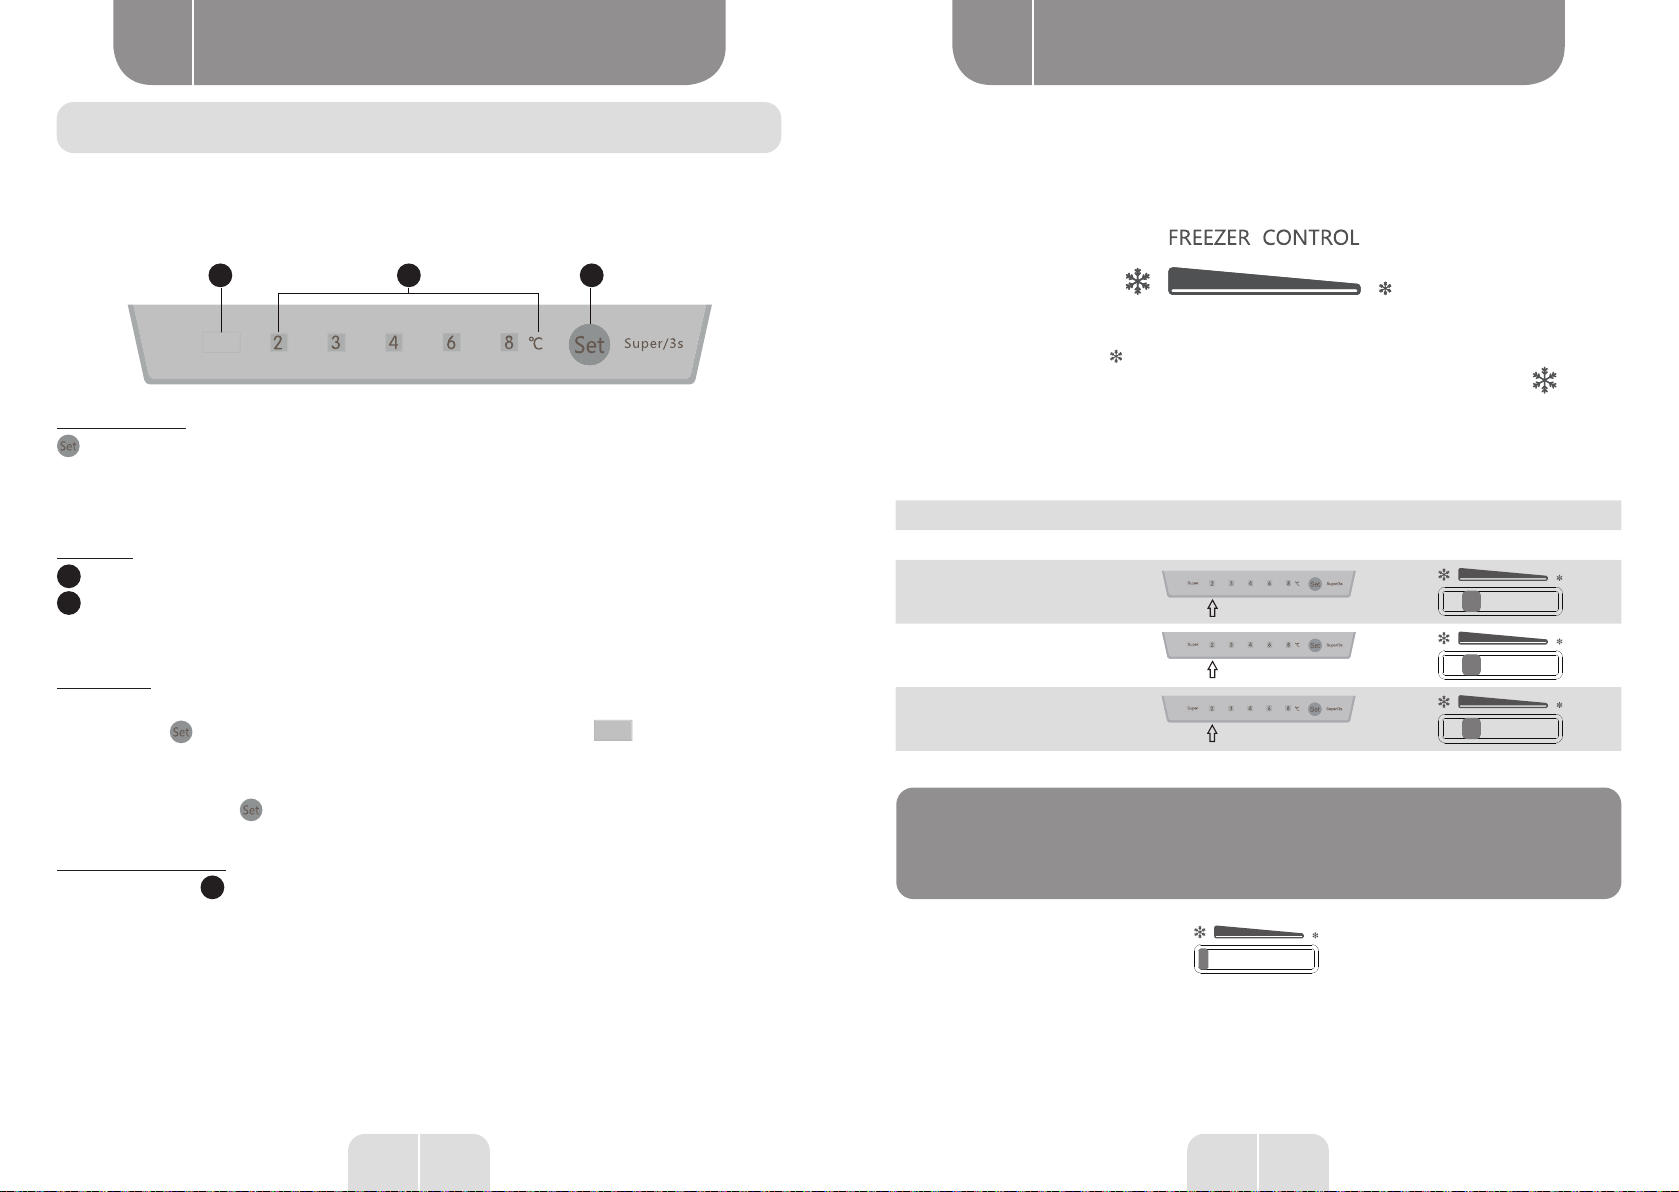
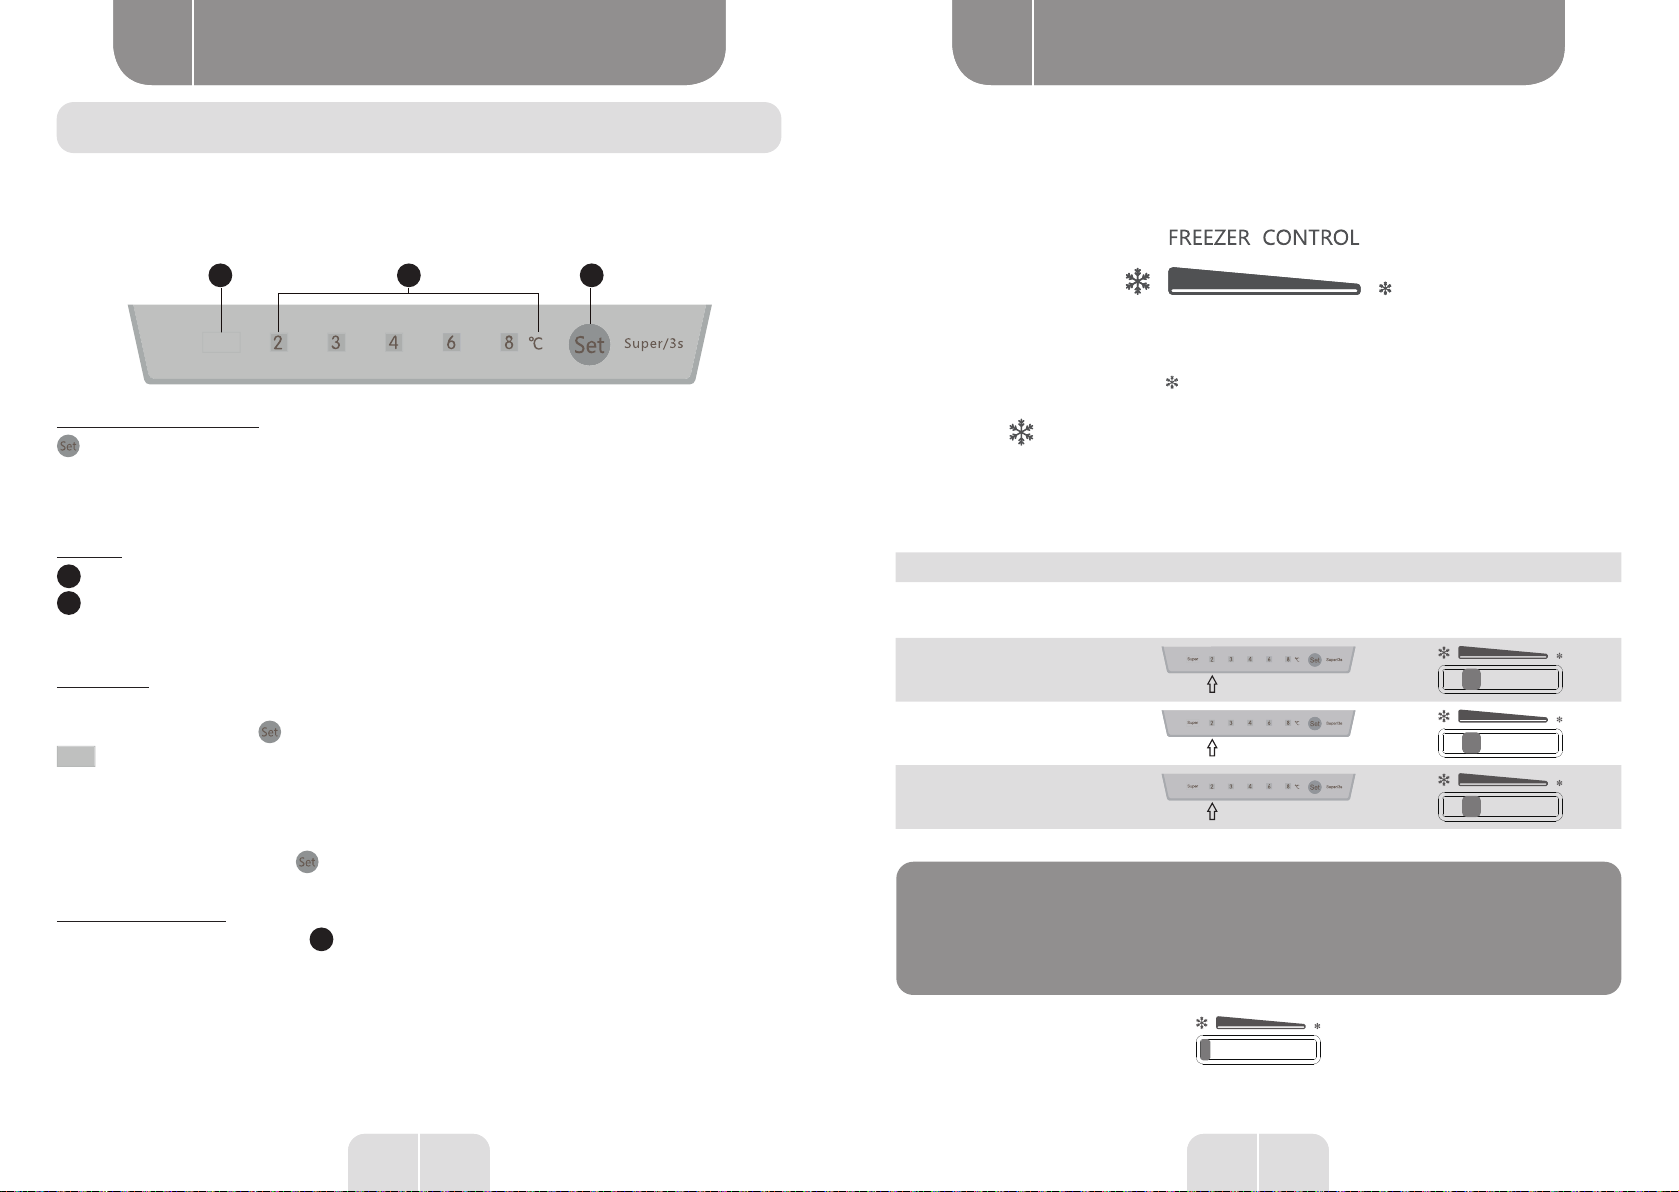
User interface
Temperature setting of fridge compartment
Fridge temperature setting Panel
Super
1 2 A
Operation button
Set button
Short press this button to select running temperature. Keep pressing this button for 3s to select
“Super” mode.
Indicators
1Super mode indicator: the light is on when Super mode is selected.
2Setting Temperature indicators of fridge compartment. The lighted indicat or means related
temperature is selected.
Super mode
Activate super mode:
Keep pressing
button for 3s,super mode will be activated, indicator
S
uper will be lighted.
When super mode is activated, fridge temperature will remain previous setting and can not
be changed by pressing
button.
Quit from Super mode
• Press Set button Afor over 3 seconds
• Or the appliance will automatically restore to original setting when Super mode has
running for more than 50 hours.
Temperature setting of freezer compartment
Freezer temperature setting slider:
• This slider in fridge compartment is used to adjust temperature of freezer compartment.
• Slider is positioned toward
,the temperature in freezer compartment will be higher. Contrarily
the temperature in freezer compartment will be lower if the slider is moved toward
.
.
• Middle position of slider is advised position for normal using.
Temperature setting recommendation
Temperature setting recommendation
Environment Temperature Fridge Compartment Freezer Compartment
16°C
25°C
32°C
WARNING:
Please never position the slider at left as below.

14 15
EN EN
Using the appliance Using the appliance
B B
Daily use
First use
Cleaning the interior
Before using the appliance for the first time, wash the interior and all internal accessories with
lukewarm water and some neutral soap so as to remove the typical smell of a brand new product,
then dry thoroughly.
IMPORTANT:
Do not use detergents or abrasive powders, as these will
damage the finish.
Daily use
Position different food in different compartments according to be below table
Refrigerator compartments Type of food
Door or balconies of fridge compartment
• Foods with natural preservatives, such as
jams,juices, drinks, condiments.
• Do not store perishable foods.
Crisper drawer (salad drawer)
• Fruits, herbs and vegetables should be placed
separately in the crisper bin.
• Do not store bananas, onions, potatoes, garlic in
Fridge shelf – middle • Dairy products, eggs
Fridge shelf – top
• Foods that do not need cooking, such as ready-
to-eat foods, deli meats, leftovers.
Freezer drawer(s)/shelf
• Foods for long-term storage.
• Bottom drawer/shelf for raw meat, poultry, fish.
• Middle drawer/shelf for frozen vegetables, chips.
• Top drawer/shelf for ice cream, frozen fruit, frozen
Freezing fresh food
• The freezer compartment is suitable for freezing fresh food and storing frozen and deep-frozen
food for a long time.
• Place the fresh food to be frozen in the bottom compartment.
• The maximum amount of food that can be frozen in 24 hours is specified on the rating plate.
• The freezing process lasts 24 hours: during this period do not add other food to be frozen.
In order to get bigger freezing capacity, please put unfrozen food into freezer compartment after
you have started super mode for 26 hours.
Storing frozen food
When first starting-up or after a period out of use. Before putting the product in the compartment
let the appliance run at least 2 hours on the higher settings.
IMPORTANT:
In the event of accidental defrosting, for example the power
has been off for longer than the value shown in the technical
characteristics chart under “rising time”, the defrosted
food must be consumed quickly or cooked immediately and
then re-frozen (after cooked).
Thawing
Deep-frozen or frozen food, prior to be used, can be thawed in the freezer compartment or at
room temperature, depending on the time available for this operation.
Small pieces may even be cooked still frozen, directly from the freezer. In this case, cooking will
take longer.
17 EN
Useful information
C
16 EN
Using the appliance
B
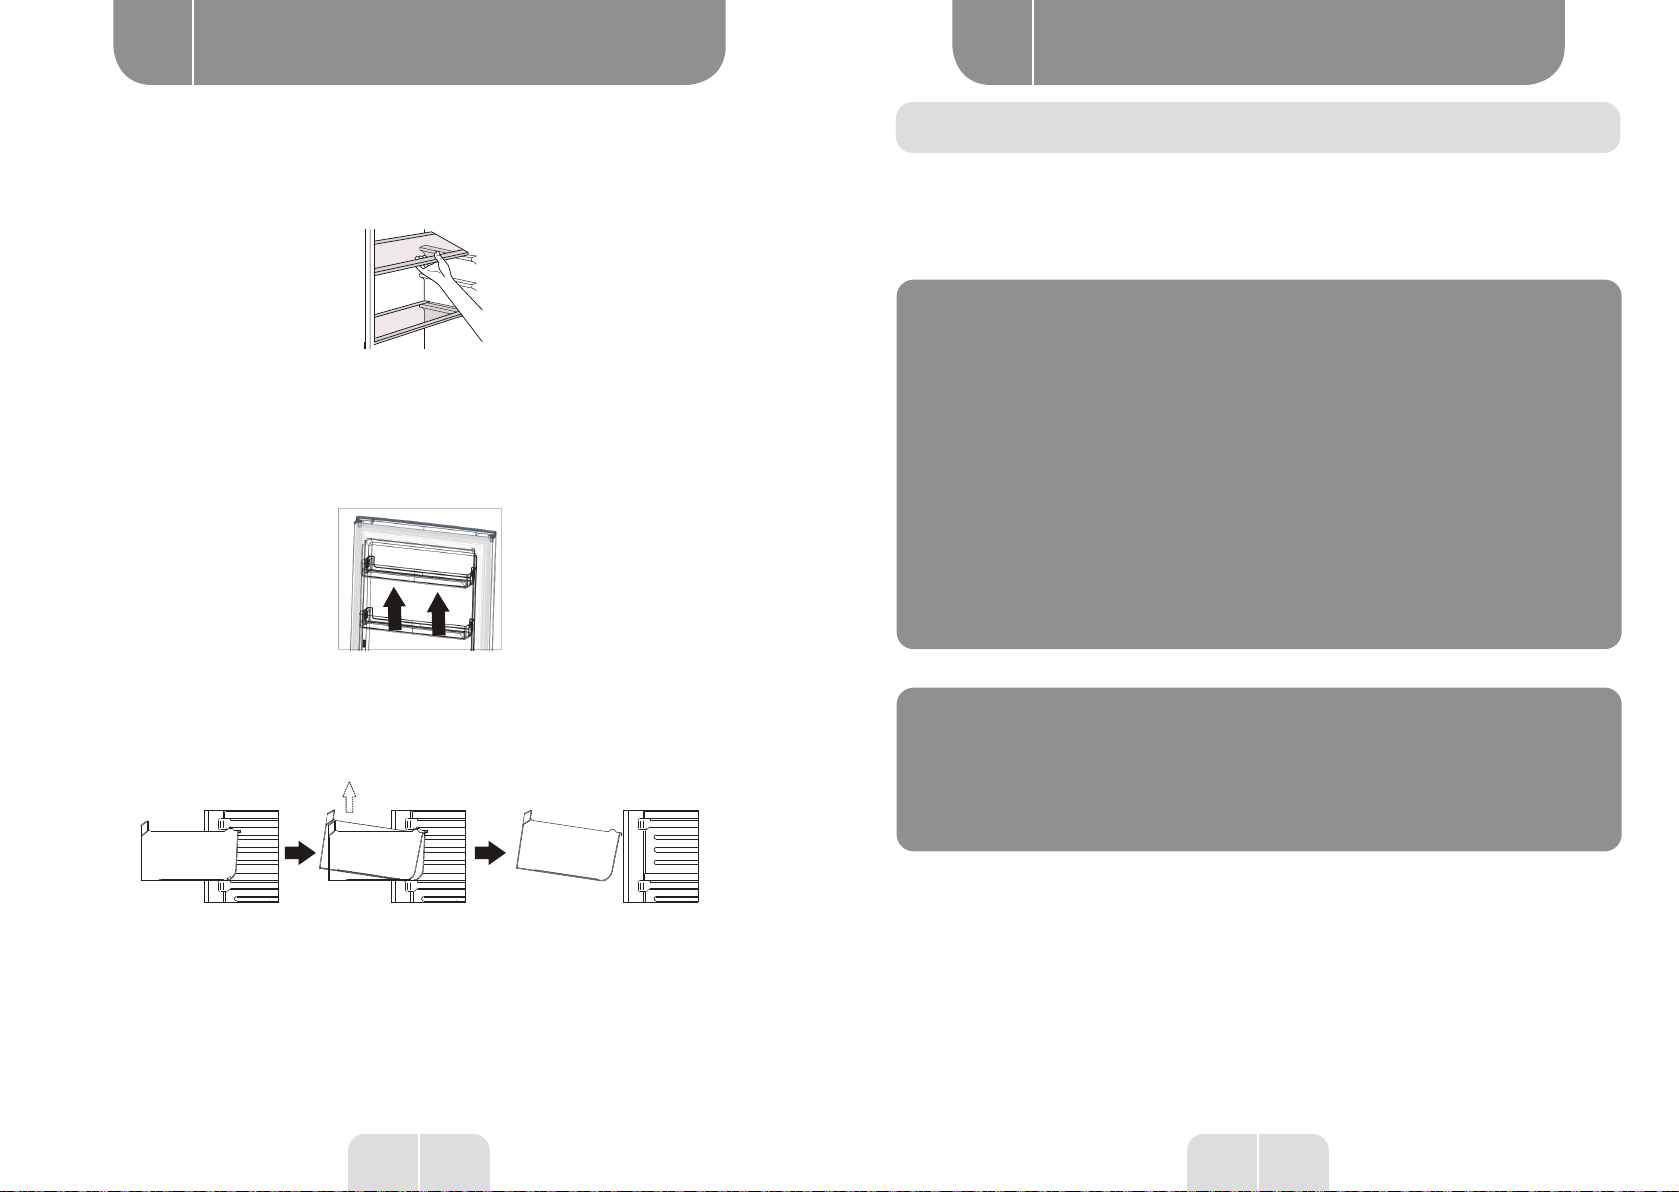
Accessories Movable shelves
The walls of the refrigerator are equipped with a series of runners so that the shelves can be
positioned as desired.
Positioning the door balconies
Door balconies can be disassembled for cleaning. To make the disassembling as follows: gradually
pull the balcony in the direction of the arrows until it comes free, after cleaning, reposition it.
Disassemble the bottom drawer
1.Pull out the bottom drawer to stopper position.
2.Lift up the front of drawer.
3.Pull out the bottom drawer.
Cleaning
For hygienic reasons the appliance interior, including interior
accessories, should be cleaned regularly.
CAUTION:
The appliance may not be connected to the mains during
cleaning. Danger of electrical shock! Before cleaning
switch the appliance off and remove the plug from the
mains, or switch off or turn out the circuit breaker or
fuse. Never clean the appliance with a steam cleaner.
Moisture could accumulate in electrical components,
danger of electrical shock! Hot vapors can lead to the
damage of plastic parts. The appliance must be dry
before it is placed back into service.
IMPORTANT:
Ethereal oils and organic solvents can attack plastic
parts, e.g. lemon juice or the juice form orange peel,
butyric acid, cleanser that contain acetic acid.
• Do not allow such substances to come into contact the
appliance parts.
• Do not use any abrasive cleaners
18 19
EN EN
Useful information Useful information
C C
• Remove the food from the freezer. Store them in a cool
place, well covered.
• Switch the appliance off and remove the plug from the
mains, or switch off or turn out the circuit breaker of fuse.
• Clean the appliance and the interior accessories with a
cloth and lukewarm water. After cleaning wipe with fresh
water and rub dry.
• After everything is dry place appliance back into service.
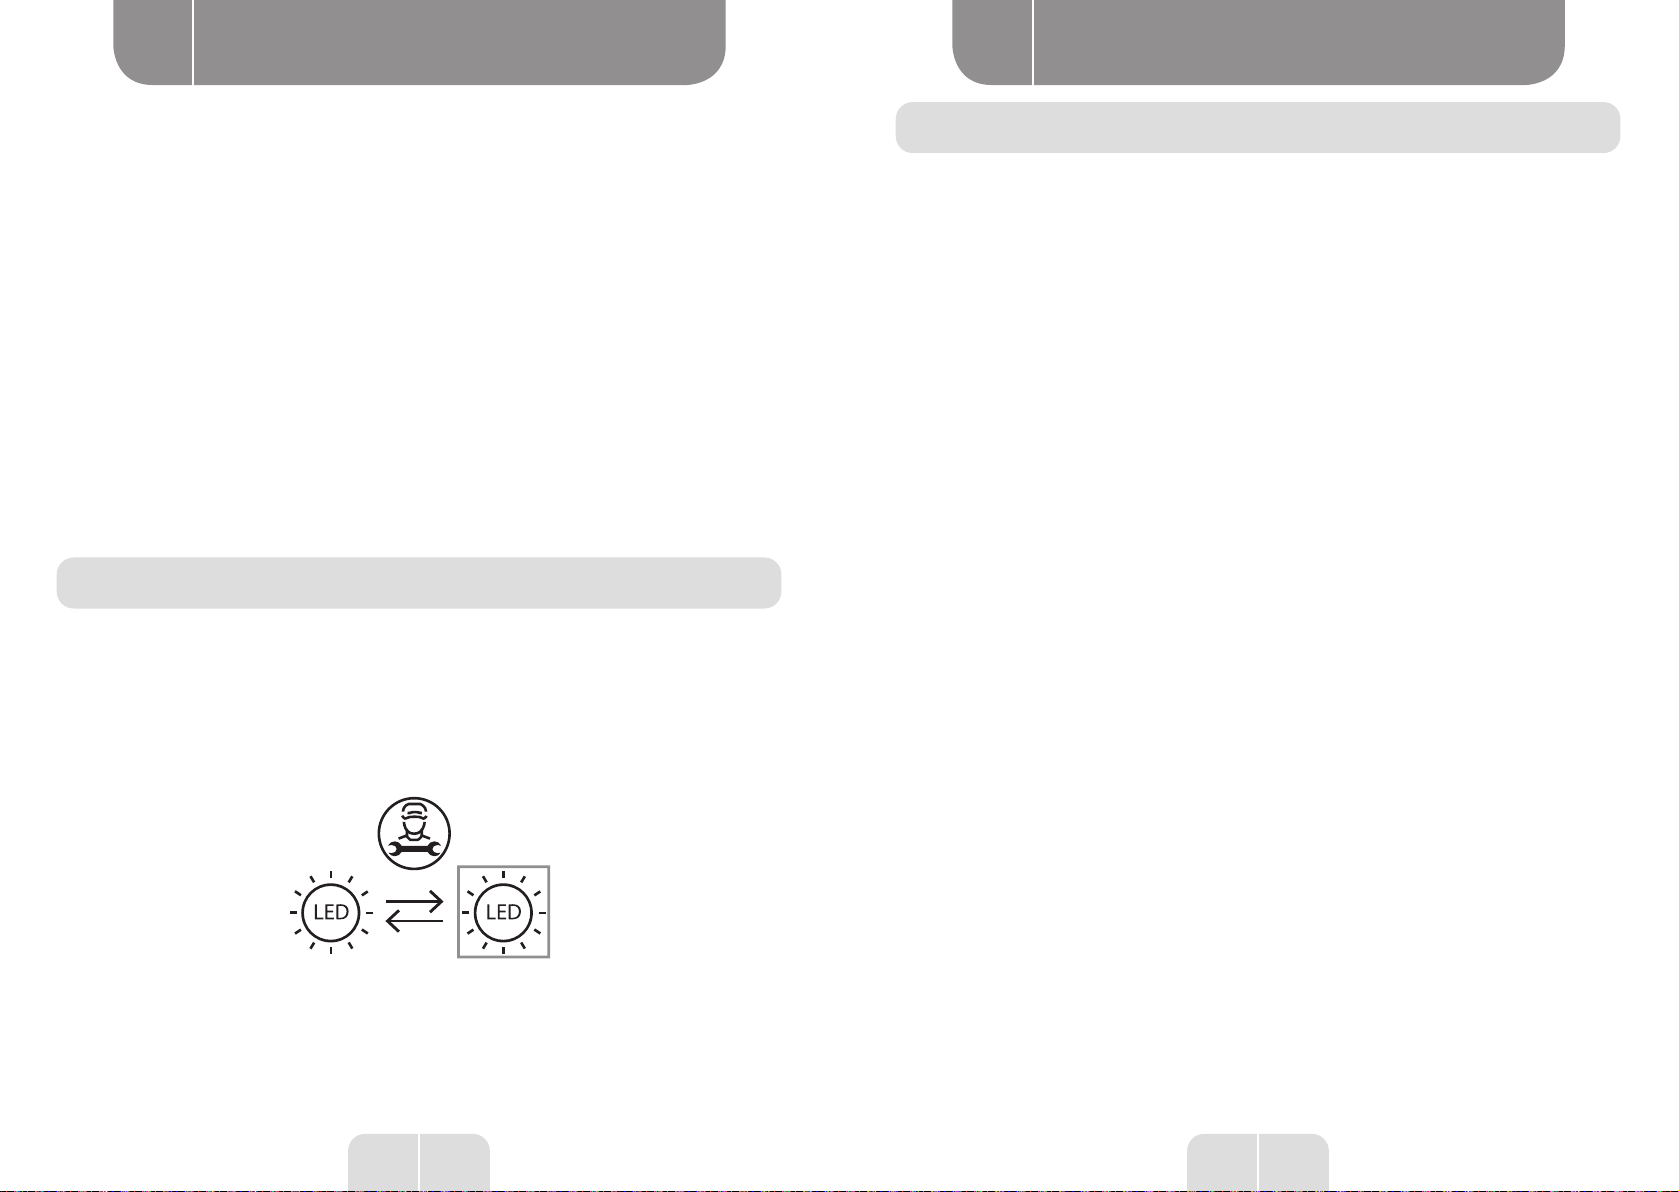
Replace the lamp
This product contains a light source of energy efficiency class G.
Light source in this product can only be replaced by qualified professionals.
Please contact after-sales service if the light source fails.
The light source shall be removed at the end of the product’s useful life, with sorting and recycling
done separately.
Helpful hints and tips
Hints for freezing
To help you make the most of the freezing process, here are some important hints:
• the maximum quantity of food which can be frozen in 24 hrs. is shown on the rating plate;
• the freezing process takes 24 hours. No further food to be frozen should be added during this
period;
• only freeze top quality, fresh and thoroughly cleaned, foodstuffs;
• prepare food in small portions to enable it to be rapidly and completely frozen and to make it
possible subsequently to thaw only the quantity required;
• wrap up the food in aluminium foil or polythene and make sure that the packages are airtight;
• do not allow fresh, unfrozen food to touch food which is already frozen, thus avoiding a rise in
temperature of the latter;
• lean foods store better and longer than fatty ones; salt reduces the storage life of food;
• water ices, if consumed immediately after removal from the freezer compartment, can possibly
cause the skin to be freeze burnt;
• it is advisable to show the freezing in date on each individual pack to enable you to keep tab of
the storage time.
Hints for storage of frozen food
To obtain the best performance from this appliance, you should:
• make sure that the commercially frozen foodstuffs were adequately stored by the retailer;
• be sure that frozen foodstuffs are transferred from the food store to the freezer in the shortest
possible time;
• not open the door frequently or leave it open longer than absolutely necessary.

20 21
EN EN
Useful information Useful information
C C
Once defrosted, food deteriorates rapidly and cannot be refrozen.
Do not exceed the storage period indicated by the food manufacture.
Hints for fresh food refrigeration
To obtain the best performance:
• Do not store warm food or evaporating liquids in the refrigerator
• Do cover or wrap the food, particularly if it has a strong flavour
Hints for refrigeration
Useful hints:
• Make (all types): wrap in polythene bags and place on the glass shelves above the vegetable drawer.
• For safety, store in this way only one or two days at the most.
• Cooked foods, cold dishes, etc...: these should be covered and may be placed on any shelf.
• Fruit and vegetables: these should be thoroughly cleaned and placed in the special drawer(s)
provided.
• butter and cheese: these should be placed in special airtight containers or wrapped in aluminum
foil or polythene bags to exclude as much air as possible.
• Milk bottle: these should have a cap and should be stored in the balconies on the door.
• Bananas, potatoes, onions and garlic, if not packed, must not be kept in the fridge.
Troubleshooting
CAUTION:
Before troubleshooting, disconnect the power supply.
Only a qualified electrician of competent person must do
the troubleshooting that is not in this manual.
IMPORTANT:
There are some sounds during normal use (compressor,
refrigerant circulation).
Problem Possible cause Solution
Appliance does not work
Temperature regulation knob is set
at coldest
Set the knob at other switch on the
appliance.
Mains plug is not plugged in or is
loose Insert mains plug.
Fuse has blown or is defective Check fuse, replace if necessary.
Socket is defective Mains malfunctions are to be
corrected by an electrician.
Appliance freezes or
cools too much
Temperature is set too cold or the
appliance runs at coldest.
Turn the temperature regulator to a
warmer setting temporarily.
The food is not frozen
enough.
Temperature is not properly
adjusted.
Please look in the initial Temperature
Setting section.
Door was open for an extended
period.
Open the door only as long as
necessary.
A large quantity of warm food was
placed in the appliance within the
last 24 hours.
Turn the temperature regulation to a
colder setting temporarily.
The appliance is near a heat source. Please look in the installation
location section.

22 23
EN EN
Useful information
CNote
Problem Possible cause Solution
Heavy build up of frost on
the door seal. Door seal is not air tight.
Carefully warm the leaking sections
of the door seal with a hair dryer
(on a cool setting). At the same time
shape the warmed door seal by hand
such that it sits correctly.
Unusual noises
Appliance is not level. Re-adjust the feet.
The appliance is touching the wall
or other objects. Move the appliance slightly.
A component, e.g. a pipe, on the
rear of the appliance is touching
another part of the appliance or the
wall.
If necessary, carefully bend the
component out of the way.
Water on the floor Water drain hole is blocked. See the Cleaning and Care section.
Side panels are hot. It’s normal. Heat exchange parts
are in the sides. Take gloves to touch sides if needed.
If the malfunction shows again, contact the Service Center.
These data are necessary to help you quickly and correctly. Write the necessary data here, refer
to the rating plate.
24 25EN EN
Preview of the appliance
A A
24 25FR FR25 FR
Table des matières
24 FR
Merci!
Nous vous remercions d'avoir choisi ce produit
VALBERG.
Choisis, testés et recommandés par ELECTRO DEPOT,
les produits de la marque VALBERG sont simples
d'utilisation, tout en offrant des performances
fiables et une qualité irréprochable.
Grâce à cet appareil, vous êtes assuré(e) que chaque
utilisation vous apportera satisfaction.
Bienvenue chez ELECTRO DEPOT.
Consultez notre site Internet: www.electrodepot.fr
www.electrodepot.be
AAperçu de l'appareil
CInformations utiles
BUtilisation de
l'appareil
Installation
Interface utilisateur
Utilisation quotidienne
Nettoyage
Remplacement de la lampe
Trucs et astuces utiles
Dépannage
Description de l’appareil
Les notices sont aussi disponibles sur le site
http://www.electrodepot.fr/sav/notices/
http://www.electrodepot.be/fr/sav/notices
VVOOTRETRE AAVISVIS CCOMPTE !OMPTE !
PARTAGEZ
VOTRE EXPERIENCE
SUR LES PRODUITS
Parce que votre satisfaction est notre priorité, nous vous proposons
de donner votre avis sur ce produit. Il sera transmis et analysé par
nos équipes afin d’améliorer continuellement le produit.
Donnez votre avis sur http://www.electrodepot.fr/avis-client

27 EN
Using the appliance
B
26 EN
Preview of the appliance
A
27 FR
Utilisation de l'appareil
B
26 FR
Aperçu de l'appareil
A
Description de l’appareil
1Thermostatet éclairage
2Balconnets du réfrigérateur
3Clayette du réfrigérateur
4Tablette de protection du bac à légumes
5Bac à légumes
6Tiroirs du congélateur
7Pieds de réglage
REMARQUE :
l'image ci-dessus est présentée à titre de référence
uniquement. L'appareil peut être différent.
Installation
Contraintes d'espacement
• Sélectionnez un emplacement sans exposition directe aux rayons du soleil ;
• Sélectionnez un emplacement avec sufsamment d'espace pour que les portes du réfrigérateur
s'ouvrent facilement ;
• Sélectionnez un emplacement où le sol est régulier (ou presque) ;
• Laissez sufsamment d'espace pour installer le réfrigérateur sur une surface plane ;
• Laissez un espace à droite, à gauche, à l'arrière et en haut au moment de l'installation. Cela
permettra de réduire la consommation d'énergie et de garder des factures d'électricité basses.
• Maintenez un espace d'au moins 50mm des deux côtés et à l'arrière.
Positionnement
Installez l'appareil dans un endroit où la température ambiante correspond à la classe climatique
indiquée sur la plaque signalétique de l'appareil:
pour les appareils de réfrigération avec une classe climatique:
- tempérée élargie: cet appareil de réfrigération est conçu pour être utilisé à des températures
ambiantes allant de 10 à 32° C; (SN)
- tempérée: cet appareil de réfrigération est conçu pour être utilisé à des températures ambiantes
allant de 16 à 32° C ; (N)
- subtropicale: cet appareil de réfrigération est conçu pour être utilisé à des températures ambiantes
allant de 16 à 38° C ; (ST)
- tropicale cet appareil de réfrigération est conçu pour être utilisé à des températures ambiantes
allant de 16 à 43° C ; (T)
Emplacement
L'appareil doit être installé à l'écart de sources de chaleur telles que les radiateurs, les chaudières,
les rayons directs du soleil, etc. Veillez à ce que l'air puisse circuler librement à l'arrière du caisson.
Pour garantir des performances optimales, si l'appareil est positionné sous une xation murale
en saillie, la distance minimale entre le haut du caisson et la xation murale doit être d'au moins
50mm. Il convient toutefois de ne pas positionner l'appareil sous des xations murales en saillie,
dans l'idéal. Une mise à niveau précise est possible grâce à un ou plusieurs pieds réglables situés
au bas de l'appareil. Cet appareil de réfrigération n’est pas conçu pour être utilisé comme un
élément de cuisine intégrée.

28 29EN EN
Using the appliance Using the appliance
B B
28 29FR FR
Utilisation de l'appareil Utilisation de l'appareil
B B
AVERTISSEMENT :
Ildoitêtrepossiblededébrancherl'appareildel'alimentation
secteur; la prise doit donc être facilement accessible après
l'installation.
Branchements électriques
Avant de brancher l’appareil, vériez que la tension et la fréquence indiquées sur la plaque
signalétique correspondent à celles de votre alimentation électrique domestique. Cet appareil
doit être relié à la terre. La che du câble d'alimentation fournie est dotée d'un contact prévu à
cet effet. Si la prise d'alimentation électrique domestique n'est pas reliée à la terre, raccordez
l'appareil à une ligne de terre distincte conformément aux réglementations en vigueur, en faisant
appel à un électricien qualié. Le fabricant décline toute responsabilité en cas de non-respect des
précautions de sécurité ci-dessus. L'appareil est conforme aux directives européennes.
Réversibilité de la porte
Avant de procéder à l'inversion de la porte, veuillez préparer les outils et le matériel ci-dessous:
tournevis plat, tournevis cruciforme, clé et les composants se trouvant dans le sachet plastique:
Cache-charnière de porte
gauche x 1
Aide fermeture gauche pour
la porte du haut x 1
Aide fermeture gauche pour
la porte du bas x 1
1. Dévissez le cache-charnière du haut puis dévissez la charnière du haut. Ensuite, retirez la porte
du haut et placez-la sur une protection douce an d'éviter toute éraure.
2. Retirez le cache-vis en haut à gauche
3. Retirez la porte du haut, enlevez la vis de la charnière du milieu à l'aide d'un tournevis cruciforme,
puis retirez la porte du bas.

30 31EN EN
Using the appliance Using the appliance
B B
30 31FR FR
Utilisation de l'appareil Utilisation de l'appareil
B B
4. En laissant le réfrigérateur à l’horizontal, retirez les pieds d’ajustement comme indiqué ci-
dessous, puis retirez la charnière du bas à l’aide d’un tournevis cruciforme.
5. Réglage de la position centrale de la charnière du bas et de la charnière du haut en position
opposée
12
6. Installez la charnière du bas sous le réfrigérateur comme indiqué ci-dessous, vissez les pieds
d’ajustement et assurez-vous de la position.
7. Démontez les joints des portes du réfrigérateur et du congélateur, puis réinstallez-les après
avoir procédé à l'inversion.
8. Installez la porte inférieure, réglez et xez la charnière du milieu sur le caisson.
9. Remontez la porte du haut. Assurez-vous que la porte est alignée horizontalement et verticalement
de façon à ce que les joints recouvrent bien chaque côté, avant de serrer la charnière. Puis inversez
la charnière du haut et vissez-la en haut de l’unité, puis installez le cache-charnière (dans le sachet
d’accessoires) à l’aide d’une vis.
10. Installez le cache-vis.
32 33EN EN
Using the appliance Using the appliance
B B
32 33FR FR
Utilisation de l'appareil Utilisation de l'appareil
B B
Espace requis
• Gardez sufsamment d'espace pour ouvrir la porte.
• Maintenez un espace d'au moins 50mm des deux côtés et à l'arrière.
E
C
DBAF
F F
H
I
G
A600
B685
C1850
Dmini. 50
Emini. 50
Fmini. 50
G1200
H1285
I135°
Mise à niveau de l'appareil
Pour cela, réglez les deux pieds de mise à niveau à l'avant de l'appareil.
Si l'appareil n'est pas droit, les portes et joints magnétiques ne seront pas correctement alignés.
Portes
Allonger Raccourcir
34 35EN EN
Using the appliance Using the appliance
B B
34 35FR FR
Utilisation de l'appareil Utilisation de l'appareil
B B
Interface utilisateur
Réglage de la température du compartiment du réfrigérateur
Panneau de réglage de la température du réfrigérateur
Super
1 2 A
Bouton de fonctionnement
Bouton de réglage
Appuyez brièvement sur ce bouton pour sélectionner la température de fonctionnement. Continuez
à appuyer sur ce bouton pendant 3 secondes pour sélectionner le mode «Super».
Témoins
1Témoin mode Super: la lumière est allumée quand le mode Super est sélectionné.
2
Témoins de réglage de température du compartiment du réfrigérateur. Le témoin allumé
signie que la température correspondante est sélectionnée.
Mode Super
Activer le mode super:
Continuez à appuyer sur le
bouton pendant 3 secondes, le mode super sera activé, et le témoin
S
uper s’allumera.
Quand le mode super est activité, la température du réfrigérateur restera au réglage précédent
et ne peut pas
être changé en appuyant sur le
bouton.
Quittez le mode Super
• Appuyez sur le bouton Réglage Apendant plus de 3 secondes
• Ou l’appareil se remettra automatiquement sur son réglage d’origine quand le mode Super
fonctionne pendant plus de 50 heures.
Commande de la température du compartiment du congélateur
Glissière de réglage de la température du congélateur:
• Cette glissière dans le compartiment réfrigérateur sert à régler la température du compartiment
congélateur.
• Si la glissière est déplacée vers
, la température du compartiment sera plus élevée. Au
contraire, la température dans le compartiment congélateur sera plus basse si la glissière est
déplacée vers
.
.
• Une position centrale de la glissière est conseillée pour une utilisation normale.
Recommandation de réglage de la température
Recommandation de réglage de la température
Température de
l’environnement Compartiment réfrigérateur Compartiment congélateur
16°C
25°C
32°C
AVERTISSEMENT :
Ne jamais positionner la glissière sur la gauche comme
montré ci-dessous.

36 37EN EN
Using the appliance Using the appliance
B B
36 37FR FR
Utilisation de l'appareil Utilisation de l'appareil
B B
Utilisation quotidienne
Première utilisation
Nettoyage de l'intérieur
Avant d'utiliser l'appareil pour la première fois, nettoyez l'intérieur et tous les accessoires internes
avec de l'eau tiède et du savon neutre an d'éliminer l'odeur propre à un produit neuf, puis séchez
soigneusement.
IMPORTANT :
N'utilisez pas de détergents ou de poudres abrasives, car
ils endommageraient la nition.
Utilisation quotidienne
Placez les différents aliments à différents emplacements selon le tableau ci-dessous
Compartiments du réfrigérateur Type d’aliment
Porte ou balconnets du compartiment
réfrigérateur
• Aliments avec des conservateurs naturels, comme
les contures, jus de fruits, boissons et condiments.
• Ne pas stocker d’aliments périssables.
Bac à légumes
• Les fruits, herbes aromatiques et légumes doivent
être placés séparément dans le bac à légumes.
• Ne pas y stocker de bananes, d’oignons, de
pommes de terre ou d’ail
Clayette du réfrigérateur – milieu • Produits laitiers, œufs
Clayette du réfrigérateur – haut
• Aliments ne nécessitant pas de cuisson, comme
les aliments prêts à manger, la charcuterie, les
restes.
Tiroir(s)/clayette du congélateur
• Aliments à longue durée de conservation.
• Tiroir/clayette du bas pour la viande, la volaille
ou le poisson crus.
• Tiroir/clayette du milieu pour les légumes et frites
surgelés.
• Tiroir/clayette du haut pour les glaces, fruits
congelés
Congélation de denrées fraîches
• Le compartiment du congélateur permet de congeler des denrées fraîches et de conserver des
denrées congelées et surgelées pendant une longue période.
• Placez les denrées fraîches à congeler dans le compartiment du bas.
• La quantité maximale de denrées pouvant être congelées en 24heures est indiquée sur la
plaque signalétique.
• Le processus de congélation dure 24heures: pendant cette période, n'ajoutez pas d'autres
denrées à congeler.
An d’obtenir une plus grande capacité de congélation, veuillez placer les aliments non congelés
dans le compartiment congélateur après avoir enclenché le mode super pendant 26 heures.
Conservation des aliments surgelés
Lors du premier démarrage ou après une période de non-utilisation. Avant de placer le produit
dans le compartiment, laissez l'appareil fonctionner pendant au moins 2heures aux réglages
les plus élevés.
IMPORTANT :
En cas de décongélation accidentelle, par exemple si
l'alimentation électrique a été coupée pendant plus
longtemps que la valeur indiquée dans le tableau des
caractéristiques techniques sous la mention «Autonomie»,
les denrées décongelées doivent être consommées
rapidement, ou cuites immédiatement puis recongelées
(une fois cuites).
Décongélation
Les denrées surgelées ou congelées peuvent être décongelées, avant consommation, dans le
compartiment réfrigérateur ou à température ambiante, en fonction du temps dont vous disposez
pour cette opération.
This manual suits for next models
1
Table of contents
Languages:
Other Electro Depot Refrigerator manuals


