Electrolux Professional UNIC TANGO ACE-ST DUO User manual

Install...............................................................3
Adjust Voltage............................................................................4
Grinder Adjustment and Calibration........................................5
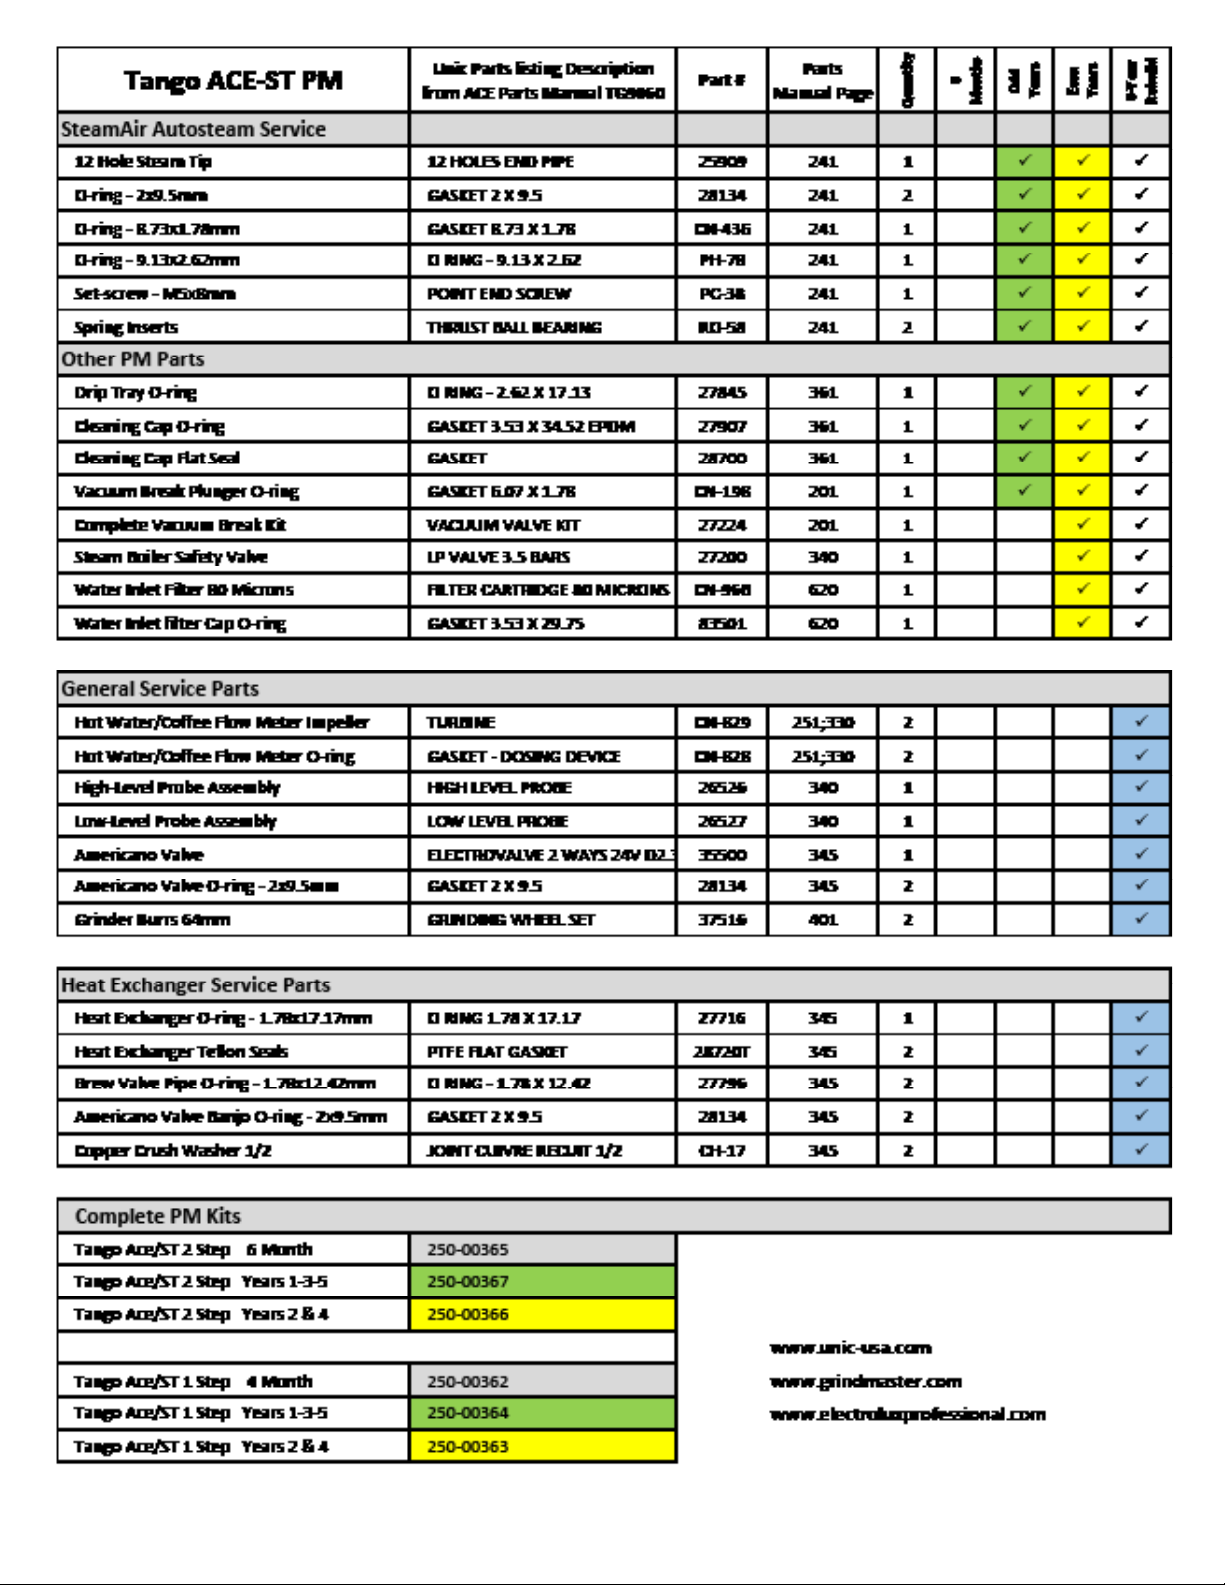
PM Service Schedule.................................................................9
BrewingPistonEvaluation.................................................11-12
Brewing Piston Exchange.........................................................13
Piston Field Rebuild.................................................................17
Turntable Adjustment............................................................33
Turntable Service.....................................................................25
Parts Schematics ................................................................34-48
Troubleshooting...................................................................49
Coee Cleaning.......................................................................58
Steam Wand and Milk Cleaning..............................................59
Field Service & PM Guide
ACE-ST
DUO
Tango 390-00322 9-21

3
Tango 390-00322 7-2022
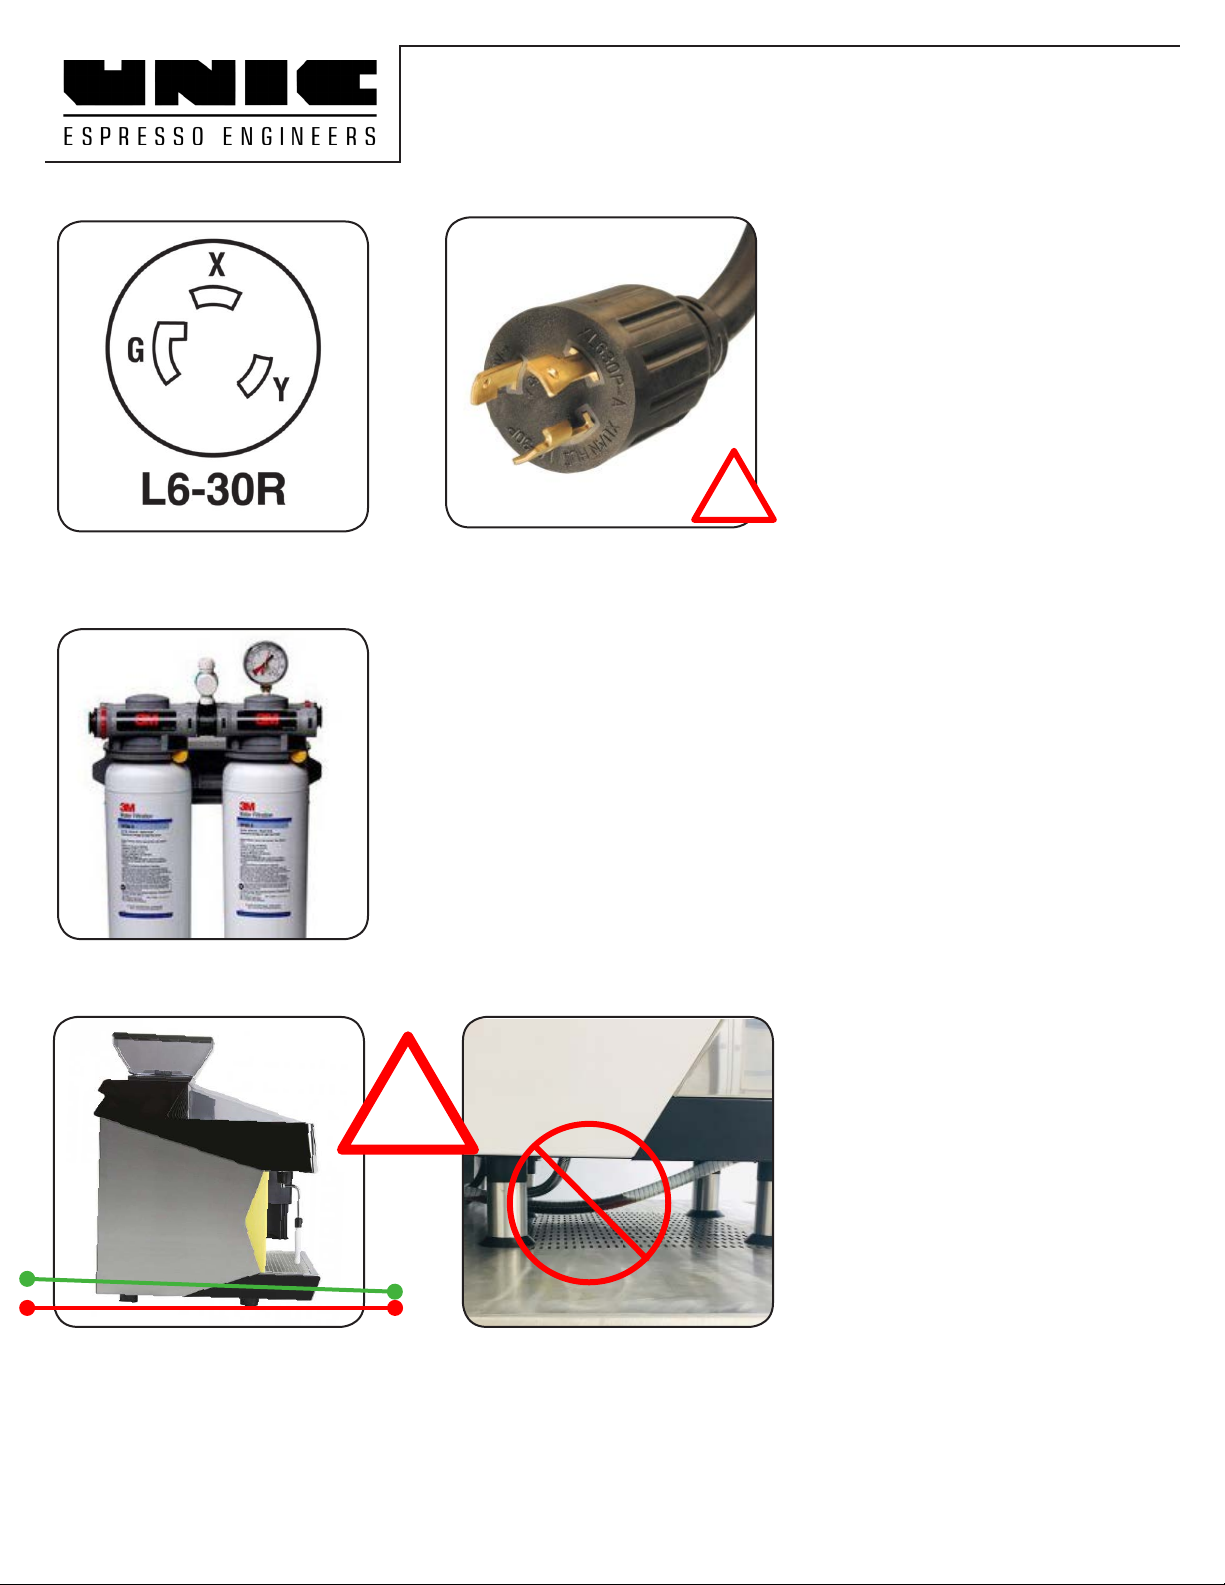
Installation
Use the provided shims on
the rear legs if necessary
to level the Tango. Angled
slightly forward is also OK
Power:
NEMA L6-30
30 Amps
Minimum 200 Volts
Maximum 242 Volts
The transformer MUST be ad-
justed to match the incoming
voltage! (See next page)
Water: Minimum Maximum
Pressure 45 PSI 100 PSI
Flow Rate 1 Gallon/ Minute
TDS 50 ppm 125 ppm
Total Hardness 3 GPG 5 GPG
PH 6.5 7.5
Free Chlorine na 0.5 ppm
Total Chlorine na 1 ppm
Drain:
Tango must be installed level
or angled slightly forward!
Install the drain line running
continuously downward so
that no “trap” is formed.
!
Back pressure in the drain
line will cause problems
with the brewing system.
!
4Tango 390-00322 7-2022
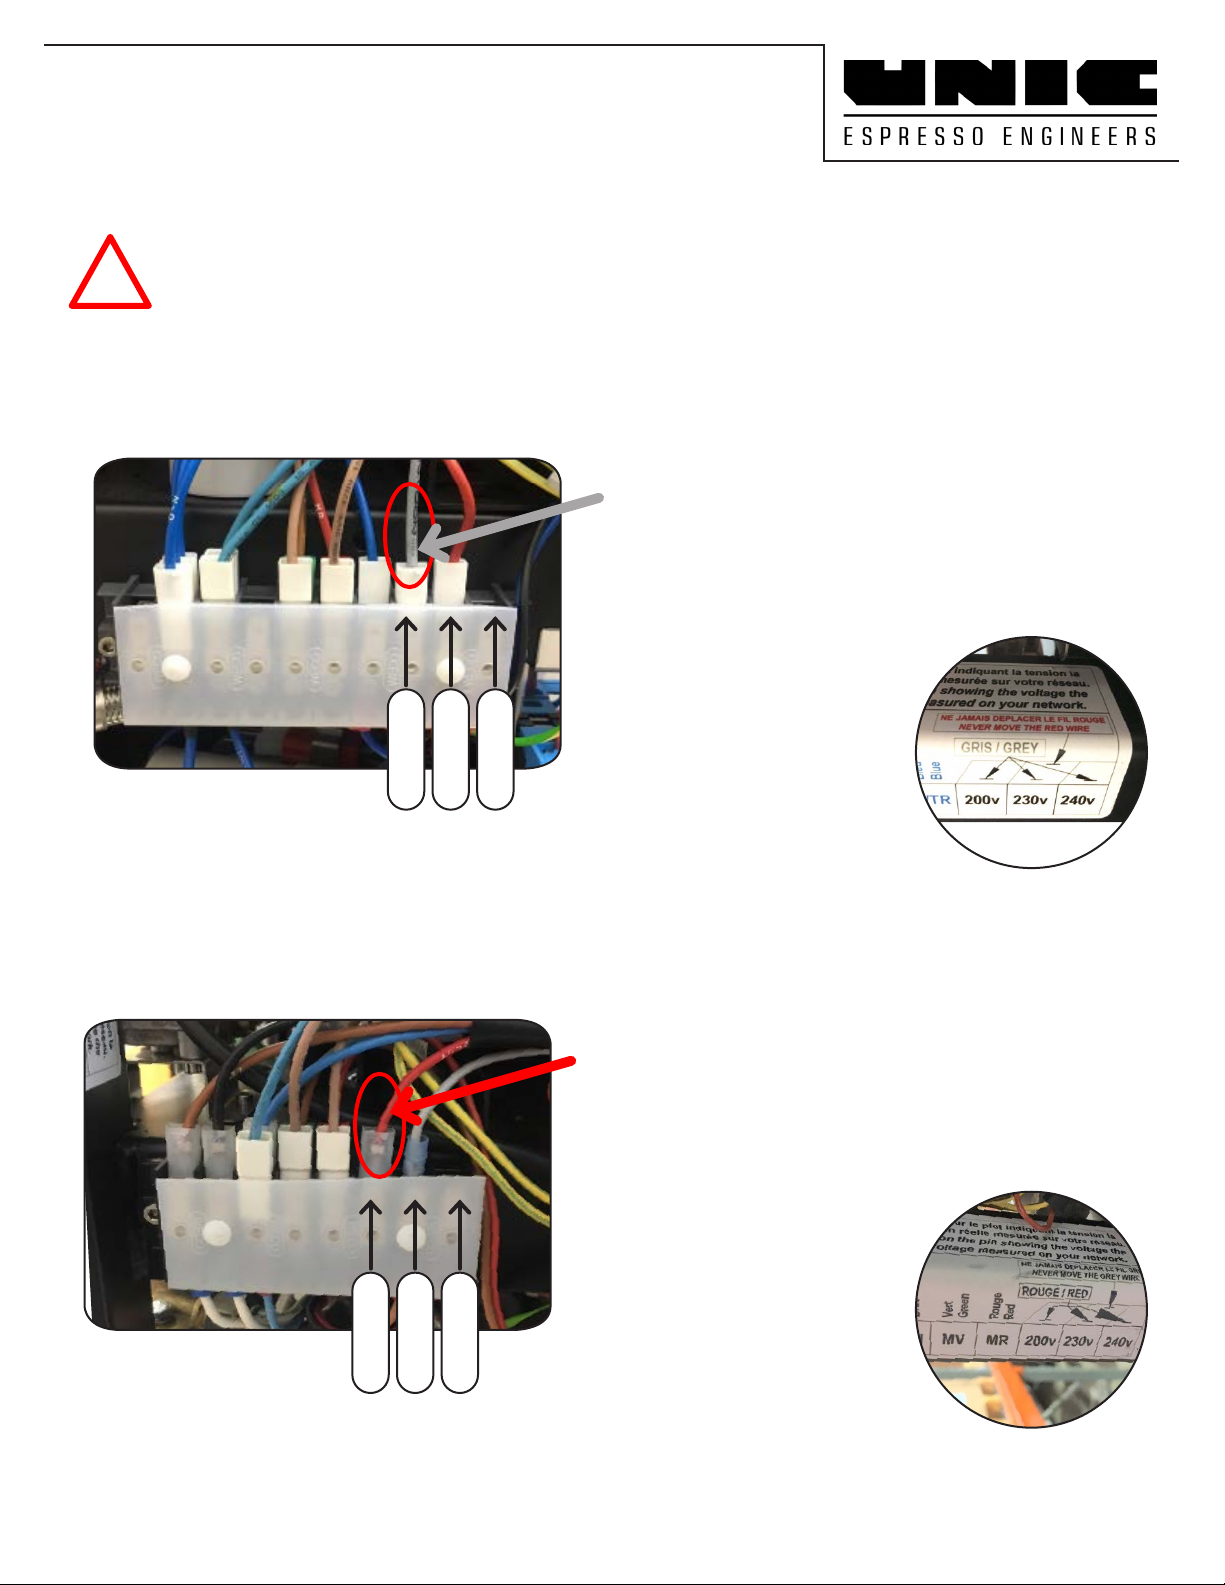
Voltage Setting
The jumper wire at the rear of the machine must be set to match the incoming voltage.
Incorrect voltage can cause problems with the touchscreen and valves.
!
Move the GREY wire to the terminal that best
matches the incoming voltage
(Red wire stays on 230 volt center terminal)
Move the RED wire to the terminal that best
matches the incoming voltage
(Grey wire stays on 230 volt center terminal)
All 2019 machines and some older machines
Dierent conguration for older machines
200 Volts
230 Volts
240 Volts
10 terminal block
200 Volts
230 Volts
240 Volts
8 terminal block
Sticker on
rear frame
Sticker on
rear frame

5
Tango 390-00322 7-2022
Adjust Grinder Setting
Fine/Coarse
Re-run and time test drink (Double shot)
18-26 seconds is usually the target time
Adjust grinder ner for longer extraction
Adjust grinder coarser for faster extraction
Repeat test and adjust as needed until extraction is in range
Adjust Grinders for best extraction: Each PM visit
Step 1: Adjust the grinders ne or coarse for best extraction
time. Typically done with the double espresso drink.
Adjust both grinders.
Run a test drink
(Double shot)
Turn counter-clockwise
for ner left (red) grinder.
Turn clockwise
for ner right (green)
grinder.
Adjustments are opposite for each grinder
Step 2: Capture a sample of the dry ground coee.
Weight the sample and enter the amount into the
calibration programming. (2 sample cycles)
Run 2-3 drinks after
each adjustment.
Note coee
ow time Adjust grinder
ne or coarse
as needed
6Tango 390-00322 7-2022
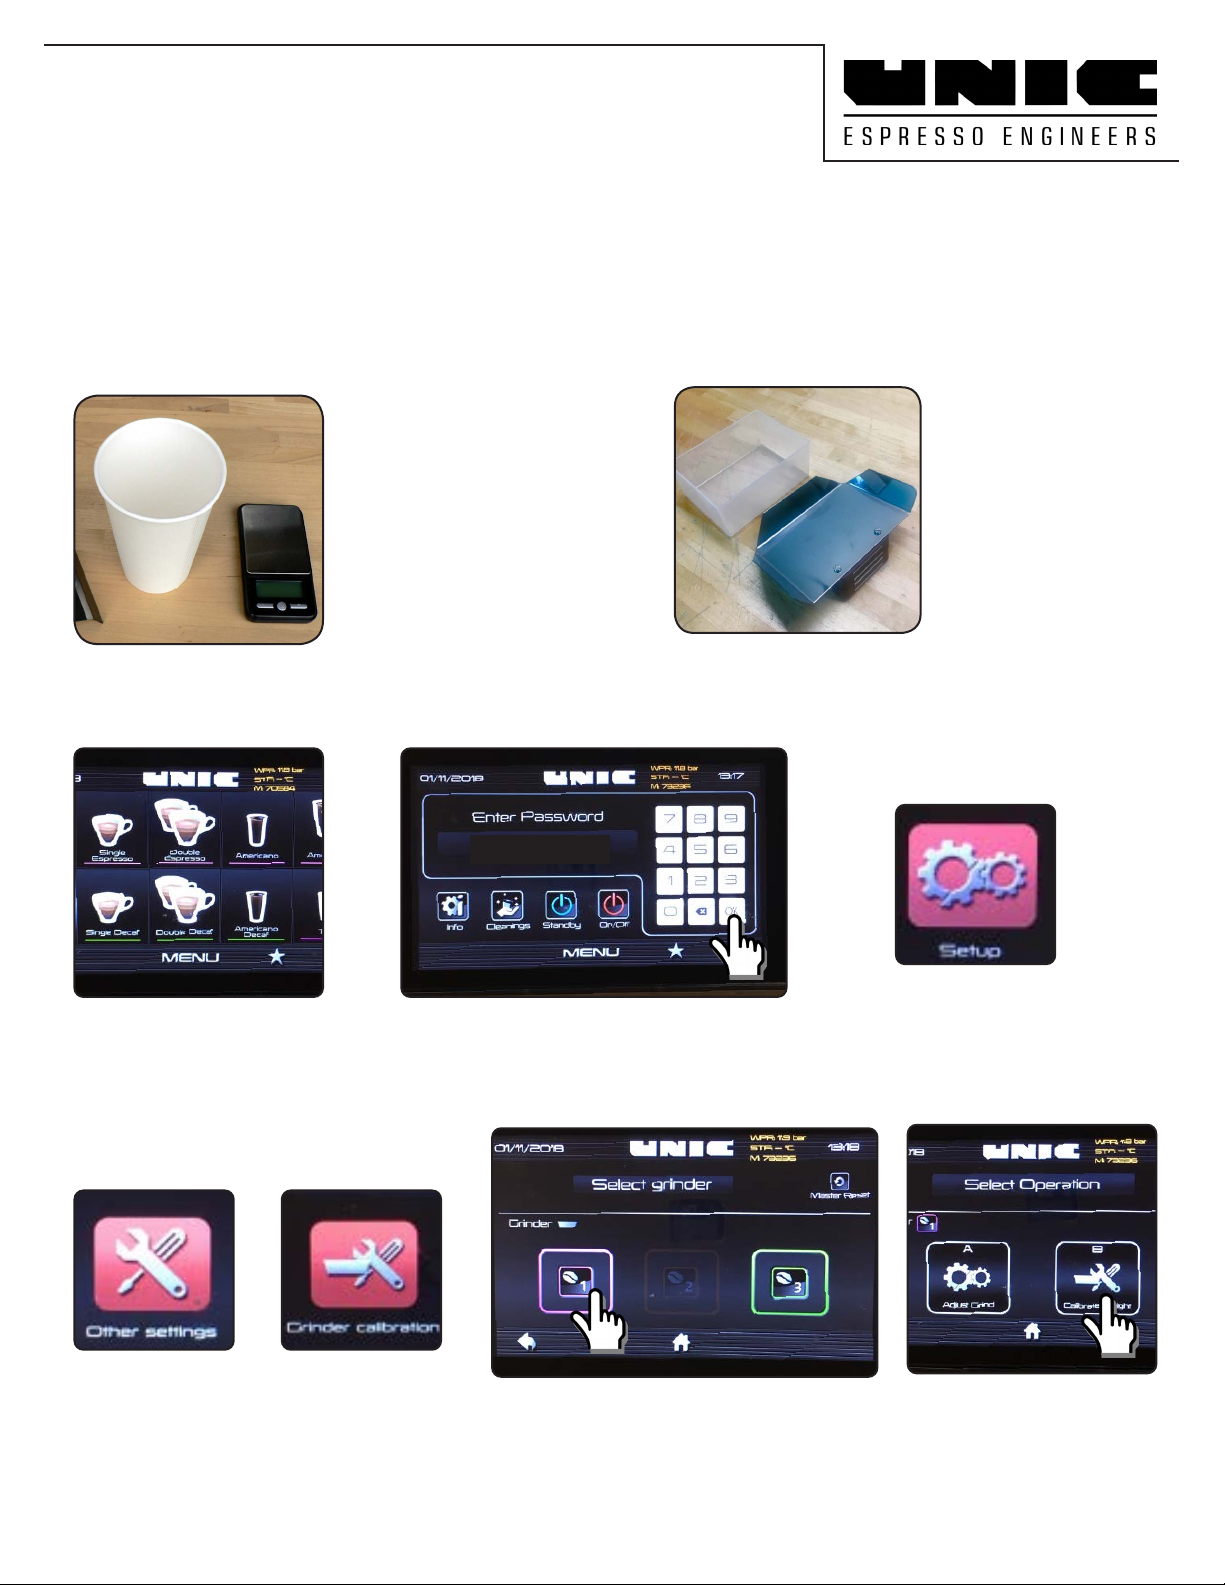
Weigh & Calibrate
Grinder Output
Weigh and enter coee amount of
2 sample cycles during calibration
Tools needed:
Scale accurate to 0.1
grams
2 Paper cups
Optional:
Unic magnetic tray
holder and sampling
tray
Select Calibrate Weight
Select Purple (left) or Green (right)
grinder
Enter 9191 - Press OKPress menu
Select
Setup
Select
Other
Settings
Select
Grinder
Calibration
9191
7
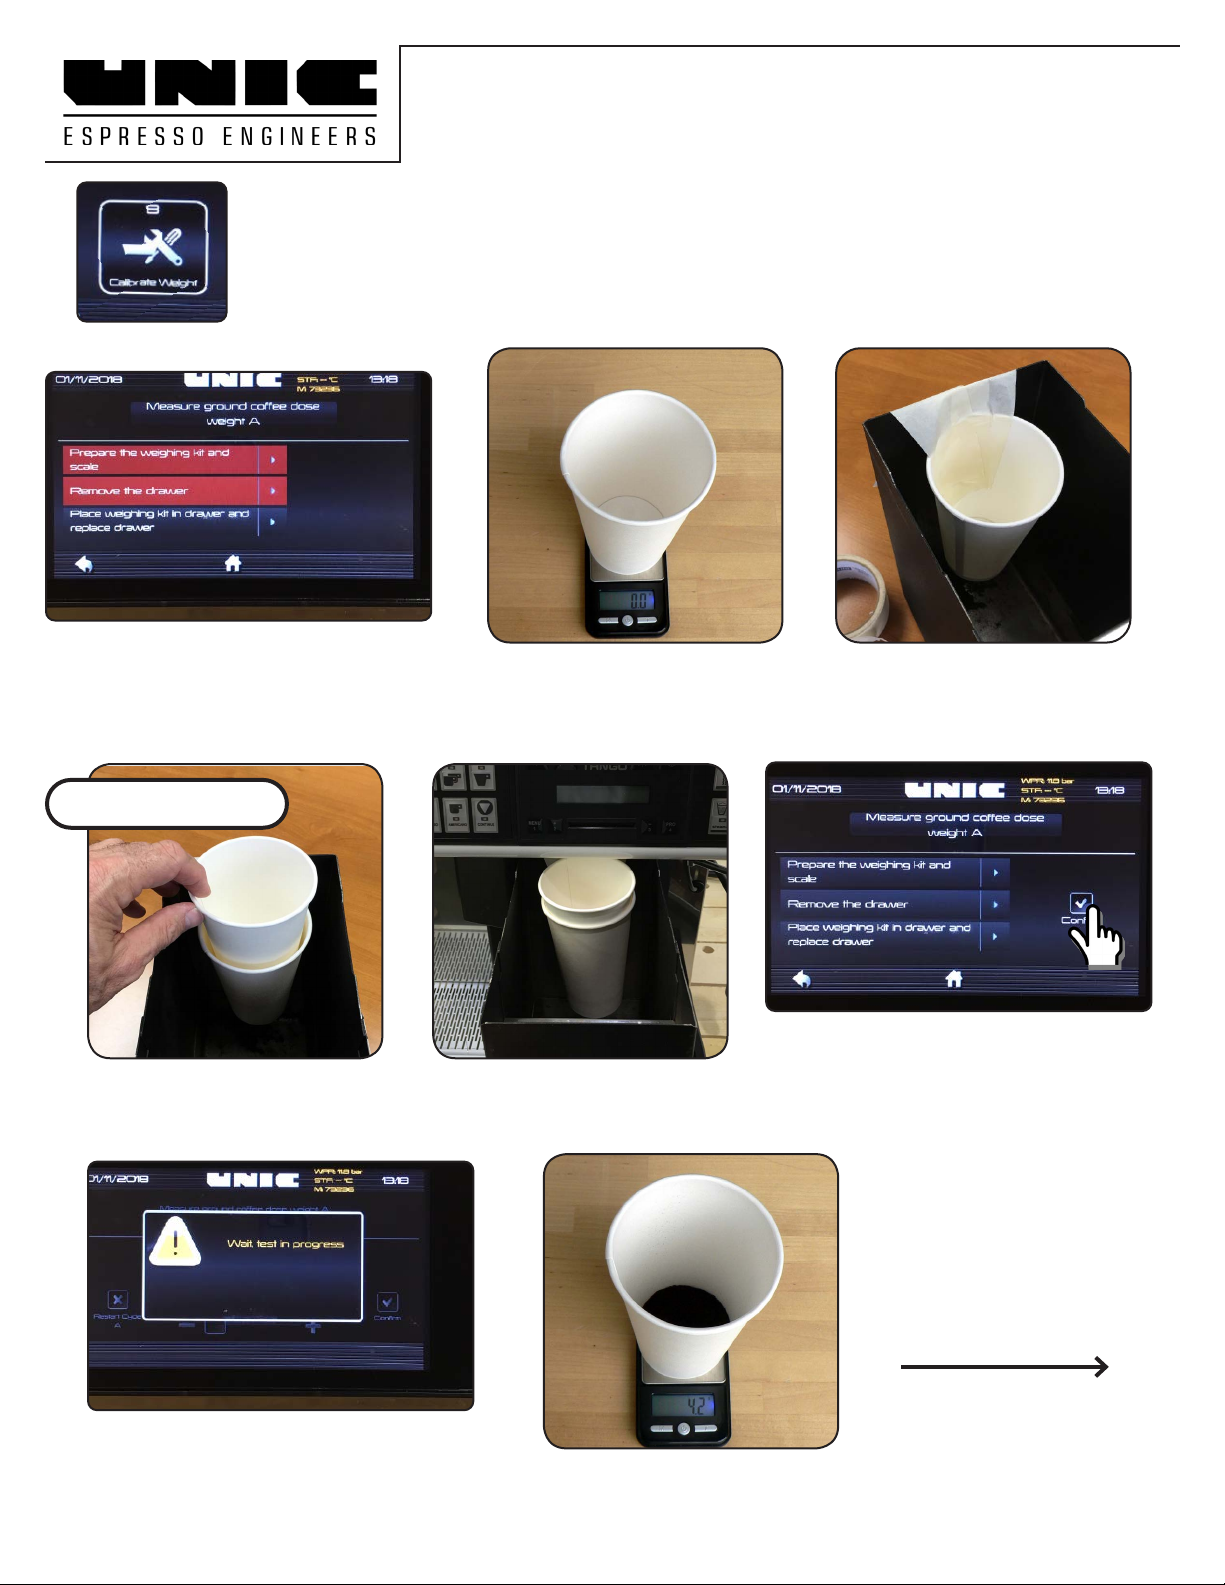
Tango 390-00322 7-2022
Tape a 2nd cup in the back of the
drawer about 1” below the top
“0” the scale with an empty
cup
Insert the empty cup into
the taped cup
Replace the drawer with
both cups in place
Calibrate Grinder Dose
Select “Calibrate Weight” to start coee weighing process.
(Adjust grind ne or coarse rst, see previous pages)
Follow screen instructions
Remove drawer
Press conrm to start
Grinds Tamps, and Ejects
Remove and weight the cup
with grounds
1st Sample
See next page
for 2nd grind
cycle

8Tango 390-00322 7-2022
Weight the grounds from
the 2nd cycle:
Empty and replace the
measuring cup
7
Remove and weight the cup
with grounds from the 1st cycle
Replace the drawer with
both cups in place
Enter the weight
Press conrm to save
Press conrm to start 2nd
grind cycle
Enter the weight
press conrm to save
Done!
Press check mark conrm
& save
Repeat the process for the Green (right, decaf ) grinder!
Calibrate Grinder Dose
2nd Sample
Continued from previous page

9
Tango 390-00322 7-2022
10 Tango 390-00322 7-2022

11
Tango 390-00322 7-2022
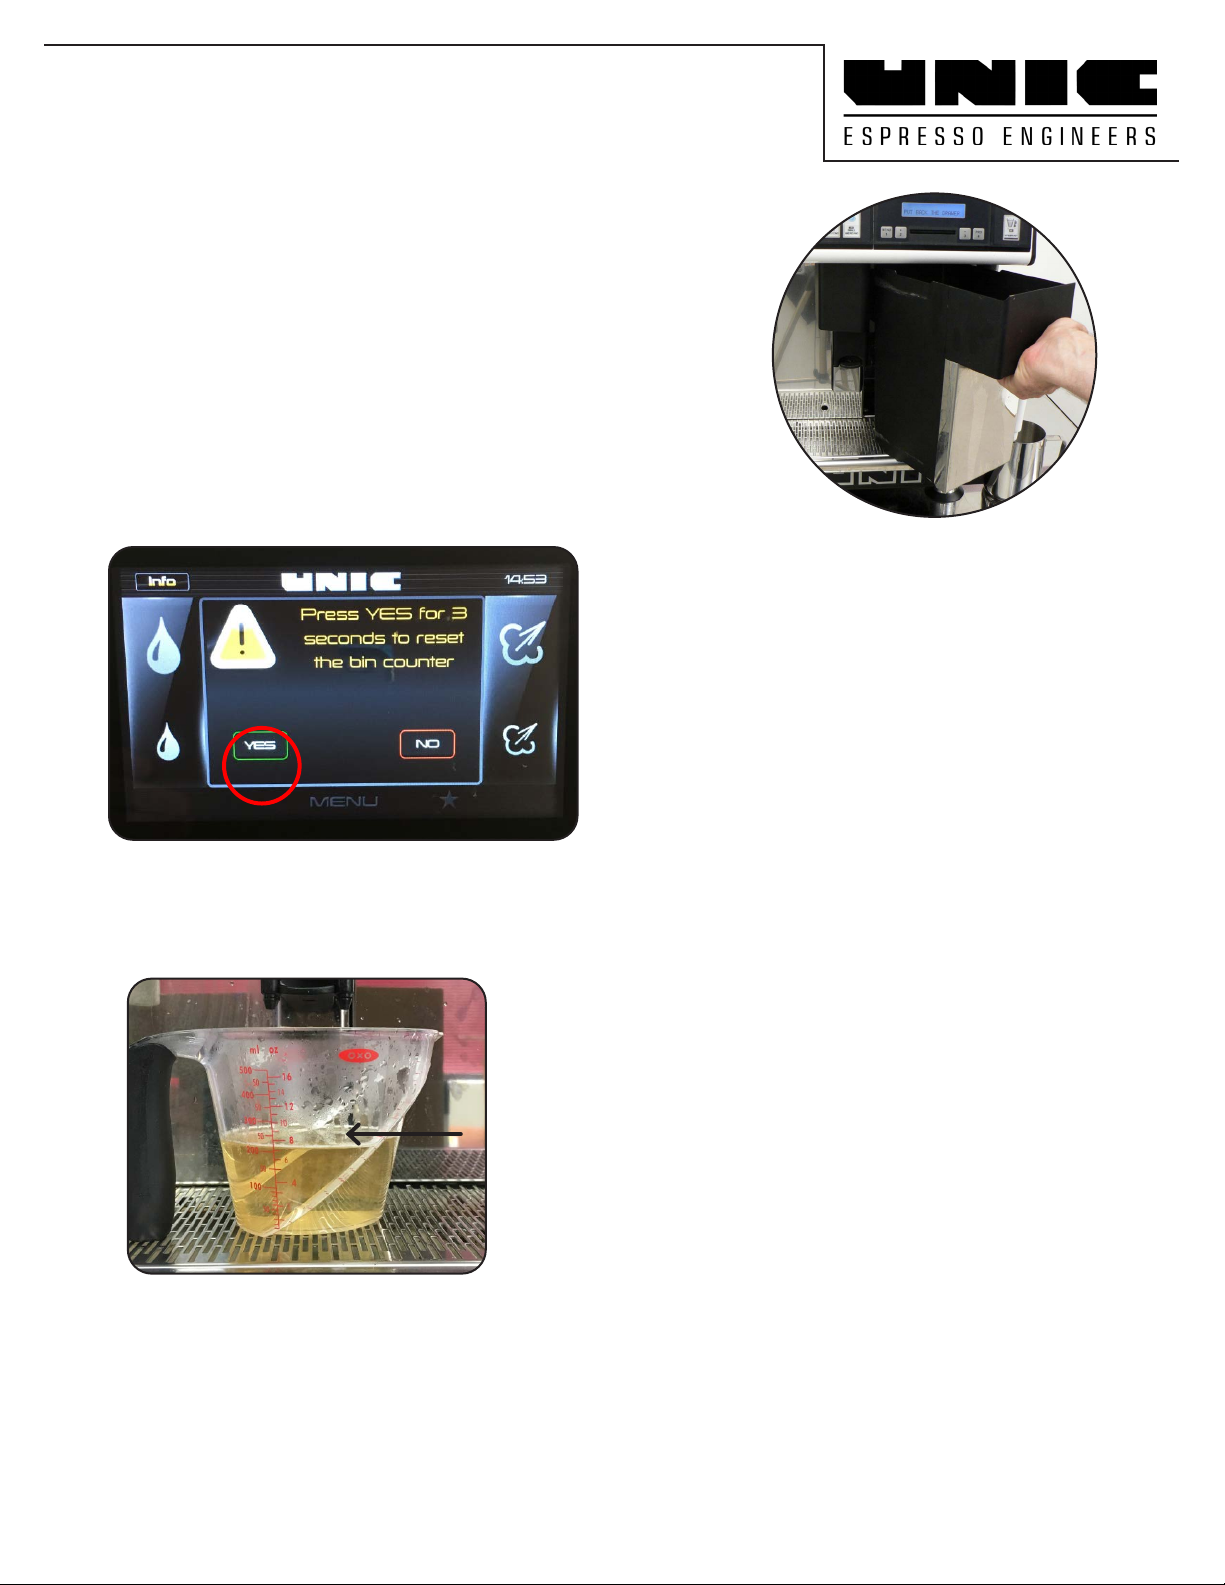
Press and Hold YES for 3 seconds
to start the rinsing cycle
Piston Water ow test
180-250 ml = Normal ow
150-200 ml = Slight restriction, run a
cleaning cycle and test again
Less than 150 ml = Piston clogged.
Remove piston to clean or replace.
Remove and replace
grounds drawer to start the rinsing cycle.
Ace / STP:
20 Second Flow
~225 ml rinse
Measure the water ow through the
Piston during the spout rinsing cycle.
Clean or replace the Piston
if the ow is restricted.
12 Tango 390-00322 7-2022
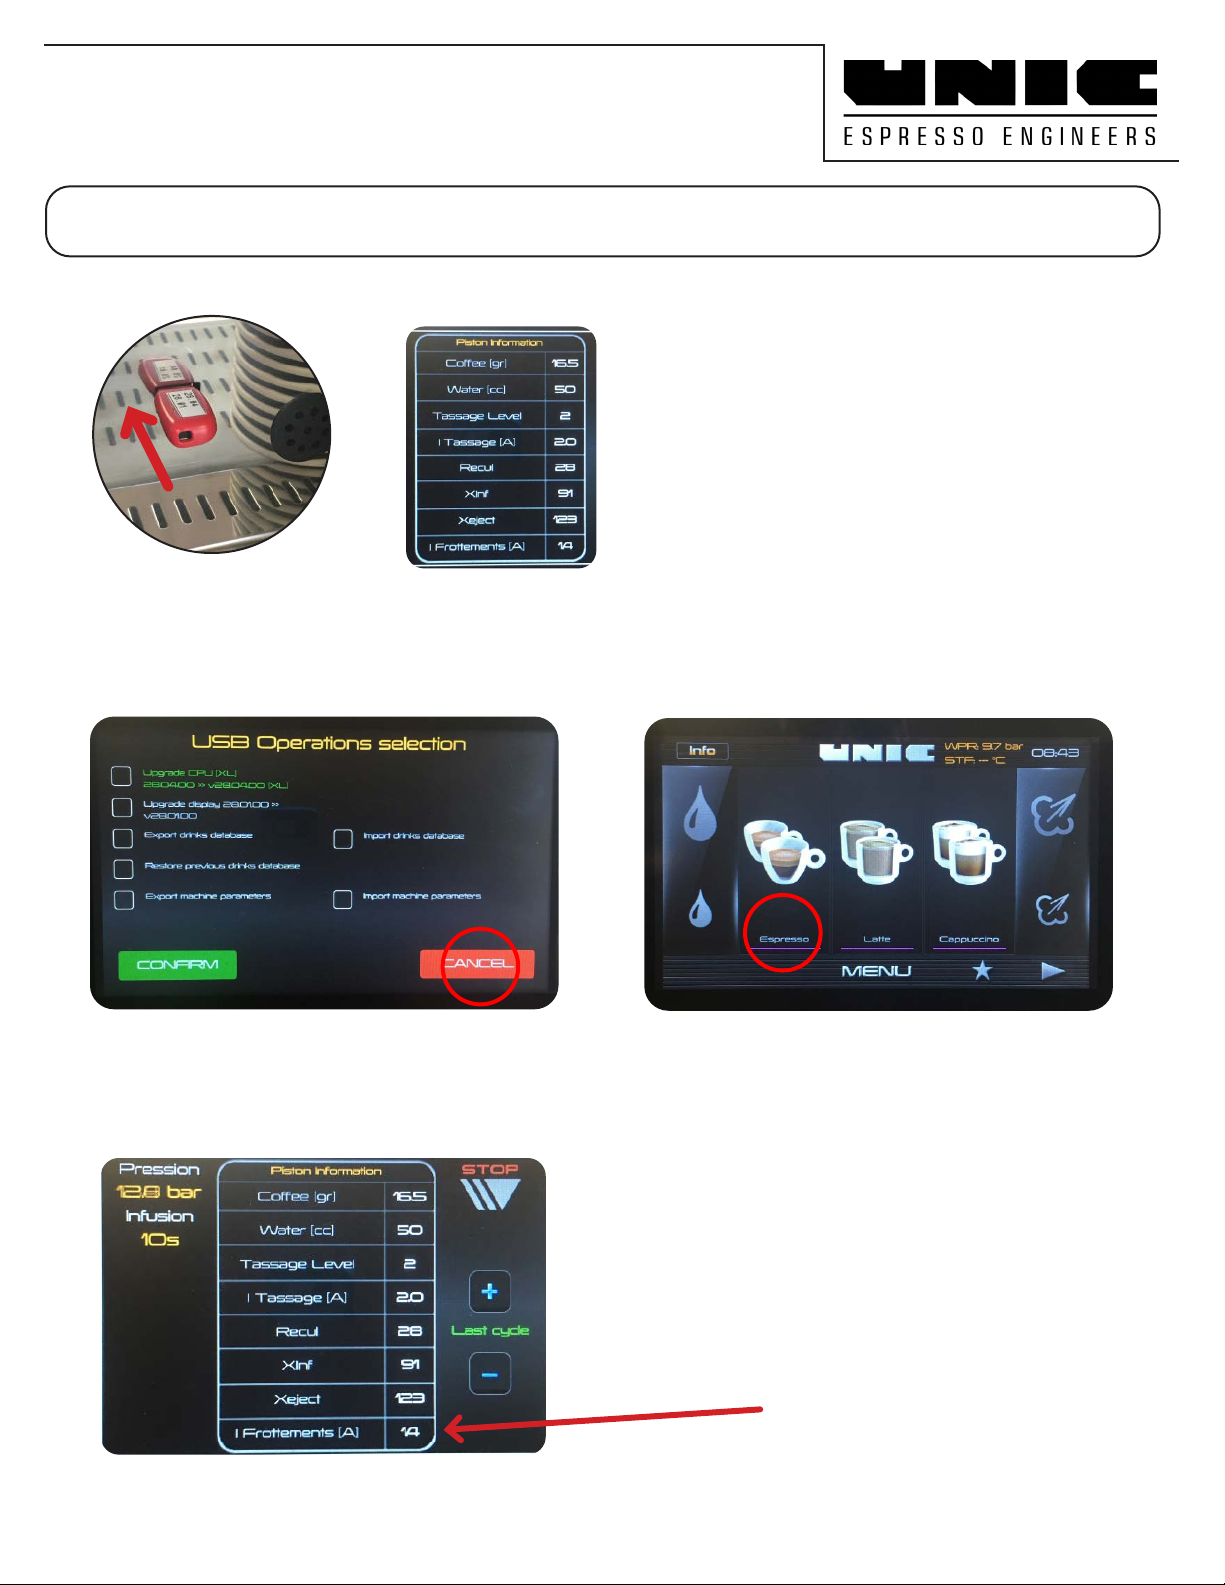
Piston Friction
Range: 0.8Amps - 2.3 Amps
Piston Information Screen
Insert USB key
Insert USB, Press Cancel Press Single or Double
to run a test cycle
1.4 Amps shown
Insert Technicians USB
Piston information is displayed
while each drink is pouring
with the USB is in place
Tango ACE / ST
Piston Amp draw test
The piston should be replaced if it draws more than 2.3 amps.

13
Tango 390-00322 7-2022
Coee Line to Spout
10 mm Nut
Drive-shaft coupler
Drive nut & Cover
Piston Movement
Sensor Plug
Piston Bottom Position
Sensor Plug
Turntable drive-shaft
Rear Piston Threaded
Attachment Rod -12 mm
Front Piston Attachment
Allen Screw - 6 mm
Tango UNO/SOLO - ACE/ST
Tools needed:
Flat Blade Screwdriver
10 mm wrench
12 mm wrench
6 mm Allen Wrench
Tango Brewing Piston Exchange
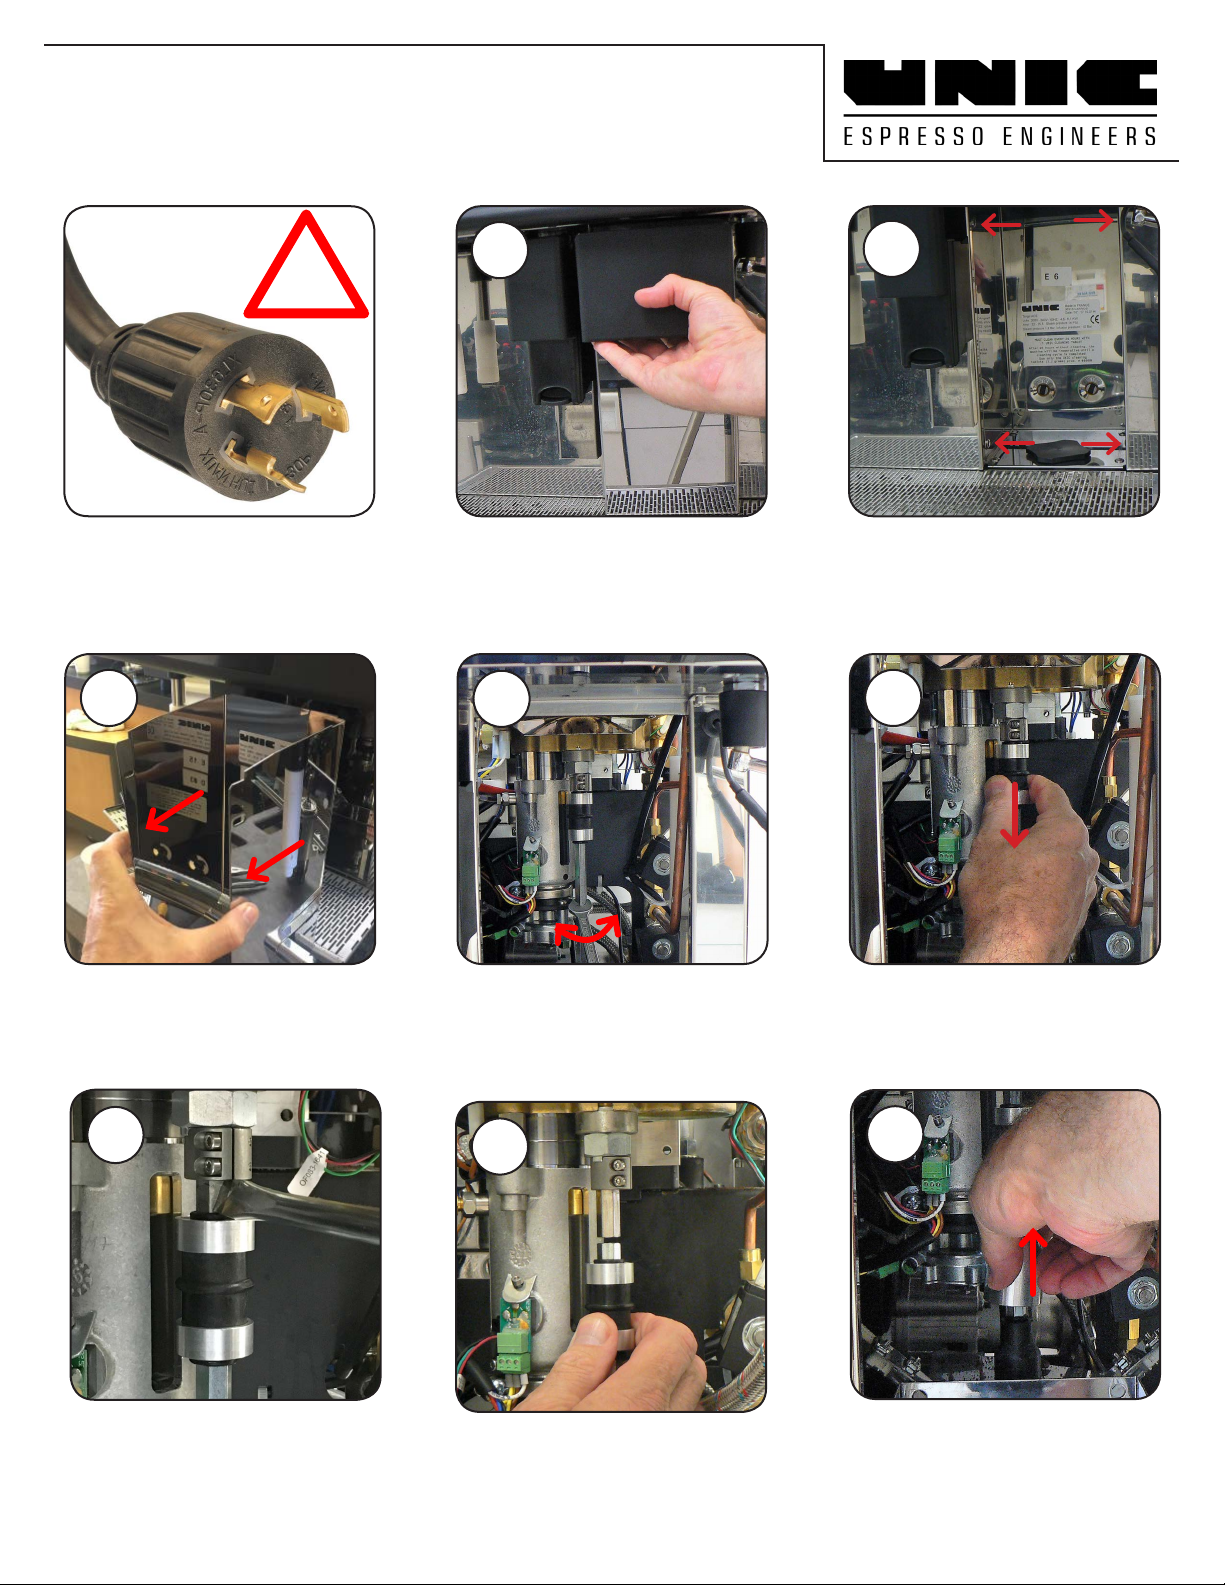
14 Tango 390-00322 7-2022
Lift aluminum reinforcement
cover from lower coupling
Remove the Inner Panel Relieve tension on Turn-
table shaft by rocking it
with a 10 mm wrench
Slide upper coupling
down
Unplug Machine Remove Grounds Drawer Remove the 4 side
screws from the Inner
panel
Use a at screwdriver to
push coupling down if nec-
essary
Turntable shaft released
Tango Brewing Piston Exchange
!
45
3
2
1
8
7
6

15
Tango 390-00322 7-2022
Unplug Piston Movement
Sensor Plug
Unscrew rear mounting
post - 12 mm wrench
Remove front mounting
bolt - 6 mm Allen
Remove Turntable drive-
shaft
Remove line to spout
10 mm compression tting
Unplug Piston lower posi-
tion sensor
Lift nylon drive nut from
lower coupling
Coee output line to
spout
Remove rear mounting
post
Tango Brewing Piston Exchange
14
15
13
12
11
17
16
910
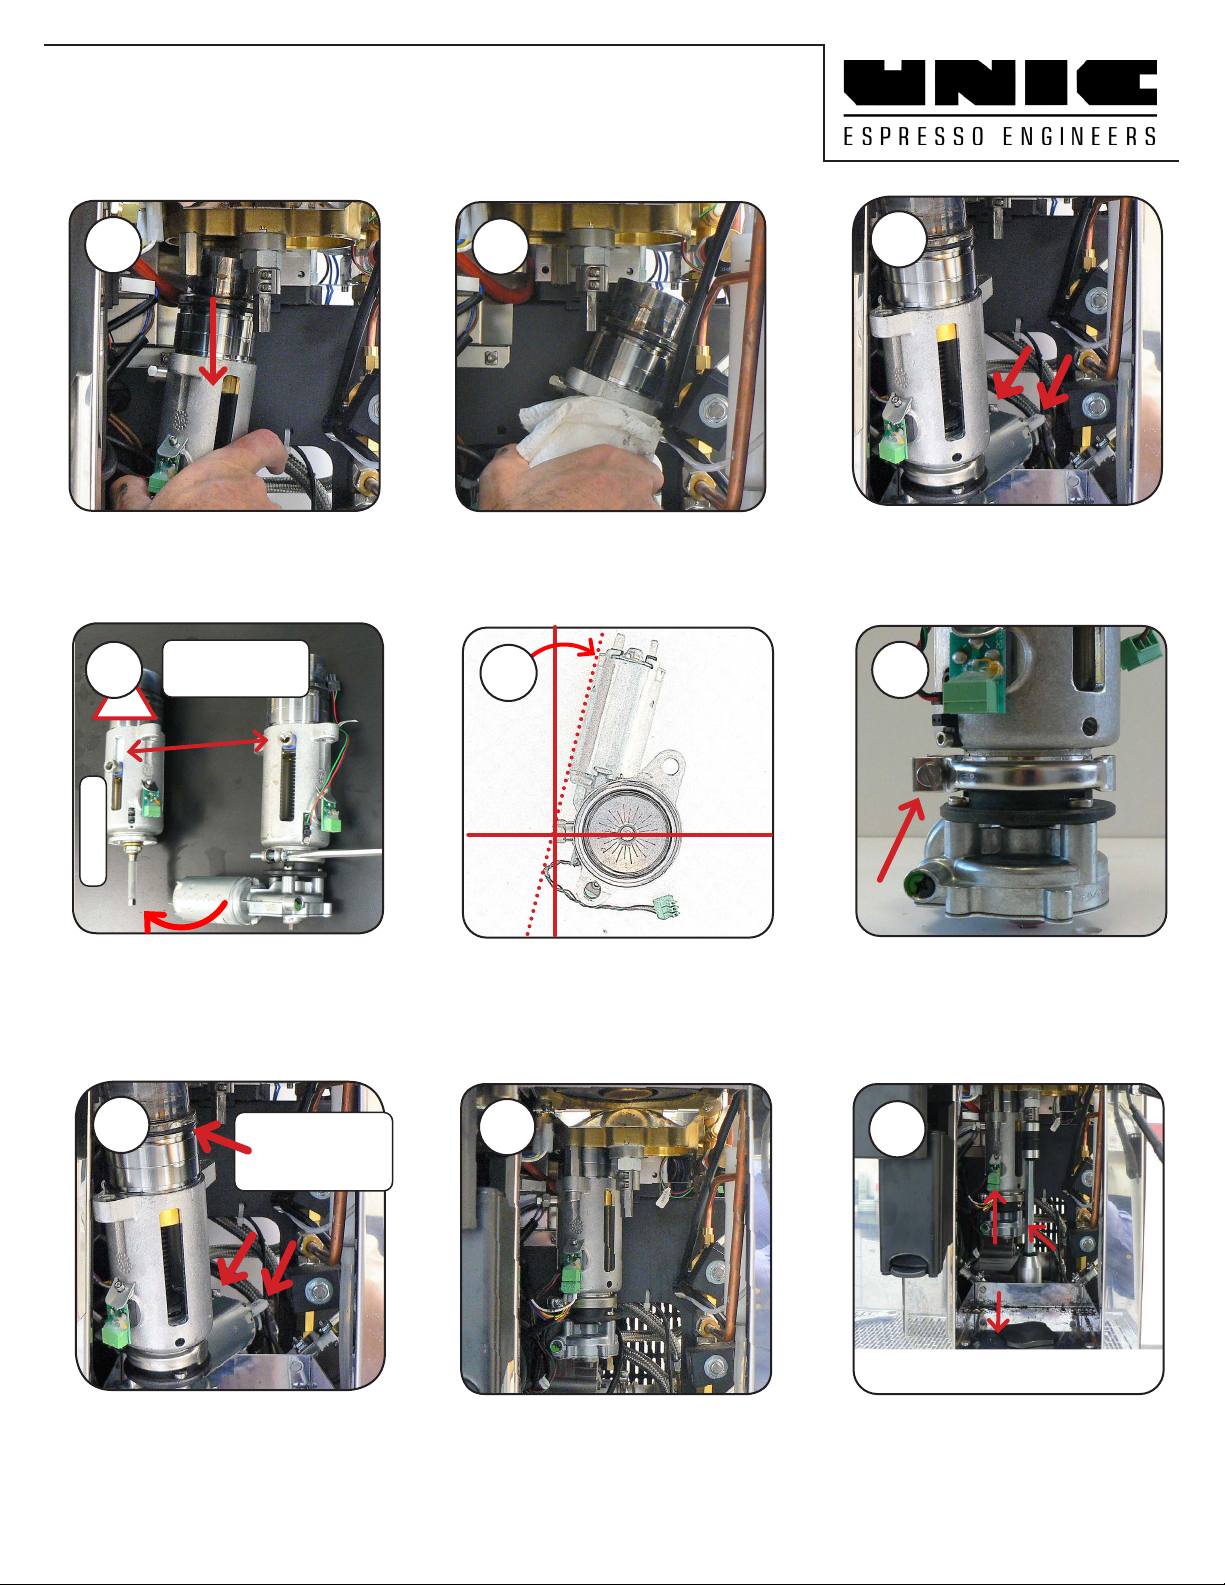
16 Tango 390-00322 7-2022
Reinstall Piston
Tighten screws, Attach
plugs & Coee Line
Replace Turntable shaft
Slide coupler up
Slide O-ring up to notch
Transfer Motor
Rotate shaft of new Piston
part-way down rst!
Rotate to the right to remove Remove piston halfway
Unplug piston motor wires
Tango Brewing Piston Exchange
Slide piston down
Orient motor at this angle Clamp must be on the left
with the screw facing out
Tighten screw rmly
Reattach motor wires!
Polarized 1/8’ & 1/4” plugs
Turn shaft
partway down
!
New Piston
19
18
22 2321
20
26
25
24 Lubricate
O-ring with
Molykote 111
17
Tango 390-00322 7-2022
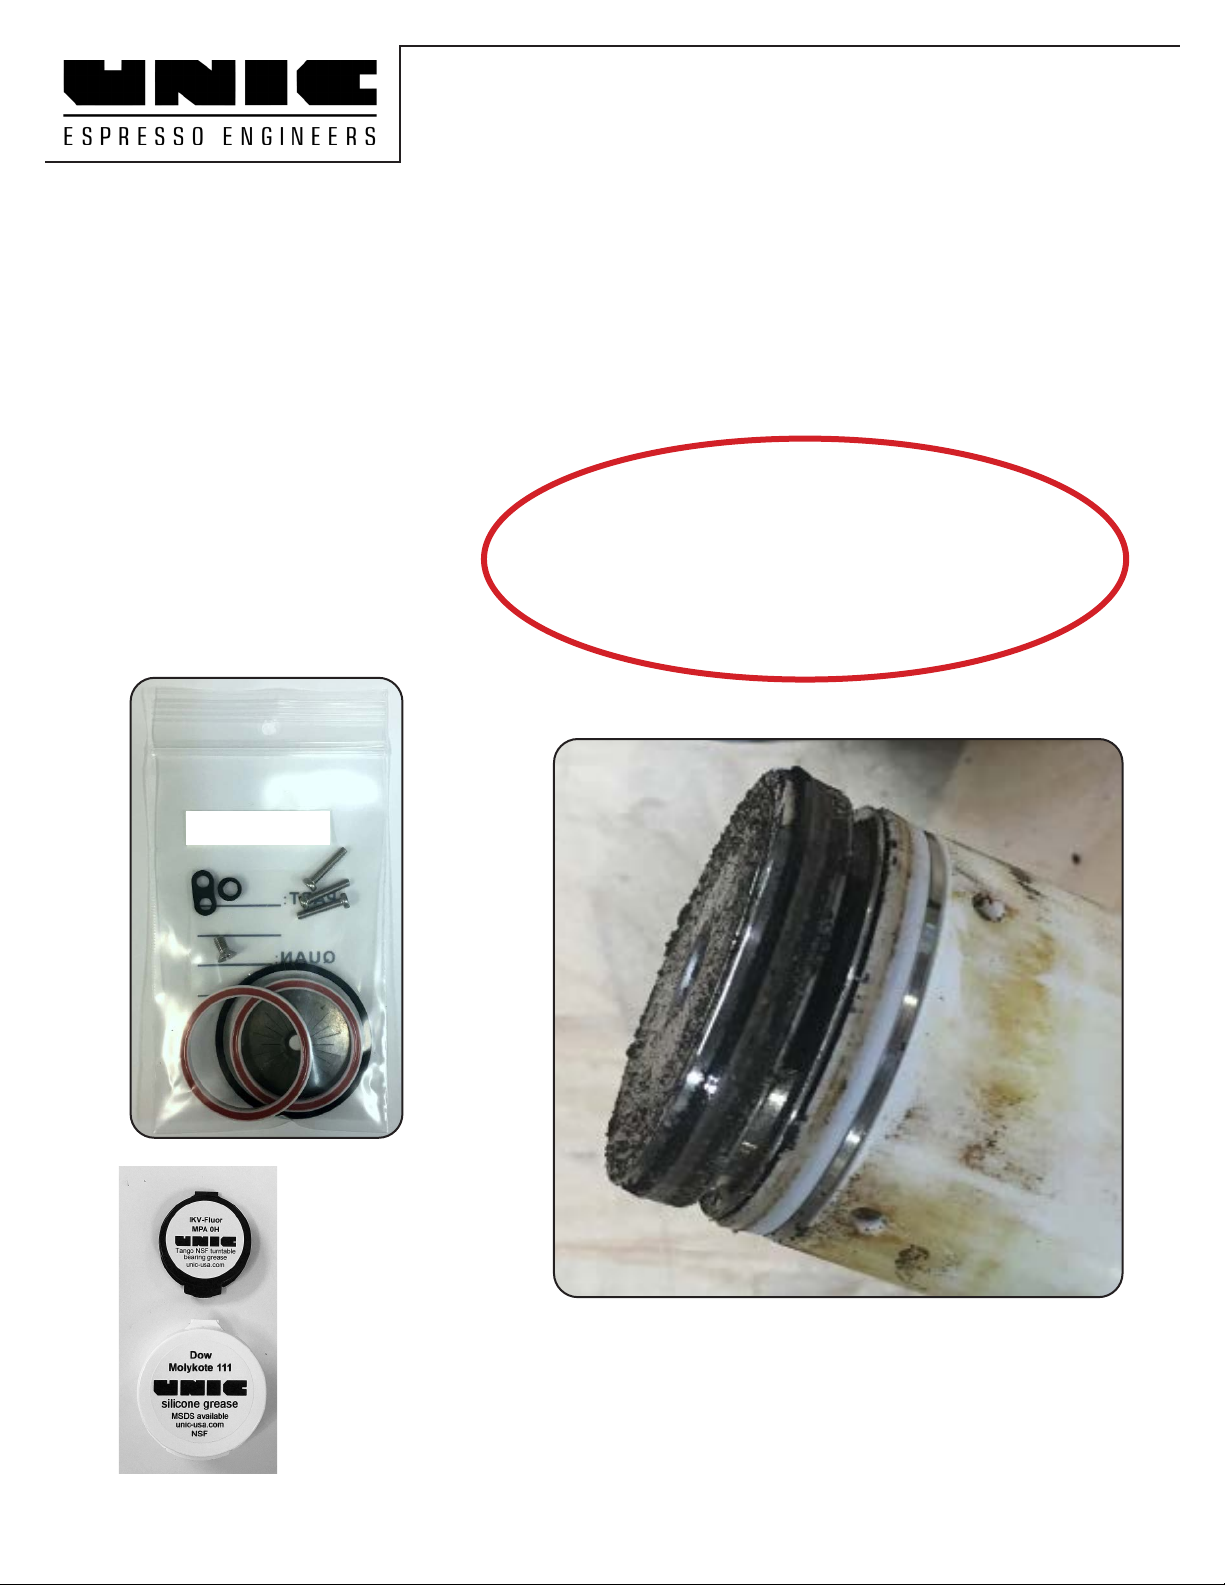
Tango Brewing Piston
Field Service
Brewing Piston Field Service for coee clogs
Limited eld rebuild
Clean areas of coee contact
Replace Seals and O-rings
Replace lter screen Allowed substitute for a piston
change if the lower bearing is OK
and the electronic sensors are in
good condition
Dow Molykote 111 grease
IKV-Fluor
UNIC turntable
grease
FR-1919
Piston rebuild kit
FR-1919
18 Tango 390-00322 7-2022
Press and Hold YES for 3 seconds
to start the rinsing cycle
Piston Water Flow Test
Tango all versions
180-250 ml = Normal ow
150-200 ml = Slight restriction, run a
cleaning cycle and test again
Less than 150 ml = Piston clogged.
Remove piston to clean or replace.
Measure the water ow through the
Piston during the spout rinsing cycle.
Consider a Field Rebuild if the ow is
restricted.
Remove and replace
grounds drawer to start the rinsing cycle.
Ace / STP:
20 Second Flow
~225 ml rinse
19
Tango 390-00322 7-2022
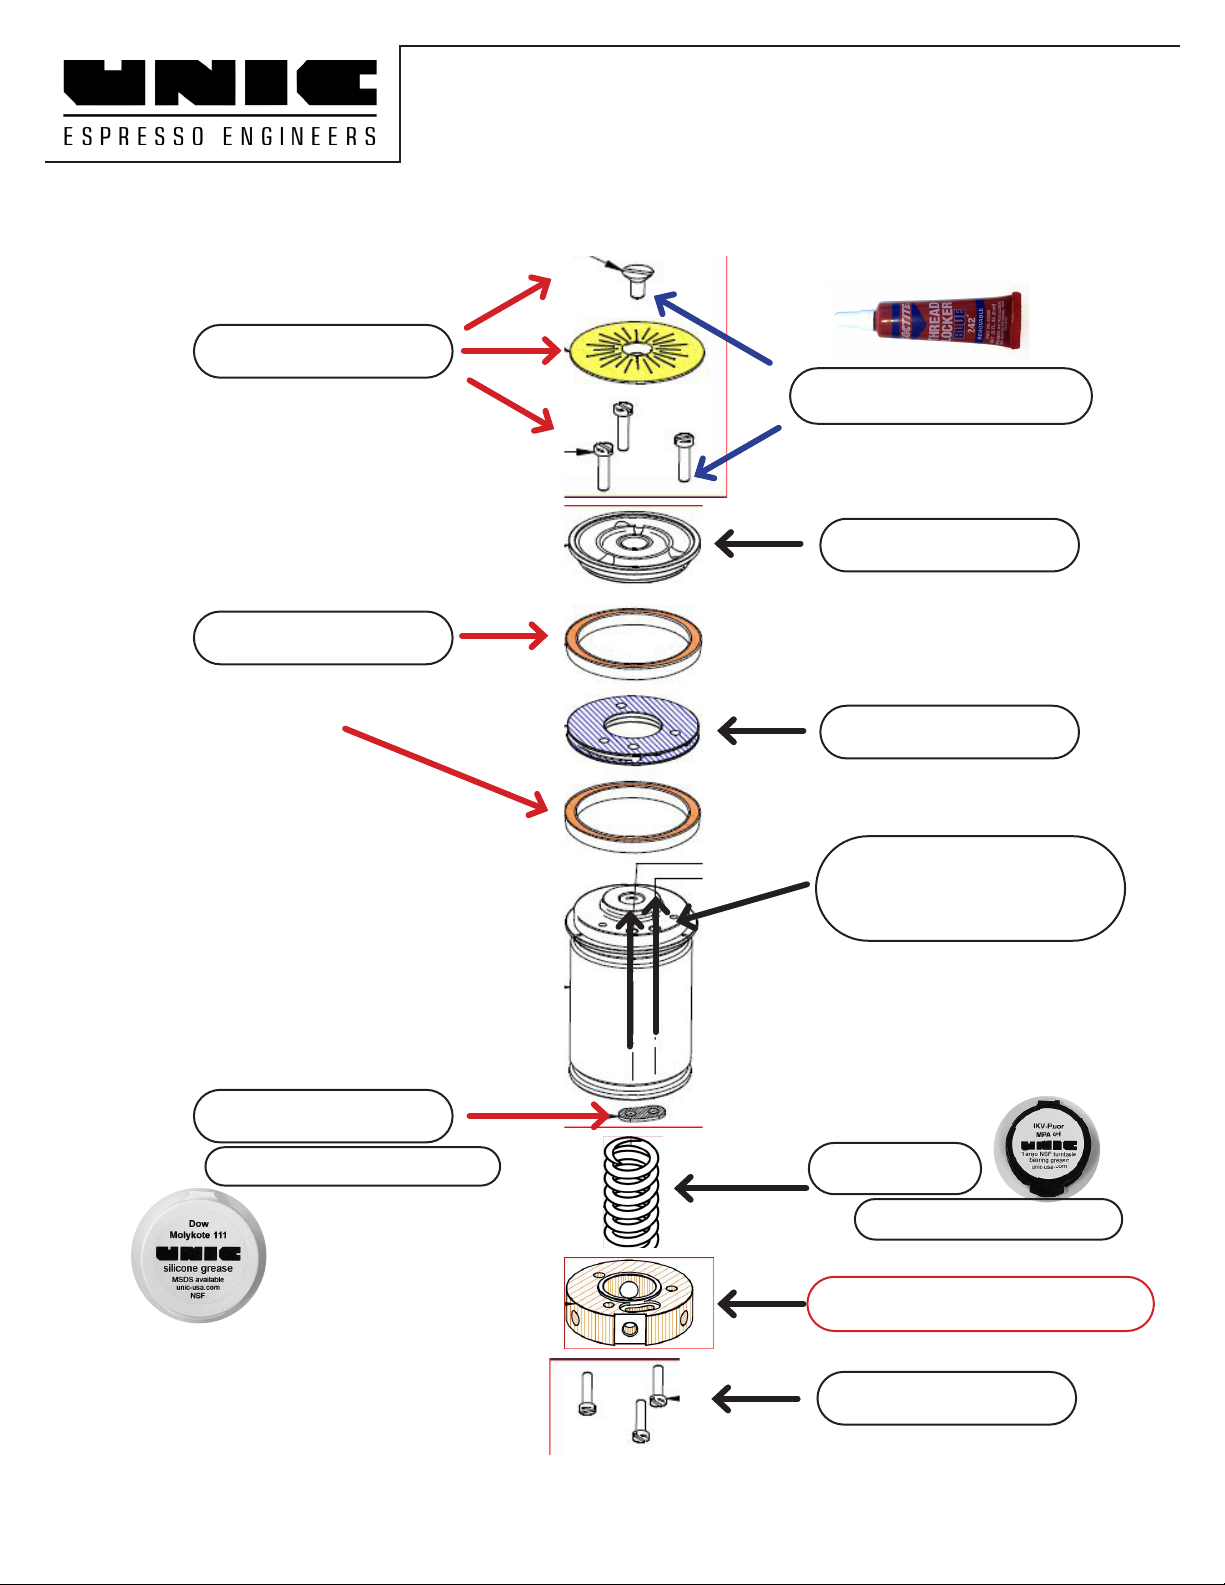
Clean
Replace
Clean
Clean
through holes
Wipe clean only!
Clean
Replace
Replace
Clean
Locktite 242
IKV-Fluor grease on ends
Thin coat of Molykote grease
Tango Brewing Piston
Field Service Overview
CN-128 screw
33419 Screen
CN-30 Screws
28500 Piston Seals
FR-4127 Seal
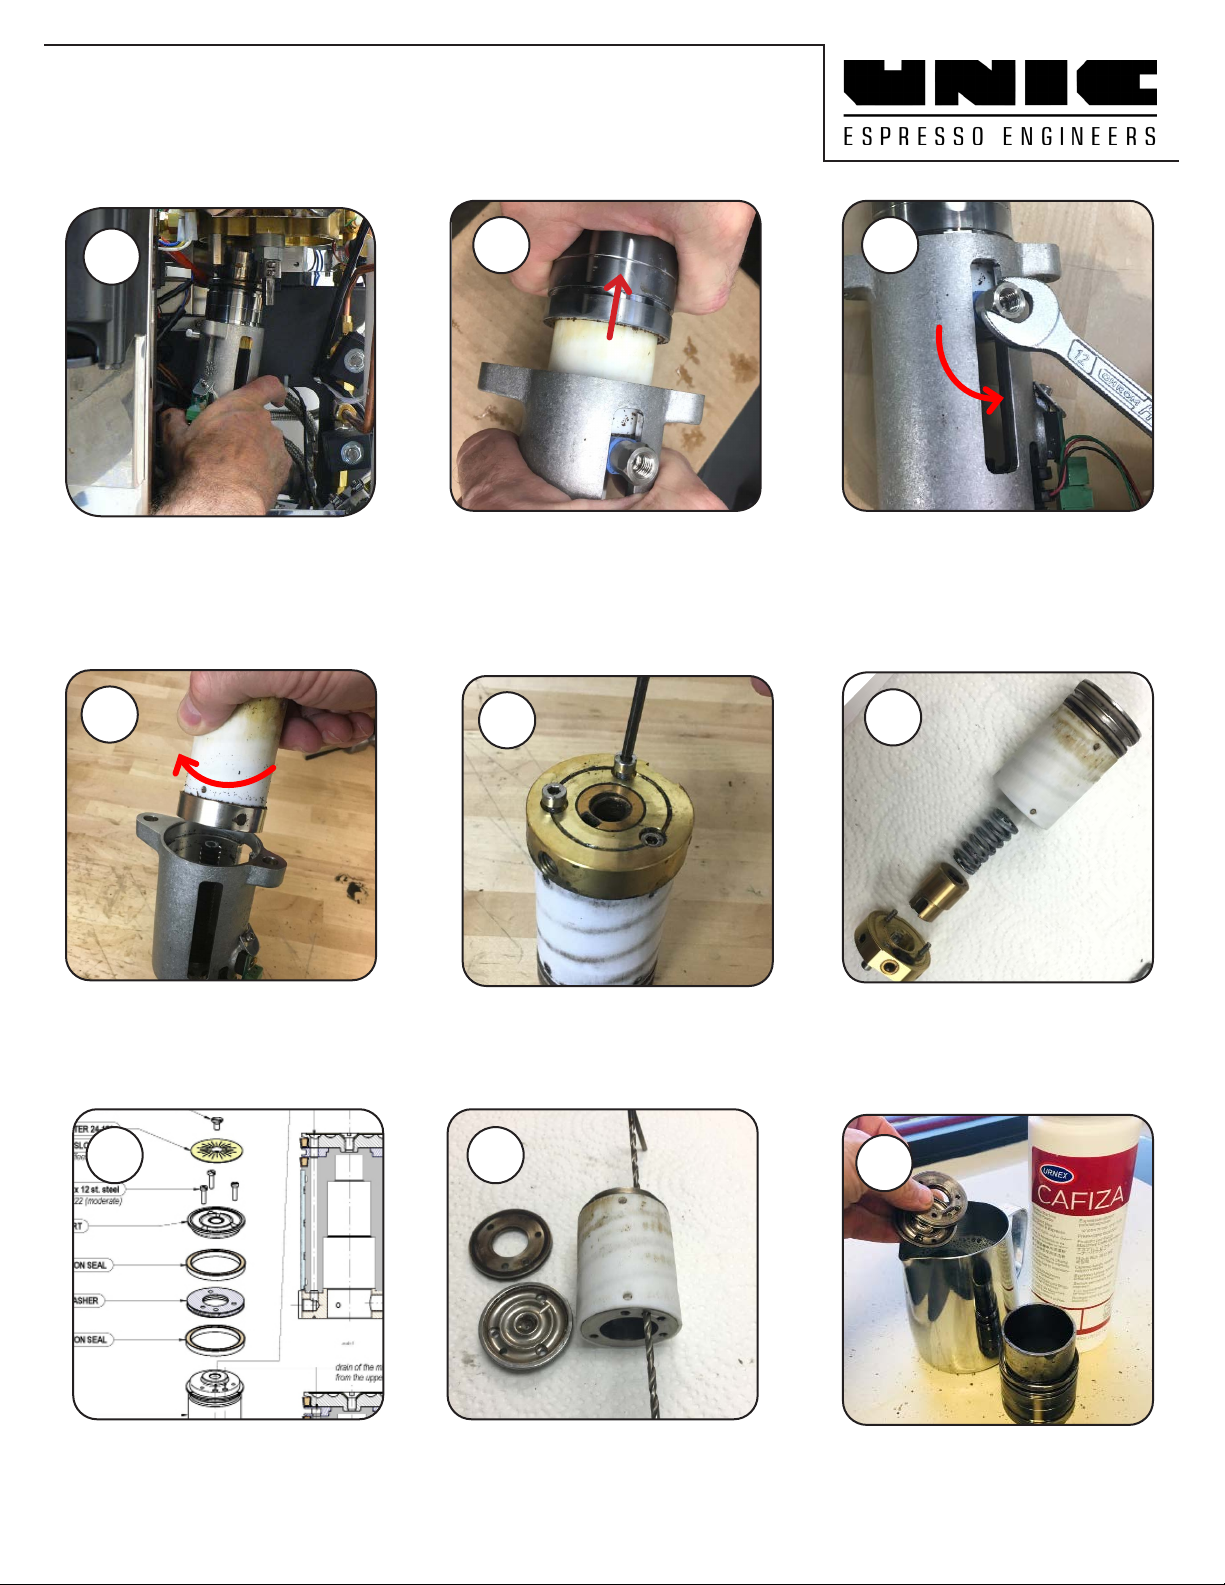
20 Tango 390-00322 7-2022
Remove the Bottom
Plate, Threaded Follower,
and Spring
Remove Screen, Seals,
and Spacers
Soak the dirty parts in
coee cleaner
Pull the brew chamber o
of the piston
Remove outlet nipple
12 mm wrench
Remove the 3 mm Allen
screws from the lower plate
The spring will decompress!
Remove the piston from
the machine
Unscrew the inner piston
from the jack-screw
Left hand threads!
Use a 1/8” drill bit to clear
coee pathways
9
Tango Brewing Piston
Field Service
45
32
1
87
6


