manuals.online logo
Brands
  1. Home
  2. •
  3. Brands
  4. •
  5. Electrolux
  6. •
  7. Dishwasher
  8. •
  9. Electrolux EDW5505EPS - ICON - Dishwasher User manual

Electrolux EDW5505EPS - ICON - Dishwasher User manual

Other manuals for EDW5505EPS - ICON - Dishwasher

3

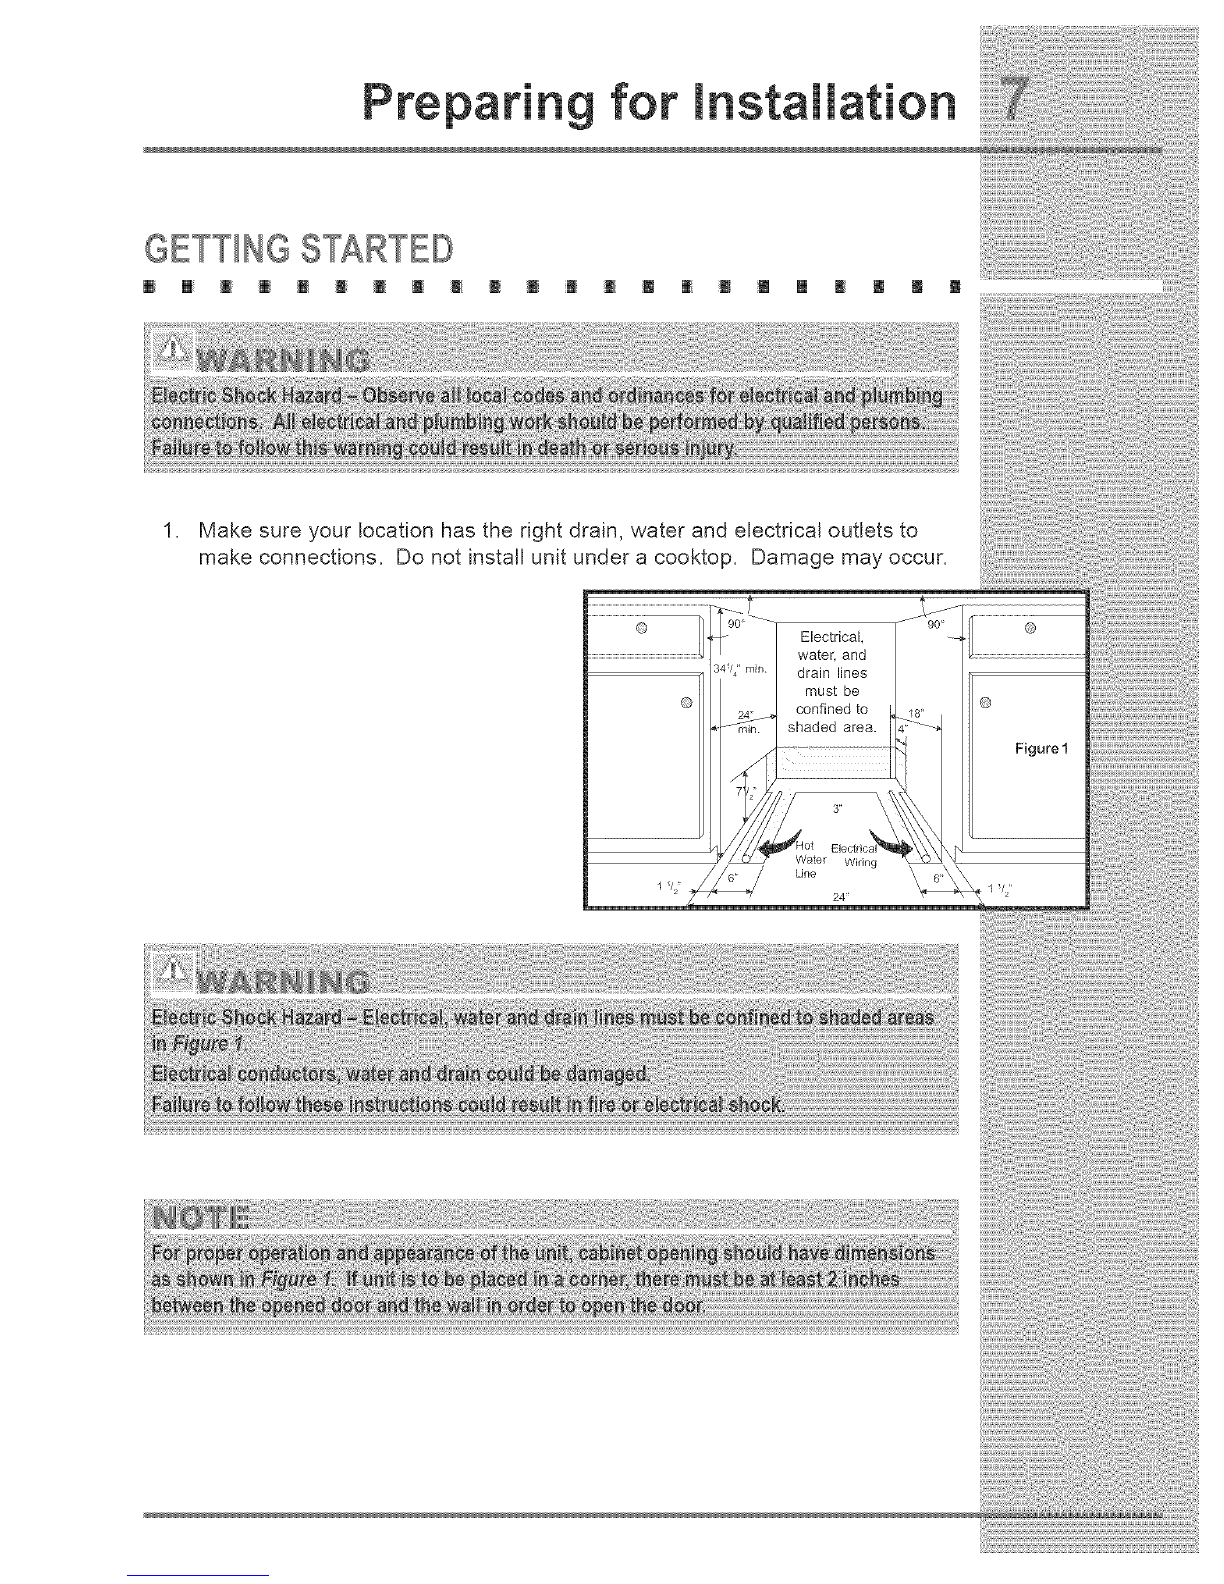
Other Electrolux Dishwasher manuals

Electrolux A15931301 User manual

Electrolux

Electrolux A15931301 User manual

Electrolux EDW7505HPS - Semi-Integrated Dishwasher With 5 Wash... User manual

Electrolux

Electrolux EDW7505HPS - Semi-Integrated Dishwasher With 5 Wash... User manual

Electrolux FAVORIT 65411 VI User manual

Electrolux

Electrolux FAVORIT 65411 VI User manual

Electrolux ESI64060 User manual

Electrolux

Electrolux ESI64060 User manual

Electrolux GA60SLVC User manual

Electrolux

Electrolux GA60SLVC User manual

Electrolux ESF 65060 User manual

Electrolux

Electrolux ESF 65060 User manual

Electrolux ESI6510LOW User manual

Electrolux

Electrolux ESI6510LOW User manual

Electrolux ESF 6126 User manual

Electrolux

Electrolux ESF 6126 User manual

Electrolux ESL7510RO User manual

Electrolux

Electrolux ESL7510RO User manual

Electrolux ESL6362LO User manual

Electrolux

Electrolux ESL6362LO User manual

Electrolux EDW5505ESS User manual

Electrolux

Electrolux EDW5505ESS User manual

Electrolux 534058 User manual

Electrolux

Electrolux 534058 User manual

Electrolux EPPWA060 User manual

Electrolux

Electrolux EPPWA060 User manual

Electrolux ZANUSSI DE 6955 User manual

Electrolux

Electrolux ZANUSSI DE 6955 User manual

Electrolux EDW5505EPS - ICON - Dishwasher User manual

Electrolux

Electrolux EDW5505EPS - ICON - Dishwasher User manual

Electrolux EIDW1805KS User manual

Electrolux

Electrolux EIDW1805KS User manual

Electrolux ESI6515LAK User manual

Electrolux

Electrolux ESI6515LAK User manual

Electrolux ASF45090 User manual

Electrolux

Electrolux ASF45090 User manual

Electrolux EES68510L User manual

Electrolux

Electrolux EES68510L User manual

Electrolux ESI5530LOW User manual

Electrolux

Electrolux ESI5530LOW User manual

Electrolux GA60GLISCN User manual

Electrolux

Electrolux GA60GLISCN User manual

Electrolux ESL 66065 User manual

Electrolux

Electrolux ESL 66065 User manual

Electrolux EIDW5705PB User manual

Electrolux

Electrolux EIDW5705PB User manual

Electrolux ESF6800ROX User manual

Electrolux

Electrolux ESF6800ROX User manual

Popular Dishwasher manuals by other brands

KitchenAid KUDB230B Use and care guide

KitchenAid

KitchenAid KUDB230B Use and care guide

Brandt BDJ424DB instruction manual

Brandt

Brandt BDJ424DB instruction manual

Asko DSD767UXXL.AU user manual

Asko

Asko DSD767UXXL.AU user manual

Beko DFN26210W instruction manual

Beko

Beko DFN26210W instruction manual

NEFF S153ITX00E INFORMATION FOR USE

NEFF

NEFF S153ITX00E INFORMATION FOR USE

Midea SV 4.45 wi manual

Midea

Midea SV 4.45 wi manual

LG LDF7932 Specifications

LG

LG LDF7932 Specifications

Gorenje GV63214 instruction manual

Gorenje

Gorenje GV63214 instruction manual

Hotpoint HDA1100ZWH Installation information

Hotpoint

Hotpoint HDA1100ZWH Installation information

Blomberg LDFN2240W instruction manual

Blomberg

Blomberg LDFN2240W instruction manual

AEG FFB83836PM user manual

AEG

AEG FFB83836PM user manual

Cylinda DM3220RFD user manual

Cylinda

Cylinda DM3220RFD user manual

Atag DW8214MB manual

Atag

Atag DW8214MB manual

GE GLD8000 Series owner's manual

GE

GE GLD8000 Series owner's manual

Siemens SN23HI02KE INFORMATION FOR USE

Siemens

Siemens SN23HI02KE INFORMATION FOR USE

Omega ODW717X instruction manual

Omega

Omega ODW717X instruction manual

BORETTI BVW-683 operating instructions

BORETTI

BORETTI BVW-683 operating instructions

Siemens SN 56N591 operating instructions

Siemens

Siemens SN 56N591 operating instructions

manuals.online logo
manuals.online logoBrands
  • About & Mission
  • Contact us
  • Privacy Policy
  • Terms and Conditions

Copyright 2025 Manuals.Online. All Rights Reserved.

1at i _
o ___r_st r uct _o ns
READTHESEINSTRUCTIONS
Read all instructions before installing the dishwasher.
For your safety, please read and observe all safety instructions. This guide will
help you anticipate electrical, water, and drain connections and help you select the
best location for the dishwasher.
1-877-4Electolux (United States and Canada)
For online support and product information, in the U.S. visit
www.electroluxusa.com. In Canada, visit www.etectroluxca.com.
@2005 Electrolux Major Appliances, North America
Post Office Box 212378, Augusta, Georgia 30917, USA
All rights reserved, Printed in the USA
J
TABIIII,,,,,,,,,,EOFCONTENTS
BeforeYouBegin..................................................3
Questions...........................................................3
Preparingfor InstaJJation.....................................5
Dimensions........................................................5
MaterialsProvidedforAII Installation.................5
MaterialsNeededforInstallation.......................5
ToolsNeededforInstallation.............................5
InstallationTips..................................................6
GettingStarted...................................................7
Makingthe Connections......................................9
LocatingtheConnections..................................9
MakingtheElectricalConnection....................10
MakingtheWaterConnection..........................10
MakingtheDrainConnections..........................11
InstaJJingthe Dishwasher..................................13
RemovingthePackaging.................................13
InstallingtheLevelingLegs.............................13
RemovingtheFoamMotorSupport.................13
RemovingtheAccessCover............................14
installingtheElbow..........................................14
LevelingtheDishwasher..................................15
PositioningtheDishwasherfor Installation......15
it _il il iB il l l il [] mi []
Finishing theConnections ................................16
FinishingtheWaterConnection.......................16
FinishingtheDrainConnection........................16
FinishingtheElectricalConnection..................17
Finishing the InstaJJation...................................18
PositioningtheDishwasherin Cabinet............18
Checkingthe Installation..................................18
Securingthe Dishwasher...................................1g
Securingto CabinetandCountertop...............19
CompJetJngthe InstaJJation...............................20
InstallingtheToekick........................................20
Adjusting Trim Plates ........................................21
Prepari for stal
BEFOREYOU START
Make sure the area selected for the installation site meets product
dimension requirements.
MATERIALSPROVIDEDFORINSTALLATION
Mounting screws
• 3/4" UL approved strain relief
• Sound seals (select models only)
• Two mounting strips
Toe panel seal
MATERIALSNEEDEDFORINSTALLATION
• 3/8" male (N.P.T.) compression or flare elbow
Plumber's tape
• Two appropriate sized wire nuts
1.25" hose clamp
TOOLSNEEDEDFORINSTALLATION
5/8"
r In; on
INSTAL,,,,L,,,,ATIONTIPS
Please read all safety instructions before installing your new Electrolux
dishwasher.
Examine the dishwasher and locate the connections. See Locating the
Connections, page 9.
Locate the dishwasher where there is easy access to drain, water, and
electrical lines. The best location is on either side of the kitchen sink for
access to existing plumbing and ease in loading dishes. See Making the
Connections, pages 9-11.
Electrical, water and drain connections are not the same for all age,
brands or models of dishwasher. Check the location and length of home
utilities. See Making the Connections, pages 9-11.
A 15-20 amp, grounded 120 volt AC only electrical supply is required. See
Making the Connections, pages 9-11.
If the dishwasher drain hose will be connected to a food disposer for the
first time, remove knock out plug covering disposer inlet. See Making the
Connections, pages 9-11.
Kinked water and drain hoses can cause problems. See Finishing the
Connections, page 16.
Dishwasher need to be connected to a hot water supply with enough water
pressure to ensure an adequate fill. See Making the Water Connection,
page 10.
Each home installation differs. You will need additional parts listed above
to complete the installation. See Materials Needed for Installation, page 5.
Flush water line prior to making the final connection to prevent clogging of
the inlet valve filter screen. See Finishing the Water Connection, page 16.
The dishwasher will look, sound and perform best when properly leveled.
See Leveling the Dishwasher, page 15.
Anchor the dishwasher to the countertop and adjacent cabinets. See
Securing the Dishwasher, page 19.
Preparing for stal
GETTINGSTARTED
1, Make sure your location has the right drain, water and electrical outlets to
make connections, Do not install unit under a cooktop, Damage may occur,
Electrical,
water, and
34/4" min drain lines
must be
confined to
shaded area.
©
Figure I
Water Wiring
Line \
1 _/j' I Uj'
24"
r ln_ on
2. Remove any carpet from area to provide clearance. Floor should be flat
and free from any obstructions.
the Conn
IIII,,,,,,,,,,OCATINGTHE CONNECTIONS
.
.
Review dimensions in Figure 2 to locate the dishwasher's drain, water
and electrical connections.
All connections must be made in the shaded
area of Figure f, page 7.
MAKING THE EIIII,EOTRICALCONNECTION
I • l _ m _ _ U • J • m E _ l [] [] [] m g m
1. The dishwasher operates on a 120 Volt, 60 Hz electrical supply. Provide
a separate circuit with fuse or circuit breaker rated for at least 15 amps (20
amps if connected with a disposer), but not more than 20 amps.
2. Note the location of the electrical supply and the dishwasher's electrical
junction box on the right hand underside of the unit. See Figure 2, page 9.
3. Cut the access hole in the shaded area shown in Figure I, page 7.
4. PuN the electrical cable through the hole into the installation area.
MAKING THEWATERCONNECTION
I _ l t l ! [] E • • _ t W I [] [] [] I l []
1. Determine where you connect to the hot water supply. Review Figure 2,
page 9 and note the location of the water inlet valve.
.
.
Be sure water inlet is protected from freezing. If valve freezes and
ruptures, flooding may occur.
Determine the amount of tubing needed to connect the hot water supply to
the unit's water inlet valve. Copper tubing must have a minimum of 3/8" OD.
High-pressure and high-temperature rated plastic tubing with a minimum
inner diameter of 1/4" may be used. A shut-off valve installed outside the
dishwasher cabinet is recommended. ,See Figure 3, page 11.
the Conn
2. Cut water access hole in cabinet as shown in Figure 3.
3. Route water supply line to installation area.
MAKINGTHE DRAINCONNECTION
.
2.
.
Follow local codes and ordinances.
Review Figure 4 and Figure 5, page 12 to see the different ways to connect
dishwasher to drain system. Choose the method that best suits your need.
If you connect to a sink drain, entry will need to be above the trap. A "Y"
branch tailpiece and connector kit, not included, will make this method easier
and included all needed fittings and instructions. See Figure 5, page 12.