manuals.online logo
Brands
  1. Home
  2. •
  3. Brands
  4. •
  5. Electrolux
  6. •
  7. Lawn Mower
  8. •
  9. Electrolux Automower G2 User manual

Electrolux Automower G2 User manual

Other manuals for Automower G2

1

Other Electrolux Lawn Mower manuals

Electrolux LT19A User manual

Electrolux

Electrolux LT19A User manual

Electrolux 165H107RB User manual

Electrolux

Electrolux 165H107RB User manual

Electrolux Flymo Roller Compact 400 User manual

Electrolux

Electrolux Flymo Roller Compact 400 User manual

Electrolux 96012001101 User manual

Electrolux

Electrolux 96012001101 User manual

Electrolux 6053SD Setup guide

Electrolux

Electrolux 6053SD Setup guide

Electrolux Flymo Micro Compact 300 Plus Operating manual

Electrolux

Electrolux Flymo Micro Compact 300 Plus Operating manual

Electrolux RC320 User manual

Electrolux

Electrolux RC320 User manual

Electrolux Sprinter 330 User manual

Electrolux

Electrolux Sprinter 330 User manual

Electrolux FL460 EL 1600 W User manual

Electrolux

Electrolux FL460 EL 1600 W User manual

Electrolux M1033 E User manual

Electrolux

Electrolux M1033 E User manual

Electrolux P4053SB User manual

Electrolux

Electrolux P4053SB User manual

Electrolux 4045PDE User manual

Electrolux

Electrolux 4045PDE User manual

Electrolux Lawn Mower Operating manual

Electrolux

Electrolux Lawn Mower Operating manual

Electrolux 5553SD Setup guide

Electrolux

Electrolux 5553SD Setup guide

Electrolux PWT420 User manual

Electrolux

Electrolux PWT420 User manual

Electrolux BM11TM92 User manual

Electrolux

Electrolux BM11TM92 User manual

Electrolux P180H122 User manual

Electrolux

Electrolux P180H122 User manual

Electrolux flymo micro lite User manual

Electrolux

Electrolux flymo micro lite User manual

Electrolux RE37 User manual

Electrolux

Electrolux RE37 User manual

Electrolux 12-107 User manual

Electrolux

Electrolux 12-107 User manual

Electrolux BBO001 User manual

Electrolux

Electrolux BBO001 User manual

Electrolux Bar Mower User manual

Electrolux

Electrolux Bar Mower User manual

Electrolux 180H122 Setup guide

Electrolux

Electrolux 180H122 Setup guide

Electrolux Flymo Mow n Vac Operating manual

Electrolux

Electrolux Flymo Mow n Vac Operating manual

Popular Lawn Mower manuals by other brands

Toro 20047 Operator's manual

Toro

Toro 20047 Operator's manual

Toro Greensmaster TriFlex 3300 Operator's manual

Toro

Toro Greensmaster TriFlex 3300 Operator's manual

Global garden products 72 Workshop manual

Global garden products

Global garden products 72 Workshop manual

EINHELL 01045 operating instructions

EINHELL

EINHELL 01045 operating instructions

Toro Greensmaster 3120 Operator's manual

Toro

Toro Greensmaster 3120 Operator's manual

Baroness LM315GC Owner's operating manual

Baroness

Baroness LM315GC Owner's operating manual

GreenWorks Tools 25157 user manual

GreenWorks Tools

GreenWorks Tools 25157 user manual

Etesia MVEHH user manual

Etesia

Etesia MVEHH user manual

Husqvarna LTH125 owner's manual

Husqvarna

Husqvarna LTH125 owner's manual

Gravely 915034 - ZT1640 Owner's/operator's manual

Gravely

Gravely 915034 - ZT1640 Owner's/operator's manual

Jacobsen 63281 Technical manual

Jacobsen

Jacobsen 63281 Technical manual

GreenWorks Pro MO802524 Operator's manual

GreenWorks Pro

GreenWorks Pro MO802524 Operator's manual

Toro TimeMaster 20976 Operator's manual

Toro

Toro TimeMaster 20976 Operator's manual

Deutz-Allis 3000 Series parts manual

Deutz-Allis

Deutz-Allis 3000 Series parts manual

Craftsman 917.9998C owner's manual

Craftsman

Craftsman 917.9998C owner's manual

jobmate YT9108 user manual

jobmate

jobmate YT9108 user manual

Yard force GM R40A instructions

Yard force

Yard force GM R40A instructions

Husqvarna R 419TsX AWD Operator's manual

Husqvarna

Husqvarna R 419TsX AWD Operator's manual

manuals.online logo
manuals.online logoBrands
  • About & Mission
  • Contact us
  • Privacy Policy
  • Terms and Conditions

Copyright 2025 Manuals.Online. All Rights Reserved.

1
A
PROGRAM
YES
B
C
abc
ghi
pqrs
MAN.
AUTO
tuv wxyz
jkl mno
ON
OFF
def
23
456
78
0
9
Automower
www.electrolux.com
www.automower.com ™
EP 0 550 473
EP 1058 958
US 6.586.908
EP 1 025 472
EP 1 302 147
SE 511 254
US 6.300.737
US 6.525.509
US 6.465.982
Introduction
When the charging station and the boundary wire are
completely installed and the Automower™ is linked to the
charging station, the mower can be started.
This document is a quick guide to installing the Automower.
There is more information about the mower and the installation
in the Automower Operator’s Manual.
Parts of the Automower
1. Display
2. Control panel
3. Main switch
4. Contact strips
5. LED for operation check of
the boundary wire
6. STOP button
7. Catch button for opening the
cutting height adjustment cover
8. Charging strips
Main menu
Commands
Timer
Garden
Settings
quick installation
guide
114 02 51-26
The Electrolux Group is the world’s largest producer of powered appliances for kitchen,
cleaning and outdoor use. More than 55 million Electrolux Group products (such as
refrigerators, cookers, washing machines, vaccum cleaners, chain saws and lawn
mowers) are sold each year to a value of approximately USD 14 billion in more than 150
countries around the world.
The Automower is protected by several patents.
Automower™ is a trademark of the Electrolux Group.
1
2
37
6
5
4
1.
2.
3.
4.
5.
2. 3.
1.
30 cm
35 cm
10 cm
0 cm
2.
3.
2.
A.
B.
C.
D.
E.
F.
G.
H.
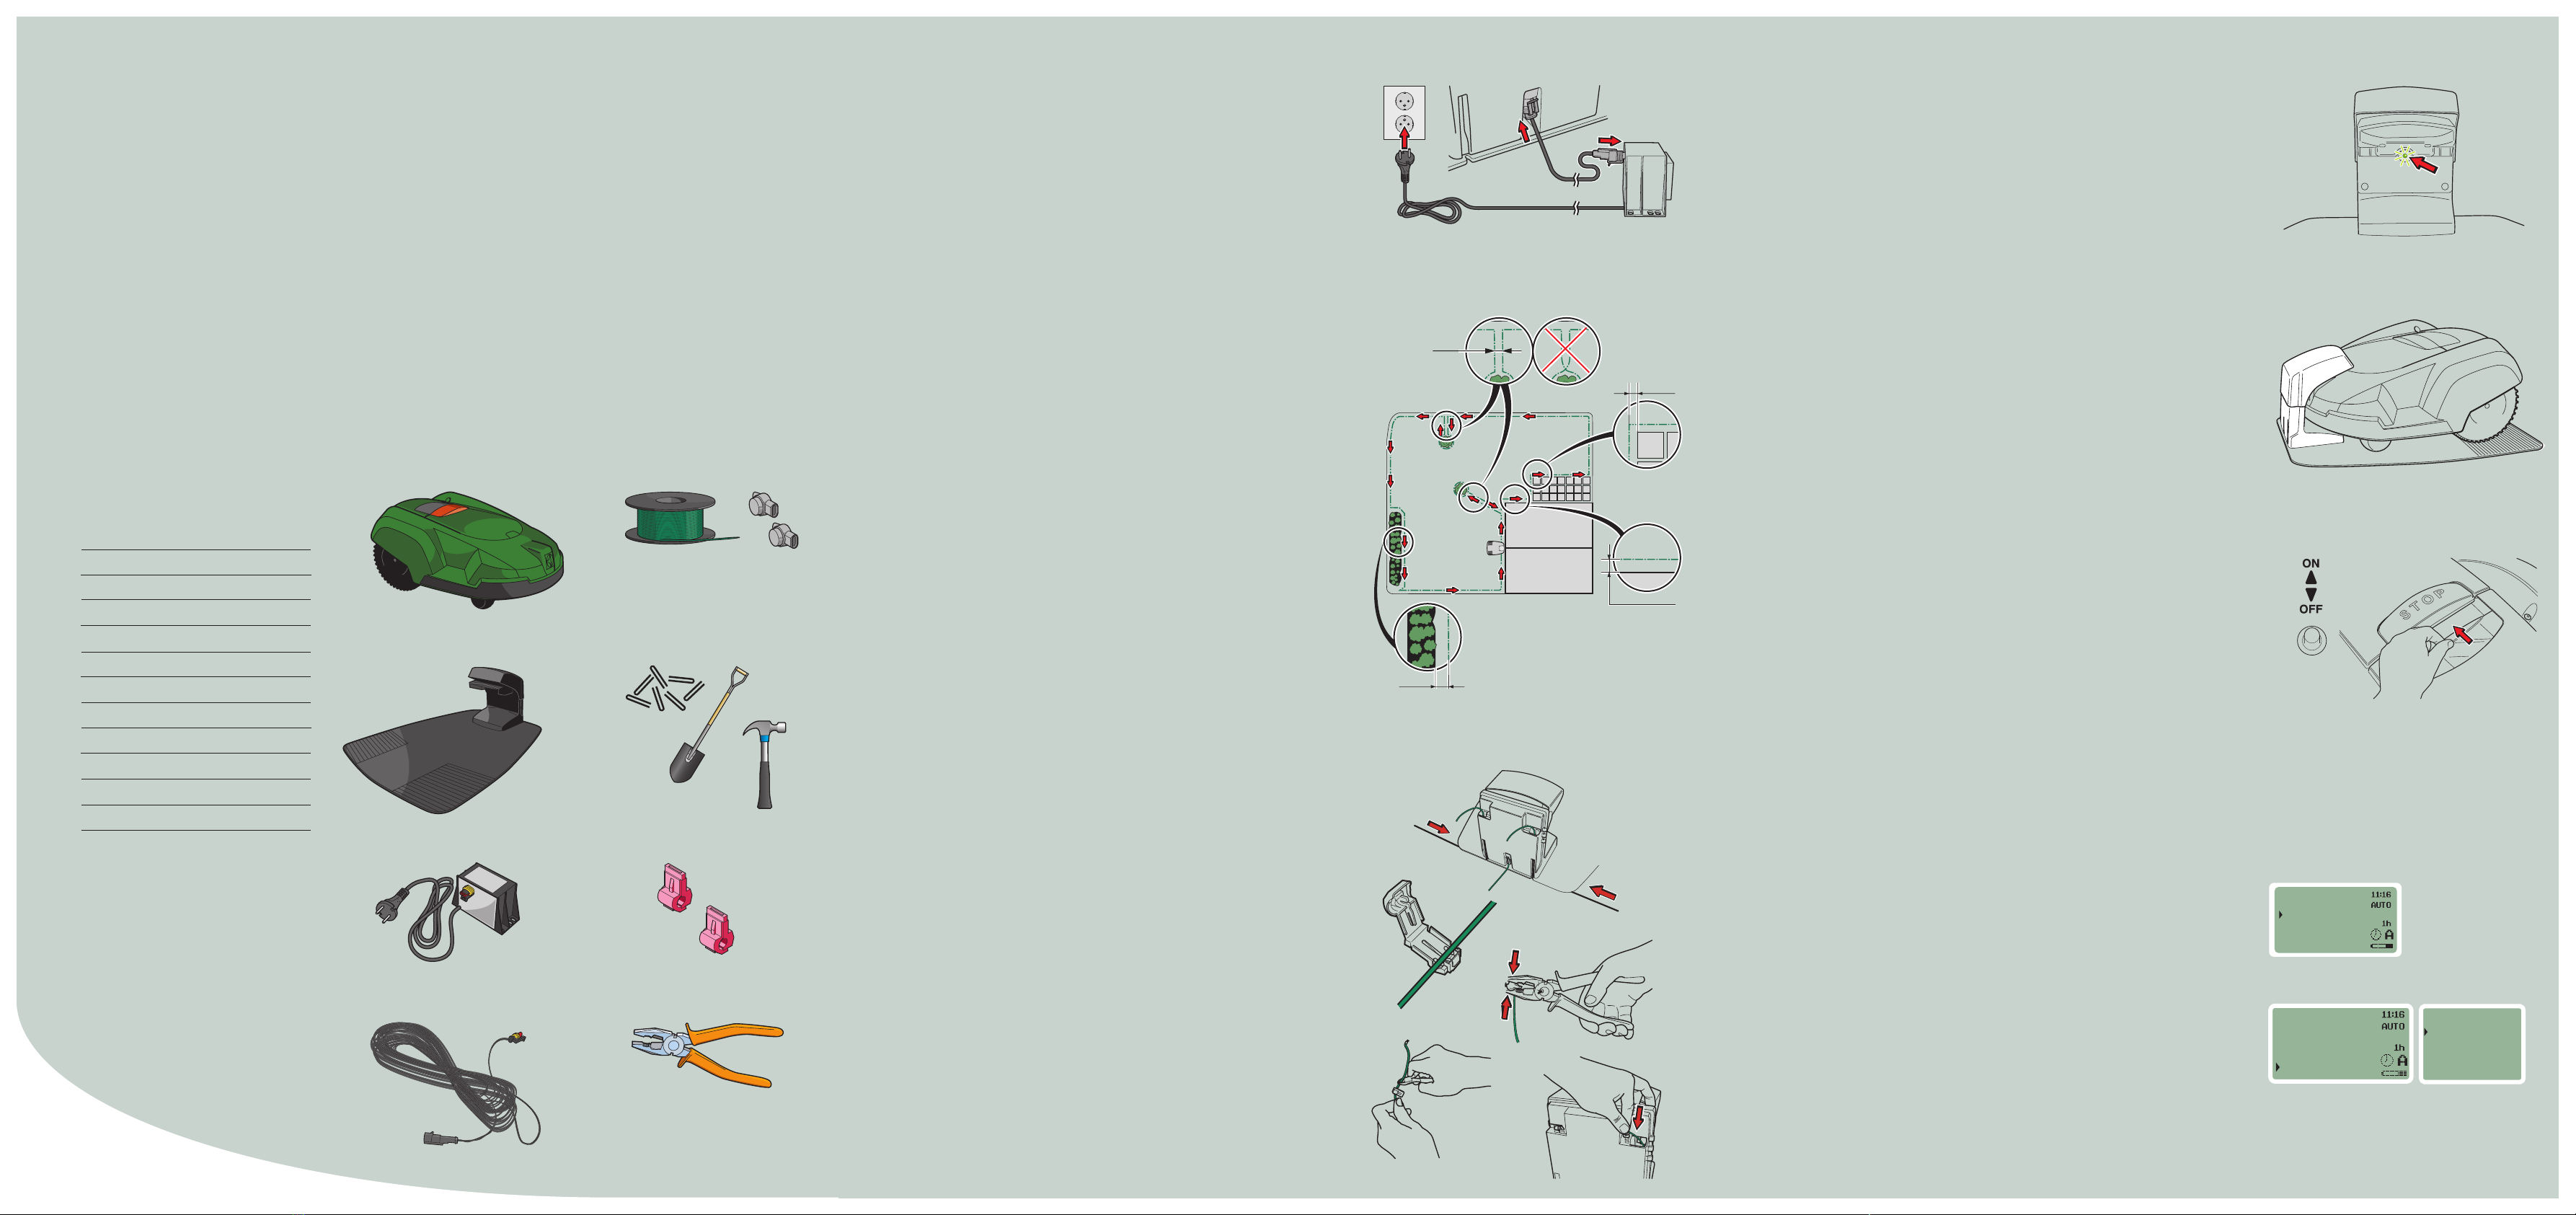
Placing and connecting the charging station
1. Place the charging station centrally in the working
area, with a large free area in front of the station and
on level ground.
2. Connect the low voltage cable to the charging station
and the transformer.
3. Connect the transformer’s power cord to a 230V wall
socket.
Charging the battery and laying out the
boundary wire
1. Place the Automower™ in the charging station to
charge the battery while you are laying out the
boundary wire. Leave the main switch in the OFF
position.
2. Lay out the boundary wire so it forms a loop around
the working area.
Connecting the boundary wire
1. Lift off the cover on the charging station and slide in
the ends of the boundary wire in the lowermost holes
on the charging station and catch them in the
uppermost holes:
• Right hand wire end into the right hand hole.
• Left hand wire end into the left hand hole.
2. Open the connector and place the wire in the
connector grip.
3. Press the connector together using a pair of pliers.
4. Cut off any surplus boundary wire. Cut 1-2 cm above
the connector.
5. Press the connector onto the metal pin on the
charging station. Refit the cover on the charging
station.
Checking the installation
Check the loop signal by looking to see what indication the green
LED on the charging station is giving.
• Lit = the signal is okay.
• Single flashing every other second = break in the loop and no
signal found.
• Double flashing every other second = signal found, but the
wire is probably damaged.
Linking the Automower™ to the charging station
To be fully functional, the Automower must be linked to its
charging station.
1. Make sure the Automower is in the charging station.
2. Enter, when requested: Language, time format, time, date
format, and date.
3. Choose and enter a four digit PIN code.
Starting and stopping the Automower
Starting
1. Open the control panel cover by pressing the STOP button.
2. Set the main switch to the ON position.
3. Close the cover.
Stopping
Press the STOP button.
Menu functions
You manage all the mower settings via the menu functions. Via the
main menu and its submenus, you customise the behaviour of the
mower with the help of functions like timer, sounds, and security.
For a complete description of the menu functions, see the
Operator’s manual for Automower.
The timer function
To achieve a good lawn quality and to avoid the lawn being
trodden, it is recommended to use the timer function (select
“Timer” on the main menu). By setting what time and which days
to mow, you ensure that Automower mows only as much as
necessary. When setting the timer, consider that the Automower
mows about 75 m2per hour.
Security
As a precaution against theft, it is recommended to use the time
lock function (select “Settings” on the main menu and “Security”
on the following submenu). The time lock function involves the
Automower stopping after a predetermined number of days and
not continuing until the correct PIN code has been entered.
Get started
A quick guide to how to install the Automower™.
If you feel uncertain about any step of the installation,
check the Operator’s manual.
Make sure you have all
the components:
A. Automower
B. Charging station
C. Transformer
D. Low voltage cable,
transformer connector
E. Boundary wire
and splice kit, if the boundary
wire needs to be spliced.
F. Staples and/or a spade.
A hammer is useful for stapling.
G. Boundary wire connector
H. Pliers
Main menu
Commands
Timer
Garden
Settings
Main menu
Security
Sounds
User info level
Language
Time and date
Settings
Commands
Timer
Garden
Settings