electromem HF Series User manual

IT MANUALE ISTRUZIONI...................................................................................................................7
GB INSTRUCTION MANUAL...............................................................................................................12
DE BETRIEBSANLEITUNG.................................................................................................................17
ES MANUAL DE INSTRUCCIONES....................................................................................................22
FR MANUEL D’INSTRUCTIONS .........................................................................................................27
CZ POKYNY K OBSLUZE ...................................................................................................................32
DK INSTRUKTIONSBOG.....................................................................................................................37
GR ΕΓΧΕΙΡΙΔΙΟ-ΟΔΗΓΙΕΣ ...................................................................................................................42
NL HANDLEIDING ...............................................................................................................................47
PT MANUAL DE INSTRUÇÕES ..........................................................................................................52
PL INSTRUKCJA.................................................................................................................................57

2
Fig. 1

3
Fig. 1/A
4
Fig. 2
Fig. 3
Fig. 4
5
Fig. 5
Fig. 6
6
Fig. 7
Fig. 8
7
MANUALE ISTRUZIONI
Modello: 12/24V 15A - Carica per batterie da 30Ah a 330Ah, mantenimento per batterie da 30Ah a 500Ah
I nuovi caricabatterie HF sono i caricatori elettronici di nuova concezione che rivoluzionano il modo di caricare le
batterie.
Concepiti per caricare tutti i tipi di batterie al piombo, tradizionali o di ultima generazione, sono particolarmente adatti
per essere impiegati quotidianamente come indispensabile mezzo di lavoro e per cariche di mantenimento di lunga
durata, come ad esempio per intere stagioni. Durante tutto il periodo in cui il mezzo (veicolo o imbarcazione) rimane
fermo e la batteria necessita di essere costantemente monitorata e mantenuta in carica, il caricabatterie può rimanervi
collegato senza pericolo di danneggiarla.
Nati per il settore automobilistico, trovano uno specico utilizzo anche nel settore dei mezzi commerciali ed agricoli, nella
nautica e nella camperistica.
Ideali per tutti i tipi di batterie al piombo ad elettrolita libero Wet o trattenuto Dry, (ad esempio le batterie ermetiche tipo
Gel, Agm, Mf).
Tutti i parametri di carica vengono settati tramite i tasti delle funzioni di carica, posti sul pannello di comando. A seconda
del modello, è possibile settare :
- la tensione della batteria (12 o 24 Volt)
- il tipo di batteria (ad elettrolita libero WET o trattenuto tipo ermetiche GEL e AGM)
- la capacità della batteria
- il ciclo di lavoro da effetture (carica normale, carica di recupero profonda, alimentatore come sostituto alla batteria)
Gli apparecchi sono inoltre dotati di segnalazioni a display, led ed acustiche che danno l’allarme in caso di inversione di
polarità, batteria guasta e tensione errata.
Sono in materiale isolante, con possibilità di ssaggio a parete, alto grado di protezione contro gli agenti esterni, protetti
contro surriscaldamento o cortocircuiti. Sono dotati di pinze.
CICLI DI CARICA
I cicli di carica dei nuovi caricabatterie HF sono stati appositamente sviluppati per ottimizzare la carica di tutti i tipi
di batterie presenti sul mercato. Le molteplici tecnologie costruttive delle batterie attualmente in commercio (Dry, Gel,
Wet, Agm) necessitano di differenti curve di carica per avere delle ricariche corrette e complete. I caricabatterie HF
allungano la vita delle vostre batterie perché forniscono ad ognuna di esse il giusto ciclo di carica.
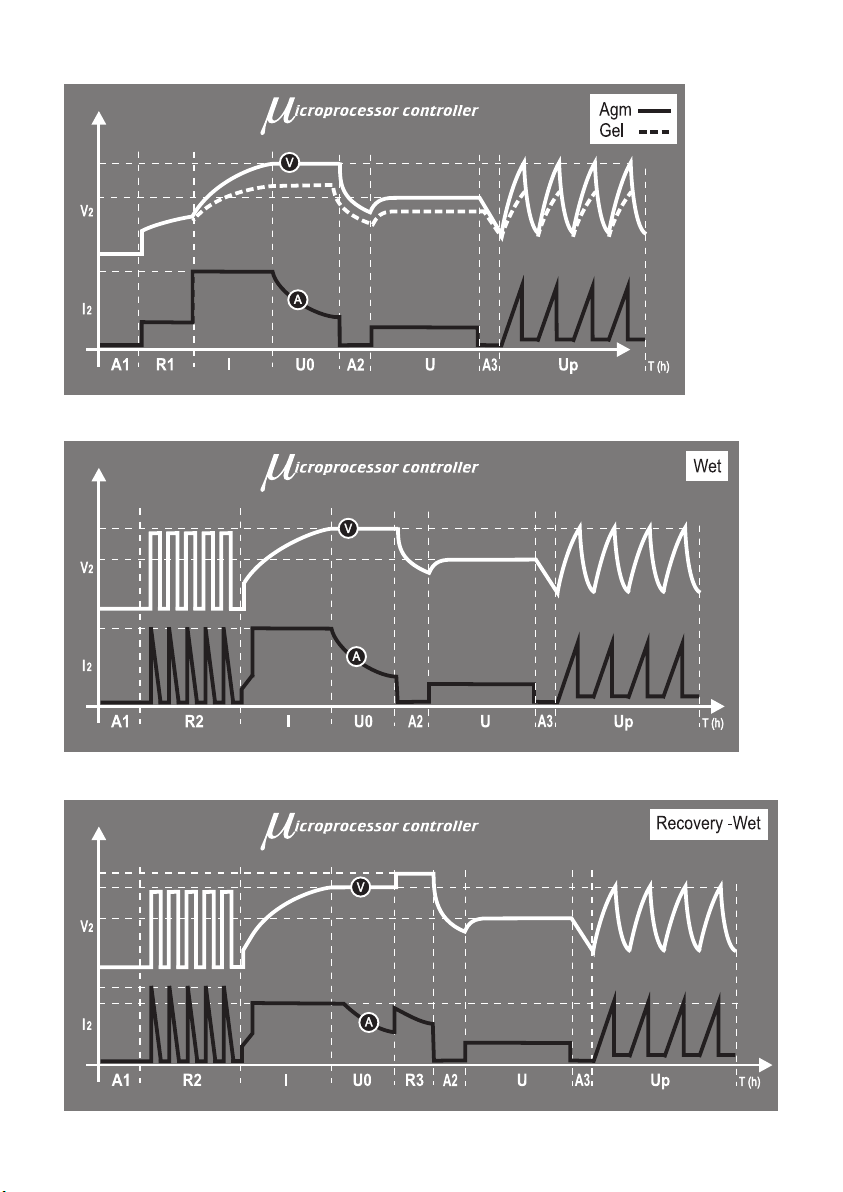
Il controllo e l’esecuzione del ciclo di carica è gestito da un microprocessore. I caricabatterie della serie HF hanno cicli
di carica distinti a seconda del tipo di batteria da caricare (Wet, Gel, Agm). Ogni ciclo di carica si attua in otto fasi, due di
diagnosi e sei di carica (in accordo con la norma DIN 41772) (Fig. 2 - 3 - 4).
• Prima fase di diagnosi
dello stato della batteria: “A1”
l caricabatterie analizza lo stato di carica della batteria da caricare.
• Prima fase di carica:
“Recupero da scarica profonda”
• Per batterie al GEL e AGM: “R1”
• Per batterie al WET: “R2”
Per batterie al GEL e AGM: se la batteria risulta essere molto scarica il
caricabatterie inizia a caricare utilizzando una corrente a bassa intensità
di carica no a che la batteria non avrà raggiunto la tensione ottimale per
iniziare la seconda fase di carica.
Per batterie WET: se la batteria risulta essere molto scarica il caricabatterie
inizia a caricare utilizzando una corrente pulsante no a che la batteria non
avrà raggiunto livelli di tensione e corrente ottimali per iniziare la seconda
fase di carica.
• Seconda fase di carica: “I” Carica a corrente costante no al raggiungimento della massima tensione
della batteria.
• Terza fase di carica: “U0” Carica a tensione stabilizzata no a che la corrente raggiunge valori minimi.
• Quarta fase di carica: “R3”
“Recovery” *
Solo con caricabatterie settato su WET: fase di carica profonda a corrente
costante e tensione crescente per aumentare la capacità di carica della
batteria.
• Seconda fase di diagnosi
dello stato della batteria: “A2”
Il caricabatterie analizza lo stato di efcienza della batteria caricata.
• Quinta fase di carica: “U” Carica di mantenimento a tensione ridotta costante (per 48 ore).
• Sesta fase di carica: “Up” Carica di mantenimento ad impulsi (costantemente in funzione).
• * Funzione di Recovery : questa modalità di carica permette di recuperare batterie Wet a 12 o 24 Volt rimaste a lungo
inattive e che presentano una straticazione dell’acido. Questa funzione agisce sicamente sulla soluzione elettrolitica
della batteria permettendo il rimescolamento della stessa e contrastando la straticazione.
IT

8
FUNZIONE SUPPLY A 12 E 24 VOLT
• I caricabatterie della serie HF sono dotati della funzione di Supply (alimentatore). Questa funzione permette di
mantenere attive le memorie di un veicolo durante i cambi di batteria o in tutti i casi in cui la batteria viene scollegata
dal circuito del veicolo. La funzione è utilizzabile su tutti i veicoli con impianti elettrici ed elettronici funzionanti e 12 o 24
Volt. (Fig. 5 - 6)
AVVERTENZE
• Il caricabatterie è destinato alla ricarica di batterie al piombo acido. Non utilizzare per altri scopi. Non caricare batterie
di tipo non ricaricabili. Non caricare batterie congelate.
• L’utilizzo di questo apparecchio non è destinato a persone inferme (bambini compresi) senza supervisione.
• Tenere lontano dalla portata dei bambini. Questo apparecchio non deve essere usato come un giocattolo.
• Indossare sempre occhiali protettivi e allontanare il viso dalla batteria durante le operazioni di collegamento e
scollegamento.
• Durante la ricarica della batteria può vericarsi l’emissione di gas esplosivi, evitare dunque la formazione di scintille o
amme e non fumare.
• Effettuare la carica in ambienti adeguatamente areati ed asciutti: non esporre a pioggia o neve.
• Accertarsi che il caricabatterie sia disinserito dalla rete prima di collegare, o scollegare, i cavi di carica alla batteria.
• Durante la ricarica non posizionare mai il caricabatterie sopra la batteria.
• Il liquido all’interno delle batterie è corrosivo, qualora vi fosse un contatto accidentale dell’acido con la pelle o con gli
occhi sciacquare immediatamente con acqua e consultare un medico.
• L’ uso improprio del caricabatteria, o la manomissione del circuito elettronico interno all’apparecchio, ne fanno decadere
la garanzia.
• In caso di danneggiamento, il cavo di alimentazione dell’apparecchio deve essere sostituito da tecnici autorizzati,
poiché l’intervento richiede l’utilizzo di utensili speciali.
• Interventi di riparazione o manutenzione dell’apparecchio devono essere effettuati solo da personale qualicato.
• Utilizzare il caricabatterie solo dopo aver letto attentamente il manuale d’ istruzioni.
CARICA
Carica di batterie collegate al veicolo
1. Vericare prima di iniziare la carica che il cavo di alimentazione sia disinserito dalla presa di rete.
2. Individuare il polo corrispondente alla massa del veicolo; in genere collegata al morsetto negativo.
3. Carica di una batteria con morsetto negativo collegato alla massa del veicolo.
• Collegare il conduttore di uscita con pinza rossa al polo (+) positivo della batteria.
• Collegare il conduttore di uscita con pinza nera alla massa del veicolo, lontano dalla batteria e dal condotto del
carburante.
4. Carica di una batteria con morsetto positivo collegato alla massa del veicolo.
• Collegare il conduttore di uscita con pinza nera al polo (-) negativo della batteria.
• Collegare il conduttore di uscita con pinza rossa alla massa del veicolo, lontano dalla batteria e dal condotto del
carburante.
Carica di batterie non collegate ad un veicolo
1. Vericare prima di iniziare la carica che il cavo di alimentazione sia disinserito dalla presa di rete.
2. Collegare il conduttore di uscita con pinza rossa al polo (+) positivo della batteria.
3. Collegare il conduttore di uscita con pinza nera al polo (-) negativo della batteria.
ATTENZIONE Assicurarsi che entrambi i morsetti dei conduttori di uscita abbiano un contatto adeguato con i
loro rispettivi terminali.
COME SI USA IL CARICABATTERIE (Fig. 1)
1. Una volta connessi i cavi dei conduttori di uscita alla batteria, collegare il cavo di alimentazione dell’apparecchio alla
prese di rete, assicurandosi che la tensione corrisponda a quella nominale del caricabatterie (230V-50Hz); a questo
punto, l’apparecchio emette un segnale acustico per 0,5 secondi e tutti i led di segnalazione, posti sul pannello di
comando, si illuminano per due secondi; in questa fase il display mostra “- - - -”.
2. Il caricabatterie si congura in modalità “stand-by”, ad esempio: led ON (L) acceso, led 12V(I) acceso, led Charge
30Ah/80Ah (G) acceso, led Wet (C) acceso. L’accensione dei led varia a seconda dell’ultimo programma memorizzato.
(Vedi par. “Memorizzazione dei cicli di carica”).
3. A questo punto, con il caricabatterie in modalità “stand-by”, settare i parametri di carica appropriati al tipo di batteria
da caricare mediante i tasti posti sul pannello di comando. I parametri di carica scelti sono evidenziati dall’accensione
del led corrispondente.

9
Parametri di carica impostabili:
• Tasto Voltage (4): a seconda della tensione della batteria, selezionare: 12Volt (led I) o 24Volt (led H)
• Tasto Function (5): a seconda della capacità della batteria e del ciclo di lavoro, selezionare:
- Charge 30Ah/80Ah (led G): carica per batterie da 30Ah a 80Ah, mantenimento per batterie da 30Ah a 250Ah
- Charge 90Ah/330Ah (led F): carica per batterie da 90Ah a 330Ah, mantenimento per batterie da 90Ah a 500Ah
- Recovery (E): Per batterie Wet rimaste a lungo inattive e che presentano una straticazione dell’acido. Questa funzione
viene attivata solo con il caricabatterie settato per batterie Wet.
Attenzione: A causa della tensione elevate che si raggiunge durante questo ciclo di ricarica, si deve effettuare il
recupero con batteria scollegata dal veicolo. Un recupero con batteria collegata al veicolo potrebbe causare danni
all’elettronica di bordo.
- Supply (D): Questa funzione permette di mantenere attive le memorie di un veicolo durante i cambi di batteria o in tutti i
casi in cui la batteria viene scollegata dal circuito del veicolo. La funzione Supply è attiva sia con caricabatteria impostato
a 12V (tensione erogata 13,5V) che a 24V (tensione erogata 27V).
Attenzione: non collegare mai il caricabatterie impostato a 24V/Supply ad un veicolo con impianto funzionante a 12V si
rischia di causare danni all’elettronica di bordo.
• Tasto Type (3), a seconda della tecnologia costruttiva della batteria, selezionare: Wet (led C), Gel (led B) o Agm led
(A).
4. Dopo aver impostato i parametri di carica, premere il tasto START/STOP (2) per avviare la carica della batteria.
L’accensione dei led START/STOP (L) e CHARGING (P) indicano che la carica è in corso, il display indicherà la corrente
di carica e la tensione della batteria.
5. Durante la carica della batteria nelle fasi “I” ed “U0” rimane acceso il led CHARGING (P).
6. All’accensione del led FULL (Q) la batteria sarà caricata al 100%, da questo momento il caricabatterie entrerà nella
fase di mantenimento e terrà costantemente monitorato lo stato di efcienza della batteria, provvedendo a mantenerla
sempre ad un livello ottimale di carica. In questa fase di carica l’apparecchio può rimanere collegato per diversi mesi.
7. Se si vuole interrompere o concludere la sezione di carica seguire la istruzioni di interruzione/ne carica.
INTERRUZIONE VOLONTARIA DEL CICLO DI CARICA
Se si vuole interrompere il ciclo di ricarica della batteria è sufciente premere il tasto START/STOP (2); lo spegnimento
del led corrispondente indica la ne del ciclo di lavoro. A questo punto e consigliato scollegare i conduttori di uscita dai
morsetti della batteria.
INTERRUZIONE DEL CICLO DI CARICA IN CASO DI INTERRUZIONE DELLA LINEA DI RETE
In caso di interruzioni sulla linea di rete a 230V il caricabatteria memorizza il ciclo di lavoro che stava eseguendo in
modo da poterlo riprende automaticamente al ritorno dell’alimentazione sulla linea di rete a 230Volt. Questa funzione
è fondamentale nei casi in cui il caricabatteria esegua cicli di carica in assenza di operatore; ad esempio durante cicli
di lavoro molto lunghi (cariche di mantenimento) o cicli notturni (cariche per mezzi che necessitano di cicli di carica
quotidiani).
FINE CARICA
1. Terminata la carica premere il tasto START/STOP (2) del caricabatterie. Lo spegnimento del led (L) indica che il
caricabatteria ha terminato il ciclo di lavoro.
2. Scollegare il conduttore di uscita con pinza nera dalla massa del veicolo o dal morsetto negativo (-) della batteria.
3. Scollegare il conduttore di uscita con pinza rossa dal morsetto positivo (+) della batteria.
MEMORIZZAZIONE DEI CICLI DI CARICA
Il caricabatterie memorizza automaticamente i parametri settati per l’ultimo ciclo di carica effettuato; all’accensione
successiva si accenderanno i led corrispondenti ai parametri di carica in memoria, per modicare questi parametri
è sufciente agire sui singoli tasti. Per resettare tutti i parametri e tornare alla congurazione primaria scollegare il
caricabatteria dalla rete elettrica e successivamente, tenendo premuto il tasto START/STOP (2), collegare il caricabatteria
alla rete, a questo punto il caricabatterie si congurerà cosi: led ON (L) acceso, led 12V(I) acceso, led Charge 30Ah/80Ah
(G) acceso, led Wet (C) acceso.
DISPLAY DIGITALE
Il caricabatteria è dotato di un display digitale che permette la visualizzazione della tensione e della corrente erogata.
Agendo sul tastino A/V (1) sarà possibile scegliere quale dei due parametri visualizzare. Il display inoltre permette di
visualizzare dei codici di errore in modo da vericare eventuali anomalie vericatesi durante il processo di carica.

10
ANALISI DELLA BATTERIA E SEGNALAZIONE ERRORI
I caricabatterie HF sono stati progettati in modo da analizzare lo stato della batteria prima e durante la carica e segnalare
eventuali anomalie di collegamento tra il caricabatteria e la batteria da caricare.
Attraverso il display digitale è possibile visualizzare un codice di errore, così da vericare in modo rapido e semplice l’
anomalia vericatasi.
In caso di anomalia il caricabatteria potrà segnalare le seguenti indicazioni:
DYSPLAY: indica il codice di errore; se i codici sono più di uno questi verranno visualizzati alternativamente
Led FAULT(O): si attiva al vericarsi dell’anomalia
Led START/STOP (L): si spegne durante tutto il perdurare dell’anomalia
SEGNALATORE ACUSTICO: si attiva in tutti i casi di anomalia.
SEGNALAZIONE
DISPLAY
CAUSA RIMEDIO
E01 Cavi scollegati, cavi in cortocircuito. Posizionare correttamente le pinze
e riprendere la carica della batteria;
(vedere il paragrafo “Come si usa il
caricabatterie”).
Batteria completamente in cortocircuito. La batteria può essere difettosa.
Consultare il Centro Servizi della batteria
più vicino.
E02 Batteria guasta o non recuperabile La batteria può essere difettosa.
Consultare il Centro Servizi della batteria
più vicino.
E03 Sovratemperatura interna del caricabatteria Rimuovere eventuali oggetti che coprono
l’area di ventilazione del caricabatteria
o spostarlo in una zona più fresca.
Attendere che il caricabatteria riparta
automaticamente.
E04 Batteria con tensione troppo bassa. (Si sta tentando
di caricare una batteria da 6Volt con il caricabatteria
settato a 12 Volt o una batteria da 12Volt con il
caricabatteria settato a 24 Volt).
Settare nuovamente la tensione
corrispondente a quella della batteria.
Riprendere la carica della batteria (vedere
paragrafo “Come si usa il caricabatterie”).
Batteria con uno o più elementi in cortocircuito. La batteria può essere difettosa.
Consultare il Centro Servizi della batteria
più vicino.
E05 Batteria con tensione troppo alta rispetto a quella
impostata. (Si sta tentando di caricare una batteria
da 24Volt con il caricabatteria settato a 12 Volt).
Settare nuovamente la tensione
corrispondente a quella della batteria.
Riprendere la carica della batteria (vedere
paragrafo “Come si usa il caricabatterie”).
E06 Batteria di capacità eccessiva Utilizzare un caricabatteria con capacità di
carica maggiore.
E07 e led
REVERSE (N)
Le pinze dei conduttori di uscita sono collegati
impropriamente alla batteria.
Funzione di Supply: è intervenuto il fusibile
Posizionare correttamente le pinze
e riprendere la carica della batteria;
(vedere il paragrafo “Come si usa il
caricabatterie”).
Scollegare il caricabatterie dalla presa
di rete.Vericare lo stato del fusibile ed
eventualmente sostituirlo.
PROTEZIONI
I caricabatteria HF sono dotati di protezioni atte a garantire il massimo della sicurezza durante l’utilizzo ed il funzionamento
dell’apparecchio.
• Protezione completa contro le scintille
• Protezione di cortocircuito
• Compensazione di tensione
• Protezione di surriscaldamento
• Protezione contro l’inversione di polarità
• Alto grado di protezione contro gli agenti esterni

11
MANUTENZIONE
Quando non è in uso il caricabatterie deve essere mantenuto in una zona asciutta per evitare l’umidità. Per la pulizia del
corpo esterno del caricabatteria, scollegare l’apparecchio e utilizzare un panno morbido.
INFORMAZIONI GENERALI PER L’UTENTE
CAPACITA’ NOMINALE DELLA BATTERIA – Ah
Quantità di corrente (A) che una batteria riesce a fornire nel tempo (h) normalmente considerato in 10 ore.
BATTERIE GEL
Le batterie al gel sono batterie al Piombo-Calcio in cui le piastre positive e negative sono immerse in una soluzione
gelatinosa. Sono batterie ermetiche sigillate e non hanno bisogno di manutenzione. Vengono solitamente utilizzate in
situazioni di uso intenso della batteria. La loro robustezza le rende particolarmente adatte per l’ utilizzo in moto,
fuoristrada, macchine operatrici ed imbarcazioni.
BATTERIE DRY
Le batterie dry sono batterie al Piombo-Calcio, la soluzione elettrolitica in questo caso è trattenuta da separatori in
microbra posti tra le piastre. Come le batterie al gel sono batterie ermetiche ad alte prestazioni.
BATTERIE WET
Sono batterie al Piombo in cui le piastra positive e negative sono immerse in una soluzione acquosa di acido solforico.
Possono essere ermetiche o dotate di tappi per la manutenzione. Questo tipo di batteria è la più usata nel settore
automobilistico.
BATTERIE AGM
Le batterie a ricombinazione di gas (AGM) sono batterie a banda continua in Piombo-Stagno in cui la stessa piastra, la
soluzione elettrolitica e i separatori in bre polimeriche e silicio sono avvolti a spirale. Sono batterie senza manutenzione,
ad elevato spunto all’avviamento studiate appositamente per l’utilizzo in situazioni estreme e gravose. Resistono a cicli
di carica e scarica intensi.
ll tempo di ricarica di una batteria dipende anche dal grado di scarica iniziale. Una batteria molto scarica impiegherà più
tempo per caricarsi rispetto ad una batteria meno scarica.
CONDIZIONI DI GARANZIA
1. La ditta produttrice si rende garante del buon funzionamento del prodotto per un periodo di 24 mesi dalla data di
acquisto, riportata sulla ricevuta scale rilasciata al momento della vendita da parte del venditore.
2. La garanzia prevede la riparazione o la sostituzione gratuita dei componenti dell’apparecchio riconosciuti dalla
ditta difettosi nella fabbricazione o nella natura dei materiali.
3. Gli inconvenienti derivati da negligenza, cattiva utilizzazione, manomissione dell’apparecchio fanno decadere la
garanzia.
4. La garanzia inoltre decade nel caso in cui la riparazione dell’apparecchio venga effettuata da personale non qualicato
e non autorizzato dalla ditta costruttrice.
5. L’errato collegamento alla rete, la non rispondenza della tensione di alimentazione con quella nominale di targa
dell’apparecchio e le variazioni di tensioni in linea causate da agenti esterni, fulmini o quant’altro comportano
l’annullamento della garanzia.
6. Le macchine rese, anche se in garanzia, dovranno essere spedite in PORTO FRANCO e verranno restituite in
PORTO ASSEGNATO.
7. Il certicato di garanzia ha validità solo se accompagnato da scontrino scale o bolla di consegna.
8. Si declina ogni responsabilità per tutti i danni diretti o indiretti di qualsiasi natura a persone o cose conseguenti all’uso
o alla sospensione dell’uso dell’apparecchio.

12
INSTRUCTION MANUAL
Model: 12/24V 15A - Charge for batteries from 30Ah to 330Ah, maintenance for 30Ah to 500Ah batteries
The new cutting edge electronic HF battery chargers revolutionise the way of charging batteries.
Designed to charge all types of lead batteries, conventional batteries and batteries of the latest generation, they are
particularly suited to withstand extensive charging cycles, even throughout an entire season, for example. For the whole
time in which the vehicle or watercraft is not used but the battery needs to be constantly monitored and its charge held,
the battery charger can be left connected without the risk of damage.
Devised for the vehicle industry, they can also be used in other elds such as sports and leisure. They can be used, for
example, for motorcycles, scooters, sports cars, vintage cars, snow mobiles, lawnmower tractors and so on. They also
nd specic use in the eld of commercial and farming vehicles, watercraft and mobile homes.
They are ideal for all types of Wet cell lead batteries, with liquid electrolyte, or Dry cell lead batteries, with immobilized
electrolyte (for example, sealed batteries type Gel, Agm and Mf).
All the charging parameters are set using charge function keys on the control panel. Based on the specic model
purchased, you can set:
- the battery voltage (12 or 24 Volt)
- the type of battery (WET cells or sealed GEL-type with immobilized electrolyte, or AGM)
- the work cycle to be carried out (normal charge, deep recovery charge, power supply unit as substitute for the
battery)
The battery chargers are also equipped with display LED and acoustic indicators, which trigger alarms if the polarity is
reversed, if the battery is faulty and if the voltage is incorrect.
They are made of insulating material and can be wall-mounted. They have a high level of protection against external
agents and are safeguarded against overheating and short-circuiting, they are equipped with clamps.
CHARGE CYCLES
The charge cycles of the new HF battery chargers have been developed especially to optimize the charge of all types of
batteries currently on the market. The numerous constructional technologies of batteries currently commercialized (Dry,
Gel,Wet, Agm) require different charging curves to ensure correct and complete charging. The HF battery chargers
extend the life of your batteries because they ensure the proper charge for each specic battery.
The control and fullment of the charge cycle is managed by a microprocessor. The battery chargers of the HF series
have specic charge cycles based on the type of battery to be charged (Wet, Gel or Agm). Each charge cycle is
implemented in six phases: two diagnosis phases and four charge phases (pursuant to standard DIN 41772) (Fig.
2 - 3 - 4).
• First diagnosis phase of the state
of the battery: “A1”
The battery charger analyses the charged state of the battery to be
charged.
• First charging phase:
“Very low recovery”
• For GEL and AGM batteries: “R1”
• For WET batteries: “R2”
For GEL and AGM batteries: if the battery is very low, the battery charger
will start to charge with a soft current charge until the battery reaches the
optimal voltage to be able to start the second charging phase.
For WET batteries: if the battery is very low, the battery charger will start
to charge using a pulsating current until the battery reaches the optimal
levels of voltage and current to be able to start the second charging
phase.
• Second charging phase: “I” The battery is charged at a constant current until it reaches its maximum
voltage.
• Third charging phase: “U0” The battery is charged at a stabilised voltage until the current reaches
minimum values.
• Fourth charging phase: “R3”
“Recovery” *
Only for battery chargers set on WET: the battery is charged deeply at
a constant current and increasing voltage to boost the charge capacity
of the battery.
• Second diagnosis phase of the
state of the battery: “A2”
The battery charger analyses the state of efciency of the charged
battery.
• Fifth charging phase: “U” The battery is held at a reduced constant voltage. (for 48 hours).
• Sixth charging phase: “Up” The battery is held with pulses of current (constantly running).
• * Recovery function: this charging mode is used to recover Wet 12 or 24 Volt batteries that have been left unused
for a long time and in which the acid has stratied. This function acts physically on the battery’s electrolyte solution so
that it mixes again and contrasts stratication.
GB

13
SUPPLY FUNCTION AT 12 AND 24 VOLT
• The HF series battery chargers have a Supply function (power supply unit). This function is used to keep the memory
banks of a vehicle active while the battery is being changed or in all cases in which the battery is disconnected from the
vehicle’s circuit. The function can be used on all vehicles that have electrical and electronic systems working at 12 or
24 Volt. (Fig. 5 - 6)
WARNINGS
• The battery charger is designed to charge lead acid batteries. Do not use it for other purposes. Do not charge disposable
batteries. Do not charge frozen batteries.
• This appliance must not be used by incapable persons (including children) without supervision.
• Keep out of the reach of children. This appliance is not a toy and must not be used as such.
• Always wear protective goggles and keep your face away from the battery while connecting and disconnecting it.
• Explosive gas could be let-off while the battery is charging, therefore prevent the formation of sparks or ames and do
not smoke.
• Charge the battery in well-aired and dry places. Do not expose to rain or snow.
• Make sure the battery charger is disconnected from the mains before connecting or disconnecting the charge leads to/
from the battery.
• Never put the battery charger on top of the battery while charging it.
• The liquid inside the batteries is corrosive. In the case of accidental contact of this acid with skin or eyes, rinse
abundantly with water and seek medical assistance.
• Improper use of the battery charger or tampering with its built-in electronic circuit provides grounds to invalidate the
warranty.
• If the power supply lead of the appliance is damaged, have it replaced by authorised technicians, because its
replacement requires the use of special tools.
• The appliance shall be repaired or serviced exclusively by qualied personnel.
• Only use the battery charger after reading the instruction manual carefully.
CHARGING
Charging batteries connected to the vehicle
1. Before you start to charge the battery, make sure the power supply lead is NOT plugged into the mains.
2. Locate the vehicle’s earth pole, which is generally connected to the negative terminal.
3. Charging a battery with negative terminal grounded to the vehicle’s chassis.
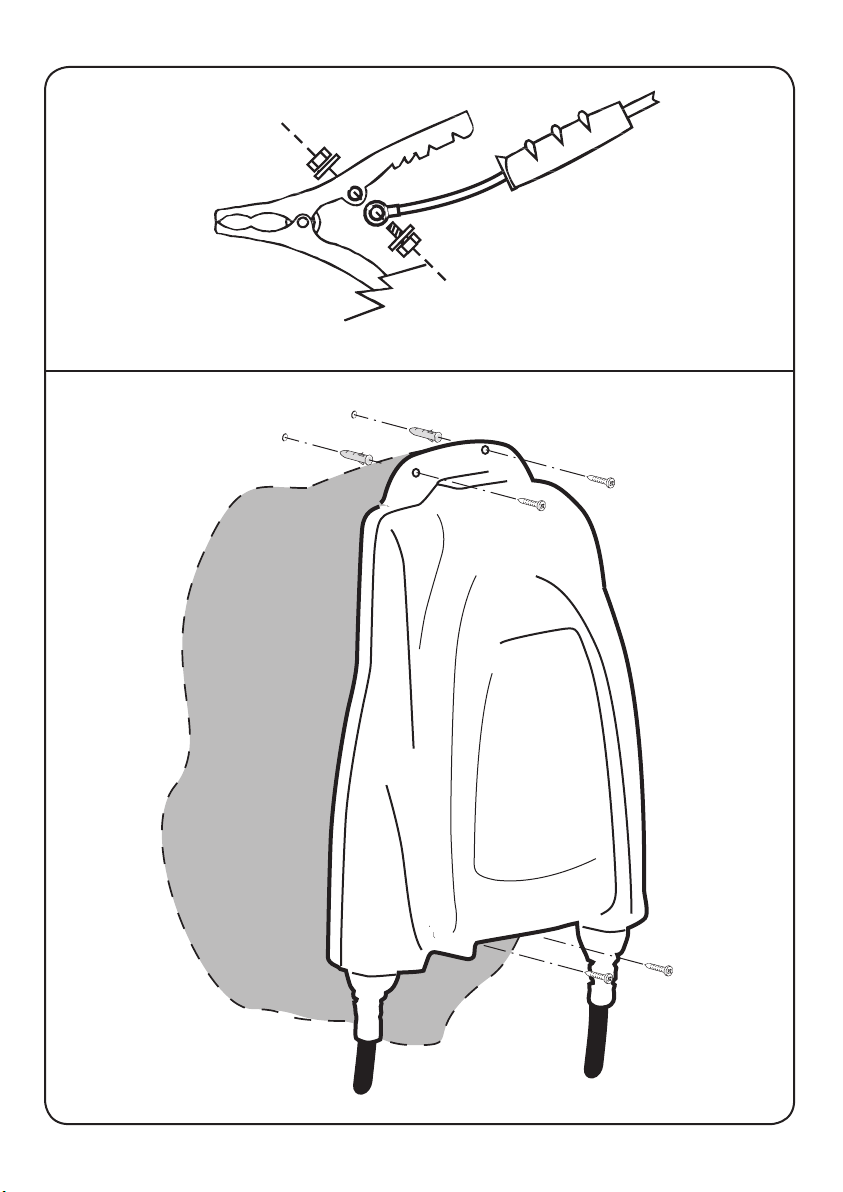
• Connect the output lead with red clamp to the positive terminal (+) of the battery.
• Connect the output lead with black clamp to the vehicle’s earthing, keeping it away from the battery and from the fuel
pipe.
4. Charging a battery with positive terminal grounded to the vehicle’s chassis.
• Connect the output lead with black clamp to the negative terminal (-) of the battery.
• Connect the output lead with red clamp to the vehicle’s earthing, keeping it away from the battery and the fuel pipe.
Charging batteries that are not connected to a vehicle
1. Before you start to charge the battery, make sure the power supply lead is NOT plugged into the mains.
2. Connect the output lead with red clamp to the positive terminal (+) of the battery.
3. Connect the output lead with black clamp to the negative terminal (-) of the battery.
ATTENTION Make sure both clamps of the output leads generate a suitable contact with their corresponding
terminals.
HOW TO USE THE BATTERY CHARGER (Fig. 1)
1. Once you have connected the output leads to the battery, plug the power supply lead of the battery charger into the
mains, making sure the voltage matches the nominal voltage of the battery charger (230V-50Hz); having done this, the
appliance will emit an acoustic signal for 0.5 seconds and all the LED indicators on the control panel will switch on for
two seconds, digital display show “----”.
2. The battery charger is congured in “stand-by” mode, for example: ON LED (L) lit, 12V LED (I) lit, Charge 30Ah/80Ah
LED (G) lit, Wet LED (C) lit. The LEDs light up differently based on the last program saved. (see section “Saving charge
cycles”).
3. At this stage, with the battery charger in “stand-by” mode, set the charging parameters suitable for the type of battery to
be charged using the keys on the control panel. The charging parameters selected are pointed out by the corresponding
LED, which switches on.

14
Settable charging parameters:
• Voltage key (4): based on the voltage of the battery, select: 12Volt (led I) or 24Volt (led H)
• Function key (5): based on the capacity of the battery and on the work cycle, select:
- Charge 30Ah/80Ah (led G): charge for batteries from 30Ah to 80Ah, maintenance for 30Ah to 250Ah batteries
- Charge 90Ah/330Ah (led F): charge for batteries from 90Ah to 330Ah, maintenance for 90Ah to 500Ah batteries
- Recovery (E): For Wet batteries that have been left unused for a long time and in which the acid has stratied. This
function is only activated when the battery charger is set for Wet batteries.
Attention!: In view of the high voltage reached during this charging cycle, the battery must be disconnected from
the vehicle while it is recovered. If you recover a battery while it is connected to the vehicle, this could damage its
electronics.
- Supply (D): This function is used to keep the memory banks of a vehicle active while the battery is being changed or
in all cases in which the battery is disconnected from the vehicle’s circuit. The Supply function is activated both when the
battery charger is set at 12V (voltage output 13.5V) and at 24V (voltage output 27V).
Attention: Never connect the battery charger set at 24V/Supply to a vehicle with system working at 12V, as you could
damage the vehicle’s electronics.
• Type key (3), depending on the constructional technology of the battery, select: Wet (led C), Gel (led B) or Agm (led
A).
4. Once you have set the charging parameters, press the START/STOP key (2) to start charging the battery. When the
START/STOP (L) and CHARGING (P) LEDs light up, it means that the battery is being charged; the display will show the
charging current and the voltage of the battery.
5. The CHARGING LED (P) remains lit in phases “I” and “U0” while the battery is charging.
6. When the FULL LED (Q) switches on, it means that the battery is fully charged (100%) and the battery charger will
switch to the maintenance phase, keeping the state of efciency of the battery constantly monitored so that it is always
at an optimal level of charge. In this charging phase, the appliance can be left connected to the battery for several
months.
7. If you wish to end or interrupt the charging cycle, following the end-of-charging instructions.
INTENTIONAL INTERRUPTION OF THE CHARGING CYCLE
If you want to interrupt the battery charging cycle, simply press the START/STOP key (2); the corresponding LED
switches off to point out that the work cycle has ended. At this stage, you are recommended to disconnect the output
leads of the battery terminals.
INTERRUPTION OF THE CHARGING CYCLE IN THE CASE OF A MAINS BLACKOUT
In the case of blackouts on the 230V mains line, the battery charger saves the work cycle that it was performing in order
to restore it automatically as soon as the power supply of the 230 Volt mains line is restored. This function is fundamental
if the battery charger is used to charge batteries without the operator supervising the cycle; for example, during very long
charging cycles (charge maintenance) or when charging overnight (charges for vehicles that need to be charged daily).
END-OF-CHARGING
1. Once the battery is charged, unplug the power supply lead of the battery charger from the mains.
2. Disconnect the output lead with black clamp from the vehicle’s earthing or from the negative terminal (-) of the
battery.
3. Disconnect the output lead with red clamp from the positive terminal (+) of the battery.
SAVING THE CHARGING CYCLES
The battery charger automatically saves the parameters set for the last charge cycle carried out; when it is switched on
again later, the LEDs corresponding to the saved charge parameters will switch on; to modify these parameters, simply
use the individual keys. To reset all the parameters and to go back to the primary conguration, disconnect the battery
charger from the electrical mains and then, holding down the START/STOP (2) key, connect the battery charger to the
mains; the battery charger will be thus congured: ON LED (L) lit, 12V LED (I) lit, Charge 30Ah/80Ah LED (G) lit, Wet
LED(C) lit.
DIGITAL DISPLAY
The battery charger has a digital display that shows the voltage and the current output. Using the A/V (1) key, you can
choose which of the two parameters you wish to display. The display also allows you to view error codes to be able to
check-out feasible anomalies that may occur during the charging process.

15
ANALYSING THE BATTERY AND ERROR INDICATORS
The HF battery chargers are designed to analyse the state of the battery before starting to charge it and to point out any
possible connection anomalies found between the battery charger and the battery to be charged.
You can view an error code on the digital display to quickly and simply check-out which anomaly has occurred.
In the case of anomalies, the battery charger may point out the following indications:
DYSPLAY: it indicates the error code; if there is more than one code, they will be displayed alternately
FAULT LED (O): it switches on when an anomaly occurs
START/STOP LED (L): it switches off for as long as the anomaly persists
ACOUSTIC INDICATOR: it triggers in all cases of anomaly.
DISPLAY
INDICATION
CAUSE SOLUTION
E01 Leads disconnected, leads short-circuited. Position the clamps correctly and
start charging the battery again;
(see section “How to use the battery
charger”).
Battery completely short-circuited. The battery could be defective.
Contact your nearest battery service
centre.
E02 Battery faulty or unrecoverable The battery could be defective.
Contact your nearest battery service
centre.
E03 Internal overheating of battery charger Remove any objects that could be
covering the ventilation area of the
battery charger or move it to a cooler
area. Wait for the battery charger to
start again automatically.
E04 Battery voltage too low. (you are attempting to
charge a 6 Volt battery with a battery charger set at
12 Volt or a 12V battery with the battery charger set
at 24 Volt).
Set again the voltage corresponding
to that of the battery. Start charging
the battery again (see section “How
to use the battery charger”).
One or more elements of the battery has/have short-
circuited.
The battery could be defective.
Contact your nearest battery service
centre.
E05 Battery voltage too high compared to that set. (You
are attempting to charge a 24V battery with the
battery charger set at 12 Volt).
Set again the voltage corresponding
to that of the battery. Start charging
the battery again (see section “How
to use the battery charger”).
E06 Battery capacity excessive Use a battery charger with greater
capacity.
E07 and led
REVERSE (N)
The clamps of the output leads are not connected
correctly to the battery.
Supply function: The fuse has tripped.
Position the clamps correctly and
start charging the battery again
(see section “How to use the battery
charger”).
Disconnect the battery charger from
the mains from socket.
Check the state of the fuse and
change if necessary.
SAFETY DEVICES
• The HF battery chargers are equipped with safety devices to guarantee utmost safety during use and operation of the
appliance.
• Full protection against sparks
• Protection against short-circuits
• Voltage compensation
• Protection against overheating
• Protection against reversed polarity
• High protection rating against external agents.

16
MAINTENANCE
When the battery charger is not used, it must be stored in a dry place to protect it against humidity. Disconnect the
appliance and use a soft cloth to clean its outer casing.
GENERAL INFORMATION FOR USERS
NOMINAL CAPACITY OF THE BATTERY – Ah
Current quantity (A) that a battery is able to supply in the time (h) normally considered in 10 hours.
GEL BATTERIES
Gel batteries are lead-calcium batteries in which the positive and negative plates are immersed in a gel solution.
They aresealed batteries and are maintenance-free. They are usually used in situations of intense use of the battery.
Their robustness makes them particularly suited for use on motorcycles, off-road vehicles, operating machines and
watercraft.
DRY CELL BATTERIES
Dry batteries are lead-calcium batteries in which the electrolyte solution is withheld by microber separators installed
between the plates. Likewise for gel batteries, they are heavy-duty and sealed batteries.
WET CELL BATTERIES
They are lead batteries in which the positive and negative plates are immersed in an aqueous solution of sulphuric acid.
They may be hermetically sealed or equipped with caps for maintenance. This is the most popular type of battery used
in vehicles.
AGM BATTERIES
Gas recombination batteries (Absorbed Glass Mat) are batteries with continuous plate in lead-tin in which the actual
plate, the electrolyte solution and the polymer-silicate bre separators are spiral-wound. They are maintenance-free,
with high Cold Cranking Amp rating upon start-up and are designed especially for very heavy-duty and harsh use. They
withstand deep charging and discharging cycles.
The charging time of a battery also depends on the level of initial discharge. A “very low” battery will take longer to charge
compared to a “not so low” battery.
WARRANTY CONDITIONS
1. The manufacturer guarantees the product’ s good operation for a period on 24 months from the date of purchase given
on the receipt issued by the seller at thetime of sale.
2. The warranty provides for free repair or replacement of those parts of the appliance the maker acknowledges as being
faulty due to manufacture or faulty inthe nature of the materials.
3. Any problems caused by carelessness, incorrect use, tampering with the appliance, will invalidate the warranty .
4. Furthermore, the warranty is invalidated whenever the appliance is repaired by unqualied persons or by persons not
authorized by the manufacturer.
5. Incorrect connection to the power mains, a feed voltage not matching the nominal voltage given on the appliance’s
dataplate and variations in line voltagecaused by outside agents, lightning or anything else shall invalidate the
warranty.
6. Returns of machines, even if under warranty , must be shipped CARIAGE FREE and will be returned CARIAGE FOR
WARD.
7. The warranty certicate is valid only if accompanied by the receipt or delivery note.
8. No responsibility can be accepted for direct or indirect damage of any nature to persons or things subsequent to use
or non-use of the appliance.
17
BETRIEBSANLEITUNG
Modell: 12/24V 15A - Laden von Batterien von 30Ah bis 330Ah, Erhaltungsladung von Batterien von 30Ah bis 500Ah
Bei den neuen Batterieladegeräten HF handelt es sich um völlig neu konzipierte elektronische Batterieladegeräte, die
das Laden von Batterien von Grund auf ändern.
Die Ladegeräte eignen sich für das Laden von traditionellen Bleibatterien und Bleibatterien der jüngsten Generation,
insbesondere für die langfristige Ladeerhaltung, wie zum Beispiel für die gesamte Saison. Während des gesamten
Zeitraums, in dem das Transportmittel (Fahrzeug oder Boot) außer Betrieb ist und die Batterie konstant überwacht und
für die Ladeerhaltung garantiert werden soll, kann das Ladegerät angeschlossen bleiben, ohne dass die Gefahr besteht,
dass die Batterie beschädigt wird.
Die Ladegeräte wurden für die Autobranche entwickelt, eignen sich aber auch für andere Anwendungen in den Sektoren
Sport und Freizeit, darunter für Motorräde r, Rolle r, Sportwagen, Oldtimer , Motorschlitten und Rasentraktoren. Zu den
weiteren Anwendungsbereichen zählen Nutzfahrzeuge, landwirtschaftliche Nutzfahrzeuge, Boote und W ohnmobile.
Ideal für alle Bleibatterien mit freiem Elektrolyt (nass, WET) oder mit festgelegtem Elektrolyt (trocken, DR Y), wie zum
Beispiel hermetisch verschlossene Batterien Typ Gel, AGM und MF.
Alle Ladeparameter werden über die Funktionstasten am Steuerpaneel eingestellt. Je nach Modell stehen folgende
Optionen zur Einstellung:
- Batteriespannung (12 oder 24 Volt).
- Batterietyp (mit freiem Elektrolyt WET oder mit festgelegtem Elektrolyt GEL, oder AGM).
- den Ladezyklus, der durchgeführt werden soll (normale Batterieladung, intensive Auffrischladung, Netzgerät als
Batterieersatz).
Die Ladegeräte verfügen außerdem über Meldungen auf dem Display, LEDs und Beeper, die bei Vertauschen der
Polarität, defekter Batterie und falscher Spannung Alarm geben.
Die Ladegeräte bestehen aus isolierendem Material und können an der Wand aufgehängt werden. Sie besitzen eine
hohe Schutzart gegen Witterungseinüsse und sind gegen Überhitzung und Kurzschluss geschützt. Zum Lieferumfang
gehört neben dem Zangenkabel.
LADEZYKLEN
Die Ladezyklen der neuen Batterieladegeräte HF wurden in der Absicht entwickelt, das Laden aller handelsüblichen
Batterien zu optimieren. Die unterschiedlichen Bauweisen der Batterien, die heute im Handel erhältlich sind (Dry,
Wet, Gel, AGM), machen verschiedene Ladekennlinien erforderlich, da nur so eine korrekte und vollständige Ladung
gewährleistet ist. Die Ladegeräte HF verlängern das Leben der Batterie, da sie den richtigen Ladezyklus für jede
Batterie garantieren.
Die Kontrolle und Durchführung vom Ladezyklus wird von einem Mikroprozessor gesteuert. Die Ladegeräte der Serie
HF haben Ladezyklen, die sich je nach dem Typ der Batterie unterscheiden, der geladen werden soll (WET, GEL, AGM).
Jeder Ladezyklus gliedert sich in sechs Phasen, und zwar zwei Diagnosephasen und vier Ladephasen nach
Vorgabe der Norm DIN 41772 (Fig. 2 - 3 - 4).
• Erste Phase der Diagnose vom
Ladezustand der Batterie: “A1”
Das Ladegerät analysiert den Ladezustand der Batterie, die geladen werden
soll.
• Erste Ladephase:
“Intensive Auffrischladung”
• Für GEL und AGM Batterien: “R1”
• Für WET Batterien: “R2”
Für GEL und AGM Batterien: Das Ladegerät analysiert den Ladezustand
der Batterie, die geladen werden soll. Bei tiefentladenen Batterien wird eine
Auffrischladung mit sehr niedrigem Strom durchgeführt, bis die Batterie die
optimale Ladung für die Durchführung der zweiten Ladephase erreicht hat.
Für WET Batterien: Bei tiefentladenen Batterien wird eine Auffrischladung
mit pulsierendem Strom durchgeführt, bis die Batterie die optimale Ladung
für die Durchführung der zweiten Ladephase erreicht hat.
• Zweite Ladephase: “I” Laden mit konstantem Strom, bis die maximale Batteriespannung erreicht
ist.
• Dritte Ladephase: “U0” Laden mit stabilisierter Spannung, bis der Strom die Mindestwerte erreicht.
• Vierte Ladephase: “R3”
“Recovery” *
Nur bei Ladegeräten, die auf WET gestellt sind: Intensive Ladephase mit
konstantem Strom und steigender Spannung, um die Ladeleistung der
Batterie zu erhöhen.
• Zweite Phase der Diagnose vom
Ladezustand der Batterie: “A2”
Das Ladegerät analysiert die Efzienz der geladenen Batterie.
• Fünfte Ladephase: “U” Erhaltungsladung mit konstanter niedriger Spannung (48 Stunden).
• Sechste Ladephase: “Up” Erhaltungsladung mit Impulsen (konstant aktiviert).
• * Funktion Recovery: Dieser Lademodus erlaubt die Auffrischung von WET Batterien mit 12 oder 24 Volt, die über
DE

18
lange Zeit nicht benützt worden sind und eine Schichtung der Batteriesäure aufweisen. Diese Funktion wirkt physikalisch
auf die Elektrolytlösung der Batterie und erlaubt ein Mischen der Lösung, um die gebildeten Schichten aufzulösen.
FUNKTION SUPPLY BEI 12 UND 24 VOLT
• Die Ladegeräte der Serie HF verfügen über die Funktion Supply (Netzgerät). Diese Funktion erlaubt die Erhaltung der
Fahrzeugspeicher beim Auswechseln der Batterie oder immer dann, wenn die Batterie vom Fahrzeug abgenommen wird.
Die Funktion eignet sich für alle Fahrzeuge mit elektrischen Anlage und Elektronik, die mit 12 oder 24 Volt funktionieren.
(Fig. 5 - 6)
WICHTIGE HINWEISE
• Das Ladegerät ist zum Laden von Bleibatterien bestimmt. Es darf nicht zu anderen Zwecken verwendet werden. Nicht
auadbare Batterien dürfen nicht geladen werden. Eingefrorene Batterien dürfen nicht geladen werden.
• Das Gerät darf ohne Aufsicht nicht von unfähigen Personen (einschließlich Kindern) benutzt werden.
• Außerhalb der Reichweite von Kindern halten. Dieses Gerät ist kein Spielzeug.
• Beim Anschließen und Abnehmen vom Ladekabel immer eine Schutzbrille tragen und das Gesicht von der Batterie
fernhalten.
• Während des Ladevorgangs können explosive Dämpfe entstehen. Funken, of fenes Feuer und Rauchen verboten!
• Das Auaden der Batterien muss an einem gut belüfteten, trockenen Ort durchgeführt werden. Vor Regen und Schnee
schützen!
• Vor dem Anschließen und Abnehmen der Ladekabel an der Batterie sicherstellen, dass der Netzstecker vom Ladegerät
abgezogen ist.
• Während des Ladevorgangs das Ladegerät auf keinen Fall auf die Batterie stellen.
• Die Batterieüssigkeit ist ätzend! Bei versehentlichem Kontakt mit der Haut oder den Augen umgehend unter ießendem
Wasser abspülen und einen Arzt aufsuchen.
• Bei unsachgemäßem Gebrauch oder Änderungen am internen elektronischen Schaltkreis des Geräts verfällt der
Garantieanspruch mit sofortiger Wirkung.
• Bei Beschädigung muss das Stromkabel vom Ladegerät von Technikern des vertraglichen Kundendienstes
ausgewechselt werden, da dazu Spezialwerkzeug erforderlich ist.
• Reparaturen und Wartungseingriffe am Gerät dürfen nur von Fachpersonal durchgeführt werden.
• Vor Gebrauch vom Ladegerät muss das Bedienungshandbuch aufmerksam gelesen werden.
LADEN
Laden von Batterien, die an das Fahrzeug angeschlossen sind:
1. Vor Beginn vom Ladevorgang sicherstellen, dass der Netzstecker vom Stromkabel aus der Steckdose abgezogen
wurde.
2. Den Pol ermitteln, der an die Erde vom Fahrzeug angeschlossen ist. Die Erde ist in der Regel an die negative Klemme
angeschlossen.
3. Laden einer Batterie mit negativer Klemme, die an die Erde vom Fahrzeug angeschlossen ist:
• Den Ausgangsleiter mit roter Klemme an den Pluspol (+) der Batterie anschließen.
• Den Ausgangsleiter mit schwarzer Klemme an die Erde vom Fahrzeug anschließen, und zwar in ausreichender
Entfernung von der Batterie und der Kraftstofeitung.
4. Laden einer Batterie mit positiver Klemme, die an die Erde vom Fahrzeug angeschlossen ist:
• Den Ausgangsleiter mit schwarzer Klemme an den Minuspol (-) der Batterie anschließen.
• Den Ausgangsleiter mit roter Klemme an die Erde vom Fahrzeug anschließen, und zwar in ausreichender Entfernung
von der Batterie und der Kraftstofeitung.
Laden von Batterien, die nicht an ein Fahrzeug angeschlossen sind:
1. Vor Beginn vom Ladevorgang sicherstellen, dass der Netzstecker vom Stromkabel aus der Steckdose abgezogen
wurde.
2. Den Ausgangsleiter mit roter Klemme an den Pluspol (+) der Batterie anschließen.
3. Den Ausgangsleiter mit schwarzer Klemme an den Minuspol (-) der Batterie anschließen.
ACHTUNG! Sicherstellen, dass beide Klemmen der Ausgangsleiter einen guten Kontakt zu den entsprechenden
Endklemmen haben.
GEBRAUCH VOM LADEGERÄT( Fig. 1)
1. Nachdem die Kabel der Ausgangsleiter an die Batterie angeschlossen worden sind, das Stromkabel vom Gerät an
eine Netzsteckdose anschließen und dabei sicherstellen, dass die Spannung der Nennspannung vom Ladegerät (230V-
50Hz) entspricht. Der Beeper vom Ladegerät schaltet sich 0,5 Sekunden ein, die LEDs am Steuerpaneel schalten sich
zwei Sekunden lang ein, digitales Display.
2. Das Ladegerät schaltet auf “Stand-by”, z.B.: LED ON (L) an, LED 12V(I) an, LED Charge 30Ah/80Ah (G) an, LED
Wet (C) an. Das Einschalten der LEDs variiert je nach dem zuletzt gespeicherten Programm (siehe Kap. “Speichern der
Ladezyklen”).

19
3. Mit dem Ladegerät im Standby-Modus mit den Tasten am Steuerpaneel die Ladeparameter einstellen, die für den
Batterietyp geeignet sind. Die eingestellten Parameter werden durch das Einschalten vom entsprechenden LED
angezeigt.
Einstellbare Ladeparameter:
• Taste Voltage (4): je nach Batteriespannung wählen: 12Volt (LED I) oder 24Volt (LED H)
• Taste Function (5): je nach Batteriekapazität und Arbeitszyklus wählen:
- Charge 30Ah/80Ah (LED G): Laden von Batterien von 30Ah bis 80Ah, Erhaltungsladung von Batterien von 30Ah bis
250Ah
- Charge 90Ah/330Ah (LED F): Laden von Batterien von 90Ah bis 330Ah, Erhaltungsladung von Batterien von 90Ah
bis 500Ah
- Recovery (E): Für WET Batterien, die über lange Zeit nicht benützt worden sind und eine Schichtung der Batteriesäure
aufweisen. Diese Funktion ist nur dann aktiviert, wenn das Ladegerät auf WET Batterien gestellt ist.
Achtung: Aufgrund der hohen Spannung, die bei diesem Ladezyklus erreicht wird, muss die Batterie zum Laden vom
Fahrzeug abgenommen werden. Das Laden von Batterien, die an das Fahrzeug angeschlossen sind, kann zu Schäden
an der Fahrzeugelektronik führen.
- Supply (D): Diese Funktion erlaubt die Erhaltung der Fahrzeugspeicher beim Auswechseln der Batterie oder immer
dann, wenn die Batterie vom Fahrzeug abgenommen wird. Die Funktion Supply ist sowohl dann aktiviert, wenn das
Ladegerät auf 12 V gestellt ist (Ausgabespannung 13,5 V), als auch bei 24 V (Ausgabespannung 27 V).
Achtung: Auf keinen Fall das Batterieladegerät, das auf 24V/Supply gestellt ist, an ein Fahrzeug anschließen, dessen
elektrische Anlage mit 12 V läuft, da sonst die Fahrzeugelektronik beschädigt werden kann.
• Taste Type (3): je nach Bauart der Batterie wählen: Wet (LED C), Gel (LED B) oder Agm LED (A).
4. Nachdem die Ladeparameter eingestellt worden sind, die Taste START/STOP (2) drücken, um das Laden der Batterie
zu starten. Das Einschaltern der LEDs START/STOP (L) und CHARGING (P) zeigt an, dass der Ladevorgang läuft. Auf
dem Display werden der Ladestrom und die Batteriespannung angezeigt.
5. Beim Laden der Batterie bleibt das LED CHARGING (P) in den Phasen I und U0 eingeschaltet.
6. Beim Einschalten vom LED FULL (Q) ist die Batterie zu 100% geladen. Das Ladegerät schaltet auf Ladeerhaltung um,
überwacht die Efzienz der Batterie ständig und erhält einen optimalen Ladezustand der Batterie. In dieser Phase kann
das Ladegerät auch über Monate angeschlossen bleiben.
7.Wenn der Ladevorgang abgeschlossen oder abgebrochen werden soll, die Hinweise im Abschnitt ENDE
LADEVORGANG beachten.
ABSICHTLICHES ABBRECHEN VOM LADEVORGANG
Um den Ladevorgang der Batterie abzubrechen, die Taste START/STOP (2) drücken. Das Abschalten der entsprechenden
LED zeigt an, dass der Ladezyklus beendet ist. Nach Beenden vom Ladevorgang die Leiter von den Batterieklemmen
abnehmen.
ABBRECHEN VOM LADEVORGANG DURCH STROMAUSFALL
Bei Stromausfall in der 230V Netzleitung speichert das Ladegerät den Ladezyklus, den es gerade durchführt, sodass
der Ladevorgang automatisch wieder aufgenommen werden kann, sobald der Strom in der 230V Netzleitung wieder
vorhanden ist. Diese Funktion ist dann ausgesprochen wichtig, wenn das Laden der Batterie in Abwesenheit der
Bedienperson erfolgt, wie zum Beispiel bei sehr langen Ladezyklen (Erhaltungsladung) oder beim Auaden der Batterie
über Nacht (Laden der Batterie von Fahrzeugen, die ein tägliches Laden erforderlich machen).
ENDE LADEVORGANG
1. Wenn der Ladevorgang beendet ist, das Stromkabel vom Ladegerät aus der Netzsteckdose ziehen.
2. Den Ausgangsleiter mit der schwarzen Klemme von der Erde des Fahrzeugs oder von der Negativklemme (-) der
Batterie abnehmen.
3. Den Ausgangleiter mit der roten Klemme von der Pos i ivklemme (+) der Batterie abnehmen.
SPEICHERN DER LADEZYKLEN
Das Ladegerät speichert automatisch die Ladeparameter, die für den zuletzt durchgeführten Ladezyklus eingestellt worden
sind. Wenn das Ladegerät wieder eingeschaltet wird, schalten sich die LEDs der gespeicherten Ladeparameter ein. Um
die Ladeparameter zu verändern, die entsprechenden Tasten drücken. Um alle Parameter auf die Werkseinstellung
zurück zu stellen, das Ladegerät vom Stromnetz nehmen, die Taste START/STOP (2) gedrückt halten und das Ladegerät
wieder an das Stromnetz anschließen. Das Ladegerät stellt sich auf folgende Parameter: LED ON (L) an, LED 12V(I) an,
LED Charge 30Ah/80Ah (G) an, LED Wet (C) an.

20
DIGITALES DISPLAY
Das Ladegerät verfügt über ein digitales Display, an dem die Spannung und der ausgegebene Strom angezeigt werden.
Durch Drücken der kleinen Taste A/V (1) kann eingestellt werden, welcher der beiden Parameter angezeigt wird. Auf dem
Display werden außerdem Fehlercodes angezeigt, sodass eventuelle Funktionsstörungen geprüft werden können, die
während des Ladevorgangs aufgetreten sind.
BATTERIEZUSTANDSERKENNUNG UND FEHLERMELDUNGEN
Die Ladegeräte HF sind darauf ausgelegt, vor Beginn vom Ladevorgang den Batteriezustand zu erkennen und
eventuelle Störungen beim Anschluss von Ladegerät und Batterie zu melden.
Am digitalen Display kann ein Fehlercode angezeigt werden, der eine schnelle und einfache Kontrolle der aufgetretenen
Funktionsstörung erlaubt.
Funktionsstörungen werden vom Ladegerät wie folgt angezeigt:
DISPLAY: Anzeige vom Fehlercode. Bei mehr als einem Fehler werden die Codes abwechselnd angezeigt.
LED FAULT(O): schaltet sich bei Auftreten einer Funktionsstörung ein.
LED START/STOP (L): schaltet sich bei Auftreten einer Funktionsstörung aus.
BEEPER: schaltet sich bei Auftreten einer Funktionsstörung ein.
M E L D U N G E N
AUF DEM
DISPLAY
URSACHE ABHILFE
E01 Kabel nicht angeschlossen oder in Kurzschluss. Die Klemmen korrekt anschließen und den
Ladevorgang wieder aufnehmen (siehe
Kap. “Bedienungsanweisung Ladegerät”).
Vollständiger Kurzschluss an Batterie. Batterie vermutlich defekt.
Die Vertragswerkstatt in der Nähe
aufsuchen.
E02 Batterie defekt oder kann nicht mehr geladen
werden.
Batterie vermutlich defekt.
Die Vertragswerkstatt in der Nähe
aufsuchen.
E03 Ladegerät überhitzt. Eventuelle Gegenstände entfernen,
die die Lüftungsschlitze vom Ladegerät
verdecken, oder das Ladegerät an einen
kühleren Standort bringen. Abwarten, bis
sich das Ladegerät automatisch wieder
einschaltet.
E04 Batteriespannung zu schwach. (Es wird versucht,
eine 6 Volt Batterie mit einem 12 Volt Ladegerät zu
laden oder eine 12 Volt Batterie mit einem Ladegerät,
das auf 24 Volt eingestellt ist.)
Die Batteriespannung korrekt am
Ladegerät einstellen. Den Ladevorgang
wieder aufnehmen (siehe Kap.
“Bedienungsanweisung Ladegerät”).
Kurzschluss an einem oder mehreren Elementen der
Batterie.
Batterie vermutlich defekt.
Die Vertragswerkstatt in der Nähe
aufsuchen.
E05 Batteriespannung zu hoch bezogen auf die
eingestellte Spannung. (Es wird versucht, eine 24
Volt Batterie mit einem Ladegerät zu laden, das auf
12 Volt eingestellt ist.)
Die Batteriespannung korrekt am
Ladegerät einstellen. Den Ladevorgang
wieder aufnehmen (siehe Kap.
“Bedienungsanweisung Ladegerät”).
E06 Batterie mit zu hoher Ladekapazität. Ein Ladegerät mit einer höheren
Ladekapazität verwenden.
E07 und LED
REVERSE (N)
Die Klemmen der Ausgangsleiter sind nicht korrekt
an die Batterie angeschlossen.
Funktion Supply: Die Sicherung ist ausgelöst
worden
Die Klemmen korrekt anschließen und den
Ladevorgang wieder aufnehmen (siehe
Kap. “Bedienungsanweisung Ladegerät”).
Das Batterieladegerät von der
Netzsteckdose trennen.
Den Zustand der Sicherung überprüfen
und diese ggf. austauschen.
This manual suits for next models
4
Table of contents
Languages:


