Eletech DP-502 User manual

DP-502
Networked Onhold Player
User’s Manual
(c) 2014 - 2016 Eletech Enterprise Co., Ltd.
All Rights Reserved
1. Package Contents
1 x DP-502 unit
1 x power supply
1 x Ethernet cable
1 x audio patch cord, monoral 3.5mm to 3.5mm
1 x audio patch cord, monoral 3.5mm to RCA
1 x software CD
1 x user’s manual
Please contact your dealer immediatelyshould any item be missing.
- 1 -

- 2 -
2. Introduction
DP-502 is a music on hold player capable of playing WAV and MP3 files via a
MOH ready phone system to callers on hold. In addition to superior sound quality
the device also offers remote content updating via the Internet, making it ideal for
installations where central management is appreciated and/or mandated.
A DP-502 based music on hold system allows multiple devices to be connected to a
central server via the Internet and have their contents updated automatically on a
regular basis. Every dayat the scheduled time a device would try to connect with
the server and download updates if there are any. This update scheme is called the
pull type (vs. the push type scheme where the server pushes updates to the device
on its own schedule).
If errors should occur during device connection the server would indicate so on the
screen to alert the system administrator. In addition to the scheduled connection
time, the device would also try to connect upon power up. This allows updates to
be downloaded on demand and become effectiveimmediately, although the device
needs to be manually power cycled.
The server would be a non-dedicated Windows PC running the DP-502 Server
Program which could be running all the time or only when updates are available.
The device stores up to 13 sound files locally (1 generic and 12 months) and loop-
plays the generic file and the month file alternatelythroughout the day. It automati-
cally switches to a new month file when the date changes from the current month to
the next.
AWindows based Console Program is used to organize devices into different
groups for easier system setup. When a device is assigned to a group it automati-
cally gets the group default settings. When a group default setting is changed, all
devices in the group automatically gets the change. However, a device may have
some or all settings changed from the default. For example, devices in a group may
be configured with different connection times so that they all would not try to
connect at thesame time.
The Console Program is also used to program initial system data such as setup
parameters and sound files onto an SD card for use in the device.Afterwards,
updates can be done either by downloading over the network or by swapping SD
cards if network is unavailable.
Sound File Support
* MP3: ISO11172-3 (both CBR and VBR), monaural and stereo
* WAV: monaural uncompressed PCM, 8- or 16-bit, up to 44.1 KHz
3. Hardware Installation
Volume Dial
The volume dial controls the output level of both the O/P outputs and the internal
speaker. It also serves as a power on/off switch.
DC 12V Jack
Connect the power supply to this jack. Always use the factory provided power
supply to avoid potential damages to the unit.
O/P Jack - 8 Ohm Unbalanced
Use this output if your phone system has an unbalanced jack, often called MOH or
BGM, for onhold music. To connect, use one of the audio patch cords provided
(whichever fits the phone system).
O/P Jack - 600 Ohm Balanced
Use this output if your phone system has a balanced jack, usually a RJ-11 type, for
onhold music. To connect, use a regular telephone cord (not included).
Hardware Reset Button
This button is used to restore device configuration to factory default. The hardware
reset is usually performed when the user name/password for device configuration is
lost. To reset the unit: use a small sharp object to press/hold down the reset button
till the audio is stopped. Then power cycle the device to complete the reset. Note
that, since the device configuration would have been restored to factory default, the
device needs to be re-configured as if it is a brand new unit.
SD Card
Both SD (up to 2GB) and SDHC (4~32 GB) are supported.
LAN
A 10/100BaseT RJ-45 Ethernet port.
Monitor Button (on the case top)
Turns the internal monitor speaker on and off.
Indicator Lights (on the case top)
After power-up it will take a few seconds for the lights to settle down.
System: solid on when ready, flashing when error.
Play:solid on when playing audio,flashing when error.
LAN: solid on when connected to a LAN, flashing with LAN activities.
- 3 -

4. Software Installation
DP502 Sever Program & DP502 Console Program
Run “DP-502 Setup.exe” on the software CD and install the software on a Windows
PC that is to be the server. The following programs will be installed: the DP502
Server Program and the DP502 Console Program.
Always uninstall the old version before installing a new version of the software. If
the new version is installed into the same folder as the old version then the Console
Program data such as groups and sound files would be preserved.
If the setup program is run without uninstalling the software first, the program will
give options to either repair or removethe current installation.
ETM
This program is used to find the IP address of a device sitting on the same LAN as
the server, so that the device may be configured with a web browser. Device
configuration is usually done just one time by the installer only, therefore ETM
needs not be installed by the end user in most cases.
ETM may be installed byrunning the “ETM Setup.exe” (the actual program name
contains a version number such as “ETM 3.0 Setup.exe”) on the software CD.
When it is installed a program called WinPcap (actual program name contains a
version number such as “WinPcap 4.1.2”) is also installed. Do not uninstall
WinPcap otherwise ETM will not work.
- 4 -
5. Server Consideration
Any Windows PC may be used as the server. It does not need to be dedicated, and
it needs to be up and running only when new updates are available for the devices
to download.
The server must have a static IP address in order for the devices to find it. If all the
devices are installed within the same LAN as the server then the server’s IP address
may be a private one. Otherwise the server’s IP address needs to be a public one
obtained from the Internet service provider.
The server IP address, along with the original set of sound files, are written via the
console program onto an SD card which is then inserted into the device. This is
how the device knows where to find the server. If the server IPaddress should
change later, the change can be downloaded by the device as the last update from
the server’s old IPaddress. Or an SD card programmed with the new data can be
sent to the location to replace the old card.
- 5 -
6. Device Configuration
The device needs to be correctly configured in order to operate properly. The
configuration must be done on a PC (not necessarilythe server) connected to the
same LAN as the target device.
By using a web browser there are two ways to configure the device:
If you know the device’s IP address (by looking up the DHCP device table), you
may enter it intothe browser (e.g. http://192.168.1.100) and get to the login
window. The default user name is dp502 and the default password is 1234.
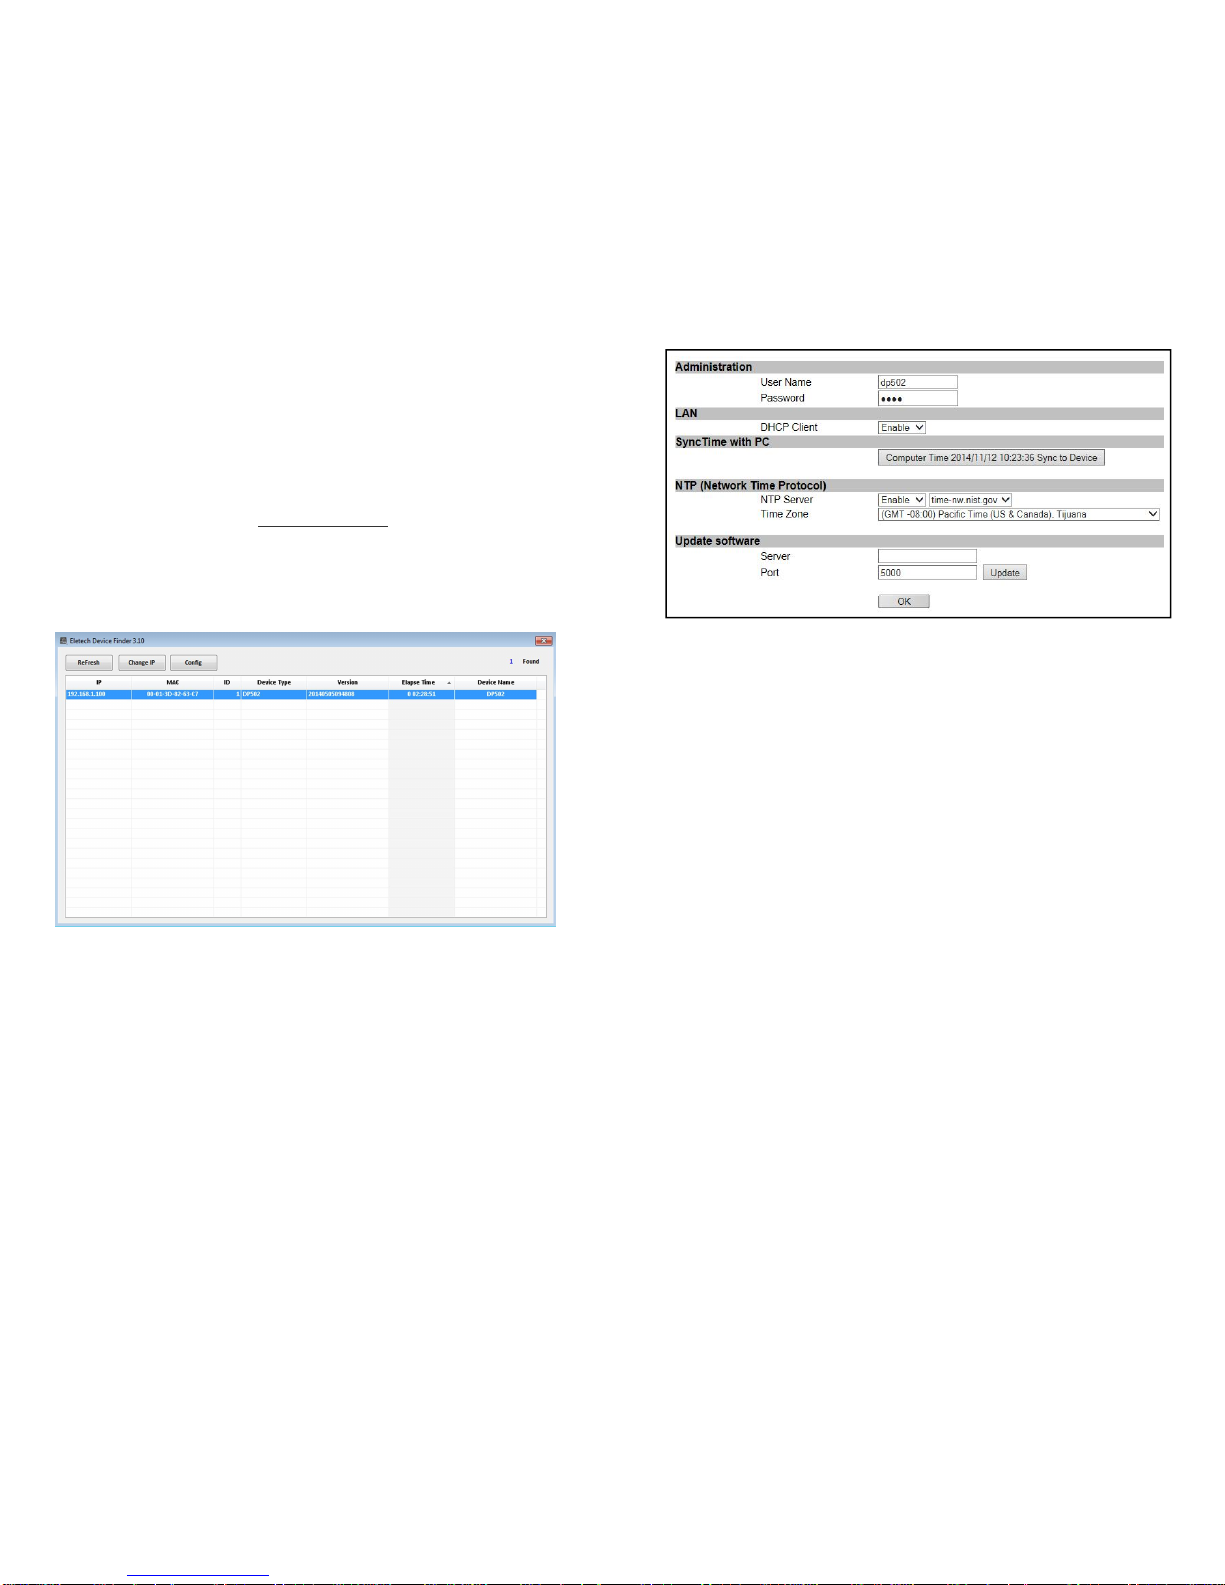
Otherwise you mayrun the ETM program to find the device’s IPaddress. You’ll get
a window similar to the following. If no device is found, click ReFresh to try again.
After the device is found, click Config to get to the login window.
It will be confusing if multiple new devices are present on the LAN and found by
ETM at the same time, because theywould all have the same device name and be
indistinguishable. Therefore it would be wise todo it one device at a time.
If the user name and/or the password should be lost, then a hardware reset must be
performed (see Hardware Installation) to restore the factory default.
After the correct user name and password are entered, a screen similar to the
following would appear:
- 6 -
Administration
The login user name & password for device configuration. The default is dp502 for
user name, 1234 for password.
LAN/DHCPClient
The default is Enable - the devicewould get automatic network configuration.
Disable DHCPClient if manual network configuration is necessary.
Sync Time with PC
The device’s internal clock must be set to the local time of the installation site. It’s
better to enable NTP and have the clock automaticallysynced over the Internet on a
regular basis (see below). If that is not feasible then the device needs to be manu-
ally synced by a PC (not necessarily the server) in the same time zone at least once
a month.
NTP (Network Time Protocol)
The default is Enable - the device will sync up with the chosen NTP server over the
Internet automatically once every four hours. Any NTP Server may be chosen since
theyall provide the same service, but the Time Zone must be set manually to that of
the installation site.
Update Firmware
When firmware update is necessary, your dealer will provide the server IP address
and port number to fill in here.
OK
Click this button when done. The device will reboot and the new configuration will
become effective after the reboot.
- 7 -

7.The ServerProgram
The Server Program needs to be running in order for the devices to connect with
the server. For convenience’s sake it is made to start running automaticallywhen
Windows starts, and display its event log which looks similar to the following:
You mayminimize or expand the event log byclicking on the corresponding button
on the upper right corner, or click the red X button to stop the Server Program.
This icon on the task bar indicates that the server program is running.
You can viewthe event log byleft-clicking the icon. Tostop the server
program manually, right-click the icon and select “Close window”.
This icon on the desktop is a shortcut to the Server Program. Double
click this icon to start the Server Program if it has been manually
stopped previously. The Server Program needs to be running in order
for the devices to connect with the server.
- 8 - - 9 -
8. The Console Program
The Console Program is used to manage devices and program SD cards with initial
system configuration data such as server IP and sound files. Unlike the Server
Program, the Console Program does not need to be running in order for the devices
to connect to the server.
When the Console Program is run for the first time, its window is mostlyblank.
Right click over the left pane to pop out the command menu.
Set Server IP & Port
This setup applies to all groups, which means all groups are to be served by the
same server.
Add/Rename/Delete Group
Highlight the target group before Rename/Delete Group.
Add/Rename/Delete Device
Adevice must be added to an existing group. Highlight the target group beforeAdd
Device. Highlight the target device before Rename/Delete Device.
- 10 -
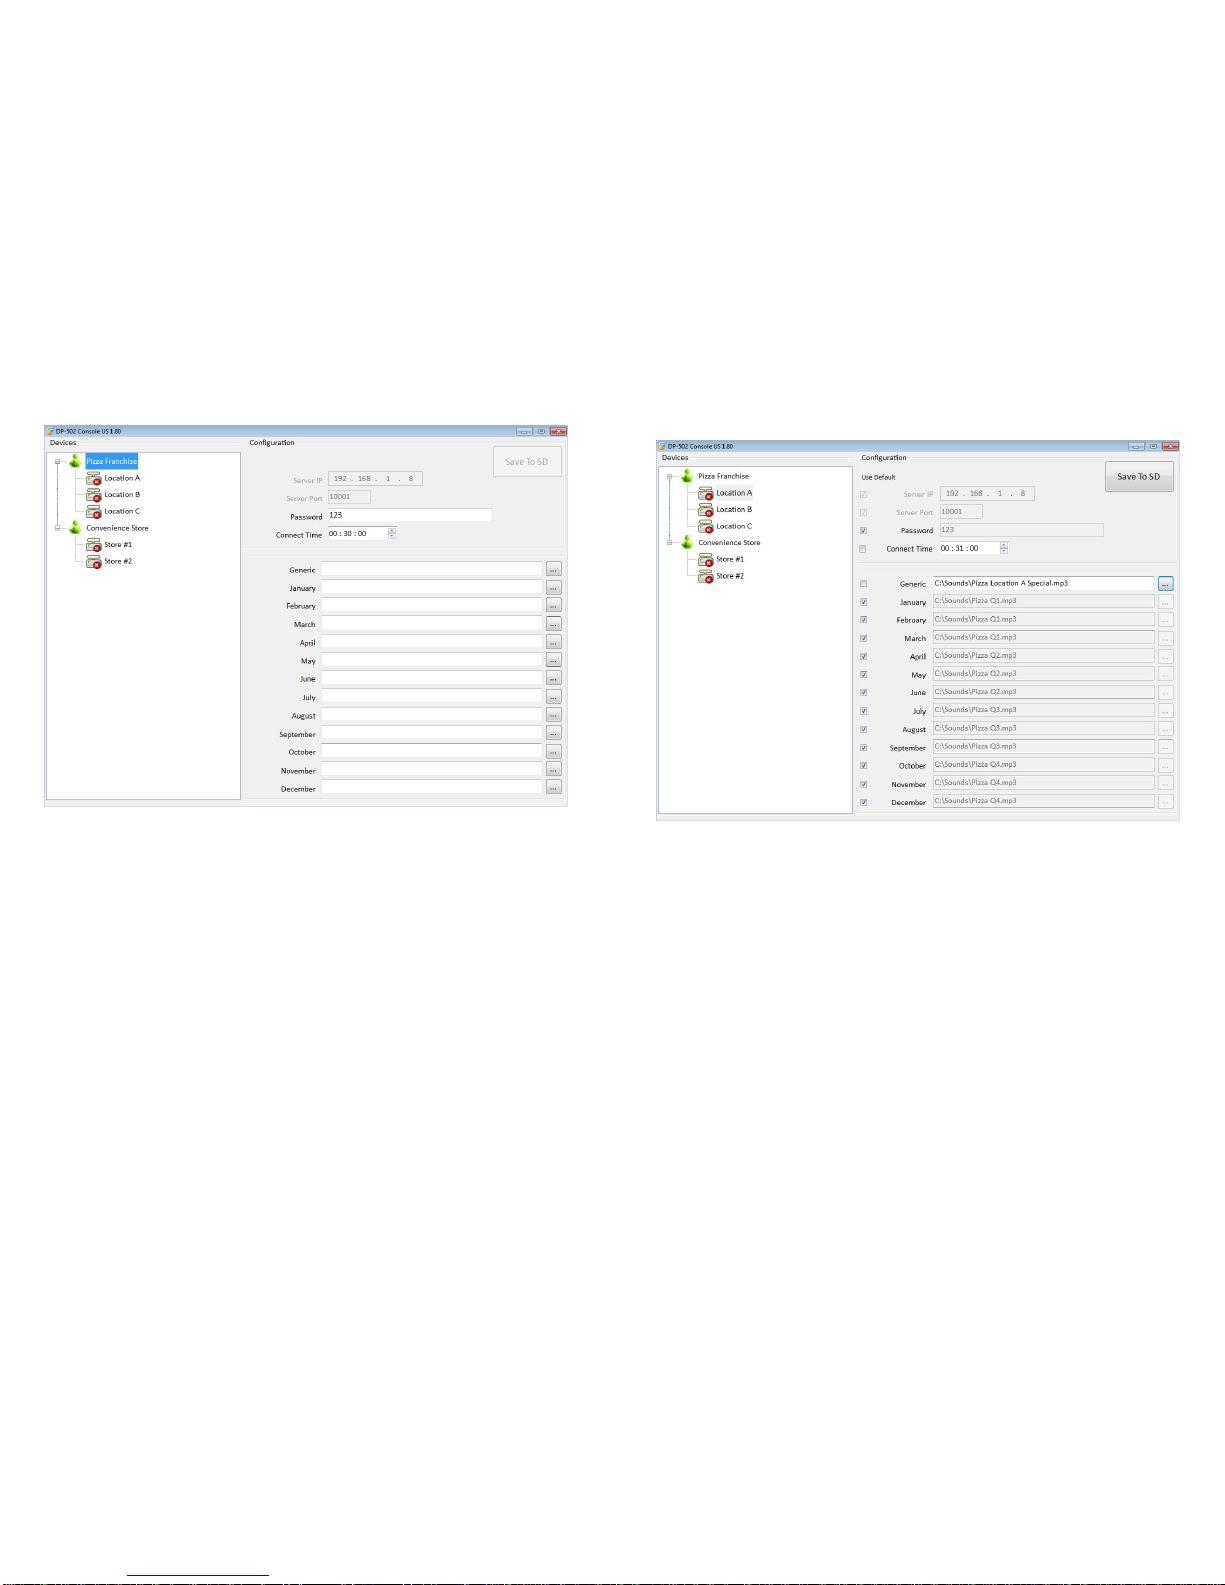
Group Configuration
Highlight the target group for configuration.
Server IP & Server Port
Unchangeable in this part of the program.
Password
The group default password.
Connect Time
The group default connect time.
Generic ~ December
The group default sound files. Click on the three-dots button to open a navigation
window for locating the file.
Save To SD
Grayed out, not applicable to a group.
- 11 -
Device Configuration
Highlight the target device for configuration. Uncheck the UseDefault box before
making changes.
In the example above, the Connect Time and the Generic have been changed from
the group default.
Save To SD
After all necessary changes have been made for this particular device, insert an SD
card into the card reader and click this button. After the SD card has been written,
insert it into the device which is now ready to operate.
The Red X
The red X on the device icon indicates that either the device has never connected to
the server or the last connection was unsuccessful.
Table of contents
Other Eletech MP3 Player manuals


