Eletech DP-501 eHold User manual

DP-501 eHold PlayerDP-501 eHold Player
DP-501 eHold PlayerDP-501 eHold Player
DP-501 eHold Player
User’s Guide

User’s Notice
No part of this manual, including the products and software described in it, may be
reproduced,transmitted,transcribed,storedinaretrievalsystem,ortranslatedinto
any language in any form or by any means, except documentation kept by the
purchaser for backup purposes, without the express written permission of Eletech.
Eletech provides this manual “as is” without warranty of any kind, either express or
implied, including but not limited to the implied warranties or conditions of mer-
chantability or fitness for a particular purpose. In no event shall Eletech, its director,
officers, employees or agents be liable for any indirect, special, incidental, or conse-
quential damages (including damages for loss of profits, loss of business, loss of
use or data, interruption of business and the like), even if Eletech has been advised
of the possibility of such damages arising from any defect or error in this manual or
product.
Productwarrantyorservicewillnotbeextended if the product isrepaired,modified
or altered, unless such repair, modification or alteration is authorized in writing by
Eletech.
Products and corporate names appearing in this manual may or may not be regis-
tered trademarks or copyrights of their respective companies, and are used only for
identification or explanation and to the owners’ benefit, without intent to infringe.
Specifications and information contained in this manual are furnished for informa-
tional use only, and are subject to change at any time without notice, and should
not be construed as a commitment by Eletech. Eletech assumes no responsibility or
liability for any errors or inaccuracies that may appear in this manual, including the
products and software described in it.
FCC and CE Statement
This device complies with Part 15 of the FCC Rules. Operation is subject to the
following two conditions: (1) this device may not cause harmful interference, and
(2) this device must accept any interference received, including interference that
may cause undesired operation.
Copyright (c) 2008 Eletech Enterprise Co. Ltd. All Rights Reserved.
Product Name: DP-501 eHold Player
Manual Revision: 1.1
Release Date: May 2008

Table of Contents
Package Contents.............................................................................................. 2
Hardware Descriptions ...................................................................................... 2
Specifications ................................................................................................. 2
Indicator Lights............................................................................................... 2
Volume Control .............................................................................................. 2
Hardware Reset Button .................................................................................. 3
Hardware Installation ........................................................................................ 3
IP Address Configuration ................................................................................ 3
Preload Music................................................................................................. 4
Site Installation............................................................................................... 4
The Server Program ........................................................................................... 5
Program Installation ....................................................................................... 5
The Main Menu.............................................................................................. 6
The Accounts Command ............................................................................... 7
The Tasks Command ...................................................................................... 9
The View Command..................................................................................... 11
The File Command........................................................................................ 12
- 1 -

Package Contents
(1) Audio player
(1) Software CD
(1) Ethernet cable
(2) Audio cables
(1) Power adaptor
(1) This user guide
Hardware Descriptions
Specifications
Memory Capacity: 1 GB
Max. Number of Sound Files: 1
Sound File Format: MP3, CBR/VBR up to 320 kbps, sample rate up to 44.1 KHz
* Stereo files are played in mono with both channels mixed together.
Ethernet Interface: RJ-45, 10/100 Mbps
* Static IP address is required for the player.
Audio Outputs:
- 8 Ohm single ended with 1/8” phone jack (for most applications)
- 600 Ohm balanced with RJ-11 jack
* Both outputs provide the same audio content.
Indicator Lights
System: This light flashes slowly during normal operation.
Play: This light is normally on but turned off during file transfer.
LAN: This light is on if the LAN connection is good, and flashes during network
activities such as file transfer.
Volume Control
There are two levels of volume control: hardware and software. The hardware
control (via the volume dial on the player) sets the maximum output level. The
software control (via the server program) allows you to remotely adjust the volume
within the range set by the hardware control.
Hardware Reset Button
To reset the hardware configurations (such as IP address and passwords) to the
factory default, hold this button down for 5 seconds while the player powers up. If
you should somehow forget the passwords, use this button to reset the passwords
to blank (no password) so that you can access the player again. Remember to re-
configure the player afterwards because all the settings will be put back to the
factory default.
- 2 -
Hardware Installation
IP Address Configuration
The player is designed to operate as a server requiring a static IP address and a
passagethrough the firewall (portforwarding)in order for themanagingPC (which
is considered a client) to access it. The static IP address should be obtained from
your ISP (Internet Service Provider) unless the player is to be installed on the same
LANas the managing PC bypassing the Internet. In that case,youshould obtain the
IP address from your network administrator.
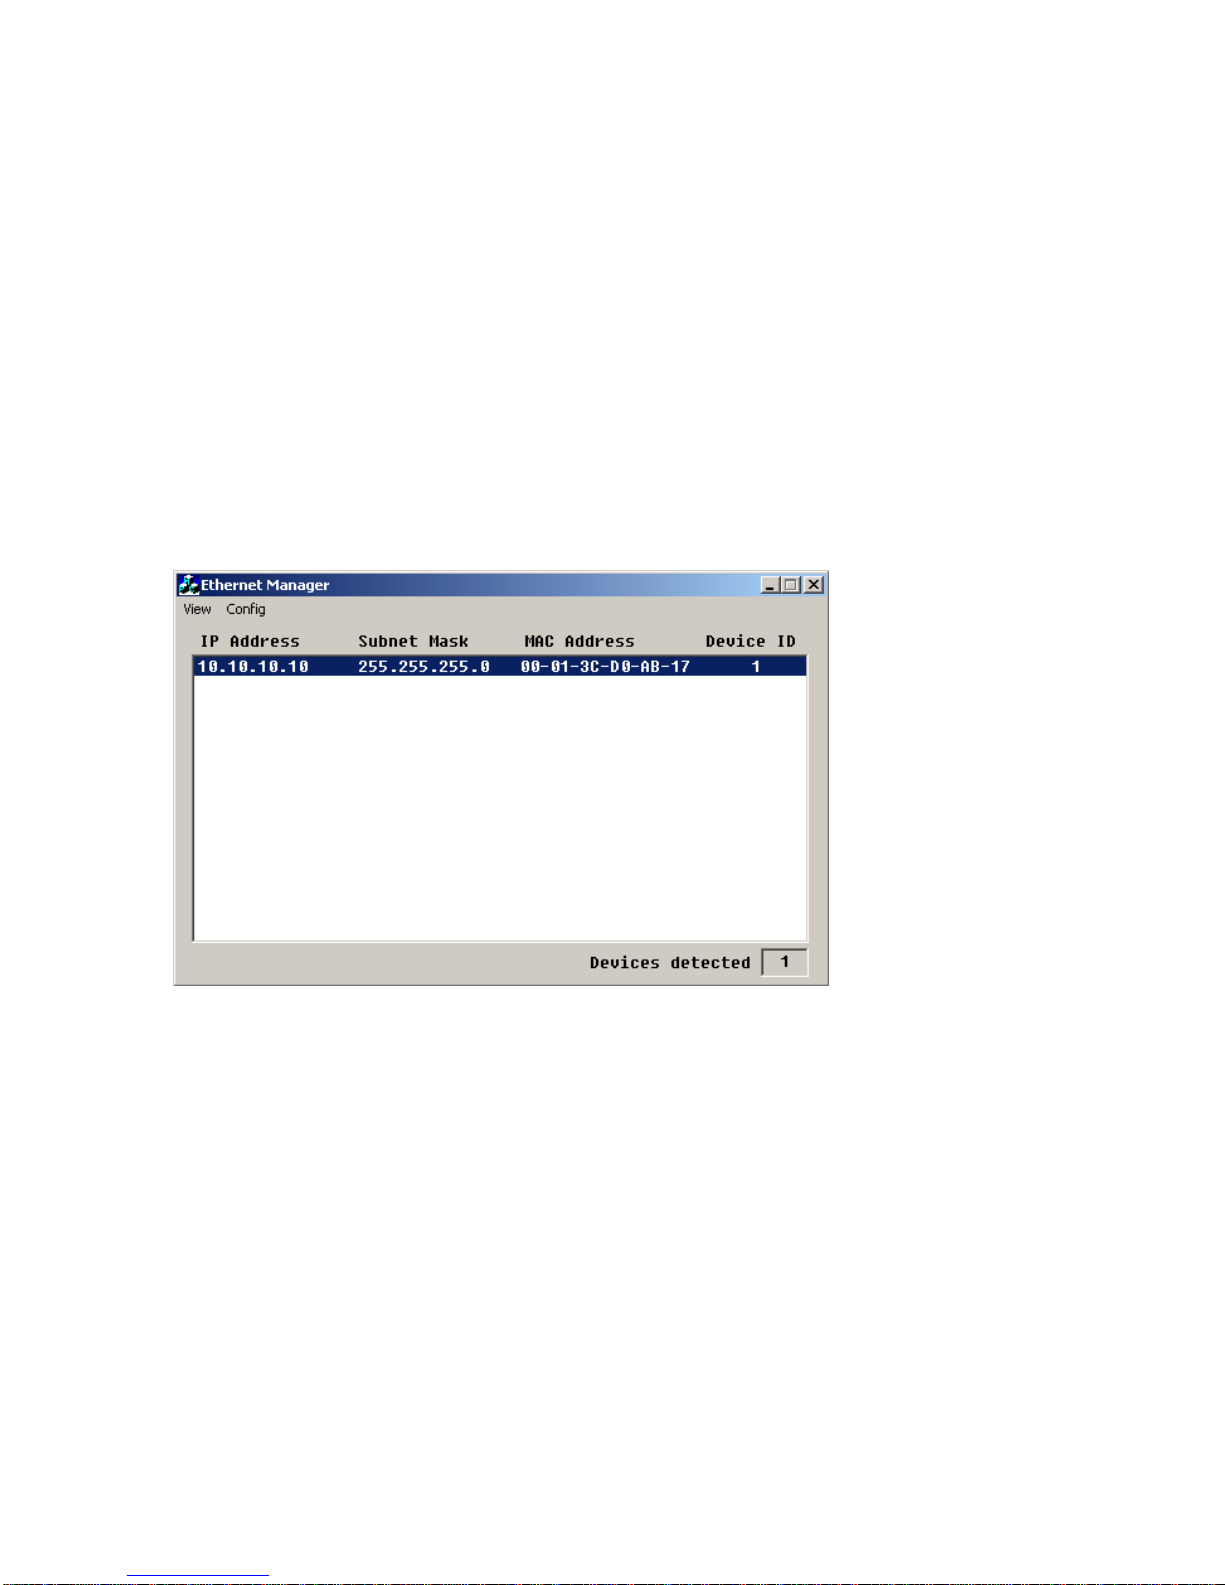
The player is pre-configured at the factory with a default IP address which is obvi-
ously useless in most cases. Before site installation, we’ll need to change the IP
address by connecting the player to the same LAN as the managing PC, then run
Etm.exeon thesoftware CD.When the programopens, itshould display theplayer’s
default IP address as the following:
Select Config > IP Address and change the IP address to the static IP address as-
signed to the player. In a few seconds the screen will automatically refresh and
show the change. Exit the program and disconnect the player from the LAN. The
player is now ready for site installation.
If Etm.exe cannot find the player, disable the firewall on the managing PC tempo-
rarily and try again. The firewall can be re-enabled afterwards. If Etm.exe still can-
not find the player after the firewall is disabled, it is probably because the player
was not connected to the same subnet as the managing PC.
- 3 -

Preload Music
The player comes preloaded with some demo music. If you want to preload your
own music before site installation, you should change the player’s IP address to be
within the subnet of the managing PC. You’ll then be able to use the server pro-
gramand preload the music. Afterwards, you should change the player’s IP address
back to the real one for site installation.
Site Installation
Before site installation, the player’s IP address must have been properly configured
asdescribed previously. Dependingon the application,the player may beconnected
to the Internet directly, via a LAN, or not connected to the Internet at all. There are
firewallissues in most cases,andyou’ll need the help ofyour network administrator
to create a passage through the firewall (usually via port forwarding) or the player
may not be accessible.
Hook up all the necessary wires and cables securely to the player. There are two
audio outputs and only one needs to be used. The 8 Ohm output should be used in
most cases. The 600 Ohm output should be used only if the phone system has a RJ-
11 connector for the onhold music.
Turn on the player and turn up the volume. Press the Monitor button down to turn
onthe speaker and youshouldbe able to hearthepreloaded music now. Adjustthe
volume if necessary - both the speaker and the audio output will be affected. The
speaker can be turned off by pressing the Monitor button again. The speaker may
be left on or off for normal operation.
- 4 -

The Server Program
The server program runs under Windows 2000 and greater. It allows you to set up
a database of accounts and upload new contents to the players immediately or at
scheduled times. You can also remotely adjust the audio volume within the range
set by the manual volume dial. Each account contains contact information such as
name, address, phone number and email address. It also contains the player infor-
mation such as IP address and password. Each account may have only one player
associated with it. For multi-location applications, each location should be consid-
ered as one account.
Software Installation
Run setup.exe on the software CD to begin the installation process. Prerequisite
software such as Microsoft .net and SQL server (compact edition) are also included
on the CD and will be installed.
If an older version was previously installed, it must be uninstalled first. When the
new version installs, the program will ask you whether you want to replace the old
database file “Accounts.sdf”. Answer “no” if you want to keep your old database
file of accounts you previously set up. You will not be asked this question if this
software has never been installed on the managing PC before.
The server program allows you to set up tasks (file transfers) for immediate or
future execution. However, the server program needs to be running at the time
whenthe scheduled tasks are supposed tobe executed. If the server programis not
runningat the time, the scheduled tasks will notbeexecuted until the next time the
server program runs. Therefore by default a shortcut to the server program is in-
stalledinthePrograms|Startupfolder.Thiscausestheserver programtobelaunched
every time the software’s owner logs in. The shortcut in the Startup folder can be
deleted if this behavior is not needed.
When using Windows Vista it may be necessary to run the server program as the
system Administrator.
The first time the server program is run the event log is created. After that server
activity will be written to the event log.
Makesure firewall and anti-virus softwareiscorrectly configured to allow the server
program to access the players.
- 5 -
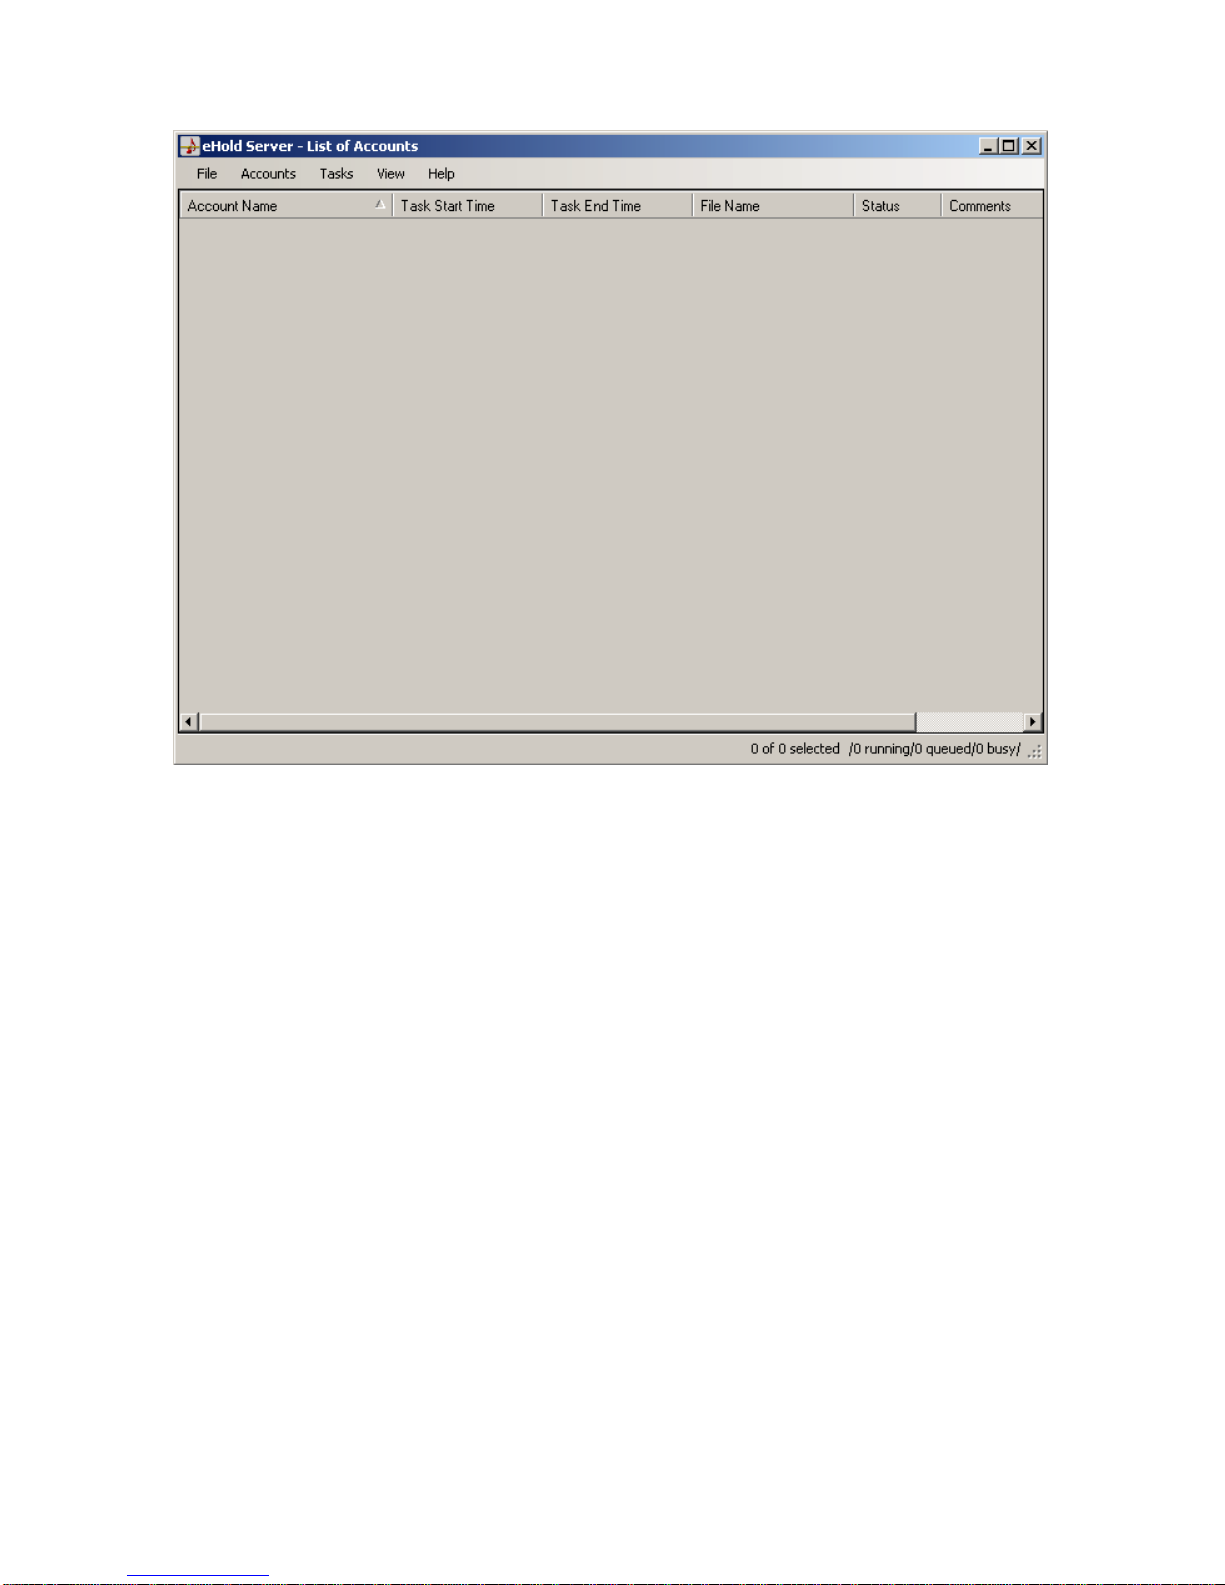
The Main Menu
1.
The main menu displays a list of all accounts. The most common commands are
available by right-clicking in the account list area. Right-click on the status bar at the
bottom of the window for task related commands.
Some of the commands allow you to act upon one or more accounts. Select one
account by simply clicking on it. Select multiple accounts by shift-clicking (range)
and/or control-clicking (individual).
The accounts can be sorted by clicking on a column header. Column order can be
changed by dragging column headers to different positions.
Sortingisa very important function as it allows you to list related accounts together
for group operations. If you plan to update a group of accounts with the same file
on a regular basis, you should give these accounts similar names such as “Acme
Corp. - CA”, “Acme Corp. - NY” and etc. When you sort on Account Name, these
accounts will be listed together for you to range select.
The program is very user friendly and intuitive to use. All you need to do is to set up
accounts first then set up tasks for these accounts. The tasks are displayed on the
screen with such details as start time, end time, file name and status (result). If a
task failed for some reason, the entry will be in red until you clear the task. You can
also sort on the Status column so that all failed accounts will be listed together for
you to examine.
- 6 -

The Accounts Command
Add Accounts
In the Contact area, all fields are optional except the Account Name which must be
unique. In the eHold Player area, fill in the IP Address but leave the IO Port and the
Digital IO Port fields unchanged.
The player has no default password. If you want to set up the password (recom-
mended), click the “Config” button after filling out the IP Address. When the Con-
trollerStatus web page opens,clickthe “Login” button. Therearetwo passwords in
the next page. The Setup password is what you use to log in this page - the default
is blank and that’s why you were able to log in without the password previously.
The Access password is what the server program uses to access the player (the
Password in the eHold Player area.) If someday you lose the passwords, you may
reset the player to the default (blank for both passwords) by pressing down the
player’s hardware reset button for 5 seconds while turning on the power.
TheReset button, not to beconfused with the hardware resetbutton,issues a reset
command to the player. Normally the player does not need to be reset. An aborted
transfer or loss of network connectivity during a transfer may put the player in a
state requiring a reset to restore normal operation. Recycling the player’s power
will also achieve the goal.
- 7 -

Clicking on the Search button will display a list of eHold players connected to the
samesubnet as the server PC.Toadd a listed player to theaccount, just double click
the entry. After the player is added to the account, you may then use the Config
button to configure it if necessary. Note that eHold players located outside the
subnet are not searchable with this button.
Values of the HTTP Port, the FIFO Port and the Digital IO Port should usually be left
unchanged. If there are multiple players (accounts) using the same public static IP
address behind the same router, then these software ports need to be changed to
unique values for each players. For example,
1st Player: HTTP = 80, FIFO = 100, Digital IO = 102
2nd Player: HTTP = 5000, FIFO = 5001, Digital IO = 5002 (changed from default)
The above software ports are used by the server program to access each player. On
the other hand, each player has the same set of hardware ports with the following
default values (changable in the device configuration page):
HTTP = 80, FIFO = 100, Digital IO = 102
Therefore, the port forwarding (if firewall is enabled in the router) should be:
1st Player: (public IP) 80 to (private IP) 80, 100 to 100, 102 to 102
2nd Player: (public IP) 5000 to (private IP) 80, 5001 to 100, 5002 to 102
Each player should have a unique private IP address - see IP Address Configuration
under Hardware Installation.
Note the HTTP port is used to access the device configuration page only. Do not
forward the HTTP port unless you want to access the device configuration page via
the Internet.
If you plan to send the same file to a group of accounts on a regular basis, you
should give them similar names such as “ABC #1”, “ABC #2” and etc. You will then
be able to quickly select these accounts using the View/Filter command.
Edit Accounts
You may select one or more accounts for editing. Select multiple accounts by shift-
clicking (range) and/or control-clicking (individual).
Duplicate Accounts
This command helps to create multiple accounts with similar data. After setting up
the first account manually, you may duplicate it and edit the duplicate to create a
newaccount.All fieldswill beduplicatedexcepttheIP address.Remember tochange
the account name so that it’s unique.
Delete Accounts
Youmay select one or more accountsfor deletion. Select multiple accounts byshift-
clicking (range) and/or control-clicking (individual).
- 8 -

The Tasks Command
Edit/Clear Tasks
Usethis command to create or clear tasks for one or more accounts. Select multiple
accounts by shift-clicking (range) and/or control-clicking (individual).
To create a new task, click the New Task button. Next, select the file and the time
toupload, and then click the Savebutton.When you click the New Taskbutton,the
StartTaskTimewillautomaticallybe set to the current time. If you want to start the
taskimmediately,leaveit unchanged.Dateand timevaluescaneasilybeincremented
and decremented by selecting the value and using the up and down arrows.
When a task is scheduled for future execution, its Status field in the Main Menu
becomes “Ready”. After a task is executed, its Status field shows the result.
The Clear button is used to clear the status of the previous task, or to delete a task
that’sscheduled for future execution.Youcan also use the Tasks> Clear command.
- 9 -
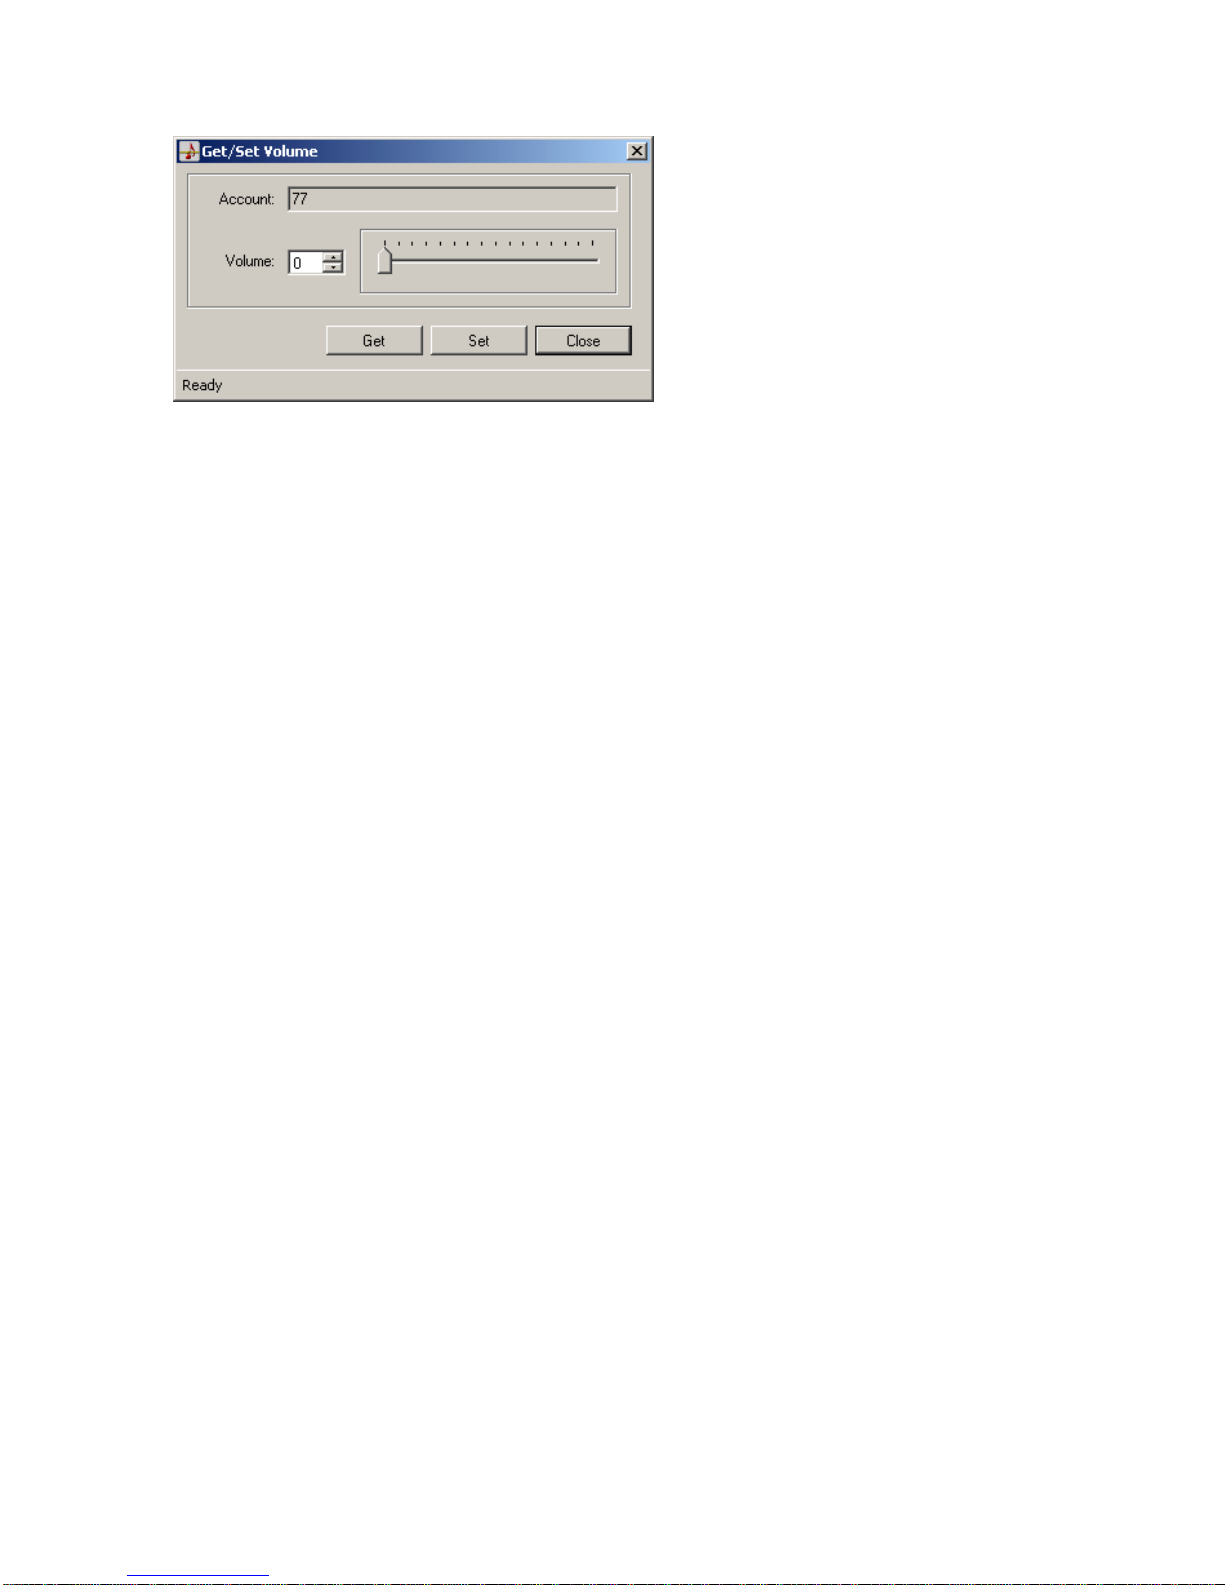
Get/Set Volume
Click the Get button to obtain the current volume. Move the slide to the desired
value and click the Set button to set the volume. This command works on one or
more accounts. Select multiple accounts by shift-clicking (range) and/or control-
clicking (individual).
Note that there are two levels of volume control: hardware and software. The
hardwarecontrol (via the volumedialon the player) setsthemaximum output level.
The software control (this command) allows you to remotely adjust the volume
within the range set by the hardware control.
Start Transfer Now
Use this command to immediately start the task(s) of the selected account(s). If the
task has been executed before, it will be executed again.
Abort Queued Tasks
A task will be queued if its time has come but the system is busy executing another
task. Use this command to abort queued tasks if any. These queued tasks do not
need to be selected. The task status will become “Aborted”.
Abort Running Tasks
Use this command to abort the task that’s currently being executed. The running
task does not need to be selected. The task status will become “Aborted”.
- 10 -
The View Command
Plain Text Password
If this box is checked, the account password will be displayed in plain text. Other-
wise, it will be displayed as “xxxxxxxx”.
Show Tool Tips
If this box is checked, tool tips will be displayed when the mouse is moved on
certain command buttons.
Filter...
Use this command to view accounts with a common word in the account name. It
allows you to quickly narrow in (and subsequently select) a group of accounts from
a list of potentially hundreds of accounts. You may view accounts that contains,
startwith, or end withthecommon word. Note thataccountswithout the common
word will be hidden but not deleted.
Remove Filter
Remove the filter and view all accounts.
Select All
Use this command to select all accounts.
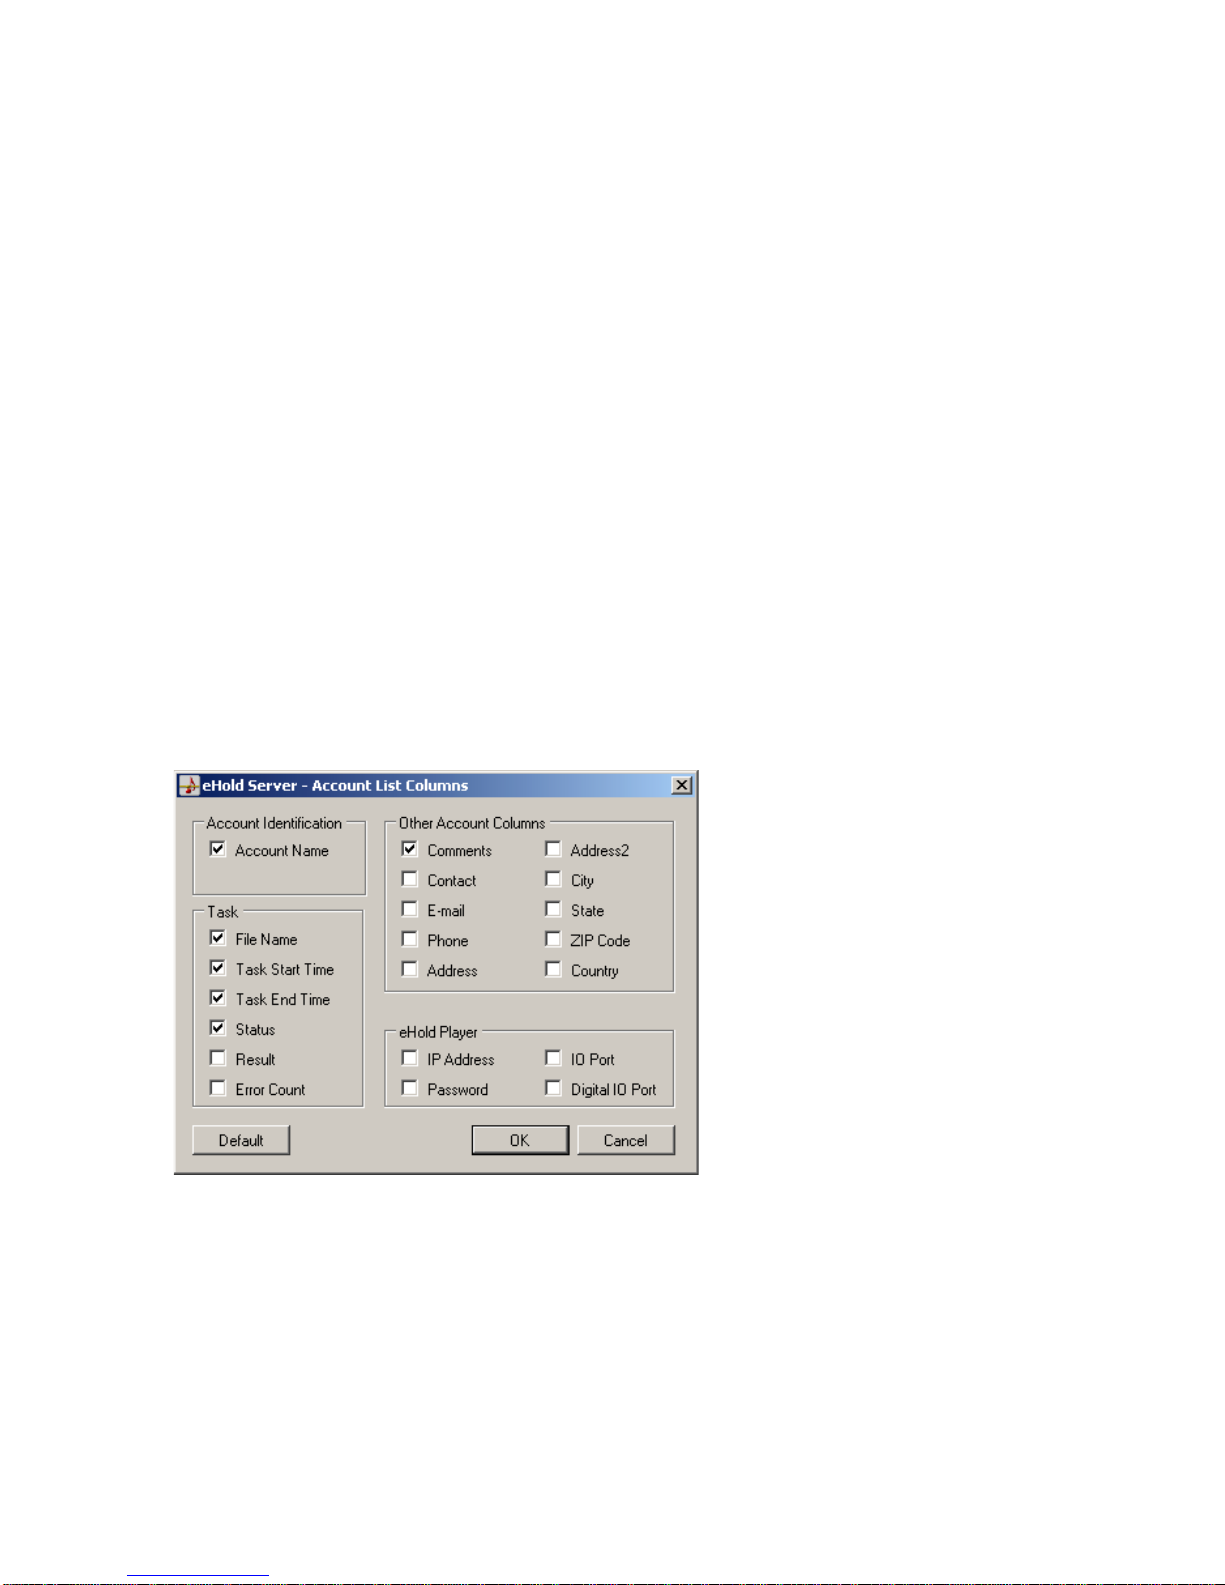
Select Columns
Select the columns to display in the Main Menu.
- 11 -

The File Command
Admin Preferences
Get Volume Timeout
The Get Volume command can take no longer than the value of this timeout. This
timeout value must be greater than Data Send and Data Receive Timeout values.
Set Volume Timeout
The Set Volume command can take no longer than the value of this timeout. This
timeout value must be greater than Data Send and Data Receive Timeout values.
Reset Device Timeout
TheReset command can take no longer than the value of this timeout. This timeout
value must be greater than Data Send and Data Receive Timeout values.
Data Send Timeout
eHold Server socket send data timeout is initialized to this value.
Data Receive Timeout
eHold Server socket receive data timeout is initialized to this value.
- 12 -

Max. Transfer File Threads
This is the maximum number of concurrent transfers. By setting this value greater
than 1, multiple transfers should complete faster because more than one will be
done at once.
Transfer Timer Interval
The interval at which system queries are services. The eHold Server checks for trans-
fers that are ready to be queued at this interval. Status messages and transitions
from queued to running are also performed at this interval.
Reset to Send File Delay
When this value is non-zero, it specifies the delay between issuing a reset and
beginning a file transfer. The default value is 0, which means that a reset is not sent
prior to beginning a transfer.
Progress Timer Interval
When a transfer is in progress, the percent completion messages are updated at
this interval.
Transfer Packet Size
When transferring a file to an eHold Player, data is written to the player ‘Transfer
Packet Size’ bytes at a time.
Show AccountID Checkbox
Each account has an AccountID. This is a unique number that is automatically gen-
erated. Accounts that have been saved to the database have positive AccountID
numbers whereas newly created accounts have negative AccountIDs. Some of the
event log entries identify the account using its AccountID. Check this check box to
enable the AccountID column check box to be displayed in the Select Columns
dialog box.
Auto-Dismiss Timeout
Messages that are displayed during a transfer are automatically dismissed after the
Auto-Dismiss Timeout has elapsed. In this way pending transfers will not be prohib-
ited from running should an error occur. Note that Auto-Dismiss can be disabled by
setting this value to zero (0).
Cell Date/Time Format
This string specifies how the Data/Time is displayed in the Task Start and Task End
columns of the List of Accounts display. Details for modifying the format string can
be found in Microsoft’s Standard Date and Time Format Strings topic in the .NET
Framework Developer’s Guide.
Dialog Date/Time Format
This string specifies how the Data/Time is displayed in the Task Edit dialog. Details
for modifying the format string can be found in Microsoft’s Standard Date and
Time Format Strings topic in the .NET Framework Developer’s Guide.
- 13 -
Other manuals for DP-501 eHold
1
Table of contents
Other Eletech MP3 Player manuals


