ELEVEN Free User manual

Eleven
™
Free Plug-in
Version 8.0

Legal Notices
This guide is copyrighted ©2008 by Digidesign, a division of
Avid Technology, Inc. (hereafter “Digidesign”), with all rights
reserved. Under copyright laws, this guide may not be
duplicated in whole or in part without the written consent of
Digidesign.
003, 96 I/O, 96i I/O, 192 Digital I/O, 192 I/O, 888|24 I/O,
882|20 I/O, 1622 I/O, 24-Bit ADAT Bridge I/O, AudioSuite,
Avid, Avid DNA, Avid Mojo, Avid Unity, Avid Unity ISIS,
Avid Xpress, AVoption, Axiom, Beat Detective, Bomb Factory,
Bruno, C|24, Command|8, Control|24, D-Command, D-Control,
D-Fi, D-fx, D-Show, D-Verb, DAE, Digi 002, DigiBase,
DigiDelivery, Digidesign, Digidesign Audio Engine, Digidesign
Intelligent Noise Reduction, Digidesign TDM Bus, DigiDrive,
DigiRack, DigiTest, DigiTranslator, DINR, D-Show, DV Toolkit,
EditPack, Eleven, HD Core, HD Process, Hybrid, Impact,
Interplay, LoFi, M-Audio, MachineControl, Maxim, Mbox,
MediaComposer, MIDI I/O, MIX, MultiShell, Nitris, OMF,
OMF Interchange, PRE, ProControl, Pro Tools M-Powered,
Pro Tools, Pro Tools|HD, Pro Tools LE, QuickPunch, Recti-Fi,
Reel Tape, Reso, Reverb One, ReVibe, RTAS, Sibelius,
Smack!, SoundReplacer, Sound Designer II, Strike, Structure,
SYNC HD, SYNC I/O, Synchronic, TL Aggro, TL AutoPan, TL
Drum Rehab, TL Everyphase, TL Fauxlder, TL In Tune, TL
MasterMeter, TL Metro, TL Space, TL Utilities, Transfuser,
Trillium Lane Labs, Vari-Fi Velvet, X-Form, and XMON are
trademarks or registered trademarks of Digidesign and/or Avid
Technology, Inc. Xpand! is Registered in the U.S. Patent and
Trademark Office. All other trademarks are the property of their
respective owners.
Digidesign Eleven Free is not affiliated with, or sponsored or
endorsed by, the makers of the classic and contemporary
amplifiers, speaker cabinets, and microphones that are
emulated in the product.
Product features, specifications, system requirements, and
availability are subject to change without notice.
Guide Part Number 9329-59663-00 REV A 11/08
Documentation Feedback
At Digidesign, we're always looking for ways to improve our
documentation. If you have comments, corrections, or
suggestions regarding our documentation, email us at

Contents iii
contents
Chapter 1. Introduction . . . . . . . . . . . . . . . . . . . . . . . . . . . . . . . . . . . . . . . . . . . . . . . . . . . . . . 1
System Requirements . . . . . . . . . . . . . . . . . . . . . . . . . . . . . . . . . . . . . . . . . . . . . . . . . . . . . 2
Working with Plug-ins . . . . . . . . . . . . . . . . . . . . . . . . . . . . . . . . . . . . . . . . . . . . . . . . . . . . . 2
Conventions Used in This Guide . . . . . . . . . . . . . . . . . . . . . . . . . . . . . . . . . . . . . . . . . . . . . . 2
About www.digidesign.com . . . . . . . . . . . . . . . . . . . . . . . . . . . . . . . . . . . . . . . . . . . . . . . . . 3
Chapter 2. Installation . . . . . . . . . . . . . . . . . . . . . . . . . . . . . . . . . . . . . . . . . . . . . . . . . . . . . . . 5
Installing Eleven Free Download Version . . . . . . . . . . . . . . . . . . . . . . . . . . . . . . . . . . . . . . . . 5
Removing Eleven Free . . . . . . . . . . . . . . . . . . . . . . . . . . . . . . . . . . . . . . . . . . . . . . . . . . . . . 6
Chapter 3. Input Calibration and QuickStart. . . . . . . . . . . . . . . . . . . . . . . . . . . . . . . . . . . . 7
Before You Begin . . . . . . . . . . . . . . . . . . . . . . . . . . . . . . . . . . . . . . . . . . . . . . . . . . . . . . . . 7
1: Connect your Guitar and Configure Source Input. . . . . . . . . . . . . . . . . . . . . . . . . . . . . . . . . 8
2: Set Hardware and Levels . . . . . . . . . . . . . . . . . . . . . . . . . . . . . . . . . . . . . . . . . . . . . . . . . 9
3: Set Up a Pro Tools Track . . . . . . . . . . . . . . . . . . . . . . . . . . . . . . . . . . . . . . . . . . . . . . . . 10
4. Set Up Eleven Free . . . . . . . . . . . . . . . . . . . . . . . . . . . . . . . . . . . . . . . . . . . . . . . . . . . . 11
Working with Pre-Recorded Tracks . . . . . . . . . . . . . . . . . . . . . . . . . . . . . . . . . . . . . . . . . . . 12
What to Do Next . . . . . . . . . . . . . . . . . . . . . . . . . . . . . . . . . . . . . . . . . . . . . . . . . . . . . . . . 12
Chapter 4. Using Eleven Free . . . . . . . . . . . . . . . . . . . . . . . . . . . . . . . . . . . . . . . . . . . . . . . . 13
Inserting Eleven Free on Tracks . . . . . . . . . . . . . . . . . . . . . . . . . . . . . . . . . . . . . . . . . . . . . 13
Adjusting Eleven Free’s Parameters . . . . . . . . . . . . . . . . . . . . . . . . . . . . . . . . . . . . . . . . . . 13
Using MIDI and MIDI Learn. . . . . . . . . . . . . . . . . . . . . . . . . . . . . . . . . . . . . . . . . . . . . . . . . 14
Settings (Presets) . . . . . . . . . . . . . . . . . . . . . . . . . . . . . . . . . . . . . . . . . . . . . . . . . . . . . . . 15
Master Section . . . . . . . . . . . . . . . . . . . . . . . . . . . . . . . . . . . . . . . . . . . . . . . . . . . . . . . . . 16
Amp Types . . . . . . . . . . . . . . . . . . . . . . . . . . . . . . . . . . . . . . . . . . . . . . . . . . . . . . . . . . . . 17
Cabinet Types and Controls . . . . . . . . . . . . . . . . . . . . . . . . . . . . . . . . . . . . . . . . . . . . . . . . 20
Tracks and Signal Routing for Guitar . . . . . . . . . . . . . . . . . . . . . . . . . . . . . . . . . . . . . . . . . . 20
Tips and Suggestions. . . . . . . . . . . . . . . . . . . . . . . . . . . . . . . . . . . . . . . . . . . . . . . . . . . . . 24
Eleven Free Signal Flow . . . . . . . . . . . . . . . . . . . . . . . . . . . . . . . . . . . . . . . . . . . . . . . . . . . 26


Chapter 1: Introduction 1
chapter 1
Introduction
Welcome to Eleven™ Free, Digidesign’s free gui-
tar amplifier plug-in for Pro Tools®and Avid®
systems. Eleven Free gives you two custom gui-
tar amplifiers and two cabinet models, selected
from among the “best of the best” vintage and
contemporary gear provided in the full version
of Eleven.
Eleven Free Plug-in Features
• Two custom amp models from Digidesign®.
• Two speaker cabinet models.
• Amps and cabinets can be mixed and
matched.
• All controls can be automated.
• Noise Gate to control any unwanted noise.
• Settings files (presets) to store and recall fac-
tory and custom tones.
• Support of any compatible work surface or
MIDI controller. MIDI Learn provides effort-
less mapping to any continuous controller
(CC)–capable MIDI device.
• Support of sample rates of 96 kHz, 88.2 kHz,
48 kHz, and 44.1 kHz.
• Support of up to 8 channel (7.1) operation, in
mono or multi-mono plug-in only.
• Available in RTAS®and AudioSuite™
Eleven Free Guide2
System Requirements
To use Eleven Free you’ll need one of the following:
• A Digidesign-qualified Pro Tools|HD®,
Pro Tools LE®, or Pro Tools M-Powered™
system (Eleven Free is RTAS and
AudioSuite only)
• A qualified Avid system (AudioSuite only)
• A third-party software application that sup-
ports the Digidesign RTAS, or AudioSuite
plug-in standards
Digidesign can only assure compatibility and
provide support for hardware and software it has
tested and approved.
For complete system requirements and a list of
Digidesign-qualified computers, operating sys-
tems, hard drives, and third-party devices, refer
to the latest information on the Digidesign web-
site:
www.digidesign.com/compatibility
Working with Plug-ins
Refer to the Pro Tools Reference Guide for detailed
information on working with plug-ins, includ-
ing:
• Inserting plug-ins on tracks
• Clip indicators
• Navigating the Plug-in window
• Adjusting plug-in controls
• Automating plug-ins
• Using Plug-in Presets
•UsingAudioSuite
Conventions Used in This
Guide
All Digidesign guides use the following conven-
tions to indicate menu choices and key com-
mands:
The names of Commands, Options, and Settings
that appear on-screen are in a different font.
The following symbols are used to highlight im-
portant information:
Pro Tools M-Powered
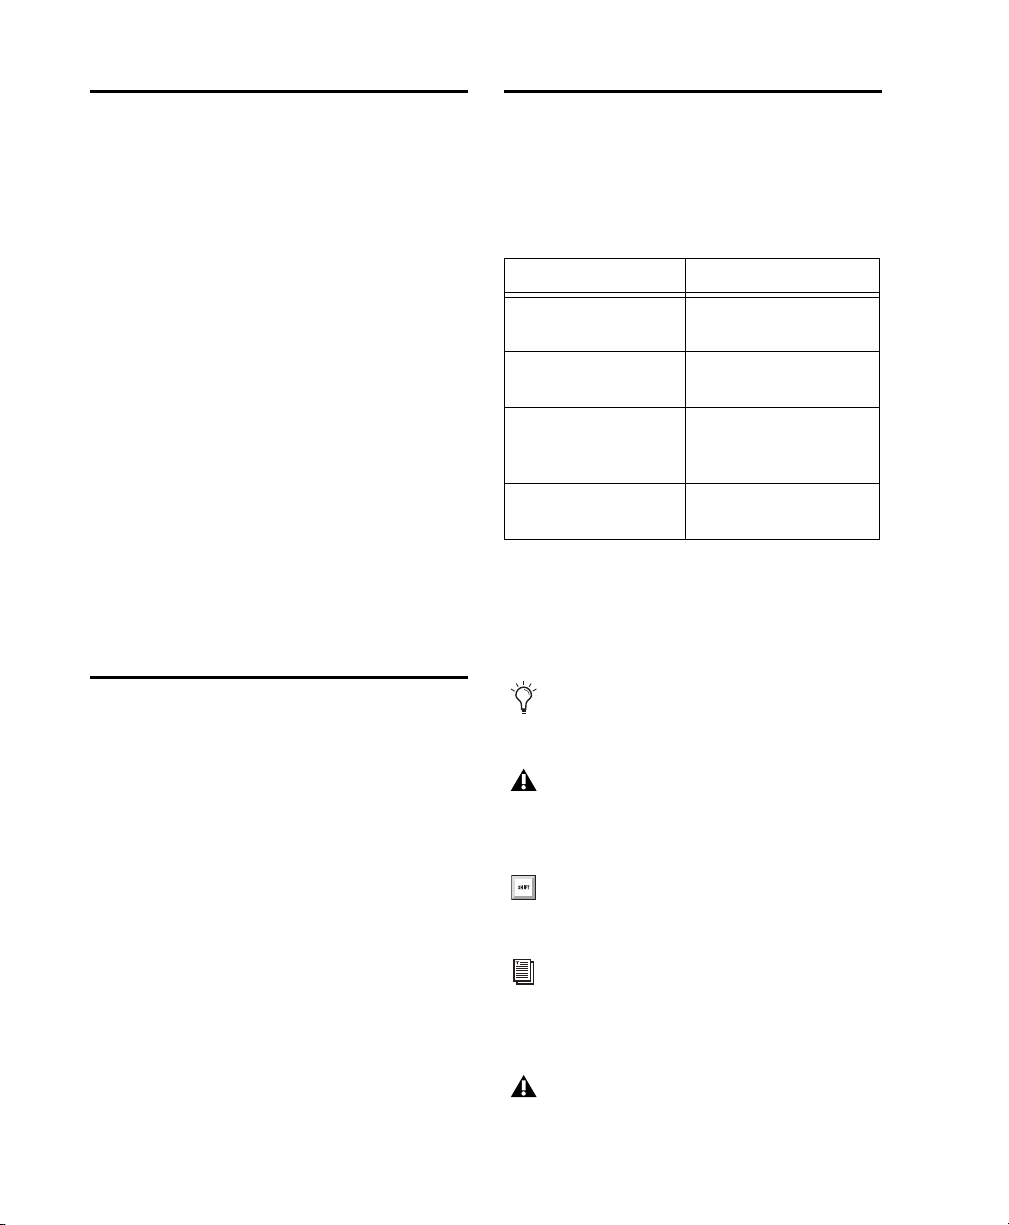
Convention Action
File > Save Choose Save from the
File menu
Control+N Hold down the Control
key and press the N key
Control-click Hold down the Control
key and click the mouse
button
Right-click (Windows) Click with the right
mouse button
User Tips are helpful hints for getting the
most from your Pro Tools system.
Important Notices include information that
could affect your Pro Tools session data or
the performance of your Pro Tools system.
Shortcuts show you useful keyboard or
mouse shortcuts.
Cross References point to related sections in
the Pro Tools Guides.
References to Pro Tools LE in this guide are
interchangeable with Pro Tools M-Powered.

Chapter 1: Introduction 3
About www.digidesign.com
The Digidesign website (www.digidesign.com) is
your best online source for information to help
you get the most out of your Pro Tools system.
The following are just a few of the services and
features available.
Product Registration Register your purchase on-
line.
Support and Downloads Contact Digidesign
Technical Support or Customer Service; down-
load software updates and the latest online
manuals; browse the Compatibility documents
for system requirements; search the online An-
swerbase or join the worldwide Pro Tools com-
munity on the Digidesign User Conference.
Training and Education Study on your own using
courses available online or find out how you can
learn in a classroom setting at a certified
Pro Tools training center.
Products and Developers Learn about Digidesign
products; download demo software or learn
about our Development Partners and their plug-
ins, applications, and hardware.
News and Events Get the latest news from
Digidesign or sign up for a Pro Tools demo.
Pro Tools Accelerated Videos Watch the series of
free tutorial videos. Accelerated Videos are de-
signed to help you get up and running with
Pro Tools and its plug-ins quickly.

Eleven Free Guide4

Chapter 2: Installation 5
chapter 2
Installation
Eleven Free is installed automatically along with
other free DigiRack™ plug-ins included with
your Pro Tools system.
The installer for the Eleven Free plug-in can also
be downloaded from the DigiStore (www.digide-
sign.com)
Installing Eleven Free
Download Version
To install the Eleven Free plug-in:
1 Download the installer for your computer
platform from the Digidesign website
(www.digidesign.com). After downloading,
make sure the installer is uncompressed (.SIT on
Mac or .ZIP on Windows).
2 Double-click the Eleven Free Installer (Mac) or
Setup (Windows) application.
3 Follow the on-screen instructions to complete
the installation.
4 When installation is complete, click Quit
(Mac) or Finish (Windows).
The Eleven Free Installer installs the Eleven Free
plug-in in the following location:
• Library/Application Support/Digidesign/
Plug-Ins folder (Mac).
– or –
• Program Files/Common Files/Digidesign/
DAE/Plug-Ins folder (Windows)

Eleven Free Guide6
Removing Eleven Free
If you need to remove the plug-in from your sys-
tem, follow the instructions below for your
computer platform.
Mac OS X
To remove the Eleven plug-in:
1 Locate and open the Plug-Ins folder on your
Startup drive (Library/Application Support
/Digidesign/Plug-Ins).
2 Do one of the following:
• To permanently remove a plug-in, drag it to
the Trash, then empty the Trash.
– or –
• To keep a copy of the plug-in but not load it
when you launch Pro Tools, drag it to the
Plug-Ins (Unused) folder (Library/Applica-
tion Support/Digidesign/Plug-
Ins (Unused).
Windows XP
To remove the Eleven Free plug-in:
1 From the Start menu, choose Settings > Control
Panel and double-click Add or Remove Programs.
2 Select the Eleven plug-in from the list of in-
stalled applications and click the Change/Re-
move button.
3 Follow the on-screen instructions to remove
the plug-in.
4 When removal is complete, click OK to close
the window.
Windows Vista
To remove a plug-in:
1 Choose Start > Control Panel.
2 Double-click Programs and Features.
3 Select the plug-in from the list of installed ap-
plications.
4 Click Uninstall.
5 Follow the on-screen instructions to remove
the plug-in.
You can also remove Settings files and doc-
umentation for Eleven (Library/Application
Support/Digidesign/Plug-In Settings, and
Applications/Digidesign/Documentation,
respectively).

Chapter 3: Input Calibration and QuickStart 7
chapter 3
Input Calibration and QuickStart
This chapter shows you how to get connected, calibrated, and cranking through Eleven Free.
Before You Begin
Eleven was designed to model the essential aspects of each amplifier including characteristics of the
input stage. Providing an appropriate level of signal delivers the most accurate response from the
plug-in.
• If you’re working with pre-recorded guitar tracks, see “Working with Pre-Recorded Tracks” on
page 12.
• If you’re working with a live guitar signal, follow the steps on the next few pages for optimal in-
put level calibration. Input calibration takes only a couple of minutes, and helps ensure the best
results with Eleven, its amps, and its factory presets.
Throughout this guide, references to Pro Tools LE also apply to Pro Tools M-Powered.
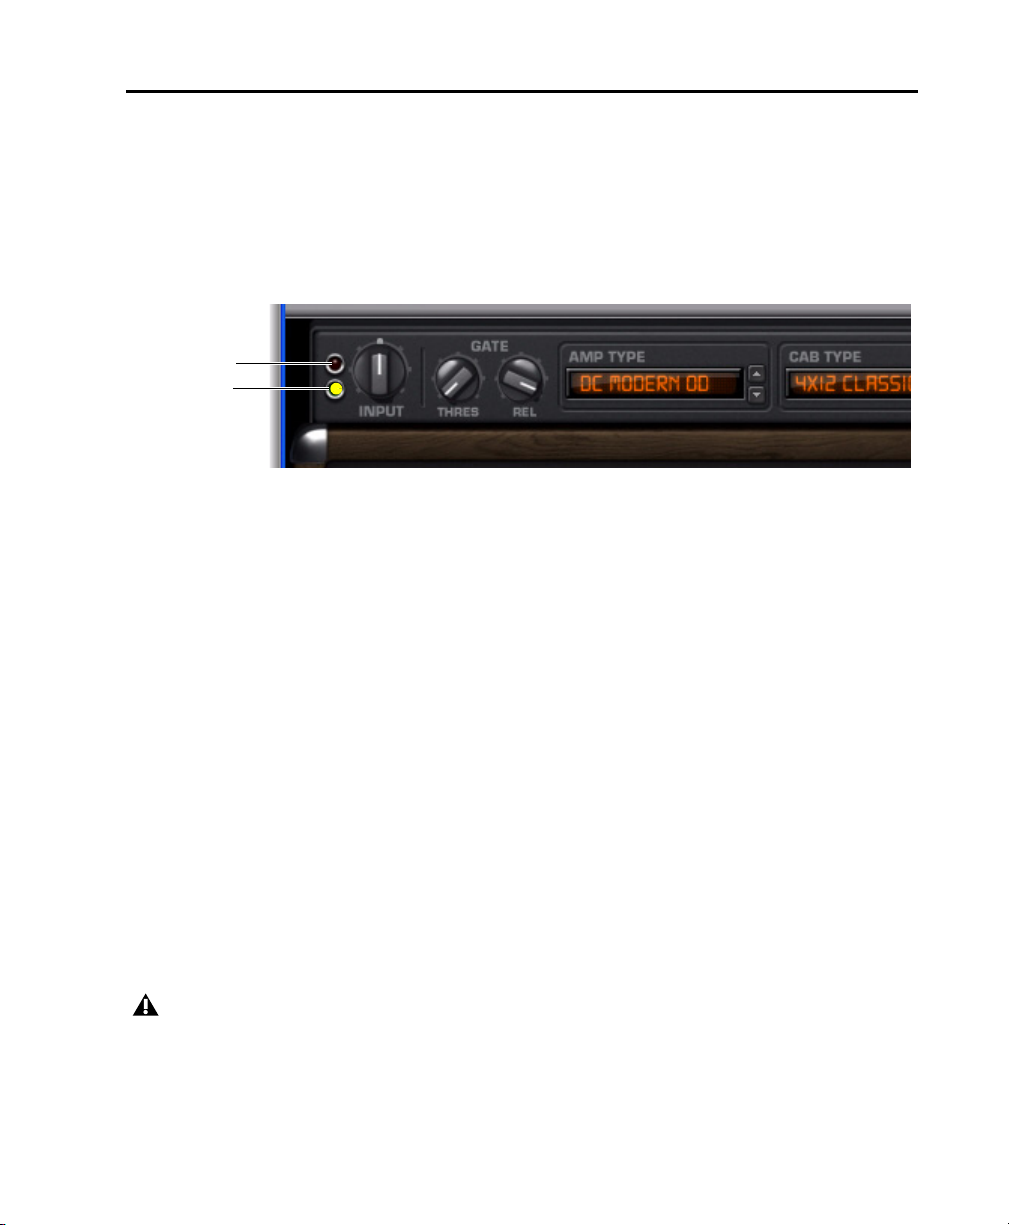
Figure 1. Basic gain stages to calibrate live guitar input for Eleven
Source Hardware Pro Tools Eleven
Vol at max Hardware input gain
(Should be
Pro Tools level
yellow or
orange)
Input LED
Eleven Free Guide8
1: Connect your Guitar and Configure Source Input
If your setup includes pedals or other gear, it helps to know whether the final output device is pro-
viding an instrument- or line-level signal. Choose and configure your input and source settings ac-
cordingly. (Check the Setup Guide that came with your system for more information.)
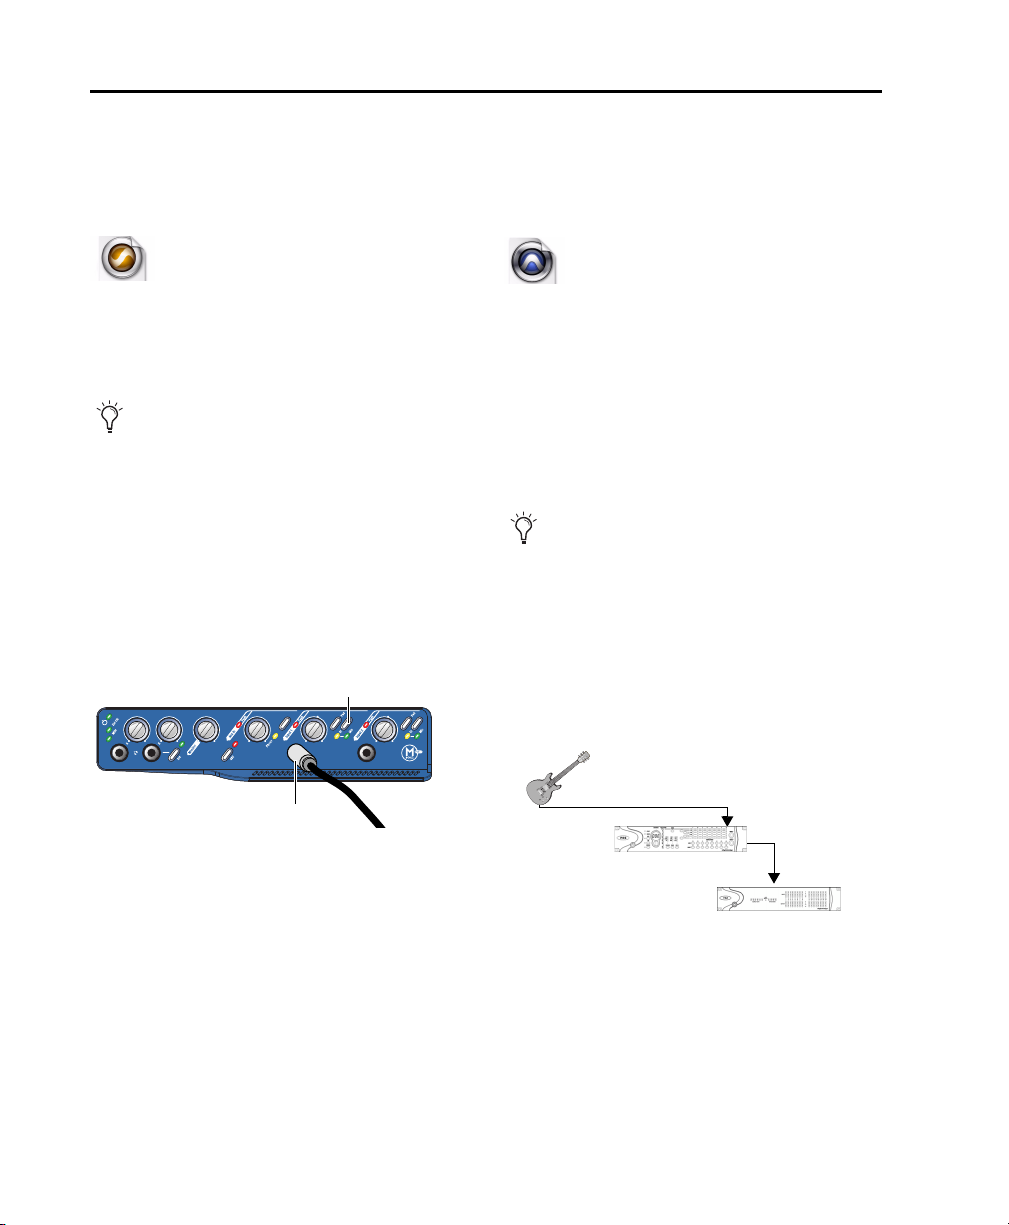
To connect your guitar to a Pro Tools LE system:
1 Plug your guitar into an available DI (direct in)
input on your Pro Tools LE audio interface.
2 Make sure to select the correct source input
(DI) on your interface.
For example, on Mbox 2 Pro, press the Input 1
Mic/DI switch until the DI indicator LED is lit.
To connect your guitar to a Pro Tools|HD system:
1 Make sure you have a pre-amp (such as a
Digidesign PRE) or similar unit connected to a
Pro Tools|HD audio interface.
2 Plug your guitar into an available pre-amp in-
put and set its source, impedance, and other set-
tings as needed for your setup.
For example, if using a Digidesign PRE you can
plug your guitar directly into the front panel
Line/Inst 1 input, then set its source to Inst.
If you use a direct box to convert your gui-
tar’s hi-impedance output to a low-imped-
ance signal, connect the direct box to an In-
strument or Line input instead of the DI
input.
Guitar into Mbox 2 Pro
Pro Tools LE
Input 1 DI
Mic/DI switch
If you use a direct box to convert your gui-
tar’s hi-impedance output to a low-imped-
ance signal, set the Line/Inst 1 input to Line
source or the equivalent on your particular
pre-amp.
Guitar into Digidesign PRE into a 192 I/O
Pro Tools|HD
Pro Tools|HD
PRE (or other pre-amp)
audio interface
Chapter 3: Input Calibration and QuickStart 9
2: Set Hardware and Levels
After plugging in, do the following to set your primary gain and configure your Pro Tools hardware
by watching its input indicators (meters). This sets the first stage of your gain structure for Eleven.
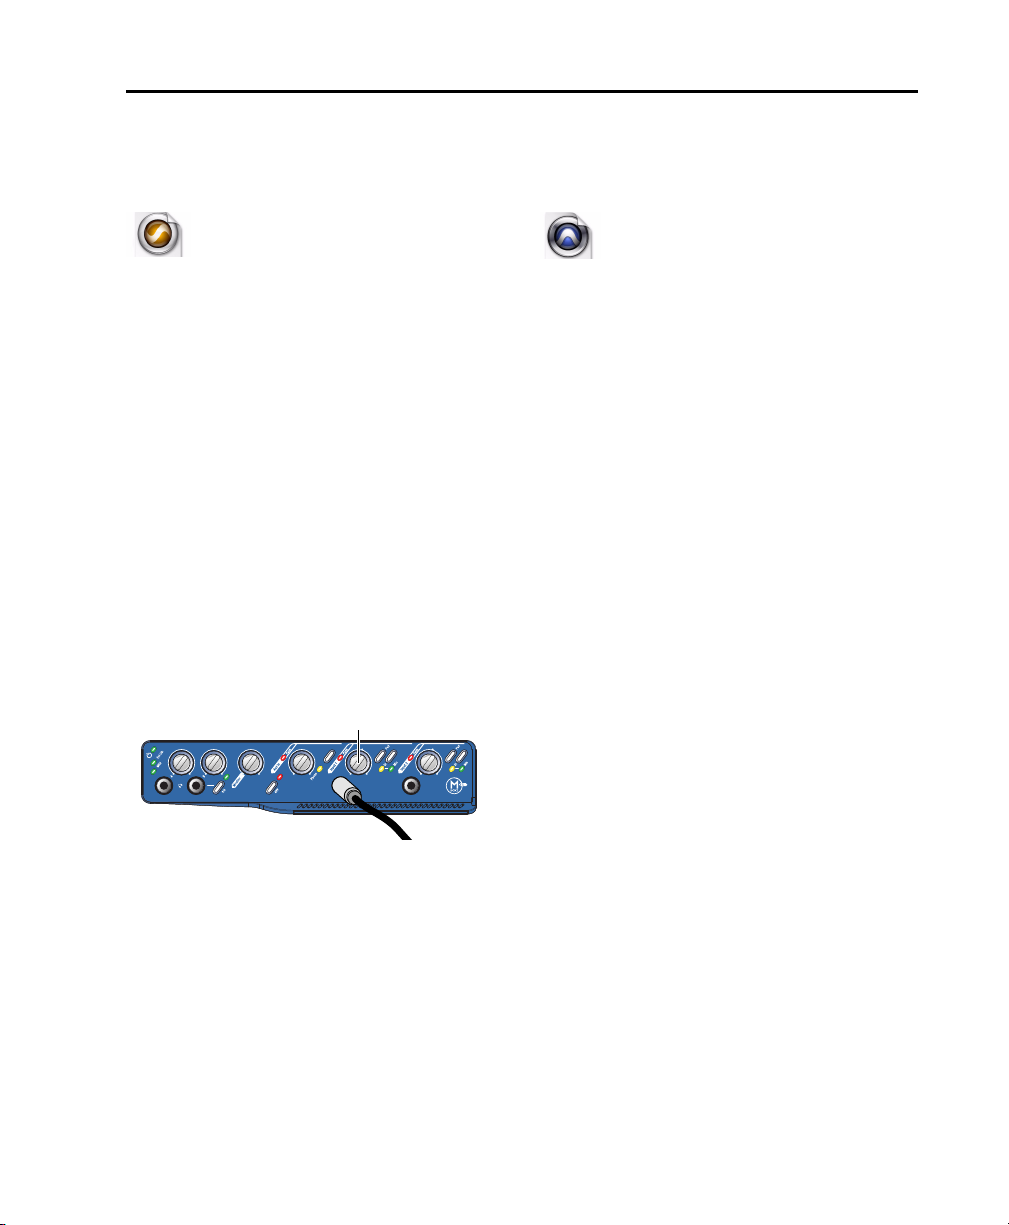
To prepare your guitar and Pro Tools LE hardware
for input calibration:
1 In Pro Tools, choose Setup > Playback Engine
and set your Hardware Buffer to a low enough
setting to reduce monitor latency.
2 On your guitar, select the highest output
pickup or position and set the volume and tone
controls to 10 (maximum).
3 Strum full chords (your loudest expected play-
ing) while watching the Input indicators on
your audio hardware.
4 Adjust the Input Gain on your audio interface
high enough to indicate a strong signal on the
hardware Input LED (but not overloading the
input).
To prepare your guitar and Pro Tools|HD hardware
for input calibration:
1 On your guitar, select the highest output
pickup or position and set all volume and tone
controls to the maximum.
2 Strum full chords (your loudest expected play-
ing) while watching the Input indicators on
your audio hardware.
3 Adjust your pre-amp input gain until you see
a strong signal on your audio interface Input
meters (but not overloading the input).
Input 1 Gain on Mbox 2 Pro
Pro Tools LE
Input 1 Gain
Pro Tools|HD
Eleven Free Guide10
3: Set Up a Pro Tools Track
In this step, you’ll create and configure an audio track to use for the final stage of input calibration.
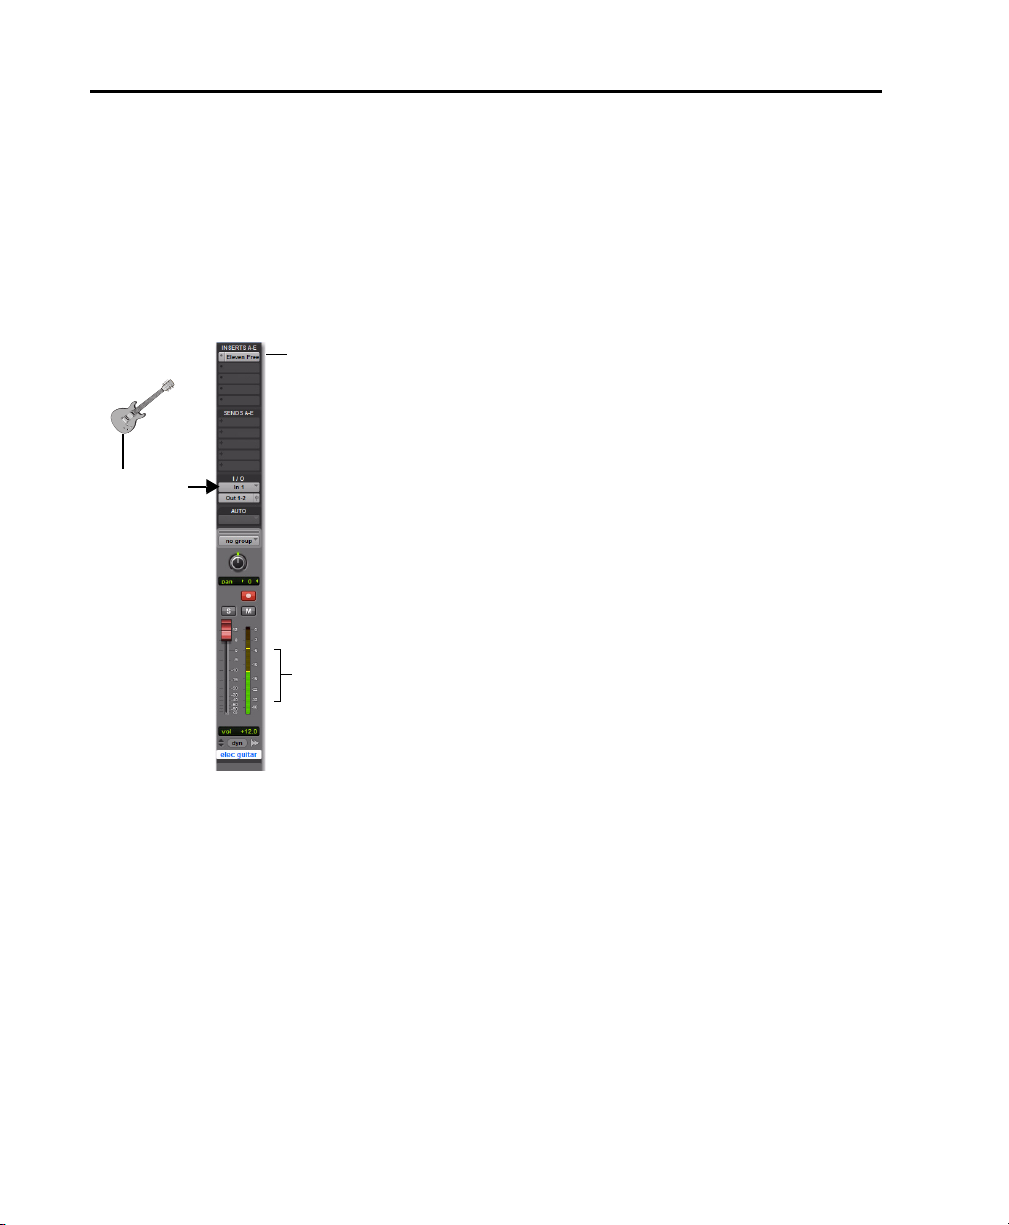
To set up and check Track level (all systems):
1 Choose Tracks > New, and create one mono Audio track.
2 In the Mix window, click the track Input selector and choose your guitar input.
3 Click the track Insert selector and select Eleven Free.
4 Record enable the audio track, or enable its TrackInput monitoring button.
One audio track, for input calibration on Pro Tools LE
Eleven Free
Guitar input
Track meter
Chapter 3: Input Calibration and QuickStart 11
4. Set Up Eleven Free
Use the Input LED in Eleven Free to make your final gain adjustments and complete the input cali-
bration process.
To calibrate your input signal to the Eleven Free plug-in:
1 Open the Eleven Free plug-in window by clicking its insert slot. Leave it at its default settings.
2 Strum as hard as you can a few more times and watch Eleven’s Input LED to see where your level
registers. The Input LED lights green, yellow, orange, or red to indicate the following level ranges:
Green (Off to –8) Indicates signal is present, but too low.
Yellow (–8 to –4) Indicates the best level for low output sources, such as single coil pickups.
Orange (–4 to 0) Indicates the best level for higher output sources, such as humbucker pickups.
Red (0 and above) Indicates that you have clipped the plug-in input. Click the Input LED to clear the
clip indicator.
3 Leaving the Input control on the plug-in at its default setting of 0 (12:00 position), set the signal
level going to the plug-in by adjusting the input gain control on your hardware until Eleven’s Input
LED shows yellow or orange.
4 After calibrating, strum as you normally would and/or back down your guitar volume from the
maximum setting used for input calibration. Don’t worry about the Input LED showing yellow or or-
ange when playing normally. As long as the plug-in isn’t indicating clipping, your gain staging should
be established.
5 Adjust the Output knob in Eleven’s Master section to raise or lower the plug-in output signal.
Figure 2. Eleven’s Input LED
Input LED
Input Clip
Proper input calibration of live guitar does not require any adjustment of Eleven’s Input control. To
learn how this control was designed to work with the amp models, see “Input” on page 16.

Eleven Free Guide12
Working with Pre-Recorded Tracks
If the pre-recorded tracks weren’t calibrated with the Eleven plug-in using the method previously de-
scribed, you can use the Input control in Eleven to adjust the signal level feeding the input stage of
the amp model.
Use your ears as a guide and adjust to taste. Since the Input LED measures the signal level entering the
plug-in and precedes the input control, you will not see any changes to the Input LED as you make
adjustments.
What to Do Next
To get started playing music with Eleven:
1 Make sure you already calibrated your input signal as explained in the previous sections of this
chapter.
2 Click the plug-in’s Librarian menu and choose a factory preset, then play guitar. Take your time to
explore — the Presets let you hear all of Eleven’s different amps and combos.
3 Turn to Chapter 4, “Using Eleven Free” for specific details on Eleven’s main controls, and for sug-
gested track setups for recording, jamming, and mixing.
Plug-in controls for Eleven Settings files
Settings menu
Librarian menu
Use the Settings menu to save, copy, paste, and manage plug-in settings files. To save a setting, see
“Settings (Presets)” on page 15. For additional information, see the Pro Tools Reference Guide.

Chapter 4: Using Eleven Free 13
chapter 4
Using Eleven Free
The following pages introduces you to the main
sections and controls in Eleven Free and show
you how to use them. You’ll also find suggested
track setups and signal routing tips to help you
get the most out of Eleven Free.
Inserting Eleven Free on
Tracks
Eleven Free is an RTAS plug-in that can be in-
serted on Pro Tools audio, Auxiliary Input, Mas-
ter Fader, or Instrument tracks for real time pro-
cessing.
Eleven Free is also available in AudioSuite for-
mat for non-real time, destructive processing.
To insert Eleven Free on a track:
Click an Insert selector on the track and
choose Eleven Free.
Channel Formats
Eleven Free is available as a mono or multi-
mono RTAS plug-in only. For use in stereo or
greater formats up to 7.1/8-channel choose the
multi-mono version.
Sample Rates
Eleven Free supports 96 kHz, 88.2 kHz, 48 kHz
and 44.1 kHz sample rates.
Category and Manufacturer
When Pro Tools plug-ins are organized by Cate-
gory or Manufacturer, Eleven Free is listed as fol-
lows:
Category Harmonic
Manufacturer Digidesign
Adjusting Eleven Free’s
Parameters
This section tells you how to adjust parameters
using your mouse or a Pro Tools worksurface.
For information on MIDI control, see “Using
MIDI and MIDI Learn” on page 14.
Editing Parameters Using a Mouse
You can adjust Eleven Free’s rotary controls by
dragging horizontally or vertically. Parameter
values increase as you drag upward or to the
right, and decrease as you drag downward or to
the left.
Keyboard Shortcuts
For finer adjustments, Command-drag (Mac)
or Control-drag (Windows) the control.
To return a control to its default value, Op-
tion-click (Mac) or Alt-click (Windows) the con-
trol.
Eleven Free Guide14
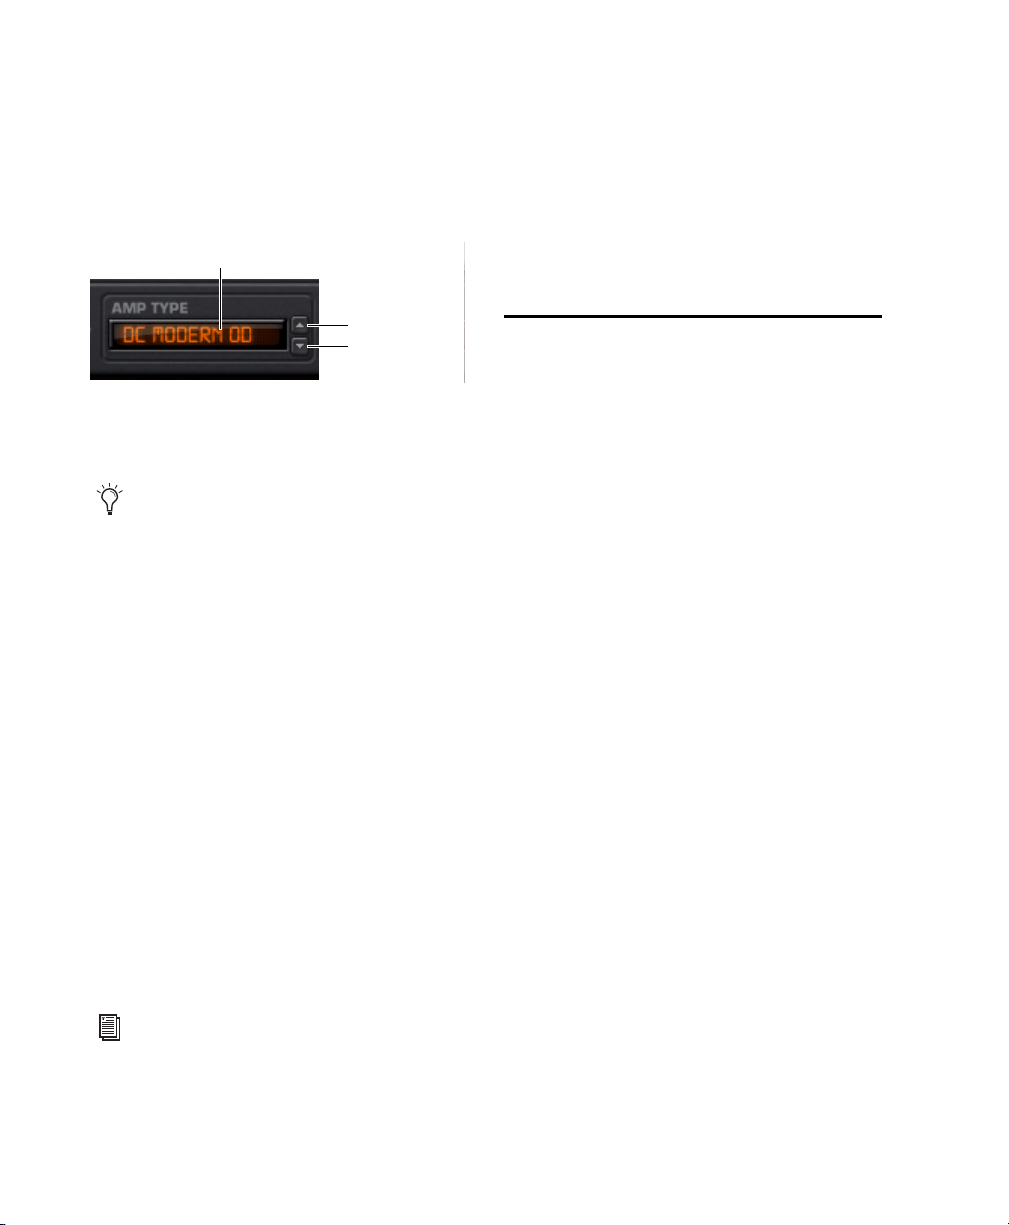
Navigating the Amp and Cab Type
Selectors
You can click on the name of the current Amp
Type or Cab Type display their pop-up menus
and select an item.
You can also click the Previous/Next arrows to
step through choices one at a time.
Enabling Switches
To enable or disable a switch or button, such as
Amp Bypass, click it to toggle its setting.
Groups and Linked Plug-in Controls
Eleven Free’s parameters can follow Pro Tools
Groups (Mix, Edit, or Mix/Edit) for linked con-
trol of multiple inserts. For more information,
see the Pro Tools Reference Guide.
Using Automation
All of Eleven Free’s parameters can be auto-
mated. When a parameter has been enabled for
automation, an LED appears lit near that con-
trol.
Using a Pro Tools Worksurface
Eleven Free can be controlled directly from any
compatible Pro Tools worksurface. Eleven Free
appears along with other plug-ins and can be as-
signed, edited, bypassed and automated using
the Insert section as available on the particular
worksurface being used.
Using MIDI and MIDI Learn
Eleven Free supports MIDI Control Change (CC)
messages, meaning that the Master section,
amp, cabinet and mic parameters can be con-
trolled remotely by any CC-capable MIDI de-
vice. This includes MIDI controllers, mixers, and
instruments, as well as the Digi 003 (in MIDI
Mode).
MIDI Learn lets you quickly map plug-in con-
trols to a MIDI foot pedal, switch, fader, knob, or
other CC-compatible trigger. You can also man-
ually assign controls to specific MIDI CC values.
It’s a Session Thing
MIDI control assignments are saved and re-
stored with the Pro Tools session in which they
are defined. Settings files (presets) for Eleven
Free do not store or recall MIDI Learn assign-
ments.
Previous/Next arrows (Amp Type shown)
You can control the Amp and Cab selectors
with MIDI. See “Using MIDI and MIDI
Learn” on page 14
See the Pro Tools Reference Guide for more
information on plug-in automation.
Previous
Next
Name
Chapter 4: Using Eleven Free 15
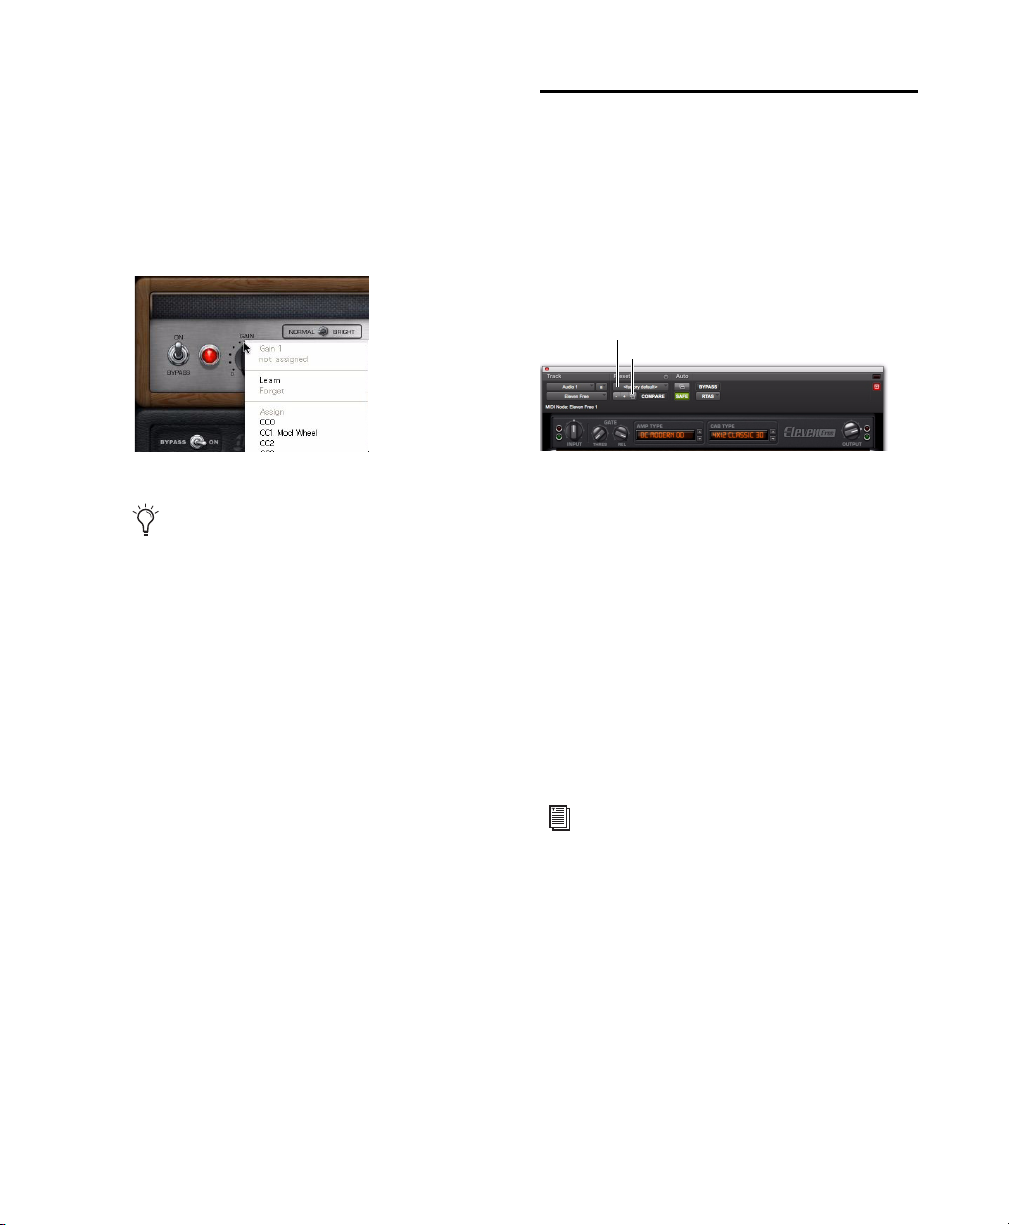
To map a MIDI controller to a parameter:
1 Make sure your external MIDI device is con-
nected to your system, and recognized by your
Audio MIDI Setup (Mac) or MIDI Studio Setup
(Windows).
2 Right-click on any control in Eleven Free.
3 Do either of the following:
• Click Learn, then move the desired control
on your MIDI controller. Pro Tools maps
whichever control you touch to that plug-
in parameter.
– or –
• If you know the MIDI CC value of your foot
controller or other device, select it from the
Assign menu.
To clear a MIDI assignment:
Right-click the control and choose Forget.
Settings (Presets)
You can pick a preset from the plug-in Librarian
menu.
To load a preset:
Click the Librarian menu and select an avail-
able Settings file.
You can save, import, copy, paste, and manage
settings using the Settings menu.
To save your settings as an Eleven Free preset:
1 Configure Eleven Free for the desired tone.
2 Click the Settings menu and choose Save Set-
tings. Name the preset, choose a location, and
click Save.
You can scroll through and select preconfigured
Eleven Free Settings files (presets) using the
plug-in Librarian menu, and the +/– buttons.
Right-clicking for MIDI Learn
If your Mac does not have a two-button
mouse, Control-click an Eleven Free param-
eter to show the MIDI Learn menu. Note
that you won’t be able to use the Control key
modifier to “clutch” a Grouped control.
Plug-in controls for Eleven Free Settings files
For more information on Settings files and
folders, see the Pro Tools Reference Guide.
Settings menu
Librarian menu

Eleven Free Guide16
Master Section
The Master section includes plug-in I/O (in-
put/output) and noise gate controls, the
Amp Type selector and the Cab Type selector.
The Master section doesn’t change when you
switch amps. Master section settings are stored
and recalled with plug-in presets.
Input LED
The Input LED shows green, yellow, orange, or
red to indicate whether you are under- or over-
driving the plug-in. The Input LED is before the
Input section of the Master section. To learn
more about the Input LED within the Eleven sig-
nal chain, see “Eleven Free Signal Flow” on
page 26.
Input
The Input knob provides input trim/boost, for
tone and distortion control. The Input range is
–18dBto+18dB.
The Input knob provides a great way to increase
or decrease gain with amp models that don't
have a separate preamp control. It also provides
a way to trim or boost the level of pre-recorded
tracks you want to treat with Eleven Free
It is important to note that the setting of the In-
put knob is saved and restored with Settings files
(presets).
Output
The Output control sets the output gain after
processing, letting you make up gain or prevent
clipping on the channel where the plug-in is be-
ing used. Output range is –60 dB to +18 dB.
Gate
Noise Gate Threshold
The Noise Gate Threshold control sets the level
at which the Noise Gate opens or closes. At min-
imum Threshold setting, the Noise Gate has no
effect. At higher Threshold settings, only louder
signals will open the Gate and pass sound.
Threshold range is from Off (–90 dB) to –20 dB.
Noise Gate Release
The Noise Gate Release control sets the length of
time the Noise Gate remains open and passing
audio. Adjust the Release to find the best setting
for the current task (not too fast to avoid cutting
off notes, and not too slow to avoid unwanted
noise). Release range is from 10 ms to 3000 ms.
Amp Type
Amp Type selects which amplifier model to use
(see “Amp Types” on page 17).
Master section
To learn more about the Input control, see
“Eleven Free Signal Flow” on page 26
Input
Gate
OutputAmp Type
Cab Type
LEDs LEDs
When you want to adjust Eleven Free’s out-
put level, use the Output knob. For tone/dis-
tortion, use the amp Master volume.
For suggested gate applications, see “Using
the Noise Gate” on page 17. For details on
where it derives its key (trigger) and applies
its gate, see “Eleven Free Signal Flow” on
page 26.
Table of contents


