elletipi PBN A SG44 User manual

Vers. 2021-01-SWING 2.0 | page 1 of 7
© ELLETIPI Inc. |www.elletipiusa.com |[email protected]
California Residents:
WARNING: Cancer and Reproductive Harm
www.P65Warnings.ca.gov
Elletipi Inc.
30 Chapin Road - Suite 1205
Pine Brook, NJ 07058
30min
SWING 2.0
PBN A
TOOLS REQUIRED
HERRAMIENTAS NECESARIAS
OUTILS NÉCESSAIRES
ESTIMATED ASSEMBLY TIME
TIEMPO ESTIMADO DE MONTAJE
TEMPS D'ASSEMBLAGE ESTIMÉ
Assembly Instructions
Instrucciones de montaje / Instructions d'assemblage
PBN A SG44 - PBN A SG34 - PBN A SG28
Vers. 2021-01-SWING 2.0 | page 2 of 7
© ELLETIPI Inc. |www.elletipiusa.com |[email protected]
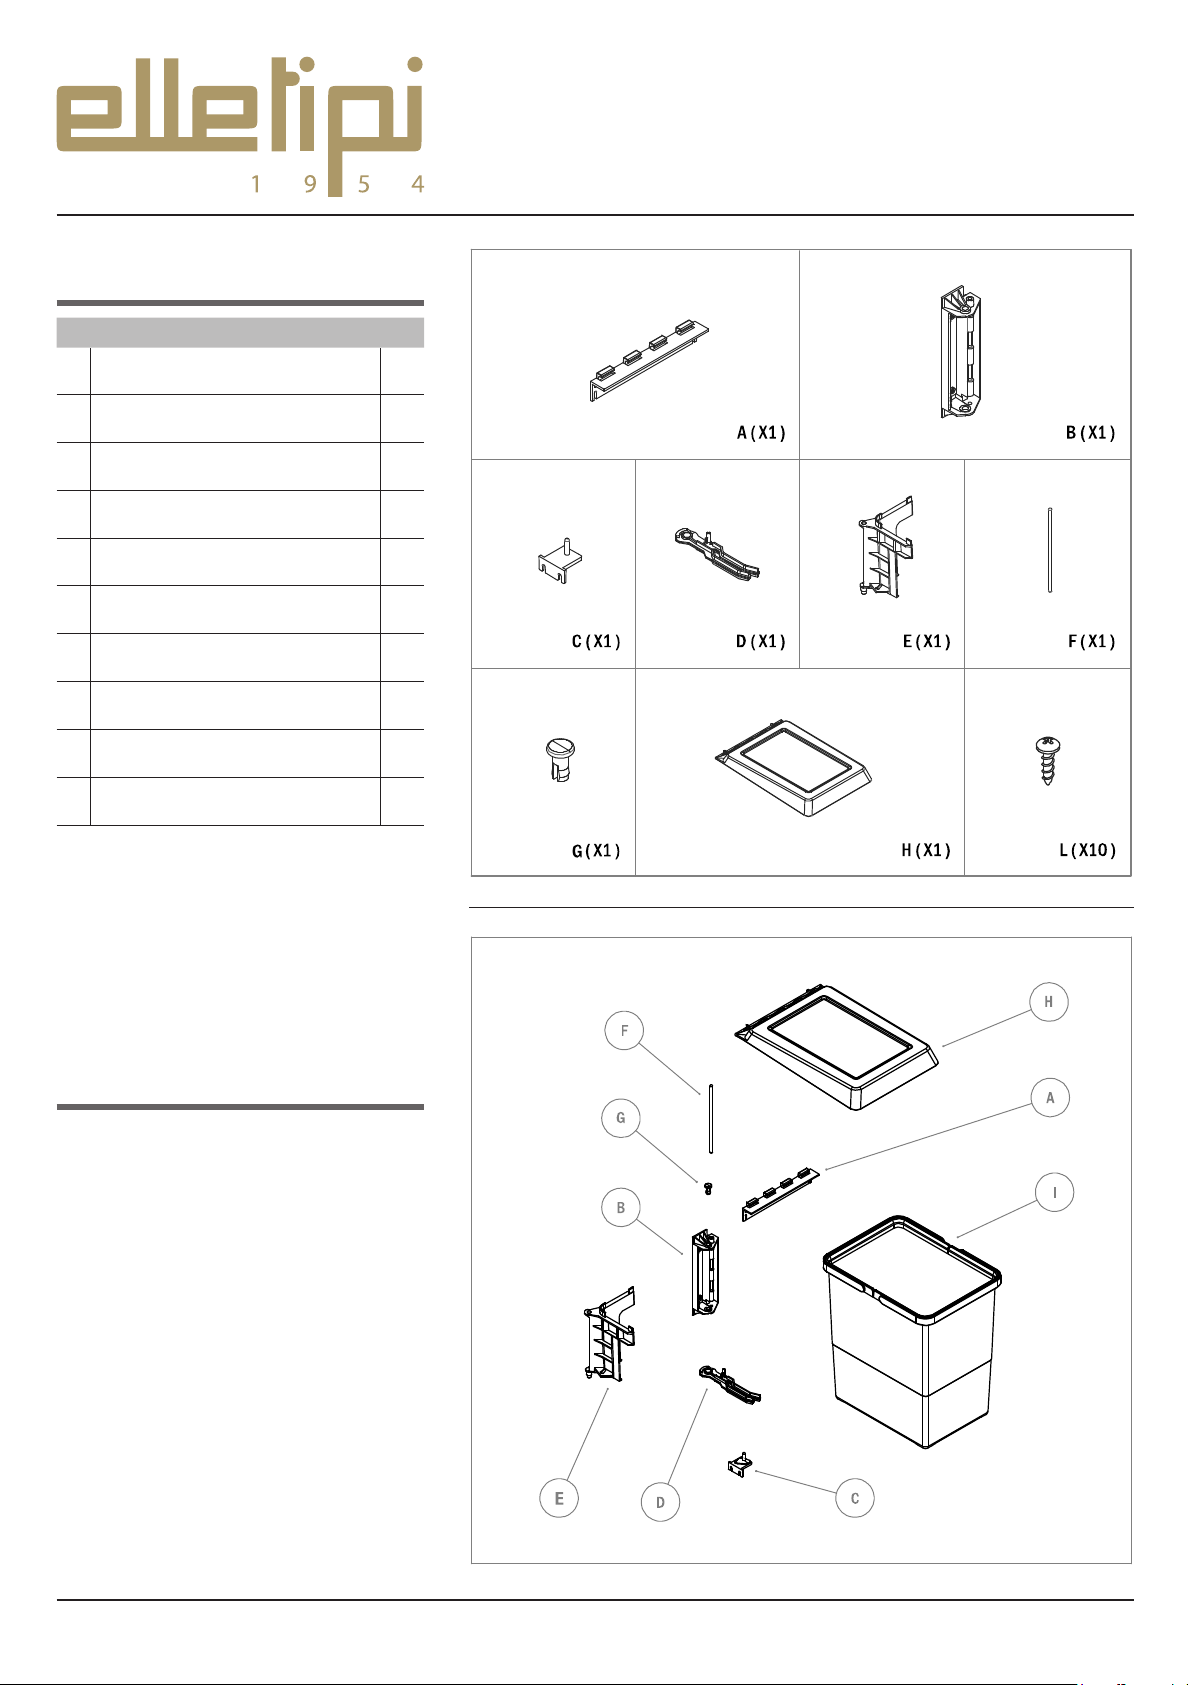
Description Qty.
PART LIST
LISTA DE PIEZAS / LISTE DES PIÈCES
SWING 2.0
PBN A
AUpper Support
Soporte superior / Support supérieur 1
BLateral Support
Soporte lateral / Support latéral 1
CDriver
Pin tirante / Tirant
1
DTie Rod
Tirante / Rotule de direction 1
EBin Support
Soporte del cubo / Support du seau 1
FRod
Varilla / Tige 1
GPin
Alfiler / Tourillon 1
HLid
Tapa / Couvercle 1
IBin
Cubo / Seau 1
L15/64” Screw
Tornillo de 15/64” / Vis 15/64” 10
BIN INFORMATION
INFORMACIÓN DEL CONTENEDORE
INFORMATIONS SUR LE BAC
The bin capacity is variable for each model
All the types of bins are shown on the final page
of these instructions.
La capacidad del cubo es variable para cada modelo.
Todos los tipos de cubos se muestran en la página final de
estas instrucciones.
La capacité du seau est variable pour chaque modèle
Tous les types de seaux sont indiqués sur la dernière page
de ces instructions.

Vers. 2021-01-SWING 2.0 | page 3 of 7
© ELLETIPI Inc. |www.elletipiusa.com |[email protected]
Sign 4 drilling points on the side of the cabinet following
the dimension indicated in the picture. Realize
Drill 4 preholes on the side of the cabinet to facilitate the
subsequent fixing of the screws.
Signar 4 puntos de perforación en el lateral del armario
siguiendo la dimensión indicada en la imagen.
Realice 4 orificios en el lateral del mueble para facilitar la
fijación posterior de los tornillos.
Marquez 4 points de perçage sur le côté du meuble
suivant la dimension indiquée sur la l'image.
Réaliser 4 pré-trous sur lle côté du meuble pour faciliter la
fixation suivante des vis.
Sign 2 drilling points on the door panel following the
dimensions as indicated in the picture.
Drill 2 preholes on the door panel of the cabinet
to facilitate the subsequent fixing of the screws.
Signar 2 puntos de perforación en el panel de la puerta
siguiendo la dimensión indicada en la imagen.
Realice 2 orificios en el panel de la puerta para facilitar la
fijación posterior de los tornillos.
Marquez 2 points de perçage sur le panneau de porte
suivant la dimension indiquée sur le l'image.
Réaliser 2 pré-trous sur le panneau de porte pour faciliter la
fixation suivante des vis.
CABINET DRILLING LAYOUT
DISEÑO DE PERFORACIÓN / SCHÉMA DE PERÇAGE
FRONT PANEL DRILLING LAYOUT
DISEÑO DE PERFORACIÓN / SCHÉMA DE PERÇAGE
SWING 2.0
PBN A
d2:
d3:
d4:
d5:
d6:
D:
L:
(118 mm)
(26 mm)
(20 mm)
(24 mm)
(178 mm)
(2 mm)
(5 mm)
4 21/32"
1 1/32"
25/32"
15/16"
7"
3/32"
5/32"
d7:
d8:
d9:
D:
L:
(175 mm)
(90 mm)
(24 mm)
(2 mm)
(5 mm)
6 7/8"
3 17/32"
15/16"
3/32"
5/32"
d1 is indicated on
page 7 of these
istructions.
d1 se indica en la
página 7 de estas
instrucciones.
d1 est indiqué à la
page 7 de ces
instructions.

Vers. 2021-01-SWING 2.0 | page 4 of 7
© ELLETIPI Inc. |www.elletipiusa.com |[email protected]
Fix the upper support (A) to the side of the cabinet using the
4 provided screws.
Fix the lateral support (B) to the side of the cabinet using 4
provided screws.
Fix the driver (C) to the side of the cabinet using the 2
provided screws.
Fije el soporte superior (A) al lateral del armario con los 4
tornillos suministrados.
Fije el suporte lateral (B) al lateral del armario con los 4
tornillos suministrados.
Fije el pin tirante (C) al lateral del armario con los 2 tornillos
suministrados.
Fixez le soutien supérieur (A) sur le côté de l'armoire avec les
4 vis fournies.
Fixez le support latéral (B) sur le côté de l'armoire avec les 4
vis fournies.
Fixez le tirant (C) sur le côté de l'armoire avec les 2 vis
fournies.
Place the tie rod (D) in correct position as indicated in the
picture.
Coloque la barra de dirección (D) en la posición correcta
como se indica en la imagen.
Placez le tirant (D) dans la bonne position comme indiqué
sur l'image.
STEP 1
PASO 1 / ÉTAPE 1
STEP 2
PASO 2 / ÉTAPE 2
SWING 2.0
PBN A
X10
A (X1) , B (X1) , C (X1) , H (X10)
D (X1)

Vers. 2021-01-SWING 2.0 | page 5 of 7
© ELLETIPI Inc. |www.elletipiusa.com |[email protected]
Place the bin support (E) in the correct position as indicated
in the figure, paying attention to the connection between
components (B) and (D).
Coloque el soporte de los cubo (E) en la posición correcta
como se indica en la figura, prestando atención al
acoplamiento con los componentes (B) y (D).
Placer le support du seau (E) à la position correcte comme
indiqué sur la figure, en faisant attention à l'accouplement
avec les composants (B) et (D).
Insert the rod (F) and the pin (G) into the respective holes as
indicated in the figure.
Inserte la varilla (F) y el alfier (G) en los orificios respectivos
como se indica en la imagen.
Insérez la tige (F) et le tourillon (G) dans leurs trous
respectifs comme indiqué sur la figure.
STEP 3
PASO 3 / ÉTAPE 3
STEP 4
PASO 4 / ÉTAPE 4
SWING 2.0
PBN A
E (X1)
F (X1) , G (X1)
This manual suits for next models
2
Table of contents
Popular Indoor Furnishing manuals by other brands

Regency
Regency LWMS3015 Assembly instructions

Furniture of America
Furniture of America CM7751C Assembly instructions

Safavieh Furniture
Safavieh Furniture Estella CNS5731 manual

PLACES OF STYLE
PLACES OF STYLE Ovalfuss Assembly instruction

Trasman
Trasman 1138 Bo1 Assembly manual

Costway
Costway JV10856 manual


