Elm Plus 30000-BTU 2022600010 Installation instructions

Elm Plus LLC
2704 Handley Ederville Rd Richland Hills, TX76118
www.elmplus.com
E-mail: [email protected]
US Toll Free: 888 - 357 - 7263
Read this manual before installing and operating this appliance.
Failure to follow these instructions may result in electric
shock, fire property, or personal injury. Do not store or use gasoline or other
flammable liquids in vicinity of this appliance.
32"D 30000-BTU Slates Top
Aluminum Propane Fire Pit with Cover
Product has been CSA tested and certified.
User Instruction
1
DANGER
FIRE OR EXPLOSION HAZARD
If you smeII gas:
• Shut off gas to the appliance.
• Extinguish any open flame.
• If odor continues, Ieave the area immediateIy.
• After Ieaving the area, caII your gas supplier or fire department.
FaiIure to foIIow these instructions couId resuIt in fire or
explosion, which couId cause property damage, personaI injury,
or death.
Do not store or use gasoline, or other flammable vapors and
liquids, in the vicinity of this or any other appliance.
An LP-cylinder not connected for use shall not be stored in the
vicinity of this or any other appliance.
lnstallation and service must be performed by a qualified installer,
service agency. or the gas supplier.
WARNING
WARNING For outdoor use only.
WARNING
INSTALLER: Leave this manual with the appliance.
CONSUMER: Retain this manual for future reference.
IMPORTANT SAFETY INFORMATION!
IMPORTANT, FAILURE TO CAREFULLY READ, UNDERSTAND AND FOLLOW EVERY PART OF
THIS DOCUMENT MAY RESULT IN PROPERTY DAMAGE, SERIOUS BODILY INJURY OR DEATH.
User Instruction 2
SAFETY INFORMATION
DANGER
EXPLOSION-FIRE HAZARD
Keep solid combustibles, such as building materials, paper of
cardboard, a safe distance away from the fire pit as recommended
by the instructions.
Provide adequate clearances around air openings into the
combustion chamber.
Never use the fire pit in spaces which do or may contain volatile or
airborne combustibles, or products such as gasoline, solvents,
paint thinner, dust particles or unknown chemicals.
During operation, this product can be a source of ignition. Keep fire
pit area clear and free from combustible materials, gasoline, paint
thinner, cleaning solvents and other flammable vapors and liquids.
Do not use fire pit in areas with high dust content.
CARBON MONOXIDE HAZARD
This appliance can produce carbon monoxide which has
no odor.
Using it in an enclosed space can kill you.
Never use this appliance in an enclosed space such as a
camper, tent, car or home.
If you are assembling this unit for someone else, give this Owner’s
Manual to them to read.
DANGER

User Instruction
3
DANGER
CARBON MONOXIDE HAZARD
This fire pit is a combustion appliance. All combustion appliances
produce carbon monoxide (CO) during the combustion process.
This product is designed to produce extremely minute,
non-hazardous amounts of CO if usedand maintained in
accordance with all warnings and instructions. DO not block air flow
into or out of the fire pit. Carbon monoxide (CO) poisoning
produces flu-like symptoms, watery eyes, headaches, dizziness,
fatigue and possibly death. You can't see it and you can't smell it.
It’s an invisible killer. If these symptoms are present during
operation of this product get fresh air immediately!
For outdoor use only.
Never use inside house, or other unventilated or enclosed areas.
This fire pit consumes air (oxygen). Do not use in unventilated or
enclosed areas to avoid endangering your life.
DANGER
EXPLOSION - FIRE HAZARD
Never store propane near high heat, open flames, pilot lights, direct
sunlight, other ignition sources or where temperatures exceed 120
degrees F (49°C). Propane vapors are heavier than air and can
accumulate in low places. If you smell gas, leave the area
immediately.
Never install or remove propane cylinder while fire pit is lighted,
near flame, pilot lights, other ignition sources or while fire pit is hot
to touch.
The fire pit is red hot during use and can ignite flammables too
close to the burner. Keep flammables at least 4 feet from sides & 4
feet from rear, 6 feet from ceiling. Keep gasoline and other
flammable liquids and vapors well away from fire pit.

User Instruction 4
Use factory approved replacement parts and accessories only. Use
of unapproved part or accessories can void the warranty on this
product and result in a hazardous condition. Please contact us for
information regarding replacement hoses, thermocouples,
electrodes, ignition modules, lava rocks, logs, fire ice, etc.
For use with 20lb (9kg) propane cylinder with type 1 connection or
for use with natural gas after conversion kit is installed (must be
professionally installed) also the LP regulator must be supplied by
the manufacturer.
WARNING
We cannot foresee every use which may be made of our fire pit.
Check with your local fire safety authority if you have questions
about fire pit use.
Other standards govern the use of fuel gases and heat producing
products for specific uses. Your local authorities can advise you
about these.
If no local codes exist, follow National Fuel Gas Code, ANSI Z223.
1. In Canada, installation must conform to local codes. If no local
codes exist, follow the current National standards of CANADA
CAN/CGA-B 149.2.
WARNING
Store the propane cylinder outdoors in a well- ventilated space out
of reach of children. Never store the propane cylinder in an
enclosed area (house, garage, etc.). If fire pit is to be stored
indoors, disconnect the propane cylinder for outdoor storage and
allow the fire pit to fully cool down prior to move indoors.
User Instruction
5
The installation must conform with local codes or, in the absence of all applicable local
codes, including, without limitation, with the National Fuel Gas Code, ANSI Z223.1/NFP A
54; International Fuel Gas Code; Natural Gas and Propane Installation Code, CSA
B149.1; or Propane Storage and Handling Code, B149.2, as applicable.
The appliance and its appliance main gas valve must be disconnected from the gas
supply piping system during any pressure testing of that system at test pressures in
excess of 1/2 psi (3.5kPa).
The appliance must be isolated from the gas supply piping system by closing its
equipment shutoff valve during any pressure testing of the gas supply system at test
pressure equal to or less than 1/2 psi (3.5kPa).
The appliance area must be kept clear and free from combustible materials, gasoline and
other flammable vapors and liquids.
Do not use this appliance if any part has been damaged or under water. Immediately call
a qualified service technician to inspect the appliance and to replace any part of the
control system and any gas control which has been damaged or under water.
IMPORTANT SAFETY INFORMATION
DANGER
Failure to comply with the precautions and instructions provided
with this fire pit can result in death, serious bodily injury and
property loss or damage from hazards of fire, explosion, burn,
asphyxiation, and/or carbon monoxide poisoning. Only persons
who can understand and follow the instructions should use or
service this fire pit.
WARNING
Do not sit or stand on appliance even when not in use and do not
touch appliance while in use or for at least 45 minutes after use as
the appliance is very hot during use and can cause serious burns.
WARNING
The appliance will remain hot for up to 45 minutes after use. Do not
touch or move appliance for at least 45 minutes after it has been
completely shut off.

User Instruction 6
WARNING
Children and adults should be alerted to the hazards of high
surface temperatures and kept at a safe distance to avoid burns or
clothing ignition.
WARNING
All children should be kept away from the appliance and should not
be allowed near the product unless carefully supervised by an
adult.
WARNING
Clothing, any other object or flammable material should not be
hung from the appliance, placed on, near or underneath the
appliance.
WARNING
Any screen or guard removed for servicing an appliance must be
replaced prior to operating the appliance.
WARNING
Keep children away from this appliance. This appliance contains
small parts that can be swallowed by children resulting in serious
bodily injury or death.
WARNING
Installation and repair should be done by a qualified service person.
The appliance should be inspected before use and at least annually
by a professional service person. More frequent cleaning may be
required as necessary. It is imperative that the control
compartments, burners and circulating air passageways of the
appliance be kept clean.

User Instruction
7
Do NOT burn solid fuels in this gas fireplace.
Do NOT ignite the burner before pouring all of the burner media
(lava rock or fire ice) into the burner pan. The media must be
evenly distributed over the burner.
If during initial firing of fire pit, please stay away from the fire pit for
20 minutes as fire media (lava rock or fire ice) may pop and hit
someone on the face or eyes.
Do NOT ignite or use the fire pit if the burner media (lava rock or
fire ice) are wet. Ensure the burner media are completely dry
before igniting as intense heat could cause the media to crack and
pop. Always place the cover on the appliance when not in use in
order to avoid water contacting the media.
It is UNSAFE to use this product for any purpose except as
described in this document including, without limitation, cooking.
CAUTION: The propane gas pressure regulator provided with this
appliance must be used. This regulator is set for an outlet pressure
of 11 inches water column.
This outdoor gas appliance is not intended to be installed in or on
recreational vehicles and/or boats.
Before each use of this gas appliance, open the LP (Liquid Pro-
pane) Tank Drawer and inspect the LP Hose. If there is evidence of
excessive abrasion or wear, or the hose is cut, it must be replaced
prior to the gas appliance being put into operation. Use only the
replacement hose assembly specified in this manual. Inspect the
burner before each use of the appliance. The burner must be
replaced prior to the appliance being put into operation if it is
evident that the burner is damaged. Use only the burner listed in
these instructions.
Keep the fuel supply hose away from any heated surfaces.
If you have any questions regarding the use of this unit, or find that
your fire pit unit needs service, please contact manufacturer.

User Instruction 8
Figure 1 SPECIFICATIONS
Sides:72 in. /
182.9 cm
Top:48in. /
121.9cm
30,000 Btu/hr
11 inches water
column
INPUT
Propane Regulator
Pressure
Clearances to
combustible
surfaces
A self-contained LP-gas cylinder for use with this appliance must have a capacity of 20
lbs. and must be equipped with a Type 1 connector and an OP D (overfill protection
device). See Figure 1.
The LP-gas supply cylinder to be used must be constructed and marked in accordance
with the specification for LP- gas cylinders of the U.S. Department of Transportation (DOT)
or the National Standard of Canada, CAN/CSA-B339, Cylinder, Sphere and Tubes for the
Transportation of Dangerous Goods.
●The cylinder supply system must be arranged for vapor withdrawal.
●The cylinder used must include a collar to protect the cylinder valve.
●This appliance shall be used only outdoors in a well-ventilated space and shall not be
used in a building, garage or any other enclosed space.
●When this appliance is not is use, the gas must be turned off at the supply cylinder.
●Storage of this appliance indoors is permissible only if the cylinder is disconnected and
removed from the appliance.
IMPORTANT SAFETY INFORMATION
WARNING
Cylinders must be stored outdoors in a well-ventilated area out of
the reach of children.
Disconnected cylinders must have threaded valve plugs tightly
installed and must not be stored in a building, garage or any other
enclosed areas.
Storing cylinders indoors or in poorly ventilated spaces outdoors
can result inserious bodily injury and/or death.
CSA (Canadian Standards Association) certified to ANSI
Z21.97•CSA 2.41- 2017 “ Outdoor Decorative Gas Appliances”.

User Instruction
9
EXPLOSIVE VIEW
A
B
C
D
E
F
G
H
I
J
K
L
M
N
P
Q
R
S
T
U
Burner Cover
Table Top
Back Post
Front Right Post
Front Left Post
Ignition Side
Side
Door
Cylinder Holder
Lava Rock
Adjustable Leveler
PVC Cover
Slate
Knob
Flat Washer
Spring Washer
1/4 in x 15 mm Bolt
1/4 in x 20 mm Bolt
#4 x 20 mm Screw
Allen Wrench
1
1
2
1
1
1
2
1
1
1 Box
4
1
9
1
24
24
8
16
1
1
Item Description Qty
User Instruction 10
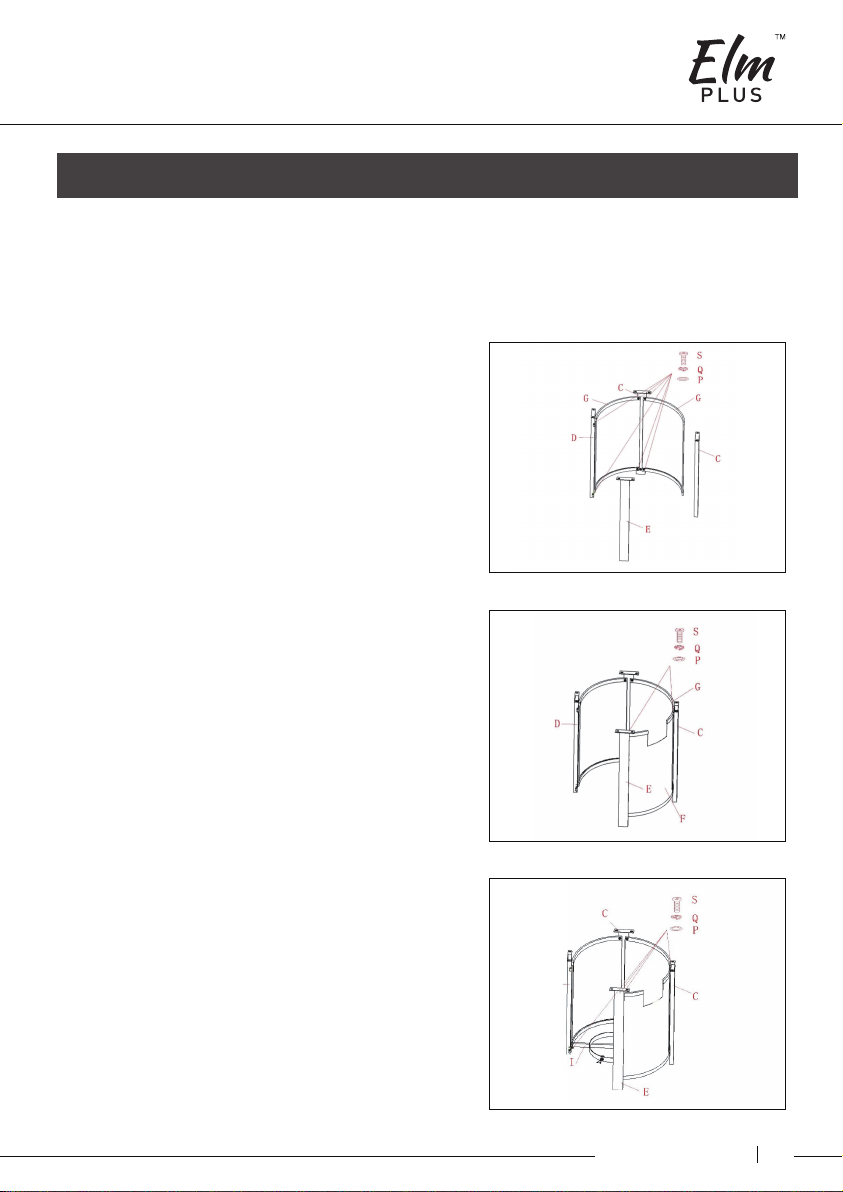
STEP 1
Connect the Front Right Post
(D), Side (G), Back Post (C),
Side (G) with 6 pieces ¼ in x
20mm Bolts (S), 6 Spring
Washers (Q) and 6 Flat Washers
(P) as shown on the right.
STEP 2
Secure the Side (G), Back Post
(C), Ignition Side (F), Front Left
Side (E) with 6 pieces ¼ in x
20mm Bolts (S), 6 Spring
Washers (Q) and 6 Flat Washers
(P).
STEP 3
Secure the Cylinder Holder (I)
and Front Left Post (E), Front
Right Post (D), Back Post (C)
with 4 pieces ¼ in x 20 mm
Bolts (S), 4 Spring Washers (Q)
and 4 Flat Washers (P) just as
right shown.
Secure the side (G), back post (C), ignion side (F), front leside (E) with 6 pieces
mm bolts (S),
6 spring washers (Q) and 6 flat wahsers (P).
ASSEMBLY INSTRUCTIONS
* Please keep this owner's manual for future reference.
* Please unpack and identify all parts using the parts list provided.
* Note: DO NOT tighten any bolts until all bolts have been started.

User Instruction
11
STEP 4
Place the Door (H) in the body,
and install the Knob (N) with #4
x 20mm Screw (T) attaching
from back of door.
STEP 5
Assemble the base frame to the top
with 8 pieces ¼ in x 15 mm Bolts (R),
8 Spring Washers (Q) and 8 Flat
Washers (P).
STEP 6
Use the Adjustable Leveler (K) to adjust
the level.
STEP 7
Put the 9 pieces inlay Slates (M) on the
Table Top (B).

User Instruction 12
STEP 8
Pour the box of Lava Rocks (J) into the
fire table body around Table Top (B).
Note: (A) Cover must be removed
when burner is in operation.
DANGER WARNING:
To ensure proper function, the
guard on this burner should be
free of lava rocks at all times.
STEP 9
Turn the cylinder valve on the tank
clockwise to close the propane tank.
Attach the preassembled regulator to the
cylinder valve by turning the regulator
coupling nut clockwise. Make sure it is
fastened securely and tighten
connections by hand only. Open the tank
valve. Apply a solution of soapy water to
the tank-regulator connection and to the
valve-hose connection to check for leaks.
If soap bubbles continue to form, the
connection has a leak. If a leak is found,
close the tank valve and tighten all
connections.
NEVER USE A FLAME TO CHECK FOR LEAKS AS DOING SO CAN CAUSE AN
EXPLOSION OR FIRE RESULTING IN PROPERTY DAMAGE, SERIOUS BODILY
INJURY OR DEATH.
STEP 10
Place the 20-pound cylinder into the
main body and tighten it as shown on the
right, so the gas cylinder cannot move
and fall down, close the door, cover the
fire pit with PVC Cover (L) when not in
use to protect it from the elements or
when fire pit is cool COMPLETELY after
the use.

User Instruction
13
BATTERIES
Make sure the control knob is in the “OFF” position.
Unscrew the push button cap on the ignition
module located on the control panel to access the
battery compartment. The ignition module requires
one AAA size battery. Battery is not included.
NATURAL GAS CONVERSION
WARNING
Prior to turning gas on and attempting to light the appliance,
make sure the appliance is outside, in a well ventilated area
and free of any debris and is not in contact with or near any
people, animals, materials or structures. Failure to adhere to
the above instruction may result in property damage, serious
bodily injury or death.
To Light
1. Read instructions before lighting.
2. Control knob must be in the “OFF” position.
3. Connect propane cylinder (See Manual), open cylinder valve.
4. Push and turn control knob counter clockwise to “LOW”.
5. Press the igniter button repeatedly to light burner.
6. Release control knob after 15 seconds for the first time using.
7. If ignition does not occur in 15 seconds, push and turn burner control knob to “OFF”,
wait 5 minutes, fan with newspaper or magazine, and repeat lighting procedure.
8. If igniter does not light burner, use a long match or long butane lighter.
9. After burner ignites, adjust flame to desired flame with the control knob.
To Extinguish
1. Turn and push the control knob clockwise to the OFF position.
2. Close cylinder valve, disconnect propane cylinder.
LIGHTING INSTRUCTIONS
User Instruction 14
• Before performing any maintenance always disconnect propane gas tank.
• Keep the heating item free and clear from combustible materials.
• Visually inspect burner for obstructions and keep tank enclosure free and clear from debris.
• Use a soft brush to get rid of the mild stains, loose dirt and soil after the burner is
completely cooled down. Wipe down with a soft cloth.
• Harsh weather conditions may cause stubborn stains, discoloration and possibly rust
pitting.
• Permanent damage may occur if powder or solvent comes in contact with painted or
plastic components on this heating unit.
• Keep the heating unit stored away from direct sunlight.
• If storing this unit inside, disconnect the propane gas tank from the gas valve.
• Not using manufacturer approved or supplied parts/accessories may result in a defective
condition and void the warranty of this heating unit.
• Carbon deposits may pose as a fire hazard; clean the reflector and inside of the glass tube
MAINTENANCE
It is recommended that you contact a qualified service technician if you believe the
appliance is not functioning properly.
TROUBLESHOOTING GUIDE
REMEDYPROBLEM CAUSE
Burner won’t light
Burner won’t stay lit
after lighting
Check that gas tank valve is open. Turn control
knob to “ON” and push control knob in. Make sure
tank has propane gas.
Check that AAA battery is installed with negative
(-) end first and has a charge. Check that the wire
is connected to the ignition module. Check that
the electrode is not cracked or broken.
No Propane Gas at Burner
No lava rocks on Burner Cover the burner with fire ices per the
instructions
No Spark at Electrode
Lack of oxygen
Thermocouple not in flame
Thermocouple connection at the main
control valve is loose
Remove excess lava rocks or fire ice from around
the ignition well.
Check that the tip of the thermocouple is even
with the top of the ignition well. Remove any lava
rock s from the ignition
Tighten the thermocouple nut at the back of the
valve.
Table of contents
Other Elm Plus Outdoor Fireplace manuals

Popular Outdoor Fireplace manuals by other brands

Classic Flame
Classic Flame FP35052-D915 manual

Firesense
Firesense 60532 Instructions for use, maintenance and assembly

HAMPTON BAY
HAMPTON BAY REDWOOD VALLEY FSS60428RST Use and care guide

BlueRhino
BlueRhino Home WAD516E owner's manual

Bionova
Bionova Round Burber L Installation and operation guide

Firesense
Firesense Bessemer Patio Fireplace Manua

Bluesky
Bluesky WBFP21RB owner's manual

OW Lee
OW Lee CASUAL FIRESIDE 5110-3050O owner's manual

RealFlame
RealFlame Farmhouse C1725LP owner's manual

HOMEDEPOT
HOMEDEPOT DS-21394 Use and care guide

OW Lee
OW Lee CASUAL FIRESIDE 51-38 Owner's Manual and Operating Instructions

BlueRhino
BlueRhino GAD1429SP owner's manual


