ProScan PDVD1034 User manual
2015.09.2
5
08:11:14
+08'00'
2015.0
9.25
08:28:5
3
+08'00'
CAUTION
RISK OF ELECTRIC SHOCK
DO NOT OPEN
CAUTION:
•THISDIGITALVIDEODISCPLAYEREMPLOYSA
LASERSYSTEM.
•TOENSUREPROPERUSEOFTHISPRODUCT,
PLEASEREADTHISOWNER`SMANUALCAREFULLY
ANDRETAINFORFUTUREREFERENCE.
•SHOULDTHEUNITREQUIREMAINTENANCE,
CONTACTANAUTHORIZEDSERVICEPROVIDER.
•MISUSEOFCONTROLS,ADJUSTMENTSTOTHE
UNITORTHEPERFORMANCEOFPROCEDURES
OTHERTHANTHOSESPECIFIEDHEREINMAY
RESULTINHAZARDOUSRADIATIONEXPOSURE.
•TOPREVENTDIRECTEXPOSURETOLASER
BEAM,DONOTTRYTOOPENTHEENCLOSURE.
VISIBLELASERRADIATIONMAYBEPRESENT
WHENTHEENCLOSUREISOPENED.
•DONOTSTAREINTOBEAM.
WARNING:
TOREDUCETHERISKOFFIREORELECTRICSHOCK,
DONOTEXPOSETHISPRODUCTTORAINOR
MOISTURE.
WARNING:
TOREDUCETHERISKOFFIREORELECTRIC
SHOCK,ANDANNOYINGINTERFERENCE,USETHE
RECOMMENDEDACCESSORIESONLY.
SURGE PROTECTORS:
It is recommended to use a surge protector for AC
connection.LightningandpowersurgesARENOT
covered under warranty for this product.
CAUTION:TOREDUCETHERISKOFELECTRICSHOCK,
DONOTREMOVECOVER(ORBACK).NOUSER-
SERVICEABLEPARTSINSIDE.REFERSERVICINGTO
QUALIFIEDSERVICEPERSONNEL.
The FCC WantsYou to Know
Thisequipmenthasbeentestedandfoundtocomplywiththe
limitsforaClassBdigitaldevice,pursuanttoPart15oftheFCC
Rules.Theselimitsaredesignedtoprovidereasonableprotection
against harmful interference in a residential installation.
Thisequipmentgenerates,usesandcanradiateradio
frequencyenergyand,ifnotinstalledandusedinaccordance
with the instructions,may cause harmful interference to
radiocommunications.However,thereisnoguaranteethat
interference will not occur in a particular installation.
Ifthisequipmentdoescauseharmfulinterferencetoradioor
television reception,which can be determined by turning the
equipmentoffandon,theuserisencouragedtotrytocorrect
the interference by one or more of the following measures:
•Reorientorrelocatethereceivingantenna.
•Increasetheseparationbetweentheequipmentand
receiver.
•Connecttheequipmentintoanoutletonacircuitdifferent
from that to which the receiver is connected.
•Consultthedealeroranexperiencedradio/TVtechnicianfor
additional suggestions.
Anychangesormodicationsnotexpresslyapprovedby
the party responsible for compliance could void the user’s
authoritytooperatetheequipment.Whereshieldedinterface
cables have been provided with the product or specified
additional components or accessories elsewhere defined to
be used with the installation of the product,they must be
used in order to ensure compliance with FCC regulation.
Thelightningashwitharrowheadsymbolwithinanequilateral
triangle is intended to alert the user to the presence of uninsulated
dangerous voltage within the product’s enclosure that may be of
sufficient magnitude to constitute a risk of electric shock to persons.
Theexclamationpointwithinanequilateraltriangleisintended
to alert the user to the presence of important operating and
maintenance(servicing)instructionsintheliteratureaccompanying
the appliance.
DANGER:Invisibleandhazardouslaserradiationwhenopenand
interlockfailedordefeated.Avoiddirectexposuretobeam.
Important Safety Instructions
WARNING:
USEUNDERSUPERVISIONOFANADULTDUETOLONGCORD
ThisunithasalongACcordorotherlongcordthatcaneasilybetrippedonorpulledon,causinginjury,
Please make sure it is arranged so it will not drape over a tabletop, etc.where it can be pulled on by
children or tripped over accidentally.
EXERCISE CAUTION AS UNIT HAS SHARP POINTS.
CAN ICES-3 (B)/NMB-3(B)
2
2015.0
9.25
08:29:0
1
+08'00'

Before using the unit,be sure to read all operating instructions carefully. Please note that these are general
precautionsandmaynotpertaintoyourunit.Forexample,thisunitmaynothavethecapabilitytobe
connected to an outdoor antenna.
1) Read these instructions.
All the safety and operating instructions should be read before the product is operated.
2) Keep these instructions.
Thesafetyandoperatinginstructionsshouldberetainedforfuturereference.
3) Heed all warnings.
All warnings on the product and in the operating instructions should be adhered to.
4) Follow all instructions.
All operating and use instructions should be followed.
5) Do not use this apparatus near water.
Donotusethisproductnearwaterandmoisture,forexample:nearabathtub,washbowl,kitchensinkor
laundry tub; in a wet basement; or near a swimming pool.
6) Clean only with dry cloth.
Unplugthisproductfromthewalloutletbeforecleaning.Donotuseliquidcleanersoraerosolcleaners.
Use a dry cloth for cleaning.
7) Do not block any ventilation openings.Install in accordance with the manufacturers instructions.
Slots and openings in the cabinet and in the back or bottom are provided for ventilation to ensure reliable
operationoftheproductandtoprotectitfromoverheating.Theseopeningsmustnotbeblockedor
covered.Theopeningsshouldneverbeblockedbyplacingtheproductonabed,sofa,rugorothersimilar
surface.Thisproductshouldneverbeplacednearoroveraradiatororheatsource.Thisproductshouldnot
beplacedinabuilt-ininstallationsuchasabookcaseorrackunlessproperventilationisprovidedorthe
manufacturer’s instructions have been adhered to.
8) Do not install near any heat sources such as radiators, heat registers,stoves,or other apparatus
(including amplifiers) that produce heat.
9) Do not defeat the safety purpose of the polarized or grounding-type plug. A polarized plug has two
blades with one wider than the other. A grounding type plug has two blades and a third grounding
prong. The wide blade or the third prong are provided for your safety. If the provided plug does not
fit into your outlet, consult an electrician for replacement of the obsolete outlet.
10) Protect the power cord from being walked on or pinched particularly at plugs,convenience
receptacles, and the point where they exit from the apparatus.
11) Only use attachments/accessories specified by the manufacturer.
12) Use only with the cart, stand,tripod,bracket,or table specified by the manufacturer,
or sold with the apparatus. When a cart is used,use caution when moving the cart/
apparatus combination to avoid injury from tip-over.
Anapplianceandcartcombinationshouldbemovedwithcare.Quickstop,excessiveforce
and uneven surfaces may cause the appliance and cart combination to overturn.
13) Unplug this apparatus during lightning storms or when unused for long periods of time.
Toprotectyourproductfromalightningstorm,orwhenitisleftunattendedandunusedforlongperiods
oftime,unplugitfromthewalloutletanddisconnecttheantennaorcablesystem.Thiswillprevent
damagetotheproductduetolightningandpower-linesurges.
14) Refer all servicing to qualified service personnel. Servicing is required when the apparatus has
been damaged in any way, such as power-supply cord or plug is damaged, liquid has been spilled or
objects have fallen into the apparatus,the apparatus has been exposed to rain or moisture or does
not operate normally, or has been dropped.
15) Power source
Thisproductshouldbeoperatedonlyfromthetypeofpowersourceindicatedonthemarkinglabel.
If you are not sure of the type of power supply to your home,consult your appliance dealer or local power
company.
Forproductsintendedtooperatefrombatterypower,orothersource,refertotheoperationinstructions.
16) Power lines
An outside antenna system should not be located in the vicinity of overhead power lines or other electric
light or power circuits, or where it can fall into such power lines or circuits. When installing an outside
antennasystem,extremecareshouldbetakentokeepfromtouchingsuchpowerlinesorcircuitsas
contact with them might be fatal.
Important Safety Instructions
3
2015.0
9.25
08:29:
08
+08'00'
17) Overloading
Donotoverloadwalloutletsandextensioncordsasthiscanresultinariskofreorelectricshock.
18) Object and liquid entry
Neverpushobjectsofanykindintotheproductthroughopeningsastheymaytouchdangerousvoltage
pointsorshortoutpartsthatcouldresultinreorelectricshock.Neverspillorsprayanytypeofliquidon
the product.
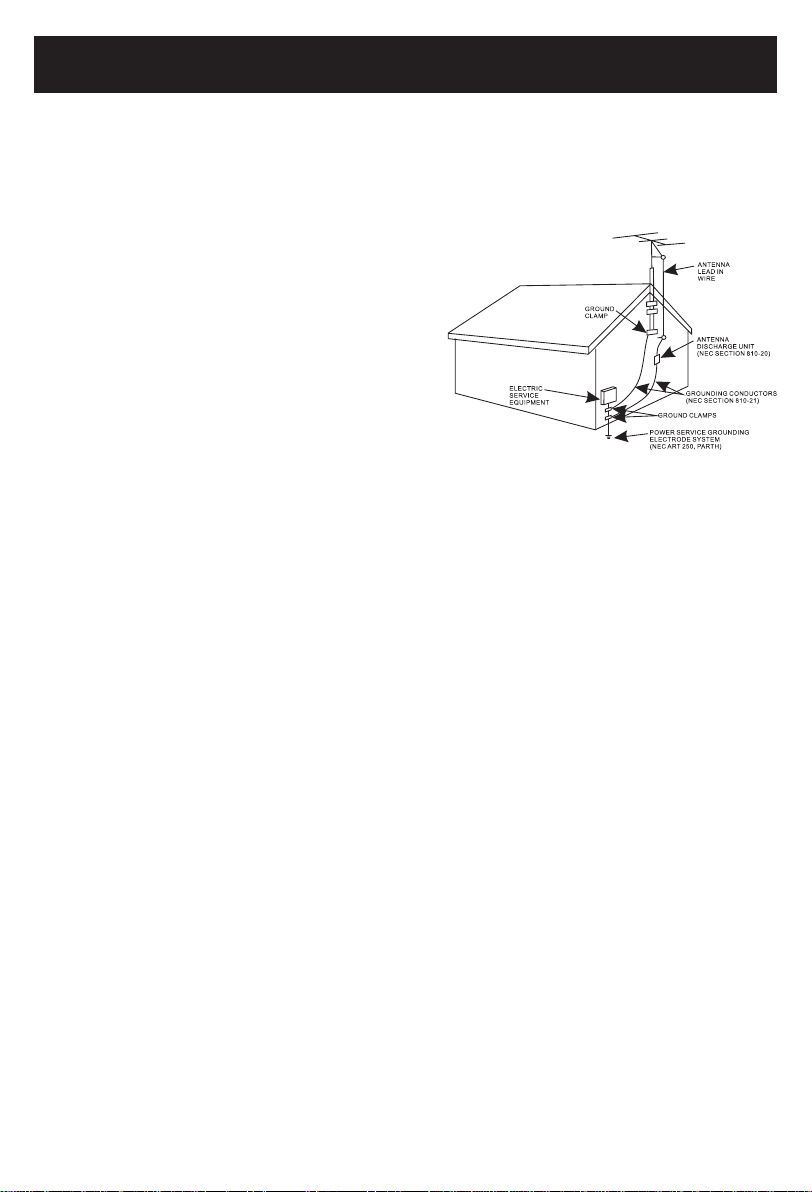
19) Outdoor antenna grounding
If an outside antenna is connected to the product, be
sure the antenna system is grounded so as to provide
some protection against voltage surges and built up
staticcharges.Section810oftheNationalElectricCode
ANSI/NFPA70providesinformationwithrespectto
proper grounding of the mast and supporting structure,
groundingofthelead-inwiretoanantennadischarge
product,sizeofgroundingconductors,locationof
antenna-dischargeproduct,connectiontogrounding
electrodesandrequirementsforthegrounding
electrodes.
20) Service
Donotattempttoservicethisproductyourselfasopeningorremovingcoversmayexposeyouto
dangerousvoltageorotherhazards.Referallservicingtoqualiedservicepersonnel.
21) Replacement parts
Whenreplacementpartsarerequired,besuretheservicetechnicianusesreplacementpartsspecied
bythemanufacturerorthosethathavethesamecharacteristicsastheoriginalparts.Unauthorized
substitutionsmayresultinreorelectricshockorotherhazards.
22) Safety check
Upon completion of any service or repairs to this product, ask the service technician to perform safety
checks to determine that the product is in proper operating condition.
23) Wall or ceiling mounting
Theproductshouldbemountedtoawallorceilingonlyasrecommendedbythemanufacturer.
24) Damage requiring service
Unplugthisproductfromthewalloutletandreferservicetoqualiedservicepersonnelunderthe
following conditions.
a) Whenthepower-supplycordorplugisdamaged.
b) Ifliquidhasbeenspilledorobjectshavefallenintotheproduct.
c) Iftheproducthasbeenexposedtorainorwater.
d) Iftheproductdoesnotoperatenormallybyfollowingtheoperatinginstructions.Adjustonlythose
controlsthatarecoveredbytheoperatinginstructions,asanadjustmentofothercontrolsmayresult
indamageandwillrequireextensiveworkbyaqualiedtechniciantorestoretheproducttoits
normal operation.
e) Iftheproducthasbeendroppedorthecabinethasbeendamaged.
f) Whentheproductexhibitsadistinctchangeinperformance-thisindicatesaneedforservice.
25) Note to CATV system installer
ThisreminderisprovidedtocalltheCATVsysteminstaller’sattentiontoArticle820-40oftheNECthat
provides guidelines for proper grounding and,in particular, specifies that the cable ground shall be
connected to the grounding system of the building, as close to the point of cable entry as practical.
NOTE:
Refer all servicing to qualified service personnel. Servicing is required when the unit has been damaged
in any way such as the following: the power-supply cord or plug has been damaged, liquid has been
spilled into unit,the unit has been exposed to rain or moisture,the unit has been dropped or the unit
does not operate normally.
Important Safety Instructions
4
2015.09.25
08:29:17
+08'00'

NOTES ON HANDLING:
• When shipping the DVD player, always use
the original shipping carton and packing
materials.Formaximumprotection,repack
the unit as it was originally packed at the
factory.
• Donotusevolatileliquids,suchasinsect
spray, near the DVD player. Do not leave
rubber or plastic products in contact with the
DVDplayerforalongtime.Theywillleave
marks on the finish.
• ThetopandrearpanelsoftheDVDplayer
may become warm after a long period of use.
Thisisnormalandnotamalfunction.
• When the DVD player is not in use, be sure to
remove the disc and turn off the power.
NOTES ON LOCATING THE DVD
PLAYER:
• When you place this DVD player near a
TV,radioorVCR,theplaybackpicture
may become poor and the sound may be
distorted.In this case,move the DVD player
awayfromtheTV,radioorVCR.
NOTES ON CLEANING:
Use a soft, dry cloth for cleaning
• Forstubborndirt,soakaclothinaweak
detergent solution,wring well and wipe.Use a
dry cloth to wipe it dry. Do not use any type
ofsolvent,suchasthinnerandbenzene,asthey
may damage the surface of the DVD player.
• Ifyouuseachemical-saturatedclothtoclean
the unit, follow that product’s instructions.
NOTES ON MOISTURE CONDENSATION:
Moisture condensation damages the DVD
player. Please read the following carefully.
• Moisturecondensationoccurs,forexample,when
you pour a cold drink into a glass on a warm day.
Drops of water form on the outside of the glass.
In the same way, moisture may condense on the
opticalpick-uplensinsidethisunit,oneofthe
most crucial internal parts of the DVD player.
Moisture condensation occurs during the
following cases:
• When you bring the DVD player directly from a cold
place to a warm place.
• When you use the DVD player in a room where you
justturnedontheheater,oraplacewherethecold
wind from the air conditioner directly hits the unit.
• ln summer, when you use the DVD player in a hot
andhumidplacejustafteryoumovedtheunitfrom
an air conditioned room.
• When you use the DVD player in a humid place.
Do not use the DVD player where moisture
condensation may occur.
• lf you use the DVD player in such a situation, it may
damage discs and internal parts. Remove the disc,
connect the power cord of the DVD player to the
walloutlet,turnontheDVDplayerandleaveitON
for two or three hours. After two or three hours, the
DVD player will have warmed up and evaporated
anymoisture.KeeptheDVDplayerconnectedto
the wall outlet and moisture condensation will
seldom occur.
Important Safety Instructions
Warning:
Cleaningandadjustmentoflensesand/orothercomponentsofplaybackmechanismshouldbe
performedbyaqualiedservicetechnician.
5
2015.09.25
08:29:24
+08'00'

PLAYABLE DISCS:
ThefollowingdiscscanbeplayedbackonthisDVDplayer:
DISC TYPES:
DVD
Data on most DVDs is divided into sections called titles and
then into subsections called chapters,each of which is given
a title or chapter number. Some features of this DVD player
will not operate with some DVD discs as they are preset. If
a function you selected does not run as desired, refer to the
manual accompanying the DVD disc.
CompatiblewithDVD/DVD±R/DVD±RW/KodakPictureJPEG/MP4
AUDIO CD:
Data on an audio CD is divided into sections called tracks,
each of which is given a track number.
CompatiblewithCD/CD-R/CDRW/MP3
IMPORTANT:
It is important that you read the manual that accompanies the DVD disc, as there are features that
areontheDVDplayerthatcannotbeusedwithcertainDVDs.Therearealsoextrafeaturesonthe
DVDdiscthataredifferentforeachDVDdisc,sotheyarenotexplainedinthisowner’smanual.
This player conforms to the NTSC and PAL color systems.However, if you are in the USA,
Canada or Mexico, leave this setting on NTSC.If incorrectly set to PAL, theTV picture may roll
vertically. In this case, set the TV system to NTSC as specified.
Notes on Copyright:
It is forbidden by law to copy, broadcast, show, broadcast on cable, play in public and rent
copyrighted material without permission.DVD video discs are copy protected, and any recordings
madefromthesediscswillbedistorted.Thisproductincorporatescopyrightprotectiontechnology
that is protected by method claims of certain U.S. Patents and other intellectual property rights
owned by Macrovision Corporation, and is intended for home and other limited viewing uses only,
unlessotherwiseauthorizedbyMacrovisionCorporation.Reverseengineeringordisassemblyis
prohibited.
Region management information:
ThisDVDPlayerisdesignedandmanufacturedtorespondtotheRegionManagementInformation
that is recorded on a DVD disc.If the Region number described on the DVD disc does not
correspondtotheRegionnumberofthisDVDplayer,thisDVDplayercannotplaythatdisc.Youmay
not be able to play back some DVD video discs on this player if they were purchased from outside
yourgeographicareaormadeforbusinesspurposes.Whenyoutrytoplaybackanunauthorized
disc,WrongRegionappearsontheTVscreen.
About Discs
THEREGIONNUMBERFORTHISDVDPLAYERIS:
See the following page for information regarding region numbers. 1
6
2015.09.25
08:29:30
+08'00'

Product Overview
1. PLAY/PAUSE ( ): Press to switch between play and pause.
2. STOP ( ):Press to stop playback.
3. OPEN:
4. VOL-: Press to decrease the volume level.
5. VOL+: Press to increase the volume level.
6. Charge Indicator: Red indicator will turn on when the unit is charging, and turn off when the
unit is fully charged.
7. Remote Control Sensor
8.
Power Indicator: Greenindicatorwillturnonwhentheunitispoweredon,andturnoffifthe
unit is powered off.
9. DISPLAY ON/OFF:PresstoturnthedisplayONorOFF.
10. MUTE:PresstoturnthesoundOFF.Pressagaintoresume.
11. DISPLAY SETUP: Press to enter the display setup menu.
12. VOL-: Press to decrease the volume level.
13. VOL+: Press to increase the volume level.
14.
Power Indicator: IndicateswhenthesecondaryunitisON/OFF.
MAIN UNIT:
SECONDARY UNIT:
OP EN
Press to open the CD door.
DI SPL AY SE TUPMU TEDI SPL AY ON /OF F
7
2015.09.25
08:29:36
+08'00'
Product Overview
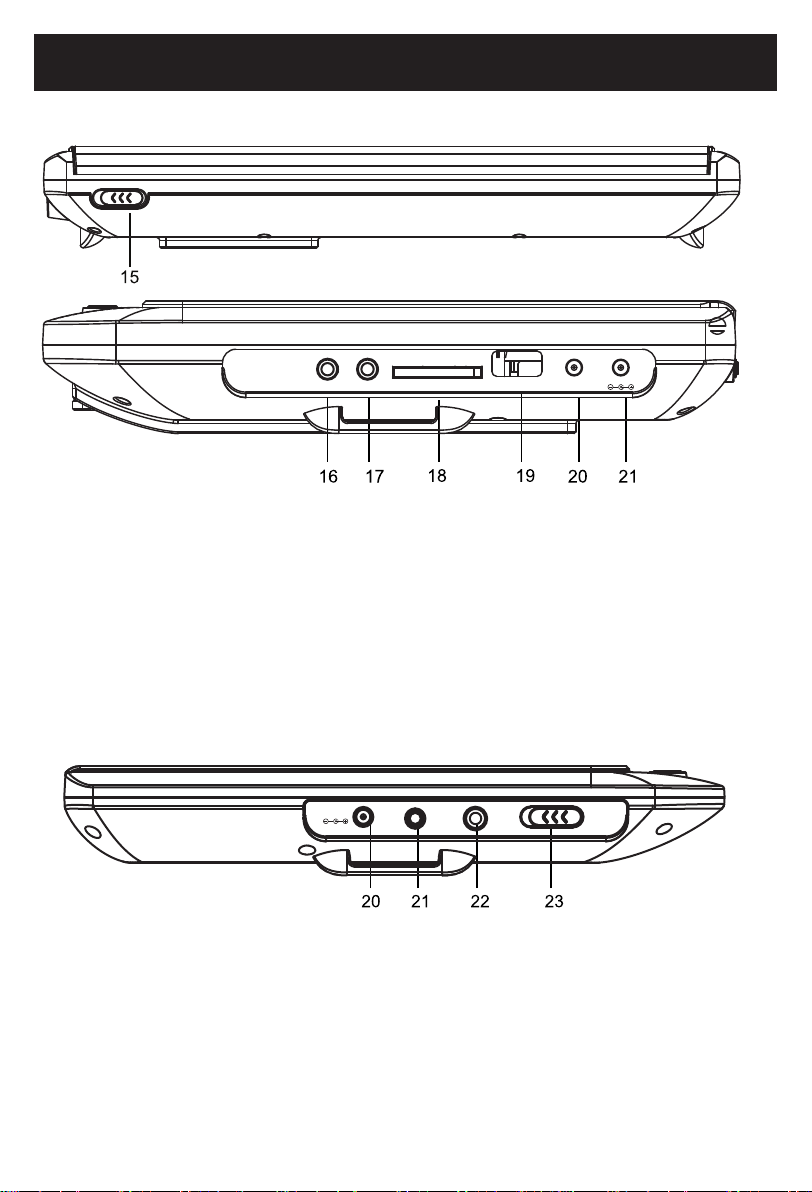
15. ON/OFF: PowerON/OFFswitch.SlidetoONpositiontopoweron,slidetoOFFpositionto
shut off.
16. PHONE:Headphonejack.
17. AV OUT:Audio/Videooutputjack.
18. Card slot.
19. USB: USB port.
20. DC OUT:Toconnecttothesecondaryunit.
21. DC IN:DCinjack
20. DC IN: DCinjack,connecttotheDCoutjackonmainunitbythesuppliedDCconnection
cable.
21. AV IN:Audio/videoinjack,connecttotheAVOUTJackonthemainunitbythesuppliedAV
connection cable.
22. PHONE:Headphonejack.
23. ON/OFF:PowerON/OFFswitch.SlidetoONpositiontopoweron,slidetoOFFpositionto
shut off.
SECONDARY UNIT:
MAIN UNIT:
SD/MMC:
OFF ONPOWER
PHONE AV OUT USBSD/MMC CARD DC OUT DC IN
8
DC IN AV IN PHONE POWER
OFF ON
2015.09.25
08:29:41
+08'00'

Remote Control
1. DISPLAY ON/OFF: ToturnONorOFFthe
screen.
2. TITLE:Todisplaythetitlemenuof
current disc.Use the Direction and
ENTERbuttonstoselectandplaythe
desired title.
3. DISC MENU:Todisplaythemenuof
current disc.Using the Direction and
ENTERbuttonstoselectandplaythe
desired chapter or track.
4. Previous: Press repeatedly to skip
backward.
5. Next: Press repeatedly to skip
forward.
6. Stop : Press to stop.
7. Direction buttons: Press to highlight
the options within the setting menu.
8. SETUP: Presstoenterorexitsetupmenu.
9. Numberic buttons: Press numeric
buttons to enter numbers.
10. PROG (Program) button: Press to
display program setting menu. Use
theNumeric/DirectionandENTER
buttons to set the program as on screen
instructions.
11. ZOOM:Pressrepeatedlytozoomin/out
the picture.
12. DVD/USB/CARD: When USB device and/
or SD Card was inserted,press repeatedly to select the playback source as desired.
13. GOTO: PresstoenterGOTOmenu.UsetheNumeric/DirectionandENTERbuttonstoselectthe
desired track to play.
14. SUBTITLE: Press repeatedly to select the subtitle languages available in the disc.
15. (Fast Forward): Press repeatedly to search for the desired section. Press button to
resume normal playback.
16. (Reverse): Press repeatedly to search for the desired section. Press button to resume
normal playback.
17. VOL+ (Volume): Press to increase the volume level.
18. ENTER: Presstoconrmtheselection(settings).
19. VOL- (Volume): Press to decrease the volume level.
20. (Play/Pause): Press to play or pause playback.
21. AUDIO: Press repeatedly to select the audio channels.
22. MUTE: Press to turn off the sound.Press again to resume the sound.
9
2015.0
9.25
08:29:
47
+08'00'

Battery Installation:
1. Press the tabs on the battery door and lift it off.
2. Inserttwo(2)AAAsizebatteries(Werecommend
InniCellbatteriesformaximumperformance)into
the battery compartment. Make sure to match the
(+)and(–)endsofthebatterycompartment.
3. Replace the battery compartment door.
BATTERY PRECAUTIONS:
Followtheseprecautionswhenusingabatteryinthis
device:
• Onlyusethesizeandtypeofbatteryspecied.
• Besuretofollowthecorrectpolaritywheninstalling
the battery as indicated in the battery compartment.
A reversed battery may cause damage to the device.
• Donotmixdifferenttypesofbatteriestogether(e.g.AlkalineandCarbon-zinc)orold
batteries with fresh ones.
• Ifthebatteriesinthedeviceareconsumedorthedeviceisnotusedforalongperiod
oftime,removethebatteriestopreventdamageorinjuryfrompossiblebattery
leakage.
• Donottrytorechargenon-rechargeablebatteries;theymayoverheatandrupture
(Followbatterymanufacturer’sdirections).
• Donotdisposeofbatteryinre.Batterymayexplodeorleak.
• Cleanthebatterycontactsandalsothoseofthedevicepriortobatteryinstallation.
Remote Control
23. REPEAT: Press repeatedly to set repeat mode.
24. A-B: Duringplayback,presstosetthebeginningpointofA-Brepeat.Pressagaintosetthe
endpointofA-Brepeat.Theunitwillstartplaybackattheselectedsection.Toresumenormal
playback,presstheA-Bbuttonagain.
25. ANGLE: Press repeatedly to select the available viewing angle.
26. OSD (On Screen Display): Press repeatedly to display the playback information.
10
2015.09.25
08:29:53
+08'00'

Charging by supplied AC/DC adapter:
1. ConnecttheplugfromthesuppliedAC/DCadaptertotheDCINJackonthemain
unit.
2. ConnecttheAC/DCadaptertothewalloutlethavingAC100-240V~;50/60Hz.
Notes:
• TheAC/DCadapterisintendedtobecorrectlyorientedinaverticaloroormount
position.
• Yourbatterywilllastlongerifyoufollowthesesimpleguidelinesforcaringforand
storing it.
• Forrsttimecharge,chargeitapproximately12hours.Fornormalcharge,itneeds
approximately6hours.
• Rechargeandstorethedevicewithinthetemperaturerangeof5°C~35°C(40°F~95°F).
• Donotovercharge(longerthan24hours).Excessivechargingordischargingmay
shorten the battery’s life.
• Batterylifenaturallyshortensslowlyovertime.
Charging by the supplied Car Adapter:
1. Connect to the cigarette lighter socket of a vehicle that has a 12V battery as the figure
below.ItisNOTcompatiblewithavehiclethathasa24Vbattery.
2. Thisisaspecialnegativegroundedcaradapter.Usingthiscaradapterwithapositive
grounded car can cause a malfunction.
3. DoNOTpluginthecaradapteruntilthecarignitionisturnedon.
4. Disconnect the car adapter from the cigarette lighter and the unit after use.
Power Source
Tothecigarette
lighter socket
ToDCINJackonthemainunit
11
Theunithasabuilt-inDC 7.4V1900mAhLithium-ionrechargeablebattery.Rechargeit
as follows:
2015.0
9.25
08:29:5
9
+08'00'

1. ConnectingthemainunittoaTVwithA/Vconnectioncable.
ConnectedtotheTV
Audio/Video Cable included
Videoinputjack(Yellow)
Audioleftchannelinputjack(White)
Audiorightchannelinputjack(Red)
Making Connections
PHONE AV OUT USBSD/MMC CARD DC OUT DC IN
12
2015.0
9.25
08:30:
07
+08'00'

Making Connections
2. Connecting the main unit to the secondary unit.
DCtoDCcable
(included)
3.5mm audio/video cable
(included)
Note:Thesecondaryunitmustbe
connected to the main unit,it can
not be operated independantly.
SECONDARY UNIT:MAIN UNIT:
PHONE AV OUT USBSD/MMC CARD DC OUT DC IN
13
DC IN AV IN PHONE POWER
OFF ON
2015.09.25
08:30:12
+08'00'

1. Recharge or connect the unit to AC/DC Adaptor/ Car Adaptor as previous procedure.
3. Insert the disc to the center spindle with label side face up and close the lid.
4. Power on the unit by sliding the POWER ON/OFFswitchontherearofunittotheON
position.Thegreenindicatorwillturnonandtheunitwillstartplaybackautomatically.
5. Forprivatelistening,insertheadphonesintothephonejack.Theexternalspeakerswill
disconnect automatically.
6. Tosavebatterypowerwhilelisteningtomusic,presstheDISPLAY ON/OFF
turnOFF.PressagaintoturnitbackON.
7. Topoweroff,slidethePOWER ON/OFFswitchtotheOFFposition.
SECONDARY UNIT:
1. Connect the secondary unit to the main unit by the supplied DC and AV connection
cables as previous procedures.
2. Slide the POWER ON/OFFswitchontherightsideofunittotheONpositiontopower
on the secondary unit.
4. Forprivatelistening,inserttheheadphonesintothephonejack.Thespeakerswill
disconnect automatically.
5. Tosavebatterypowerwhilelisteningtomusic,presstheDISPLAY ON/OFF button to
turnOFF.PressagaintoturnitbackON.
6. Topoweroff,slidethePOWER ON/OFFswitchtoOFFposition.
Operation
3. Press the DISPLAY SETUP
VOL +/-
MUTE
and press
button to set.
button to enter the display setting menu.
Press the
or
DISPLAY ON/OFF
to move up and down,
MAIN UNIT:
Press the DISPLAY SETUP button to
confirm.
2. Press the OPEN button on main unit to open the CD door.
button on
remote control to
14
2015.09.25
08:30:19
+08'00'

Operation
(CD/DVD)PROGRAM:
1. During CD or DVD playback, press the PROG(Program)button.TheProgrammenu
appears.
2. Use the numericbuttonstoselectandsetthedesiredTT(Title),CH(Chapters),tracks
you want of the CD or DVD.
3. Use the directionbuttonstomovetothenextinput.Repeatstep2until
programming is completed. Note: Press togotonextpageforprogramming
track 11 to 20.
4. Highlightthe“PLAY”icon,presstheENTER button to start the program play.
5. Press the STOP button twice to stop the program playback and clear the program
memory.
DVD CD
15
2015.09.25
08:30:25
+08'00'
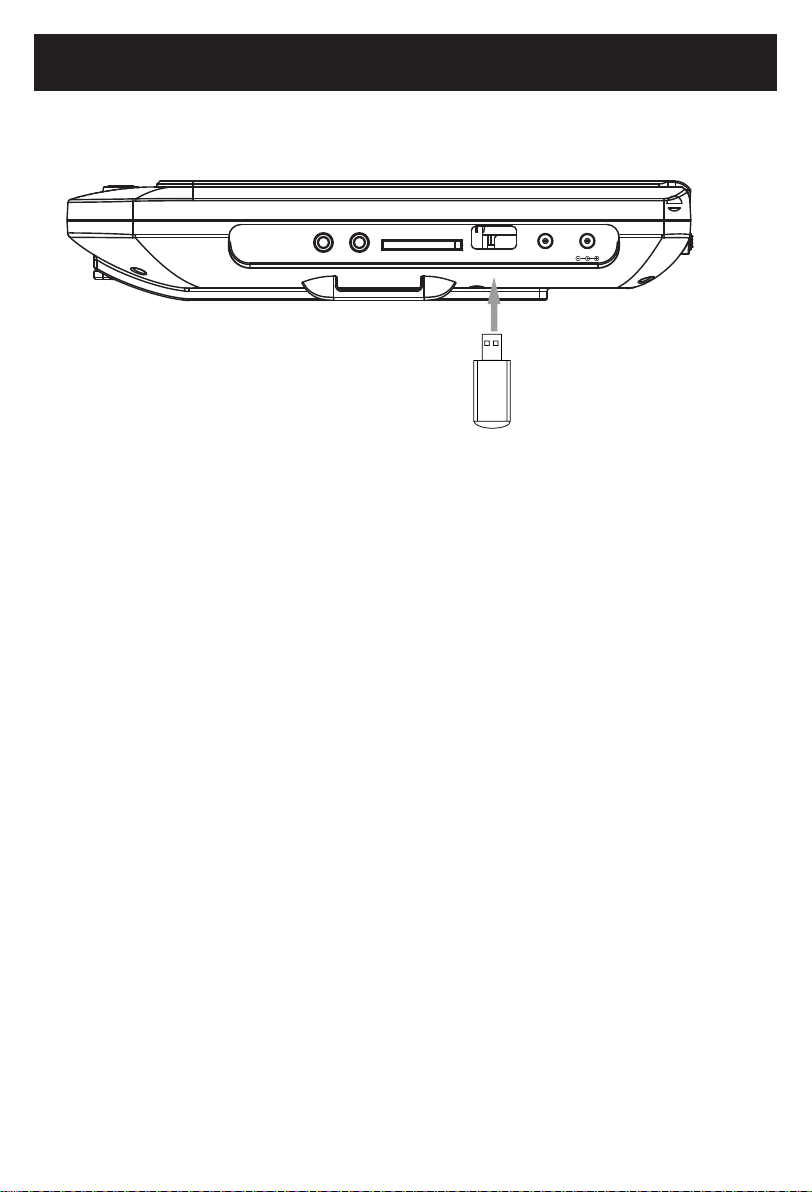
Note:Theunitsupportsthefollowingleformats:
• MP3;WMA(Musicle)
• JPEG(Pictures)
• MPEG2;AVI;VOB(Videolesupto640x480pixels)
Make sure correct files were saved in the USB device or memory cards.
2. PowerONtheunit,andwaituntil“Nodisc”appearsonthescreenorthediscstarts
to play. Press DVD/USB/CARD button to select the desired playback source.Wait
until the folder/file list appears on the screen.Use the direction buttons to select the
desired file,then press the ENTER button to start playback.
USB device
(notincluded)
USB or SD/MMC Card Playback
1. Insert the USB Device or SD/MMC memory card into the USB port/card slot as
shown on the figure below.
PHONE AV OUT USBSD/MMC CARD DC OUT DC IN
16
2015.09.25
08:30:31
+08'00'
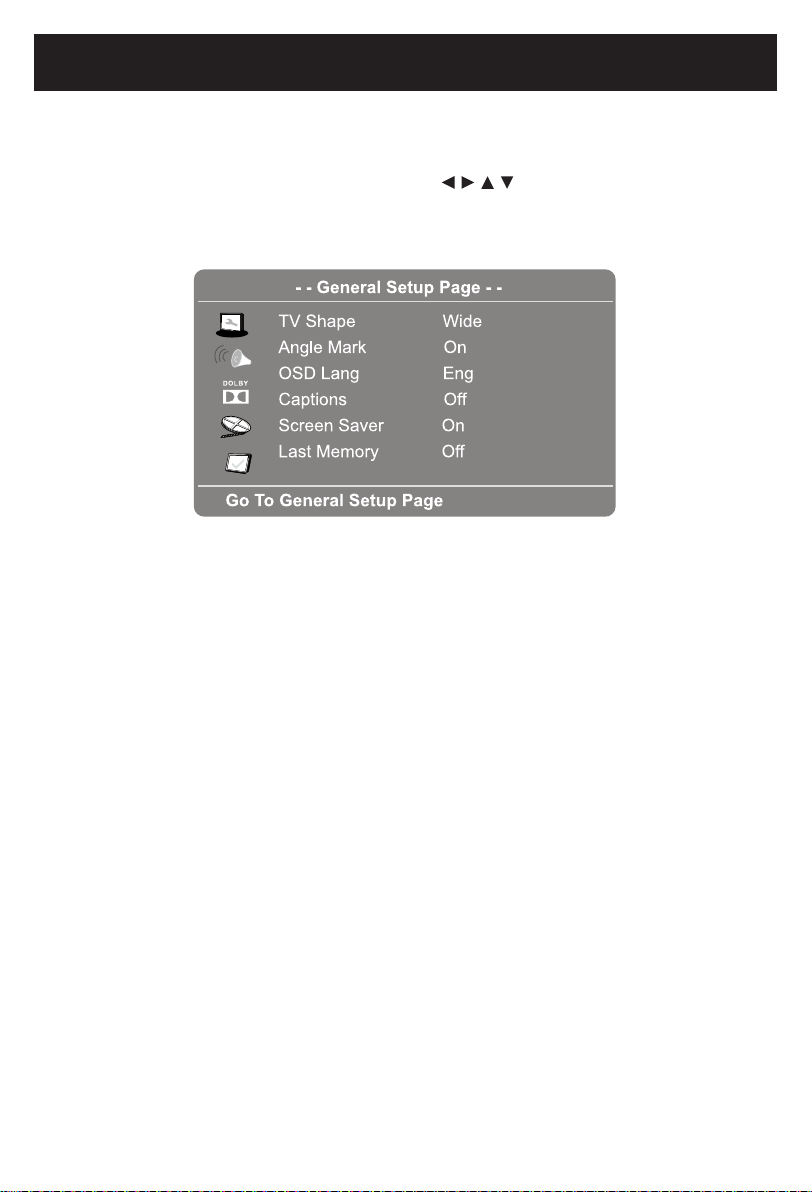
Setting Menu
Setting Menus:
In fully stop mode,press the SETUP button on the remote control, the setting menu will
appear on the screen as below. Use the Direction , , , , Numeric and ENTER buttons
to select and highlight the function you need to set or reset. Press the
or confirm the selection. After setting,press the SETUP
exit.
IN GENERAL SETUP PAGE:
1. IftheTVshapeisselected,usetheDirection and
matchtheconnectedTV.
2. If Angle Mark is selected, use the Direction and
to On, when multi-anglesareavailableintheplayingDVD,themulti-anglelogo
will
appear on the screen.
3. IfOSDLang(OnScreenDisplayLanguage)isselected,usetheDirection and
buttons to set the OSD language as desired.
4. If Captions is selected,use the Direction and buttons to set it On or Off.
IfsettoOn,whenmulti-languageareavailableinplayingdisc,thecaptionswill
appear on screen.
5. If Screen Saver is selected, use the Direction and
approximatelyveminutes.
6. IfLastMemoryisselected,usetheDirection and
time.
ENTER button to
enter button to save the settings
and
ENTER buttons to set the aspect
ratio to
ENTER buttons to set it On or Off.
If set
ENTER
ENTER
ENTER buttons to set it On or Off.
If set to On, the screen saver will come on when the unit stops or the image is paused
for ENTER buttons to set it On or Off.
If set to On, the unit will start playback from the position where the disc was stopped
last
17
2015.0
9.25
08:30:
36
+08'00'

Setting Menu
IN SPEAKER SETUP PAGE:
If Speaker Setup is selected, press the button,thesub-settingmenuwillappear.
1. IfDownmixisselected,usethe Direction and buttonssetittoLt/Rt;Stereo.
• IfsettoLt/Rt,therearleftorrearrightchannelswillplayonbothLeftandRight
Speakers.
• IfsettoStereo,therearleftchannelwillplayonleftspeaker;therearrightchannelwill
play on right speaker.
IN DOLBY DIGITAL SETUP PAGE:
1. If Dual Mono is selected, use the Direction and button to set it to Stereo,
L-Mono
(Play Left channel on all speakers), R-Mono (Play Right channel
on
all
speakers) or Mix- Mono (Mixed Right and Leftchannelthenplaysonallspeakers)
asdesired.(Functionsdependontherecordingofthedisc).
2. If Dynamic is selected, use the Direction and
desired or turn it off.
ENTER
ENTER
ENTER
ENTER button to set the dynamic level
as
18
2015.09.25
08:30:41
+08'00'

Setting Menu
IN VIDEO SETUP PAGE:
1. If“Picture”isselected,usetheDirection and buttonstosetthepanelquality
(Sharpness;Brightness;Contrast;HueorSaturation)asdesired.
Sharpness:Toadjustthesharpnessofvideooutput
Brightness:Toadjustthevideobrightnesslevelonascaleof-20to+20.
Contrast:Toadjustthevideocontrastlevelonascaleof–16to+16.
Hue:Toadjustthecolorhuelevelonascaleof–9to+9.
Saturation:Toadjustthecolorsaturationlevelonascaleof-9to+9
2. IfPictureQualityisselected,usetheDirection and buttons to set the Sharpness,
Brightness,Contrast,Gamma,HueorSaturationofthevideoinputsignalasdesired.
Sharpness: Toadjustthesharpnessofvideooutput
Brightness: Toadjustthevideobrightnesslevelonascaleof-20to+20.
Contrast: Toadjustthevideocontrastlevelonascaleof–16to+16.
Gamma: Toadjustthevideodisplaygammalevel(High,Medium,LoworNone)
Hue: Toadjustthecolorhuelevelonascaleof–9to+9.
Saturation: Toadjustthecolorsaturationlevelonascaleof-9to+9
ENTER
ENTER
19
2015.09.25
08:30:46
+08'00'

Setting Menu
IN PREFERENCE SETUP PAGE:
1. IfTVTypeisselected,usetheDirection and buttonstosettoPAL,AUTO
orNTSC.
(NOTE: TheTVsysteminUSA,CanadaandMexicoisNTSC.)
2. If Audio, Subtitle or Disc Menu is selected, use the Direction and buttons to the
priorityoftheavailablelanguage.(Functiondepend the recording of DVD).
3. If Parental is selected,use the Direction and buttons to set the rating level as
follows:
• Pressthe button to enter, the rating level list will appear.
• Pressthe or button to select the desired level.
• Pressthe button to enter, password enter window will pop up.
• Enterthe digitpassword(defaultpasswordis136900 )bypressingtheNumeric
buttons.
• Pressthe buttontosavethesettingsandexit.
RATE LEVELS:
1(KidSaf):Safeforkids
2(G):Allages
3(Pg):Parentalguidance
4(Pg13):Parentalguidancelessthan13yearsold
5(Pgr):Under17yearsold,parentalguidancesuggested
6(R):Under17yearsold,parentalguidancestrongly
7(Nc17):17yearsoldandolder
8(Adult):Adultsonly
TV NTSC
ENTER
ENTER
ENTER
ENTER
ENTER
six
20
2015.09.25
08:30:51
+08'00'
Table of contents
Other ProScan DVD Player manuals

ProScan
ProScan PDVD1057 User manual

ProScan
ProScan PDVD9806 User manual

ProScan
ProScan PDVD1053D User manual

ProScan
ProScan PDVD1096-PL User manual

ProScan
ProScan PDVD6655-PL User manual

ProScan
ProScan PDVD6670 User manual

ProScan
ProScan PS8600P User manual

ProScan
ProScan PDVD1053D User manual

ProScan
ProScan PDVD6655-B User manual

ProScan
ProScan PDVD1030 User manual


