elvita CTM7840V User manual

User manual
Washing machine
CTM7840V

Thank you
for your trust and the purchase of our product. This user manual is supplied to help you
use this product. The instructions should allow you to learn about your new product as
quickly as possible.
Make sure you have received an undamaged product. If you do find transport damage,
please contact the seller from which you purchased the product, or the regional
warehouse from which it was supplied.
Language: en-GB, Publication date: 2021-03-09
This document and its content, including written material and images, are the property of Elon Group AB. You may not
copy, reproduce, modify, republish or distribute this document or any of its content without express written permission
from Elon Group AB. © 2020, Elon Group AB. All rights reserved.

Warranty 3
© 2020, Elon Group AB. All rights reserved.
Warranty
Consumer warranty regarding quality of product applies.

4 Contents
© 2020, Elon Group AB. All rights reserved.
Contents
SAFETY 6
Admonitions .............................................................................................................................. 6
Intended use ............................................................................................................................. 6
Safety for children and people with disabilities........................................................................ 6
General safety........................................................................................................................... 7
Safety during installation .......................................................................................................... 7
Safety during operation ............................................................................................................ 8
Safety during maintenance ...................................................................................................... 9
Disposal..................................................................................................................................... 9
QUICK START 10
GETTING STARTED 11
Installation................................................................................................................................. 11
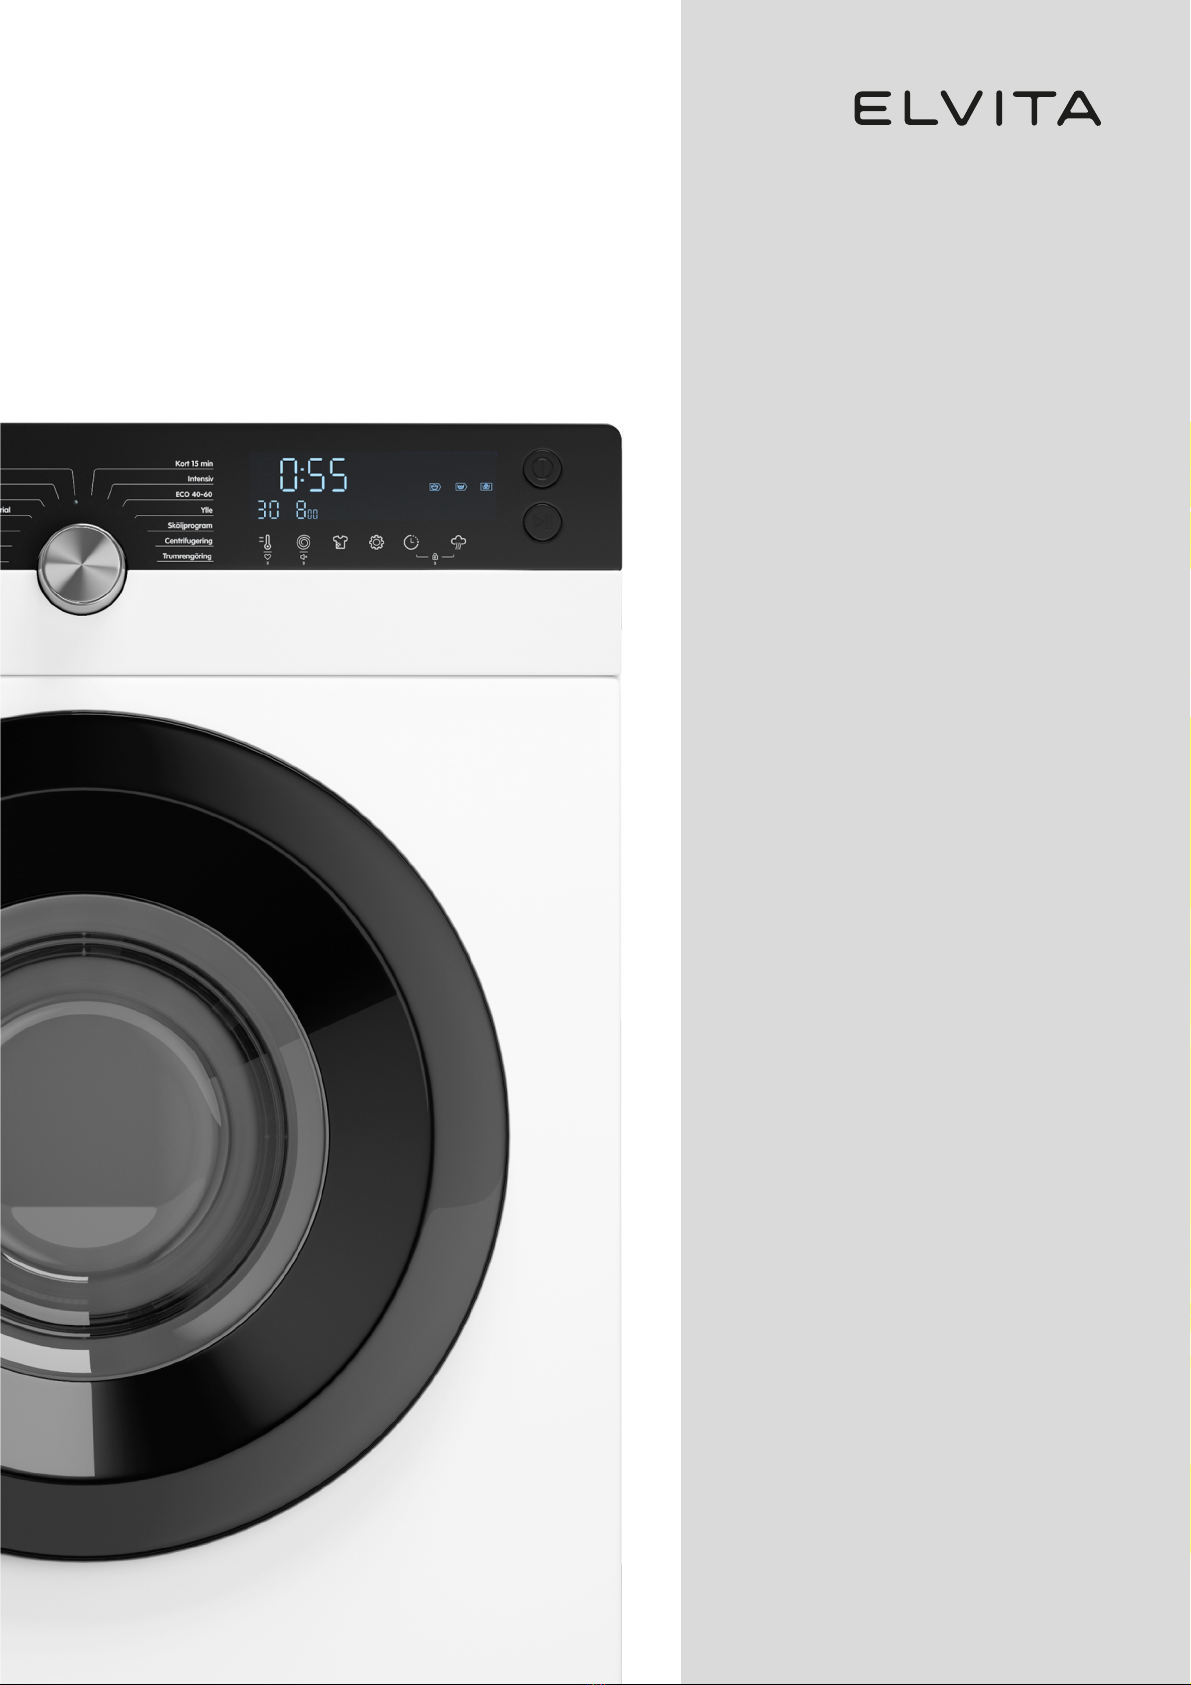
Getting to know your washing machine................................................................................... 11
Controls................................................................................................................................................ 11
Symbols on the display....................................................................................................................... 11
Detergent dispenser............................................................................................................................ 11
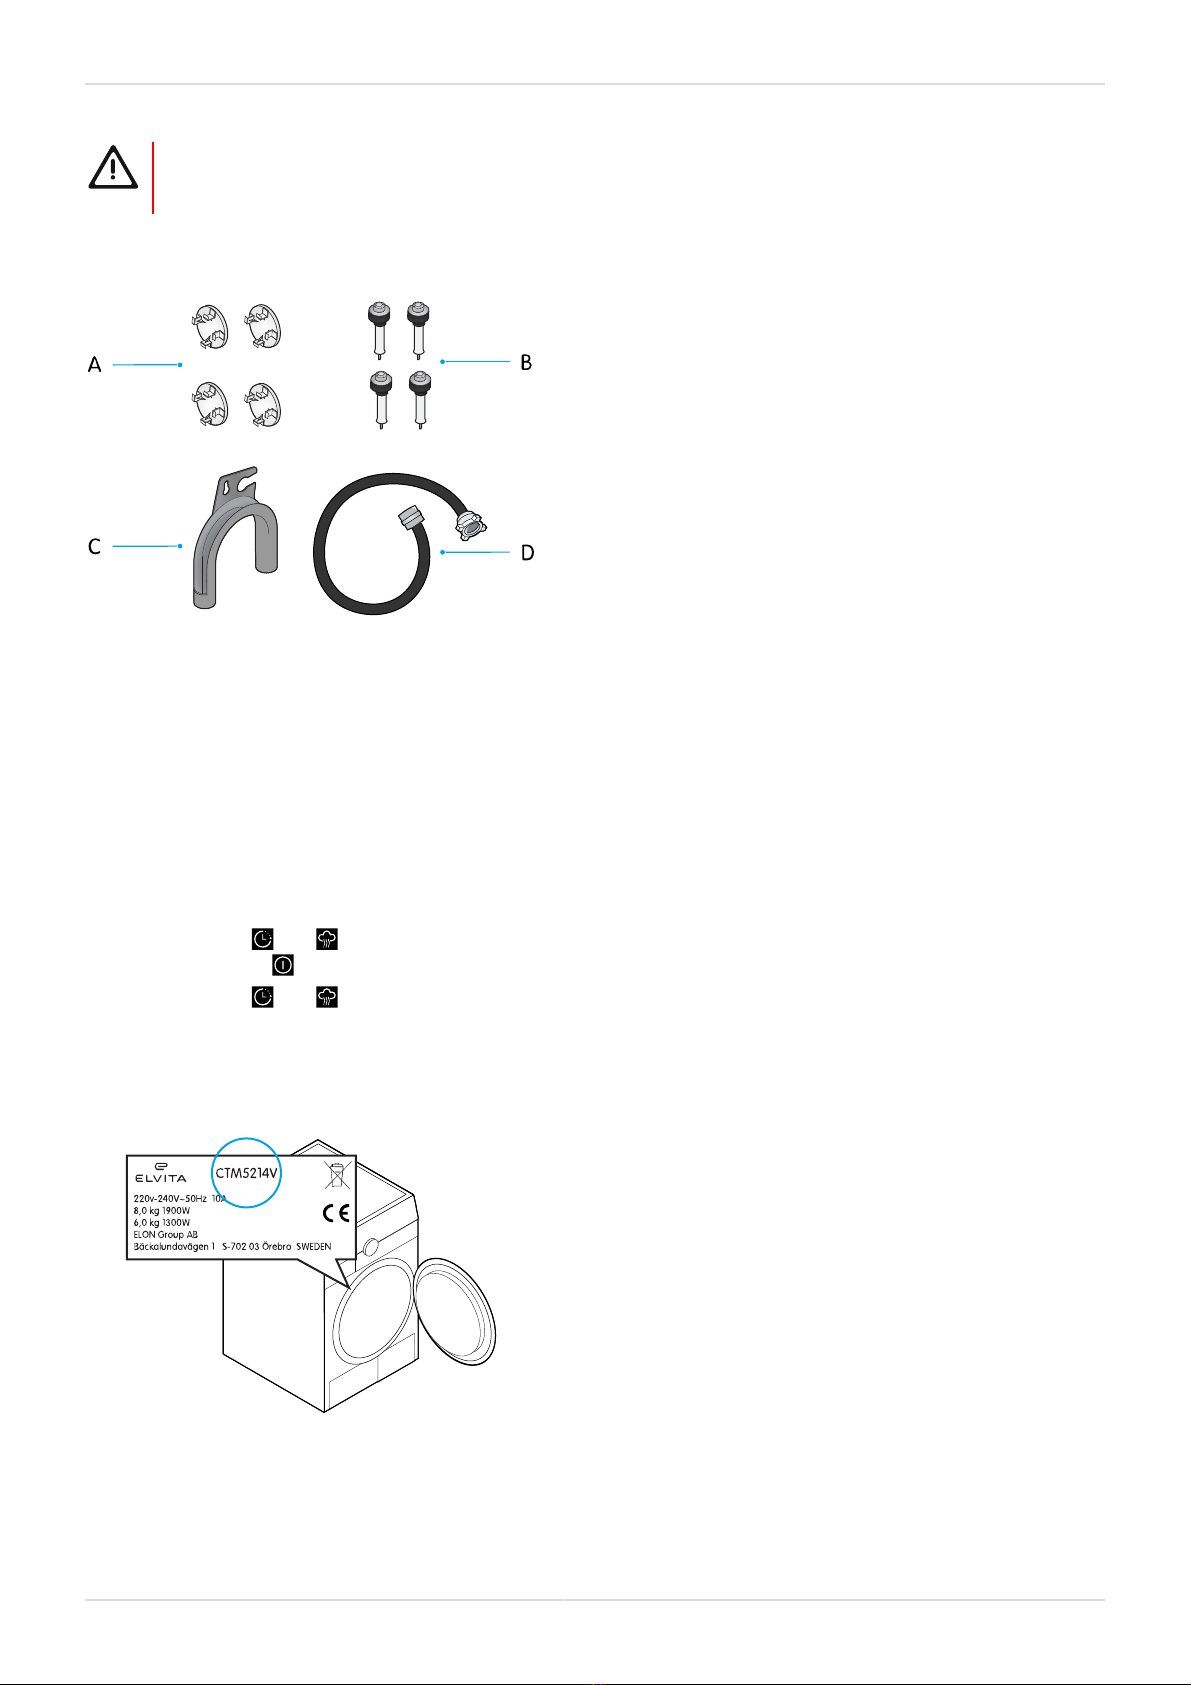
Accessories.......................................................................................................................................... 12
Use the child lock ................................................................................................................................ 12
Find the model code............................................................................................................................ 12
Before first use .......................................................................................................................... 13
Calibrate the machine......................................................................................................................... 13
Run an empty washing cycle.............................................................................................................. 13
WASHING 14
Before each wash ..................................................................................................................... 14
Start washing ............................................................................................................................ 14
Options, settings and functions................................................................................................. 15
Change the Soil level........................................................................................................................... 15
Change the spin speed....................................................................................................................... 16
Change the temperature .................................................................................................................... 16
Use the Delay option........................................................................................................................... 16
Use the Extra rinse option................................................................................................................... 16
Use the Pre-wash option .................................................................................................................... 16
Use the SpaCare option...................................................................................................................... 16
Use the Speed wash option................................................................................................................ 17
Use the My cycle function ................................................................................................................... 17
Reload - add laundry during a wash................................................................................................. 17
Mute and unmute the acoustic signal ............................................................................................... 17
Washing programmes............................................................................................................... 17
20 °C .................................................................................................................................................... 17
Baby care............................................................................................................................................. 18
Bed linen.............................................................................................................................................. 18
Cotton................................................................................................................................................... 18

Contents 5
© 2020, Elon Group AB. All rights reserved.
Drum clean .......................................................................................................................................... 19
ECO 40-60............................................................................................................................................ 19
Intensive............................................................................................................................................... 20
Mix ....................................................................................................................................................... 20
My cycle ............................................................................................................................................... 20
Spin only .............................................................................................................................................. 20
Synthetic............................................................................................................................................... 21
Quick 15 min ........................................................................................................................................ 21
Rinse & Spin......................................................................................................................................... 21
Wool ..................................................................................................................................................... 22
CLEANING 23
Clean the exterior...................................................................................................................... 23
Clean the detergent dispenser.................................................................................................. 23
Clean the drum ......................................................................................................................... 23
Clean the door seal and glass .................................................................................................. 24
Clean the tap inlet filter............................................................................................................. 24
Clean the machine inlet filter .................................................................................................... 25
Clean the drain pump filter....................................................................................................... 25
TROUBLESHOOTING 27
Troubleshooting......................................................................................................................... 27
INSTALLATION 29
Installation area ........................................................................................................................ 29
Unpack the machine................................................................................................................. 30
Remove the transport bolts....................................................................................................... 31
Level the machine ..................................................................................................................... 32
Connect the water supply hose to a tap................................................................................... 32
Connect the water supply hose to the machine....................................................................... 33
Connect to an external drain .................................................................................................... 33
Position the drain hose into a floor drain........................................................................................... 33
Connect the drain hose to a sink drain pipe...................................................................................... 34
Position the drain hose into a sink ..................................................................................................... 34
APPENDIX 36
Technical specifications............................................................................................................. 36
Consumption values.................................................................................................................. 36
EU directives and standards...................................................................................................... 37

6 Safety
© 2020, Elon Group AB. All rights reserved.
SAFETY
Carefully read the instructions before you install and use the product. Save the instructions and keep them near the
product for future reference. All kinds of warranties shall be invalid if these instructions are not followed.
Admonitions
WARNING!
Used when there is a risk for personal injury.
CAUTION!
Used when there is a risk for damage to the product.
NOTE!
General information that you should be aware of.
Helpful tips that you may find useful.
Intended use
This product is only intended for:
• Indoor use in a household or a household environment such as:
– staff kitchen areas in shops, offices and other working environments;
– family houses;
– by clients in hotels, motels and other residential type environments;
– bed and breakfast type environments.
• The washing of machine-washable clothes and textiles in a detergent solution.
• Washing using commercially available low foam detergents and care products which are suitable for use in a
front-loaded washing machine or washer-dryer.
This product is not intended for integration into a cabinet.
Safety for children and people with disabilities
WARNING!
Only let the following groups use the product if they are supervised or if instructions are provided to them
about how to use the product in a safe way. They must understand the hazards involved.
• Children. (Children younger than 8 years old must be continuously supervised.)
• People with reduced physical, sensory or mental capabilities.
• People with lack of experience and knowledge.
WARNING!
• Do not let children play with the product.
• Do not let children clean the product without supervision.
WARNING!
There is a risk that animals and children may climb into the product. Check inside before every operation.
WARNING!
The glass door may get very hot during operation. Keep children and pets well away from the product during
operation.

Safety 7
© 2020, Elon Group AB. All rights reserved.
General safety
WARNING!
• Do not wash or dry articles that have been cleaned in, washed in, soaked in, or dabbed with combustible
or explosive substances, such as wax, oil, paint, gasoline, degreasers, dry cleaning solvents, kerosene,
etc. This may result in fire or explosion.
• Rinse any such items of laundry thoroughly by hand before washing.
WARNING!
Risk of electric shock!
• If the supply cord is damaged, it must be replaced by the manufacturer, its service agent or similarly
qualified persons in order to avoid a hazard.
• Before any cleaning or performing any maintenance of the product, unplug the product from the mains.
• Do not use a socket with a rated current less than that of the product.
• Never pull out the power plug from the socket with wet hands.
CAUTION!
• Do not climb up or sit on top of the product.
• Do not lean against the door of the product.
• Do not close the door with excessive force. If you find it difficult to close the door, please check that it is not
obstructed by laundry.
• Do not wash rugs in the product.
CAUTION!
When moving the product:
• The transport bolts must be reinstalled in the machine by a suitably qualified person.
• Any water in the product must be drained out of the machine.
• Handle the product carefully. Never hold protruding parts of the machine while lifting.
• Do not use the door of the product to lift it during transport.
• This product is heavy. Transport with care.
Safety during installation
WARNING!
Before installing the product, check for any externally visible damage. Do not install or use a damaged
product.
WARNING!
Do not install the machine
• in a bathroom, a very wet room or a room with high humidity;
• in a room with explosive gases or caustic gases; or
• behind a lockable door, a sliding door or a door with a hinge on the opposite side from the product.
WARNING!
Adequate ventilation has to be provided to avoid the back flow of gases into the room from appliances
burning other fuels, including open fires.
WARNING!
• Remove all packaging and transport bolts before using the product. Otherwise, serious damage may
result.
• Keep all packaging material well away from children. There is a risk of suffocation!

8 Safety
© 2020, Elon Group AB. All rights reserved.
WARNING!
• Make sure that the product is connected to water and electrical supplies by a suitably qualified person in
accordance with the manufacturer’s instructions and local safety regulations.
• If the power cord is damaged, it must be replaced by the manufacturer, the manufacturer’s service agent
or similarly qualified persons in order to avoid a hazard.
• Make sure to connect the power plug to an earthed three-pole socket. Check carefully to ensure that your
socket is properly and reliably earthed.
• Make sure that the power plug of the machine is accessible after installation and that the machine does
not stand on the power cord.
• When levelling the machine, the lock nuts on all four feet must be screwed tightly against the housing.
• If applicable, make sure the ventilation openings in the base of the product not are obstructed by, for
example, a carpet.
• Use the new hose sets supplied with the product. Do not reuse old hose sets.
CAUTION!
• The inlet hose must be connected to the cold water supply.
• Do not kink, crush, modify or sever the water inlet hose.
• Do not kink or stretch the drain hose.
• Position the drain hose properly, as it could lead to a water leak if it is damaged.
• If the drain hose is too long, do not force it into the machine as it will cause unusual noises.
CAUTION!
• Before the product is used the first time, it must be calibrated.
• Before washing laundry items the first time, a washing programme must be run to completion without any
items in the drum.
Safety during operation
WARNING!
• Flammable, explosive or toxic solvents are forbidden. Gasoline and alcohol etc. must not be used as
detergents. Only use detergents that are suitable for machine washing.
WARNING!
• Always unplug the product and turn off the water supply after use.
WARNING!
• Take care to avoid scalding when the hot water is being emptied from the product.
• If the product has a function that allows you to pause a washing programme and add more clothes, do
not use this function when the water level is above the rim of the inner drum or the temperature setting is
high.
• When the drum is still rotating and there is a large amount of hot water in the drum, it is unsafe to open
the door and the door cannot be opened by force.
• Never refill with water by hand during washing.
CAUTION!
• After a washing program is completed:
– wait for two minutes before opening the door, and
– check whether the water inside the drum has been drained before opening the door. Do not open the
door if there is any water visible.
CAUTION!
• Fabric softeners, or similar products, should be used as specified by the fabric softener instructions.
• Sharp and rigid items, such as coins, brooches, nails, screws or stones etc., may cause serious damage to
this machine. Make sure that all pockets are emptied.

Safety 9
© 2020, Elon Group AB. All rights reserved.
CAUTION!
• Before the product is used the first time, it must be calibrated.
• Before washing laundry items the first time, a washing programme must be run to completion without any
items in the drum.
Safety during maintenance
WARNING!
• Only authorised technicians may carry out repairs.
• If you experience problems with the product that the troubleshooting information in the complete manual
cannot help you solve, turn off the product, unplug it from the power supply, turn off the water supply, and
contact our support and service.
WARNING!
Turn off the power supply and the water supply to the product before performing any maintenance.
WARNING!
During operation, there may be hot water in the drain pump. Never remove the pump cover during a washing
cycle, always wait until the product has finished the cycle and all water has been drained.
CAUTION!
• Do not use solvents, alcohol, products containing formic acid, abrasive cleaners, glass cleaners or
all-purpose cleaners to clean this product. Plastic surfaces and other parts may become damaged.
• Wear gloves when cleaning the product.
• There is a risk for water leakage if the pump cover is not properly reinstalled after cleaning of the drain
pump filter.
Disposal
Dispose of packaging in an environmentally-friendly manner. Recycling packaging, while observing national
and local regulations, can reduce the consumption of raw materials and the amount of waste in landfill
sites.
This product is marked in compliance with European Directive 2012/19/EU, Waste Electrical and Electronic
Equipment (WEEE). The symbol on the product or on its packaging indicates that this product should not be
treated as household waste. Instead it shall be handed over to the applicable collection point for the
recycling of electrical and electronic equipment.
By ensuring this product is disposed of correctly, you will help prevent potential negative consequences for
the environment and human health, which could otherwise be caused by inappropriate waste handling of
this product. For more detailed information about recycling of this product, please contact the relevant
municipal body in charge of waste management, your household waste disposal service or the store where
you purchased the product.

10 Quick start
© 2020, Elon Group AB. All rights reserved.
QUICK START
Before washing
Washing
After washing

Getting started 11
© 2020, Elon Group AB. All rights reserved.
GETTING STARTED
Installation
See section "Installation", page 29
Getting to know your washing machine
Controls
A. Programme selector
B. Display
C. On/Off
D. Start/Pause
E. Options, settings, and functions
Symbols on the display
Pre-wash Reload Door lock Child lock
Extra rinse Cycle phase: Pre-wash Cycle phase: Wash Cycle phase: Rinse Cycle phase: Spin
Speed wash Delay SpaCare
Detergent dispenser
A. Main wash detergent
B. Detergent lock (push down to remove dispenser)
C. Softener
D. Pre-wash detergent

12 Getting started
© 2020, Elon Group AB. All rights reserved.
WARNING!
Flammable and explosive or toxic solvents are forbidden. Gasoline and alcohol etc. must not be used as
detergents. Only use detergents that are suitable for machine washing.
Accessories
A. Transport hole plugs
B. Transport bolts
C. Drain hose holder
D. Water supply hose
Transport hole plugs For plugging the holes after the transport bolts have been removed.
Transport bolts For securing the machine during transport.
Drain hose holder For securing the hose and avoiding kinks, for example when placing the hose over
the edge of a sink.
Water supply hose For connecting the machine to the water supply.
Use the child lock
Activate the child lock to avoid accidental operation by children.
1. Touch and hold and for 3 seconds until an acoustic signal sounds.
All buttons except are now locked.
2. Touch and hold and for 3 seconds to deactivate the child lock.
NOTE! Turning the power off and on will not deactivate the child lock.
Find the model code
The model code is printed on a label on the product. You need the code to find the complete and most recent information,
service and support for your product model.

Getting started 13
© 2020, Elon Group AB. All rights reserved.
NOTE!
This product and label text are examples. Your product and text may have a different look and content.
Before first use
Calibrate the machine
1. Make sure the machine is empty.
2. Plug in the power cord.
3. Press to turn on the machine.
4. Within 10 seconds after the machine was turned on, touch and hold and until t19 is displayed.
5. Press .
NOTE! Calibration is completed when the drum stops rotating and digits are displayed.
Run an empty washing cycle
Make sure that the machine is installed and calibrated properly.
1. Plug in the power cord.
2. Open the water tap.
3. Start a washing programme.
NOTE! Do not put any clothes in the machine.
The machine is ready for use when the programme has completed.

14 Washing
© 2020, Elon Group AB. All rights reserved.
WASHING
Before each wash
1. Check the clothing care labels.
2. Remove any items from the pockets.
CAUTION! Sharp and rigid items, such as coins, brooches, nails, screws or stones etc., may cause serious
damage to this washing machine.
3. Tie any belts and fasten any zips or buttons.
4. Place small items inside a washing bag.
You can also use a pillow case.
5. Turn easy-pilling and long-pile fabric inside out
6. Separate clothes according to fabric type.
Start washing
CAUTION!
Before washing, make sure the machine is correctly installed.
NOTE!
Save energy and water.
• Washing full loads will save energy and water. Maximum capacity depends on the programme.
• In general, a programme that performs at lower temperature and longer duration consumes less energy.
1. Press to turn on the power.
2. Add clothes.
3. Turn the programme selector to select a programme.
4. Select settings and options if needed.

Washing 15
© 2020, Elon Group AB. All rights reserved.
5. Add detergent and softener in the detergent dispenser if needed.
NOTE! Make sure to use a detergent suitable for the the laundry to be washed and the selected washing
programme and temperature.
6. Press to start the programme.
When the washing is completed an acoustic signal sounds and End is displayed.
WARNING!
• Never refill with water by hand during washing.
• After the program is finished, wait for two minutes before opening the door.
• Check whether the water inside the drum has been drained before opening the door. Do not open the
door if there is any water visible.
• Take care to avoid scalding when the hot water is being emptied from the machine.
Options, settings and functions
Child lock
Prevents accidential use of the machine. See section "Use the child lock", page 12.
Delay
Delays the start of the washing programme by a specified amount of time. Maximum delay time is 24 hours.
See section "Use the Delay option", page 16.
Extra rinse, Pre-wash, Speed wash
• Extra rinse: Gives the laundry an extra rinse. See section "Use the Extra rinse option", page 16.
• Pre-wash: Gives the laundry an extra wash before the main wash. This helps to bring dirt to the surface
of the clothes. See section "Use the Pre-wash option", page 16.
• Speed wash: Decreases the washing time. See section "Use the Speed wash option", page 17.
Reload
Add laundry during a wash. See section "Reload - add laundry during a wash", page 17.
Soil level
Sets a soil level. The washing time will increase with higher levels. See section "Change the Soil level", page
15.
SpaCare
Treats the laundry with steam for better washing performance. See section "Use the SpaCare option", page
16.
Spin speed, Mute / unmute
• Spin speed: Adjusts the spin speed. See section "Change the spin speed", page 16.
• Mute / unmute: Mutes and unmutes the acoustic signal. See section "Mute and unmute the acoustic
signal", page 17.
Temperature, My cycle
• Temperature: Adjusts the temperature. See section "Change the temperature", page 16.
• My cycle: Saves your favourite combination of washing programme and options. See section "Use the
My cycle function", page 17.
Change the Soil level
1. Touch to cycle through the available levels, from lightly soiled to heavily soiled: ( , , )
NOTE!
Higher soil level increases washing time, as indicated on the display.

16 Washing
© 2020, Elon Group AB. All rights reserved.
Change the spin speed
1. Touch to cycle through the available speeds: (0, 400, 600, 800, 1000, 1200, 1400)
NOTE!
When the spin speed indication lights are off the spin speed is 0.
NOTE!
Higher spin speeds create more noise and lower residual moisture content.
Change the temperature
1. Turn the programme selector to select a programme.
2. Touch to cycle through the available temperatures: (Cold, 20°C, 30°C, 40°C, 60°C, 90°C)
Use the Delay option
1. Turn the programme selector to select a programme.
2. Change settings and select options if needed.
3. Touch to cycle through the available delay times.
4. Touch .
The washing cycle will start after the delay time has passed.
You can cancel the delay timer by touching to cycle through the available delay times until the display
shows 0H.
Use the Extra rinse option
1. Turn the programme selector to select a programme.
2. Touch to cycle through the available options until is displayed.
NOTE! The Extra rinse option can be used together with the Pre-wash option. Cycle through the options until
both and are displayed.
3. Press .
Use the Pre-wash option
NOTE!
You need to add pre-wash detergent when you select this option. See section "Detergent dispenser", page
11.
1. Turn the programme selector to select a programme.
2. Touch to cycle through the available options until is displayed.
NOTE! The Pre-wash option can be used together with the Extra rinse option. Cycle through the options until
both and are displayed.
3. Press .
Use the SpaCare option
This option is available with the programmes Cotton, Baby care, Bed linen and Mix.
NOTE!
SpaCare uses steam to improve the washing result. In the beginning of the washing cycle, the water will be
heated to up to 70°C to create steam inside the drum.

Washing 17
© 2020, Elon Group AB. All rights reserved.
1. Turn the programme selector to select a programme.
2. Touch .
3. Press .
Use the Speed wash option
1. Turn the programme selector to select a programme.
2. Touch to cycle through the available options until is displayed.
3. Press .
Use the My cycle function
You can save a frequently used programme for quick access. The default programme is Cotton.
1. Select a programme and the settings and options you want to use.
2. Touch and hold for 3 seconds to add the current programme and settings to the memory.
Your programme and settings are now stored and can be used by turning the programme selector to My Cycle .
Reload - add laundry during a wash
You can add more laundry to a wash by first pausing the programme.
WARNING!
Do not use this function when the water level is above the rim of the inner drum or the temperature setting is
high.
1. Press and hold for 3 seconds.
is displayed.
2. Wait for the drum to stop rotating and for the door to unlock.
WARNING! When the drum is still rotating and there is large amount of hot water in the drum it is unsafe to
release open the door and the door cannot be opened by force.
3. Add the laundry and close the door.
4. Press to resume washing.
Mute and unmute the acoustic signal
NOTE!
The acoustic signal will not sound when it is muted.
1. Touch and hold for 3 seconds to mute the acoustic signal.
2. Touch and hold for 3 seconds to unmute the acoustic signal.
The setting will be remembered until the next reset.
Washing programmes
20 °C
20°C as default temperature. Cold water can also be selected.
Default temperature 20°C
Default time 1:01
Default speed 1000rpm

18 Washing
© 2020, Elon Group AB. All rights reserved.
Maximum load, washing 8.0kg
Pre-wash detergent -
Main wash detergent Essential
Softener Optional
Options • Delay
• Extra rinse
Baby care
Keeps the washing temperature above 60°C for more than 30 minutes to remove harmful bacteria.
Default temperature 60°C
Default time 1:42
Default speed 800rpm
Maximum load, washing 8.0kg
Pre-wash detergent Optional
Main wash detergent Essential
Softener Optional
Options • Delay
• Extra rinse
• Pre-wash
• Soil level
• SpaCare
• Speed wash
Bed linen
For bed linen, bed sheets or other large items.
Default temperature 40°C
Default time 1:48
Default speed 1000rpm
Maximum load, washing 8.0kg
Pre-wash detergent Optional
Main wash detergent Essential
Softener Optional
Options • Delay
• Extra rinse
• Pre-wash
• Soil level
• SpaCare
• Speed wash
Cotton
For hard-wearing, heat-resistant textiles made of cotton or linen.

Washing 19
© 2020, Elon Group AB. All rights reserved.
Default temperature 40°C
Default time 3:39
Default speed 1400rpm
Maximum load, washing 8.0kg
Pre-wash detergent Optional
Main wash detergent Essential
Softener Optional
Options • Delay
• Extra rinse
• Pre-wash
• Soil level
• SpaCare
• Speed wash
Drum clean
Clean the drum of the machine at 90°C. Not to be used for laundry.
To increase the cleaning effect, you can use a chlorine bleaching agent intended for washing machines.
Follow the instructions included with the bleaching agent.
Default temperature 90°C
Default time 1:18
Default speed -
Maximum load, washing -
Pre-wash detergent -
Main wash detergent -
Softener -
Options • Delay
ECO 40-60
Recommended for normally soiled cotton laundry.
NOTE!
This programme is able to wash laundry declared to be washable at 40°C or 60°C in one go in the same
cycle.
Default temperature 40°C
Default time 3:32
Default speed 1400rpm
Maximum load, washing 8.0kg
Pre-wash detergent -
Main wash detergent Essential

20 Washing
© 2020, Elon Group AB. All rights reserved.
Softener Optional
Options • Delay
Intensive
The washing time is increased for better washing effect.
Default temperature 40°C
Default time 3:48
Default speed 800rpm
Maximum load, washing 8.0kg
Pre-wash detergent -
Main wash detergent Essential
Softener Optional
Options • Delay
Mix
Mixed load consisting of textiles made of cotton and synthetics.
Default temperature 40°C
Default time 1:20
Default speed 800rpm
Maximum load, washing 8.0kg
Pre-wash detergent Optional
Main wash detergent Essential
Softener Optional
Options • Delay
• Extra rinse
• Pre-wash
• SpaCare
• Speed wash
My cycle
Define and save your favourite combination of washing programme and options. See section "Use the My cycle function",
page 17.
Spin only
Extra spinning with selectable spin speed.
Default temperature -
Default time 0:12
Default speed 1000rpm
Maximum load, washing 8.0kg
Other manuals for CTM7840V
2
Table of contents
Other elvita Washer manuals

elvita
elvita CTM5712V User manual

elvita
elvita CTM5712V User manual

elvita
elvita CDI8616V User manual

elvita
elvita CTM4214V User manual

elvita
elvita CTM7814V User manual

elvita
elvita CTM3714V User manual

elvita
elvita CTT3802V User manual

elvita
elvita CTM5914V User manual

elvita
elvita CTM7814V User manual

elvita
elvita CTM3714V User manual

elvita
elvita CTM1612V User manual

elvita
elvita CTM4612V User manual

elvita
elvita CTM4712V User manual

elvita
elvita CTM7840AV User manual

elvita
elvita CTM3712V User manual

elvita
elvita CTM7840V User manual

elvita
elvita CTM4612V User manual

elvita
elvita CTC3860V User manual

elvita
elvita CTS1195V User manual

elvita
elvita CTM7840AV User manual