emerio IM-111502 User manual


- 1 -
Content –Inhalt –Innehåll –Inhoud –Pitoisuus –Indhold
Instruction manual –English......................................................................................- 2 -
Bedienungsanleitung –German...............................................................................- 11 -
Bruksanvisning –Swedish ........................................................................................- 21 -
Gebruiksaanwijzing –Dutch.....................................................................................- 30 -
Käyttöopas –Finnish................................................................................................- 40 -
Brugsanvisning –Danish...........................................................................................- 49 -

- 2 -
Instruction manual –English
SAFETY INSTRUCTIONS
Before use make sure to read all of the below instructions in
order to avoid injury or damage, and to get the best results
from the appliance. Make sure to keep this manual in a safe
place. If you give or transfer this appliance to someone else
make sure to also include this manual.
In case of damage caused by user failing to follow the
instructions in this manual the warranty will be void. The
manufacturer/importer accepts no liability for damages
caused by failure to follow the manual, a negligent use or use
not in accordance with the requirements of this manual.
1. This appliance can be used by children aged from 8 years
and above and persons with reduced physical, sensory or
mental capabilities or lack of experience and knowledge if
they have been given supervision or instruction concerning
use of the appliance in a safe way and understand the
hazards involved.
2. Children shall not play with the appliance.
3. Cleaning and user maintenance shall not be made by
children without supervision.
4. If the supply cord is damaged, it must be replaced by the
manufacturer, its service agent or similarly qualified
persons in order to avoid a hazard.
5. WARNING: fill with potable water only.
6. WARNING: Keep ventilation openings, in the appliance
enclosure or in the built-in structure, clear of obstruction.
7. WARNING: Do not damage the refrigerant circuit.
8. WARNING: Do not use electrical appliances inside the
food storage compartments of the appliance, unless they
are of the type recommended by the manufacturer.
9. Do not store explosive substances such as aerosol cans with
a flammable propellant in this appliance.
10. Children aged from 3 to 8 years are allowed to load and
unload refrigerating appliances.

- 3 -
11. WARNING: When positioning the appliance, ensure the
supply cord is not trapped or damaged.
12. WARNING: Do not locate multiple portable socket-outlets
or portable power supplies at the rear of the appliance.
13. Opening the door for long periods can cause a significant
increase of the temperature in the compartments of the
appliance.
14. Clean regularly surfaces that can come in contact with food
and accessible drainage systems.
15. Clean water tanks if they have not been used for 48 h; flush
the water system connected to a water supply if water has
not been drawn for 5 days.
16. If the refrigerating appliance is left empty for long periods,
switch off, defrost, clean, dry, and leave the door open to
prevent mould developing within the appliance.
17. Always disconnect the appliance from the supply if it is left
unattended and before assembling, disassembling or
cleaning.
18. This appliance is intended to be used in household and
similar applications such as: staff kitchen areas in shops,
offices and other working environments; farm houses and
by clients in hotels, motels and other residential type
environments; bed and breakfast type environments;
catering and similar non-retail applications.
19. Before inserting the plug into the mains socket, please
check that the voltage and frequency comply with the
specifications on the rating label.
20. Disconnect the mains plug from the socket when the
appliance is not in use and before cleaning.
21. Ensure that the mains cable is not hung over sharp edges
and keep it away from hot objects and open flames.
22. Do not immerse the appliance or the mains plug in water
or other liquids. There is danger to life due to electric shock!
23. To remove the plug from the plug socket, pull the plug. Do
not pull the power cord.

- 4 -
24. Do not touch the appliance if it falls into water. Remove the
plug from its socket, turn off the appliance and send it to
an authorized service center for repair.
25. Do not plug or unplug the appliance from the electrical
outlet with a wet hand.
26. Never attempt to open the housing of the appliance, or to
repair the appliance yourself. This could cause electric
shock.
27. Never leave the appliance unattended during use.
28. This appliance is not designed for commercial use.
29. Do not use the appliance for other than intended use.
30. Do not wind the cord around the appliance and do not
bend it.
31. Do not use this appliance in the immediate surroundings of
a bath, a shower or a swimming pool.
32. This ice maker is specially used to make ice cubes, do not
use the appliance to refrigerate other food or beverages, or
it will damage the system.
33. Do not store or use gasoline and other flammable
substances near the ice maker. Do not use ice maker if has
leakage of flammable gas, to avoid cause a fire.
34. Do not move the appliance while it is switched on, to avoid
damaging the cooling system.
35. Do not overfill water as this may cause a hazard. Do not fill
above the MAX or below MIN mark.
36. Keep the appliance in a well-ventilated place. Leave at least
20cm free space near the air inlet and outlet.
37. WARNING: Do not use mechanical devices or other means
to accelerate the defrosting process, other than those
recommended by the manufacturer.
38. Do not damage the refrigerant circuit.
39. Warning: Risk of fire / flammable materials.

- 5 -
40. WARNING: Do not touch the evaporator
while the unit is making ice. It may burn your skin!
41. Regarding the instructions for operation, cleaning and
disposal of the appliance, please refer to the below
paragraph of the manual.

- 6 -
PARTS DESCRIPTION
1. Transparent window
2. Lid
3. Operation panel
4. Air outlet
5. Air inlet
6. Power cord
7. Water outlet
8. Ice cube bucket
9. Evaporator
10. Ice making box
11. Water tank
12. Ice scoop
OPERATION PANEL AND DIGITAL DISPLAY
Functions or meanings of buttons or icons:
①Make Ice. / Stop making ice (standby). / Enter self-cleaning mode.
②Set real time, turn-on time and/or turn-off time.
③Adjust hours and minutes of time.
④Select ice cube size - L/M/S.
⑤Malfunction indication
⑥Large size ice cube
⑦Medium size ice cube
⑧Small size ice cube
⑨Ice full indication
⑩Water absence indication
⑪Ice making status indication (flashing in the process of making ice, still when standby)
⑫Real time
⑬Auto turn-on
⑭Auto Turn-off
⑮Time display (hour : minute)
IM-111502 EN

- 7 -
BEFORE USE
1. Remove all the packaging; take out the ice scoop and backup silicon plug.
2. Place the appliance on a stable and flat surface. Keep the appliance away from heat sources and direct
sunlight; keep it in a well-ventilated place and leave at least 20cm space near the air inlet and outlet.
3. Clean the appliance and its components (See “CLEANING AND MAINTENANCE”).
Caution! Do not use outdoors. Do not use the appliance in a too cold or too hot environment. When the
environment temperature is lower than 5 ℃ or higher than 43 ℃ , the appliance will have problems in making
ice.
HOW TO USE
Do not use the appliance within 30 minutes after transportation. Switching on the power too early might cause
damage to your Ice Cube Maker.
1. Take out the ice cube bucket. Pour water (only water conformed to drinking standard) into the water tank.
Pay attention that the water line should never stay beneath the “H-MIN” mark nor exceed the “H-MAX” mark.
Place back the ice cube bucket when water has been poured.
2. Put the plug into the power outlet. There is a beep sound and the LCD display will light up. Now the appliance
is ready for use.
3. Press the “SELECT” button to choose the size of ice cube. Different sizes will lead to different time for making
process. The default size is Medium size.
S = Small (this will take approximately 9 minutes)
M = Medium (this will take approximately 11 minutes)
L = Large (this will take approximately 13 minutes)
4. Press the button to start making ice. The LCD display will have the snow flake icon flashing to indicate
the ice making process is on-going. You can press at any time to stop the ice-making, the program
will stop at once and you may find some incomplete ice cubes.
5. After about 9-13 minutes (depending on the cube size), the first batch of 9 ice cubes will be produced and
dropped into the ice cube bucket. You can also check through the transparent window on the top.
Note! The produced ice cubes in the bucket will melt gradually so please use the
scoop to take out the ice cubes in time. The melted water will be collected into the
water tank. If you want to remove the left water in water tank, screw off the little
cap (a) anticlockwise (at the back of appliance) and take out the silicon plug (b),
then you can drain the water tank.
Ice full indication
If the ice cube bucket is completely full with ice cubes, the icon will appear on the LCD and emit a beep
sound for a reminder. Take out the ice cubes and then press button, the icon will turn to .
Water shortage indication
When the water line drops beneath the “H-MIN” mark, it means there is a water shortage, the icon will flash
on the LCD and a beep sound reminder will be sent out. Fill more water and then press button to resume
making ice, the icon will become still.

- 8 -
Malfunction indication
If there is a malfunction, the appliance will have the icon flashing on the LCD.
Auto turn-on and turn-off function
Press the “SET” button to cycle through the setting of real time, auto turn-on time and auto turn-off time.
When setting one type of time, the corresponding icon will appear on the left-down corner of LCD.
Press the ▲button to adjust the hour or minute numeral of the time. You can adjust the time only when
the numeral is flashing (lasts for several seconds). If you press ▲ when time numerals are still, the presses
will lead to the timer function selection.
When the hour or minute numeral flashes, one press of “SET” button can directly reach the next setting.
For example, Press the “SET” button once and then press ▲to adjust the hour of real time. If the hour
numeral still flashes, just press “SET” once to set the minute of real time; if the hour flashing stops, you
need to press the “SET” twice to set the minute. Then, if the minute numeral keeps flashing, you can press
“SET” once to adjust the hour numeral of auto turn-on time, but if the flashing stops, you need to press
“SET” three times to adjust the hour of auto turn-on time.
When the time numerals are still, you can directly reach the real time setting by one press of “SET”, the auto
turn-on time setting by three presses of “SET” and the auto turn-off time setting by five presses.
When time settings are finished, press the ▲button to select which function you want. The presses of ▲
will cycle through auto turn-on, auto turn-off, both auto-on and auto turn-off and no timer. Your function
choices will be shown on the LCD by corresponding icons.
SELF-CLEANING MODE
This mode can help clean the water tank. When the ice maker is in this mode, the size indication icons (L, M, S)
will flash on the LCD at the same time. The operation steps are listed below.
Stage 1
1. Add equal amount of water and vinegar (1:1) into water tank.
2. In standby mode, keep pressing button at least 5 seconds to activate self-cleaning mode. The self-
cleaning mode will automatically start after beep sound.
3. During self-cleaning mode, pump will draw water into ice making box and evaporator coils, then ice making
box rotates and pours the water into water tank. This cycle will repeat for 5 times.
4. Upon completion, the appliance automatically changes to standby mode.
Stage 2
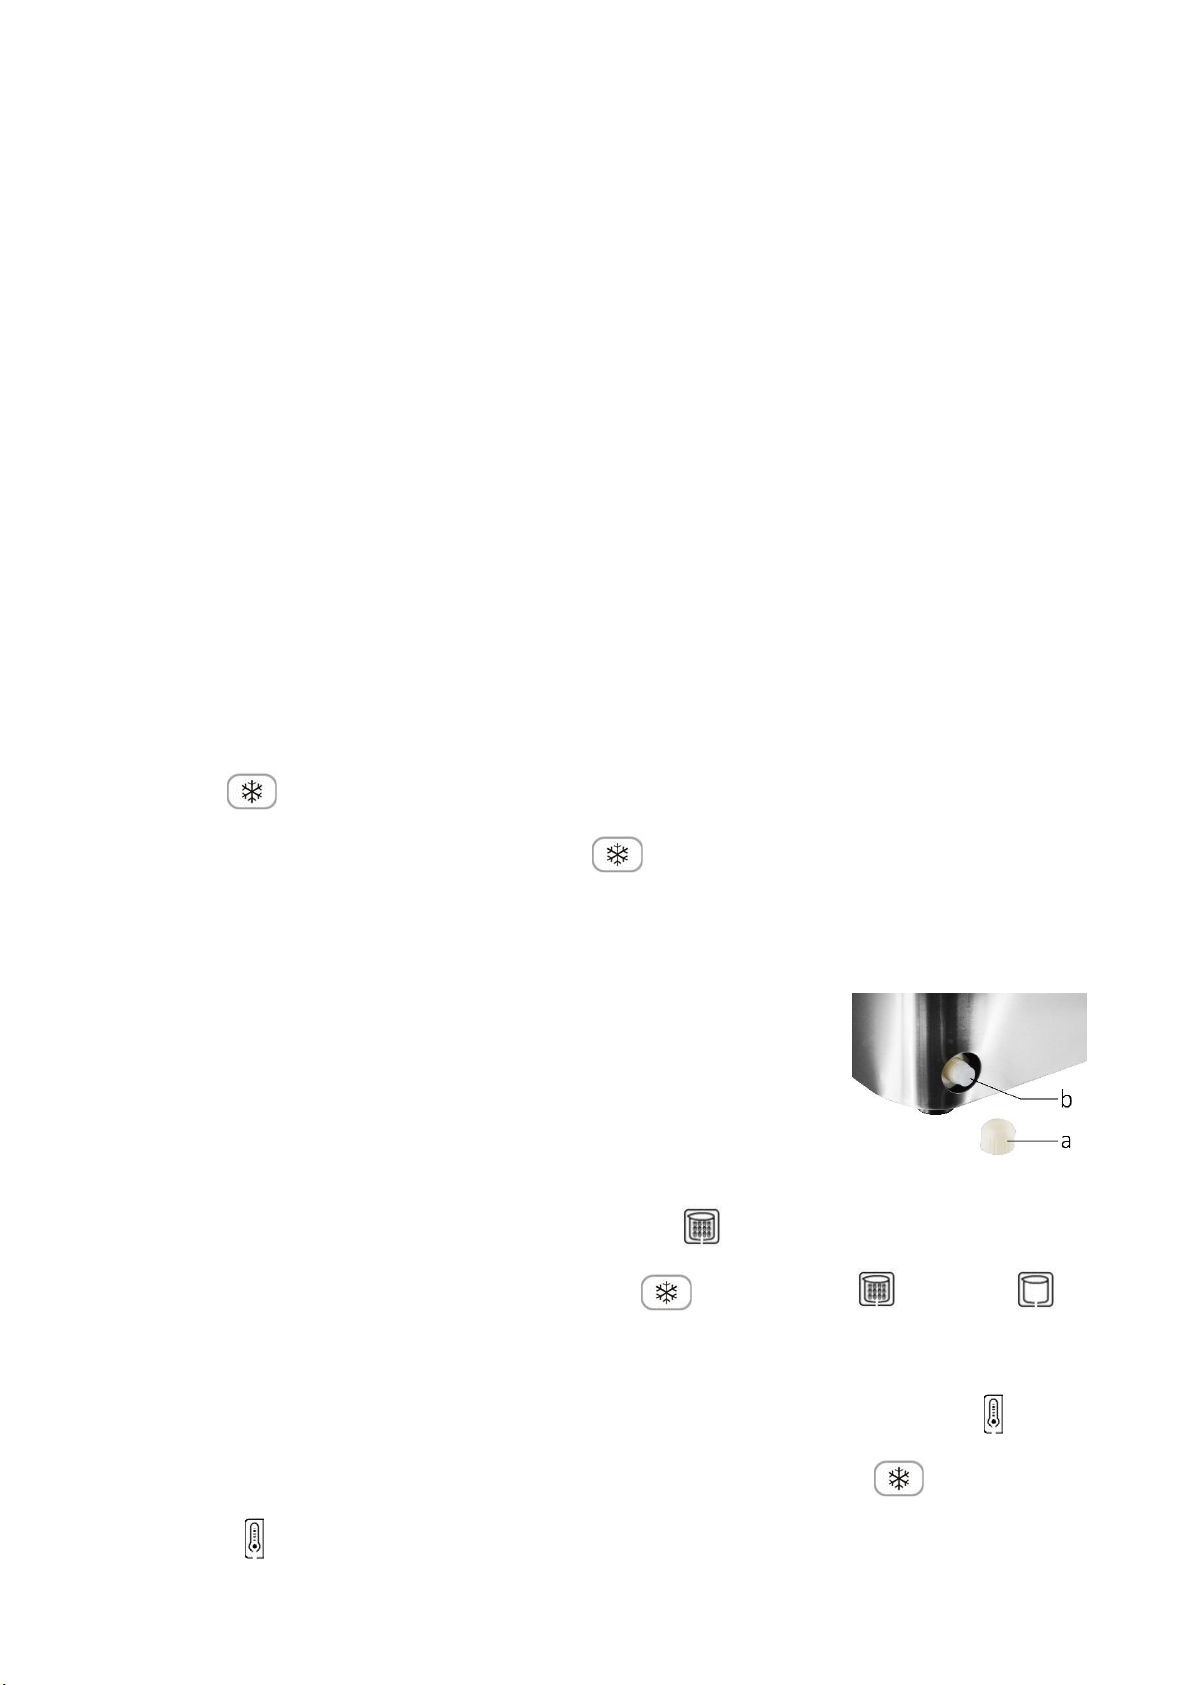
1. Remove the little cap and silicon plug at back, and drain off the water, then insert the plug and screw on the
cap.
2. Add fresh water to the maximum water line.
3. In standby mode, keep pressing button at least 5 seconds to activate self-cleaning mode again to
clean out.
4. Upon completion, the appliance automatically changes to standby mode.
5. Remove the little cap and plug to drain off the water again. Leave the upper lid open to allow it to air dry.
Notes:
If water shortage happens during self-cleaning mode, the appliance will automatically go into standby mode.
If the ice making box fail to turn over, the malfunction indication icon will appear on the LCD.
If you want to exit from the self-cleaning mode, just long press the button for at least 5 seconds.

- 9 -
CLEANING AND MAINTENANCE
1. Before cleaning and maintenance, stop the ice making process and take out the plug from power outlet.
Wait until the appliance has cooled down.
2. Clean the appliance with a soft and damp cloth, then thoroughly dry the appliance with a clean and dry cloth.
3. Clean the ice cube bucket and ice scoop in soapy water. Rinse and dry them thoroughly.
4. The self-cleaning should be conducted before you use the ice maker for the first time or haven’t used it for
a long time. (See the “SELF-CLEANING MODE”section)
5. Always drain off the water in the ice maker if it will not be used for a long time.
TROUBLE SHOOTING
PROBLEM
POSSIBLE CAUSE
SOLUTION
LCD not bright
1. Lack appropriate power
connection.
2. Internal components may be
damaged.
1. Check if the power supply is appropriate.
2. Check if the power cord is connected
properly to power supply.
3. If internal components are damaged,
professional maintenance is required.
ICE FULL icon flashes
1. Ice bucket full.
2. Low-temperature protection
(ambient temperature is lower
than 5℃).
1. Automatic recovery after removal of ice
cubes.
2. Do not place the appliance in such cold
places.
WATER SHORTAGE
icon flashes
Short of water.
1. Fill the drinkable water into ice maker
and press button to eliminate the
failure.
2. Water supply system or components
may be damaged. Professional
maintenance is required.
MALFUNCTION
INDICATION icon
flashes
Ice making box is in an incorrect
position.
1. Check whether any foreign objects are
stuck in the ice making box.
2. Internal components may be damaged.
Professional maintenance is required.
Not making ice or not
performing well
1. Heat output is blocked.
2. Water temperature is too high.
3. The ambient temperature is
too high.
4. Leakage of refrigerant.
1. Clean the dust on air inlet and outlet.
2. Fill room temperature water.
3. Do not place the appliance in places with
such high temperature.
4. Refrigerating system may be damaged.
Maintenance by a professional is required.
Abnormal noise
Fan or pump is obstructed.
1. Place the appliance in a proper location.
2. Professional maintenance is required.
TECHNICAL DATA
Rated voltage: 220-240 V
Rated frequency: 50 Hz
Rated Current: 0,8 A

- 10 -
Foaming agent: C5H10
Refrigerant: R600a/24g
Climatic class: SN/N/ST/T
GUARANTEE AND CUSTOMER SERVICE
Before delivery our devices are subjected to rigorous quality control. If, despite all care, damage has occurred
during production or transportation, please return the device to your dealer. In addition to statutory legal rights,
the purchaser has an option to claim under the terms of the following guarantee:
For the purchased device we provide 2 years guarantee, commencing from the day of sale. If you have a defective
product, you can directly go back to the point of purchase.
Defects which arise due to improper handling of the device and malfunctions due to interventions and repairs
by third parties or the fitting of non-original parts are not covered by this guarantee. Always keep your receipt,
without the receipt you can’t claim any form of warranty. Damage caused by not following the instruction manual,
will lead to a void of warranty, if this results in consequential damages then we will not be liable. Neither can we
hold responsible for material damage or personal injury caused by improper use or if the instruction manual are
not properly executed. Damage to accessories does not mean free replacement of the whole appliance. In such
case please contact our service department. Broken glass or breakage of plastic parts is always subject to a charge.
Defects to consumables or parts subjected to wearing, as well as cleaning, maintenance or the replacement of
said parts are not covered by the warranty and are to be paid.
ENVIRONMENT FRIENDLY DISPOSAL
Recycling –European Directive 2012/19/EU
This marking indicates that this product should not be disposed with other household wastes. To
prevent possible harm to the environment or human health from uncontrolled waste disposal,
recycle it responsibly to promote the sustainable reuse of material resources. To return your used
device, please use the return and collection systems or contact the retailer where the product was
purchased. They can take this product for environmental safe recycling.

- 11 -
Bedienungsanleitung –German
SICHERHEITSHINWEISE
Lesen Sie vor dem Gebrauch unbedingt die nachfolgenden
Anleitungen, um Verletzungen oder Beschädigungen zu
vermeiden und das beste Ergebnis mit dem Gerät zu erzielen.
Bewahren Sie diese Bedienungsanleitung an einem sicheren
Ort auf. Wenn Sie dieses Gerät an eine andere Person
weitergeben, stellen Sie sicher, dass Sie auch diese
Bedienungsanleitung aushändigen.
Im Falle von Beschädigungen, die durch die Missachtung der
Anleitungen in dieser Bedienungsanleitung verursacht
wurden, wird die Garantie ungültig. Der Hersteller/Importeur
haftet nicht für Schäden, die durch Missachtung der
Bedienungsanleitung, fahrlässigen Gebrauch oder Benutzung,
die nicht in Übereinstimmung mit den Anforderungen dieser
Bedienungsanleitung erfolgt, verursacht wurden.
1. Dieses Gerät kann von Kindern ab 8 Jahren und Personen
mit eingeschränkten körperlichen, sensorischen oder
geistigen Fähigkeiten oder mangelnder Erfahrung und
Kenntnis benutzt werden, wenn sie beaufsichtigt werden
oder in die sichere Benutzung des Gerätes unterwiesen
werden und die damit verbundenen Gefahren verstehen.
2. Kinder dürfen nicht mit dem Gerät spielen.
3. Die Reinigung und vom Benutzer auszuführende
Wartungsarbeiten dürfen von Kindern nur unter Aufsicht
durchgeführt werden.
4. Wenn das Netzkabel beschädigt ist, muss es vom Hersteller,
seinem Kundendienst oder einer ähnlich qualifizierten
Person ausgewechselt werden, um Gefahren zu vermeiden.
5. ACHTUNG: Ausschließlich mit Trinkwasser zu befüllen.
6. WARNUNG: Lüftungsöffnungen im Gehäuse des Gerätes
oder der eingebauten Konstruktion frei von Blockaden
halten.
7. WARNUNG: Den Kühlmittelkreislauf nicht beschädigen.
8. WARNUNG: Keine elektrischen Geräte in den

- 12 -
Lebensmittelfächern verwenden, es sei denn, sie werden
vom Hersteller empfohlen.
9. Keine explosionsgefährlichen Substanzen wie Spraydosen
mit einem entzündlichen Treibgas in diesem Gerät
aufbewahren.
10. Kinder von 3 bis 8 Jahren dürfen Kühlgeräte beladen und
entladen.
11. WARNUNG: Beim Aufstellen des Geräts ist darauf zu achten,
dass das Kabel nicht eingeklemmt oder beschädigt wird.
12. WARNUNG: Keine Steckdosenleisten oder tragbare
Stromversorgungsgeräte an der Rückseite des Geräts
positionieren.
13. Das längere Ö ffnen der Tür kann zu einem deutlichen
Anstieg der Temperatur in den Fächern des Geräts führen.
14. Oberflächen, die mit Lebensmitteln in Berührung kommen,
und die zugänglichen Entwässerungssysteme regelmäßig
reinigen.
15. Wasserbehälter reinigen, wenn diese für 48 Stunden nicht
benutzt wurden. Wassersystem mit einem
Wasseranschluss verbinden und durchspülen, wenn für 5
Tage kein Wasser entnommen wurde.
16. Wenn das Kühlgerät für längere Zeit leer steht, ausschalten,
abtauen, reinigen, abtrocknen und die Tür offenstehen
lassen, damit sich kein Schimmel im Gerät bilden kann.
17. Ziehen Sie immer den Netzstecker des Gerätes aus der
Steckdose, wenn es unbeaufsichtigt ist und vor dem
Zusammenbauen, Zerlegen oder Reinigen.
18. Dieses Gerät ist ausschließlich für die Benutzung im
Haushalt oder in ähnlichen Anwendungsbereichen
geeignet wie z.B.: Mitarbeiter-Küchenbereiche in
Geschäften, Büros und anderen Arbeitsumgebungen;
Bauernhöfe; die Benutzung durch Gäste in Hotels, Motels
und anderen Unterkunftsarten.
19. Bevor Sie den Stecker mit der Netzsteckdose verbinden,
prüfen Sie bitte, ob die Spannung und die Frequenz mit den

- 13 -
Angaben auf dem Typenschild übereinstimmen.
20. Ziehen Sie den Netzstecker aus der Steckdose, wenn das
Gerät nicht benutzt und bevor es gereinigt wird.
21. Achten Sie darauf, dass das Netzkabel nicht über scharfe
Kanten hängt und halten Sie es von heißen Objekten und
offenen Flammen fern.
22. Tauchen Sie das Gerät oder den Netzstecker nicht in Wasser
oder andere Flüssigkeiten. Es besteht Lebensgefahr
aufgrund von Stromschlag!
23. Um den Stecker aus der Steckdose zu entfernen, ziehen Sie
am Stecker. Ziehen Sie nicht am Kabel.
24. Berühren Sie das Gerät nicht, wenn es ins Wasser gefallen
ist. Ziehen Sie den Stecker aus der Steckdose, schalten Sie
das Gerät aus und schicken Sie es an einen autorisierten
Kundendienst zwecks Reparatur.
25. Den Netzstecker des Gerätes nicht mit einer nassen Hand
aus der Steckdose ziehen oder mit der Steckdose verbinden.
26. Versuchen Sie unter keinen Umständen, das Gehäuse des
Gerätes zu öffnen oder das Gerät selbst zu reparieren. Dies
könnte einen Stromschlag verursachen.
27. Lassen Sie das Gerät während des Gebrauchs niemals
unbeaufsichtigt.
28. Dieses Gerät ist nicht für den gewerblichen Gebrauch
konzipiert.
29. Verwenden Sie das Gerät nur zu seinem
bestimmungsgemäßen Zweck.
30. Wickeln Sie das Kabel nicht um das Gerät und knicken Sie
es nicht.
31. Das Gerät darf nicht in unmittelbarer Umgebung einer
Badewanne, einer Dusche oder eines Pools verwendet
werden.
32. Diese Eismaschine ist ausschließlich zur Zubereitung von
Eiswürfeln geeignet. Verwenden Sie das Gerät nicht zum
Einfrieren von Lebensmitteln oder Getränken, da das
System hierdurch beschädigt wird.
33. Bewahren Sie kein Benzin oder andere leicht entzündliche
Stoffe in der Nähe der Eismaschine auf. Die Eismaschine

- 14 -
darf nicht verwendet werden, wenn entzündliche Gase
ausströmen. Bei Nichtbeachtung besteht Feuergefahr.
34. Das Gerät darf nicht bewegt werden, wenn es angeschaltet
ist. Nichtbeachtung kann zu Schäden im Kühlsystem führen.
35. Nicht zu stark mit Wasser befüllen. Die Überfüllung des
Geräts kann gefährlich sein. Die eingefüllte Wassermenge
muss sich zwischen den Markierungen MAX und MIN
befinden.
36. Bewahren Sie das Gerät an einem gut belüfteten Ort auf.
Lassen Sie vor den Be- und Entlüftungsöffnungen einen
Freiraum von mindestens 20 cm.
37. WARNUNG: Benutzen Sie zur Beschleunigung des
Abtauvorgangs keine anderen mechanischen
Vorrichtungen oder Hilfsmittel als die vom Hersteller
empfohlenen.
38. Beschädigen Sie nicht den Kältekreislauf.
39. Warnung: Brandgefahr/brennbares Material
40. ACHTUNG: Berühren Sie den Verdampfer
nicht während des Gefriervorgangs. Es besteht
Verbrennungsgefahr!
41. Für Hinweise zu Betrieb, Reinigung und Entsorgung des
Geräts, beachten Sie bitte den untenstehenden Teil der
Bedienungsanleitung.

- 15 -
IM-111502 DE
BESCHREIBUNG DER GERÄTETEILE
1. Sichtfenster
2. Deckel
3. Bedienfeld
4. Entlüftungsöffnung
5. Belüftungsöffnung
6. Netzkabel
7. Wasserablauf
8. Eiswürfelkorb
9. Verdampfer
10. Gefrierbox
11. Wassertank
12. Eisschaufel
BEDIENFELD UND DIGITALANZEIGE
Erklärung der Tasten und Symbole:
①Eiszubereitung starten. / Eiszubereitung abbrechen (Standby). / Selbstreinigungsprogramm starten.
②Einstellen der Echtzeit, Einschaltzeit und/ oder Abschaltzeit.
③Einstellen der Stunden- und Minutenanzeige.
④Auswahl der Eiswürfelgröße - L/M/S
⑤Fehleranzeige
⑥Große Eiswürfel
⑦Mittlere Eiswürfel
⑧Kleine Eiswürfel
⑨Anzeige „Eiswürfelkorb gefüllt“
⑩Anzeige „Wasserleerstand“
⑪Anzeige „Eiszubereitungsstatus“ (Blinkt während der Eiszubereitung, Leuchtet im Standby-Modus)
⑫Echtzeit
⑬Automatische Einschaltung
⑭Automatische Abschaltung
⑮Uhrzeit (Stunde : Minute)

- 16 -
VOR GEBRAUCH
1. Entfernen Sie sämtliches Verpackungsmaterial. Entnehmen Sie die Eisschaufel und den Silikonstöpsel.
2. Das Gerät auf eine stabile und ebene Oberfläche stellen. Schützen Sie das Gerät vor direkter
Sonneneinstrahlung oder anderen Hitzequellen. Bewahren Sie es einem gut belüfteteten Ort auf und lassen
Sie vor den Be- und Entlüftungsöffnungen einen Freiraum von mindestens 20 cm.
3. Das Gerät und die dazugehörigen Teile reinigen (Siehe „REINIGUNG UND PFLEGE“).
Vorsicht! Nicht im Freien verwenden. Verwenden Sie das Gerät nicht in einer zu kalten oder zu heißen Umgebung.
Bei Umgebungstemperaturen unter 5 ℃ oder über 43 ℃ können Störungen bei der Eisherstellung auftreten.
BEDIENUNG
Nachdem das Gerät transportiert wurde, warten Sie 30 Minuten bevor Sie das Gerät verwenden. Eine zu frühe
Inbetriebnahme kann zu Schäden an Ihrem Eiswürfelbereiter führen.
1. Entnehmen Sie den Eiswürfelkorb. Befüllen Sie den Wassertank mit Wasser (verwenden Sie ausschließlich
sauberes Trinkwasser). Achten Sie darauf, dass der Wasserstand weder die Markierung „H-
MIN“ unterschreitet, noch die Markierung „H-MAX“ überschreitet.
Legen Sie den Eiswürfelkorb erneut ein, wenn der Wassertank befüllt ist.
2. Den Gerätestecker in eine Steckdose stecken. Ein Piepton ist zu hören und die LCD-Anzeige leuchtet auf. Das
Gerät ist jetzt betriebsbereit.
3. Drücken Sie die “SELECT”-Taste, um die Größe der Eiswürfel auszuwählen. Die Zubereitungszeit variiert je
nach Auswahl der Eiswürfelgröße. Die Standardeinstellung ist „Mittel“.
S = Kleine Würfel (Zubereitungszeit: ca. 9 Minuten)
M = Mittlere Würfel (Zubereitungszeit: ca. 11 Minuten)
L = Große Würfel (Zubereitungszeit: ca. 13 Minuten)
4. Die -Taste drücken, um die Eiszubereitung zu starten. Das blinkende Schneeflocken-Symbol in der LCD-
Anzeige gibt an, dass die Eiszubereitung läuft. Sie können jederzeit die -Taste drücken, um die
Eiszubereitung abzubrechen. Hierdurch wird das Programm sofort zum Abbruch gebracht. Möglicherweise
wurden unvollständige Eiswürfel hergestellt.
5. Nach etwa 9-13 Minuten (je nach Größe der Eiswürfel) ist die erste Ladung Eiswürfel (9 Stück) fertig und fällt
in den Eiswürfelkorb. Sie können dies auch durch das Sichtfenster überprüfen.
Hinweis! Die Eiswürfel beginnen zu schmelzen, nachdem sie in den Korb gefallen
sind. Entnehmen Sie die Eiswürfel deshalb rechtzeitig mithilfe der Eisschaufel. Das
Schmelzwasser wird im Wassertank gesammelt. Wenn Sie das verbliebene Wasser
aus dem Wassertank entleeren möchten, schrauben Sie den kleinen Deckel (a) (auf
der Rückseite des Geräts) gegen den Uhrzeigersinn und nehmen Sie den
Silikonstöpsel (b) ab. Jetzt können Sie den Wassertank ausleeren.
Anzeige „Eiswürfelkorb gefüllt“
Wenn der Eiswürfelkorb vollständig mit Eiswürfeln gefüllt ist, erscheint das -Symbol auf der LCD-Anzeige
und zur Erinnerung hören Sie einen Piepton. Entnehmen Sie die Eiswürfel und drücken Sie danach die -
Taste. Das -Symbol wird auf umspringen.
Anzeige „Wasserleerstand“
Wenn der Wasserstand unter die „H-MIN“-Markierung fällt, bedeutet dies, dass der Wasserstand unzureichend

- 17 -
ist. Das -Symbol auf der LCD-Anzeige wird blinken und zur Erinnerung hören Sie einen Piepton. Füllen Sie
zusätzliches Wasser ein und drücken Sie danach die -Taste, um die Eiszubereitung fortzusetzen. Das -
Symbol wird aufhören zu blinken.
Fehleranzeige
Falls eine Störung vorliegt, blinkt das -Symbol auf der LCD-Anzeige des Geräts.
Automatische Ein- und Abschaltung
Drücken Sie die “SET”-Taste, um die Einstellung der Echtzeit, der automatischen Einschaltzeit und der
automatischen Abschaltzeit auszuwählen. Das entsprechende Symbol erscheint links unten auf der LCD-
Anzeige, wenn eine dieser Uhrzeiten eingestellt wird.
Drücken Sie die ▲-Taste, um Änderungen an der Stunden- oder Minutenanzeige vorzunehmen. Die
angezeigte Uhrzeit kann geändert werden, wenn die entsprechende Ziffern blinken (dauert mehrere
Sekunden). Wenn Sie die ▲ -Taste drücken, während die Ziffern der Uhrzeit still stehen, wird die Timer-
Funktion ausgewählt.
Wenn die Stunden- oder die Minutenanzeige blinkt, führt das Drücken der „SET“-Taste automatisch zur
nächsten Einstellung. Durch einmaliges Drücken von „SET“ und danach ▲können Sie beispielsweise die
Stunde der Echtzeit einstellen. Wenn die Ziffern der Stundenanzeige weiterhin blinken, drücken Sie lediglich
einmal auf „SET“, wenn die Stundenanzeige nun nicht mehr blinkt, müssen Sie zwei Mal auf „SET“ drücken,
um die Minutenzeit einzustellen. Wenn die Ziffern der Minutenanzeige weiterhin blinken, drücken Sie
einmal auf „SET“ drücken, um die Ziffern der Stundenanzeige für die automatische Einschaltzeit anzupassen.
Falls die Minutenanzeige nicht mehr blinkt, drücken Sie drei Mal auf „SET“, um die Stundenzeit der
automatischen Einschaltzeit anzupassen.
Stehen die Ziffern der Zeitanzeige still, können Sie durch einmaliges Betätigen der „SET“-Taste direkt zur
Einstellung der Echtzeit übergehen. Durch dreimaliges Betätigen der „SET“-Taste springen Sie zur Einstellung
der automatischen Einschaltzeit, und durch fünfmaliges Betätigen der Taste gelangen Sie zur Einstellung der
automatischen Abschaltzeit.
Wenn Sie die Zeiteinstellungen vorgenommen haben, drücken Sie die ▲-Taste, um die Funktion Ihrer Wahl
auszuwählen. Durch das Drücken der ▲-Taste springen Sie durch die Funktionen automatische
Einschaltzeit, automatische Abschaltzeit, automatische Ein- und Abschaltzeit und Deaktivierung des
Timers. Auf der LCD-Anzeige werden die Symbole der Funktionen angezeigt, die Sie auswählen.
SELBSTREINIGUNGSFUNKTION
Diese Funktion dient der Reinigung des Wassertanks. Ist dieser Modus aktiviert, blinken auf der LCD-Anzeige
gleichzeitig die drei Symbole zur Größenanzeige (L, M, S). Nachfolgend werden die Schritte zur Durchführung der
Selbstreinigung aufgeführt.
Schritt 1
1. Befüllen Sie den Wassertank zu gleichen Teilen (Verhältnis 1:1) mit Wasser und Essig.
2. Halten Sie die -Taste während des Standby-Modus mindestens 5 Sekunden lang gedrückt, um die
Selbstreinigungsfunktion zu starten. Die Selbstreinigung beginnt automatisch nach einem Piepton.
3. Während der Selbstreinigung wird Wasser in die Gefrierbox und die Verdampferspiralen gepumpt. Danach
dreht sich die Gefrierbox und das Wasser läuft in den Wassertank. Dieser Vorgang wird 5 Mal wiederholt.
4. Danach wechselt das Gerät automatisch in den Standby-Modus.

- 18 -
Schritt 2
1. Entleeren Sie das Abwasser, indem Sie den Deckel vom Wasserauslass auf der Rückseite des Geräts
abschrauben und den Silikonstöpsel abnehmen.
2. Füllen Sie den Tank mit frischem Wasser bis zur MAX-Markierung auf.
3. Halten Sie die -Taste mindestens 5 Sekunden lang gedrückt, um die Selbstreinigung zum Ausspülen
erneut zu starten.
4. Danach wechselt das Gerät automatisch in den Standby-Modus.
5. Entleeren Sie das Abwasser, indem Sie den Deckel vom Wasserauslass und den Stöpsel abnehmen. Lassen
Sie den Wasserauslass offen, damit er trocknen kann.
Hinweis:
Falls während der Selbstreinigung das Wasser ausgeht, wechselt das Gerät automatisch in den Standby-Modus.
Falls sich die Gefrierbox nicht dreht, erscheint das Symbol der Fehleranzeige auf der LCD-Anzeige.
Wenn Sie den Selbstreinigungsmodus abbrechen möchten, halten Sie die -Taste mindestens 5 Sekunden
gedrückt.
REINIGUNG AND PFLEGE
1. Brechen Sie den Eiszubereitungsvorgang ab und ziehen Sie den Stecker, bevor Sie das Gerät reinigen oder
pflegen.
Warten Sie bis das Gerät abgekühlt ist.
2. Wischen Sie das Gerät mit einem weichen und feuchten Lappen ab. Wischen Sie das Gerät anschließend mit
einem sauberen und trockenen Tuch sorgfältig ab.
3. Spülen Sie den Eiswürfelkorb und die Eisschaufel in Seifenwasser. Spülen und trocknen Sie die Teile sorgfältig
ab.
4. Benutzen Sie das Selbstreinigungsprogramm bevor Sie das Gerät zum ersten Mal in Betrieb nehmen oder
wenn es lange nicht benutzt wurde. (Siehe Abschnitt “SELBSTREINIGUNGSFUNKTION”)
5. Falls Sie das Gerät länger nicht benutzen, lassen Sie das Wasser komplet abfließen.
STÖ RUNGSBESEITIGUNG
PROBLEM
MÖ GLICHE URSACHE
LÖ SUNG
Die LCD-Anzeige
leuchtet nicht.
1. Keine angemessene
Stromversorgung.
2. Möglicherweise sind
elektronische Bauteile
beschädigt.
1. Überprüfen Sie die Stromversorgung.
2. Überprüfen Sie, ob der Netzstecker
richtig eingesteckt ist.
3. Falls elektronische Bauteile beschädigt
sind, muss das Gerät von einem
Fachbetrieb repariert werden.
Die Anzeige
EISWÜRFELKORB
GEFÜLLT blinkt.
1. Der Eiswürfelkorb ist voll.
2. Der Gefrierschutz (bei einer
Umgebungstemperatur von unter
5℃) ist aktiviert.
1. Automatische Ruhephase nach
Entnahme der Eiswürfel.
2. Bewahren Sie das Gerät an einem
weniger kalten Ort auf.

- 19 -
Die Warnanzeige
WASSERLEERSTAND
blinkt.
Der Wassertank ist nicht
ausreichend befüllt.
1. Füllen Sie klares Wasser in den Tank der
Eismaschine und drücken Sie die Taste
, um die Fehleranzeige abzuschalten.
2. Die Wasserversorgung oder Teile davon
sind möglicherweise beschädigt. Das Gerät
muss von einem Fachbetrieb repariert
werden.
FEHLERANZEIGE blinkt
auf
Die Gefrierbox befindet sich nicht
in der korrekten Position.
1.Überprüfen Sie, ob sich Fremdkörper in
der Gefrierbox befinden.
2. Möglicherweise sind elektronische
Bauteile beschädigt. Das Gerät muss von
einem Fachbetrieb repariert werden.
Die Eisherstellung
funktioniert nicht
richtig.
1. Die Hitze kann nicht abgeleitet
werden.
2. Die Wassertemperatur ist zu
hoch.
3. Die Umgebungstemperatur ist
zu hoch.
4. Kühlmittel läuft aus.
1. Entstauben Sie die Be- und
Entlüftungsöffnung.
2. Füllen Sie lauwarmes Wasser ein.
3. Bewahren Sie das Gerät an einem
kühleren Ort auf.
4. Möglicherweise ist das Kühlsystem
beschädigt. Das Gerät muss von einem
Fachbetrieb repariert werden.
Ungewöhnliche
Geräusche.
Lüfter oder Pumpe sind
beschädigt.
1. Stellen Sie das Gerät an einem den
beschriebenen Anforderungen
entsprechenden Ort auf.
2. Das Gerät muss von einem Fachbetrieb
repariert werden.
TECHNISCHE DATEN
Bemessungsspannung: 220-240 V
Bemessungsfrequenz: 50 Hz
Bemessungsstrom: 0,8 A
Schaummittel: C5H10
Kühlmittel: R600a/24g
Klimaklasse: SN/N/ST/T
GARANTIE UND KUNDENSERVICE
Vor der Lieferung werden unsere Geräte einer strengen Qualitätskontrolle unterzogen. Wenn, trotz aller Sorgfalt,
während der Produktion oder dem Transport Beschädigungen aufgetreten sind, senden Sie das Gerät zurück an
den Händler. Zusätzlich zu den gesetzlichen Rechten hat der Käufer die Option, gemäß den folgenden
Bedingungen Garantie zu fordern:
Wir bieten eine 2-jahres-Garantie für das erworbene Gerät, beginnend am Tag des Verkaufs. Defekte, die
aufgrund von unangemessenem Umgang mit dem Gerät entstehen und Störungen aufgrund von Eingriffen und
Reparaturen Dritter oder das Montieren von nicht-Originalteilen werden nicht von dieser Garantie abgedeckt.
Die Quittung immer aufbewahren, ohne Quittung wird jegliche Garantie ausgeschlossen. Bei Schäden durch
Nichteinhalten der Bedienungsanleitung erlischt die Garantie, Wir sind für daraus resultierende Folgeschäden
nicht haftbar. Für Materialschäden oder Verletzungen aufgrund falscher Anwendung oder Nichtbefolgen der
Table of contents
Languages:
Popular Ice Maker manuals by other brands

Hoshizaki
Hoshizaki CUBELET ICEMAKER/DISPENSER DCM-750BAH-OS parts list

Hoshizaki
Hoshizaki KM-1340MAH Specifications

KitchenAid
KitchenAid KUIS15NRTB2 parts list

Cuisinart
Cuisinart SCM-10 INSTRUCTION AND RECIPE BOOKLET

Vitrifrigo
Vitrifrigo ICE Maker installation manual

Hoshizaki
Hoshizaki F-1101AU parts list