manuals.online logo
Brands
  1. Home
  2. •
  3. Brands
  4. •
  5. Emerson
  6. •
  7. Home Theater System
  8. •
  9. Emerson AV101 User manual

Emerson AV101 User manual

Other manuals for AV101

3

Other Emerson Home Theater System manuals

Emerson AV400 User manual

Emerson

Emerson AV400 User manual

Emerson AV510 User manual

Emerson

Emerson AV510 User manual

Emerson AV400 User manual

Emerson

Emerson AV400 User manual

Emerson AV101 User manual

Emerson

Emerson AV101 User manual

Emerson AV101C User manual

Emerson

Emerson AV101C User manual

Emerson AV301 User manual

Emerson

Emerson AV301 User manual

Emerson AV300 User manual

Emerson

Emerson AV300 User manual

Emerson AV101 User manual

Emerson

Emerson AV101 User manual

Emerson AV301 User manual

Emerson

Emerson AV301 User manual

Popular Home Theater System manuals by other brands

Samsung HT-DL200 instruction manual

Samsung

Samsung HT-DL200 instruction manual

Samsung HT-ES6600 user manual

Samsung

Samsung HT-ES6600 user manual

Curtis DVD6010 instruction manual

Curtis

Curtis DVD6010 instruction manual

Philips MCD716/12 user manual

Philips

Philips MCD716/12 user manual

Sherwood ST-4108 operating instructions

Sherwood

Sherwood ST-4108 operating instructions

Philips HTS5520/12 quick start

Philips

Philips HTS5520/12 quick start

Sony BDV-T57 Notices and Licences

Sony

Sony BDV-T57 Notices and Licences

LG HT503PHW owner's manual

LG

LG HT503PHW owner's manual

Samsung HT-ES4200K user manual

Samsung

Samsung HT-ES4200K user manual

Samsung HT-P10 instruction manual

Samsung

Samsung HT-P10 instruction manual

Philips HTS5131 User manaul

Philips

Philips HTS5131 User manaul

Goodmans GDVD19SWS user manual

Goodmans

Goodmans GDVD19SWS user manual

Moxi media center user guide

Moxi

Moxi media center user guide

Samsung HT-EM35 user manual

Samsung

Samsung HT-EM35 user manual

Sony BDV-N990W installation guide

Sony

Sony BDV-N990W installation guide

Manta GK-500 user manual

Manta

Manta GK-500 user manual

Sharp SBW800 user manual

Sharp

Sharp SBW800 user manual

Philips HTS3541 user manual

Philips

Philips HTS3541 user manual

manuals.online logo
manuals.online logoBrands
  • About & Mission
  • Contact us
  • Privacy Policy
  • Terms and Conditions

Copyright 2025 Manuals.Online. All Rights Reserved.

50
HOME THEATER SYSTEM
with DVD/AUDIO CD PLAYER
DOLBY DIGITAL DECODER
and AM/FM DIGITAL TUNING RECEIVER
OWNERS MANUAL
AV101
Visit our web site at www.emersonradio.com
1
Warning
To prevent fire or shock hazard, do not
expose the unit to rain or moisture.
To avoid electrical shock, do not open the
cabinet.
Refer servicing to qualified service
personnel only.
The AC cord must only be changed at
qualified service facility.
lThis appliance is classified as a CLASS 1 LASER
product.
lThe CLASS 1 LASER PRODUCT MARKING is located
on the rear panel.
lThis product contains a low power laser device. To
ensure continued safety, do not remove any cover or
attempt to gain access to the inside of the product.
Refer all servicing to qualified personnel only.
This product incorporates copyright protection
technology that is protected by method claims of certain
U.S. patents and other intellectual property rights owned
by Macrovision Corporation and other rights owners. Use
of this copyright protection technology must be
authorized by Macrovision Corporation, and is intended
for home and other limited viewing uses only unless
otherwise authorized by Macrovision Corporation.
Reverse engineering or disassembly is prohibited.
Caution
Refer servicing to qualified service personnel only.
The following marking is printed on the rear panel.
This symbol is intended to alert the user of
the presence of uninsulated dangerous
voltage within the product enclosure that
may be of sufficient magnitude to constitute
a risk of electric shock to persons.
This symbol is intended to alert the user to
the presence of important operating and
maintenance (servicing) instructions in the
literature accompanying the applicance.
Welcome...
And thank you for purchasing this Emerson Audio/Video
Home Theater System. This state of the art system
includes everything you need to experience movie
theater quality digital video and audio in the comfort of
your own living room. The only thing you need to add is
your own TV. We have designed this system to be easy
to set up, and even easier to use. But please, review
this manual before you operate your system; have it
handy while you are setting the system up; and keep it
available for future reference, or in the unlikely event
that you encounter any unexpected problems. We have
tried to keep this manual as simple as possible. It
begins with a description of the important controls on
the main unit and the remote. It then explains how to
connect the speakers, your TV, and optional external
sources to the main unit, how to position the speakers
for the most natural surround sound, and then how to
operate the DVD/CD player and the AM/FM Stereo
Receiver. If you follow the instructions carefully you can
have the system up and operating in less than an hour.
All of the optional system settings have been preset at
our factory for correct operation of the system in North
America. All you have to do is insert a disc, sit back, and
enjoy a great home theater experience.
Eventually you may want to change some of the optional
settings. A description of all the optional settings, and
instructions for changing them, is found in the second
half of the manual.
This system was designed to provide you with many years
of reliable operation with a minimum of care and
maintenance. Every component in your system was in
perfect working condition when it left our factory. If you
experience any problems with the set up or operation of
this system please review the Trouble Shooting Guide at
the end of this manual before you contact your dealer or
the Emerson Customer Service Department.
Thanks again from all of us at Emerson Radio Consumer
Products Corp.
The serial number of your system can be found on a
label on the back panel of the main unit, and also on
the display carton. Please record the serial number in
the space below. You may need to refer to this number
if your system ever needs to be serviced.
Model No.: AV101
Serial No.:
2
IMPORTANT SAFETY INSTRUCTIONS (CONTINUED)
Before using the unit, be sure to read all operating instructions carefully. Please note that these are general
precautions and may not pertain to your unit. For example, this unit may not have the capability to be connected
to an outdoor antenna.
1. READ INSTRUCTIONS
All the safety and operating instructions should be read before the product is operated.
2. RETAIN INSTRUCTIONS
The safety and operating instruction should be retained for future reference.
3. HEED WARNINGS
All warning on the product and in the operating instructions should be adhered to.
4. FOLLOW INSTRUCTIONS
All operating and use instructions should be followed.
5. CLEANING
Unplug this product from the wall outlet before cleaning. Do not liquid cleaners or awrosol cleaners. Use a damp
cloth for cleaning.
6. ATTACHMENTS
Do not use attachments not recommended by the products manufacturer as they may cause hazards.
7. WATER AND MOISTURE
Do not use this product near water- for example, near a bathtub, washbowl, kitchen sink, or laundry tub, in a wet
basement, or near a swimming pool.
8. ACCESSORIES
Do not place this product on an unstable cart, stand, tripod, bracket, or table. The product may
fall, causing serious injury and serious damage to the product. Use only with a cart, stand,
tripod, bracket, or table recommended by the manufacturer or sold with the product. Any
mounting of the product should follow the manufacturers instructions, and should use a
mounting accessory recommended by the manufacturer.
8A. An appliance and cart combination should be moved with care. Quick stops, excessive force,
and uneven surface may cause the appliance and cart combination to overturn.
9. VENTILATION
Slots and openings in the cabinet and in the back or bottom are provided for ventilation and to ensure reliable
operation of the product and to protect it from overheating. These openings must not be blocked or covered. The
openings should never be blocked by placing the product on a bed, sofa, rug, or other similar surface. This product
should never be placed near or over a radiator or heat source. This product should not be placed in a built-in
installation such as a bookcase or rack unless proper ventilation is provided or the manufacturers instructions
have been adhered to.
10. POWER SOURCES
This product should be operated inly from the type of power source indicated on the marking label. If you are not
sure of the type of power supply to your home, consult your appliance dealer or local power company. For
products intended to operate from battery power, or other sources, refer to the operating instruction.
11. GROUNDING OR POLARIZATION
This product is equipped with a alternating-current line plug (a plug having one blade wider than the other).
This plug will fit into the power outlet only one way. This is a safety feature. If you are unable to insert the plug fully
into the outlet, try reversing the plug. If the plug should still fail to fit, contact your electrican to replace your obsolete
outlet.
Do not defect the safety purpose of the polarized plug.
12. POWER-CORD PROTECTION
Power-supply cords should be routed so that they are not likely to be walked on or pinched by items placed upon
or against them, paying particular attention to cords at plugs, convenience receptacles, and the point where they
exit from the appliance.
13. LIGHTNING
To protect your product from a lightning storm, or when it is left unattended and unused for long periods of time,
unplug it from the wall outlet and disconnect the antenna or cable system. This will prevent damage to the product
due to lightning and power-line surges.
14. POWER LINES
An outside antenna system should not be located in the vicinity of overhead power lines or other electric light or
power circuits, or where it can fall into such powerlines or circuits. When installing an outside antenna system,
extreme care should be taken to keep from touching such power lines or circuits as contact with them might be
fatal.
3
IMPORTANT SAFETY INSTRUCTIONS (CONTINUED)
15. OVERLOADING
Do not overload wall outlets and extension cords as this can result in a risk of fire or electric shock.
16. OBJECT AND LIQUID ENTRY
Never push ojects of any kind into this product through openings as they may touch dangerous voltage points or
short out parts that could result in fire or electric shock. Never spill or spray any type of liquid on the product.
17. OUTDOOR ANTENNA GROUNDING
If an outside antenna is connected to the product, be sure the antenna system is grounded so as to provide
some protection against voltage surges and built-up static charges. Section 810 of the National Electric Code,
ANSI/NFPA 70, provides information with respect to proper grounding of the mast and supporting structure,
grounding of the lead-in wire to an antenna discharge product, size of grounding conductors, location of
antenna discharge product, connection to grounding electrodes, and requirements for grounding electrode.
18. SERVICING
Do not attempt to service this product yourself as opening or removing covers may expose you to dangerous
voltage or other hazards. Refer all servicing to qualified service personnel.
19. REPLACEMENT PARTS
When replacement parts are required, be sure the service technician uses replacement parts specified by the
manufacturer or those that have the same characteristics as the original part. Unauthorized substitution may
result in fire, electric shock or other hazards.
20. SAFETY CHECK
Upon completion of any service or repairs to this product, ask the service technician to perform safety checks to
determine that the product is in proper operating condition.
21. WALL OR CEILING MOUNTING
The product should be mounted to a wall or ceiling only as recomended by the manufacturer.
22. DAMAGE REQUIRING SERVICE
Unplug the product from the wall outlet and refer servicing to qualified service personnel under the following
conditions:
a. When the power-supply cord or plug is damaged.
b. If liquid has been spilled, or objects have fallen into the product.
c. If the product has been exposed to rain or water.
d. If the product does not operate normally by following the operating instructions. Adjust only those controls
that are covered by the operating instructions, as an adjustment of other controls may result on damage and
will often require extensive work by a qualified technician to restore the product to its normal operation.
e. If the product has been dropped or the cabinet has been damaged.
f. When the product exhibits a distinct change in performance - this indicates a need for service.
23. HEAT
The product should be situated away from heat sources such as radiators, heat registers, stoves, or other
products (including amplifiers) that produce heat.
24. NOTE TO CATV SYSTEM INSTALLER
This reminder is provided to call the CATV system installers attention to Article 820-40 of NEC that provides
guidelines for proper grounding and, in particular, specifies that the cable ground shall be connected to the
grounding system of the building, as close to the point of cable entry as practical.
4
IMPORTANT SAFETY INSTRUCTIONS (CONTINUED)
FCC NOTICE:
This equipment has been tested and found to comply with the limits for a Class B digital device, pursuant to part 15 of
the FCC Rules. These limits are designed to provide reasonable protection against harmful interference in a
residential installation. This equipment generates, uses, and can radiate radio frequency energy and, if not installed
and used in accordance with the instructions, may cause harmful interference to radio communications.
Howeve, there is no guarantee that interference will not occur in a particular installation. If this equipment does cause
harmful interference to radio or television reception, which can be determined by turning the equipment off and on, the
user is encouraged to try to correct the interference by one or more of the following measures:
=Reorient or relocate the receiving antenna.
=Increase the separation between the equipment and receiver.
=Connect the equipment into an outlet on a circuit different from that to which the receiver is connected.
=Consult the dealer or an experienced radio/TV technician for help.
FCC Caution:
To assure continued compliance, follow the attached installation instructions and use only shielded cables when
connecting to other devices. Also, any changes or modifications not expressly approved by the party responsible for
compliance could void the users authority to operate the equipment.
5
Setting and Adjustments
Using the SETUP Menu and Navigation Buttons ........................31
SETUP Menu Listing ................................................................32
TV Display Setting ................................................................33
TV Type Setting (Multi /NTSC/PAL) .................................33
Selecting Angle Mark ................................................................34
Selecting The On Screen Display (OSD) Language ..............34
Selecting Captions ..............................................................35
Screen Saver Setting (SCR Saver) .....................................35
Dynamic Range Setting ......................................................35
Preferences
Selecting the Language for Audio ........................................36
Selecting the Language for Subtitles ....................................36
Selecting the Language for Disc Menus................................36
Setting the Parental Control Level ........................................37
Special Functions During Playback
Zoom Control ..................................................................38
Angle Selection .....................................................................39
Subtitle Language Selection ................................................39
Audio Language Selection ....................................................39
Other Functions
Listening to the Radio .......................................................40-41
Bass and Treble Adjustments ...........................................41
Adjusting the Left/Right Balance ...........................................41
Center, Rear, and Subwoofer Level Adjustments...................41
Other Sound Effects ...............................................................41
Listening to an External Source ............................................42
Nignt Playback Mode (DVD Only) .......................................42
Speaker Configuration Setup .............................................42
Headphone Jack ................................................................42
Additional Information
Troubleshooting ...........................................................43-44
Glossary ...............................................................................45
Specifications .......................................................................46
Contact Customer Service ....................................................47
Warranty ..............................................................................48
Table of Contents
Warnings and Cautions
Welcome ................................................................................1
UL Safety Instructions ........................................................1-3
FCC Notice .............................................................................4
Basic System Information
Index ......................................................................................5
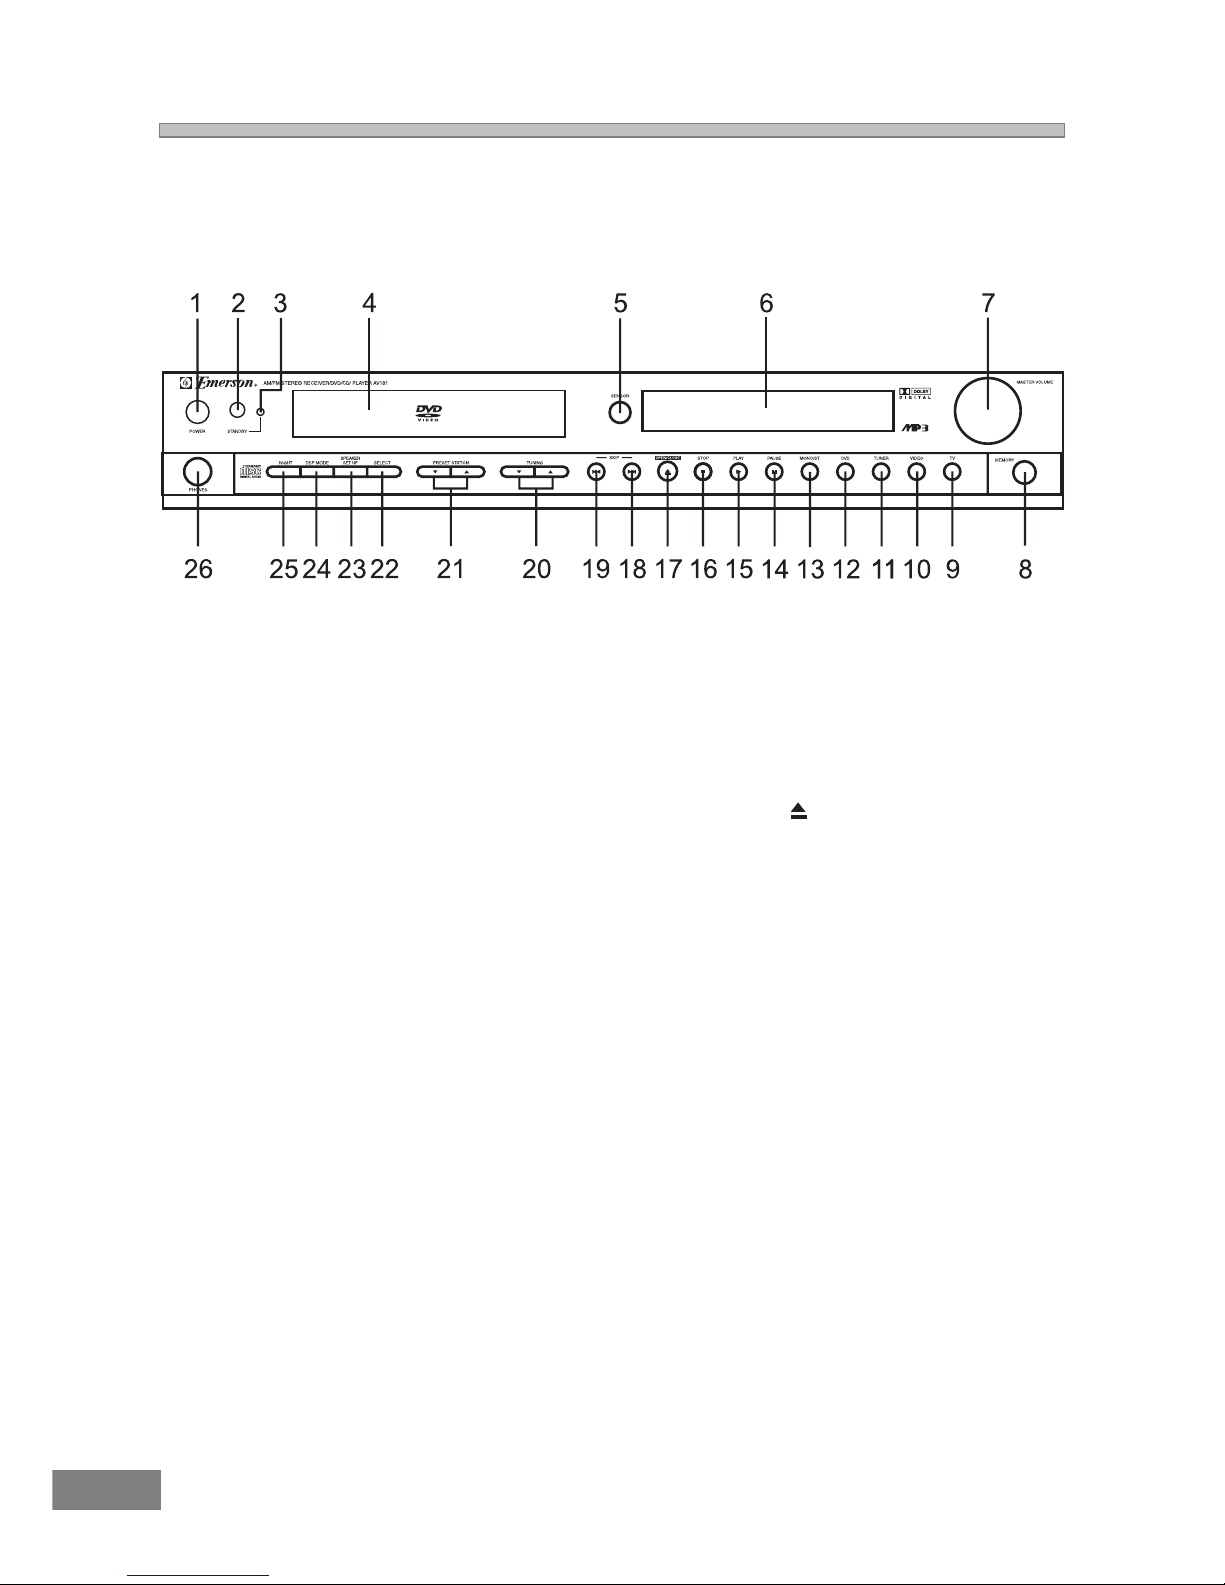
Location of Controls & Indicators ...........................................6
Location of Jacks and Terminals ............................................7
Main Display Indicators ..........................................................8
Remote Controller ..................................................................9
Important Safeguards and Precautions .................................10
Features of This System .......................................................11
Important Information Regarding This Manual ........................11
Types of Discs That Can be Played on This System .................12
Notes on Disc Handling .......................................................13
Installations and Connections
Unpacking..............................................................................14
Inserting Batteries into the Remote Control ...........................14
Speaker System Connection .................................................15
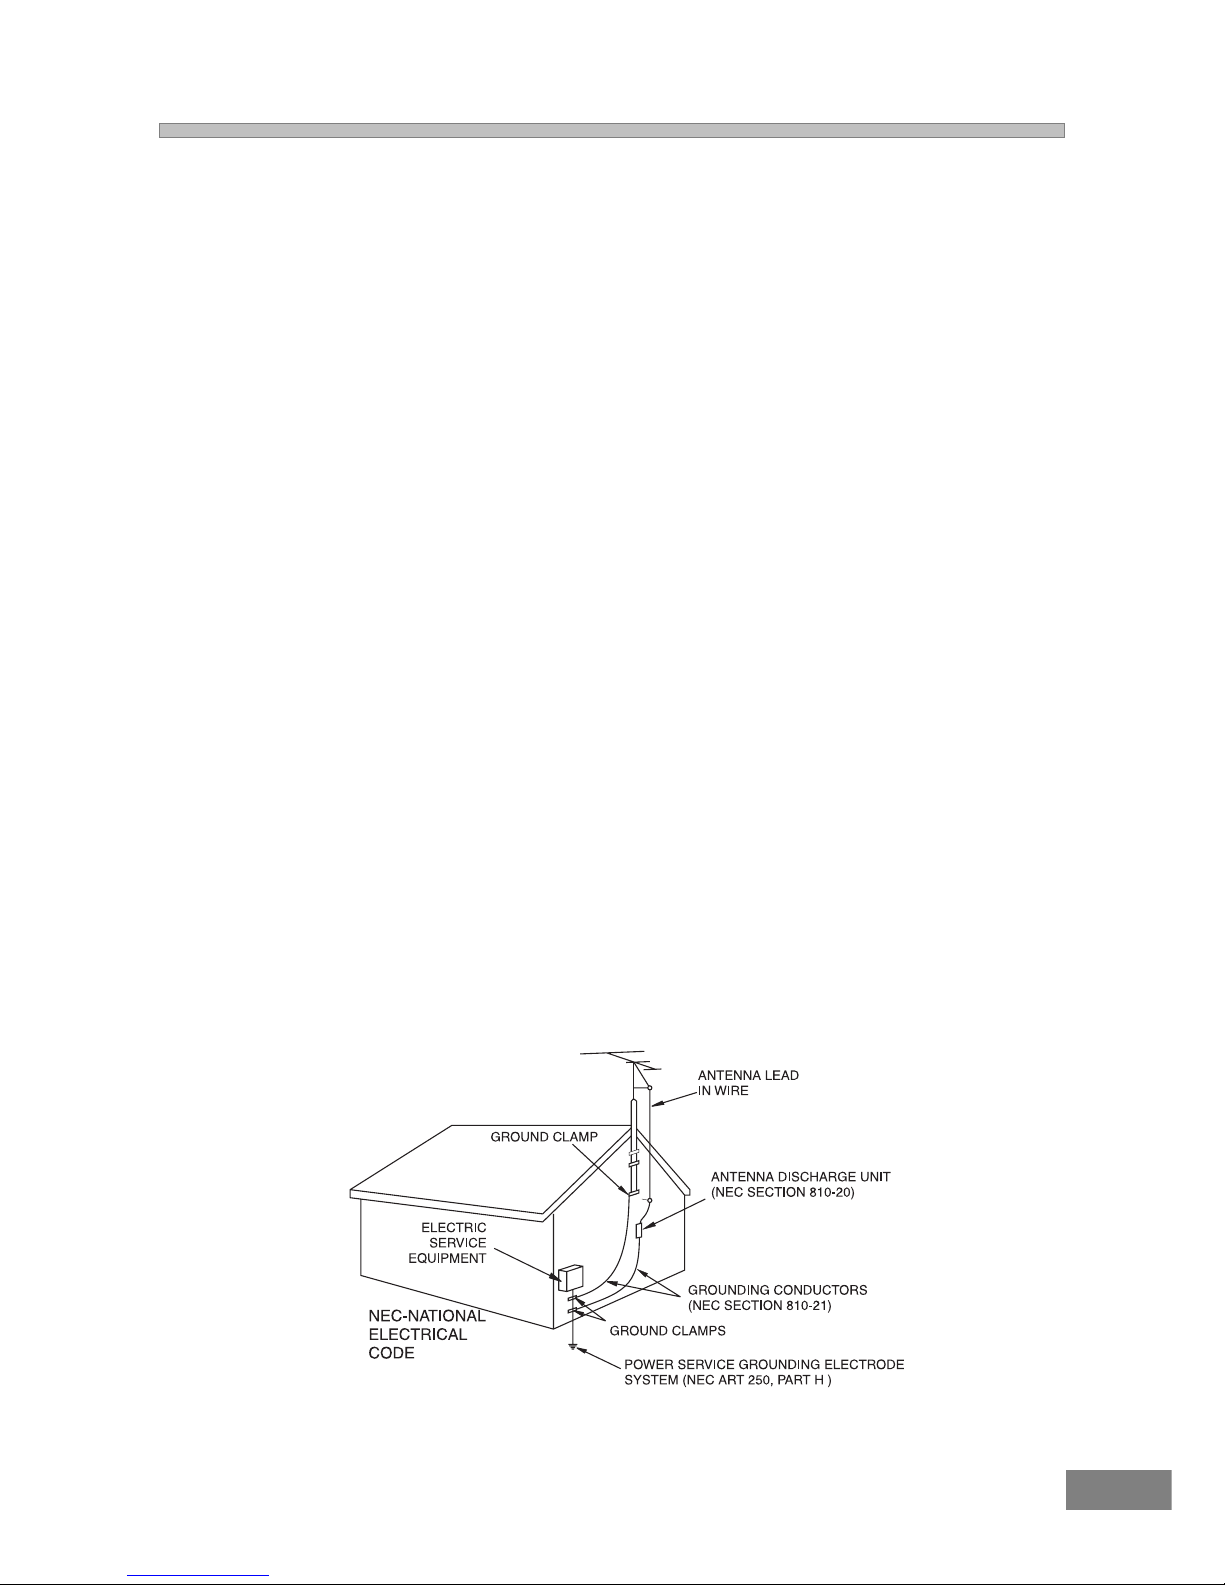
Antenna Connections ...........................................................16
TV and Optical Component Connections ..............................17
Connecting the AC power Cord ............................................17
Basic System Set Up
Speaker Positioning Information .......................................18-19
Typical Speaker Set up .........................................................20
Controls and Their Functions ................................................21
Presetting Radio Stations ..................................................22
Recalling Preset Stations ......................................................22
Changing Preset Stations ..................................................22
Last Station Memory ..........................................................22
Playing Discs
Basic Playback ................................................................23-24
Slow Motion Playback ...........................................................24
Frame By frame Advance (Step) ..........................................24
High-Speed Search (Fast Forward or Fast Reverse)............24
Skipping Chapter or Tracks ..................................................24
Adjusting the Speaker Levels (TEST TONE) ........................25
Understanding DVD Disc Menus ............................................26
Repeat Playback ....................................................................27
A-B Repeat Playback ............................................................27
Program Play (Audio CDs Only) ............................................28
Selecting a Start Point by Chapter or Time Code ...................29
Selecting a CD Track Using Number Buttons ..............................29
Checking Disc information Using Display Button ...................30
6
LOCATION OF CONTROLS AND INDICATORS
Main Unit (Front View)
1. POWER button 14. PAUSE ;Button
2. STANDBY button 15. PLAY 4 Button
3. Standby LED 16. STOP <Button
4. Disc Tray 17. OPEN/CLOSE Button
5. Remote SENSOR 18. SKIP Forward : Button
6. Display 19. SKIP Reverse 9 Button
7. MASTER VOLUME Control 20. TUNING Up 5 / Down 6 Button
8. MEMORY Button 21. PRESET STATION Up 5 / Down 6 Button
9. TV Button 22. SELECT Button
10. VIDEO Button 23. SPEAKER SETUP Button
11. TUNER Button 24. DSP MODE Button
12. DVD Button 25. NIGHT Button
13. MONO/ST. Button 26. PHONES Jack
7
LOCATION OF JACKS AND TERMINALS
Main Unit (Rear View)
1. AM Loop Antenna Terminal 7. Coaxial Digital Audio Output
2. Coaxial FM Antenna Terminal 8. Power Cord
3. TV/AUX Input 9. Video Output
4. Video (Audio) Input 10. Subwoofer Pre Output
5. Audio (DVD) Output 11. Speakers (Main, Center, Rear & Subwoofer)
6. S-Video Output Output
8
MAIN DISPLAY INDICATORS
1. Key Lock Indicator 12. Channel / Decibel / Milliseconds Indicators
2. Play/Pause Indicator 13. Remain Time Indicator
3. Dolby Digital Indicator 14. Total Indicator
4. Dolby Surround Pro logic Indicator 15. Night Indicator
5. DTS Indicator 16. Status Bar Indicator
6. DSP Mode Indicator 17. Track Indicator
7. Dolby 3-Stereo Indicator 18. Chapter Indicator
8. 2 Channel Stereo Indicator 19. Title Indicator
9. Repeat 1/A-B Indicator 20. AM Band Indicator
10. FM Stereo Indicator 21. FM Band Indicator
11. Preset Station Indicator 22. Left / Right Channel Indicator
9
REMOTE CONTROLLER
1. OPEN/CLOSE Button
2. KEY LOCK Button
3. PBC Button
4. SUB TITLE Button
5. TITLE MENU Button
6. AUDIO MENU Button
7. DIGEST Button
8. DVD MENU Button
9. AUDIO MODE Button
10. BOOKMARK Button
11. SEARCH Button
12. DISPLAY Button
13. RETURN Button
14. SEARCH REVERSE 7 Button
15. RANDOM Button
16. SKIP REVERSE 9 Button
17. PROGRAM Button
18. TREBLE Button
19. SLOW/R Button
20. BASS Button
21. TEST TONE Button
22. MUTE Button
23. DSP MODE Button
24. PRESET STATION UP 5 / DOWN 6 Button
25. TUNING UP 5 / DOWN 6 Button
26. SPEAKER CHANGE LEVEL +/- Buttons
27. VOLUME UP 5 / DOWN 6 Button
28. SLOW/F Button
29. PAUSE ;Button
30. STOP <Button
31. SKIP FORWARD :Button
32. PLAY 4 Button
33. SEARCH FORWARD 8 Button
34. ENTER Button
35. NAVIGATION ARROWS (3/4/5/6)
36. SETUP Button
37. REPEAT Button
38. REPEAT A-B Button
39. ZOOM Button
40. ANGLE Button
41. CLEAR Button
42. NUMBER 0 TO +9 Button
43. STANDBY Button
44. FUNCTION Button