BACK
Recording history Recording history playback
Local album on Android OS
FCC Part 15:
Caution:
Any changes or modifications not expressly approved could void the user's authority to operate the equipment.
This equipment has been tested and found to comply with the requirements for a Class B digital device under
Part 15 of the Federal Communications Commission (FCC) rules.These requirements are intended to provide
reasonable protection against harmful interference in a residential installation. This equipment generates, uses
and can radiate radio frequency energy and, if not installed and used in accordance with the instructions, may
cause harmful interference to radio communications. However, there is no guaranteethat inter ferencewill not
occur in a particular installation. If this equipment does cause harmful interference to radio or television reception,
which can be determined by turning the equipment off and on, the user is encouraged to try to correct the
interference by one or more of the following measures:
• Re-orient or relocate the receiving antenna.
• Increase the separation between the equipment and receiver.
• Connect the equipment into an outlet on a circuit different from that to which the receiver is connected.
• Consult the dealer or an experienced radio/TV technician for help.
“This device complies with Part 15 of the FCC Rules. Operation is subject to the following two conditions:
(1) this device may not cause harmful interference, and
(2) this device must accept any interference received, including interference that may cause undesired operation.”
Shielded USB cables must be used with this unit to ensure compliance with the Class B FCC limits.
Android, Google and the Google Play store logo are registeredtrademarks of G oogle Inc., used with permission.
Apple, iOS, and the App Store are registered trademarks of Apple Inc., registeredin the U.S. and other countries.
All other trademarks and trade names are those of their respective owners.
90 Days Limited Warranty
In the unlikely event that this product is defective, or does not perform properly, you may within ninety (90)
days from your original date of purchase return it to the authorized service center for repair or exchange.
TO OBTAINWARRANTY SERVICE:
• Provide proof of the date of purchase within the package (Dated bill of sale).
• Prepay all shipping costs to the authorized service center, and remember to insure yourreturn.
• Include a return shipping address (no P.O. Boxes), a telephone contact number, and the defective unit
within the pack age.
• Describe the defect or reason you are returning the product.
Your product will be repairedor replaced, at our option, for the same or similar model of equal value if examination
by the service center determines this product is defective. Products received damaged as a result of shipping
will require you to file a claim with the carrier.
The shipping address of the authorized service center is:
Southern Telecom,Inc.
Attention: Customer Service (2nd Floor)
14-C 53rd Street
Brooklyn, NY 11232
Should you have any questions or problems concerning this product, please contact our customer service
department at:
Customer Support:
1-877-768-8481 (Toll Free)
Monday - Friday: 8AM - 10PM (EST)
www.southerntelecom.com
Click on “ProductSuppor t”
Warranty service not provided
This warranty does not cover damage resulting from accident, misuse, abuse, improper installation or operation,
lack of reasonable care, and unauthorized modification. This warranty is voided in the event any unauthorized
person opens, alters or repairs this product. All products being returned to the authorized service center for
repair must be suitably packaged.
Limitation of Warranty:
• THE WARRANTY STATED ABOVE ISTHE ONLY WARRANTY APPLICABLETO THIS PRODUCT. ALL OTHER WARRANTIES,
EXPRESS OR IMPLIED (INCLUDING ALL IMPLIEDWARRANTIES OF MERCHANTABILITY OR FITNESS FOR A PARTICULAR
PURPOSE) ARE HEREBY DISCLAIMED. NO VERBAL ORWRIT TEN INFORMATION GIVEN BY SOUTHERN TELECOM,
INC. IT’S AGENTS, OR EMPLOYEES SHALL CREATEA GUARANTY OR IN ANY WAYINCREASE THE SCOPE OFTHIS WARRANTY.
• REPAIROR REPLACEMENT AS PROVIDED UNDER THIS WARRANTY IS THE EXCLUSIVEREMEDY OF THE CONSUMER.
SOUTHERN TELECOM, INC. SHALL NOT BE LIABLE FOR INCIDENTALOR CONSEQUENTIAL DAMAGES RESULTING
FROM THE USE OF THIS PRODUCT OR ARISING OUT OF ANY BREACH OF ANY EXPRESS OR IMPLIED WARRANTY
ON THIS PRODUCT.THIS DISCLAIMER OF WARRANTIES AND LIMITED WARRANTY ARE GOVERNED BY THE LAWS
OF THE STATE OF NEWYORK. EXCEPT TO THE EXTENT PROHIBITED BY APPLICABLE LAW,ANY IMPLIED WARRANTY
OF MERCHANTABILITY OR FITNESS FOR A PARTICULAR PURPOSE ON THIS PRODUCT IS LIMITED TOTHE APPLICABLE
WARRANTY PERIOD SET FORTH ABOVE.
Some states do not allow the exclusion nor limitation of incidental or consequential damages, or limitations
on how long an implied warranty lasts so the above limitations or exclusions may not apply to you.This warrant y
gives you specific legal rights, and you also may have other rights that vary from state to state.
Legal information Limited Warranty
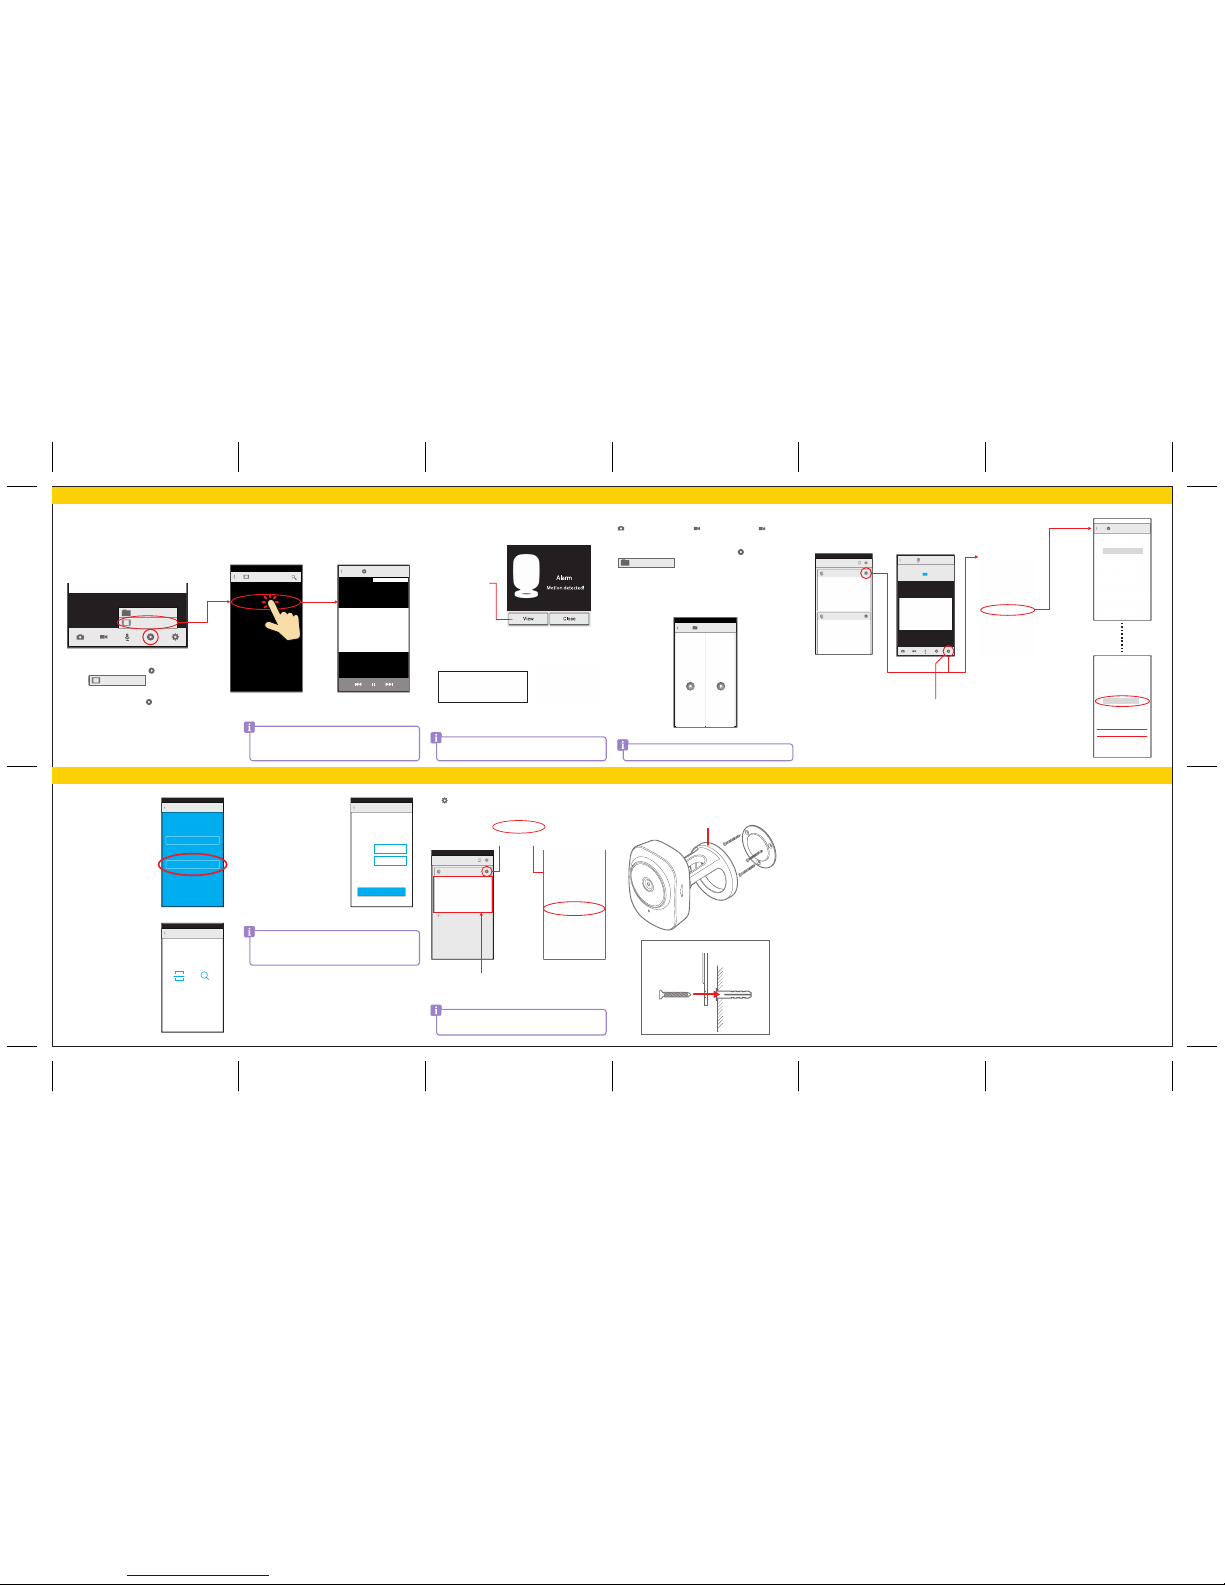
Local album
You can take snapshots or videos from your live camera feed. Tap
to take a snapshot, or tap to record a video (tap again to
stop recording).
To access your snapshots and recordings, tap and select
.
�To view snapshots or videos on the Apple iOS version, go to the
“Photos” app.
The contents of the Local album is stored on your personal device.
Local album
Each camera has its own individual Recording history. To view
another camera‘s Recording history, go back to “Camera list”
and select which camera captured what you wish to see.
Notications
When the motion detection alarm is triggered, you will be notified
immediately on your device.
Enable notifications on your Apple or Android device to receive
notifications even when the app is not active.
You can turn the motion detection alarm off or change its
sensitivity in Advanced Settings.
Apple iOS Android OS
Motion detection alarm
Tap View to see live feed
Recording history
Your SmartCam can detect motion and automatically record it
directly into its Micro SD card.
When something triggers the alarm, your camera will begin to record.
When the camera is done recording, the video will appear in the
Recording history.
Playback
07-30-2015 06:27 AM
If you cannot access your camera because the password is incorrect,
tap and select “Edit”, then type in the correct password.
�For the Apple iOS version, tap the preview to input the correct
password.
2. Scan the QR code on the SmartCam,
or search for it via Wi-Fi (your device
must be on the same Wi-Fi network
as your SmartCam for this option).
1. To connect your device to a camera
that has already been set up, tap
“Reconnect your camera.”
Make sure the blue LED indicator is
constant before connecting.
3. Once your device is connected to
the camera, you will be prompted
to enter its password.
Reconnecting your camera
If you relocate your camera to a different Wi-Fi network, you will
need to reset your camera and follow the “Setting up the camera”
instructions.
If you forget your password, you can reset the password by
resetting the camera (see “Reset camera”).
Local album
Advanced settings
Alarm